Dealing with a flat tire is an inevitable part of cycling. Knowing how to replace a bike inner tube is a fundamental skill that can save you from being stranded and get you back on the road or trail quickly. While it might seem daunting at first, changing an inner tube is a straightforward process with the right knowledge and a few essential tools.
At usabikers.net, our team of cycling enthusiasts and experts regularly handles tire and tube changes, and we’ve compiled our top tips to make this task as easy and efficient as possible for you. This guide will walk you through each step of removing and replacing your bike’s inner tube, ensuring you’re well-prepared for any puncture situation. Whether you’re a beginner or an experienced rider, mastering this skill is crucial for your cycling independence and safety.
 How To Change a Bike Tyre
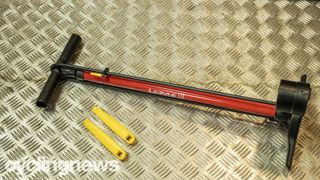
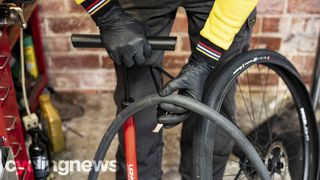
Image: Essential tools for replacing a bicycle inner tube, including tire levers and a pump.
Essential Tools for Inner Tube Replacement
Before you start, having the right tools will make the process significantly smoother. While skilled cyclists might manage without them in certain situations, for most, and especially for roadside repairs, these tools are indispensable:
- Tire Levers: Invest in quality tire levers made of durable plastic or composite material. Avoid cheap, flimsy levers that can break or bend easily. Old-school metal levers should be avoided, especially with carbon rims, as they can cause damage.
- Bike Pump: A reliable pump is crucial. For lower pressure tires on gravel bikes, a hand pump might suffice. However, for road bikes or higher pressures (above 60psi), a track pump with a gauge is highly recommended for easier and more accurate inflation. For on-the-go repairs, consider a mini-pump or CO2 inflator.
- New Inner Tube: Ensure you have a spare inner tube that matches your tire size, valve type (Presta or Schrader), and valve length. Carrying the correct spare is essential for a successful repair.
Step-by-Step Guide to Removing the Inner Tube
 How To Change an inner tube
Image: Deflating a bicycle tire completely before inner tube removal is necessary.
1. Deflate the Tire Completely
The first step in how to change a bike tire inner tube is to ensure the tire is fully deflated. If you haven’t already, remove the wheel from your bike. For Presta valves (common on road and performance bikes), slightly loosen the small nut at the valve tip and press down to release any remaining air. Once deflated, unscrew and remove the knurled collar at the base of the valve.
For Schrader valves (often found on mountain bikes and kids’ bikes, similar to car tires), simply depress the pin in the center of the valve to let the air out.
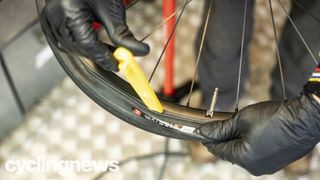
2. Unseat the Tire Bead from the Rim
 How To Change a Bike Tyre
Image: Unseating the tire bead from the rim edge all around the wheel to create necessary slack.
With the tire completely deflated, you need to unseat the tire bead – the edge of the tire that sits inside the rim – from the rim wall. Squeeze the tire inwards towards the center of the rim, working your way around the entire circumference of the tire on both sides of the wheel. This action pushes the tire bead into the deeper central channel of the rim, creating slack that’s crucial for easier removal. The tire should feel loose and move freely around the rim once properly unseated.
3. Remove the Tire by Hand (If Possible)
 How To Change a Bike Tyre
Image: Using thumbs to push the tire over the rim edge, demonstrating manual tire removal technique.
If you’re fortunate and have a tire that isn’t too tight, you might be able to remove it by hand. Gather all the slack you created in the previous step at one point on the wheel. Try to push the tire bead over the rim edge using just your thumbs. Start opposite the valve and work your way around.
While removing a tire without levers showcases skill, it’s also the safest method as it eliminates the risk of pinching the inner tube with a tire lever during removal. If you can manage it, it’s always worth attempting manual removal first.
4. Using Tire Levers for Tire Removal
If manual removal isn’t possible, don’t worry, tire levers are designed for this purpose. When using tire levers to replace bicycle inner tube, proceed with caution to avoid damaging the tube or rim.
- Insert two tire levers under the tire bead, about 2cm or an inch apart. Make sure the spoon-shaped end of the lever hooks securely under the tire bead.
- Ensure you aren’t trapping the inner tube between the tire lever and the rim, as this can cause another puncture.
- Press down on one lever to lift the tire bead over the rim edge. Then, use the second lever to lever out a longer section of the tire.
- Once a section of the tire is off the rim, you can often hook one lever onto a spoke to maintain the gap and prevent the tire from slipping back onto the rim.
- Work around the rim with the tire levers, carefully prying the tire bead over the edge. If the tire is very tight, you may need to use two levers simultaneously, but be extra cautious to avoid lever breakage or injury.
 How To Change a Bike Tyre
Image: A removed bicycle tire, allowing for inspection for damage and debris before inner tube replacement.
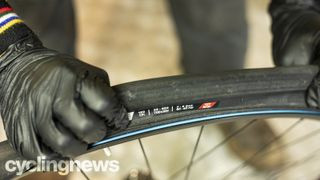
5. Remove the Inner Tube
With one side of the tire completely removed from the rim, you can now access the inner tube. Push the valve back through the valve hole in the rim. Then, gently pull the inner tube out from under the tire, working your way around the wheel. The inner tube should come out relatively easily once the tire is detached on one side.
6. Inspect the Tire for Damage
Before installing a new inner tube, it’s crucial to identify and remove the cause of the flat to prevent a repeat puncture. Carefully inspect the inside and outside of the tire for any sharp objects like glass, thorns, nails, or flints that may have penetrated the tire. Run your fingers (carefully!) around the inside of the tire to feel for anything embedded. Remove any debris you find. Also, check the tire for cuts, excessive wear, or damage that might necessitate tire replacement. Lastly, inspect the rim for any damage, cracks, or sharp edges that could also cause punctures.
Step-by-Step Guide to Fitting a Fresh Inner Tube
 How To Change a Bike Tyre
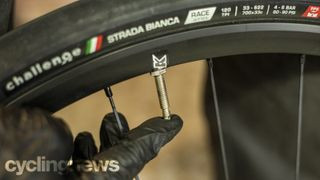
Image: Aligning the tire logo with the valve hole on the rim for easier valve location and aesthetics.
1. Position the Tire (Optional but Recommended)
While not strictly necessary for function, aligning the tire’s logo or name with the valve hole is a good practice. It makes locating the valve easier later, provides a reference point for finding punctures if they reoccur, and offers a more professional look. Simply rotate the tire on the rim until the logo is positioned next to the valve hole.
2. Partially Inflate the New Inner Tube
 How To Change a Bike Tyre
Image: Adding a small amount of air to the inner tube to prevent pinching during tire installation.
Inflate the new inner tube just enough to give it some shape and volume. This slight inflation helps prevent the tube from being pinched between the tire bead and the rim during tire installation – a common cause of immediate flats after a tube change. Remove the valve collar (if present) and keep it handy for later.
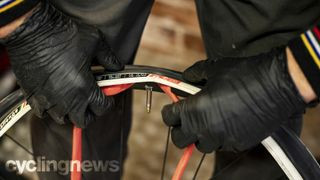
3. Fit the Inner Tube and First Tire Bead
Insert the valve of the slightly inflated inner tube through the valve hole in the rim. Carefully tuck the inner tube into the tire cavity, ensuring it sits evenly within the tire and doesn’t protrude over the rim edge. Work your way around the wheel, gently massaging the inner tube into place within the tire. Be careful not to twist or pinch the tube during this process. Once the inner tube is seated, begin pushing the first tire bead (the one you didn’t fully remove) back onto the rim. You should be able to do this by hand, starting opposite the valve and working your way around.
4. Fit the Second Tire Bead
 How To Change a Bike Tyre
Image: Demonstrating manual tire installation, sliding the tire bead onto the rim using hands only.
Fitting the second tire bead is often the trickiest part of how to replace bike tire inner tube. Start opposite the valve and use your thumbs to push the tire bead over the rim edge. Employ the same technique you used for tire removal in reverse – gather slack by working the tire around the rim. Aim to have as much slack as possible for the final section of tire to be pushed onto the rim. Be extremely cautious not to pinch the inner tube between the tire bead and the rim during this step.
5. Using Tire Levers for Tire Installation (If Necessary)
 How To Change a Bike Tyre
Image: Using tire levers to carefully assist in fitting the final section of a tight tire onto the rim.
Ideally, you should be able to get most of the tire bead onto the rim by hand. However, if the last section is too tight, carefully use tire levers. Insert the levers under the tire bead about an inch or 2.5cm from the point where the tire is still off the rim. Use one lever to hold the tire in place and the other to gently lever the tire bead over the rim edge. Work inwards towards the valve, using small, controlled movements. Again, be extremely careful not to pinch the inner tube.
6. Inflate the Tire Carefully
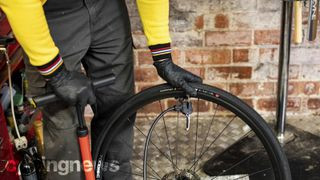 How To Change a Bike Tyre
Image: Inflating the tire slowly and checking for proper seating and any bulges or pinches.
Once the tire is fully seated on the rim, double-check that no part of the inner tube is visible poking out from under the tire bead. Push the valve inwards to ensure it’s not trapped, and then screw the valve collar back on (for Presta valves). Begin inflating the tire slowly, using your pump. As you inflate, constantly check the tire bead on both sides of the wheel to ensure it is seating evenly and correctly in the rim. Look for a molded line on the tire sidewall, which should be an equal distance from the rim all the way around. Watch for any bulges or unevenness in the tire, which could indicate a pinched inner tube or improperly seated tire. Inflate to the recommended tire pressure (usually printed on the tire sidewall).
7. Final Checks
After reaching the desired pressure, remove the pump and spin the wheel, checking for proper alignment both side-to-side and vertically. If you notice any wobble or unevenness, deflate the tire slightly, massage the tire and inner tube to re-center them, and re-inflate. Once you are satisfied that everything is correctly seated and aligned, you’re ready to remount the wheel and get back to riding.
8. Post-Ride Checks
It’s wise to check the repaired tire frequently during your first few rides after a tube change, just to ensure everything remains seated and there are no slow leaks. Make it a habit to check your tire pressure and inspect your tires for damage or debris before and after every ride to minimize the chances of future flats.
Conclusion
Knowing How To Replace Bike Inner Tube is an essential skill for every cyclist. By following these steps and practicing, you’ll gain confidence in your ability to handle flat tires and keep your rides rolling smoothly. Remember to be patient, take your time, and always prioritize safety. With a little practice, you’ll be changing inner tubes like a pro in no time, ensuring that a flat tire never keeps you off your bike for long.