Choosing the right bike frame size is crucial for comfort, efficiency, and injury prevention when cycling. Whether you are a seasoned cyclist or a beginner, understanding how to measure your bike frame size is an essential skill. This guide will walk you through the process of accurately measuring your bike frame and understanding key geometry measurements to ensure you get the perfect bike fit.
Understanding Bike Geometry Measurements
Before we delve into the “how-to,” let’s clarify the key bike geometry measurements that define a bike frame. These measurements are essential for comparing different bikes and ensuring the frame suits your body and riding style.
- Top Tube Length (Effective): This is the horizontal distance from the center of the head tube to the center of the seat post. It’s a crucial measurement for reach and overall bike fit.
- Seat Tube Length: Measured from the center of the bottom bracket to the top of the seat tube, this measurement often dictates frame size, especially for traditional frames.
- Reach: The horizontal distance from the center of the bottom bracket to the top center of the head tube. Reach is a key factor in determining the bike’s cockpit length and rider position.
- Stack: The vertical distance from the center of the bottom bracket to the top center of the head tube. Stack height influences the handlebar height and rider’s uprightness.
- Wheelbase: The distance between the front and rear wheel axles. Wheelbase affects stability and handling.
- Chainstay Length: The distance from the center of the bottom bracket to the rear axle. Chainstay length impacts bike’s responsiveness and climbing ability.
- Front Center: The distance from the center of the bottom bracket to the front axle. Front center influences weight distribution and handling.
- Seat Tube Angle: The angle of the seat tube relative to the horizontal. This angle affects pedaling efficiency and weight distribution.
- Head Tube Angle: The angle of the head tube relative to the horizontal. Head tube angle influences steering responsiveness and stability.
- Bottom Bracket Drop: The vertical distance between the wheel axles and the bottom bracket. Bottom bracket drop affects stability and cornering.
- Bottom Bracket Height: The vertical distance from the ground to the center of the bottom bracket. Bottom bracket height influences ground clearance and stability.
Understanding these terms will empower you to make informed decisions when selecting a bike frame.
Tools You’ll Need for Bike Frame Measurement
Measuring a bike frame requires a few simple tools that you likely already have or can easily obtain:
- Tape Measure: Essential for measuring lengths accurately. Metric units (centimeters or millimeters) are recommended for consistency.
- Clinometer or Angle Finder App: A smartphone app or a physical clinometer to measure angles accurately.
- Spirit Level or Straight Edge with Level App: Ensures horizontal and vertical measurements are precise. A long spirit level is ideal, but a straight piece of wood combined with a level app can also work.
- Plumb Line or String and Weight: Used to create a vertical reference line. A plumb line is purpose-built, but string and a small weight (like a nut or bolt) will suffice.
 Measuring top tube length on a bicycle frame using a spirit level
Having these tools ready will streamline the measurement process and improve accuracy.
Step-by-Step Guide to Measuring Your Bike Frame
Now, let’s go through each measurement step-by-step to ensure you capture the dimensions of your bike frame accurately.
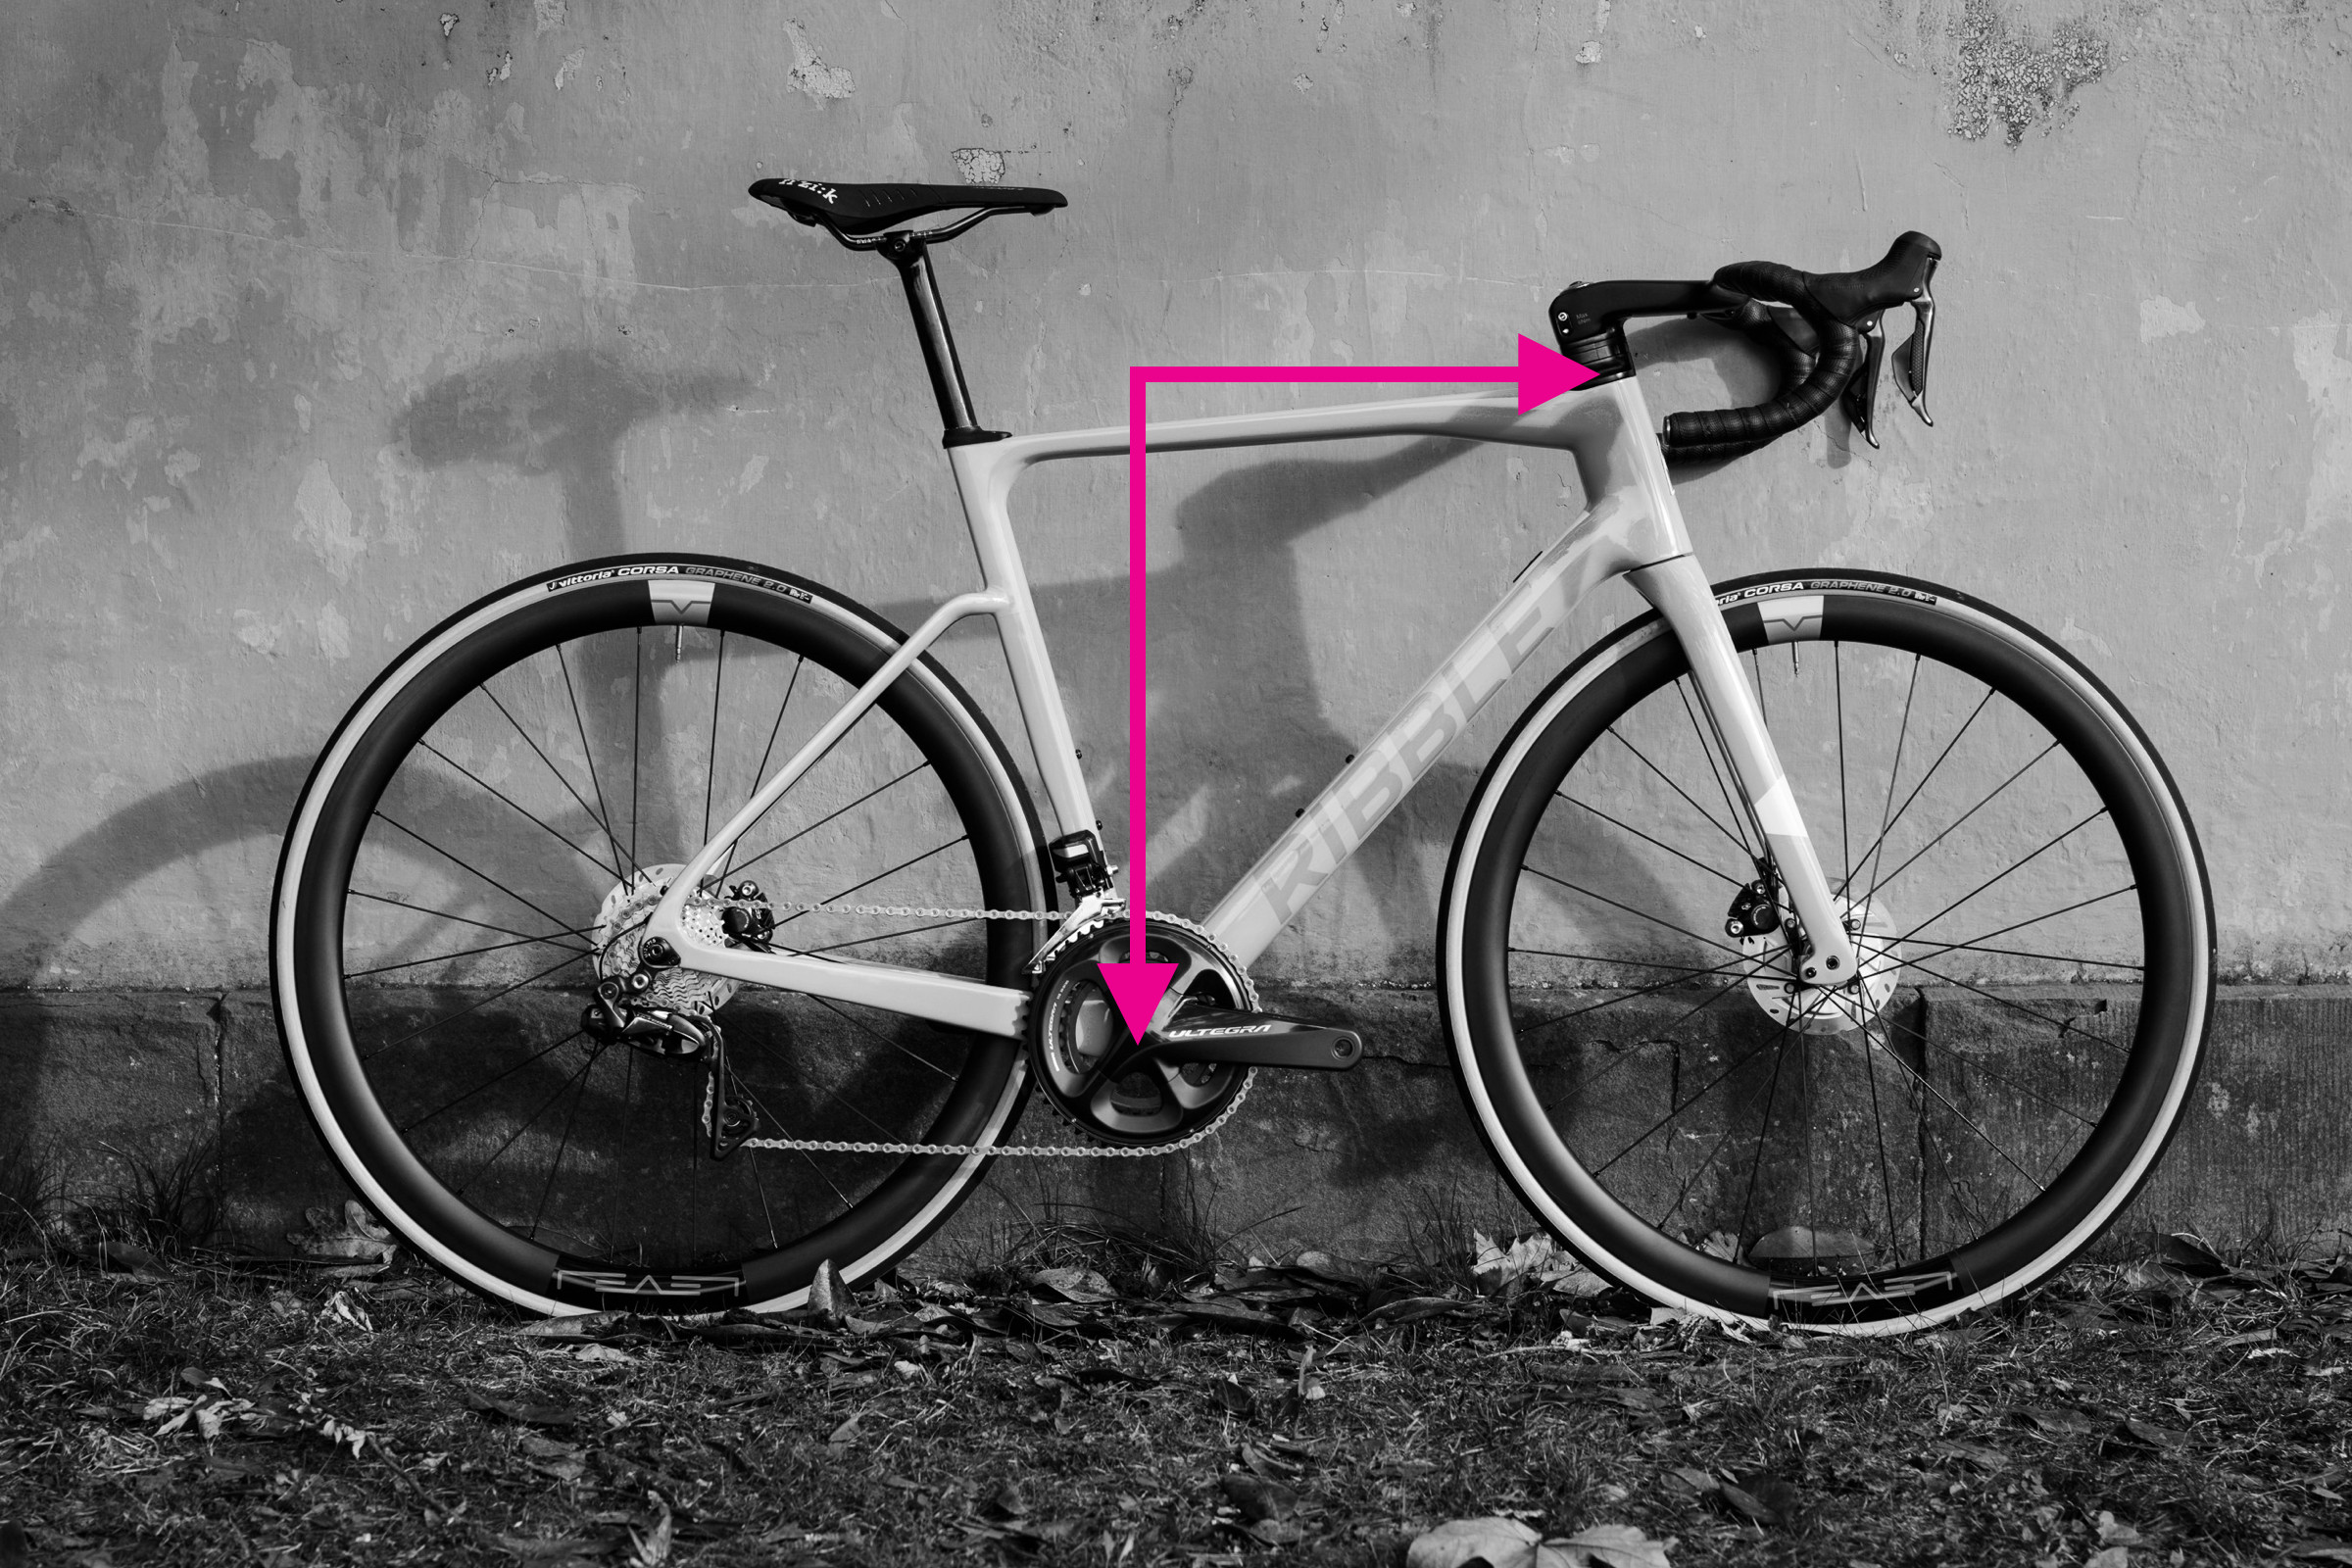
1. Measuring Top Tube Length (Effective Top Tube)
The effective top tube length is crucial because it represents the horizontal riding space of the bike.
- Locate the center of the head tube and the center of the seat post.
- Use the spirit level (or straight edge with level app) to ensure a horizontal line. Place it against the head tube and extend it towards the seat post area.
- Measure the horizontal distance from the center of the head tube to the center of the seat post, keeping the tape measure perfectly horizontal using the spirit level.
This measurement, known as the effective top tube length, is often listed in bike geometry charts and is a primary factor in determining bike size, especially for road bikes.
2. Measuring Seat Tube Length
Seat tube length is a more traditional measurement but still relevant, especially for older bikes or when comparing across different frame styles.
- Identify the center of the bottom bracket and the top of the seat tube.
- Measure the straight-line distance between these two points, following the seat tube. Be mindful of any kinks or bends in the seat tube; measure in a straight line.
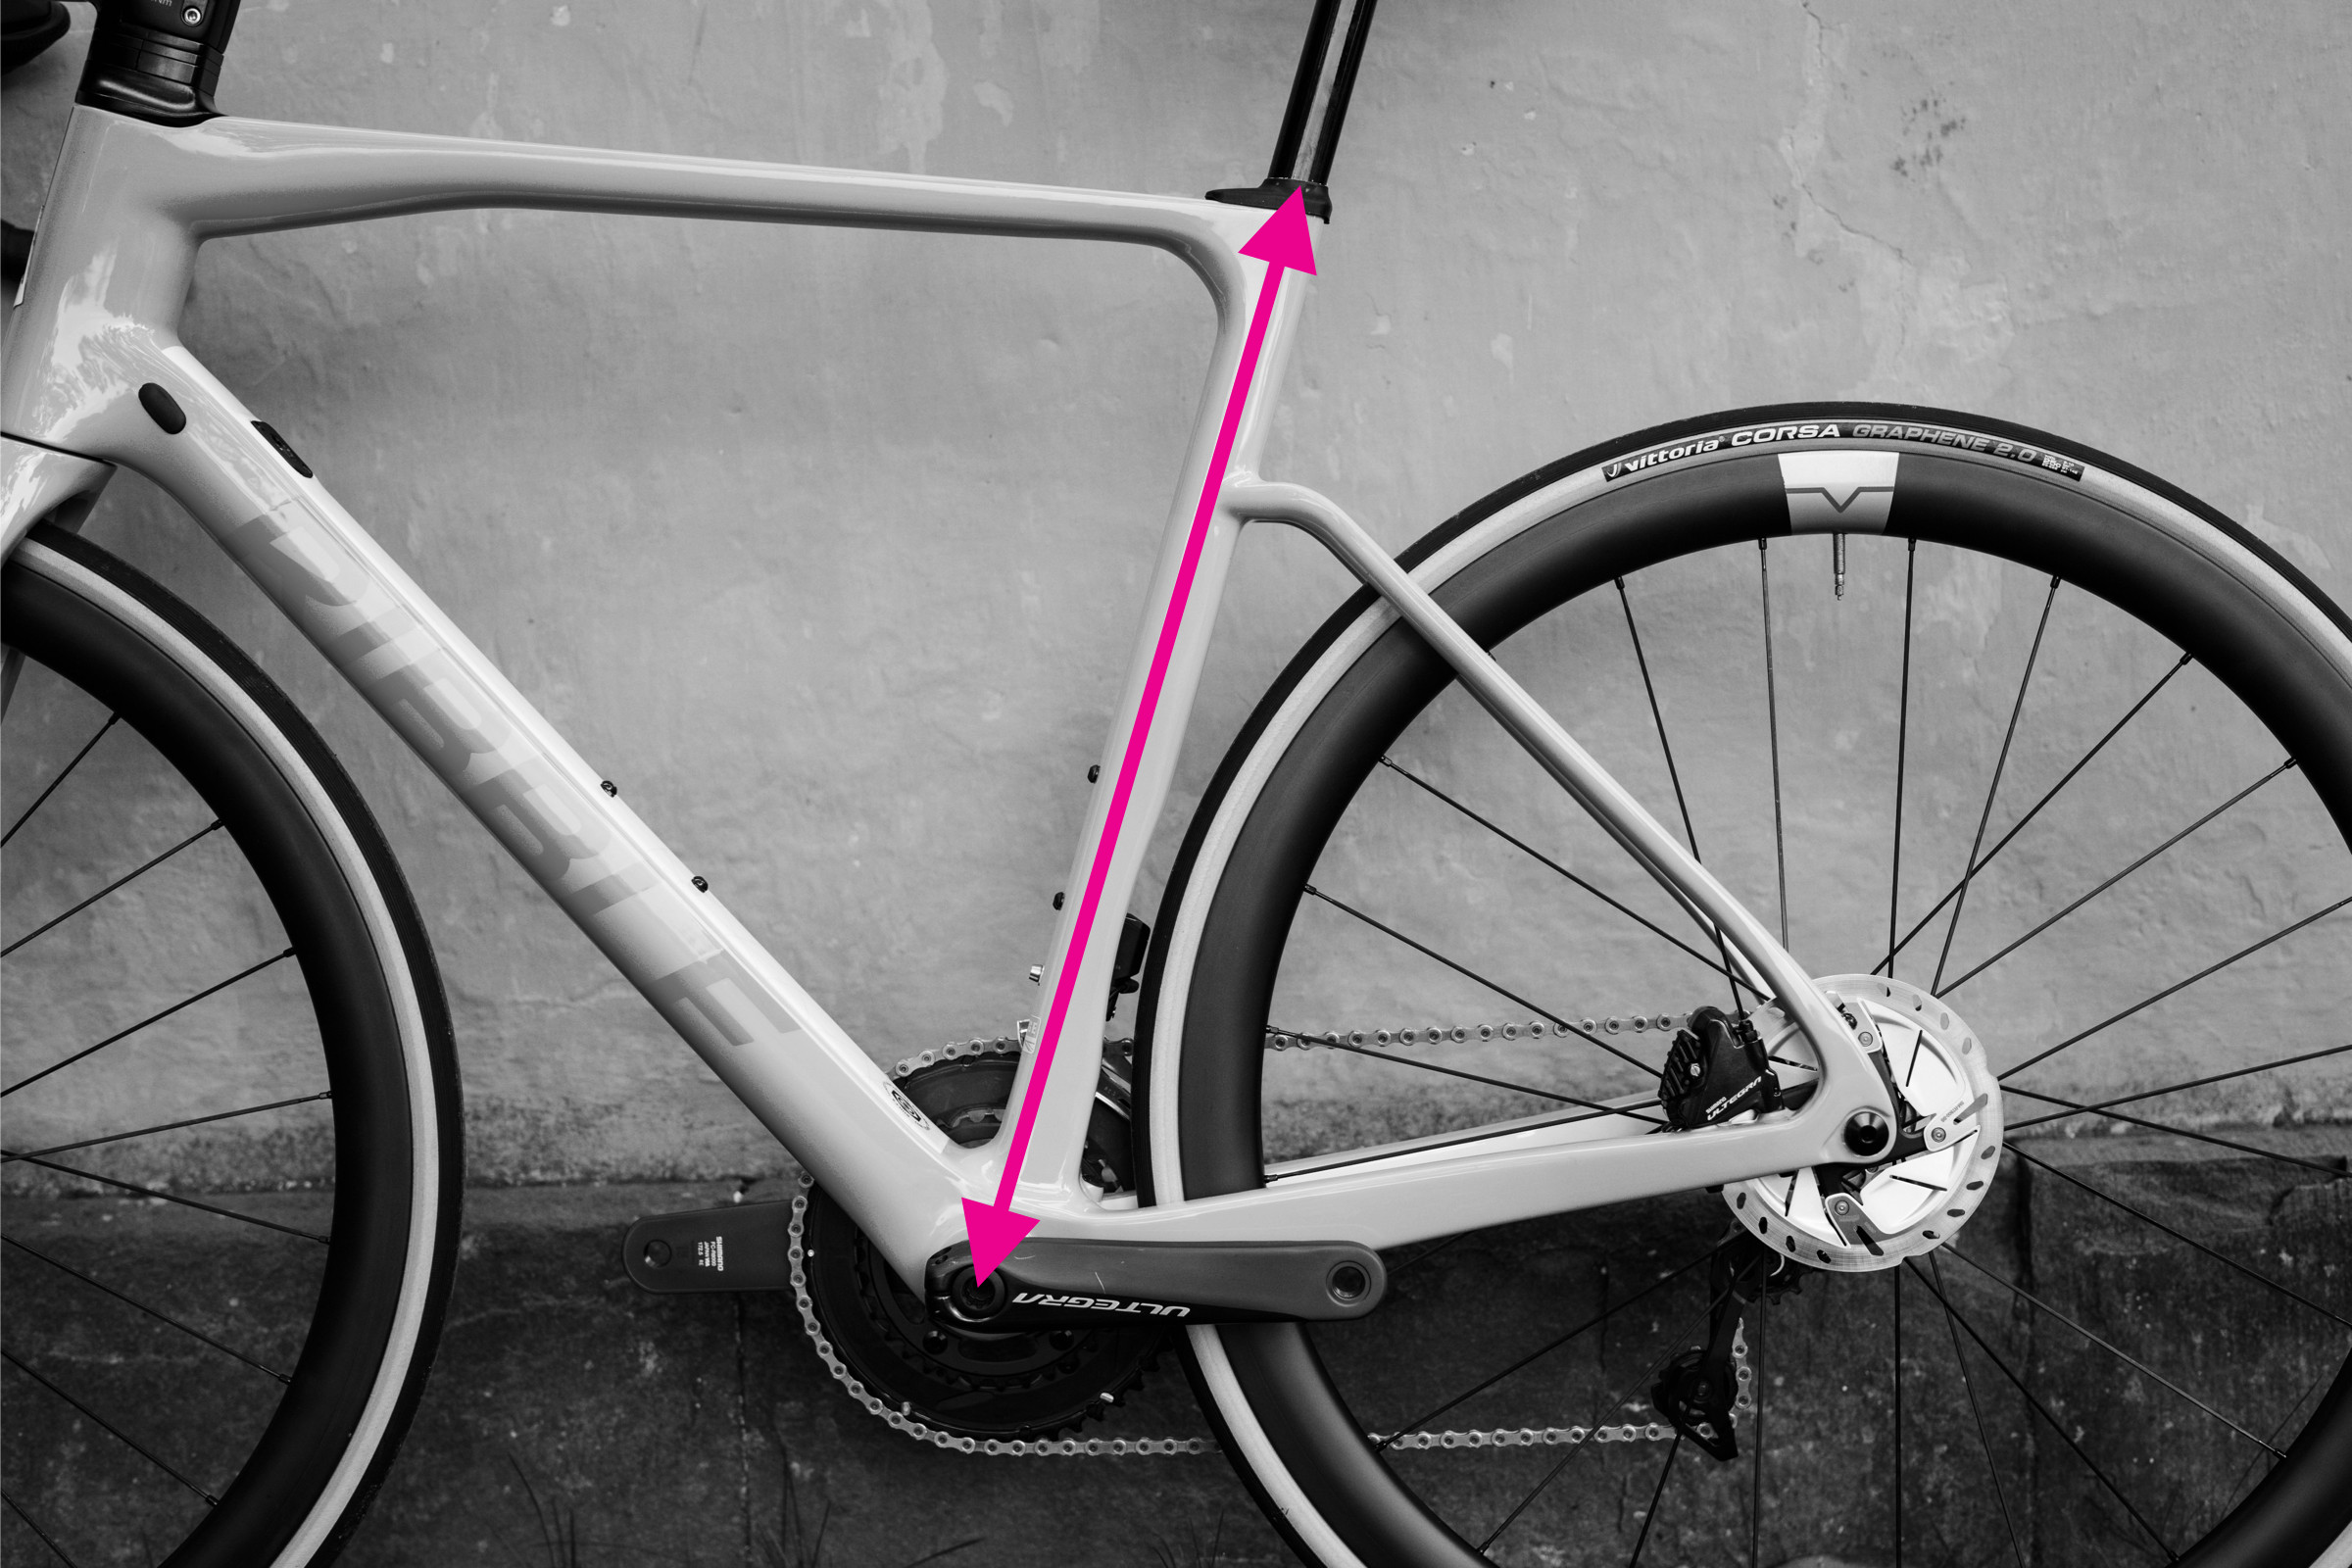 Measuring seat tube length on a bicycle frame from bottom bracket to seat tube top
Note that seat tube measurements can be less consistent across modern bike designs due to varying seat tube extensions and seat mast designs.
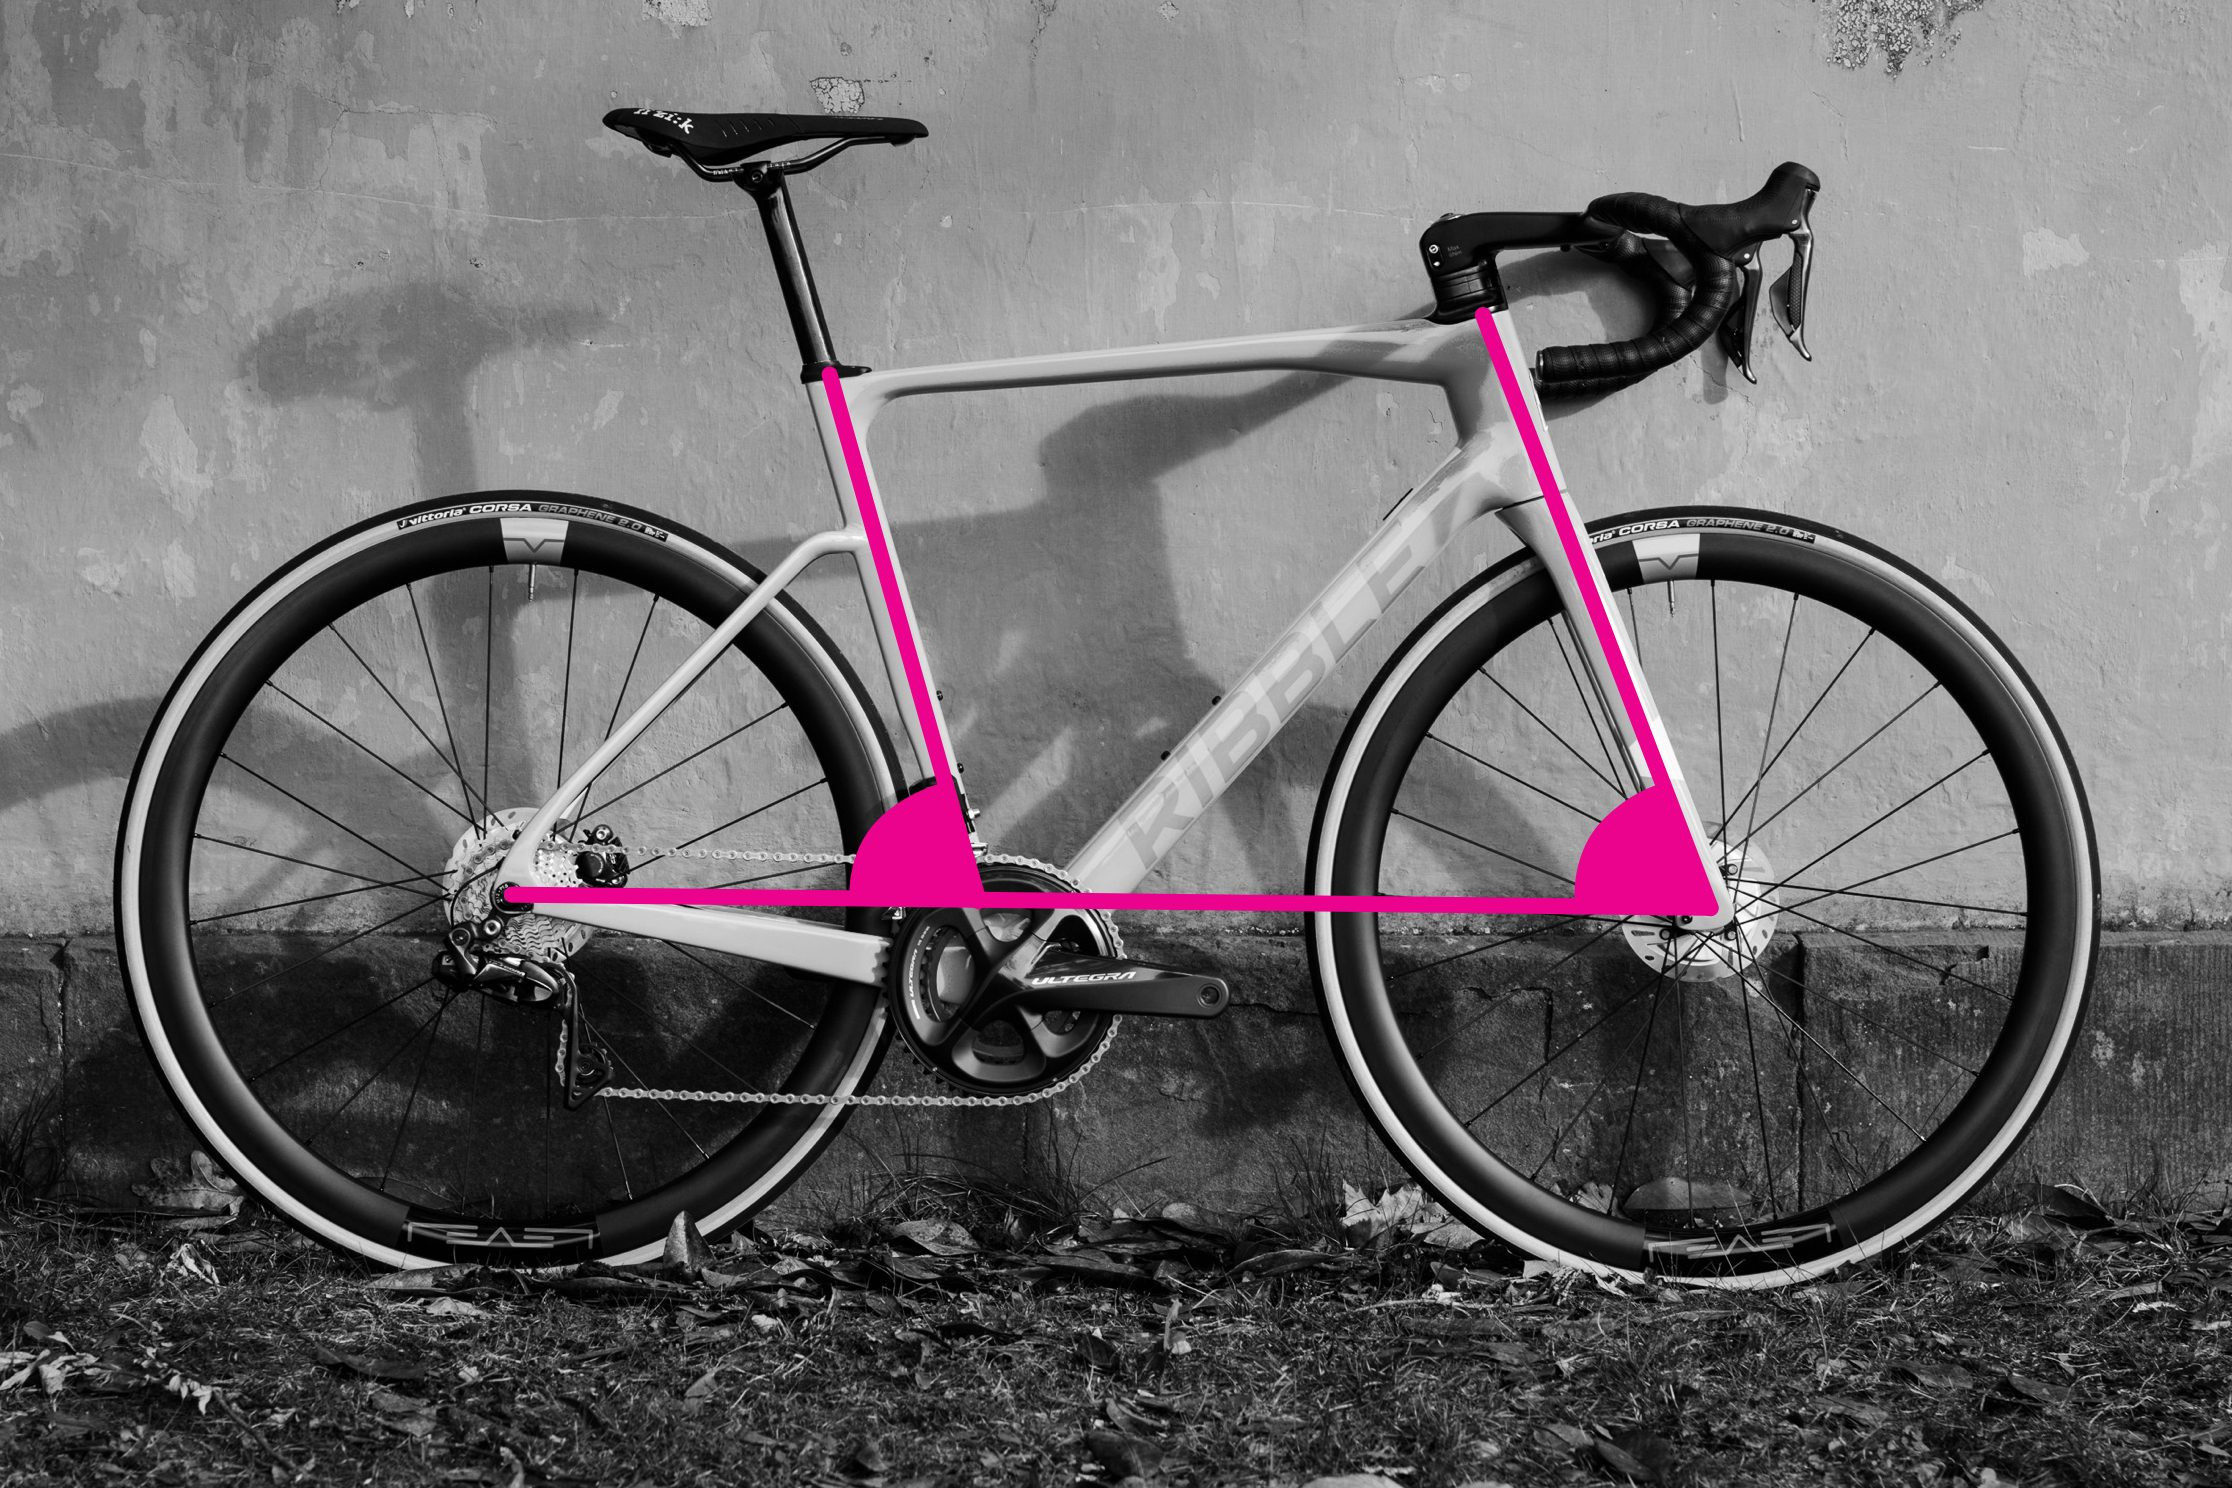
3. Measuring Reach and Stack
Reach and stack are considered more consistent and brand-independent measurements for comparing bike frame sizes.
Measuring Reach:
- Position the spirit level at the top center of the head tube.
- Hang the plumb line from the spirit level. Ensure the plumb line hangs straight down.
- Adjust the spirit level horizontally until the plumb line intersects with the center of the bottom bracket.
- Measure the horizontal distance from the top center of the head tube to the point directly above the bottom bracket on the spirit level. This is your reach.
Measuring Stack:
- Using the same setup as for reach, measure the vertical distance from the top center of the head tube down to the horizontal plane of the bottom bracket (you can use the plumb line as a guide). This vertical distance is your stack.
 Demonstrating stack and reach measurements on a bike frame with spirit level and plumb line
Reach and stack provide a clear picture of the bike’s front-center dimensions and are crucial for comparing different frame geometries.
4. Measuring Wheelbase
Wheelbase is straightforward to measure and gives insight into the bike’s overall length and stability.
- Ensure the front wheel is pointing straight ahead.
- Measure the distance from the center of the front axle to the center of the rear axle.
For increased accuracy, measure both sides of the bike and average the results to account for any slight fork misalignment.
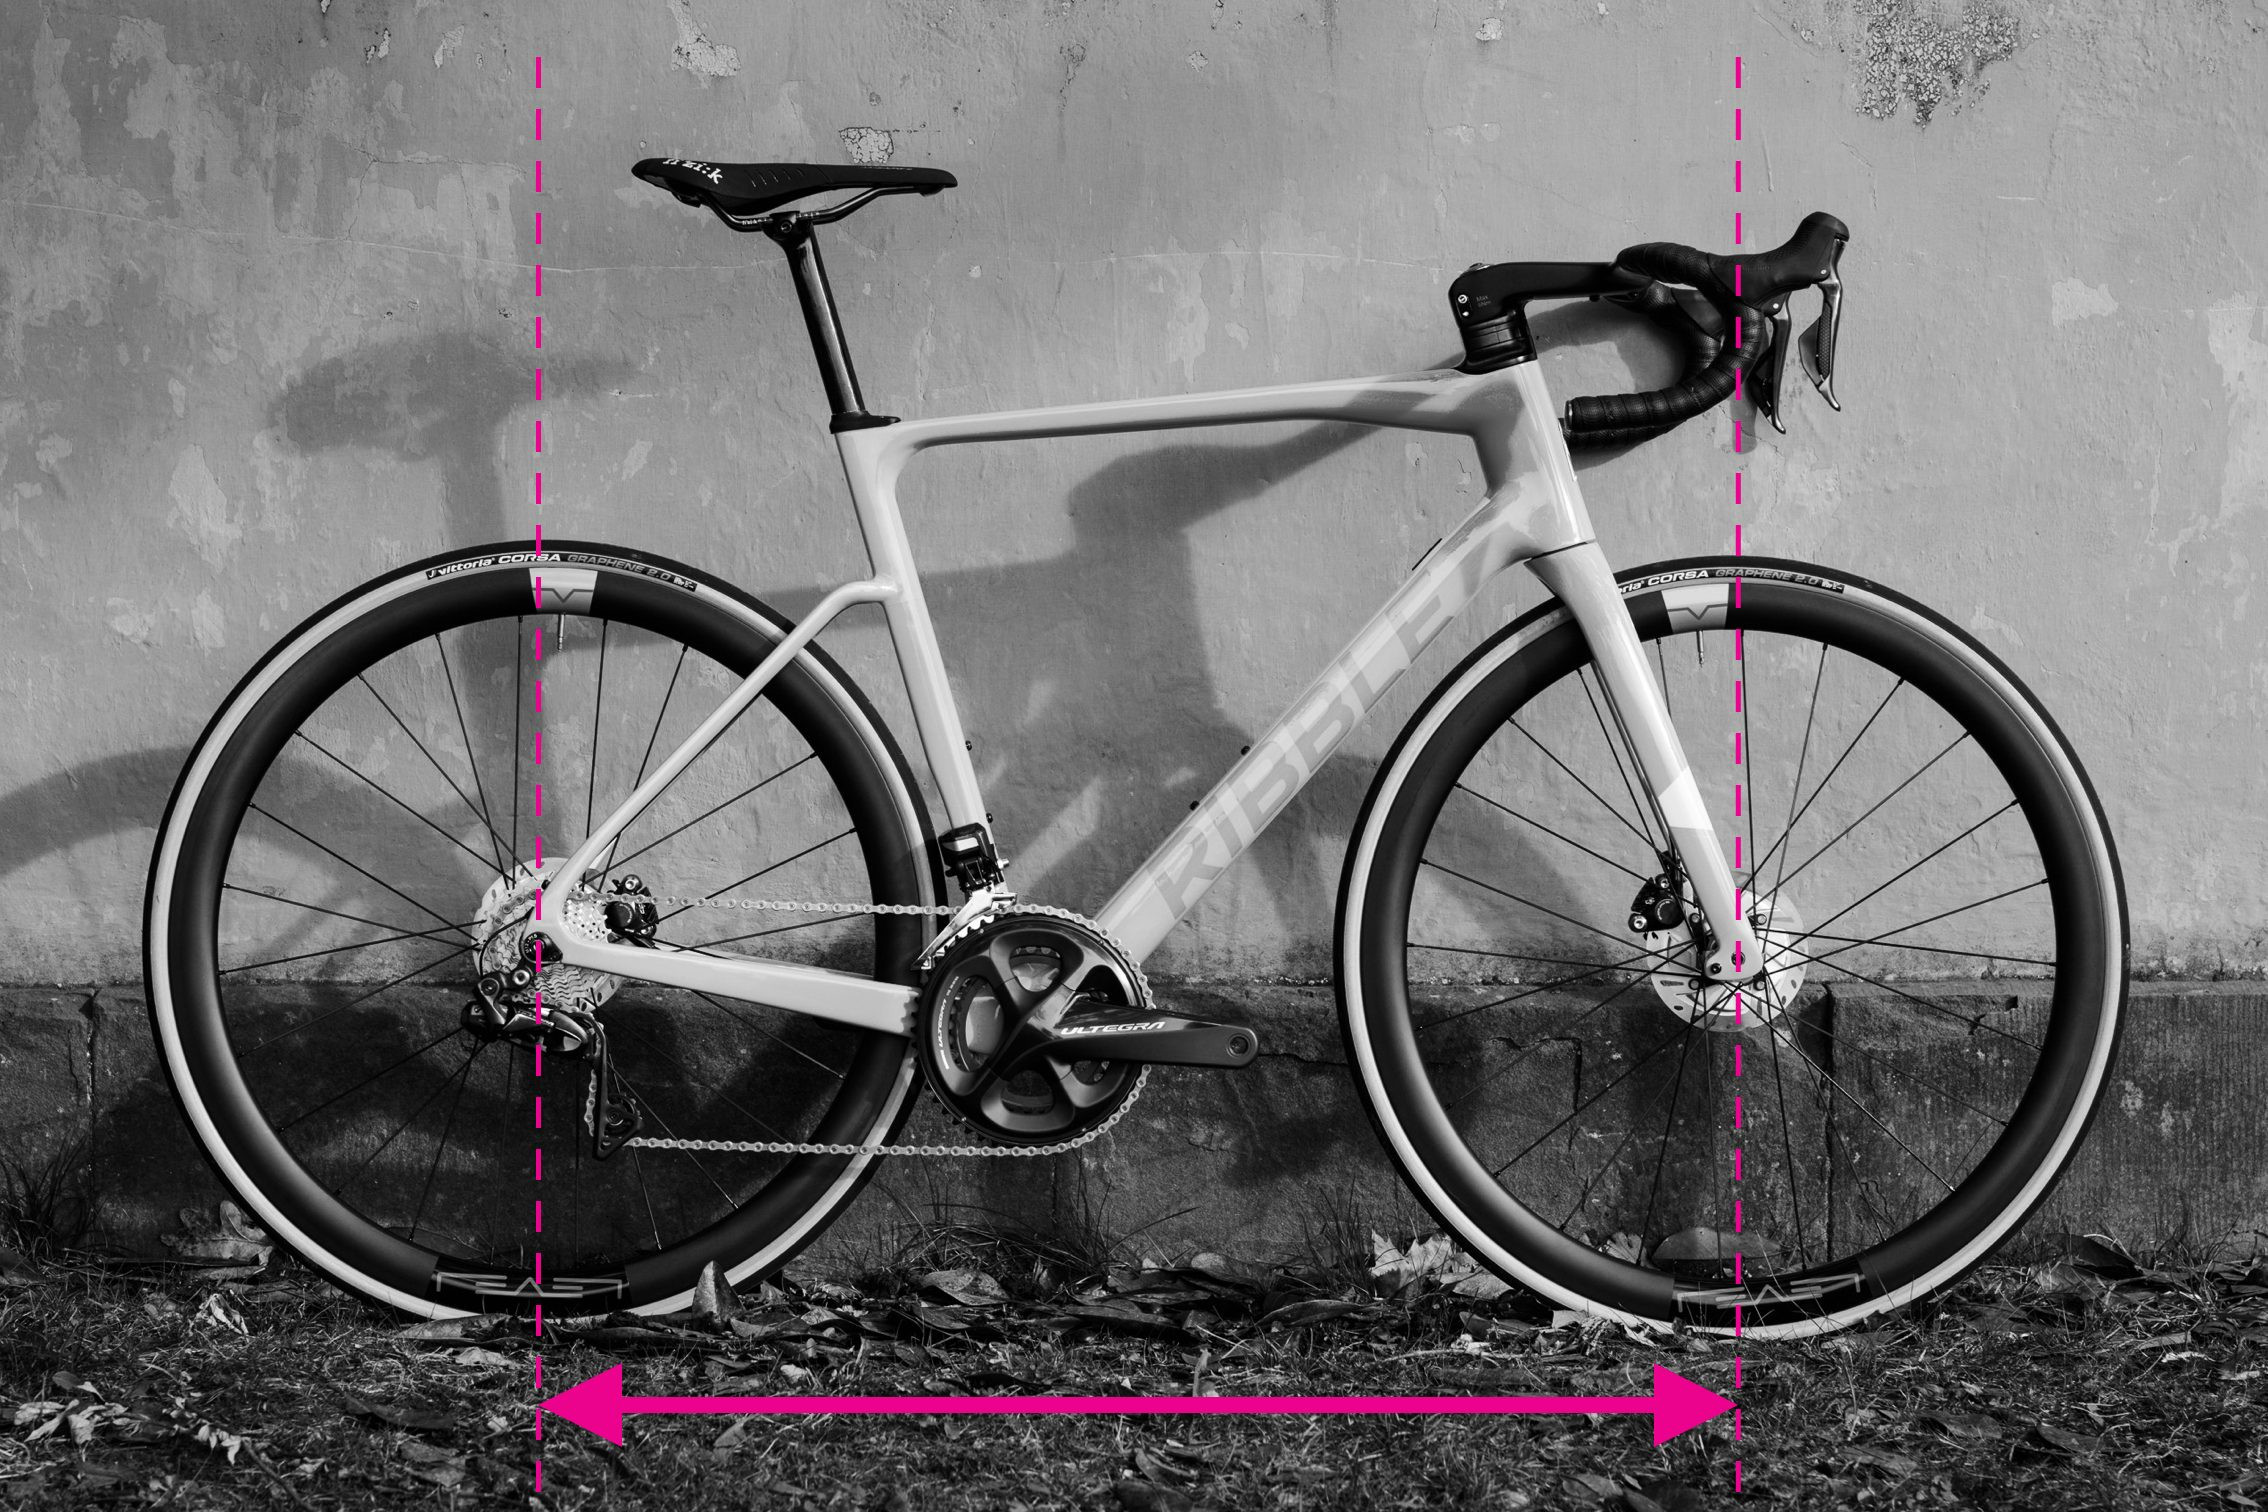 Measuring wheelbase of a bicycle by spanning from front to rear axle
5. Measuring Chainstay Length
Chainstay length is important for understanding the bike’s rear-end geometry and its impact on handling.
- Locate the center of the bottom bracket and the center of the rear dropout.
- Measure the straight-line distance between these two points.
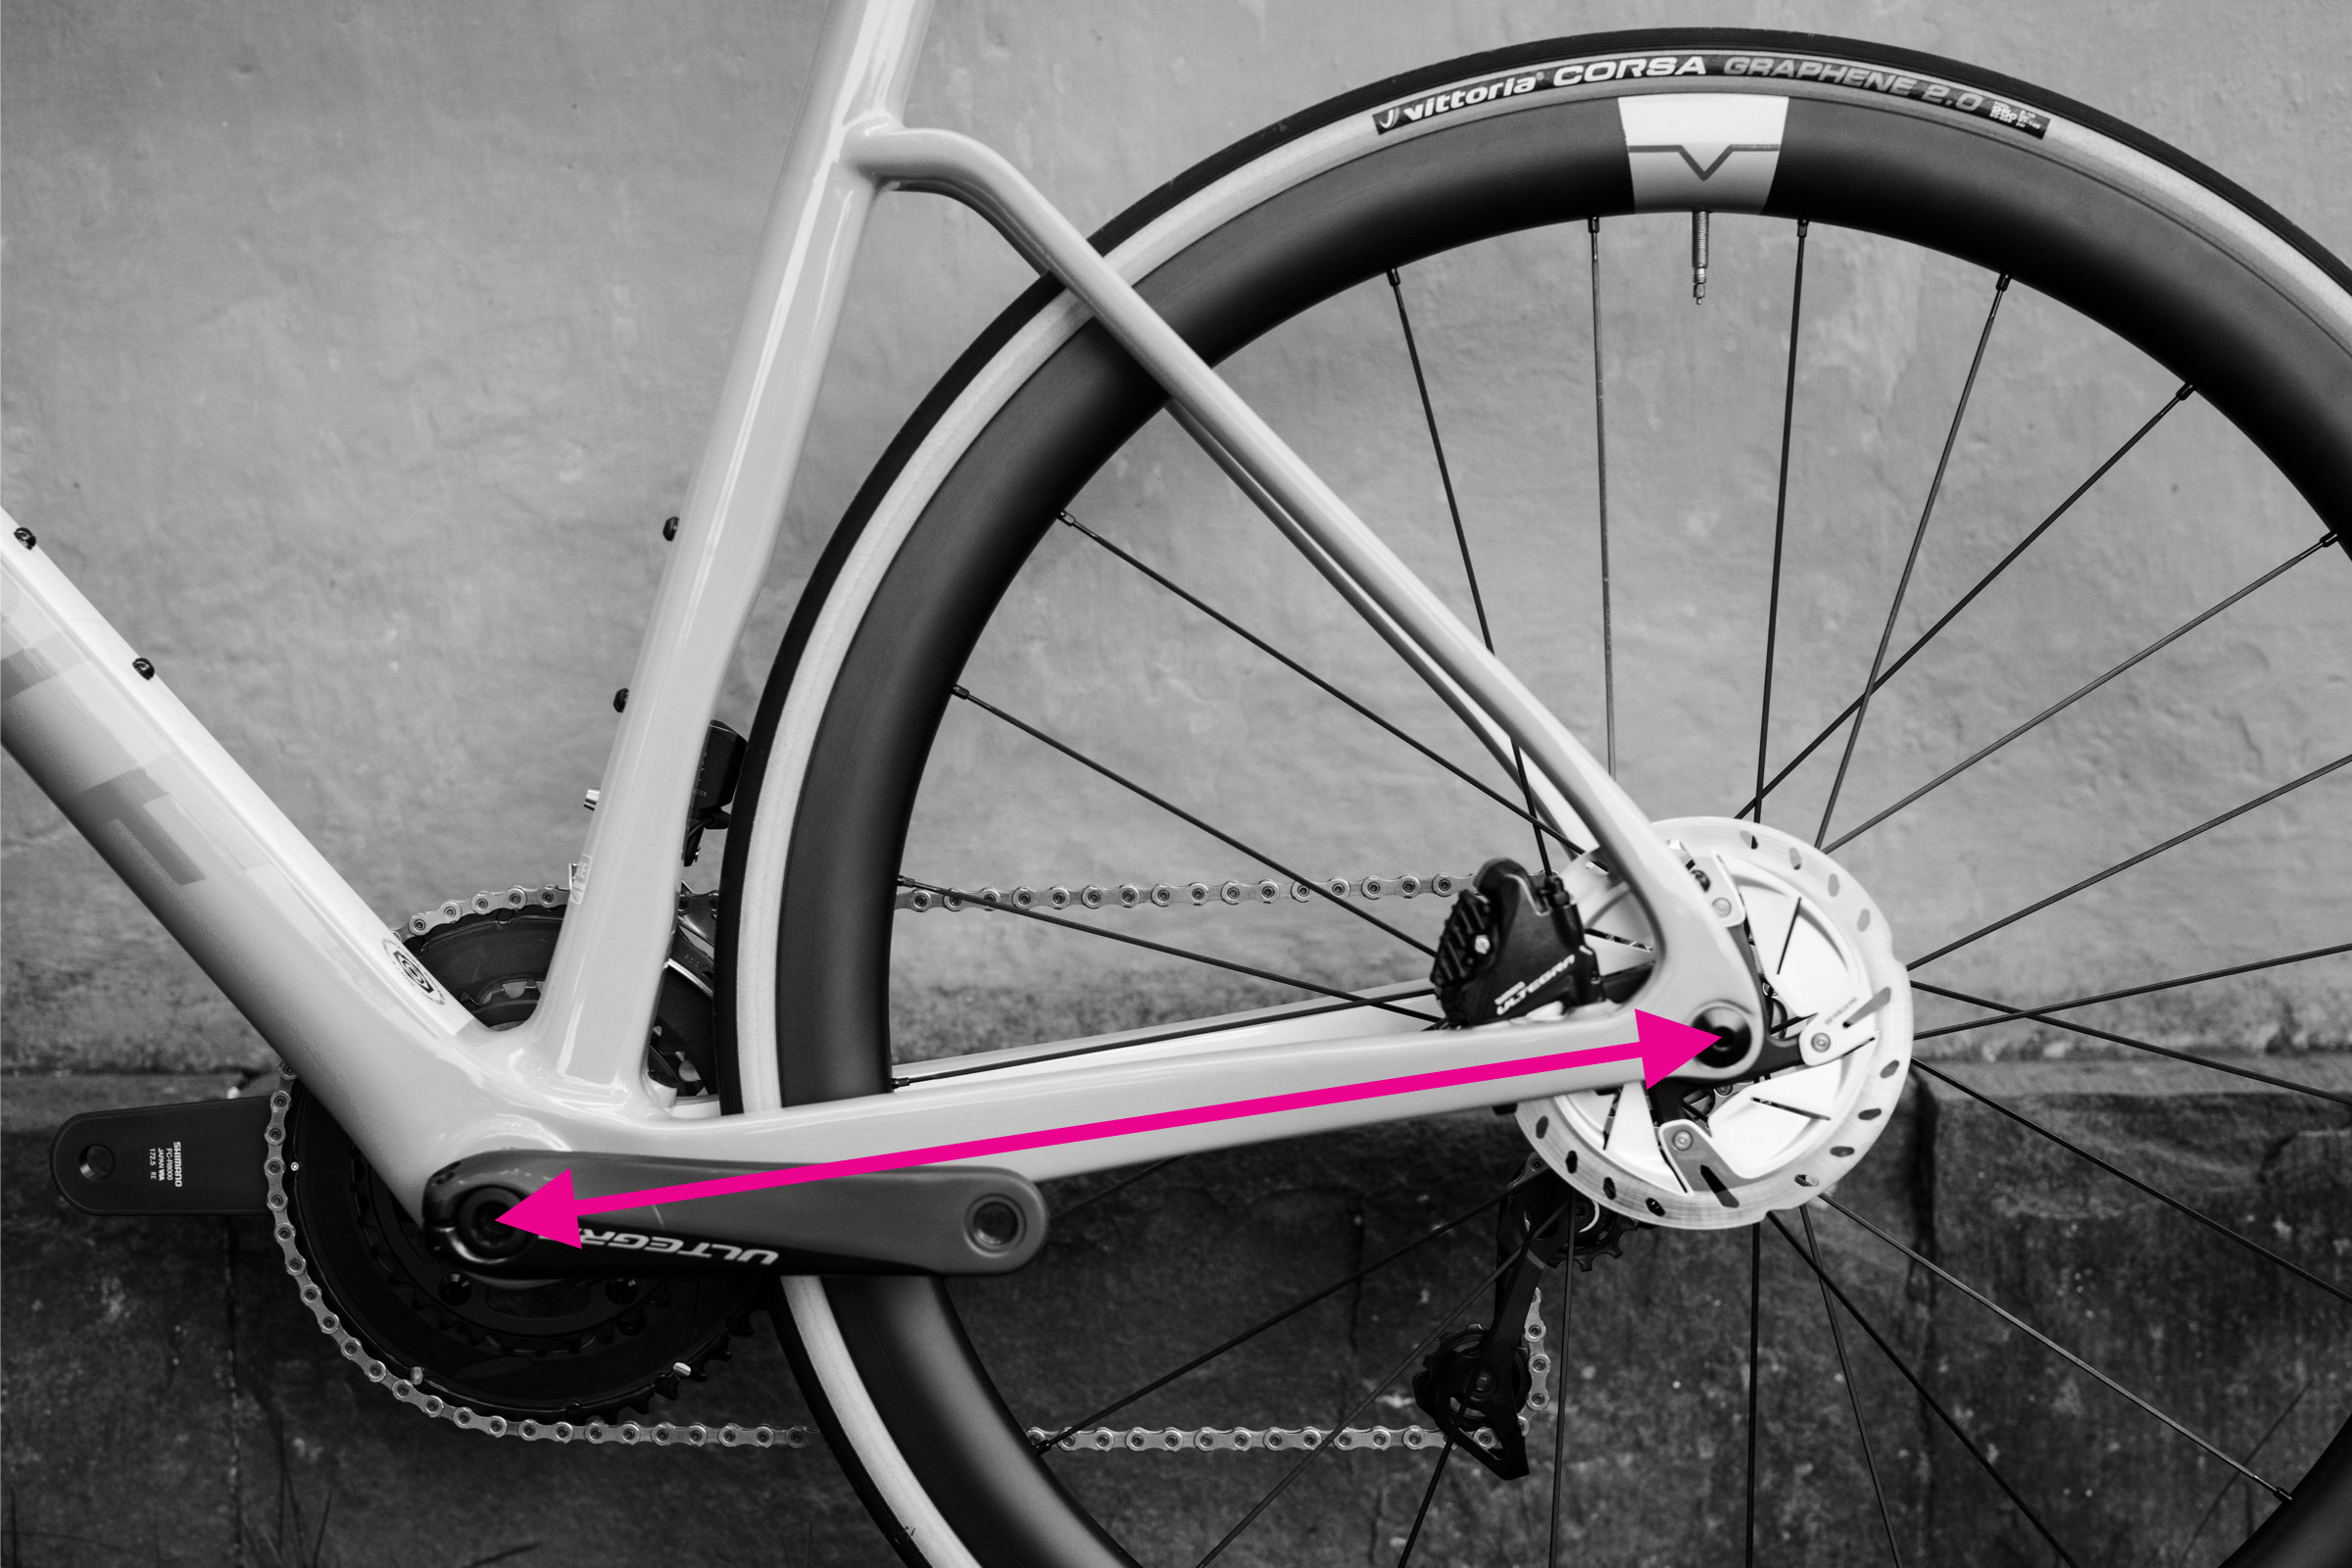 Measuring chainstay length from bottom bracket to rear dropout on a bicycle frame
6. Measuring Front Center
Front center, though less commonly quoted, is vital for understanding weight distribution and handling characteristics.
- Locate the center of the bottom bracket and the center of the front dropout.
- Measure the straight-line distance between these two points.
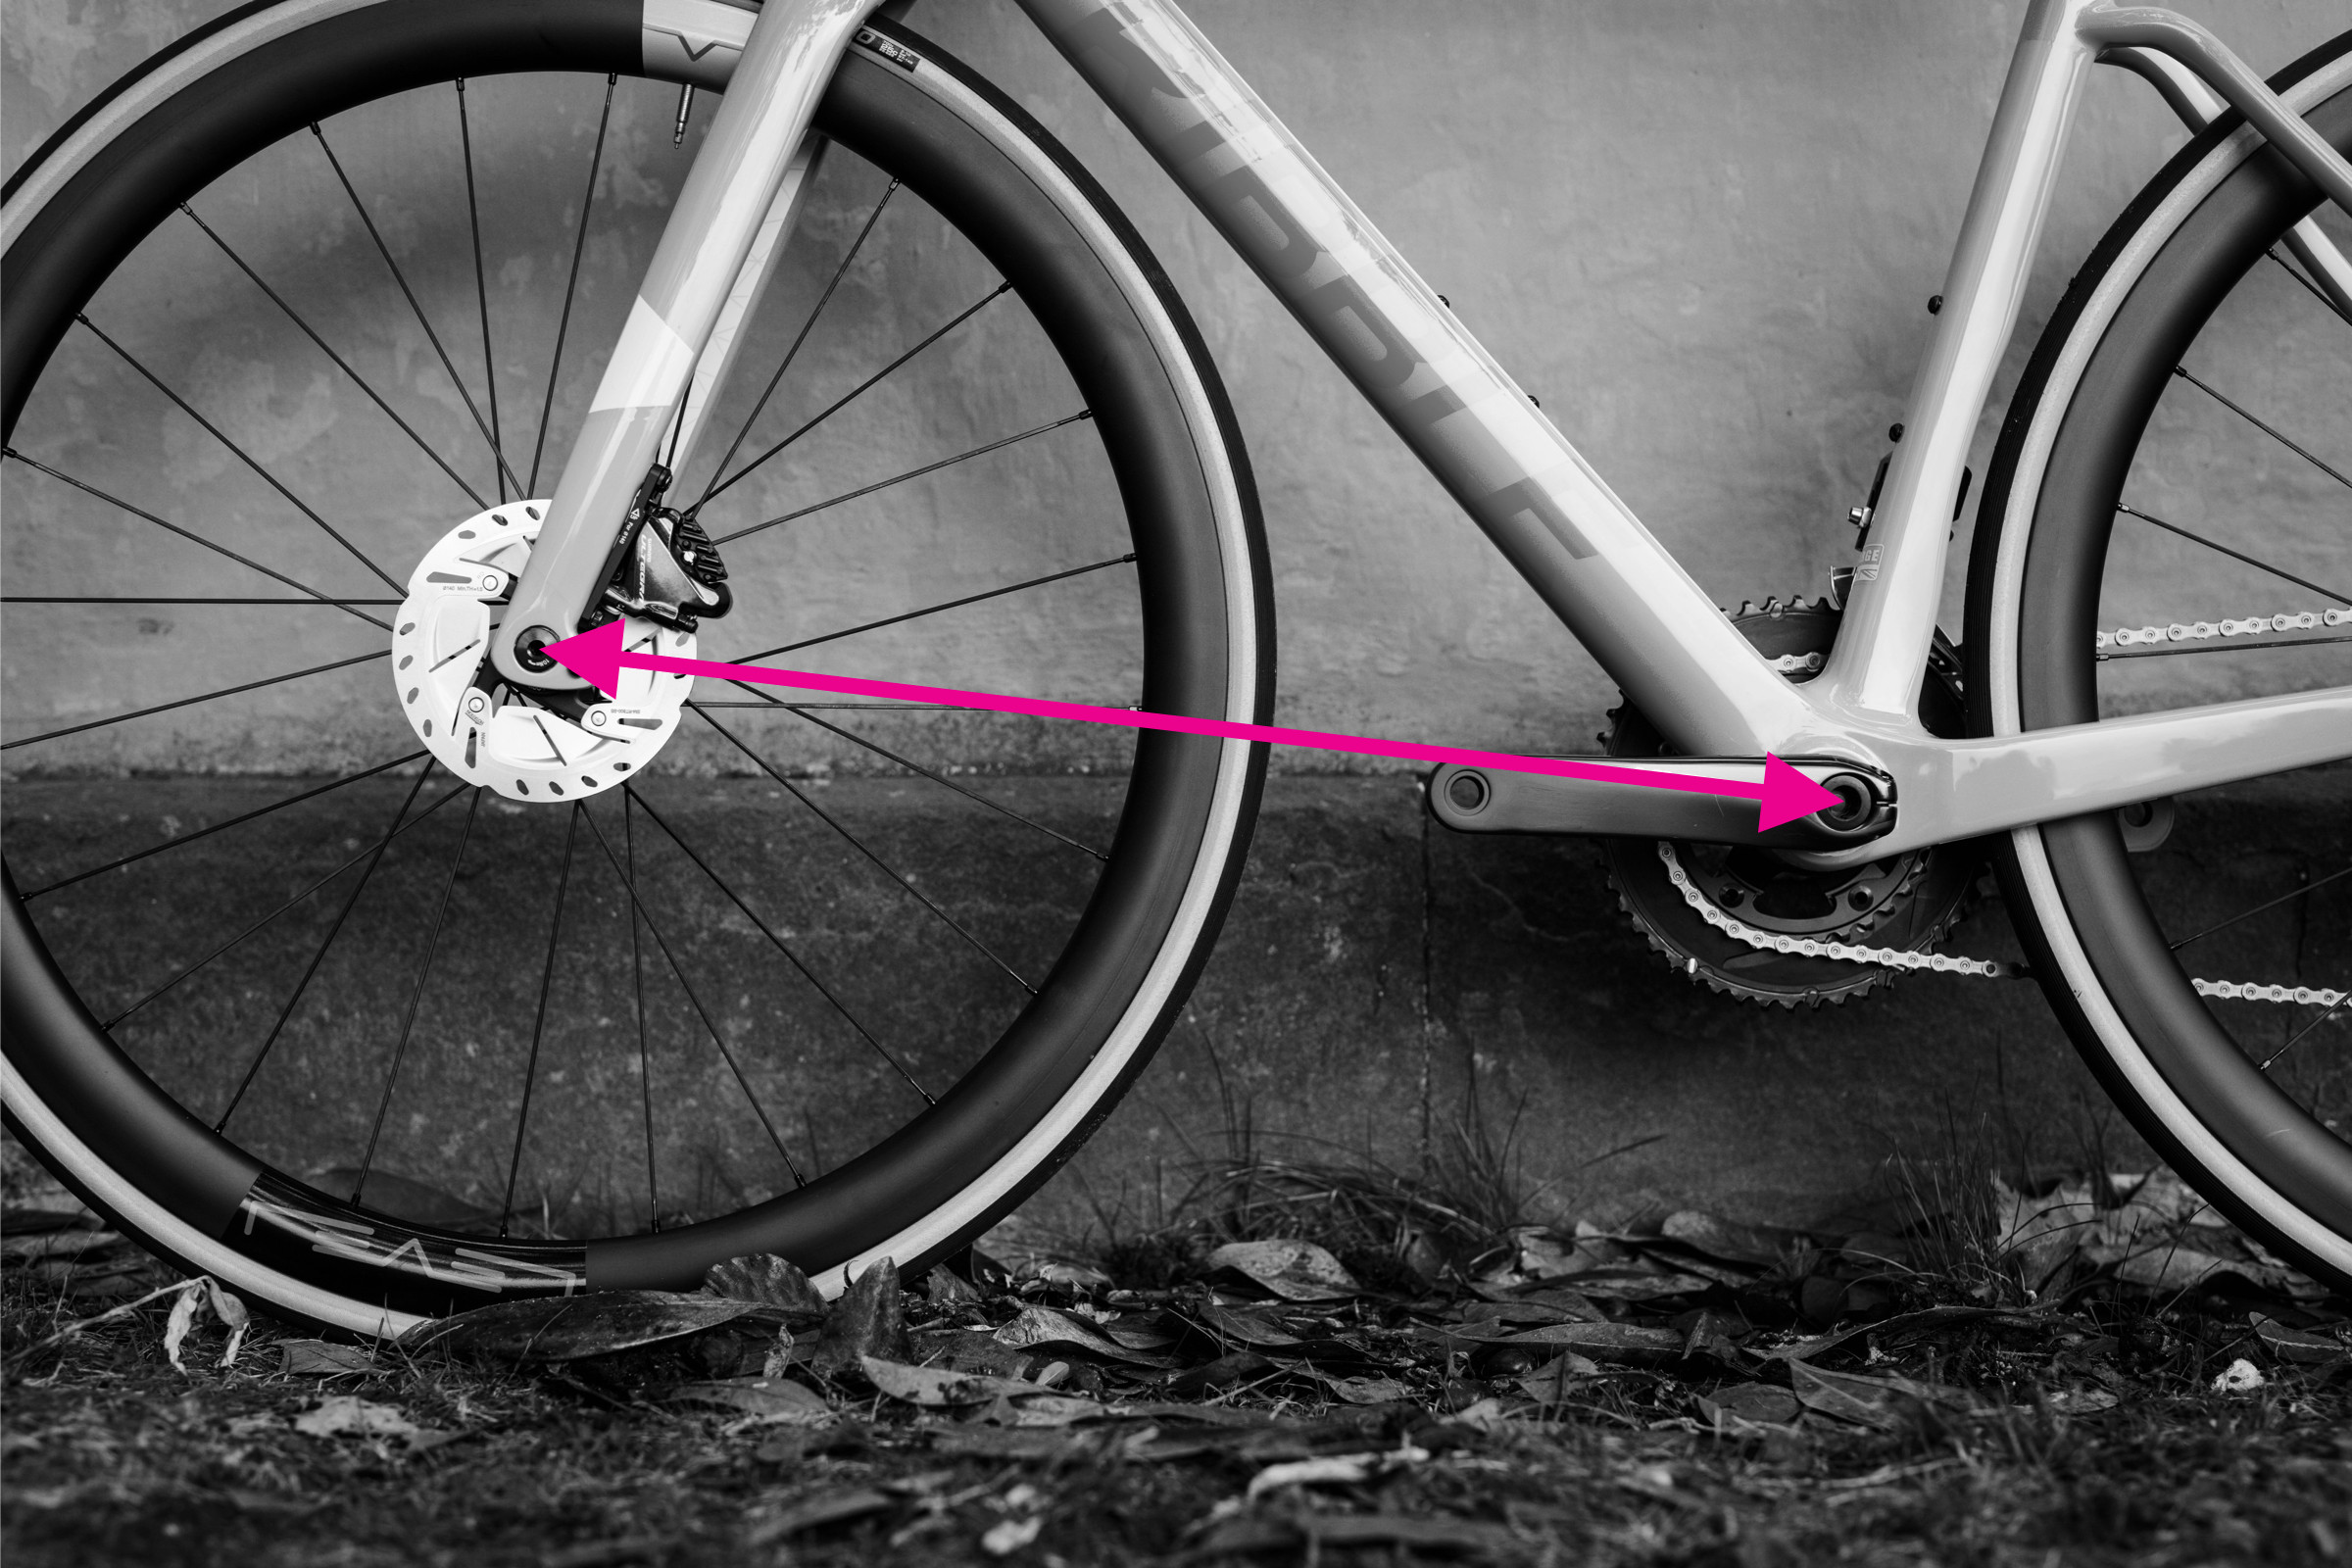 Measuring front center distance on a bicycle frame from bottom bracket to front dropout
Remember that the wheelbase is not simply the sum of chainstay and front center because these measurements are not taken horizontally.
7. Measuring Seat Tube and Head Tube Angles
Angles significantly influence a bike’s handling and ride feel. A clinometer or angle finder app is essential for this.
Measuring Seat Tube Angle:
- Place your smartphone with the clinometer app against the seat tube. For bikes with curved seat tubes, use a straight edge along the main section of the seat tube.
- Ensure the bike is vertical and on a level surface.
- Read the angle from the clinometer app. The seat tube angle is the angle relative to the horizontal (90 degrees would be perfectly vertical).
Measuring Head Tube Angle:
- Place your smartphone with the clinometer app against the head tube. For tapered head tubes, try to align with the center line or use a straight edge connecting the top and bottom centers of the head tube.
- Ensure the bike is vertical and on a level surface.
- Read the angle from the clinometer app. The head tube angle is also relative to the horizontal. Alternatively, you can measure the angle of the fork leg if it’s straight.
 Measuring seat tube and head tube angles using a clinometer app on a smartphone
8. Measuring Bottom Bracket Drop
Bottom bracket drop affects stability, especially when cornering.
- Measure the height from the ground to the rear axle center.
- Measure the height from the ground to the bottom bracket center.
- Subtract the rear axle height from the bottom bracket height. This difference is the bottom bracket drop.
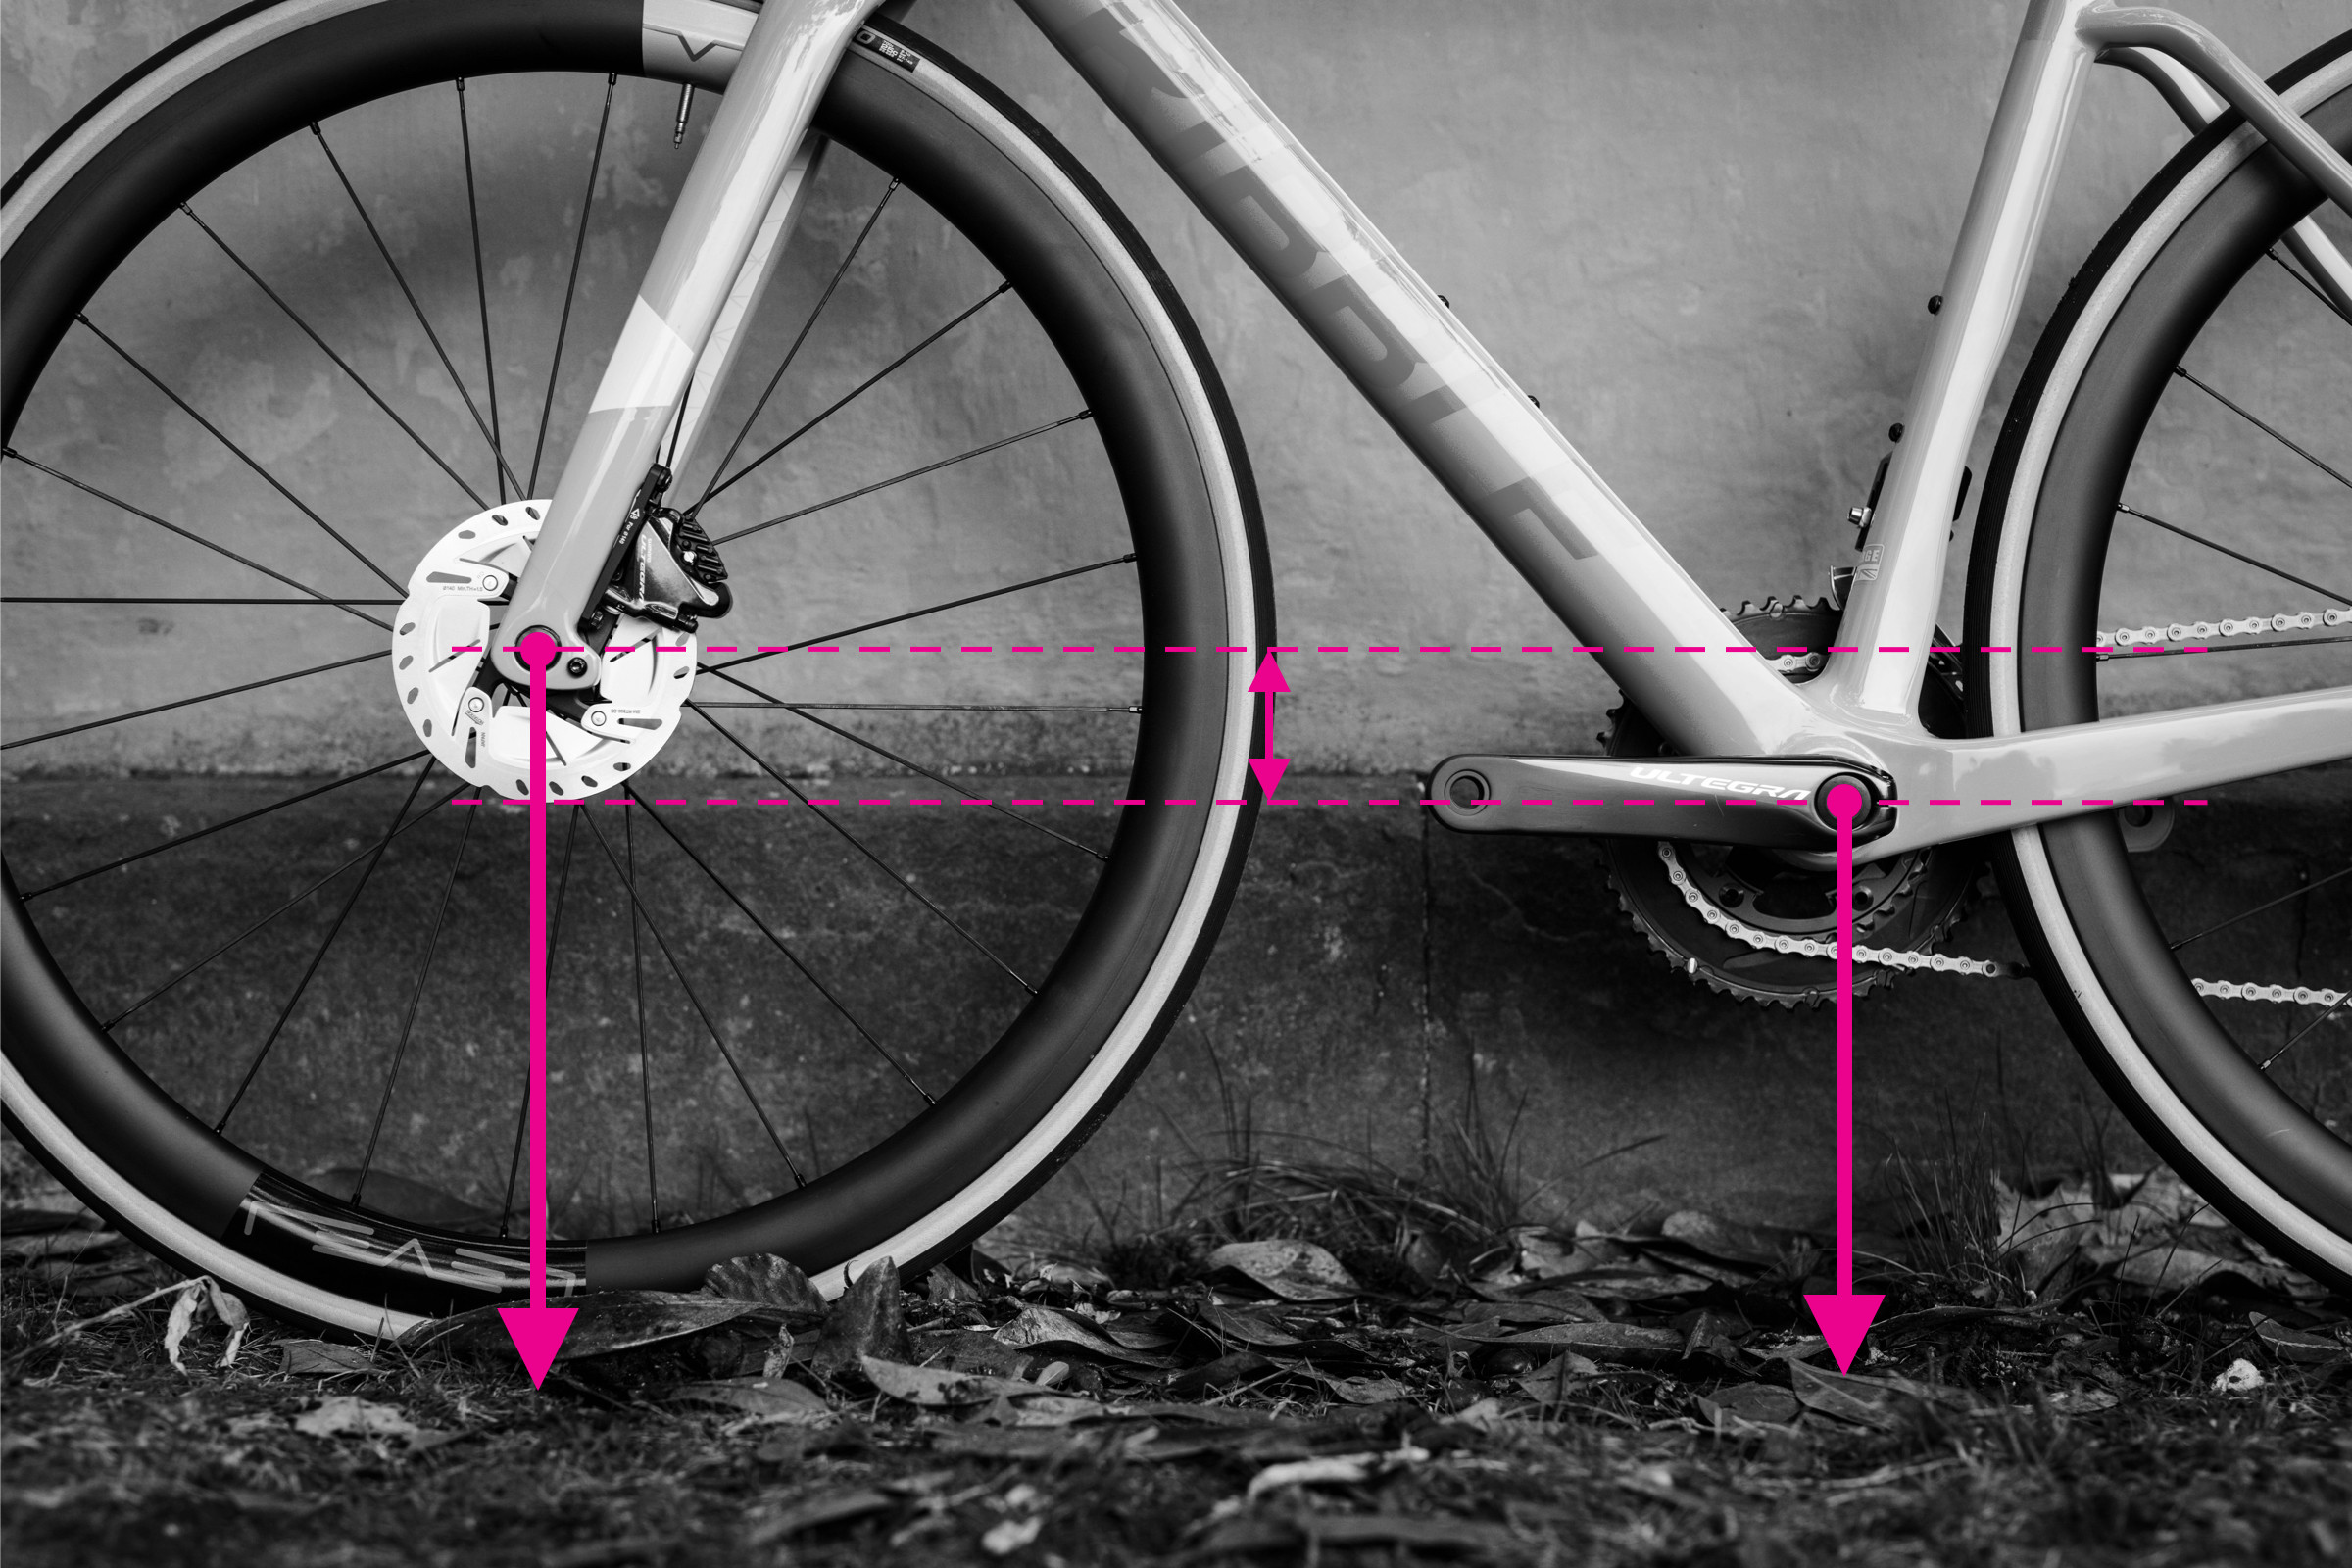 Measuring bottom bracket drop by comparing axle and bottom bracket heights
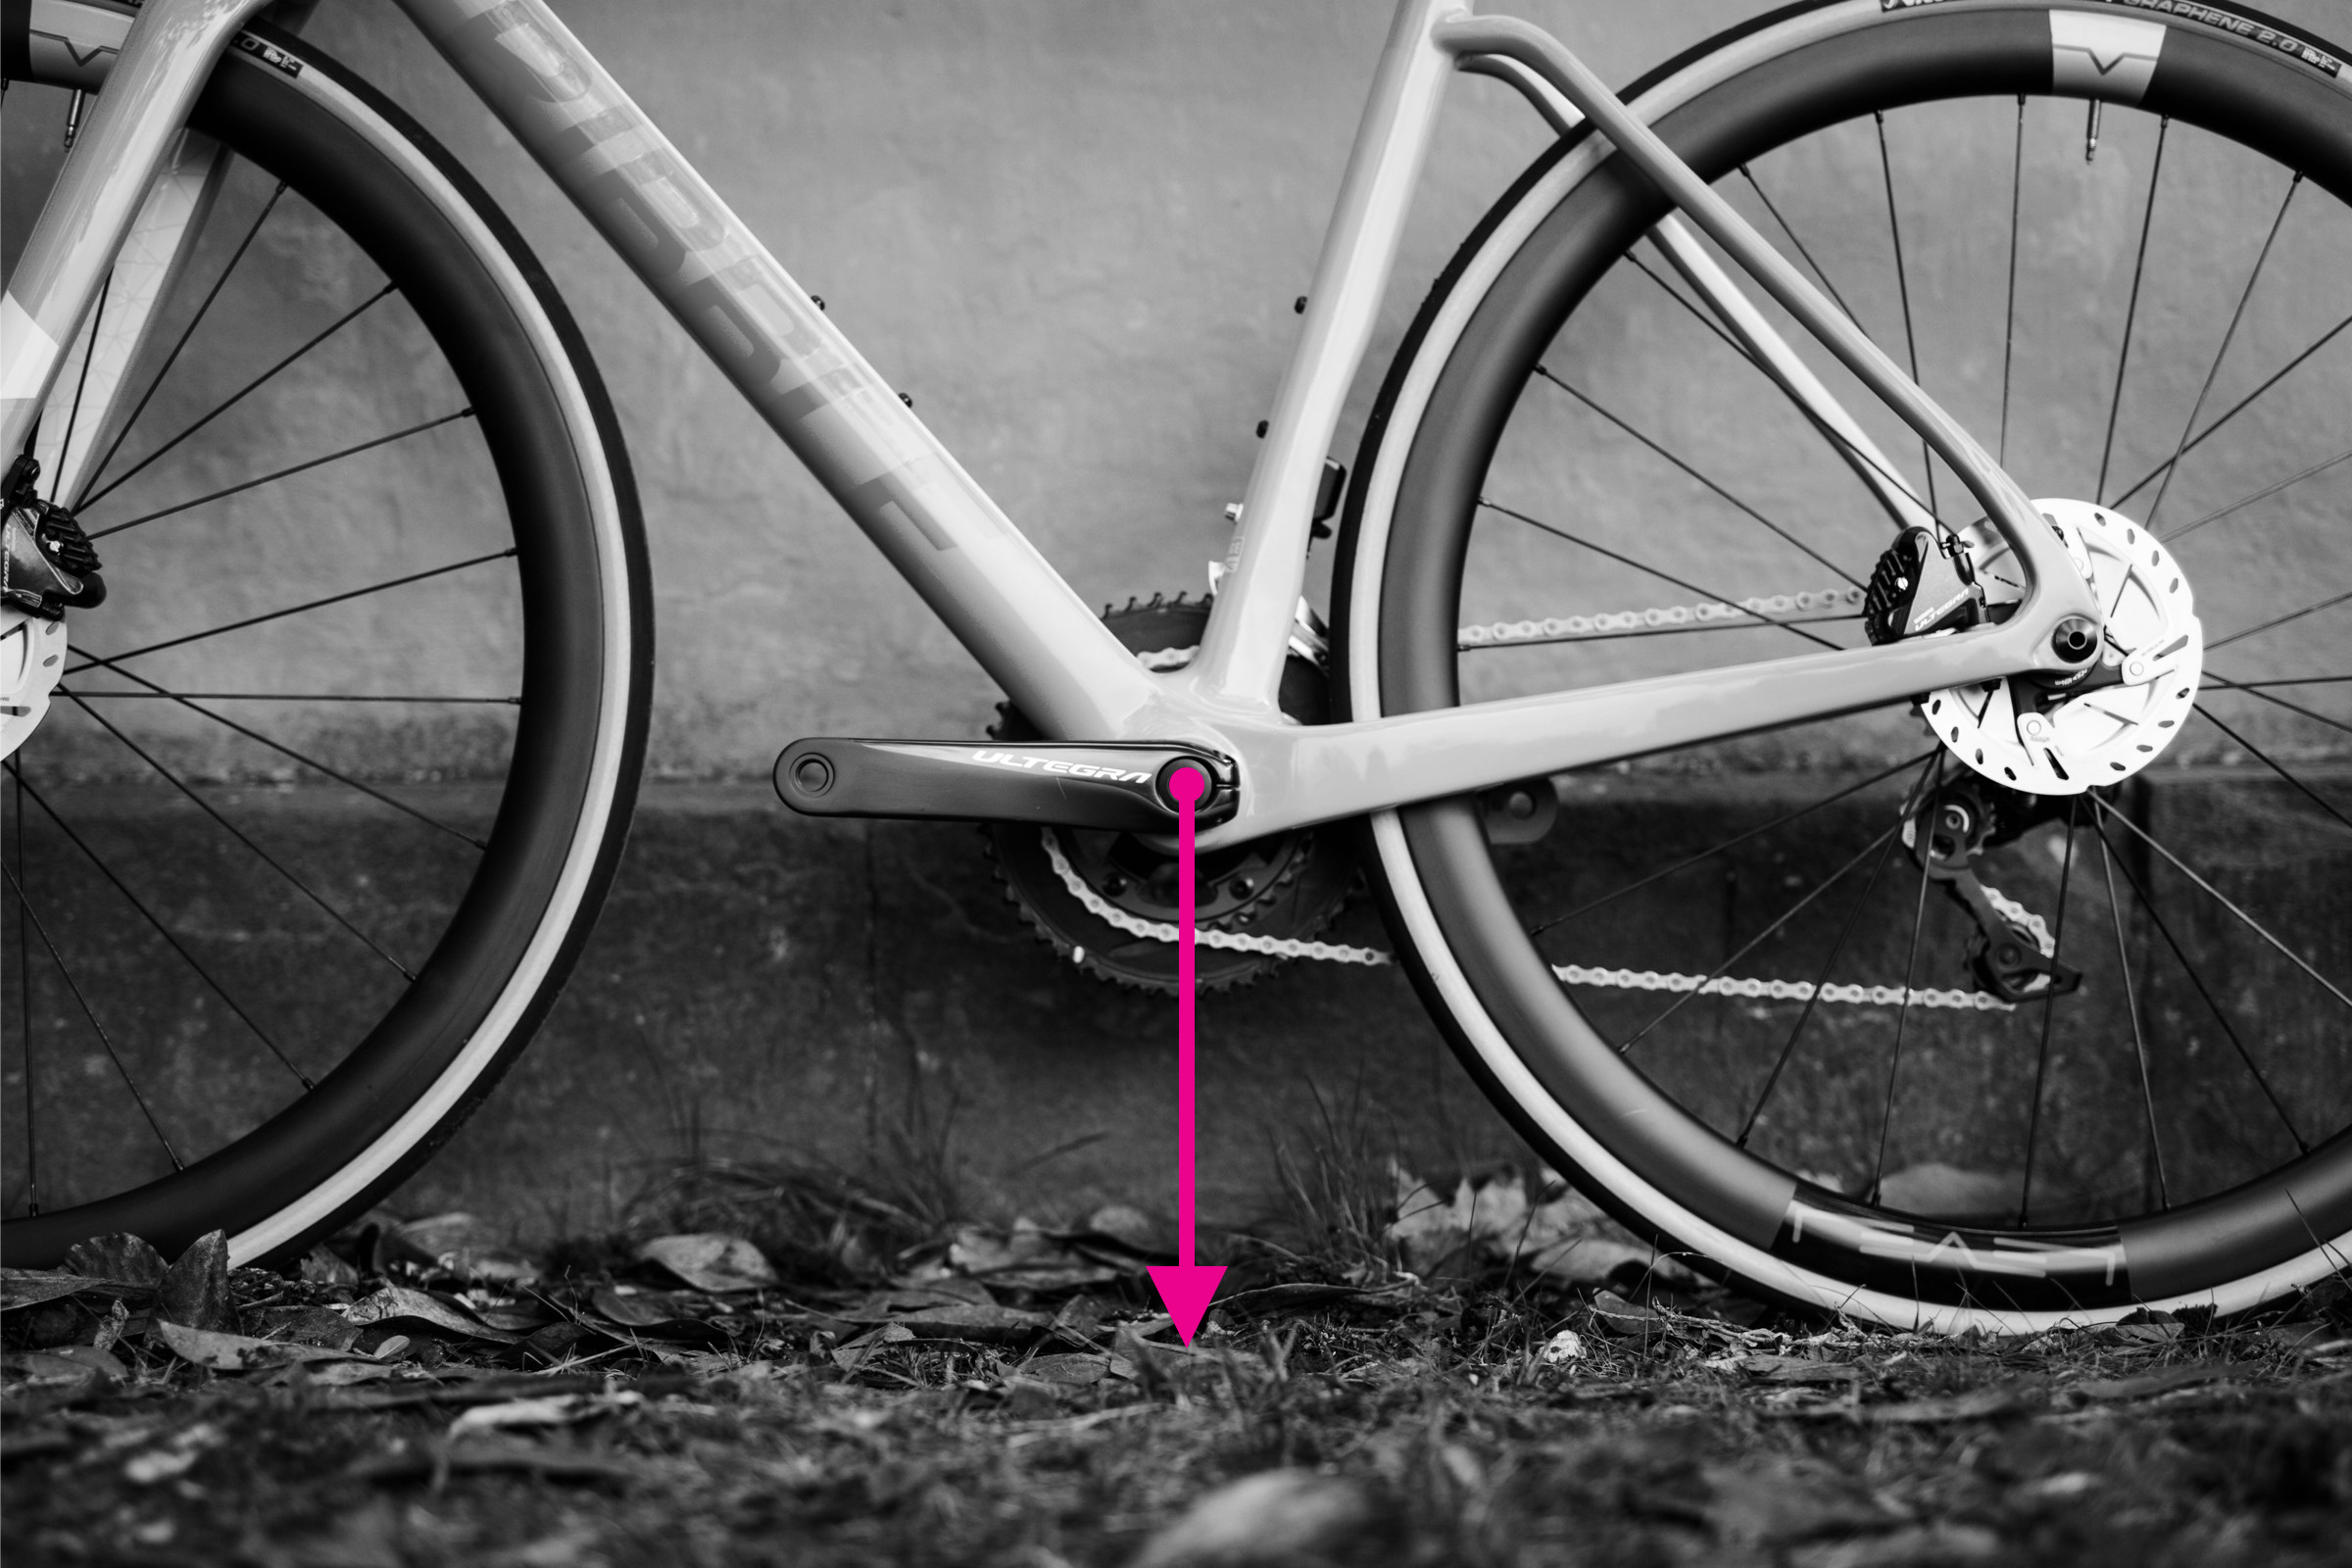
9. Measuring Bottom Bracket Height
Bottom bracket height is a simple measurement indicating ground clearance and overall bike height.
- Measure the vertical distance from the ground to the center of the bottom bracket.
 Measuring bottom bracket height from the ground to the center of the bottom bracket
Ensure your tires are inflated to your typical riding pressure for the most accurate measurement, as tire pressure can slightly influence bottom bracket height.
Why Accurate Bike Frame Measurement Matters
Accurately measuring your bike frame provides valuable data for several reasons:
- Bike Purchase: When buying a new or used bike, these measurements help you compare frame sizes across different brands and models, ensuring a better fit.
- Bike Rental: Knowing your frame measurements allows you to confidently rent a bike that fits you comfortably.
- Adjustments and Upgrades: Understanding your bike’s geometry aids in making informed decisions about component adjustments or frame upgrades.
- Understanding Bike Fit: These measurements are fundamental to understanding overall bike fit and how the bike interacts with your body.
By taking the time to measure your bike frame, you equip yourself with the knowledge to make better cycling choices and enhance your riding experience. Keep these measurements handy for future bike-related decisions!