
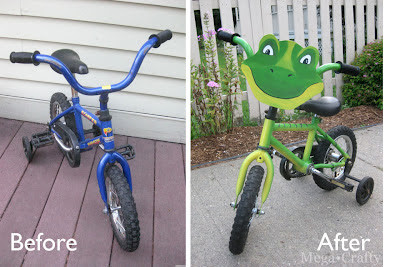
Looking for a creative and exciting way to surprise your little one? Transform an ordinary bicycle into a thrilling “Dinosaur Bike”! This fun DIY project is perfect for kids who love dinosaurs and biking. It’s a fantastic way to upcycle an old bike and create a personalized, roaring ride that will be the envy of the neighborhood. This guide will walk you through each step to create your very own dinosaur bike, ensuring a safe, durable, and incredibly cool ride for your young adventurer.
Materials You’ll Need to Create Your Dinosaur Bike
Before you embark on this exciting crafting journey, gather these essential materials. Having everything on hand will make the process smoother and more enjoyable.
- A Used Bike: Start with a functional, used bike. Garage sales or online marketplaces are great places to find affordable options. Even better if it’s a bit worn – we’re giving it a complete dinosaur-themed makeover!
- Cleaning Supplies: Soap, water, and a sponge or cloth to clean the bike frame.
- Painter’s Tape: For masking off areas you don’t want to paint, ensuring clean lines and a professional finish.
- Spray Paint: Choose colors that bring dinosaurs to mind! Green is a classic dinosaur color, but browns, yellows, and oranges can also work well. Consider a base coat color and a highlight color for added dimension. We recommend paints suitable for metal and outdoor use for durability.
- Paint Brushes: For detail work and painting stripes or features.
- Glossy Finish Coat/Sealer: To protect the paint job and give your dinosaur bike a shiny, finished look. This also adds weather resistance.
- Craft Foam: For creating the dinosaur head. Choose a thickness that’s sturdy yet easy to cut and shape.
- Grocery Bag or Paper for Template: To sketch out your dinosaur head shape.
- Scissors or Craft Knife: For cutting the foam.
- Outdoor Mod Podge or Foam Sealer: To seal the craft foam, making it weather-resistant and ready for paint.
- Acrylic Craft Paint: In various colors for painting dinosaur features on the foam head. Ensure they are water-resistant for outdoor use.
- Waterproof Spray Sealer (for Foam Head): An extra layer of protection for the painted dinosaur head to withstand the elements.
- Waterproof Glue (for Metal and Foam): A strong adhesive to securely attach the foam dinosaur head to the bike handlebars.

Image: A finished dinosaur bike in green and yellow with a friendly dinosaur head attached to the handlebars, parked outdoors.
Step-by-Step Guide to Creating Your Dino Bike
Let’s get started on transforming that ordinary bike into a prehistoric beast! Follow these steps to bring your dinosaur bike vision to life.
1. Bike Prep and Painting: Laying the Foundation for Your Dino Bike
First, disassemble the bike as much as you comfortably can. Removing wheels, seats, and any detachable parts will make painting easier. Clean the bike frame thoroughly to remove any dirt, grease, or rust. This ensures the paint adheres properly. Use soap and water, and for stubborn grease, a degreaser can be helpful. Once clean and dry, use painter’s tape to carefully mask off any areas you don’t want to paint, such as tires or handlebar grips if you can’t remove them.

Image: A used blue bicycle before the dinosaur bike makeover, showing its original condition before painting.
Now, it’s time to paint! Apply your base coat of spray paint in even strokes, holding the can about 10-12 inches from the frame. Work in a well-ventilated area, preferably outdoors, and use a drop cloth to protect your surroundings. Let the first coat dry completely according to the paint manufacturer’s instructions. Apply a second coat for full coverage and vibrant color. For added dinosaur-like details, use a highlight color to spray the front and underside of the crossbars, mimicking natural animal shading.

Image: The bike frame partially spray-painted in green, showing the transformation from blue to a dinosaur-themed color.
To create dinosaur stripes, use a brush and dark green paint. Hand-paint stripes along the frame for a realistic dinosaur skin effect. Let all paint layers dry thoroughly. Finally, apply a glossy finish coat/sealer over the entire painted frame. This protects your paint work from chipping and adds a brilliant shine, making your dinosaur bike even more appealing.

Image: Close-up of the bike frame with hand-painted dark green dinosaur stripes over the light green base coat.

Image: The bike frame after applying a glossy finish coat, enhancing the green paint and dinosaur stripe details.
2. Crafting the Dinosaur Head: Bringing the Dino to Life
While the bike frame is drying, let’s work on the dinosaur head. The goal is to create a lightweight, soft, and weather-resistant head that’s safe for kids. Craft foam is ideal for this. Start by creating a template. Use a grocery bag or paper, fold it in half, and sketch half of a dinosaur head shape that fits the curve of the bike handlebars. Cut out the half-shape and unfold it to get a symmetrical dinosaur head template. Adjust the shape until you are satisfied.

Image: Creating a dinosaur head template using a folded grocery bag to achieve a symmetrical shape.
Trace the template onto the craft foam and carefully cut out the dinosaur head shape using scissors or a craft knife. To prepare the foam for painting and make it weather-resistant, seal it with outdoor Mod Podge or a foam sealer. Apply an even coat and let it dry completely. Sealing prevents the foam from absorbing paint and creating a blotchy finish.

Image: Sealing the cut-out craft foam dinosaur head with Mod Podge to prepare it for painting and weather resistance.
Once the sealant is dry, paint the dinosaur’s features using acrylic craft paints. Get creative with eyes, nostrils, and mouth details. After the acrylic paint dries, seal the foam head again with a waterproof spray sealer for maximum protection against weather and wear. This ensures the dinosaur head remains vibrant and intact through all your nephew’s adventures.

Image: Painting dinosaur features on the sealed craft foam head with acrylic paints, bringing the character to life.
3. Assembly and Finishing Touches: Completing Your Dinosaur Bike
With all components ready, it’s time for assembly! Reassemble the bike parts you removed for painting. Once the bike is back together, it’s time to attach the dinosaur head. Apply waterproof glue suitable for both metal and foam to the back of the foam dinosaur head. Carefully position and firmly press the head onto the handlebars, ensuring it’s securely attached. Let the glue dry completely according to the adhesive instructions.

Image: Attaching the completed and painted foam dinosaur head to the handlebars of the newly painted bike.
Congratulations! Your DIY dinosaur bike is now complete. Stand back and admire your handiwork. This unique dinosaur bike is ready to bring roaring fun and adventurous rides to your little nephew, or any dinosaur-loving child in your life.

Image: A happy child riding the completed dinosaur bike, showcasing the fun and engaging design.
This dinosaur bike makeover is not only a fun craft project but also a thoughtful and personalized gift. It’s a fantastic way to recycle an old bike and turn it into something extraordinary. Get ready to hear roars of excitement and see miles of smiles with this amazing dinosaur bike!