

Navigating the evolving landscape of indoor cycling, the Oreka O2 cycling treadmill trainer emerges as a distinctive product. Often referred to as a Bike Treadmill, this innovative device blurs the lines between a traditional bike trainer and a treadmill, offering a unique indoor cycling experience. While the company officially markets it as a ‘bike trainer’, its functionality and appearance strongly resemble a treadmill specifically designed for bikes. Unlike a regular treadmill, the Oreka O2 isn’t for running; it’s purely for cycling. Throughout this review, we’ll explore various facets of this intriguing machine, often referencing it as a bike treadmill for clarity.
Priced at 3,699EUR, the Oreka O2 positions itself as a premium option in the indoor cycling market, significantly more affordable than alternatives like the Tacx Magnum bike treadmill, which exceeds 10,000EUR. Currently available in Europe, its size likely dictates its regional availability.
For those who prefer visual content, a video review is available, offering a dynamic perspective on the Oreka O2 bike treadmill.
This review is based on a media loaner unit provided by Oreka, used extensively since the past fall. Consistent with ethical review practices, this is not a sponsored review, ensuring an unbiased evaluation. Let’s delve into what comes with this substantial piece of equipment.
Unboxing and Setting Up Your Bike Treadmill
Forget compact packaging; the Oreka O2 bike treadmill arrives on a robust double pallet, signaling its substantial size and weight. This isn’t your average home trainer that fits in a small box.
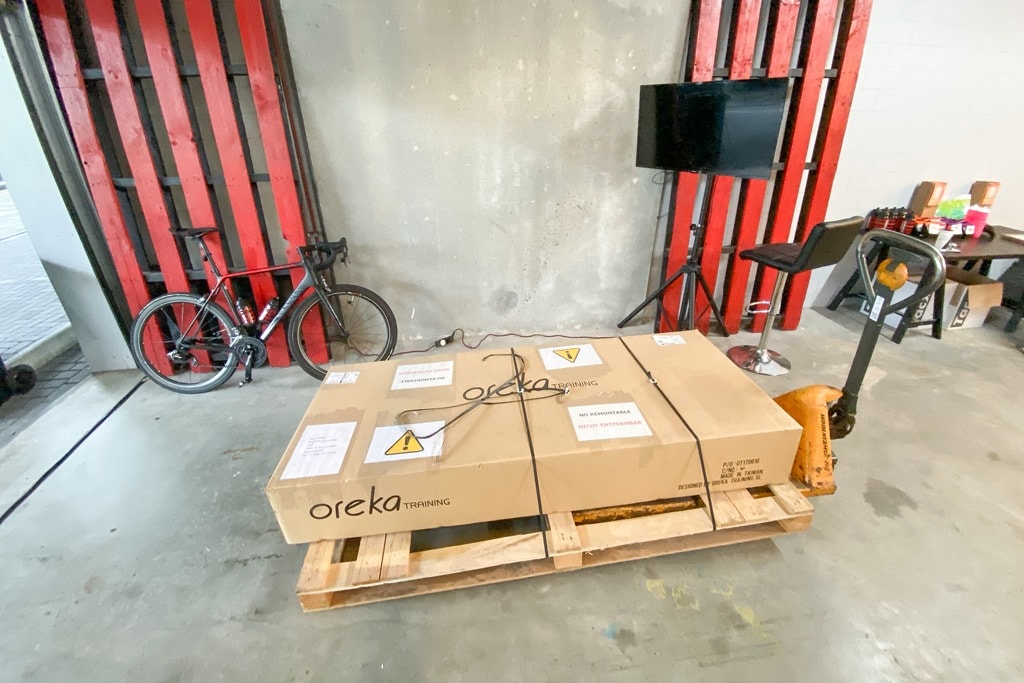 Oreka O2 bike treadmill on a double pallet
Unboxing and moving the Oreka O2 requires planning and potentially some assistance. Assembling the bike treadmill, however, is surprisingly straightforward. The package contains:
- The treadmill base itself
- The safety handlebar with integrated emergency stop
- Electrical cords
- Bike skewer components
- A bike attachment rope and bracket
Despite its size, the assembly process is designed to be user-friendly, taking just a short amount of time.
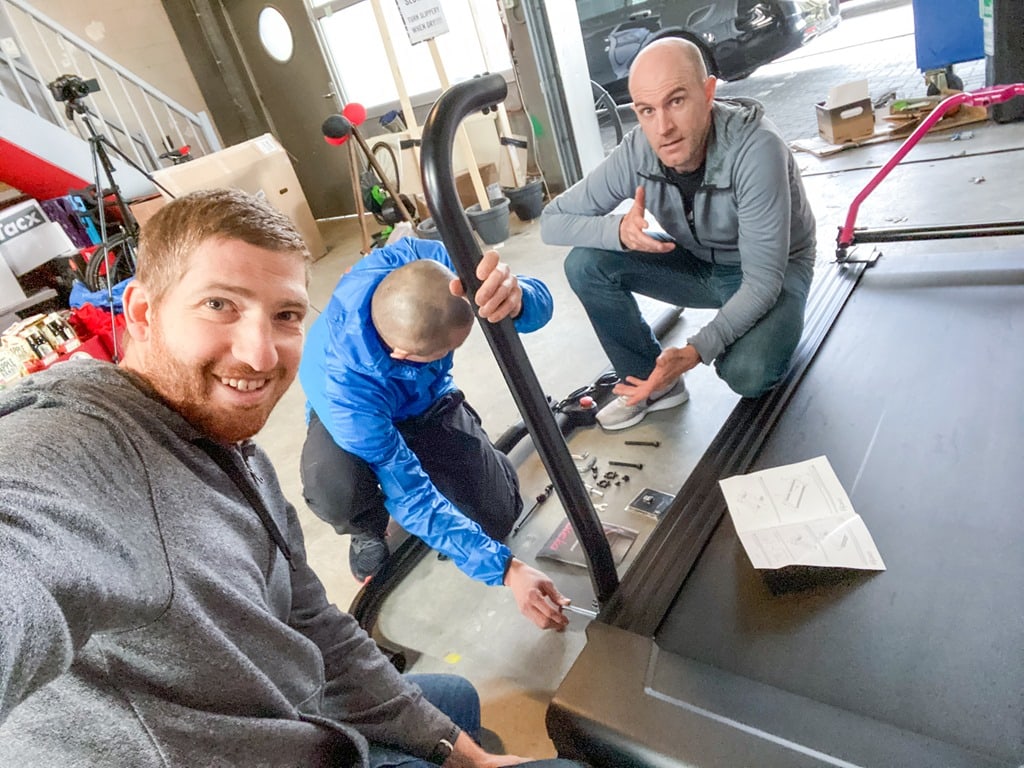 Assisted setup of the Oreka O2 bike treadmill
The primary steps for setting up your bike treadmill are:
- Connecting the electrical cables.
- Assembling and attaching the handlebar and emergency stop button.
- Securing your bike to the treadmill.
 Humorous image of pallet mover after Oreka O2 setup
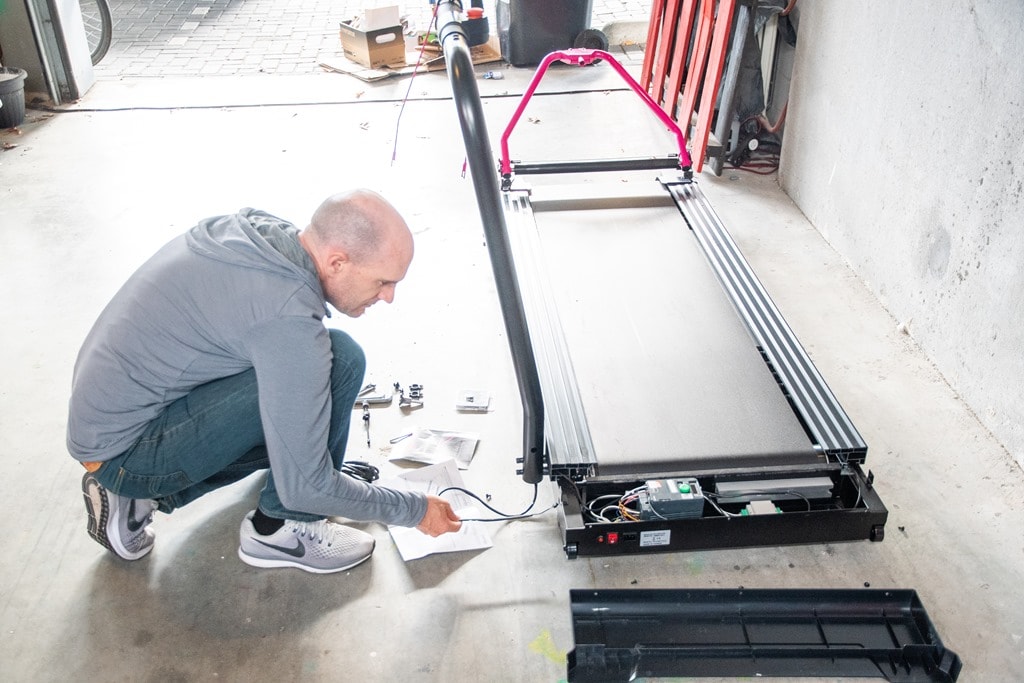
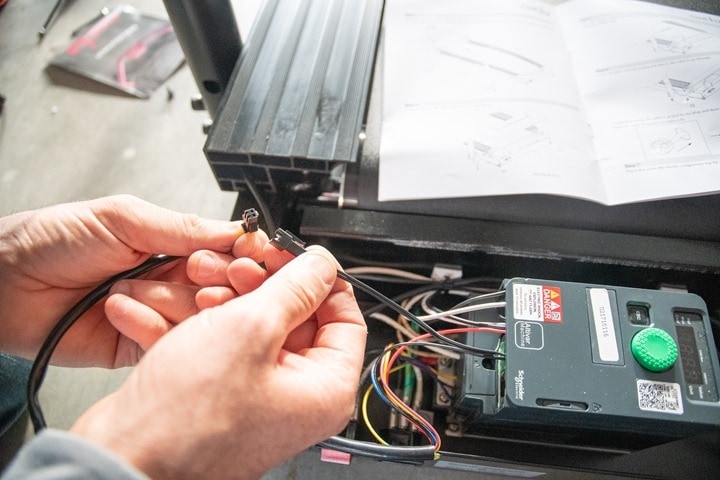
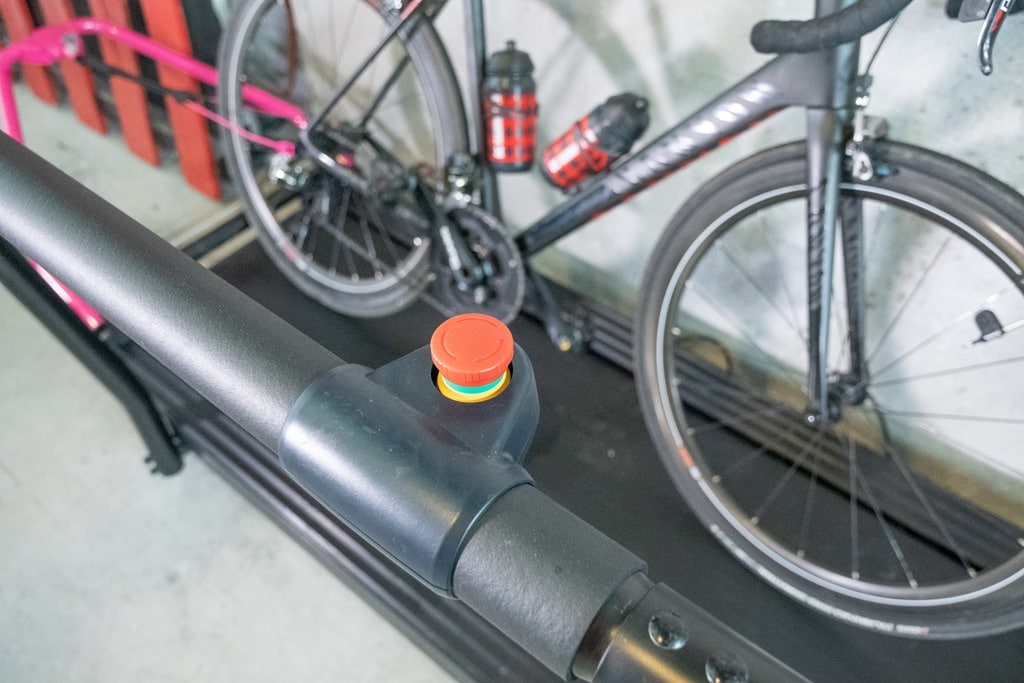
The handlebar assembly involves connecting three pieces and integrating the emergency stop button, ensuring the wire is correctly routed to the base of the Oreka.
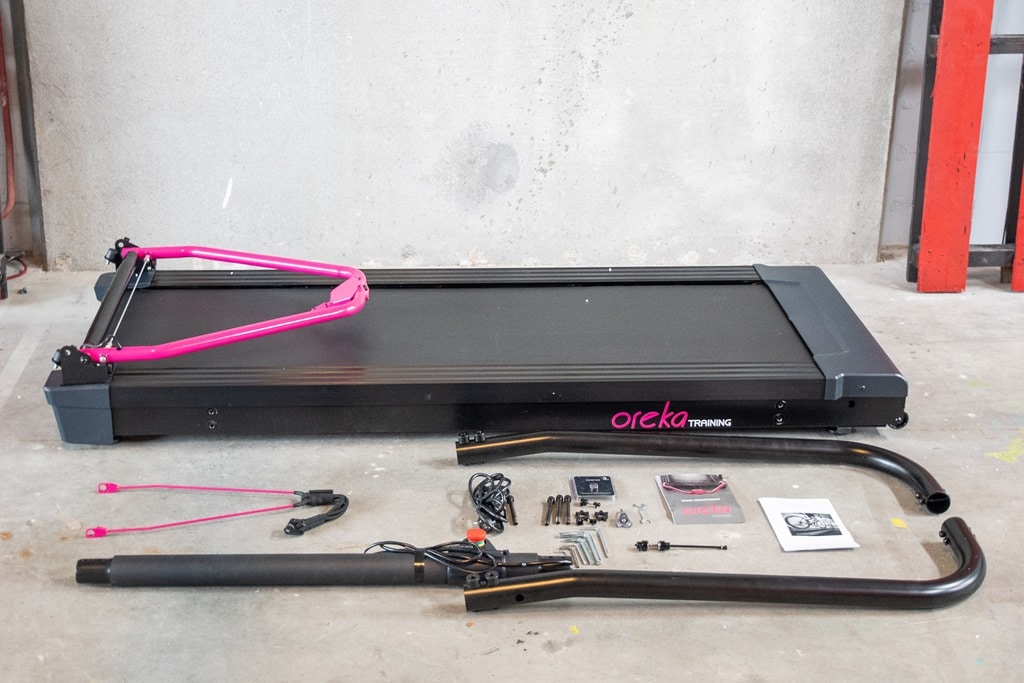 Parts of the Oreka O2 bike treadmill after unboxing
Connecting the emergency stop requires opening the front frame, attaching the connector, and reclosing the frame.
 Assembling the handlebar of the Oreka O2 bike treadmill
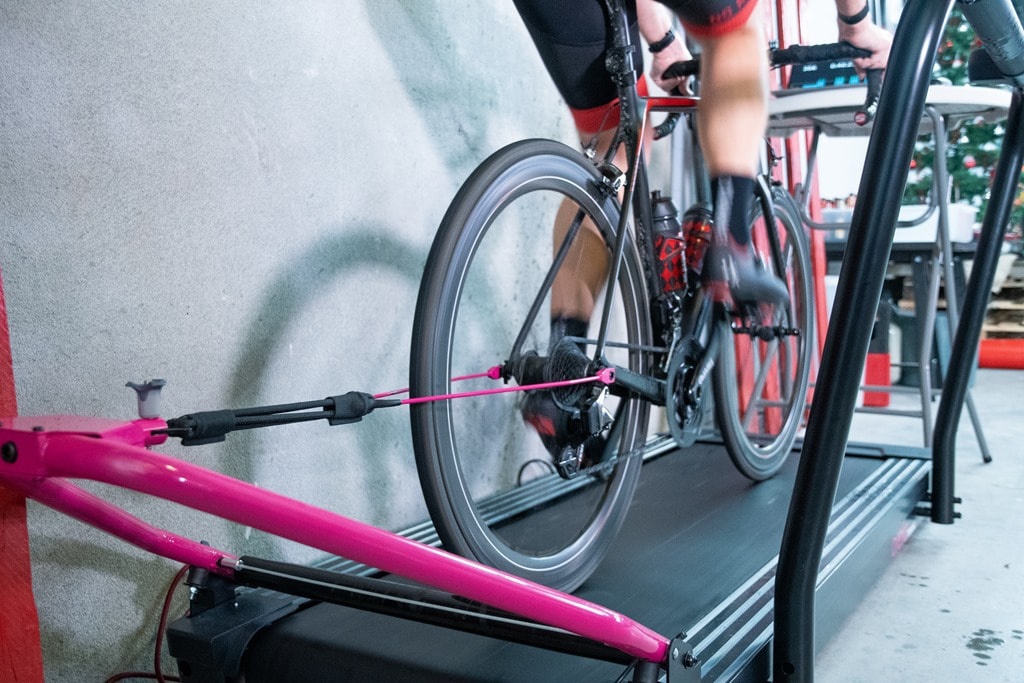
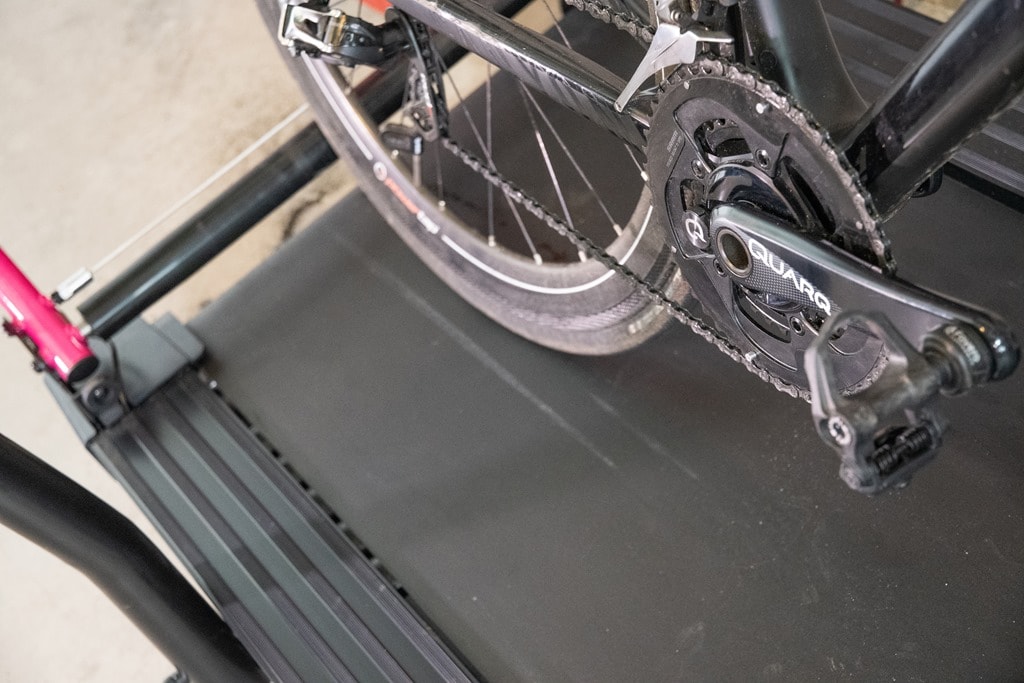
Attaching your bike involves swapping your bike’s standard quick release skewer with the provided skewer, which includes unique metal ends to secure the bike to the bike treadmill bracket.
 Attaching emergency stop button inside Oreka O2 frame
This skewer, while requiring a hex wrench, securely attaches your bike to the Oreka O2.
 Internal components visible during Oreka O2 setup
The bike is positioned vertically and then rotated down to lock onto the bracket, preventing forward movement off the bike treadmill.
 Special skewer for bike attachment to Oreka O2
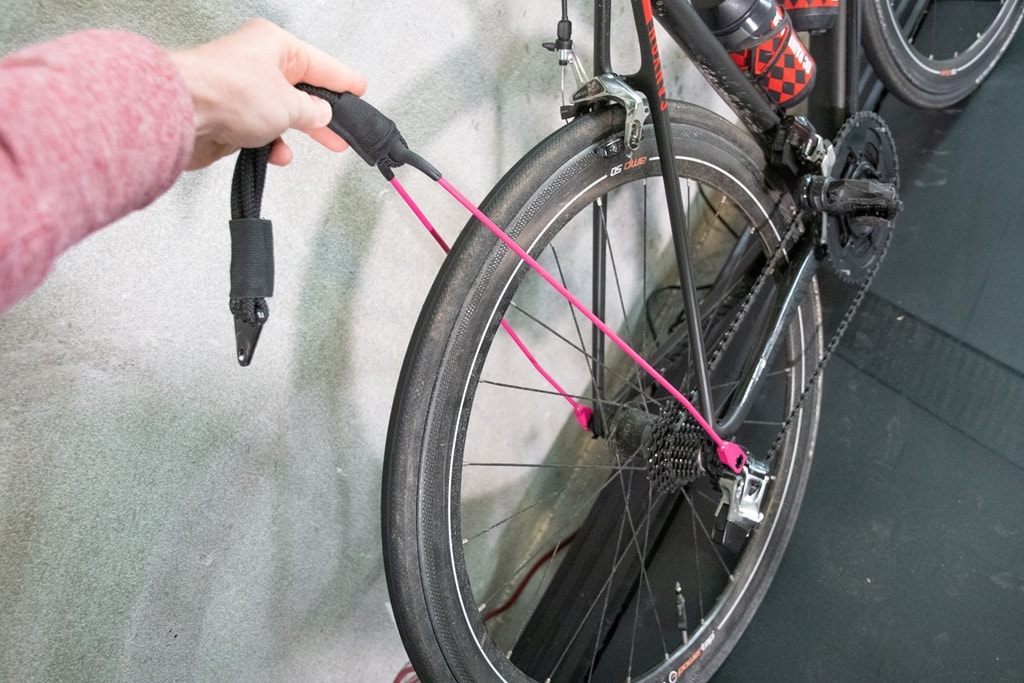
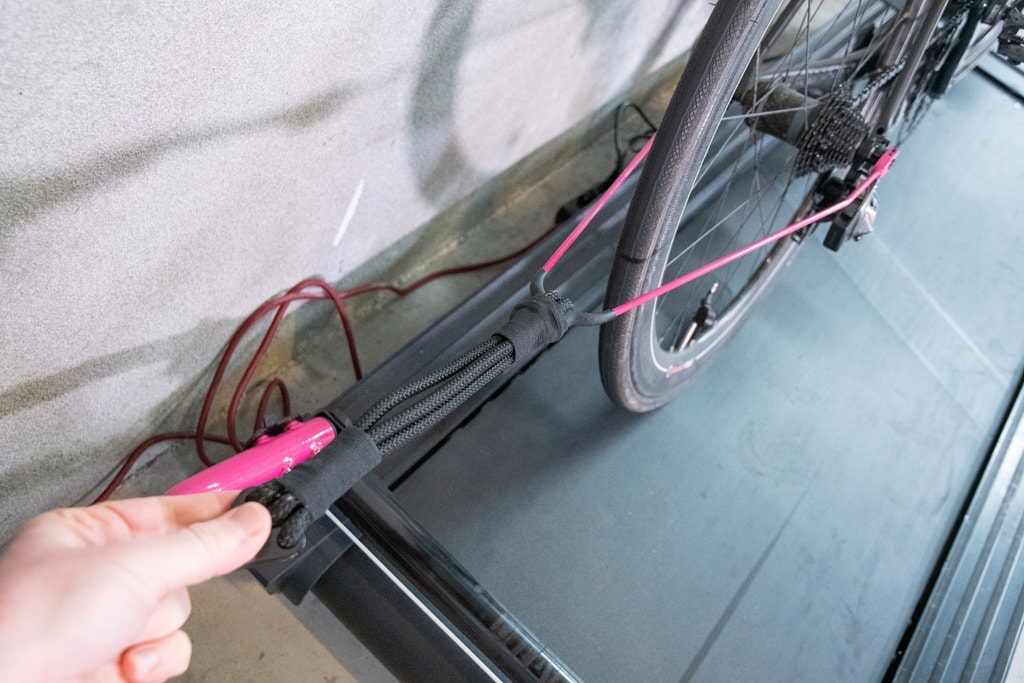
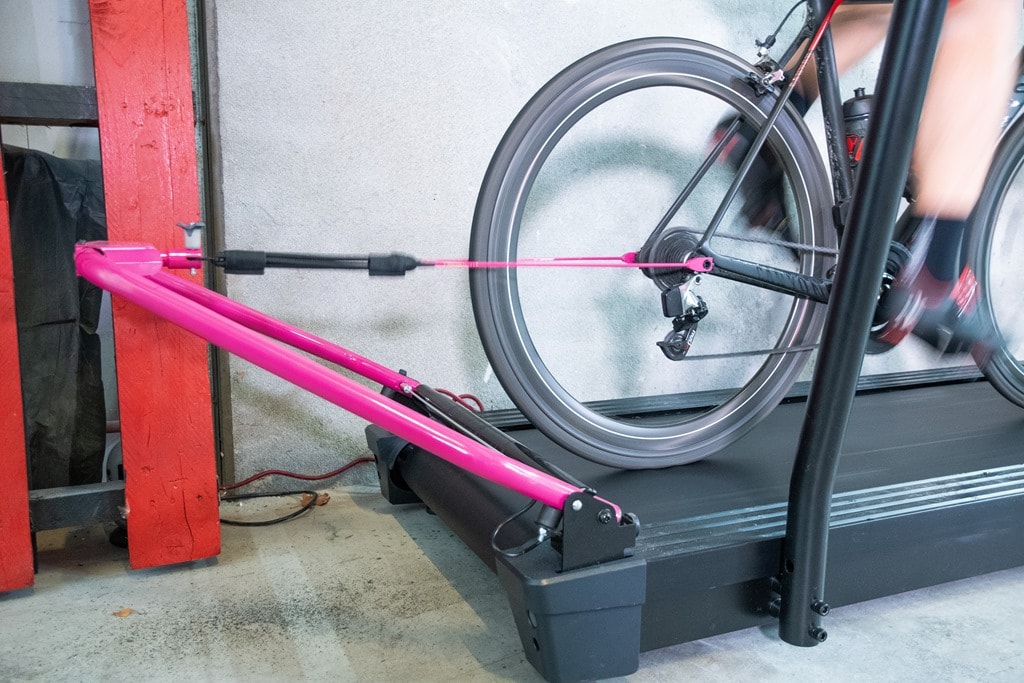
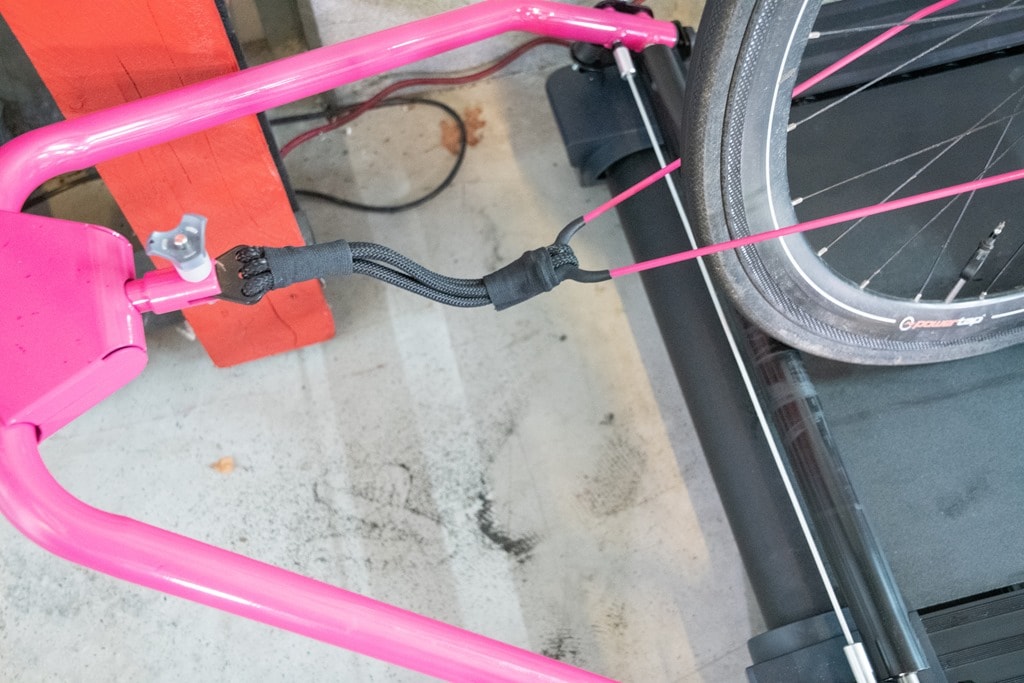
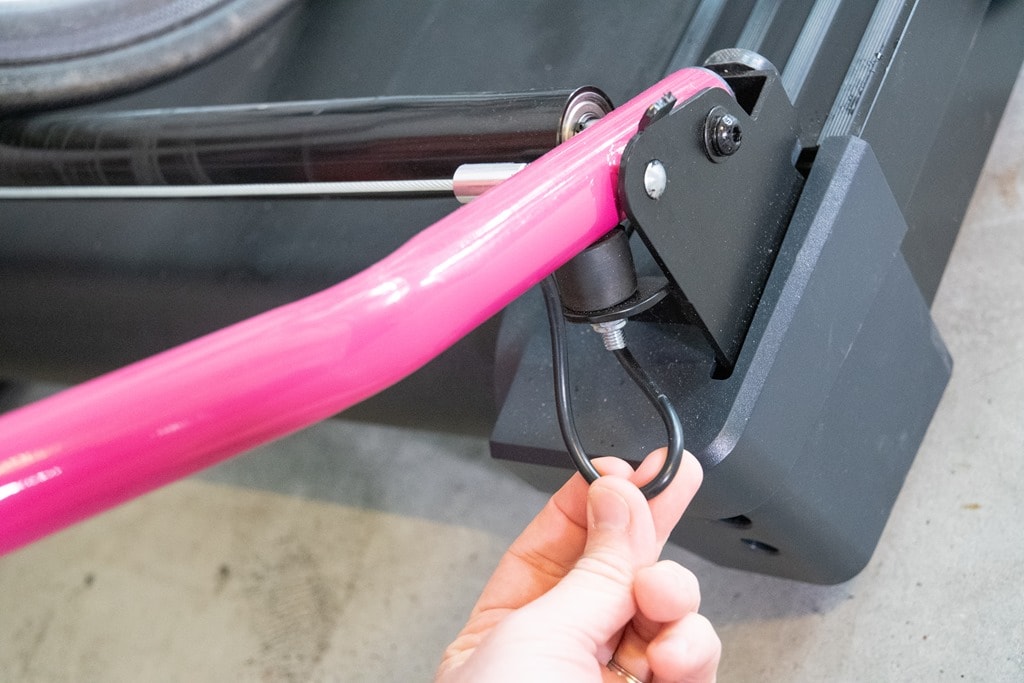
The pink rope system at the rear uses a double-lock mechanism to further secure the bike, ensuring stability during your indoor cycling sessions on the bike treadmill.
 Bike attachment mechanism – vertical position
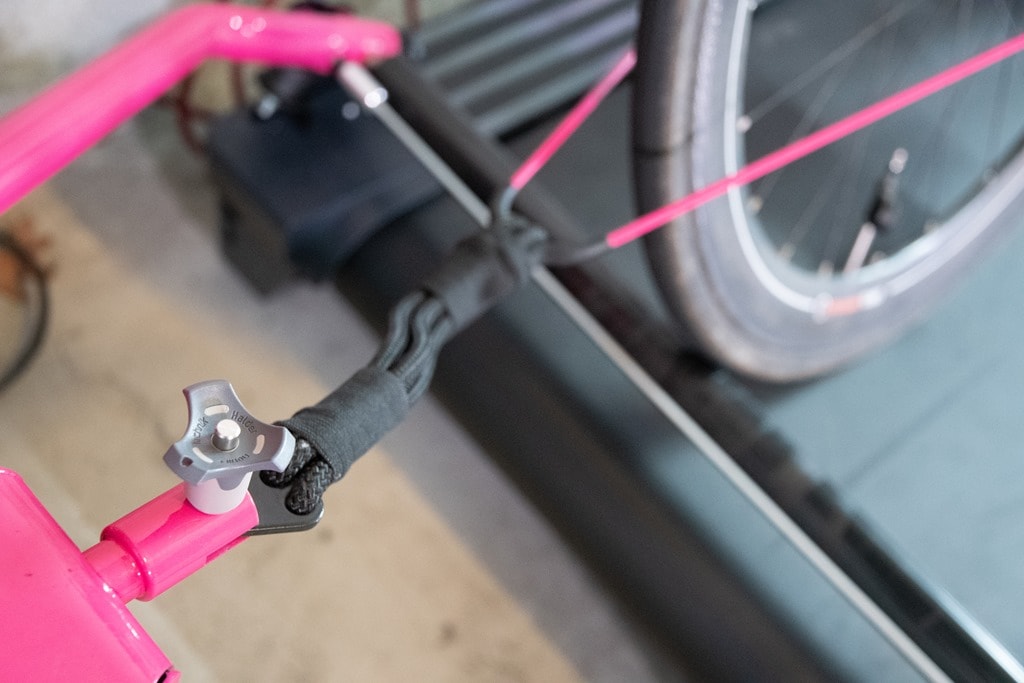
 Bike attachment mechanism – locked horizontal position
Once assembled and plugged in, the Oreka O2 bike treadmill is ready for your first ride.
 Pink rope bike securing system on Oreka O2
 Close-up of the double-lock mechanism of the pink rope system
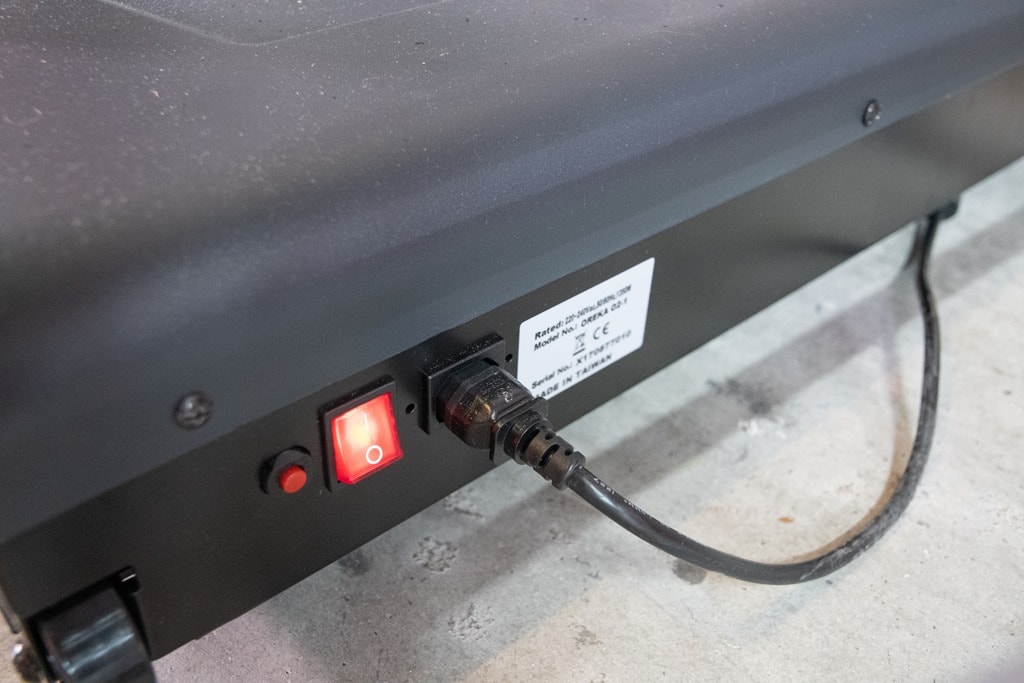 Power button on the Oreka O2 bike treadmill
Riding Experience on the Bike Treadmill
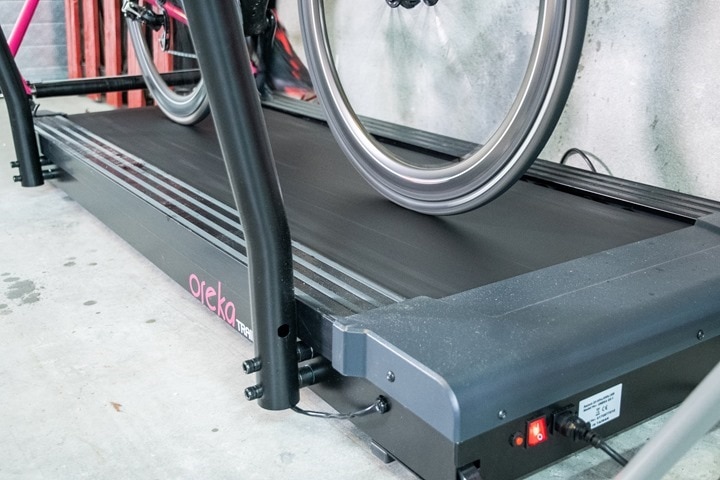
The Oreka O2 bike treadmill offers a unique riding sensation. Unlike traditional treadmills, it’s designed specifically for bikes. The belt movement is initiated by the bike’s wheels turning rollers beneath the belt, creating forward motion.
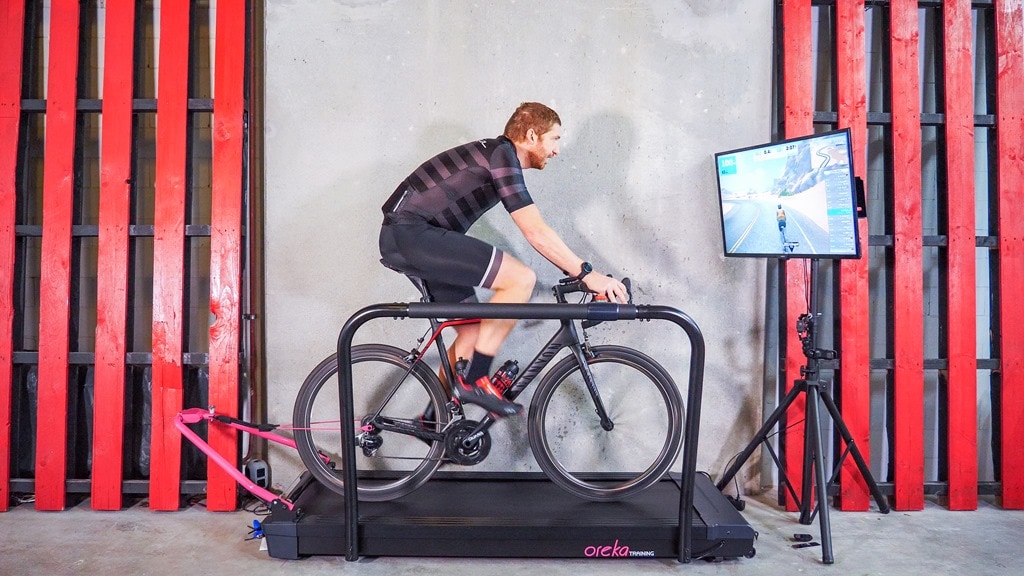 Rider on the Oreka O2 bike treadmill
The platform features rollers under the belt where your bike’s wheels rest, facilitating movement. The rest of the surface is solid, unsuitable for running.
 Rollers under the belt – rear wheel position
 Rollers under the belt – front wheel position
The rear pink rope is crucial for safety, preventing the bike from moving forward off the bike treadmill. It allows for side-to-side sway, similar to riding rollers, enhancing rider comfort and mimicking outdoor cycling dynamics.
 Rear view of bike secured to Oreka O2 with pink rope
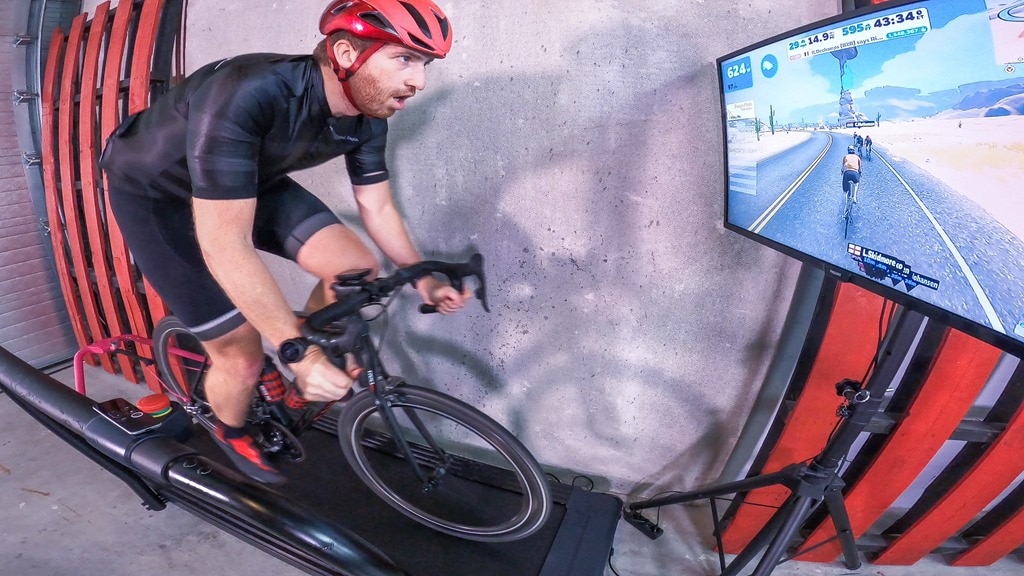
Compared to rollers, the Oreka O2 bike treadmill provides increased stability due to the handlebar and the rear rope system, making it more accessible for riders new to rollers. However, falls are still possible, and caution is advised. Wearing a helmet, especially in environments with hard surfaces, is recommended for safety.
 Rider preparing for a session on the Oreka O2 bike treadmill
Once you start pedaling and connect to a cycling app like Zwift, the resistance adjusts, simulating real-road conditions. The bike treadmill aims to replicate the feel of outdoor riding more closely than traditional static trainers.
 Side view during a ride on the Oreka O2 bike treadmill
In terms of ‘road-like feel’, the Oreka O2 excels in mimicking the subtle movements of riding on asphalt due to the belt and roller system. It provides a closer sensation to outdoor riding compared to static indoor trainers. However, in terms of acceleration and deceleration, the bike treadmill has limitations. The elasticity in the rope system and the belt speed control can lead to a less responsive feel during sprints and sudden stops.
 Close-up of tire on the belt of the Oreka O2 bike treadmill
During sprints, the ‘leash’ effect from the rope can be noticeable. When you stop sprinting, the rebound from the rope can be abrupt as the belt’s momentum and your bike’s deceleration are not perfectly synchronized.
 Rope tension during sprinting on Oreka O2 – pulling forward
 Rope recoil after sprint on Oreka O2 – snapping back
Watch a short video demonstrating the sprint leash effect
A notable safety concern is the bike treadmill‘s behavior when stopping. Unlike the Tacx Magnum, the Oreka O2 lacks optical sensors to detect if a rider has fallen off. If you dismount without completely stopping the belt, it can re-accelerate unexpectedly, potentially causing a hazardous situation as the bike is tethered to the moving belt.
 Tacx Magnum bike treadmill with side sensors
While the Oreka O2 has an emergency stop button, the risk remains if a crash occurs where the rider is unable to reach it. The belt’s continued motion in such a scenario is a safety aspect that warrants consideration. It’s crucial to understand that the belt will re-accelerate if not brought to a complete stop. A potential improvement could involve integrating a cadence sensor to automatically stop the belt if pedaling ceases for a short period.
 Emergency stop button on the Oreka O2 handlebar
Despite these points, understanding the safety nuances allows for safer usage. Let’s now explore app compatibility with this bike treadmill.
 Wire running into the rear frame of Oreka O2 – potentially for sensor
App and Software Compatibility of the Bike Treadmill
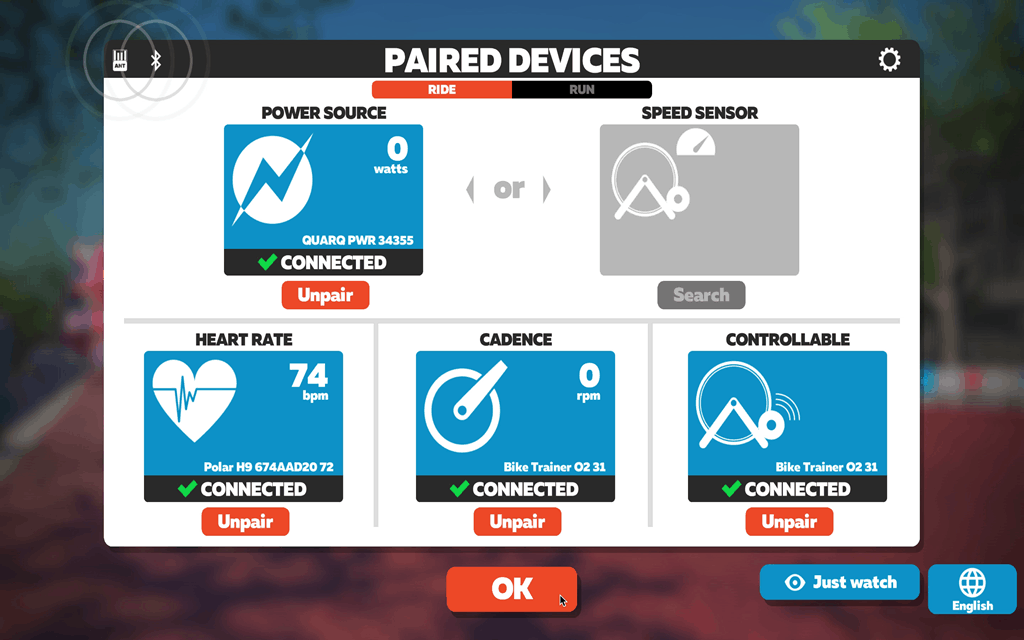
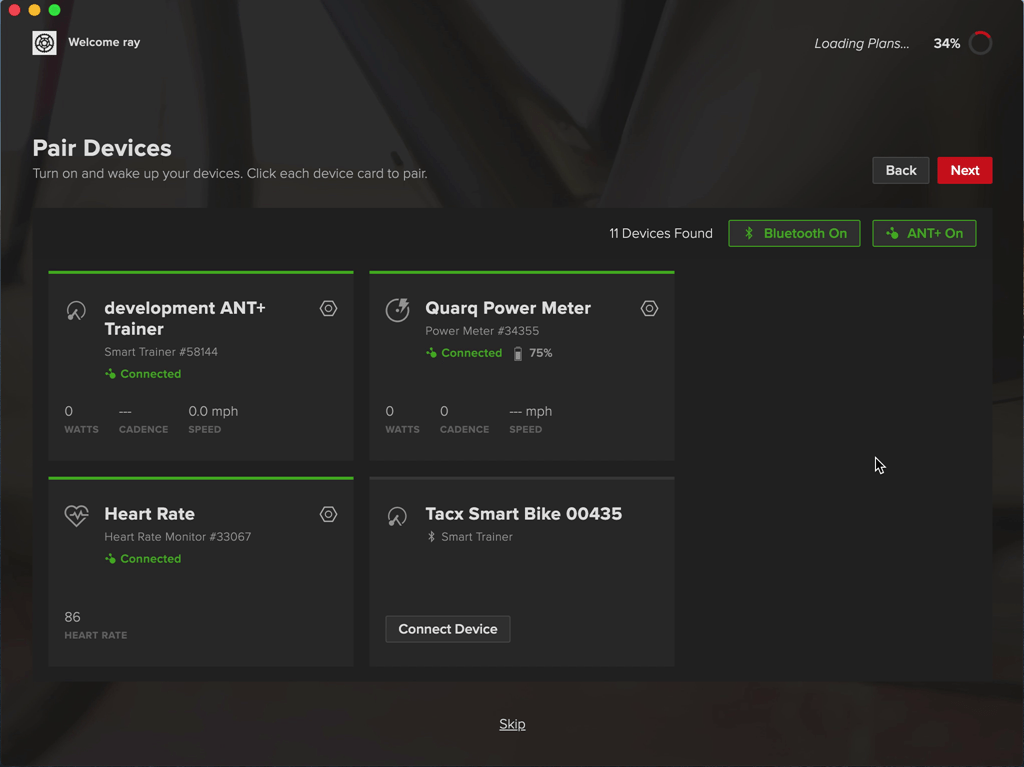
The Oreka O2 bike treadmill is designed to be compatible with a wide range of cycling apps, adhering to industry standards for smart trainers. It supports ANT+ FE-C, ANT+ Power Meter Profile, Bluetooth Smart Power Meter Profile, and Bluetooth Smart FTMS, ensuring broad connectivity.
 Display screen during app connection setup on Oreka O2
These protocols facilitate control and data transmission with popular apps like Zwift, TrainerRoad, Sufferfest, Rouvy, and Kinomap. However, practical testing revealed some inconsistencies, particularly with Bluetooth Smart connectivity.
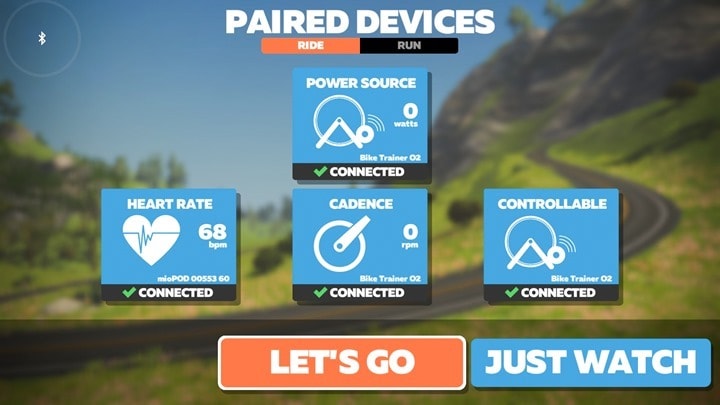
Initially, Bluetooth Smart pairing with Zwift on Apple TV had issues with gradient simulation. While power data was transmitted, the resistance did not adjust with changes in Zwift’s virtual terrain.
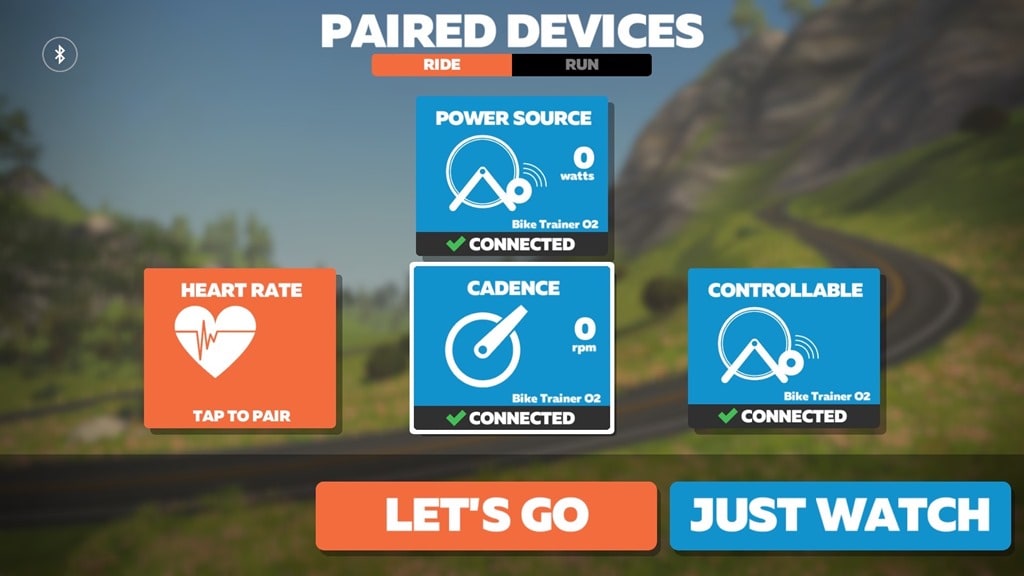 Zwift pairing screen showing Oreka O2 bike treadmill
Switching to ANT+ connection on a laptop resolved the control issues with Zwift. However, resistance changes were only noticeable for gradients of 4% or greater. Slopes below 4% were not simulated with resistance changes, impacting the realism of virtual rides, especially in undulating terrains.
 Zwift interface connected to Oreka O2 via ANT+
This limitation means that shallow inclines in virtual environments will feel flat on the bike treadmill, with a sudden jump in resistance at 4% incline.
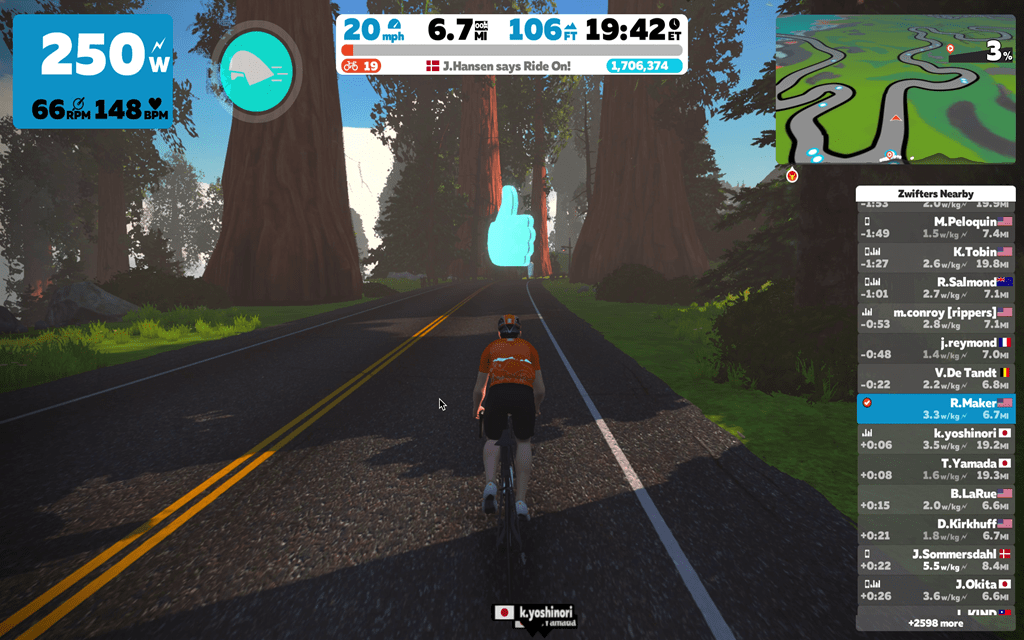 Zwift in-ride display showing gradient on Oreka O2
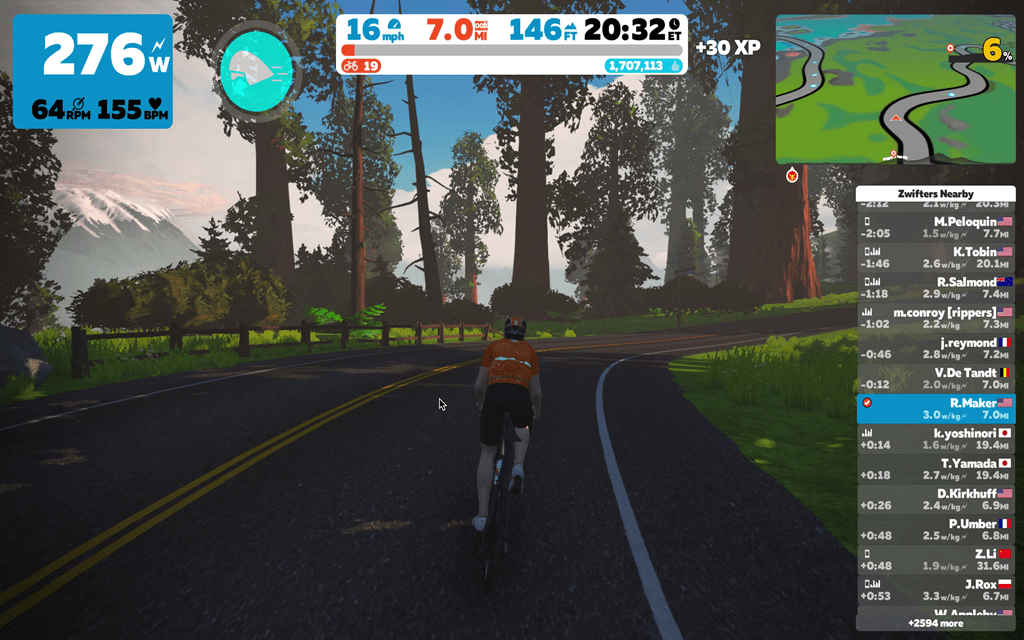 Zwift in-ride display showing power and other metrics
The Oreka O2 bike treadmill does not offer a calibration function, which is relevant when considering power accuracy.
Similarly, Bluetooth Smart control issues were encountered with TrainerRoad. ANT+ connection was recommended and used for successful control.
 TrainerRoad pairing screen showing Oreka O2 bike treadmill
When using TrainerRoad in ERG mode, it’s advised to use a smaller chainring to optimize performance, a tip generally applicable to smart trainers but particularly relevant to the Oreka O2.
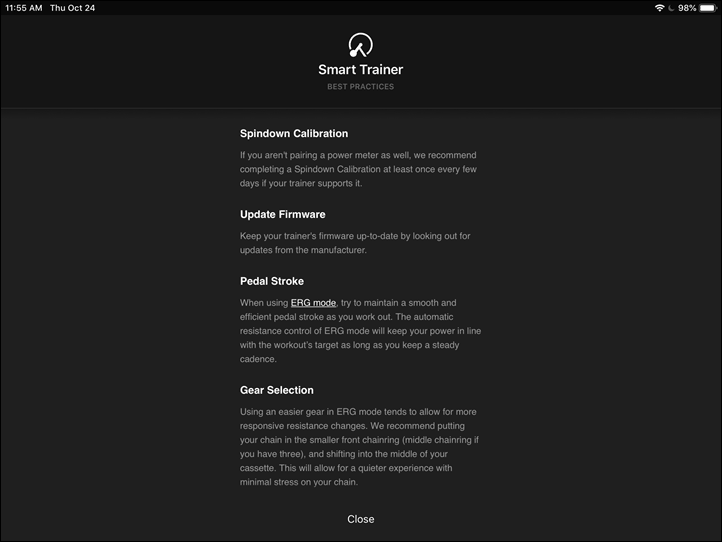 TrainerRoad tips for using smart trainers in ERG mode
With ANT+ and proper gearing, TrainerRoad effectively controls the Oreka O2 bike treadmill in ERG mode for structured workouts.
 TrainerRoad workout interface controlling Oreka O2 in ERG mode
Currently, Oreka does not offer a dedicated app for configuration or adjustments beyond standard protocol compatibility.
Power Accuracy Assessment of the Bike Treadmill
Power accuracy is a critical aspect of any smart trainer, and unfortunately, the Oreka O2 bike treadmill demonstrates significant limitations in this area. Initial tests revealed substantial discrepancies in power readings, with the Oreka O2 underreporting power by hundreds of watts compared to calibrated power meters.
 Close-up of sensor and components on Oreka O2
The Oreka O2 relies on power estimation, which, in its current implementation, is not sufficiently accurate. Oreka acknowledges that accuracy is particularly challenged at lower resistance levels, simulating flat roads (below 3% incline) and higher speeds.
Due to these accuracy issues, Oreka recommends using an external power meter in conjunction with the bike treadmill. This approach is also suggested by InsideRide for their e-motion rollers, which face similar power accuracy challenges.
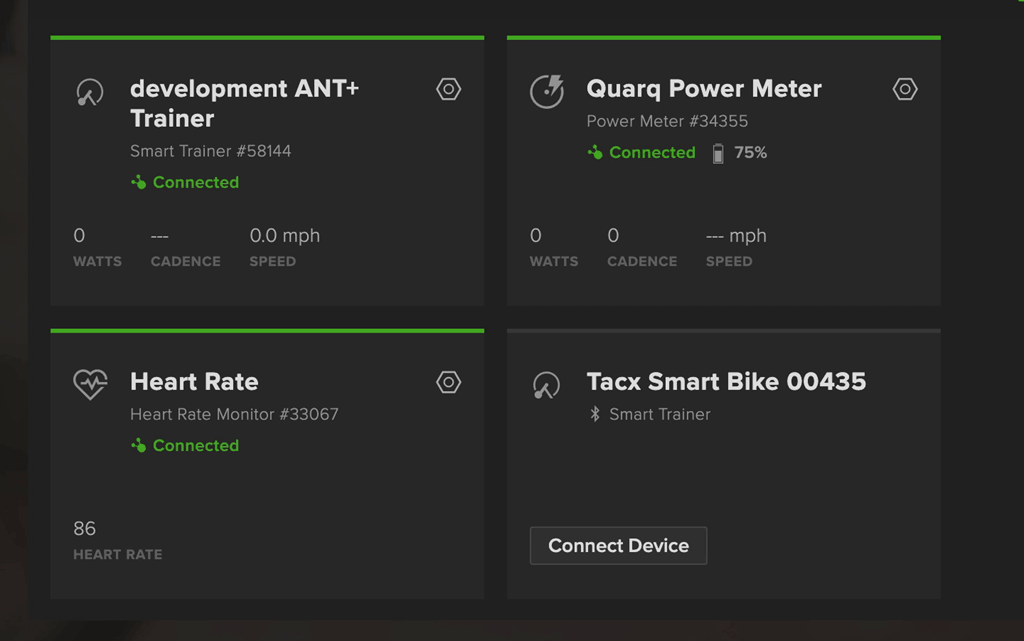
To utilize an external power meter with Zwift, pair the Oreka O2 as a controllable trainer but then separately pair your power meter for power readings.
 Zwift pairing screen showing power meter pairing with Oreka O2
It’s also advisable to disconnect the Oreka’s cadence signal and rely on the cadence from your power meter for more accurate data.
With an external power meter, the system’s responsiveness in Zwift improves, though the lack of resistance below 4% incline remains a limitation. While not replicating the feel of a high-end smart bike, it becomes functionally acceptable for general use.
For ERG mode workouts in TrainerRoad, similar setup adjustments are needed. Pairing the Oreka O2 as a controllable trainer via ANT+ FE-C and using an external power meter for power data is crucial.
 TrainerRoad pairing screen for power meter with Oreka O2
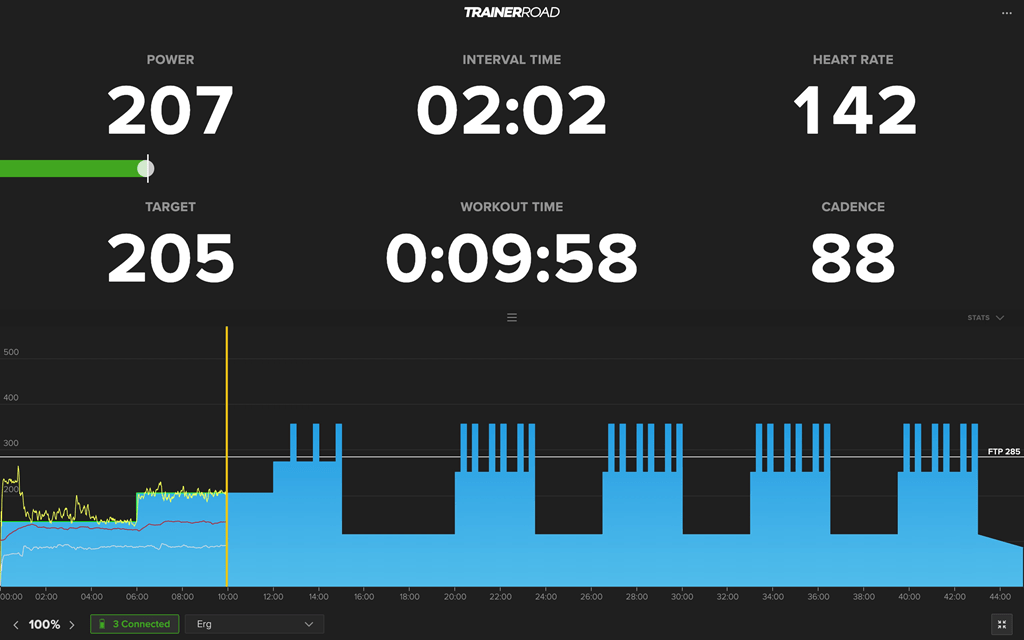
Initial ERG mode tests revealed extreme power overestimation when using a larger chainring due to the bike treadmill‘s high belt speed at lower wattages. Shifting to a smaller chainring and easier gear is essential to achieve accurate ERG mode control, especially at lower power targets. This highlights a high “wattage floor” for the Oreka O2, requiring higher resistance even at low target powers.
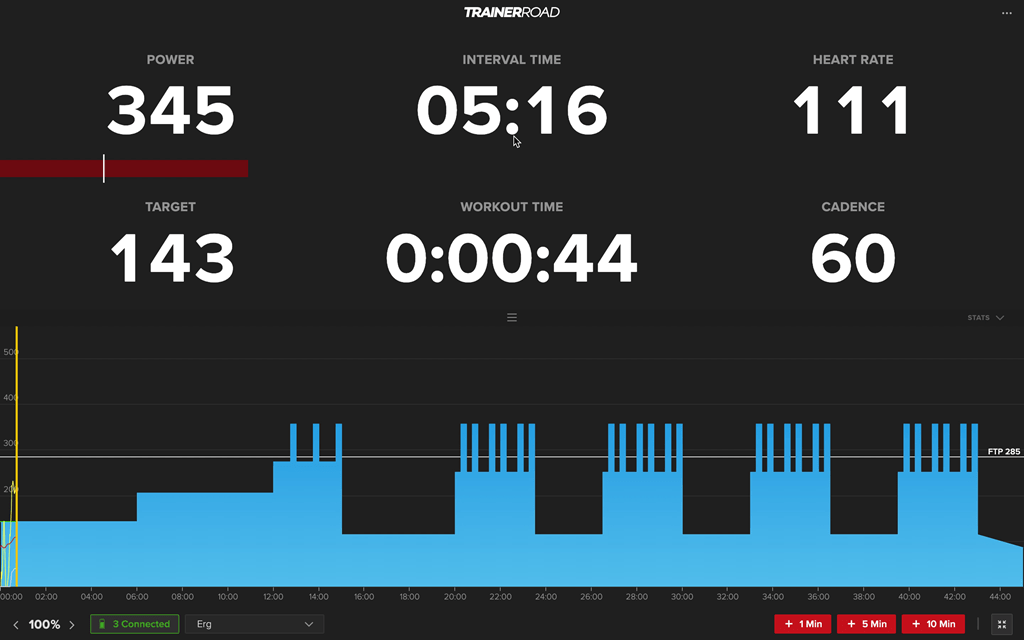 TrainerRoad workout showing power overestimation issue
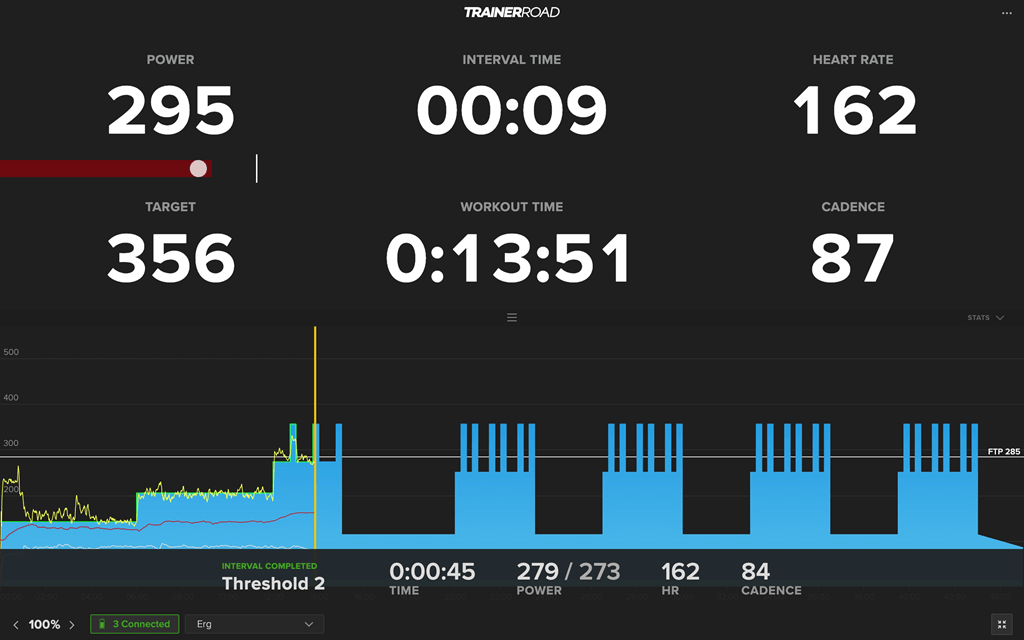
Even with correct gearing and power matching, power stabilization in ERG mode can take 5-15 seconds, which is less than ideal for short interval workouts. This lag and the general inconsistency make the power matching experience less than perfect.
 TrainerRoad workout showing delayed power stabilization
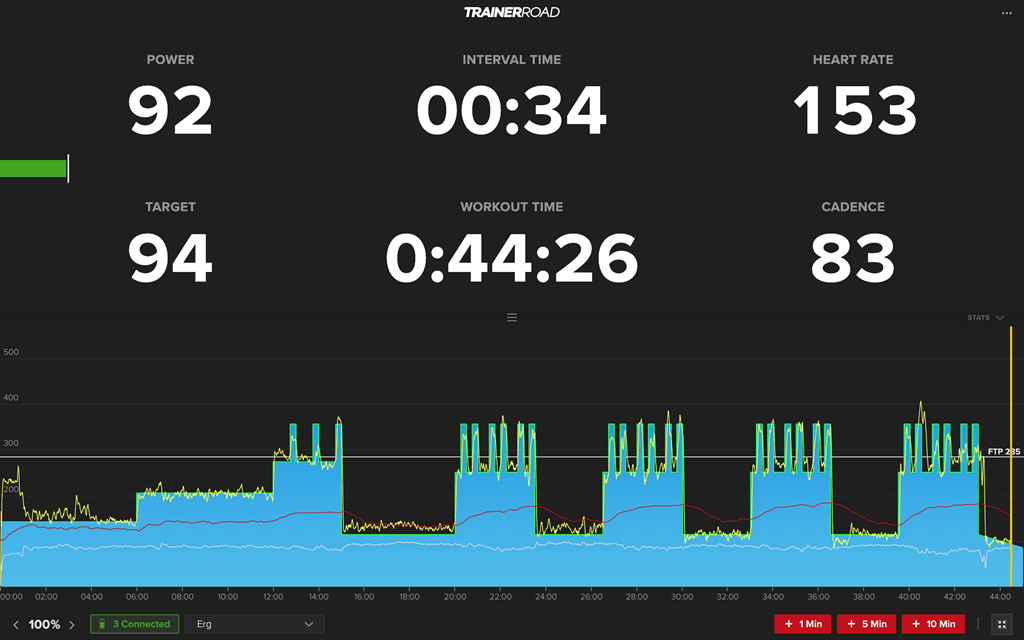
For longer intervals, the power matching is more manageable, but for shorter, high-intensity intervals, the responsiveness is insufficient for precise training. The fundamental issue remains the lack of inherent power accuracy in the Oreka O2 bike treadmill itself, which is a significant drawback for a device in this price range.
 TrainerRoad workout showing power fluctuations during intervals
 TrainerRoad workout showing further power inconsistencies
Final Verdict on the Bike Treadmill
 Oreka O2 bike treadmill in a home setting
The Oreka O2 bike treadmill is an innovative attempt to merge the benefits of rollers with the interactive features of smart trainers. It successfully delivers a riding experience that more closely resembles outdoor cycling compared to traditional static trainers, particularly in terms of bike movement and saddle comfort for longer sessions. This positions it as a treadmill for your bike, offering a unique approach to indoor training.
However, despite its innovative design and road-like feel, it’s challenging to recommend the Oreka O2 at its current price point due to critical limitations. The primary concerns are the lack of power accuracy without relying on an external power meter, the limited resistance simulation below 4% inclines, and potential safety considerations regarding belt behavior during dismounts or crashes.
While the concept of a bike treadmill is compelling, further refinements are needed, especially in power accuracy, gradient simulation, and safety features, to fully justify its premium price. Future iterations from Oreka with improvements in these areas could make it a more attractive option for serious indoor cyclists seeking a more realistic and engaging training experience.
Support this Site
If you found this review helpful, consider supporting the site to help continue in-depth reviews and content creation.
Support DC Rainmaker
Shop on Amazon using this link