
Cycling offers freedom and fitness, but sharing the road requires clear communication. Just like drivers use turn signals, cyclists rely on Bike Hand Signals to indicate their intentions, ensuring safety and preventing accidents. Whether you’re a daily commuter, weekend adventurer, or part of a cycling group, mastering these signals is crucial for a confident and secure ride.
Why Knowing Bike Hand Signals Can Save Your Ride (and More)
In 2015, over 1,000 cyclists tragically lost their lives in accidents, and nearly half a million sustained injuries. While road hazards and conditions play a role, miscommunication is a significant factor in many bike crashes.
Bike hand signals are your voice on the road. They bridge the communication gap between you and motorists, pedestrians, and fellow cyclists. By clearly signaling your actions, you:
- Reduce the risk of collisions with cars: Alert drivers to your turns, stops, or lane changes, giving them time to react and preventing unexpected maneuvers.
- Enhance safety for fellow cyclists: In group rides or busy cycling areas, signals warn others of your intended actions, preventing pile-ups and ensuring smooth navigation.
- Promote predictability and confidence: Clear signals make your movements predictable to everyone around you, fostering a safer and more harmonious cycling environment.
Think of hand signals as your essential toolkit for safe urban cycling and beyond. Let’s explore the fundamental signals every cyclist should know.
Decoding the Essential Bike Hand Signals
Before signaling, always remember to quickly glance back and make eye contact when possible. This confirms that other road users have seen your signal and are aware of your intentions. Aim to signal approximately 100 feet before you plan to turn or stop, holding the signal for about 3 seconds. This provides ample time for others to react and allows you to safely return both hands to your handlebars for maneuvering.
Signaling a Left Turn
To indicate a left turn, simply extend your left arm straight out to your side, parallel to the ground. Keep your fingers extended and your palm facing forward or down. This clear and unambiguous signal is universally recognized by drivers and cyclists alike.
Signaling a Right Turn
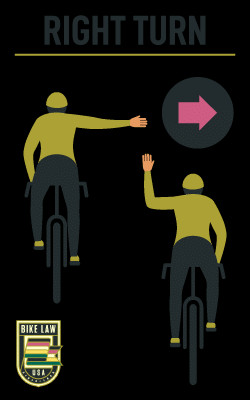 Cyclist signaling a right turn by extending right arm straight out to the side.
There are two accepted methods for signaling a right turn.
-
Right Arm Extension: The most common and intuitive method is to extend your right arm straight out to your side, mirroring the left turn signal but on the opposite side.
-
Left Arm Upward Angle: In some regions or for added visibility, you can use an alternative right turn signal. Extend your left arm out to your side and then bend your forearm upwards at a 90-degree angle, forming an “L” shape.
Both signals are valid, but the right arm extension is generally more widely understood. Choose the method you are most comfortable with and ensure it is clear and visible.
Signaling a Stop or Slowing Down
The stop signal is crucial as bikes lack brake lights. To indicate that you are stopping or slowing down, extend your left arm out to your side and then bend your forearm downwards at a 90-degree angle, with your palm facing rearwards. This signal clearly communicates your intention to decelerate or come to a complete stop.
Tips for Making Your Bike Hand Signals Effective
Beyond knowing the signals, consider these tips to enhance their effectiveness:
- Be Visible: Extend your arm fully and ensure it’s easily seen. Wear bright clothing during the day and reflective gear at night to improve overall visibility.
- Be Clear and Deliberate: Make your signals distinct and hold them for the recommended duration. Avoid hesitant or ambiguous movements.
- Practice Regularly: Practice your hand signals in a safe environment like a park or empty parking lot until they become second nature.
- Context Matters: Consider the traffic situation and adjust your signaling timing accordingly. In faster traffic, signal earlier to provide more warning time.
- Maintain Control: Always signal while maintaining control of your bike. If you need to signal and brake simultaneously, prioritize braking and use your signals when it’s safe to do so.
By incorporating these bike hand signals into your cycling routine, you actively contribute to a safer and more predictable environment for yourself and everyone you share the road with. Mastering these simple gestures empowers you to ride with confidence and responsibility.
