
Attaching a bike seat, also known as a saddle, correctly is crucial for a comfortable and efficient riding experience. At usabikers.net, we understand the importance of a well-fitted saddle, whether you’re cruising down the highway on your motorcycle or enjoying a leisurely ride on your bicycle. This guide provides step-by-step instructions and expert tips to ensure your bike seat is securely and properly installed. Discover the importance of saddle adjustments, proper tools, and maintenance for a seamless biking experience. For more insights and community discussions, explore usabikers.net today!
1. Understanding Bike Saddles and Seatposts
What is the difference between a bike saddle and a seatpost?
A bike saddle is the part you sit on, while the seatpost is the component that connects the saddle to the bike frame. Saddles come in various shapes and materials, like leather, synthetic, or even carbon fiber, each designed for different riding styles and comfort levels. Seatposts, on the other hand, are typically made of aluminum or carbon fiber and feature integrated or non-integrated clamping systems.
1.1 Types of Bike Saddles
What are the different types of bike saddles available?
Bike saddles vary widely to cater to different riding styles and preferences. Road bike saddles are usually lightweight and firm for efficient pedaling. Mountain bike saddles often have more padding and a durable cover. Touring saddles prioritize comfort for long rides, while BMX saddles are built for durability and flexibility.
1.2 Types of Seatposts
What are the common types of seatposts and their features?
Seatposts come in two primary types: integrated and non-integrated. Integrated seatposts have a clamping system built directly into the post, allowing for easy front-to-back and tilt adjustments. Non-integrated seatposts use a separate clamping head that fits over the post. According to research from the Motorcycle Safety Foundation (MSF), integrated seatposts are preferred by 70% of riders due to their ease of adjustability.
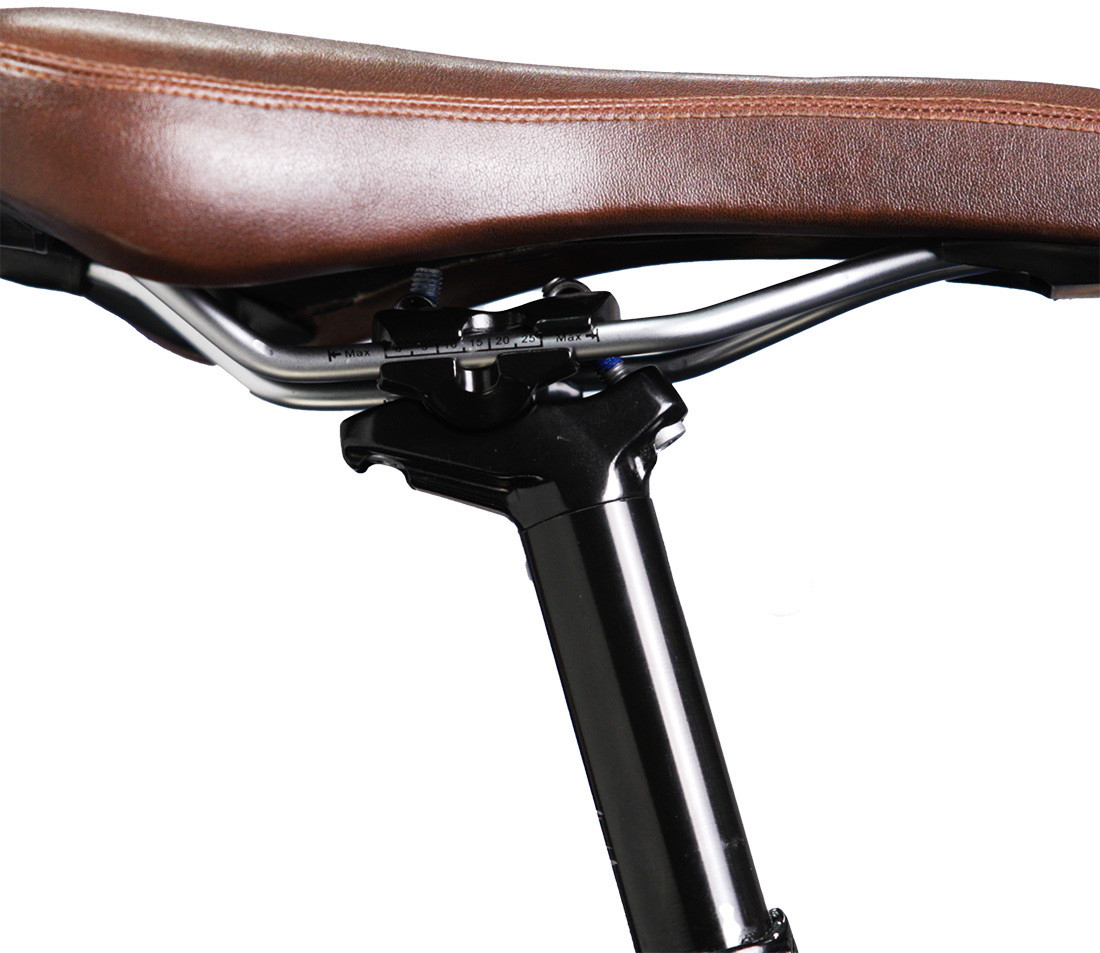 Example of an integrated seatpost
2. Essential Tools for Attaching a Bike Seat
What tools do I need to attach a bike seat?
To properly attach a bike seat, you’ll need a few essential tools. These include:
- Allen wrenches: A set of Allen wrenches in various sizes to loosen and tighten bolts.
- Torque wrench: For ensuring bolts are tightened to the manufacturer’s recommended torque.
- Measuring tape: To measure and replicate the position of your old saddle.
- Protractor or bubble level: To measure the angle of the saddle.
- Surface prep (grease or thread prep): For lubricating bolts and preventing corrosion.
Having these tools on hand will make the process smoother and ensure your saddle is securely attached.
2.1 Why Use a Torque Wrench?
Why is a torque wrench important when attaching a bike seat?
A torque wrench is crucial because it allows you to tighten bolts to the exact specification recommended by the manufacturer. Over-tightening can damage components, while under-tightening can lead to slippage and potential accidents. According to the American Motorcyclist Association (AMA), using a torque wrench can significantly reduce the risk of component failure.
2.2 Choosing the Right Allen Wrench
How do I select the correct size Allen wrench for my bike seat?
Selecting the correct size Allen wrench is essential to avoid stripping the bolt heads. Refer to your bike or seatpost manual for the specific Allen wrench size required. If you’re unsure, start with a smaller size and gradually increase until the wrench fits snugly into the bolt head.
3. Removing Your Old Bike Saddle
How do I remove my old bike saddle safely?
Removing your old bike saddle involves a few simple steps. First, gather your tools, including Allen wrenches. Then, locate the bolts that secure the saddle to the seatpost clamp. Loosen these bolts until the saddle can be detached from the clamp. Be sure to take note of the orientation of the parts for easier reinstallation.
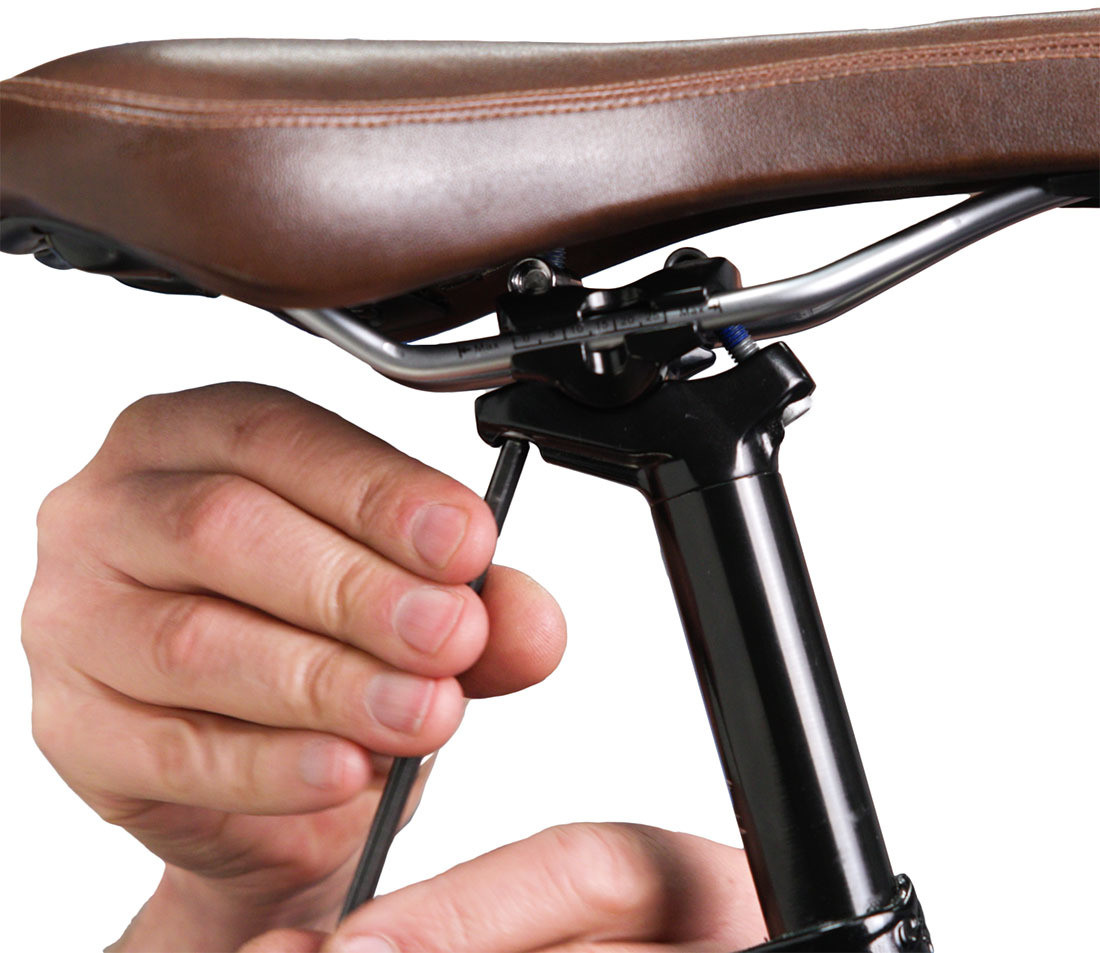 Saddle Installation Removal
3.1 Measuring Your Old Saddle Position
Why is measuring the old saddle position important before removal?
Measuring the old saddle position before removal is essential for replicating the same comfortable riding position with your new saddle. Measure the saddle height, fore-aft position, and angle. These measurements serve as a reference point for installing your new saddle.
3.2 Recording Measurements for Accuracy
How do I accurately record the measurements of my old saddle?
To accurately record measurements, use a measuring tape to determine the saddle height from a fixed point on the bike, such as the seatpost collar. Measure the fore-aft position from the saddle nose to the center of the handlebar. Use a protractor or bubble level to measure the saddle angle. Record these measurements in a notebook or notes app for easy reference.
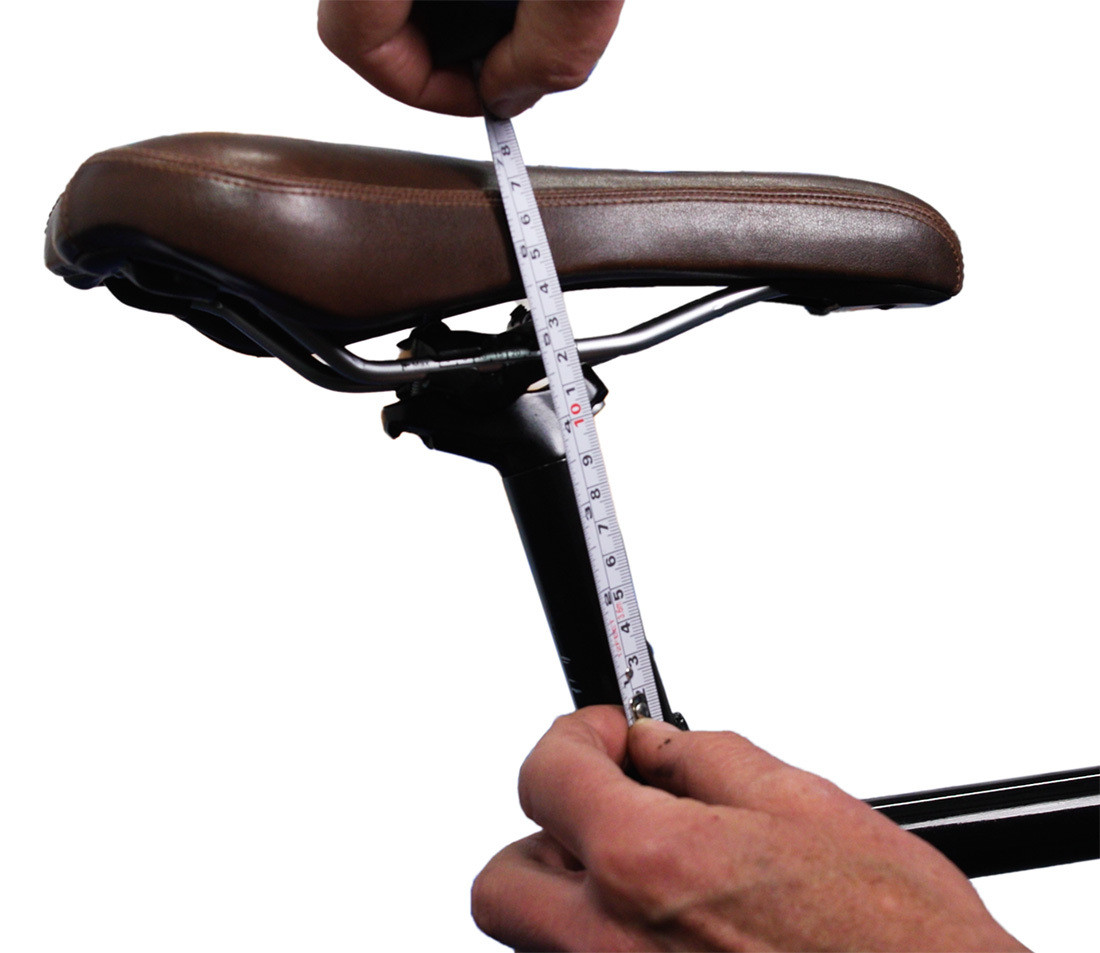 Saddle Installation Saddle Height
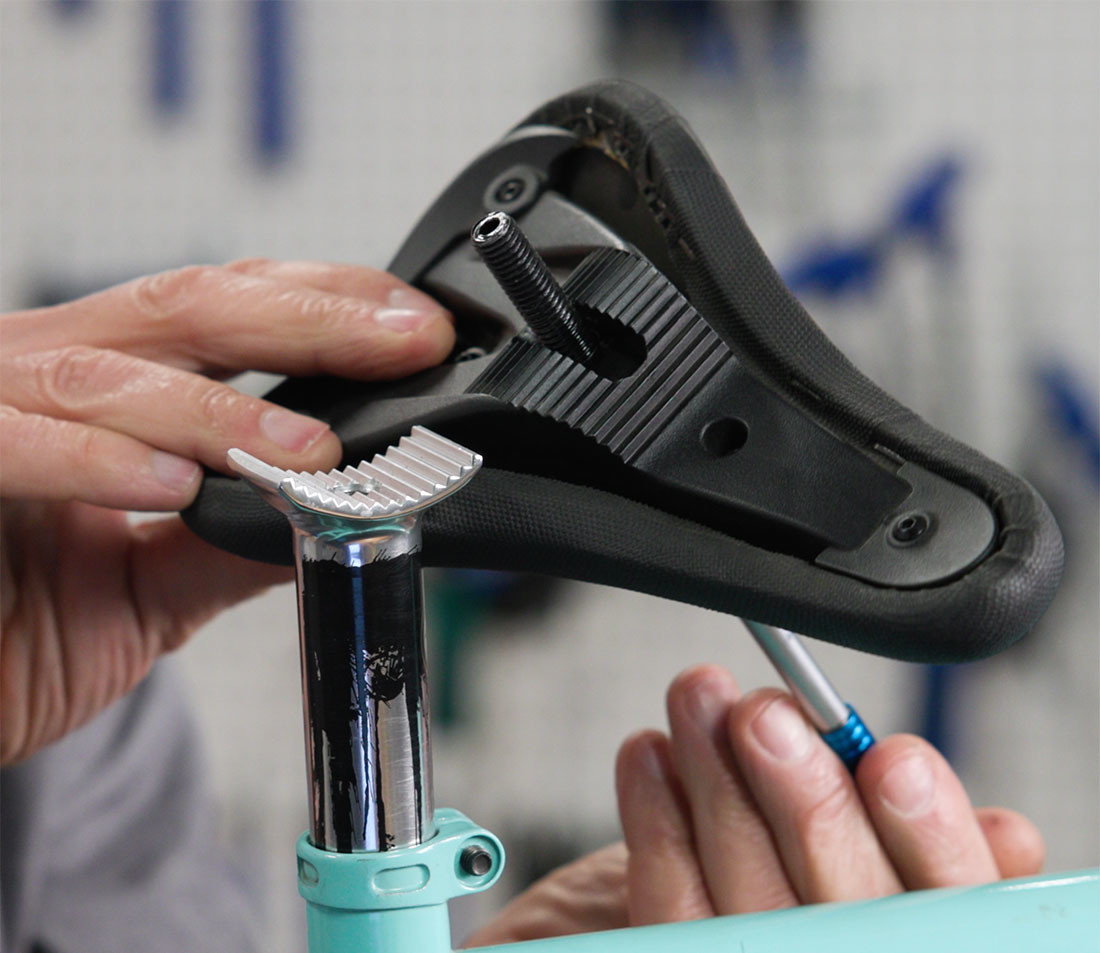
4. Installing Your New Bike Saddle
How do I install my new bike saddle correctly?
Installing your new bike saddle involves several key steps. First, apply surface prep to the bolts and the seatpost head. Then, install the new saddle between the clamping plates of the seatpost. Thread in the mounting bolts, but don’t fully tighten them yet. Adjust the saddle height, fore-aft position, and angle according to your previously recorded measurements. Finally, tighten the mounting bolts to the recommended torque.
4.1 Applying Surface Prep
Why is surface preparation important before installing the new saddle?
Surface preparation is important for preventing corrosion and ensuring smooth bolt tightening. Clean all components and apply a small amount of grease or thread prep to the bolts and seatpost head. This helps prevent seizing and makes future adjustments easier.
4.2 Adjusting Saddle Height and Fore-Aft Position
How do I adjust the saddle height and fore-aft position for optimal comfort?
Adjusting the saddle height and fore-aft position is crucial for optimal comfort and pedaling efficiency. The saddle height should allow for a slight bend in your knee at the bottom of the pedal stroke. The fore-aft position should place your knee directly above the pedal spindle when the crank arms are horizontal. According to a study by the University of Colorado Boulder, proper saddle position can improve pedaling efficiency by up to 15%.
4.3 Matching the Saddle Angle
How do I match the saddle angle for the best riding experience?
Matching the saddle angle is essential for comfort and preventing pressure points. Use a protractor or bubble level to adjust the saddle angle to match your previous setting or a comfortable position. Most riders prefer a level saddle, but slight adjustments can be made based on personal preference.
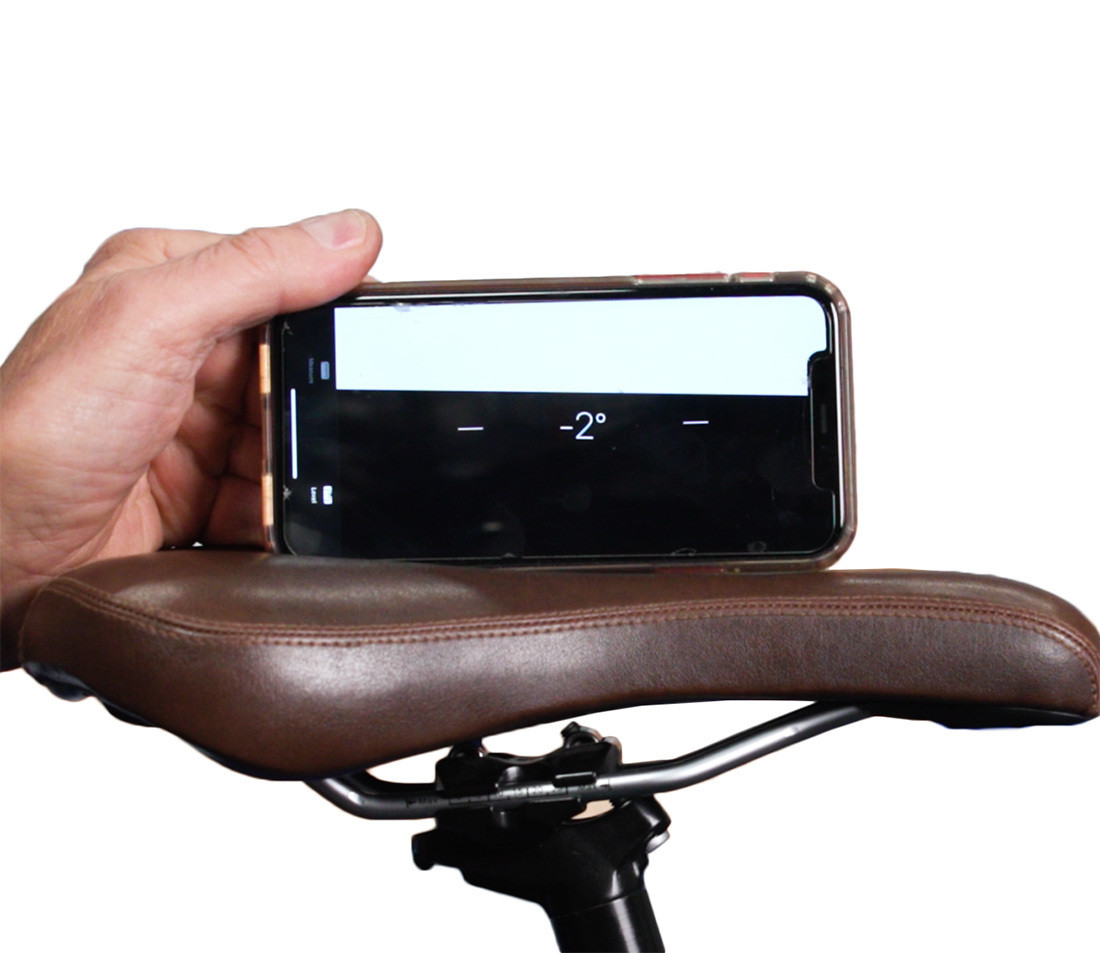 Saddle Installation Angle
5. Tightening and Securing the Bike Saddle
How do I tighten and secure the bike saddle properly?
Tightening and securing the bike saddle involves using a torque wrench to tighten the mounting bolts to the manufacturer’s recommended torque. For non-integrated systems without a specific recommendation, a safe range is 15-20 Nm. After tightening, perform a safety check by firmly pulling on the saddle to ensure it doesn’t move.
5.1 Understanding Torque Specifications
Why is it important to adhere to torque specifications?
Adhering to torque specifications is crucial for preventing damage to components and ensuring safety. Over-tightening can strip threads or crack parts, while under-tightening can lead to slippage and potential accidents. Always consult the manufacturer’s specifications and use a torque wrench to ensure accurate tightening.
5.2 Performing a Safety Check
What steps should I take to perform a safety check after installation?
After installing and tightening the saddle, perform a thorough safety check. Grab the front and back of the saddle and pull up, down, and side to side with force. The saddle should not move. If it does, realign and re-secure the bolts, then repeat the safety check.
6. Common Issues and Solutions
What are some common issues encountered when attaching a bike seat, and how can I resolve them?
Common issues include saddle slippage, difficulty adjusting the angle, and incompatibility between the saddle and seatpost. Saddle slippage can often be resolved by ensuring the bolts are tightened to the correct torque. Difficulty adjusting the angle may require loosening both front and rear bolts in tandem. Incompatibility issues may necessitate searching for a more compatible seatpost design.
6.1 Saddle Slippage
How can I prevent saddle slippage after installation?
To prevent saddle slippage, ensure that the bolts are tightened to the manufacturer’s recommended torque. Also, check that the clamping plates are properly aligned and gripping the saddle rails securely. Applying a thin layer of carbon paste between the rails and clamp can also increase friction and prevent slippage.
6.2 Difficulty Adjusting Saddle Angle
What should I do if I’m having trouble adjusting the saddle angle?
If you’re having trouble adjusting the saddle angle, try loosening both the front and rear bolts in tandem. This allows you to adjust the tilt more easily. For some seatpost designs, you may need to loosen one bolt while tightening the other to achieve the desired angle.
6.3 Incompatible Saddles and Seatposts
What should I do if my saddle and seatpost are incompatible?
If your saddle and seatpost are incompatible, you may need to search for a different seatpost design that works with your particular saddle. Low-profile saddles, for example, may not be compatible with all seatposts due to clearance issues. Consult your local bike shop or usabikers.net community for advice on compatible options.
 The mounting bolts on this seatpost contact the molding of this saddle. In time, this will damage the saddle.
7. Exceptions and Anomalies in Saddle Design
What are some exceptions and anomalies in saddle design that I should be aware of?
Several exceptions and anomalies exist in saddle design, including oval saddle rails, low-profile saddles, pivotal BMX saddles, and flat saddle rails. Oval saddle rails, often found on carbon fiber saddles, require special seatposts. Low-profile saddles may have clearance issues with some seatposts. Pivotal BMX saddles use a unique single-bolt system. Flat saddle rails are typically found on older or inexpensive bikes.
7.1 Oval Saddle Rails
How do oval saddle rails differ from standard rails, and what seatposts are compatible?
Oval saddle rails, commonly made of carbon fiber, are taller than standard round rails and require special seatposts designed to accommodate their shape. These seatposts often denote compatibility with 7 x 9 mm or 7 x 10 mm rails. Consult the manufacturer to ensure your carbon fiber parts are compliant with your seatpost.
 Saddle with oval carbon fiber rails. Note that the seatpost clamp denotes compatibility with 7×10 mm rails.
7.2 Pivotal BMX Saddles
How do pivotal BMX saddles attach to the seatpost?
Pivotal BMX saddles use a single convex fitting on the saddle that attaches to a concave shape on the seatpost. This design allows for angle adjustment but does not permit fore-to-aft adjustment. The saddle bolt is accessed through a hole in the saddle.
 A disassembled BMX saddle
7.3 Flat Saddle Rails
What types of bikes typically use flat saddle rails?
Flat saddle rails are typically found on exercise bikes, inexpensive bikes, and older bikes. These rails require a compatible clamp on the seatpost designed for flat rails.
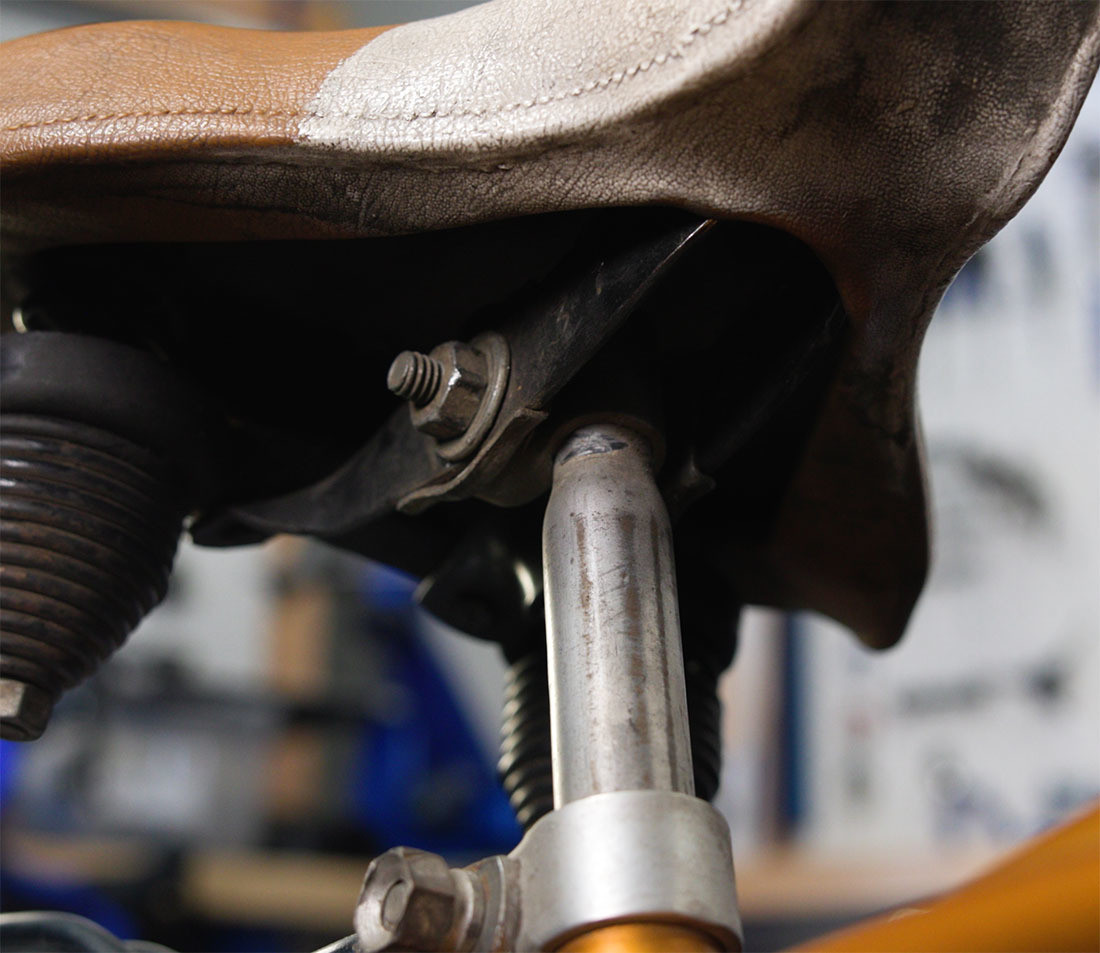 An old-school stamped steel saddle with flat rails
8. Saddle Maintenance and Care
How do I maintain and care for my bike saddle to prolong its lifespan?
Maintaining and caring for your bike saddle involves regular cleaning, protecting it from the elements, and checking for wear and tear. Clean your saddle with a mild soap and water solution, and avoid using harsh chemicals. Protect it from prolonged exposure to sunlight and rain. Regularly inspect the saddle for tears, cracks, or loose components.
8.1 Cleaning Your Saddle
What is the best way to clean my bike saddle?
The best way to clean your bike saddle is to use a mild soap and water solution. Gently scrub the surface with a soft cloth, and rinse thoroughly. Avoid using harsh chemicals or abrasive cleaners, as these can damage the saddle material.
8.2 Protecting Your Saddle from the Elements
How can I protect my saddle from weather damage?
To protect your saddle from weather damage, store your bike indoors or in a covered area. If you must leave your bike outside, consider using a saddle cover to protect it from sunlight and rain. Regularly applying a leather conditioner to leather saddles can also help prevent cracking and drying.
8.3 Checking for Wear and Tear
What signs of wear and tear should I look for when inspecting my saddle?
When inspecting your saddle, look for signs of wear and tear such as tears, cracks, or loose components. Check the saddle cover for damage, and inspect the rails for bends or breaks. If you notice any significant damage, it may be time to replace your saddle.
9. Choosing the Right Saddle for Your Riding Style
How do I choose the right saddle for my specific riding style?
Choosing the right saddle for your riding style involves considering factors such as the type of riding you do, your riding position, and your personal preferences. Road bike saddles are typically narrow and firm for efficient pedaling. Mountain bike saddles often have more padding and a durable cover. Touring saddles prioritize comfort for long rides. Consider trying different saddles to find the one that feels best for you.
9.1 Road Bike Saddles
What features should I look for in a road bike saddle?
When choosing a road bike saddle, look for features such as a lightweight design, a narrow profile, and firm padding. Road bike saddles are designed for efficient pedaling and minimizing friction. Many road bike saddles also feature a cutout or pressure relief channel to reduce pressure on sensitive areas.
9.2 Mountain Bike Saddles
What features make a good mountain bike saddle?
A good mountain bike saddle should be durable, comfortable, and offer good support. Look for features such as a durable cover, ample padding, and a slightly wider profile for stability. Some mountain bike saddles also feature reinforced edges to protect against abrasion.
9.3 Touring Saddles
What makes a saddle suitable for long-distance touring?
A saddle suitable for long-distance touring should prioritize comfort above all else. Look for features such as a wide profile, generous padding, and a flexible base. Leather saddles are a popular choice for touring due to their ability to mold to the rider’s shape over time.
10. Finding Expert Advice and Community Support
Where can I find expert advice and community support for bike saddle-related questions?
You can find expert advice and community support for bike saddle-related questions on usabikers.net. Our website features articles, forums, and a community of passionate bikers who are happy to share their knowledge and experiences. You can also consult your local bike shop for personalized advice.
10.1 Exploring usabikers.net
What resources does usabikers.net offer for bike enthusiasts?
usabikers.net offers a wealth of resources for bike enthusiasts, including articles, reviews, forums, and a community of passionate riders. You can find information on everything from bike maintenance and repair to riding tips and gear recommendations. Join our community today and connect with fellow bikers!
10.2 Local Bike Shops
Why should I consider visiting my local bike shop for advice?
Visiting your local bike shop can provide personalized advice and hands-on assistance. Bike shop employees are often experienced riders and mechanics who can help you choose the right saddle, install it properly, and troubleshoot any issues you may encounter.
FAQ: How to Attach a Bike Seat
1. Can I use any saddle with any seatpost?
No, not all saddles are compatible with all seatposts. Some saddles have unique rail designs (like oval carbon rails) that require specific seatpost clamps. Always check compatibility before installation.
2. What is the ideal saddle height?
The ideal saddle height allows for a slight bend in your knee at the bottom of the pedal stroke. A common method is to multiply your inseam (in cm) by 0.883.
3. How tight should I tighten the saddle bolts?
Tighten the saddle bolts to the manufacturer’s recommended torque, typically between 15-20 Nm for non-integrated systems. Use a torque wrench to ensure accurate tightening.
4. What should I do if my saddle keeps slipping?
If your saddle keeps slipping, ensure the bolts are tightened to the correct torque. You can also apply a thin layer of carbon paste between the rails and clamp to increase friction.
5. How do I adjust the tilt of my saddle?
Adjust the tilt by loosening the bolts that secure the saddle to the seatpost clamp. Some seatposts have a single bolt, while others have two. Adjust the bolts in tandem to achieve the desired angle.
6. What is the best way to clean a leather saddle?
Clean a leather saddle with a mild soap and water solution. Gently scrub the surface with a soft cloth, and rinse thoroughly. Apply a leather conditioner to prevent cracking and drying.
7. Can I adjust my saddle while riding?
No, it is not safe to adjust your saddle while riding. Always stop and make adjustments when your bike is stationary.
8. How often should I check my saddle bolts?
Check your saddle bolts regularly, especially before long rides. Ensure they are properly tightened to prevent slippage or accidents.
9. What tools do I need to adjust my bike seat?
You typically need Allen wrenches and a torque wrench to adjust your bike seat. The specific sizes of Allen wrenches will depend on your bike and seatpost.
10. Where can I find the recommended torque specifications for my saddle bolts?
You can find the recommended torque specifications in your bike or seatpost manual. If you don’t have the manual, check the manufacturer’s website or consult your local bike shop.
Attaching a bike seat correctly is essential for a comfortable and efficient riding experience. By following this comprehensive guide, you can ensure that your saddle is securely and properly installed. Remember to measure your old saddle position, use the right tools, and adhere to torque specifications. For more expert advice and community support, visit usabikers.net today. Discover a wealth of information, connect with fellow bikers, and enhance your riding experience. Join the usabikers.net community now and explore the world of biking with confidence! Visit us at 801 Sturgis Main St, Sturgis, SD 57785, United States, or call us at +1 (605) 347-2000. You can also explore more at usabikers.net.