
Building bike jumps is an exciting endeavor for any biker looking to enhance their skills and enjoy the thrill of aerial maneuvers. At usabikers.net, we aim to provide you with the knowledge to construct safe and exhilarating jumps. This guide covers essential aspects, from understanding projectile motion to practical building tips. With the right approach, you can create bike jumps that are both fun and safe, enhancing your mountain biking experience.
1. What Are The Essential Factors To Consider Before Building Bike Jumps?
Before you even think about shoveling dirt, consider these essential factors to guarantee a safe and enjoyable jump-building experience. Evaluate the location and terrain for suitability, ensuring the area is free of hazards and has ample space for landing. Then you will need to assess rider skill level and tailor jump designs to match abilities, starting with smaller, more forgiving jumps for beginners.
- Location and Terrain: Assess the area for suitability, ensuring it’s free of hazards and has ample space for landing.
- Rider Skill Level: Tailor jump designs to match abilities, starting with smaller, more forgiving jumps for beginners.
- Materials and Tools: Gather necessary materials such as dirt, gravel, and wood, along with tools like shovels, rakes, and tampers.
- Safety Considerations: Prioritize safety by planning for run-outs, clear landing zones, and proper signage.
Understanding the principles of projectile motion and jump design is crucial for creating jumps that offer the right balance of challenge and safety. With careful planning and consideration, you can build jumps that enhance your riding skills and provide endless hours of enjoyment. For more detailed information and community support, explore usabikers.net.
2. What Is Projectile Motion and How Does It Affect Bike Jump Design?
Projectile motion is the cornerstone of bike jump design, governing the trajectory of your flight. Understanding this concept allows you to predict and control how a rider will move through the air, ensuring jumps are built with precision and safety. It dictates the relationship between speed, angle, and distance when airborne.
- Laws of Motion: Understand Newton’s laws of motion, especially how gravity affects a rider’s trajectory.
- Speed and Angle: Calculate how speed and launch angle influence the jump’s height and distance.
- Parabolic Trajectory: Recognize that a jump’s flight path follows a parabolic curve, which can be distorted by factors like wind resistance.
- Jump Calculator: Utilize tools like the jump calculator to estimate jump parameters based on speed and angle.
 Ideal_projectile_motion_for_different_angles.svg
By grasping the principles of projectile motion, you can design jumps that are both challenging and safe, providing riders with the thrill of flight while minimizing the risk of accidents. Remember, a well-designed jump is predictable and consistent, allowing riders to progress their skills with confidence. For additional resources and expert advice, be sure to visit usabikers.net.
3. What Are The Key Components of A Well-Designed Bike Jump?
A well-designed bike jump combines several key components to ensure safety, performance, and fun. Understanding these components and how they work together is essential for creating jumps that riders of all skill levels can enjoy. The three key components are the inrun, the lip, and the landing.
- Inrun: The inrun is the approach to the jump, which should be smooth and consistent to allow riders to maintain a steady speed.
- Lip: The lip, or takeoff ramp, determines the rider’s launch angle and trajectory. It can be flat or curved, with different shapes influencing the jump’s feel.
- Landing: The landing should be appropriately sloped to match the trajectory of the jump, providing a smooth and controlled touchdown.
These elements must work together harmoniously to deliver a predictable and enjoyable experience. Additionally, consider factors like jump height and length relative to the skill levels of the riders who will be using it. For expert guidance and to connect with fellow bike enthusiasts, explore usabikers.net.
4. How Do You Select The Best Location For Building A Bike Jump?
Selecting the best location is crucial for building a bike jump that is safe, fun, and sustainable. The location should offer the right terrain, soil quality, and environmental considerations to support your jump design. Additionally, you need to consider how the location will impact the surrounding area.
- Terrain Analysis: Look for natural slopes that can be integrated into the jump design, reducing the amount of digging required.
- Soil Quality: Choose locations with soil that packs well and drains easily to ensure the jump’s structural integrity.
- Environmental Considerations: Avoid areas with sensitive vegetation, wildlife habitats, or erosion risks.
- Accessibility: Ensure the location is easily accessible for both building and riding, while minimizing impact on the surrounding environment.
Always obtain necessary permissions and follow local regulations to protect the environment and avoid legal issues. At usabikers.net, we encourage responsible trail building and provide resources to help you make informed decisions about your jump location.
5. What Materials And Tools Are Needed To Build A Bike Jump?
Gathering the right materials and tools is essential for constructing a durable and safe bike jump. The quality of your materials and the efficiency of your tools will directly impact the final product. Here is a breakdown of what you will need.
- Soil and Aggregate: Use a mix of topsoil, clay, and gravel to create a solid and well-draining jump structure.
- Shovels and Rakes: Invest in high-quality shovels for moving dirt and rakes for shaping and smoothing surfaces.
- Tampers and Compactors: Use tampers or compactors to pack the soil tightly, preventing erosion and ensuring stability.
- Measuring Tools: Use levels, measuring tapes, and angle finders to ensure accurate jump dimensions and angles.
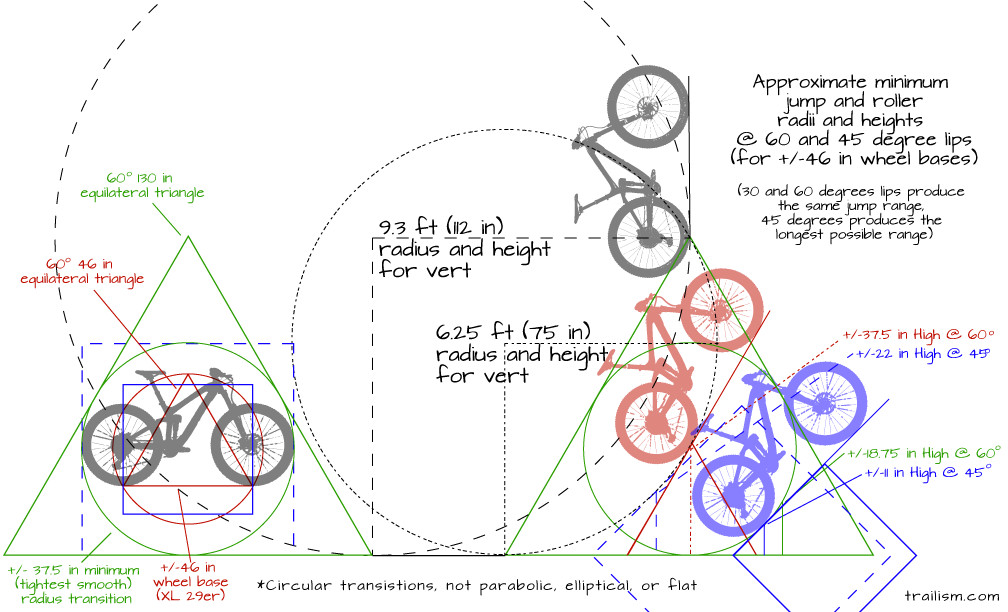 minimum-transition-bike-jumps-rollers4.png
Safety gear, such as gloves, helmets, and eye protection, is also crucial for protecting yourself during the building process. High-quality materials and tools will not only make the construction process easier but also ensure the longevity and safety of your bike jump. For more tips and community support, explore usabikers.net.
6. How Do You Shape And Compact Dirt Properly For Bike Jumps?
Properly shaping and compacting dirt is essential for creating a durable and safe bike jump. These steps ensure that the jump can withstand repeated use and weather conditions. Start by layering the dirt.
- Layering: Apply dirt in layers, typically 4-6 inches thick, to allow for even compaction.
- Moisture Control: Maintain optimal moisture levels to help the soil bind together effectively.
- Compaction: Use a tamper or compactor to tightly pack each layer, starting from the bottom and working your way up.
- Shaping: Use shovels and rakes to shape the jump, ensuring smooth transitions and consistent angles.
Correct compaction prevents settling and erosion, extending the lifespan of your jump. For additional guidance and access to expert resources, check out usabikers.net.
7. What Are The Different Types of Bike Jump Lips And How Do They Affect The Ride?
The type of bike jump lip significantly affects the rider’s experience, influencing the trajectory, speed, and overall feel of the jump. Each type of lip caters to different skill levels and riding styles. There are two main types of jump lips: planar (flat) and curved.
- Planar (Flat) Lips: These lips are more linear and offer a predictable, consistent launch. They are ideal for beginners and riders who prefer a controlled jump experience.
- Curved Lips: Curved lips, which can be circular or elliptical, allow for more rider input and “boost.” They are favored by experienced riders looking to manipulate their flight and perform tricks.
- Transition to Lip: Regardless of the lip type, the transition leading up to it is crucial. A smooth transition ensures riders can maintain their speed and control as they approach the jump.
As you can see tighter transitions and higher speeds don’t mix well.
Curved lips can be further enhanced with features like a clothoid shape, which minimizes jerk and stress on riders. Understanding the nuances of each lip type can help you design jumps that match your specific needs and preferences. For in-depth information and community discussions, visit usabikers.net.
8. How Do You Calculate The Ideal Angle For A Bike Jump Lip?
Calculating the ideal angle for a bike jump lip is essential for achieving the desired height, distance, and overall feel of the jump. This angle depends on several factors, including rider speed, skill level, and the intended use of the jump. The calculations can vary based on these factors, here are the general guidelines:
- Beginner Jumps: Aim for angles between 15 and 25 degrees to provide a gentle launch with minimal airtime.
- Intermediate Jumps: Angles between 25 and 35 degrees offer a good balance of height and distance for riders looking to progress their skills.
- Advanced Jumps: Angles between 35 and 45 degrees are suitable for experienced riders seeking significant airtime and opportunities for tricks.
Using tools like a jump calculator can help you fine-tune the angle based on specific speed and distance goals. Remember to test and adjust as needed to find the perfect balance for your jump. For expert advice and community support, visit usabikers.net.
9. What Safety Measures Should Be Implemented When Building Bike Jumps?
Implementing comprehensive safety measures is paramount when building bike jumps to protect both builders and riders. These measures help minimize the risk of accidents and ensure a positive experience for everyone involved. Here are some crucial safety steps:
- Planning and Design: Start with a well-thought-out plan that considers rider skill levels, available space, and potential hazards.
- Clear Signage: Use clear and visible signage to indicate jump difficulty, potential hazards, and trail closures.
- Protective Gear: Always wear appropriate protective gear, including helmets, gloves, and eye protection, during construction.
- Regular Inspection: Conduct regular inspections to identify and address any maintenance issues, such as erosion, loose dirt, or damaged structures.
For additional safety guidelines and resources, be sure to visit usabikers.net.
10. How Can You Maintain Bike Jumps To Ensure Longevity and Safety?
Maintaining bike jumps is essential for ensuring their longevity, safety, and continued enjoyment. Regular maintenance prevents wear and tear, addresses potential hazards, and keeps the jumps in optimal condition. Here are some key maintenance practices:
- Regular Inspections: Conduct routine inspections to identify any signs of erosion, damage, or wear.
- Erosion Control: Implement erosion control measures, such as drainage systems and vegetation, to prevent soil loss.
- Repair Damage: Promptly repair any damage, such as cracks, holes, or loose dirt, to prevent further deterioration.
- Seasonal Maintenance: Perform seasonal maintenance, such as clearing debris, reshaping surfaces, and re-compacting soil.
Consistent maintenance not only extends the life of your jumps but also ensures they remain safe and enjoyable for all riders. For more maintenance tips and community support, explore usabikers.net.
11. How Does Suspension Affect Bike Jump Trajectory And Landing?
Bike suspension plays a significant role in jump trajectory and landing, influencing the rider’s control, stability, and overall experience. Understanding how suspension works can help you fine-tune your jumps and riding technique. Here’s how it affects your ride:
- Absorption of Impact: Suspension absorbs impact on landing, reducing stress on the rider and bike.
- Control and Stability: Proper suspension settings improve control and stability during both takeoff and landing.
- Adjustment of Launch Angle: Suspension can affect the launch angle, influencing the jump’s height and distance.
- Energy Management: Suspension helps manage energy during pumping and boosting, enhancing the rider’s ability to manipulate the bike.
Adjusting suspension settings to match the jump’s characteristics and the rider’s style is crucial for optimizing performance. For more information on suspension tuning and bike setup, visit usabikers.net.
12. What Is The Clothoid Curve And Why Is It Ideal For Bike Jump Transitions?
The clothoid curve, also known as Cornu or Euler’s spiral, is a unique mathematical curve that offers superior transition performance for bike jumps. Unlike circular arcs, the clothoid curve has a variable radius that gradually changes along its length, minimizing jerk and stress on riders. This characteristic makes it ideal for creating smooth, predictable, and comfortable transitions. Here’s why it’s beneficial:
- Minimized Jerk: The gradual change in curvature reduces abrupt changes in force, providing a smoother ride.
- Enhanced Control: Riders experience better control as they transition onto the jump lip.
- Increased Comfort: The smoother transition reduces discomfort and fatigue, allowing for longer riding sessions.
- Improved Safety: By minimizing jerk, the clothoid curve reduces the risk of losing control or experiencing harsh impacts.
The clothoid curve is especially advantageous for jumps with low angles or high speeds. For more details and expert insights on trail design, visit usabikers.net.
13. How Do You Determine The Right Speed For Approaching A Bike Jump?
Determining the right speed for approaching a bike jump is crucial for achieving a successful and safe jump. The ideal speed depends on various factors, including the jump’s size, angle, and design, as well as the rider’s skill level and experience. There are a few ways to determine the right speed for a jump:
- Assess Jump Characteristics: Evaluate the jump’s height, length, and lip angle to estimate the required speed.
- Start Slow: Begin with a slower approach and gradually increase speed until you find the sweet spot.
- Use a Bike Computer: A bike computer or GPS unit can help you monitor your speed, but be cautious when looking at it during takeoff.
- Observe Experienced Riders: Watch how experienced riders approach the jump and try to replicate their speed and technique.
Adjusting your speed based on the jump’s design and your skill level is key to a safe and enjoyable experience. For expert tips and community support, visit usabikers.net.
14. What Are Some Common Mistakes To Avoid When Building Bike Jumps?
Avoiding common mistakes when building bike jumps is essential for ensuring the jumps are safe, durable, and fun to ride. These mistakes can lead to structural issues, increased risk of accidents, and overall dissatisfaction. Here are some pitfalls to watch out for:
- Poor Planning: Failing to plan the jump design, location, and materials can result in a poorly constructed jump.
- Inadequate Compaction: Insufficiently compacting the soil can lead to erosion, settling, and instability.
- Incorrect Angles: Incorrect lip and landing angles can make the jump unpredictable and dangerous.
- Neglecting Maintenance: Ignoring regular maintenance can cause the jump to deteriorate quickly and become unsafe.
Learning from these common mistakes can help you build better jumps and ensure a positive experience for all riders. For expert guidance and community support, visit usabikers.net.
15. How Can You Incorporate Rollers Into A Bike Jump Course For Speed Control?
Incorporating rollers into a bike jump course is an excellent way to control speed, add flow, and enhance the overall riding experience. Rollers are small, rounded mounds that riders can pump over to maintain momentum or absorb to slow down. Here’s how to effectively integrate rollers:
- Placement: Position rollers strategically before or after jumps to regulate speed and prepare riders for the next feature.
- Spacing: Adjust the spacing between rollers to control the rhythm and flow of the course.
- Size and Shape: Vary the size and shape of the rollers to create different pumping opportunities and challenges.
- Smooth Transitions: Ensure smooth transitions between rollers and other features to maintain a consistent and predictable ride.
Rollers add variety and excitement to a bike jump course, making it more enjoyable and accessible for riders of all skill levels. For more design tips and community inspiration, visit usabikers.net.
Bike Jump Calculator
| Bike Jump Calculator | |
|---|---|
| Enter speed or velocity and ramp/jump angle**, and see notes* | |
| Jump velocity at launch lip, v= m/s | |
| Standard | Metric |
| Jump angle, θ= degrees | Jump angle, θ= degrees |
| Horizontal range, R= feet | Horizontal range, R= m |
| Air time, t= seconds | Air time, t = seconds |
| Height, h=feet | Height, h= m |
*Notes:
For a step-by-step guide on actually doing some of the math and using this calculator and more read the notes below, and go to the Jump Building Guide page.
- If you find this helpful, or not, let me know with a comment or email.
- Please kick down a donation if you found this useful, or want the Excel sheet.
- Jumping is dangerous, and may cause serious injury or death (see this)
- Build and jump at your own risk, no guarantees are promised by the numbers output by the ramp calculator or spreadsheet, but they can get you in the ball park (if you know what average launch speeds will be– don’t forget speeds will slow as you climb up ramp, and drag friction will reduce R, sometimes significantly, leaving you short). Speeds can also increase if transitions are pumped, see this.
- Read #3 and 4 again, then this: THIS CALCULATOR ASSUMES same launch and landing height. **”Jump angle” or θ = the angle of the bike the instant the back tire leaves the ramp, which should be very close to the wheel base angle when the front tire is at the lip.
- IMPORTANT: the bike jump calculator is for a “point” of mass. In turn, R will have to be shortened by: (wheelbase in feet or meters) x sin(jump angle) = distance to shorten R. For example, perhaps err for extra large 29er wheelbases that are somewhere around 46 inches: 46in/12in/ft= 3.83 ft, meaning 3.83 feet x sin(jump angle) = distance to shorten R for XL 29ers with 46 inch wheelbases.
- ALSO: What shape are you making?
- Please read and understand this.
- Launch and landing speeds will be the same (or negligibly different) if the launch and landing heights are the same (also see 5).
- For a slower/softer landing, landing ramps can be elevated, but this will change the range, R, to a shorter distance. If landing at a lower height than takeoff then R, or the the landing lip, can be pushed farther from the takeoff lip. Please see the “safer jump” pdf documents linked below for details about the best landing ramp design.
- WIND and rider behaviors like pumping, lifting, braking, spinning, flipping etc. could change any of the variables (h, R, t, and the angle of launch)– in other words the parabolic line of flight as as depicted in the red and black image will be altered, altering R
- Wind and drag may become a factor if strong enough or H and/or R is great enough
- The calculator above is for RIGID forks AND RIGID tails, i.e. hard-tails. Suspension can change the angle of launch, thus H and R. Recoil may also affect the outcome.
- Test your creation and measure carefully. How fast were you going, what exactly is the lip angle, and did you pull up or pump? Was it windy? What tire pressure and how knobby? Adjust your creation accordingly, perhaps with a correction coefficient.
- Use a level or other means to check angles (see image below).
*image was for a template no longer linked to, but the angles I typically use are from 15-45 degrees based on speeds that push the design to account for a 0.25 second takeoff equilibrium, and a radius that will keep gs below 1.5 > “How do I know my speed at takeoff?” A bike computer or gps unit could work, but may not be exact, or to state the obvious, are dangerous to look at on takeoff; of course the jump could be bypassed or skipped to get the approximate speed the jump will be hit. Speed loss to gravity will occur when ascending to the lip. If high enough the loss could be significant. Someone could help with a tape measure and stop watch as well, and this method may be better than the computer, but several trials may have to be done to determine the speed more accurately, or to get an average in case the time keeper doesn’t hit the start and stop at exactly the right moment. A radar gun, or triggers, or lasers and an arduino could work too. Most cheaper radar guns might not be accurate enough near 10 mph, and usually have +/-1-2 mph accuracy issues. The Speedclock app is pretty good once you know how to use it. SeeLevel or other inclinometers and a digital level may help as well.
GOOD LUCK. HAVE FUN. BE SAFE.
*props to Greg from dirtycentury for helping with the script
FAQ: Building Bike Jumps
- What is the ideal height for a beginner bike jump?
The ideal height for a beginner bike jump is typically between 1 to 3 feet, providing a safe and manageable introduction to jumping. - How far apart should the lip and landing be on a bike jump?
The distance between the lip and landing depends on the jump’s height and angle, but a good starting point is 10 to 15 feet for beginner jumps, increasing with height and difficulty. - What type of soil is best for building bike jumps?
A mixture of topsoil, clay, and gravel is best, as it provides a good balance of compaction, drainage, and stability. - How do I prevent erosion on my bike jump?
Prevent erosion by compacting the soil properly, implementing drainage systems, and using vegetation to stabilize the slopes. - What is the best angle for a bike jump lip?
The best angle for a bike jump lip depends on the desired height and distance, but angles between 25 and 35 degrees are common for intermediate jumps. - How often should I maintain my bike jumps?
You should inspect and maintain your bike jumps regularly, ideally every few weeks, to address any erosion, damage, or wear. - What tools do I need to build a bike jump?
Essential tools include shovels, rakes, tampers, levels, measuring tapes, and angle finders. - How can I make my bike jump safer?
Make your bike jump safer by planning carefully, using clear signage, wearing protective gear, and conducting regular inspections. - What is a clothoid curve, and why is it beneficial for bike jumps?
A clothoid curve is a mathematical curve with a variable radius that minimizes jerk and stress on riders, providing smoother transitions. - How does bike suspension affect jump trajectory and landing?
Bike suspension absorbs impact, improves control and stability, and can affect the launch angle, influencing the jump’s height and distance.
Resources
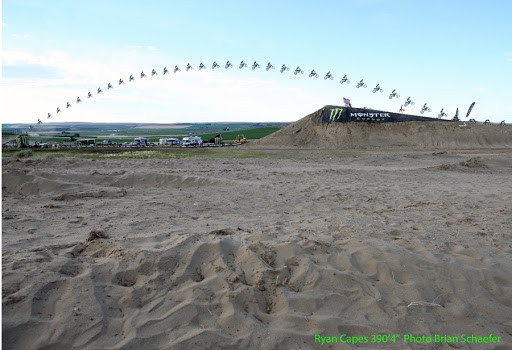 31072008_Capes_B
- Contact me about consulting
- A downloadable spreadsheet is forthcoming
Ready to take your mountain biking to the next level? Visit usabikers.net for more in-depth guides, expert advice, and a thriving community of fellow riders. Join our forums, share your experiences, and discover everything you need to build and ride the perfect bike jumps. Don’t miss out – your next adventure starts here! Address: 801 Sturgis Main St, Sturgis, SD 57785, United States. Phone: +1 (605) 347-2000. Website: usabikers.net.