Transporting a bike on a plane doesn’t have to be a logistical nightmare or a budget-breaker; with careful planning and the right strategies, you can ensure your beloved ride arrives safely at your destination. At usabikers.net, we’re dedicated to providing you with the ultimate guide on how to transport your bike on a plane, covering everything from packing options to airline policies. Discover the secrets to stress-free bike transport, avoid hefty fees, and keep your gear in top condition. Learn valuable tips for successful bicycle transport, airline bike policies, and choosing the best bike travel case.
Table of Contents
- Understanding the Basics of Flying With Your Bike
- Essential Advice for Bikers Traveling by Air
- Packing Options: Choosing the Right Container
- Cardboard Bike Boxes: The Economical Choice?
- Bike Bags/Soft Cases: Balancing Convenience and Protection
- Hard-Sided Cases: Ultimate Protection for Your Bike
- Step-by-Step Guide to Packing Your Bike Securely
- Important Packing Tips for a Hassle-Free Trip
- Decoding the Typical Cost of Flying With Your Bike
- Airline Policies: Finding the Best Airlines for Bikers
- Flying With a Mountain Bike: Specific Considerations
- Frequently Asked Questions (FAQ)
1. Understanding the Basics of Flying With Your Bike
Flying with a bike involves balancing safety, cost, and convenience. Ensuring your bike arrives undamaged, minimizing expenses, and simplifying the packing/unpacking process are critical. No single method is perfect, but understanding each option’s pros, cons, and logistics will help you make the best choice for your needs and equipment. Let’s explore the key elements of bicycle transport, covering safety measures, cost-effective strategies, and practical tips for easy bike handling.
2. Essential Advice for Bikers Traveling by Air
Before you even think about packing, some basic knowledge and tools are essential.
-
Technical Know-How: Be familiar with deconstructing your bike—at least removing pedals, wheels, and handlebars. Integrated cockpits on modern road bikes may require special cases.
-
Airline Fees: Fees vary significantly. Research airlines for the best baggage fee policies, as a more expensive airline might save you money overall.
Did you know? According to a survey by the American Motorcyclist Association (AMA) in 2024, baggage fees are a top concern for bikers when flying with their bikes.
-
Luggage Insurance: Airlines often aren’t responsible for damage during transit. Purchase luggage insurance, especially for carbon bikes. Check if your homeowner’s/renter’s insurance or credit cards already offer coverage.
-
Advance Planning: Practice packing well in advance. Consider transport logistics upon arrival and at your lodging. Plan how you’ll transport your bike to the airport for your return trip.
-
Alternatives: Explore bike shipping services or renting a bike at your destination.
3. Packing Options: Choosing the Right Container
The main packing options include cardboard bike boxes, soft-sided bike bags, and hardshell cases. Some bikes have frames designed for easy disassembly, which can be a great investment for frequent travelers. Let’s dive into the pros and cons of each option.
4. Cardboard Bike Boxes: The Economical Choice?
Cardboard boxes are the simplest and often cheapest option. They’re easy to obtain from bike shops and generally large enough to fit your bike with minimal disassembly.
- Pros: Cheap and easy to pack.
- Cons: Fragile, prone to damage (especially in wet conditions), difficult to transport, and airlines usually won’t insure bikes packed in them. They almost always incur oversize fees.
| Feature | Description |
|---|---|
| Cost | Typically free from bike shops |
| Protection | Low; susceptible to punctures and crushing |
| Portability | Difficult; bulky and awkward to handle |
| Airline Policy | Often not insured against damage |
| Size Fees | Usually incurs oversize baggage fees |
| Best For | Short trips, budget-conscious travelers willing to risk potential damage, those who can add significant internal padding |
 Cardboard Bike Box
5. Bike Bags/Soft Cases: Balancing Convenience and Protection
Soft-sided bike bags offer a range of designs and features. Most have straps and wheels for easy maneuvering and are generally compact enough to fit in rental cars.
- Pros: Easy to transport and can potentially avoid oversize fees.
- Cons: Can be expensive ($400-$600 USD), require extra padding, and airlines may require a liability release.
Many companies offer rentals as an alternative to buying a bag outright. Larger bags may include an internal frame mount, making packing easier. Smaller bags are designed to avoid oversize fees, requiring more bike disassembly but offering better portability.
| Feature | Description |
|---|---|
| Cost | $400 – $600 USD (rental options available) |
| Protection | Moderate; requires additional internal padding |
| Portability | Good; equipped with straps and wheels |
| Airline Policy | May require a liability release |
| Size Fees | Smaller bags can avoid oversize fees; larger bags usually incur them |
| Best For | Travelers seeking a balance between protection and portability, willing to invest in a good bag |
6. Hard-Sided Cases: Ultimate Protection for Your Bike
Hard cases offer the most robust protection for your bike but are also the most expensive. Sizes and designs vary, with some allowing you to travel with your bike almost fully assembled.
- Pros: Highly protective; airlines are usually willing to insure your bike.
- Cons: Heavy, awkward to transport, expensive, and usually incur extra fees.
Some have multiple handles and wheels for easier handling. However, their visibility often means you can’t avoid bike-specific fees.
| Feature | Description |
|---|---|
| Cost | Higher than soft cases |
| Protection | Excellent; provides robust impact resistance |
| Portability | Moderate; some models have handles and wheels |
| Airline Policy | Typically insurable against damage |
| Size Fees | Usually incurs oversize and bike-specific fees |
| Best For | Travelers prioritizing maximum protection, willing to pay extra for peace of mind |
7. Step-by-Step Guide to Packing Your Bike Securely
To ensure your bike arrives safely, follow these steps:
- Disassemble: Remove components needed to fit the bike in your container (handlebars, pedals, wheels). Use shipping spacers or thru axles in dropouts and spacers in disc brake calipers.
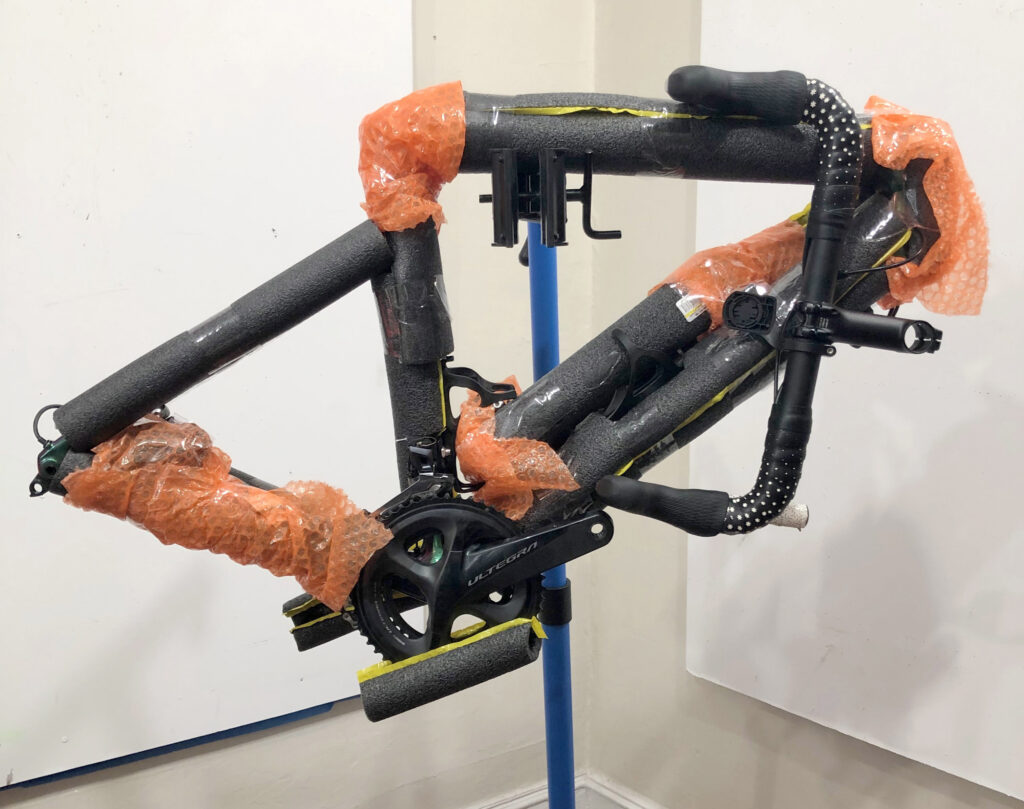
- Pad: Wrap your bike and components in bubble wrap, pipe insulation, or pool noodles. Secure with tape or zip ties.
- Attach: Attach handlebars/fork/seat post to your frame and zip-tie in place for easier TSA repacking.
- Remove: Remove rear derailleur and other protruding components (computer mount, eTap batteries). Wrap these parts and your chain in padding and attach them to your frame. Remove disc rotors from wheels and wrap in bubble wrap or clothing.
- Photograph: Take photos of your gear before packing for insurance claims and easy repacking.
- Identify: Write your name and contact information on a sheet of paper and tape it to your bike. Insert the bike into your bag or case.
- Fill Space: Fill extra space with kit and shoes. Wrap your pump and other removed components (pedals, rotors, saddlebag) in padding and place them in small bags. Include all tools used for disassembly.
- Inspect: Close the bag/case and check for protruding parts. Reopen and add extra padding if needed.
- Label: Remove old barcodes/destination stickers from the exterior. Mark clearly with your name and contact information.
8. Important Packing Tips for a Hassle-Free Trip
- Padding: Prevent damage by adding padding between any parts that might touch inside the case.
- Rotors: Remove disc rotors, wrap them in padding, and secure them safely to prevent bending.
- Zip-Tie: Zip-tie everything together inside the case to prevent loss or confusion during inspections.
- Tools: Pack all necessary tools together, as many are prohibited in carry-on luggage. Include an air pump and torque wrench.
- Tires: Deflate tires enough to fit but leave enough air to keep tubeless setups seated.
- CO2 Cartridges: Remove CO2 cartridges as they are prohibited in both carry-on and checked luggage.
- Electronic Groupsets: Remove batteries from SRAM derailleurs and coin cell batteries from SRAM shifters. Unplug shifter cables under Shimano hoods.
- Power Meter: Remove removable batteries from power meters to prevent battery drain.
- Chargers: Bring chargers for all electronic components (head units, lights, derailleurs).
 Specialized Tarmac SL6
9. Decoding the Typical Cost of Flying With Your Bike
The cost of flying with your bike depends on the airline and your equipment. Use this formula to estimate expenses:
Cost to Bring Bike = Bike Fee + Standard Checked Bag Fee + Oversize Fee (if Applicable) + Overweight Fee (if applicable)
Oversize fees usually apply if the combined dimensions exceed 62 inches. Overweight penalties typically start at 50 lbs. Discount carriers often charge more in additional fees, so research costs before buying your ticket.
10. Airline Policies: Finding the Best Airlines for Bikers
Here’s a comparison of major airlines’ policies on bikes. Note that fees and policies can change, so always verify directly with the airline before your trip.
| Airline | Bike Fee | 1st Checked Bag Fee | Oversize Fee | Overweight Fee |
|---|---|---|---|---|
| Air Canada | $50 CAD/ USD | N/A | N/A | N/A |
| Air France | €40-€125 | Usually included | N/A | N/A |
| Alaska Airlines | No Fee | $30 | N/A | N/A |
| American Airlines | No Fee | $30 | $150 – $200 | $100 |
| British Airways | No Fee | Usually included | Uncertain | €75/ $100USD |
| Delta | No Fee | $30 | $200 | $100 |
| Frontier | $75 | N/A | N/A | N/A |
| Hawaiian Airlines | $35 – $150 | $0–$35 | N/A | $60-$150 |
| jetBlue | $100 | $35 | N/A | N/A |
| Lufthansa | $80-$287 USD | Usually included | $150-$300 | $70-$150 |
| Quantas | No Fee | Usually Included | Varies | Varies |
| Ryanair | €/£60 | €25/£25 – €40/£40 | N/A | €11/£11 per kg |
| Southwest | NoFee | Usually Included | $75 | $75 |
| Spirit | $75 | $35–$65 | N/A | N/A |
| United Airlines | No Fee | $35 | Varies | Varies |
| Virgin Atlantic | No Bike Fee | Included | $300 | $100 |
| WestJet | $50 CAD | $30–$71 | N/A | N/A |
11. Flying With a Mountain Bike: Specific Considerations
Bringing a mountain bike on a plane is similar to bringing a road or gravel bike, but mountain bikes are often bulkier. They may require a case specifically designed for larger bikes. Pay close attention to weight, as mountain bikes can easily exceed overweight limits.
- Handlebars: Removing handlebars from the stem is often easier than removing the stem from the steerer tube.
- Fork: Flip your fork backward to shorten your wheelbase.
- Rotors: Always remove brake rotors.
- Tires: Deflate tires enough to fit, but don’t allow them to come off the bead. Bring a small container of sealant.
- Suspension: Let some air out of your suspension to reduce height.
- Dropper Post: Avoid flying with your dropper post down to prevent stress on the hydraulics.
- Hydraulic Components: Service any hydraulic components before traveling.
- Cleaning: Bring a large rag or towel for wiping down your bike before repacking.
12. Frequently Asked Questions (FAQ)
Q1: What’s the best way to protect my bike when flying?
The best way is to use a hard-sided case, which offers the most robust protection. However, soft-sided bags with ample padding can also work well.
Q2: How much does it typically cost to fly with a bike?
Costs vary, but you can expect to pay between $0 and $300 or more each way, depending on the airline and any additional fees for oversize or overweight luggage.
Q3: Do I need to deflate my tires when flying with my bike?
Some airlines require it. Deflate them enough to fit in your case, but leave enough air to keep tubeless tires seated.
Q4: Can I bring CO2 cartridges for my tires?
No, most airlines prohibit CO2 cartridges in both carry-on and checked luggage.
Q5: What tools should I pack when flying with my bike?
Pack all the tools you need to reassemble your bike, including an air pump and torque wrench.
Q6: Is it better to ship my bike or fly with it?
Shipping can be more convenient but often more expensive. Consider the costs, logistics, and your personal preference.
Q7: What should I do if my bike is damaged during the flight?
Document the damage immediately, file a claim with the airline, and keep all receipts for repairs.
Q8: Do I need to remove the pedals when packing my bike?
Yes, you’ll almost always need to remove the pedals to fit your bike in the case.
Q9: How can I avoid oversize baggage fees?
Use a smaller bike bag designed to meet the airline’s size restrictions, or choose an airline with more lenient policies.
Q10: Should I purchase travel insurance for my bike?
Yes, travel insurance is a good idea, especially if you’re traveling with an expensive bike.
At usabikers.net, we understand your passion for biking and the importance of keeping your gear safe. That’s why we’ve compiled this comprehensive guide to help you navigate the complexities of transporting your bike on a plane. Remember to visit usabikers.net for more in-depth articles, reviews, and community forums to share your experiences and tips with fellow bikers.
Ready to embark on your next biking adventure? Visit usabikers.net now to explore more articles, join our community forums, and get all the information you need for your next ride. Don’t forget to check out our guides on bike maintenance, gear reviews, and the best biking destinations in the USA!
Address: 801 Sturgis Main St, Sturgis, SD 57785, United States.
Phone: +1 (605) 347-2000.
Website: usabikers.net.

