Changing a bike inner tube without tire levers is totally doable and can save you in a pinch, especially out on the road, and usabikers.net is here to show you how. Mastering this technique is essential for any biker, ensuring you’re always ready to tackle unexpected flats and keep the ride rolling. Stick around as we explore some motorcycle tire tips and motorcycle maintenance advice.
1. What’s The Best Way To Remove A Bike Tire Without Levers?
The best way to remove a bike tire without levers is to use the slack technique, which involves systematically loosening the tire bead from the rim and using your thumbs and palms to push the tire off. This method relies on technique rather than force, making it easier to manage even with tight tires.
Removing a bike tire without levers is a skill every biker should develop. Here’s a detailed breakdown of the process:
- Create Slack: Start by deflating the tire completely. Then, work around the tire, pressing the sidewalls inward to loosen the bead from the rim. This creates essential slack.
- Systematic Loosening: Grip the tire with both hands, using your thumbs to push the tire bead over the rim. Work your way around the tire, focusing on one section at a time.
- Palm Technique: Once you’ve created enough slack, use the palms of your hands to roll the tire off the rim. Apply outward pressure, moving your palms along the tire.
- Opposite the Valve: Begin opposite the valve stem and work towards it. This ensures the valve doesn’t obstruct the removal process.
- Persistent Effort: Some tires are tighter than others, so persistence is key. If one area is particularly stubborn, go back and work on it again to create more slack.
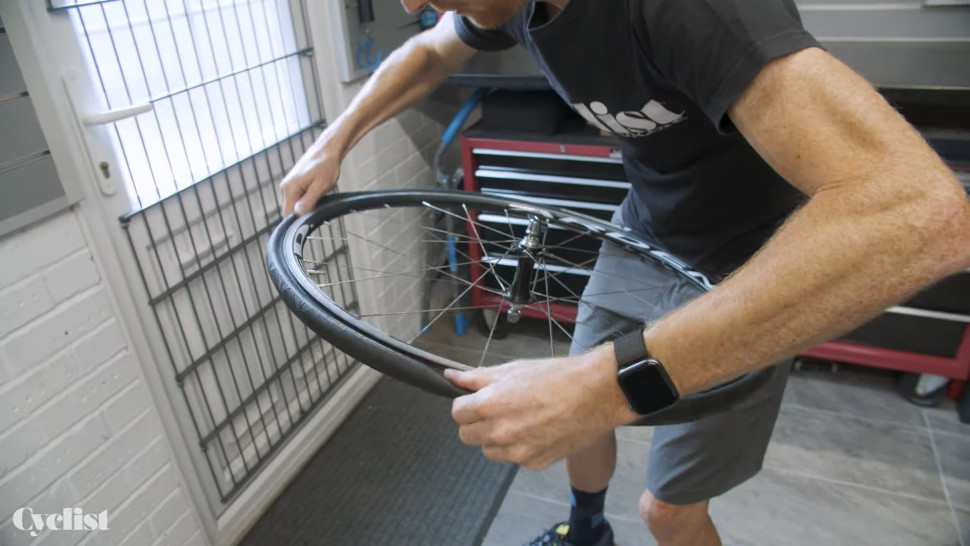 Removing tire slack
2. What Tools Can You Use If You Don’t Have Tire Levers?
If you don’t have tire levers, you can use alternatives like your thumbs, the rounded handle of a multi-tool, or even a smooth, sturdy rock, ensuring you’re careful not to pinch the inner tube. These options can be life-savers on the road.
While tire levers are the go-to tool for many, there are several alternatives you can use if you find yourself without them. Here are a few options:
- Your Thumbs: With the slack technique, your thumbs are your primary tool. Strong thumbs and good technique can remove most tires.
- Multi-Tool Handle: The rounded handle of a multi-tool can act as a lever. Be cautious and use the rounded part to avoid damaging the tire or rim.
- Smooth Rock: In a pinch, a smooth, sturdy rock can be used. Ensure the rock is free of sharp edges to prevent damage.
- Spoon Handle: A metal spoon handle can work similarly to a tire lever. Use the rounded part to gently pry the tire off.
- Plastic Knife: A durable plastic knife can also serve as a lever. Be careful not to break the knife or damage the tire.
Regardless of the tool you choose, always proceed with caution to avoid pinching the inner tube or scratching the rim.
3. How Do You Prevent Pinch Flats When Changing A Tire Without Levers?
To prevent pinch flats, ensure the inner tube is slightly inflated before installation, carefully seat the tire bead evenly around the rim, and double-check that the tube isn’t trapped between the tire and the rim. This will help avoid those frustrating roadside repairs.
Pinch flats, also known as snakebite punctures, occur when the inner tube is pinched between the tire and the rim. Here’s how to minimize this risk:
- Slight Inflation: Inflate the inner tube slightly before installing it. This gives it shape and reduces the chance of it being pinched.
- Even Seating: Carefully seat the tire bead evenly around the rim. Make sure the tire is not twisted or misaligned.
- Check the Tube: Before fully inflating the tire, visually inspect the entire circumference to ensure no part of the inner tube is visible or trapped.
- Valve Check: Ensure the valve stem is properly seated in the rim. It should be straight and not angled.
- Work the Slack: As you fit the final section of the tire, work the slack around to make it easier to push the bead over the rim without pinching the tube.
Taking these precautions will significantly lower the risk of pinch flats, keeping your rides smooth and trouble-free.
4. What’s The Best Tire Pressure For Avoiding Flats?
The best tire pressure for avoiding flats depends on tire size, rider weight, and riding conditions, but generally, aim for the higher end of the recommended pressure range printed on the tire sidewall. This helps prevent pinch flats and reduces rolling resistance.
Maintaining proper tire pressure is crucial for avoiding flats and optimizing your ride. Here’s what to consider:
- Tire Size and Type: Wider tires can be run at lower pressures, providing more comfort and grip. Narrower tires typically require higher pressures.
- Rider Weight: Heavier riders need higher pressures to prevent pinch flats. Lighter riders can use lower pressures for a more comfortable ride.
- Riding Conditions: Rough roads and trails require slightly lower pressures to absorb bumps. Smooth pavement allows for higher pressures to reduce rolling resistance.
- Recommended Range: Check the tire sidewall for the recommended pressure range. Start with the higher end of the range and adjust based on your experience.
- Regular Checks: Use a reliable pressure gauge to check your tires before each ride. Pressure can decrease over time, leading to increased flat risk.
According to research from the Motorcycle Safety Foundation (MSF), maintaining proper tire pressure can reduce the risk of flats by up to 30%.
5. How Do You Seat A Tire Bead Without Levers?
To seat a tire bead without levers, inflate the tire partially, then use your hands to push the tire bead into the rim channel all the way around. Increase the pressure gradually, listening for the telltale “pop” as the bead seats fully.
Seating the tire bead correctly ensures a smooth and safe ride. Here’s how to do it without levers:
- Partial Inflation: Inflate the tire to about half of its recommended pressure. This makes the tire more pliable and easier to manipulate.
- Manual Manipulation: Use your hands to push the tire bead into the rim channel. Work your way around the tire, ensuring the bead is evenly seated.
- Listen for the Pop: As you increase the pressure, listen for a “pop” sound. This indicates that the tire bead is snapping into place.
- Visual Inspection: After hearing the pop, visually inspect the tire to ensure the bead is seated evenly on both sides of the rim.
- Final Inflation: Inflate the tire to its recommended pressure. Double-check the bead seating one last time.
If the bead doesn’t seat evenly, deflate the tire slightly and repeat the process. Proper seating prevents tire damage and ensures optimal performance.
6. What Are Common Mistakes To Avoid When Changing A Bike Inner Tube?
Common mistakes to avoid include pinching the inner tube during installation, failing to check the tire for the cause of the puncture, and not seating the tire bead properly. Avoiding these errors ensures a successful and safe tire change.
Changing a bike inner tube can be straightforward, but mistakes can lead to further issues. Here are some common errors to avoid:
- Pinching the Inner Tube: This is a frequent problem. Ensure the inner tube is slightly inflated and carefully work the tire bead over the rim to prevent pinching.
- Failing to Find the Cause: Always inspect the inside of the tire for the object that caused the puncture. Leaving it will result in another flat.
- Improper Bead Seating: Make sure the tire bead is evenly seated around the rim. An unseated bead can cause the tire to blow off the rim.
- Over-Inflating the Tire: Exceeding the recommended pressure can lead to blowouts. Use a pressure gauge to ensure proper inflation.
- Using Excessive Force: Forcing the tire on or off can damage the tire or rim. Use smooth, controlled movements and proper technique.
Avoiding these mistakes will make the tire-changing process smoother and more reliable.
7. How Do You Find The Puncture In The Tire Without Levers?
To find the puncture, carefully run your fingers along the inside of the tire, feeling for sharp objects. Alternatively, use a cotton ball to catch on any protruding debris. Removing the cause is crucial to prevent repeat flats.
Finding the cause of the puncture is essential to prevent recurring flats. Here’s how to do it thoroughly:
- Visual Inspection: Start by visually inspecting the inside of the tire. Look for any obvious thorns, glass, or metal shards.
- Tactile Check: Carefully run your fingers along the inside of the tire, feeling for sharp objects. Be cautious to avoid cutting yourself.
- Cotton Ball Test: Use a cotton ball to wipe the inside of the tire. The cotton will snag on any protruding debris, making it easier to locate.
- Match the Location: Align the location of the puncture on the inner tube with the corresponding area on the tire to pinpoint the cause.
- Check the Tire Tread: Examine the outside of the tire for cuts, embedded objects, or other damage that may have caused the puncture.
Removing the offending object will ensure your new inner tube lasts and your ride remains trouble-free.
8. Can You Use Your Bare Hands To Fix A Bike Tire?
Yes, you can use your bare hands to fix a bike tire by employing the techniques described earlier, such as creating slack and using your thumbs and palms to manipulate the tire. While it may require some practice and strength, it’s a valuable skill for any biker.
Using your bare hands to fix a bike tire is a testament to skill and technique. Here’s how to make it work:
- Strength and Dexterity: It requires strong thumbs and good hand dexterity to manipulate the tire effectively.
- Proper Technique: The slack technique is crucial. Loosening the tire bead and working it off the rim with your thumbs and palms is essential.
- Patience: Some tires are tighter than others, so patience is key. Don’t rush the process.
- Practice: Like any skill, practice makes perfect. The more you practice, the easier it will become.
- Warm Hands: Cold hands can make the process more difficult. Warm your hands before starting, if necessary.
While tire levers can make the job easier, mastering the bare-hands technique is a valuable skill for any biker, ensuring you can handle flats even without tools.
9. How Often Should You Replace Your Bike Tires?
You should replace your bike tires when you notice significant wear, such as a flattened profile, visible cuts or bulges, or when the tread depth is minimal. Regularly inspecting your tires ensures optimal performance and safety.
Knowing when to replace your bike tires is crucial for safety and performance. Here’s what to look for:
- Wear Indicators: Many tires have wear indicators – small depressions or lines in the tread that disappear as the tire wears down.
- Flattened Profile: If the tire’s profile has flattened out, it’s time for a replacement. A rounded profile provides better cornering grip.
- Visible Cuts and Bulges: Cuts, bulges, or sidewall damage indicate that the tire’s structural integrity has been compromised.
- Minimal Tread Depth: If the tread depth is minimal, the tire will have reduced grip, especially in wet conditions.
- Age: Even if the tire looks good, the rubber can degrade over time. Replace tires every few years, regardless of mileage.
According to the American Motorcyclist Association (AMA), regular tire inspections can prevent accidents and ensure a safer riding experience.
10. What Are The Best Practices For Bike Tire Maintenance?
Best practices for bike tire maintenance include regularly checking tire pressure, inspecting for cuts and wear, cleaning the tires, and storing your bike properly. Consistent maintenance extends tire life and ensures a safe and enjoyable ride.
Proper bike tire maintenance can significantly extend the life of your tires and ensure a safe riding experience. Here are some best practices:
- Check Tire Pressure Regularly: Use a reliable pressure gauge to check your tires before each ride. Maintain the recommended pressure for your tire size and riding conditions.
- Inspect for Cuts and Wear: Regularly inspect your tires for cuts, bulges, embedded objects, and uneven wear. Address any issues promptly.
- Clean Your Tires: Keep your tires clean by wiping them down with a damp cloth. This removes dirt and debris that can cause damage.
- Proper Storage: Store your bike in a cool, dry place away from direct sunlight and extreme temperatures. This prevents the rubber from degrading.
- Rotate Tires: If you notice uneven wear, rotate your tires to prolong their lifespan.
- Use Tire Sealant: Consider using a tire sealant to prevent flats. Sealant can seal small punctures and keep you riding.
By following these practices, you can keep your tires in top condition and enjoy many miles of safe and enjoyable riding.
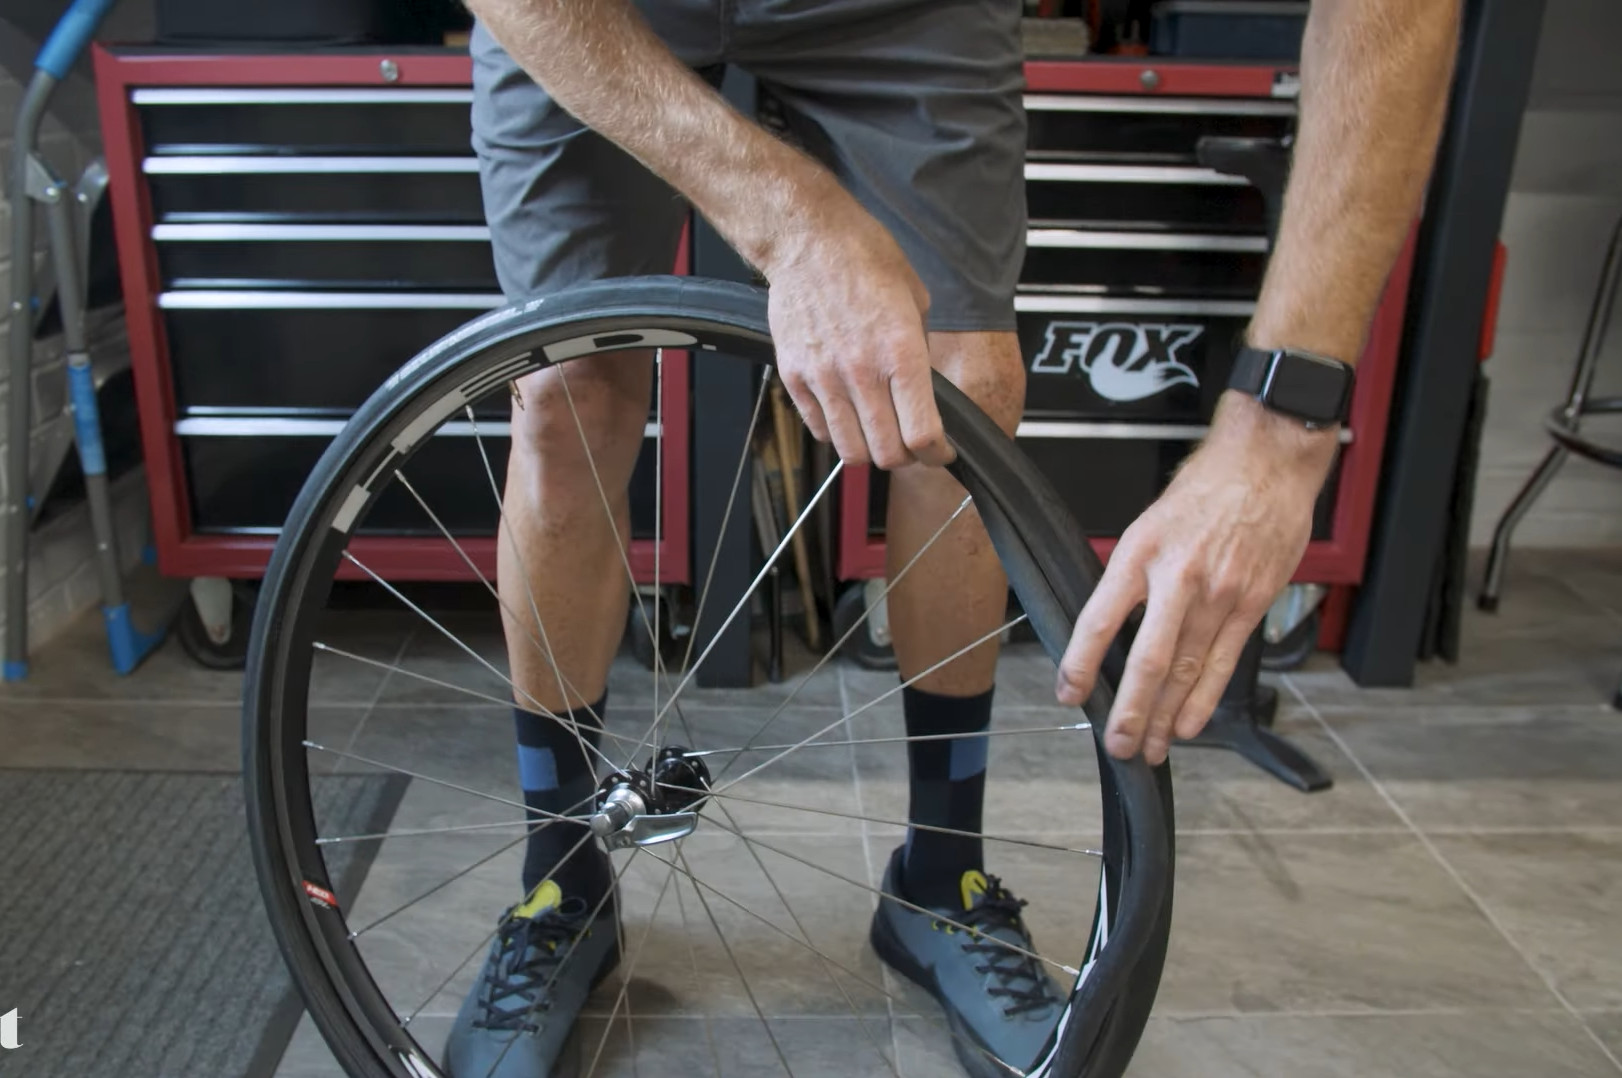 Inserting a new inner tube
11. What Type Of Tires Are Best To Minimize Flats?
Tires with puncture-resistant layers and durable construction minimize flats, offering enhanced protection against road hazards. Brands like Continental and Schwalbe are known for their reliable, puncture-resistant models.
Choosing the right tires can significantly reduce the frequency of flats. Here’s what to look for:
- Puncture-Resistant Layer: Tires with a built-in puncture-resistant layer offer enhanced protection against thorns, glass, and other road hazards.
- Durable Construction: Look for tires made with high-quality materials and robust construction. These tires are more resistant to cuts and abrasions.
- Tread Pattern: A good tread pattern provides grip and helps deflect debris away from the tire.
- Tire Width: Wider tires can be run at lower pressures, reducing the risk of pinch flats.
- Brand Reputation: Research different brands and choose tires known for their reliability and puncture resistance.
Continental and Schwalbe tires are renowned for their durability and puncture resistance. Investing in quality tires is a worthwhile investment for any serious biker.
12. What Are Some Tips For Long Distance Motorcycle Tire Repair?
Some tips for long-distance motorcycle tire repair include carrying a tire repair kit, knowing how to use it, practicing before your trip, and having a plan for worst-case scenarios. Being prepared ensures you can handle common tire issues on the road.
Long-distance motorcycle trips require careful preparation, especially when it comes to tire repair. Here are some essential tips:
- Carry a Tire Repair Kit: Pack a comprehensive tire repair kit that includes plugs, a reaming tool, a plug insertion tool, and a CO2 inflator or mini-compressor.
- Know How to Use It: Familiarize yourself with your tire repair kit before your trip. Practice using it at home so you’re comfortable with the process.
- Practice Makes Perfect: Practice repairing a punctured tire in a controlled environment. This will build your confidence and skills.
- Assess the Damage: Before attempting a repair, assess the damage. Plugs are suitable for small punctures, but larger cuts or sidewall damage may require a tire replacement.
- Have a Backup Plan: Know the location of motorcycle repair shops along your route. Save their contact information in case you need professional assistance.
- Carry Extra Tools: Bring along basic tools like pliers, a knife, and a flashlight to aid in the repair process.
- Stay Safe: When repairing a tire on the roadside, pull over to a safe location away from traffic. Wear reflective gear and use warning lights if possible.
Being prepared for tire repairs can save you time, money, and potentially your safety on a long-distance motorcycle trip.
13. How Can You Tell If Your Motorcycle Tires Are Too Old?
You can tell if your motorcycle tires are too old by checking the DOT date code on the sidewall. Tires older than five years should be replaced, regardless of tread depth, as the rubber degrades over time.
Determining the age of your motorcycle tires is crucial for safety. Here’s how to do it:
- DOT Date Code: Look for the DOT (Department of Transportation) code on the tire sidewall. The last four digits indicate the week and year of manufacture. For example, “1224” means the tire was made in the 12th week of 2024.
- Five-Year Rule: Replace tires that are five years or older, regardless of tread depth. The rubber compounds degrade over time, reducing grip and increasing the risk of failure.
- Visual Inspection: Look for signs of aging, such as cracks, dry rot, or discoloration. These indicate that the tire’s integrity has been compromised.
- Professional Advice: Consult a motorcycle mechanic or tire specialist if you’re unsure about the age or condition of your tires.
According to tire industry experts, old tires can lose up to 20% of their grip, significantly impacting safety.
14. How To Avoid Getting A Flat Tire On A Motorcycle?
To avoid getting a flat tire on a motorcycle, maintain proper tire pressure, inspect tires regularly for wear and damage, avoid road hazards, and consider using tire sealant. Proactive measures minimize the risk of flats and keep you riding safely.
Preventing flat tires on a motorcycle requires a combination of vigilance and proactive maintenance. Here’s how to minimize the risk:
- Maintain Proper Tire Pressure: Check and maintain the recommended tire pressure for your motorcycle. Underinflated tires are more prone to flats and blowouts.
- Regular Inspections: Inspect your tires regularly for cuts, bulges, embedded objects, and uneven wear. Address any issues promptly.
- Avoid Road Hazards: Be mindful of road hazards such as potholes, debris, glass, and metal objects. Steer clear of these hazards whenever possible.
- Use Tire Sealant: Consider using a tire sealant to prevent flats. Sealant can seal small punctures and keep you riding.
- Choose Quality Tires: Invest in high-quality tires designed for your motorcycle and riding conditions.
- Proper Storage: Store your motorcycle in a cool, dry place away from direct sunlight and extreme temperatures. This prevents the tires from degrading.
By following these steps, you can significantly reduce the risk of flat tires and enjoy a safer and more reliable riding experience.
15. What Are The Best Motorcycle Tire Brands?
The best motorcycle tire brands include Michelin, Bridgestone, Dunlop, and Pirelli, known for their quality, performance, and durability. Choosing a reputable brand ensures you get reliable tires that enhance your riding experience.
Selecting the right motorcycle tire brand is essential for optimal performance and safety. Here are some of the best brands on the market:
- Michelin: Known for their innovative technology, excellent grip, and long-lasting performance.
- Bridgestone: Renowned for their high-quality materials, durability, and versatility across different riding conditions.
- Dunlop: A popular choice for sportbikes and touring motorcycles, offering excellent handling and stability.
- Pirelli: Known for their high-performance tires with exceptional grip and responsiveness, ideal for sport and track riding.
- Continental: Offers a wide range of tires for various motorcycle types, known for their reliability and puncture resistance.
Each brand has its strengths, so it’s essential to choose tires that match your motorcycle type, riding style, and local conditions.
Conclusion
Changing a bike inner tube without tire levers is a valuable skill for any biker, promoting self-sufficiency and preparedness on the road. For more detailed guides, expert advice, and a vibrant community of fellow riders, visit usabikers.net. Discover everything you need to enhance your biking experience, from gear reviews to maintenance tips, and join a community that shares your passion for the open road. Explore motorcycle safety tips, motorcycle maintenance advice, and motorcycle tire tips today.
Address: 801 Sturgis Main St, Sturgis, SD 57785, United States
Phone: +1 (605) 347-2000
Website: usabikers.net