Are you experiencing brake rub or reduced stopping power on your disc brake bike? Don’t worry, usabikers.net is here to guide you through the process of adjusting your disc brakes for optimal performance. We’ll cover everything from identifying the components to making precise adjustments so you can enjoy a smooth, confident, and safe riding experience. Learn about disc brake adjustment screws, proper clearance, and other valuable insights and tips to ensure your bike is in top-notch condition for all your adventures.
1. Understanding Disc Brake Components
Before you begin adjusting your disc brakes, it’s crucial to understand the components involved. This knowledge will make the adjustment process smoother and more effective.
1.1 What are the Key Components of a Disc Brake System?
The key components include the rotor, caliper, brake pads, and adjustment screws. The rotor is a metal disc attached to the wheel hub. The caliper houses the brake pads and pistons, clamping onto the rotor when you apply the brakes. The brake pads are what physically contact the rotor to slow or stop the bike. Understanding these components is key to performing effective disc brake adjustments.
- Rotor: The rotor is a metal disc attached to the wheel hub and provides a surface for the brake pads to grip.
- Caliper: The caliper houses the brake pads and pistons, clamping onto the rotor when the brake lever is activated.
- Brake Pads: These are located inside the caliper and press against the rotor to slow or stop the bike.
- Adjustment Screws: These screws allow you to fine-tune the position of the brake pads relative to the rotor.
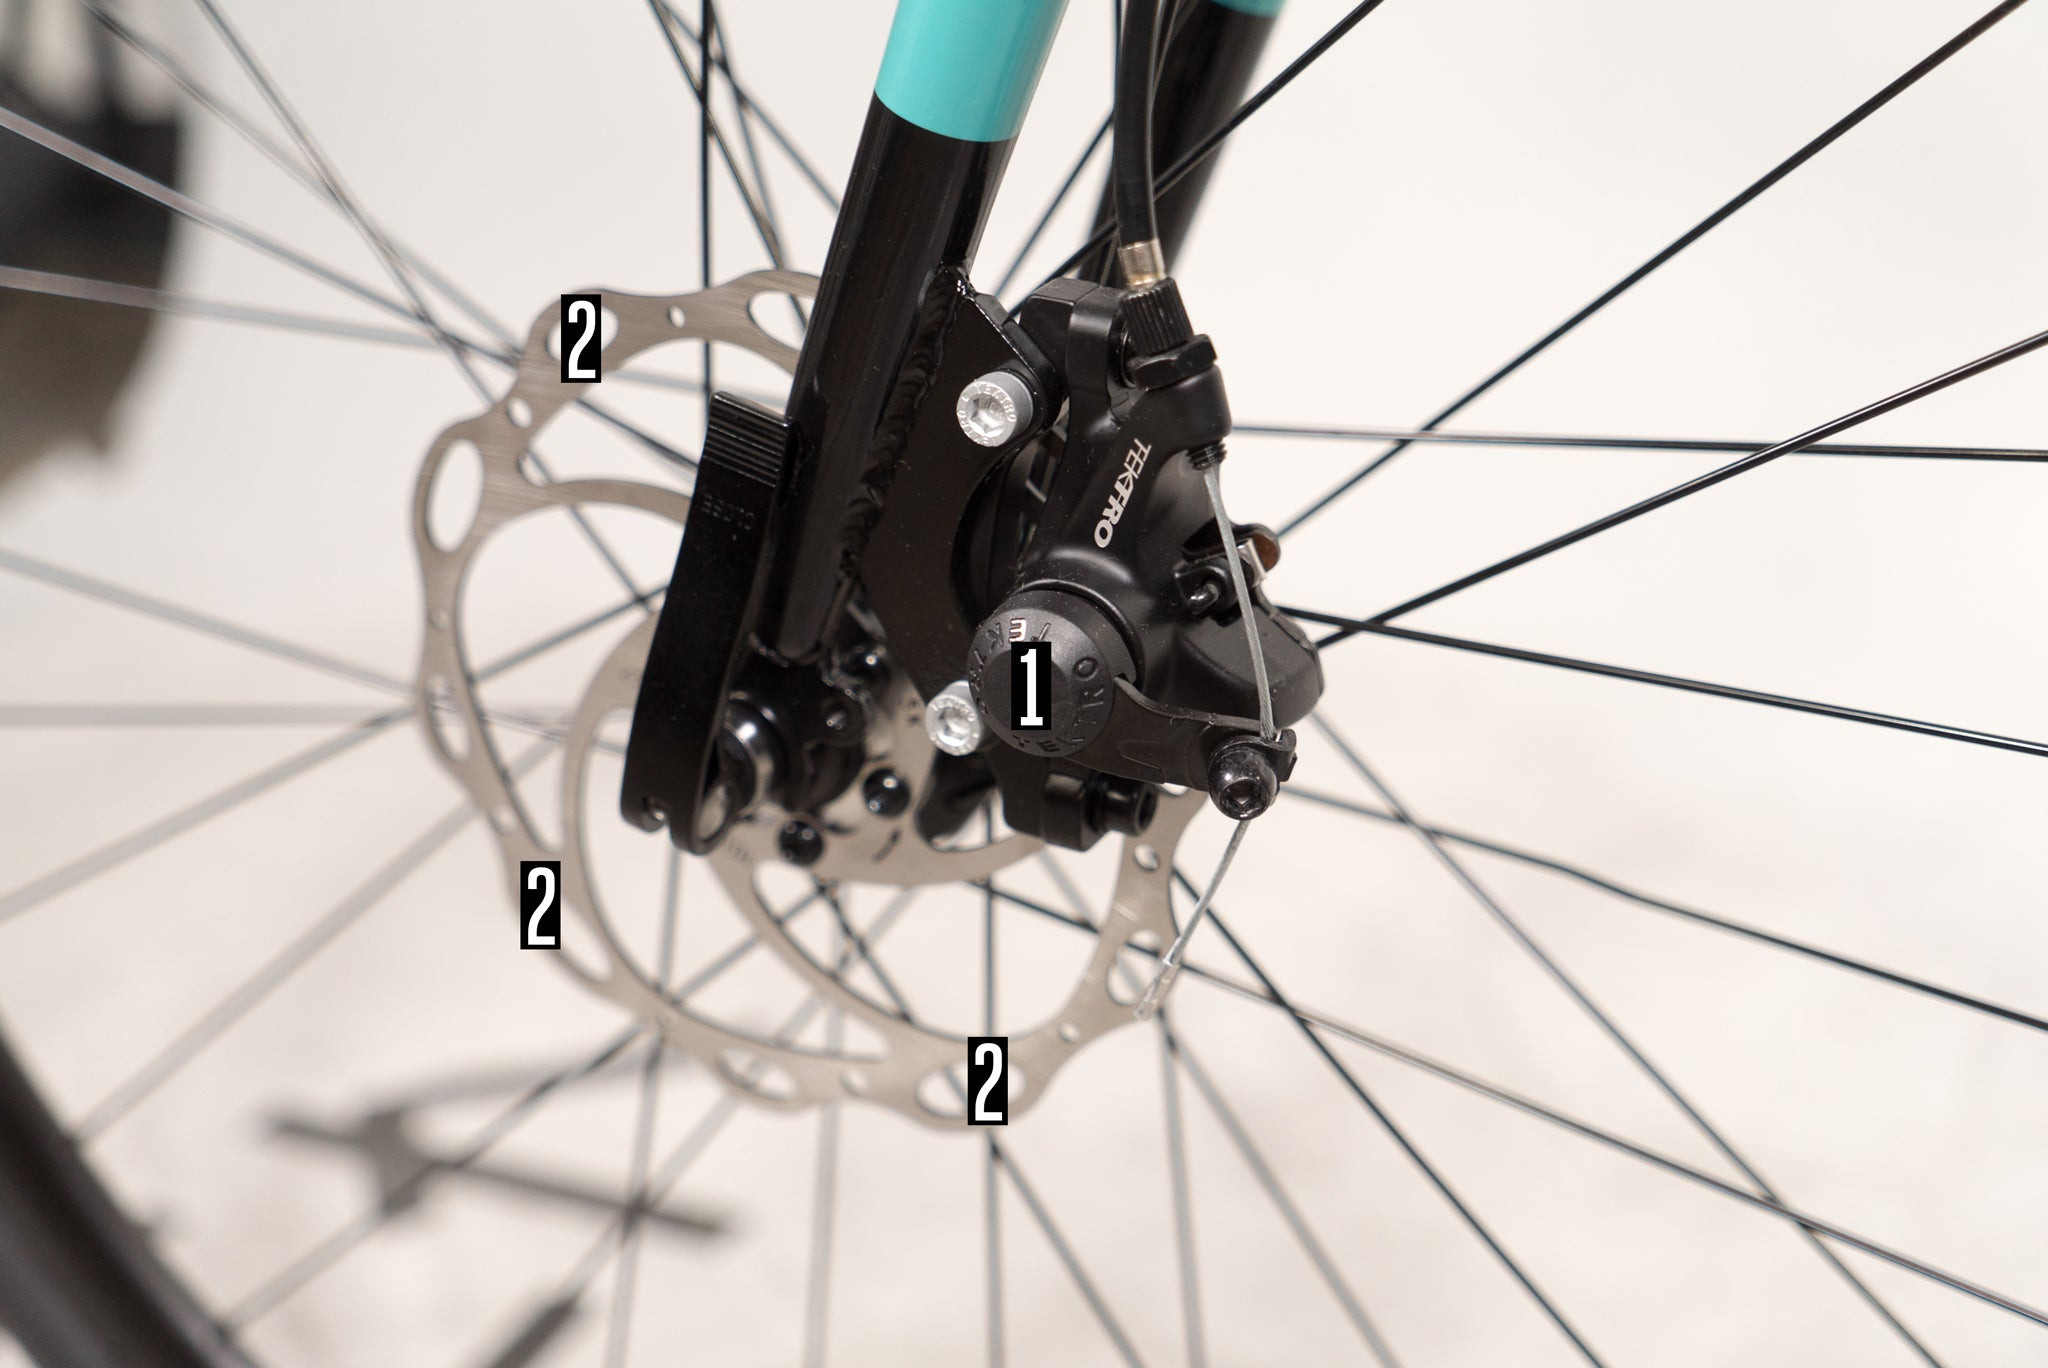 Disc brake components labelled
1.2 Where Can I Find the Brake Caliper on My Bike?
Unlike rim brakes, the disc brake caliper is located near the wheel hub on the fork or frame. Locating the brake caliper is the first step in understanding how to adjust disc brakes effectively.
- Front Brake: Look for the caliper mounted on the fork, near the front wheel hub.
- Rear Brake: The caliper will be mounted on the frame, near the rear wheel hub.
2. Identifying Common Disc Brake Problems
Recognizing common issues will help you determine if your disc brakes need adjustment. Addressing these problems promptly ensures your safety and enhances your riding experience.
2.1 What Are the Signs of Misaligned Disc Brakes?
Signs include brake rub, squealing noises, reduced stopping power, and uneven pad wear. Correcting these issues will improve your disc brake performance and extend the life of your brake components.
- Brake Rub: The brake pads are constantly rubbing against the rotor, even when the brake lever is not engaged.
- Squealing Noises: The brakes produce a high-pitched squealing sound when applied.
- Reduced Stopping Power: The brakes feel weak and require more effort to stop the bike.
- Uneven Pad Wear: One brake pad wears down faster than the other.
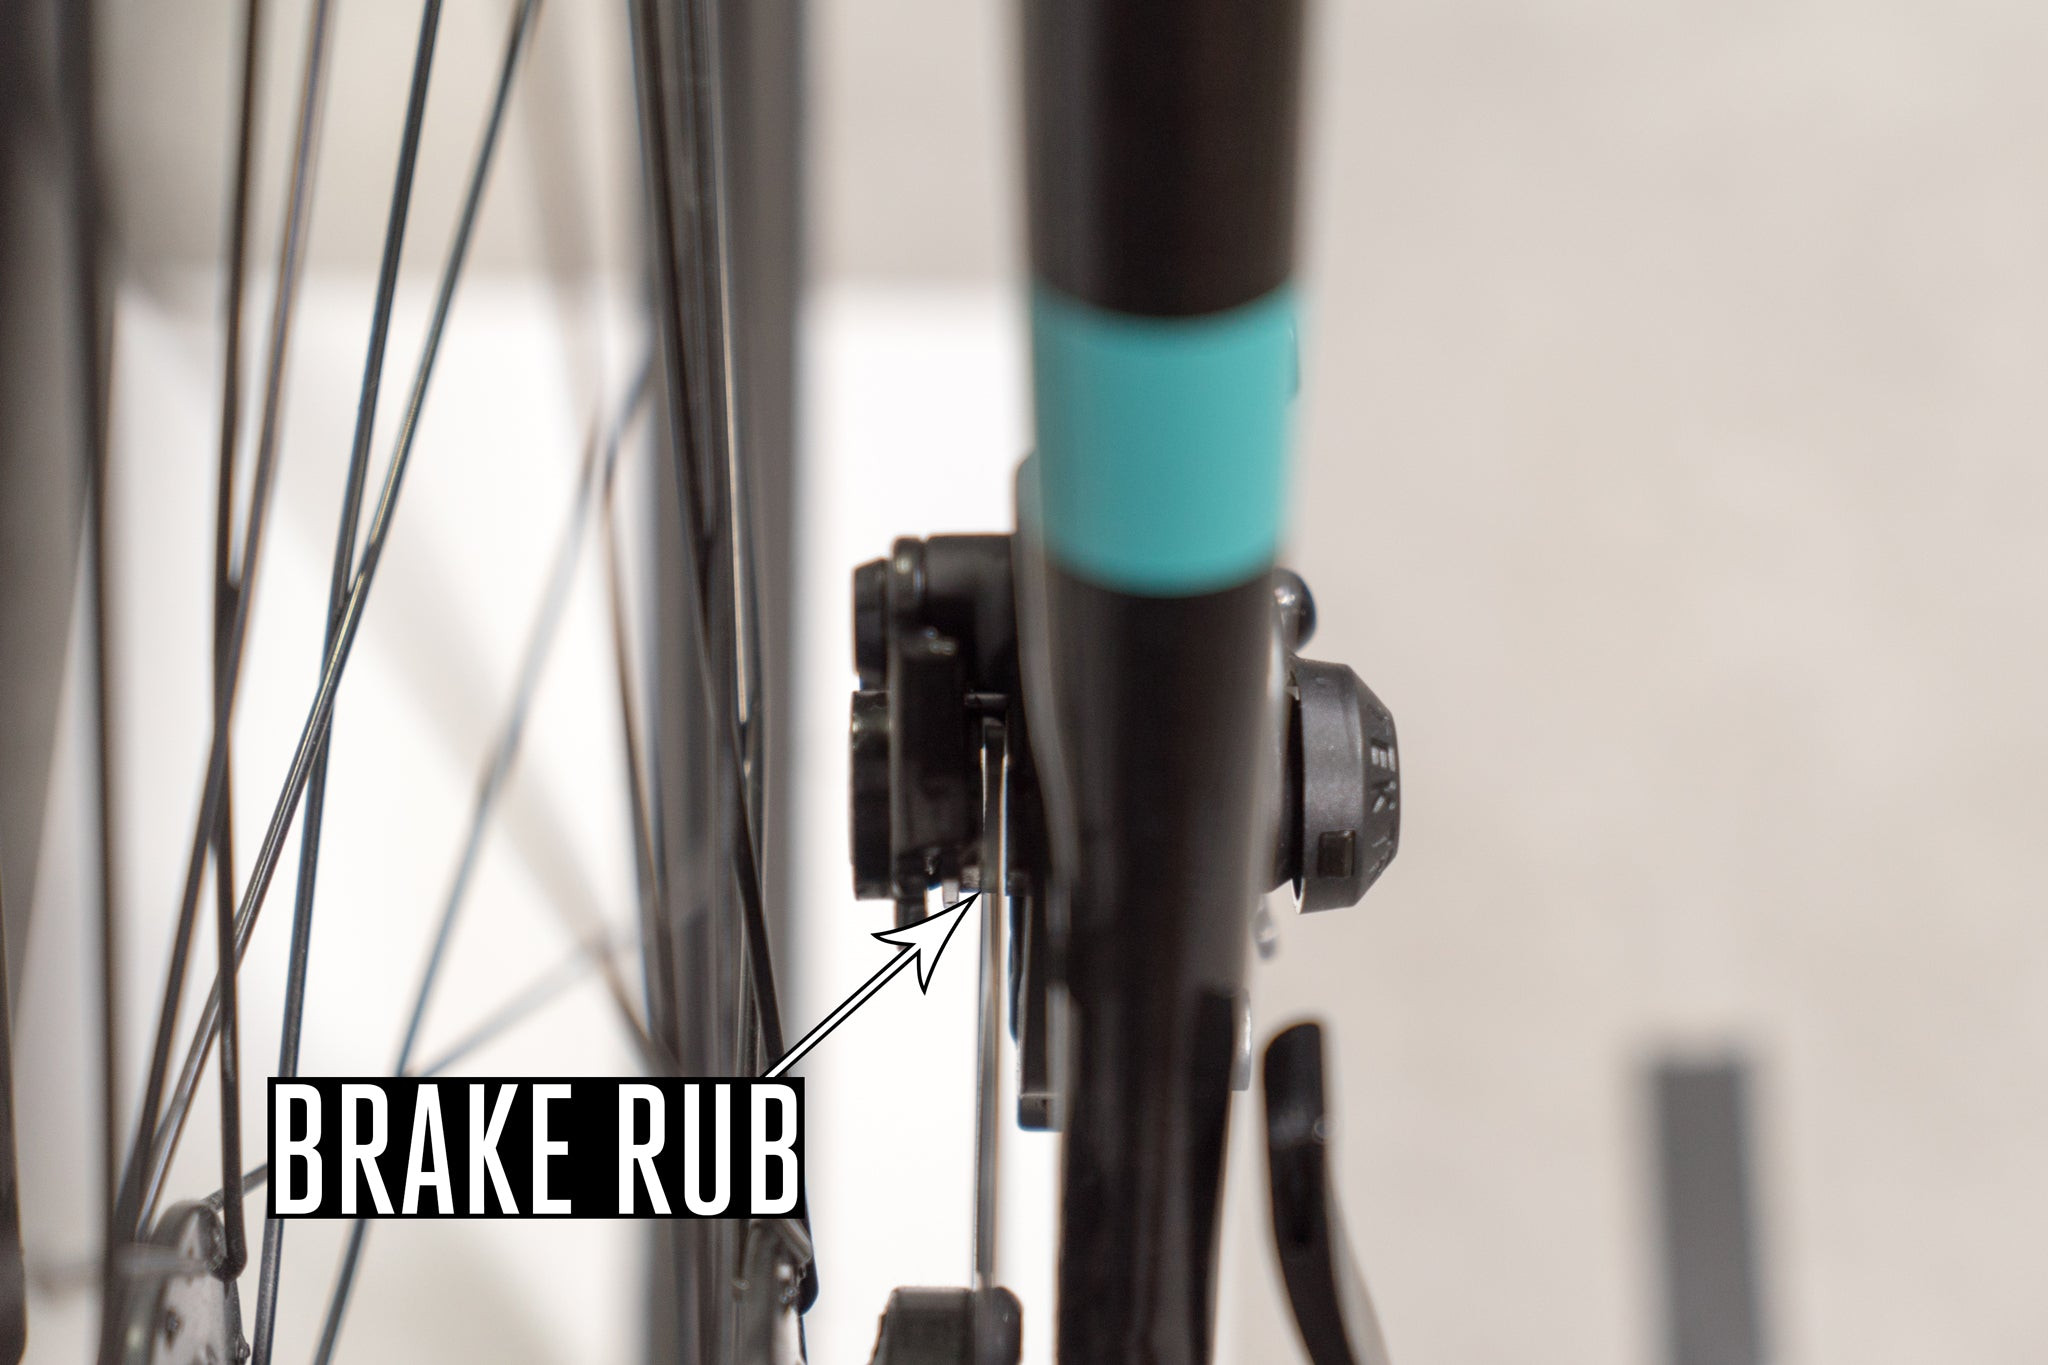 Brake rub on disc brake
2.2 Why Does Brake Rub Occur on Disc Brakes?
Brake rub occurs when the caliper is not centered over the rotor, causing the pads to contact the rotor even when the brake lever is released.
According to research from the Motorcycle Safety Foundation (MSF), in July 2025, misaligned calipers are the most common cause of brake rub in disc brake systems.
- Misaligned Caliper: The caliper is not centered over the rotor, causing the pads to rub.
- Bent Rotor: A warped or bent rotor can cause intermittent rubbing.
- Contaminated Pads or Rotor: Dirt, oil, or other contaminants can cause the pads to stick to the rotor.
- Loose Caliper Bolts: If the caliper bolts are loose, the caliper can shift and cause rubbing.
3. Tools and Materials Needed for Disc Brake Adjustment
Having the right tools and materials will make the adjustment process much easier and more efficient. Make sure you have everything on hand before you start working on your brakes.
3.1 What Tools Do I Need to Adjust Disc Brakes?
You’ll need a set of Allen wrenches, a clean rag, isopropyl alcohol, and possibly a rotor truing tool. Having the right tools ensures that you can perform the adjustment safely and accurately.
- Allen Wrenches: A set of Allen wrenches of various sizes to adjust the caliper bolts and pad adjustment screws.
- Clean Rag: For cleaning the rotor and brake pads.
- Isopropyl Alcohol: To remove contaminants from the rotor and brake pads.
- Rotor Truing Tool (Optional): For straightening a bent rotor.
3.2 How Important is it to Use Cleaners Specifically Designed for Bike Components?
Using cleaners specifically designed for bike components helps avoid damage and ensures optimal performance. These cleaners are formulated to remove dirt and grime without harming the delicate parts of your braking system.
- Brake Cleaner: Use a dedicated brake cleaner to remove contaminants from the rotor and pads.
- Avoid Harsh Chemicals: Do not use harsh chemicals like WD-40, as they can damage the brake pads and rotor.
4. Step-by-Step Guide to Adjusting Disc Brakes
Follow these steps to adjust your disc brakes and eliminate brake rub, improve stopping power, and ensure a smooth ride.
4.1 How Do I Loosen Caliper Bolts?
Loosen the caliper mounting bolts slightly, just enough to allow the caliper to move freely. Do not remove the bolts completely. This step is essential for centering the caliper over the rotor.
- Locate Caliper Bolts: Find the two bolts that secure the caliper to the fork or frame.
- Loosen Slightly: Use an Allen wrench to loosen the bolts slightly.
- Maintain Stability: Ensure the caliper remains in place while loosening the bolts.
4.2 What is the Process of Centering the Caliper?
Center the caliper by either manually aligning it or using the “spin and tighten” method. Proper centering ensures even contact between the brake pads and the rotor.
- Manual Alignment: Visually align the caliper so that the gap between each brake pad and the rotor is equal.
- Spin and Tighten: Spin the wheel and gently apply the brakes. While holding the brake lever, tighten the caliper bolts. Release the lever and check for rub.
4.3 How Do I Tighten Caliper Bolts?
Tighten the caliper bolts to the manufacturer’s specified torque setting. Using a torque wrench ensures the bolts are neither too loose nor too tight.
- Torque Specifications: Check the manufacturer’s specifications for the correct torque setting.
- Torque Wrench: Use a torque wrench to tighten the bolts to the specified torque.
- Alternating Pattern: Tighten the bolts in an alternating pattern to ensure even pressure.
4.4 What are the Steps to Adjust Pad Clearance?
Adjust the pad clearance using the pad adjustment screws. Proper clearance prevents brake rub and ensures responsive braking.
- Locate Adjustment Screws: Find the pad adjustment screws on the caliper.
- Adjust Screws: Use an Allen wrench to adjust the screws, increasing or decreasing the gap between the pads and the rotor.
- Test Clearance: Spin the wheel to check for rub. Readjust if necessary.
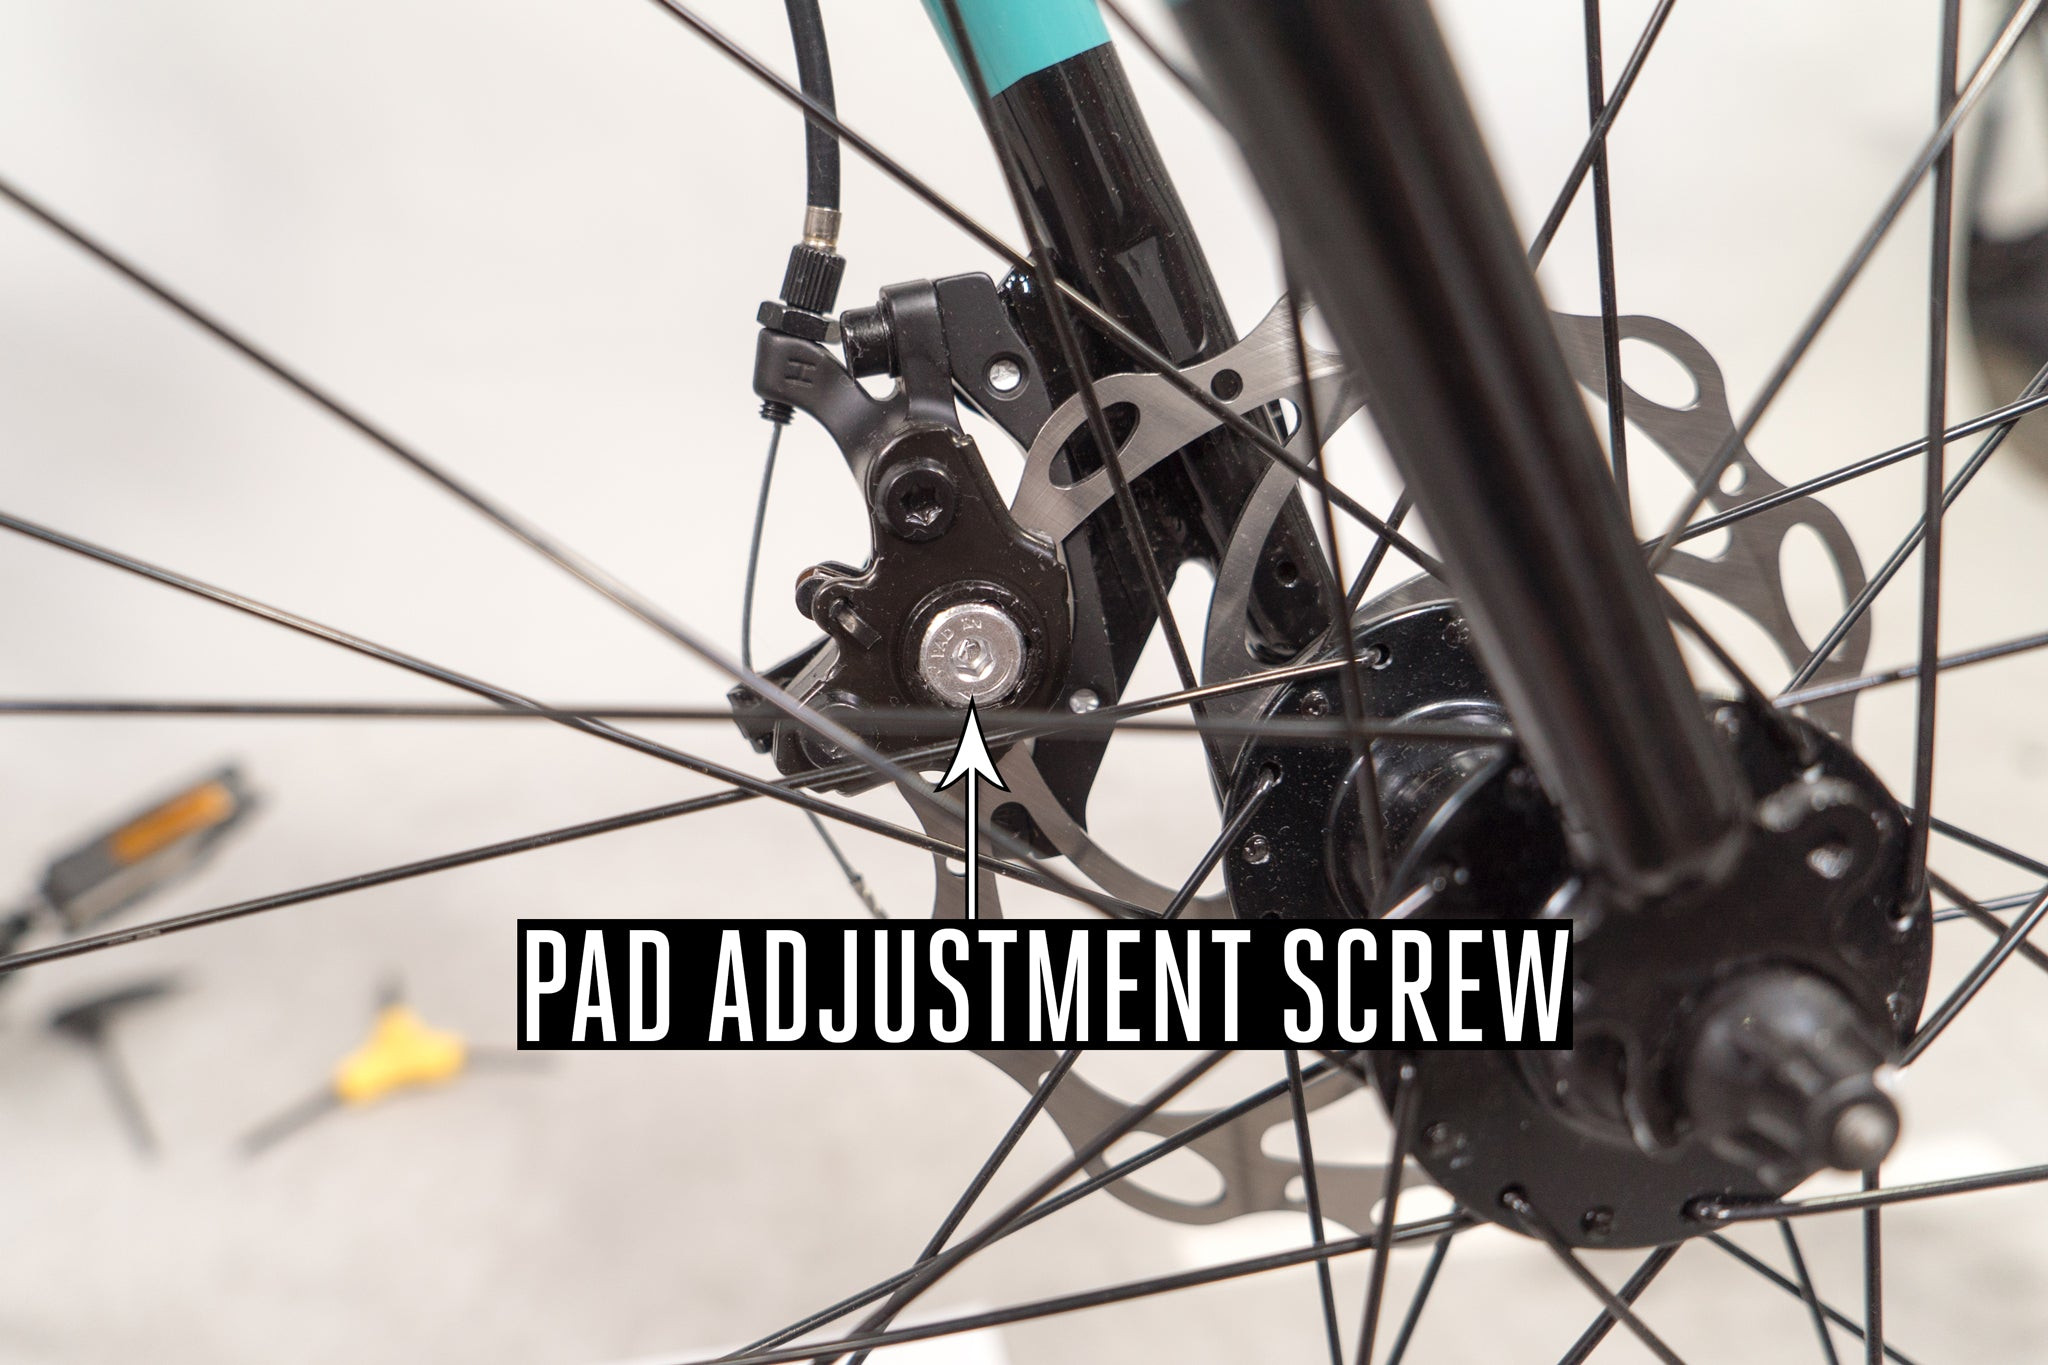 Pad adjustment screw
4.5 How Do I Check My Work?
Spin the wheel to ensure it spins freely without any brake rub. Apply the brakes to ensure they engage properly and provide sufficient stopping power. This final check is essential for safety.
- Free Spin: Spin the wheel and listen for any rubbing sounds.
- Brake Engagement: Apply the brakes firmly to ensure they engage properly.
- Stopping Power: Test the stopping power to ensure the brakes are effective.
5. Advanced Disc Brake Adjustments
For more complex issues, consider these advanced adjustments to ensure your disc brakes are performing at their best.
5.1 What Do I Do If the Rotor is Bent?
Use a rotor truing tool to carefully straighten any bends or warps in the rotor. A bent rotor can cause persistent brake rub and reduce braking performance.
- Rotor Truing Tool: Use a rotor truing tool to gently bend the rotor back into shape.
- Careful Adjustments: Make small, careful adjustments to avoid damaging the rotor.
- Check for Straightness: Regularly check the rotor for straightness as you make adjustments.
5.2 How Do I Replace Brake Pads?
Remove the old brake pads and install new ones, ensuring they are properly seated in the caliper. Replacing worn brake pads restores braking performance and ensures safety.
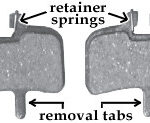
- Remove Old Pads: Remove the retaining bolt or clip and slide out the old brake pads.
- Install New Pads: Insert the new brake pads into the caliper, ensuring they are properly seated.
- Secure Pads: Secure the pads with the retaining bolt or clip.
5.3 What is the Proper Way to Bleed Disc Brakes?
Bleed the brakes to remove air bubbles from the hydraulic system, restoring braking power and feel. Bleeding the brakes requires specific tools and fluids.
According to the American Motorcyclist Association (AMA), bleeding your brakes regularly will improve braking performance.
- Bleed Kit: Use a hydraulic brake bleed kit to remove air bubbles from the system.
- Brake Fluid: Use the correct type of brake fluid specified by the manufacturer.
- Follow Instructions: Follow the bleed kit instructions carefully to avoid damaging the system.
6. Maintaining Your Disc Brakes
Regular maintenance is essential to keep your disc brakes in optimal condition and ensure your safety.
6.1 How Often Should I Clean My Disc Brakes?
Clean your disc brakes regularly, especially after riding in wet or muddy conditions. Regular cleaning prevents the buildup of dirt and grime, which can affect braking performance.
- Regular Intervals: Clean your brakes every few weeks, or more often if you ride in harsh conditions.
- Clean Rotor: Use a clean rag and isopropyl alcohol to wipe down the rotor.
- Clean Caliper: Use a brush to remove dirt and debris from the caliper.
6.2 What are the Signs That My Brake Pads Need Replacing?
Replace your brake pads when they are worn down to the minimum thickness indicated by the manufacturer, or if they are contaminated with oil or grease. Replacing worn pads ensures optimal braking performance.
- Minimum Thickness: Check the brake pads for the minimum thickness marking.
- Contamination: Replace pads that are contaminated with oil or grease.
- Reduced Performance: Replace pads if you notice a significant decrease in braking performance.
6.3 How Do I Store My Bike to Prevent Brake Problems?
Store your bike in a dry place to prevent rust and corrosion, which can affect braking performance. Proper storage can extend the life of your brake components.
- Dry Environment: Store your bike in a dry, well-ventilated area.
- Avoid Moisture: Avoid storing your bike in damp or humid conditions.
- Protect Components: Cover your bike to protect it from dust and debris.
7. Troubleshooting Common Disc Brake Issues
Addressing common problems will help you keep your disc brakes functioning properly and ensure a safe riding experience.
7.1 What Causes Brake Squeal and How Can I Fix It?
Brake squeal can be caused by contaminated brake pads, a dirty rotor, or misaligned calipers. Cleaning the rotor and pads, and aligning the caliper, can often resolve the issue.
- Clean Rotor and Pads: Use isopropyl alcohol to clean the rotor and brake pads.
- Align Caliper: Ensure the caliper is properly aligned over the rotor.
- Replace Pads: If cleaning and alignment don’t work, replace the brake pads.
7.2 Why Are My Brakes Still Rubbing After Adjustment?
If your brakes are still rubbing after adjustment, the rotor may be bent, or the caliper may not be properly centered. Check the rotor for straightness and realign the caliper.
- Check Rotor: Inspect the rotor for bends or warps.
- Realign Caliper: Realign the caliper to ensure it is centered over the rotor.
- Check Pad Clearance: Ensure there is sufficient clearance between the pads and the rotor.
7.3 How Do I Deal With Spongy Brakes?
Spongy brakes are often caused by air in the hydraulic system. Bleeding the brakes will remove the air bubbles and restore a firm brake feel.
- Bleed Brakes: Bleed the brakes to remove air bubbles from the system.
- Check for Leaks: Inspect the brake lines and calipers for leaks.
- Replace Fluid: Replace the brake fluid if it is old or contaminated.
8. Safety Tips for Working on Disc Brakes
Always prioritize safety when working on your disc brakes. These tips will help you avoid injury and ensure your brakes function properly.
8.1 What Safety Precautions Should I Take When Adjusting Brakes?
Wear gloves to protect your hands from chemicals and sharp edges. Work in a well-lit area to ensure you can see all the components clearly.
- Wear Gloves: Protect your hands with gloves.
- Well-Lit Area: Work in a well-lit area.
- Eye Protection: Wear safety glasses to protect your eyes.
8.2 How Do I Avoid Contaminating Brake Pads?
Avoid touching the brake pad friction surface with your bare hands, and keep the pads away from oil and grease. Contaminated brake pads can lose their effectiveness and cause brake squeal.
- Handle with Gloves: Always handle brake pads with clean gloves.
- Avoid Oil and Grease: Keep brake pads away from oil and grease.
- Clean Work Area: Ensure your work area is clean and free of contaminants.
8.3 What is the Importance of Following Manufacturer Instructions?
Always follow the manufacturer’s instructions for adjusting and maintaining your disc brakes. These instructions provide specific guidance for your brake system and ensure safe and effective operation.
- Read Manual: Read the manufacturer’s manual before working on your brakes.
- Follow Steps: Follow the instructions carefully.
- Torque Specs: Adhere to the specified torque settings for all bolts.
9. Benefits of Properly Adjusted Disc Brakes
Properly adjusted disc brakes offer numerous benefits, including improved safety, better performance, and a more enjoyable riding experience.
9.1 How Does Proper Adjustment Improve Safety?
Properly adjusted brakes provide reliable stopping power, reducing the risk of accidents and ensuring your safety in various riding conditions.
- Reliable Stopping Power: Properly adjusted brakes provide consistent and reliable stopping power.
- Predictable Performance: Properly adjusted brakes offer predictable performance in all weather conditions.
- Reduced Risk: Properly adjusted brakes reduce the risk of accidents.
9.2 What Performance Benefits Can I Expect?
Expect better modulation, more responsive braking, and a smoother, quieter ride with properly adjusted disc brakes. Optimal performance enhances your overall riding experience.
- Better Modulation: Properly adjusted brakes offer better control over braking force.
- Responsive Braking: Properly adjusted brakes respond quickly and effectively to your input.
- Smooth Ride: Properly adjusted brakes result in a smoother and quieter ride.
9.3 How Does Maintenance Extend the Life of Brake Components?
Regular maintenance prevents premature wear and tear, extending the life of your brake pads, rotors, and calipers. Saving money on replacements and ensuring long-term reliability.
- Prevent Wear: Regular maintenance prevents premature wear and tear.
- Extend Lifespan: Regular maintenance extends the lifespan of brake components.
- Save Money: Regular maintenance saves money on replacements.
10. Community and Resources for Disc Brake Enthusiasts
Connect with other disc brake enthusiasts and access valuable resources to enhance your knowledge and skills.
10.1 What are Some Popular Online Forums for Bike Mechanics?
Online forums like Bike Forums and Reddit’s r/bikewrench offer a wealth of information and support for bike mechanics of all levels.
- Bike Forums: A popular forum for discussing all aspects of cycling and bike maintenance.
- Reddit r/bikewrench: A subreddit dedicated to bike repair and maintenance.
- MTBR: A forum focused on mountain biking, with a large section on bike mechanics.
10.2 Where Can I Find Detailed Guides and Tutorials?
Websites like Park Tool and usabikers.net provide detailed guides and tutorials on disc brake adjustment and maintenance.
- Park Tool: A leading manufacturer of bike tools, with a comprehensive website offering repair guides and tutorials.
- usabikers.net: Here at usabikers.net, we are proud to offer a wide range of articles, reviews, and how-to guides to help you maintain your bike and enjoy the sport of cycling.
- YouTube: Many channels offer video tutorials on disc brake adjustment and maintenance.
10.3 How Can I Connect With Local Biker Communities?
Join local cycling clubs and attend bike maintenance workshops to connect with other enthusiasts and learn from experienced mechanics.
- Cycling Clubs: Join a local cycling club to meet other riders and learn from experienced mechanics.
- Bike Shops: Attend bike maintenance workshops at your local bike shop.
- Events: Participate in local cycling events and races.
 Urban biker
Adjusting your disc brakes may seem daunting, but with the right knowledge and tools, it’s a manageable task. By understanding the components, following the adjustment steps, and maintaining your brakes regularly, you can ensure a safe, smooth, and enjoyable riding experience. And remember, usabikers.net is always here to provide you with the information and resources you need to keep your bike in top condition.
Ready to dive deeper into the world of motorcycle maintenance and connect with a vibrant community of fellow enthusiasts? Visit usabikers.net today to explore our extensive collection of articles, participate in discussions, and find everything you need to fuel your passion for biking. Don’t miss out – your next great adventure starts here!
Address: 801 Sturgis Main St, Sturgis, SD 57785, United States
Phone: +1 (605) 347-2000
Website: usabikers.net
FAQ: Adjusting Disc Brakes
1. Why is my disc brake bike making noise?
Your disc brake bike might be making noise due to misaligned calipers, contaminated brake pads, or a bent rotor. Cleaning the rotor and pads, aligning the caliper, or replacing worn pads can often fix this.
2. How do I stop my disc brakes from rubbing?
To stop disc brakes from rubbing, loosen the caliper bolts, center the caliper over the rotor, tighten the bolts to the manufacturer’s specified torque, and adjust the pad clearance using the adjustment screws.
3. What tools are needed to adjust disc brakes on a bike?
You’ll need a set of Allen wrenches, a clean rag, isopropyl alcohol, and possibly a rotor truing tool. These tools ensure you can perform the adjustment safely and accurately.
4. How do I maintain disc brakes on my bike?
Maintain your disc brakes by cleaning them regularly, especially after riding in wet or muddy conditions. Also, replace brake pads when they are worn down to the minimum thickness indicated by the manufacturer.
5. What causes spongy brakes on a disc brake bike?
Spongy brakes are often caused by air in the hydraulic system. Bleeding the brakes will remove the air bubbles and restore a firm brake feel.
6. How often should I replace my disc brake pads?
Replace your disc brake pads when they are worn down to the minimum thickness indicated by the manufacturer, or if they are contaminated with oil or grease.
7. Can I use any type of cleaner on my disc brakes?
No, avoid using harsh chemicals like WD-40. Use cleaners specifically designed for bike components to avoid damage and ensure optimal performance.
8. What should I do if my disc brake rotor is bent?
Use a rotor truing tool to carefully straighten any bends or warps in the rotor. A bent rotor can cause persistent brake rub and reduce braking performance.
9. How do I bleed my disc brakes?
Bleeding the brakes requires a hydraulic brake bleed kit and the correct type of brake fluid specified by the manufacturer. Follow the bleed kit instructions carefully to avoid damaging the system.
10. Where can I find more information about disc brake maintenance?
You can find detailed guides and tutorials on websites like Park Tool and usabikers.net, which offer comprehensive information on disc brake adjustment and maintenance.