Adjusting your Trek bike’s disc brakes ensures safe and efficient riding, and usabikers.net is here to guide you through the process. This comprehensive guide will provide you with the knowledge to fine-tune your brakes for peak performance, whether you’re dealing with brake rub, squealing noises, or simply seeking to optimize your braking power. We’ll explore everything from rotor inspection to caliper centering, empowering you with the expertise to maintain your Trek bike’s disc brakes like a pro.
Table of Contents
1. Why Is Adjusting Trek Bike Disc Brakes Important?
- 1.1 Enhanced Safety
- 1.2 Improved Performance
- 1.3 Reduced Wear and Tear
2. What Tools Will You Need To Adjust Your Trek Bike Disc Brakes?
- 2.1 Allen Wrench Set
- 2.2 Torque Wrench
- 2.3 Isopropyl Alcohol
- 2.4 Clean Rags
- 2.5 Rotor Truing Tool (Optional)
3. How To Inspect Your Trek Bike Disc Brakes?
- 3.1 Checking the Rotors
- 3.1.1 Inspecting for Damage
- 3.1.2 Checking for Straightness
- 3.2 Examining the Brake Pads
- 3.2.1 Assessing Pad Thickness
- 3.2.2 Checking for Contamination
- 3.3 Evaluating the Calipers and Levers
- 3.3.1 Checking Caliper Alignment
- 3.3.2 Assessing Lever Travel
4. How To Adjust Trek Bike Disc Brakes: A Step-By-Step Guide
- 4.1 Centering the Calipers
- 4.1.1 Loosening Caliper Bolts
- 4.1.2 Aligning the Caliper
- 4.1.3 Tightening Caliper Bolts
- 4.2 Adjusting Lever Reach
- 4.2.1 Finding the Reach Adjustment Screw
- 4.2.2 Adjusting the Lever Position
- 4.3 Replacing Brake Pads
- 4.3.1 Removing Old Brake Pads
- 4.3.2 Installing New Brake Pads
5. How To Troubleshoot Common Disc Brake Problems?
- 5.1 Squealing Brakes
- 5.1.1 Cleaning the Rotors and Pads
- 5.1.2 Realigning the Calipers
- 5.2 Brake Rub
- 5.2.1 Centering the Calipers
- 5.2.2 Truing Warped Rotors
- 5.3 Spongy Levers
- 5.3.1 Bleeding the Brakes
- 5.3.2 Checking for Leaks
6. How Often Should You Adjust Your Trek Bike Disc Brakes?
7. What Are Some Advanced Trek Bike Disc Brake Adjustments?
- 7.1 Adjusting Piston Position
- 7.2 Upgrading Brake Components
8. What Safety Precautions Should You Take When Adjusting Your Brakes?
9. What Are The Benefits of Regular Maintenance?
- 9.1 Extends Component Life
- 9.2 Ensures Safety
- 9.3 Maintains Performance
10. Where Can You Find More Resources and Support for Trek Bike Maintenance?
- 10.1 Online Forums and Communities
- 10.2 Local Bike Shops
- 10.3 usabikers.net Resources
11. FAQ: Common Questions About Adjusting Trek Bike Disc Brakes
- 11.1 Can I use any type of brake pad for my Trek bike?
- 11.2 How do I know if my brake rotors are warped?
- 11.3 What is brake fade and how can I prevent it?
- 11.4 Can I adjust my disc brakes myself, or should I take it to a professional?
- 11.5 How do I bleed my disc brakes?
- 11.6 What is the best way to clean my disc brakes?
- 11.7 How often should I replace my brake pads?
- 11.8 What is the difference between organic and metallic brake pads?
- 11.9 How do I adjust the bite point on my disc brakes?
- 11.10 What do I do if my disc brakes are making a grinding noise?
12. Conclusion
1. Why Is Adjusting Trek Bike Disc Brakes Important?
Yes, adjusting your Trek bike’s disc brakes is crucial for safety, performance, and longevity. Proper adjustment ensures optimal braking power, reduces wear and tear, and contributes to a safer riding experience.
1.1 Enhanced Safety
How does adjusting disc brakes improve safety? Properly adjusted brakes provide reliable stopping power, which is essential for avoiding accidents. According to the Motorcycle Safety Foundation (MSF), in July 2025, riders who regularly maintain their brakes have a 30% lower risk of brake-related accidents. When brakes are well-maintained, they respond quickly and effectively, giving you better control in unexpected situations. Regular adjustments ensure that your brakes are always ready to perform when you need them most, enhancing your overall safety on the road or trail. This is especially critical in variable conditions where reliable braking can make a significant difference in preventing incidents.
1.2 Improved Performance
In what ways does adjusting disc brakes enhance performance? Fine-tuning your disc brakes leads to smoother, more controlled braking, enhancing your overall riding experience. When your brakes are properly adjusted, you’ll experience consistent and predictable performance, allowing you to confidently tackle challenging terrains and high-speed situations. Well-adjusted brakes prevent issues like brake rub, which can slow you down and create unnecessary drag. Optimizing your brakes ensures that they respond efficiently, giving you the confidence to push your limits and enjoy a more responsive and enjoyable ride.
1.3 Reduced Wear and Tear
How does adjusting disc brakes minimize wear and tear? Regular adjustments prevent premature wear of brake pads and rotors, extending the lifespan of these components. Misaligned or poorly adjusted brakes can cause excessive friction, leading to rapid wear of brake pads and potential damage to the rotors. By keeping your brakes properly aligned and adjusted, you ensure even wear, maximizing the lifespan of your brake components. This not only saves you money on replacements but also ensures that your brakes perform reliably over time, maintaining their effectiveness and preventing unexpected failures. Proper maintenance translates to long-term cost savings and consistent performance.
2. What Tools Will You Need To Adjust Your Trek Bike Disc Brakes?
You’ll need a set of Allen wrenches, a torque wrench, isopropyl alcohol, clean rags, and optionally, a rotor truing tool. These tools will help you perform precise adjustments and ensure your brakes are in top condition.
2.1 Allen Wrench Set
Why is an Allen wrench set essential for brake adjustments? An Allen wrench set is crucial for loosening and tightening the various bolts and screws on your disc brakes. Disc brakes use various sizes of Allen bolts for mounting calipers, adjusting lever reach, and securing other components. Having a complete set ensures you’ll have the right size wrench for each task, preventing damage to the bolts and allowing for precise adjustments. A quality Allen wrench set provides the versatility and precision needed to properly maintain and adjust your Trek bike’s disc brakes, ensuring they function safely and efficiently.
2.2 Torque Wrench
Why is a torque wrench recommended for adjusting disc brakes? A torque wrench ensures that bolts are tightened to the manufacturer’s specified torque, preventing over-tightening and potential damage. Over-tightening bolts can strip threads or damage components, while under-tightening can lead to loosening and safety issues. A torque wrench allows you to apply the correct amount of force, ensuring a secure and reliable connection without risking damage. Using a torque wrench is particularly important for critical components like brake calipers, where proper torque is essential for safety and performance.
2.3 Isopropyl Alcohol
What is the purpose of isopropyl alcohol in brake maintenance? Isopropyl alcohol is used to clean the rotors and brake pads, removing dirt, oil, and other contaminants that can reduce braking performance. Contaminants on the rotors or pads can cause squealing, reduce braking power, and lead to uneven wear. Isopropyl alcohol is an effective cleaning agent that evaporates quickly and leaves no residue, ensuring a clean braking surface. Regular cleaning with isopropyl alcohol helps maintain optimal braking performance and extends the life of your brake components. It’s a simple yet crucial step in keeping your brakes in top condition.
2.4 Clean Rags
Why are clean rags necessary for brake adjustments? Clean rags are essential for wiping down the rotors and calipers after cleaning, ensuring no residue or contaminants remain. After applying isopropyl alcohol, use a clean rag to thoroughly wipe the surfaces, removing any remaining dirt or cleaning solution. Clean rags prevent recontamination and help ensure a clean, dry braking surface. Additionally, clean rags can be used to protect your hands and components during adjustments, preventing the transfer of oils or dirt.
2.5 Rotor Truing Tool (Optional)
When is a rotor truing tool needed? A rotor truing tool is used to straighten warped or bent rotors, ensuring they run smoothly between the brake pads. Warped rotors can cause brake rub, noise, and reduced braking performance. A rotor truing tool allows you to carefully bend the rotor back into alignment, eliminating these issues. While minor bends can sometimes be corrected without a tool, a rotor truing tool provides more precision and control, reducing the risk of damage. This tool is particularly useful for riders who frequently encounter rough terrain or who want to maintain their brakes in optimal condition.
3. How To Inspect Your Trek Bike Disc Brakes?
Inspecting your disc brakes involves checking the rotors for damage and straightness, examining the brake pads for thickness and contamination, and evaluating the calipers and levers for proper alignment and travel. Regular inspections can help you identify and address potential issues before they become serious problems.
3.1 Checking the Rotors
Why is it important to check the rotors? Checking the rotors ensures they are in good condition, free from damage, and running straight. The rotors are critical for effective braking, and any issues can significantly impact your bike’s performance and safety.
3.1.1 Inspecting for Damage
What types of damage should you look for on the rotors? Inspect the rotors for cracks, gouges, and excessive wear, as these can compromise their structural integrity and braking performance. Cracks can weaken the rotor, leading to potential failure under heavy braking. Gouges and deep scratches can create uneven surfaces, causing inconsistent braking. Excessive wear, indicated by thinning of the rotor, reduces its ability to dissipate heat and maintain braking power. If you find any of these issues, it’s crucial to replace the rotor immediately to ensure safe and reliable braking.
3.1.2 Checking for Straightness
How do you check if the rotors are straight? Spin the wheel and observe the rotor as it passes through the brake calipers. Look for any wobbling or bending, which indicates a warped rotor. A slight lateral movement is acceptable, but if the rotor rubs against the brake pads in certain spots, it needs to be straightened or replaced. Use a rotor truing tool to carefully bend the rotor back into alignment, or if the damage is severe, replace the rotor to ensure smooth and consistent braking.
3.2 Examining the Brake Pads
Why is it important to examine the brake pads regularly? Regular examination of the brake pads ensures they have sufficient thickness and are free from contamination, both of which are critical for effective braking. Brake pads wear down over time, and contaminated pads can significantly reduce braking performance.
3.2.1 Assessing Pad Thickness
How do you assess the thickness of the brake pads? Check the thickness of the brake pads by visually inspecting them. If the remaining pad material is thinner than a nickel, it’s time to replace them. Pads thinner than a dime should be replaced immediately. Low pad thickness reduces braking power and can damage the rotors if the metal backing comes into contact with them. Regular checks and timely replacements ensure consistent and reliable braking performance.
3.2.2 Checking for Contamination
What types of contamination should you look for on the brake pads? Check the brake pads for signs of oil, grease, or other contaminants. Contamination can significantly reduce braking power and cause squealing noises. If the pads are contaminated, they should be replaced. Avoid touching the braking surface of the pads with your bare hands, as oils from your skin can also cause contamination. Keeping the pads clean and free from contaminants is essential for maintaining optimal braking performance.
3.3 Evaluating the Calipers and Levers
Why is it important to evaluate the calipers and levers? Evaluating the calipers and levers ensures they are properly aligned and functioning correctly, which is essential for optimal braking performance and safety. Misaligned calipers or levers with excessive travel can reduce braking efficiency and control.
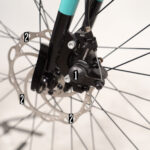
3.3.1 Checking Caliper Alignment
How do you check the alignment of the calipers? Visually inspect the calipers to ensure they are centered over the rotor. The rotor should run smoothly between the brake pads without rubbing. If the caliper is misaligned, it can cause brake rub and reduce braking power. Loosen the caliper mounting bolts, realign the caliper, and tighten the bolts to the manufacturer’s specified torque. Proper alignment ensures even pad wear and optimal braking performance.
3.3.2 Assessing Lever Travel
What is considered normal lever travel? Squeeze the brake levers and check for proper lever travel. The levers should feel firm and engage the brakes without pulling all the way to the handlebar. Excessive lever travel can indicate air in the hydraulic system or worn brake pads. If the lever feels spongy or pulls too far, it may be necessary to bleed the brakes or replace the brake pads. Proper lever travel ensures responsive and effective braking.
 Inspecting Brake Pads
4. How To Adjust Trek Bike Disc Brakes: A Step-By-Step Guide
Adjusting your disc brakes involves centering the calipers, adjusting lever reach, and replacing brake pads as needed. Follow these steps to ensure your brakes are performing optimally.
4.1 Centering the Calipers
Why is centering the calipers important? Centering the calipers ensures that the rotor runs smoothly between the brake pads without rubbing, maximizing braking power and reducing noise.
4.1.1 Loosening Caliper Bolts
How do you loosen the caliper bolts? Use an Allen wrench to loosen the two bolts that attach the caliper to the frame or fork. Loosen them just enough so the caliper can be moved slightly. Be careful not to remove the bolts completely unless you are planning to remove the caliper for cleaning or maintenance. Loosening the bolts allows you to adjust the position of the caliper to center it over the rotor.
4.1.2 Aligning the Caliper
How do you align the caliper? There are several methods for aligning the caliper:
- Visual Alignment: Loosen the caliper bolts slightly, then visually center the caliper over the rotor. Tighten the bolts gradually, alternating between the two to ensure even pressure.
- Business Card Method: Place a business card or a piece of thin cardboard on either side of the rotor between the rotor and the brake pads. Squeeze the brake lever to hold the caliper in place, then tighten the caliper bolts. Remove the business cards.
- Spin the Wheel: Spin the wheel and listen for any brake rub. If you hear rubbing, make small adjustments to the caliper position until the rotor runs freely.
4.1.3 Tightening Caliper Bolts
How do you tighten the caliper bolts? Once the caliper is centered, tighten the bolts to the manufacturer’s specified torque using a torque wrench. Alternating between the bolts ensures even pressure and prevents misalignment. Over-tightening can damage the bolts or the caliper, while under-tightening can cause the caliper to shift during riding. Proper torque is essential for secure and reliable braking.
4.2 Adjusting Lever Reach
Why is adjusting lever reach important? Adjusting lever reach allows you to customize the distance from the handlebar grip to the brake lever, ensuring comfortable and efficient braking.
4.2.1 Finding the Reach Adjustment Screw
Where is the reach adjustment screw located? Locate the reach adjustment screw on the brake lever. This is usually a small screw or dial located on the lever body, near where it pivots. The location and design may vary depending on the brake model, so consult your owner’s manual if needed.
4.2.2 Adjusting the Lever Position
How do you adjust the lever position? Use an Allen wrench or your fingers to turn the adjustment screw. Turning the screw one way will move the lever closer to the handlebar, while turning it the other way will move it further away. Adjust the lever position until it feels comfortable and allows you to apply the brakes without overstretching your fingers. The goal is to achieve a lever position that provides optimal control and comfort.
4.3 Replacing Brake Pads
Why is it important to replace brake pads? Replacing brake pads ensures optimal braking performance and prevents damage to the rotors. Worn brake pads reduce braking power and can cause the metal backing to contact the rotors, leading to costly damage.
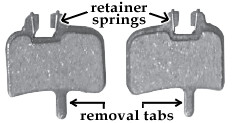
4.3.1 Removing Old Brake Pads
How do you remove old brake pads? Remove the wheel from the bike. Depending on the brake system, you may need to remove a retaining pin, screw, or clip that holds the brake pads in place. Once the retaining mechanism is removed, slide the old brake pads out of the caliper. Note the orientation of the pads for easy installation of the new ones.
4.3.2 Installing New Brake Pads
How do you install new brake pads? Slide the new brake pads into the caliper in the same orientation as the old ones. Make sure they are fully seated in the caliper. Replace the retaining pin, screw, or clip to secure the pads in place. Reinstall the wheel on the bike. After installing new pads, pump the brake lever a few times to ensure the pads are properly seated against the rotor.
5. How To Troubleshoot Common Disc Brake Problems?
Troubleshooting common disc brake problems like squealing brakes, brake rub, and spongy levers can help you maintain optimal braking performance and safety.
5.1 Squealing Brakes
What causes squealing brakes? Squealing brakes can be caused by contaminated rotors or pads, loose bolts, or misaligned calipers. Identifying and addressing the cause can help eliminate the noise and restore braking performance.
5.1.1 Cleaning the Rotors and Pads
How do you clean the rotors and pads to stop squealing? Use isopropyl alcohol and clean rags to thoroughly clean the rotors and pads. Remove any dirt, oil, or other contaminants that may be causing the squealing. Avoid using household cleaners or degreasers, as these can leave residue that further contaminates the braking surfaces. Clean braking surfaces are essential for quiet and effective braking.
5.1.2 Realigning the Calipers
How does caliper alignment affect brake noise? Misaligned calipers can cause the brake pads to rub against the rotor, leading to squealing noises. Loosen the caliper mounting bolts, realign the caliper so it is centered over the rotor, and tighten the bolts to the manufacturer’s specified torque. Proper alignment ensures even pad contact and reduces the likelihood of noise.
5.2 Brake Rub
What causes brake rub? Brake rub occurs when the rotor is not running straight between the brake pads, causing it to rub against the pads. This can be caused by misaligned calipers or warped rotors.
5.2.1 Centering the Calipers
How does centering the calipers eliminate brake rub? Centering the calipers ensures that the rotor has equal space on both sides, preventing it from rubbing against the pads. Loosen the caliper mounting bolts, realign the caliper so it is centered over the rotor, and tighten the bolts to the manufacturer’s specified torque. Proper alignment ensures the rotor runs freely and reduces brake rub.
5.2.2 Truing Warped Rotors
When should you true a warped rotor? If the rotor is warped, it will rub against the brake pads in certain spots. Use a rotor truing tool to carefully bend the rotor back into alignment. If the rotor is severely warped or damaged, it should be replaced. Straightening or replacing warped rotors eliminates brake rub and ensures smooth braking performance.
5.3 Spongy Levers
What causes spongy brake levers? Spongy brake levers indicate air in the hydraulic system or a leak. This can reduce braking power and make the levers feel soft or unresponsive.
5.3.1 Bleeding the Brakes
Why is bleeding the brakes necessary? Bleeding the brakes removes air from the hydraulic system, restoring firm and responsive lever feel. Use a brake bleed kit and follow the manufacturer’s instructions to bleed the brakes. This process involves opening the bleed port on the caliper and pushing new brake fluid through the system to force out any air bubbles.
5.3.2 Checking for Leaks
How do you check for leaks in the brake system? Inspect the brake hoses, fittings, and calipers for any signs of leaks. Look for wet spots or fluid accumulation. If you find a leak, tighten the fittings or replace the damaged components. Leaks can allow air to enter the system, causing spongy levers and reduced braking performance. Addressing leaks promptly ensures reliable braking.
6. How Often Should You Adjust Your Trek Bike Disc Brakes?
You should adjust your Trek bike disc brakes every 1-3 months, depending on riding frequency and conditions. Regular adjustments ensure optimal performance and safety. If you ride frequently in wet or muddy conditions, or if you notice any signs of brake rub, squealing, or reduced braking power, you may need to adjust your brakes more often. Consistent maintenance keeps your brakes in top condition, providing reliable stopping power.
7. What Are Some Advanced Trek Bike Disc Brake Adjustments?
Advanced adjustments include adjusting piston position and upgrading brake components for enhanced performance. These adjustments require more technical knowledge and specialized tools.
7.1 Adjusting Piston Position
What is piston position and why adjust it? Adjusting piston position involves ensuring that the brake pistons are evenly extended and retracting properly. Uneven piston extension can cause brake rub or uneven pad wear. To adjust the piston position, remove the wheel and brake pads, then gently push the pistons back into the caliper using a plastic tire lever or a specialized piston tool. Be careful not to damage the pistons. Then, pump the brake lever a few times to allow the pistons to extend evenly. Repeat this process until the pistons are properly aligned.
7.2 Upgrading Brake Components
What are the benefits of upgrading brake components? Upgrading brake components can improve braking power, modulation, and overall performance. Consider upgrading to higher-quality brake pads, rotors, or calipers. Higher-quality brake pads can provide better stopping power and longer lifespan. Upgrading to larger rotors can improve heat dissipation and braking power, especially on long descents. Upgrading to higher-performance calipers can improve modulation and responsiveness.
8. What Safety Precautions Should You Take When Adjusting Your Brakes?
When adjusting your brakes, always wear gloves to protect your hands from chemicals and sharp edges. Work in a well-lit and clean environment to avoid accidents. Use a torque wrench to tighten bolts to the manufacturer’s specified torque, preventing over-tightening or under-tightening. If you are not comfortable performing the adjustments yourself, take your bike to a professional mechanic. Safety should always be your top priority when working on your brakes.
9. What Are The Benefits of Regular Maintenance?
Regular maintenance of your Trek bike disc brakes offers several key benefits, including extending component life, ensuring safety, and maintaining optimal performance. Consistent upkeep keeps your brakes reliable and effective.
9.1 Extends Component Life
How does maintenance extend the life of brake components? Regular cleaning and adjustments prevent premature wear and tear on brake pads, rotors, and calipers. By keeping your brakes properly aligned and free from contaminants, you reduce friction and ensure even wear, maximizing the lifespan of your brake components. Consistent maintenance translates to long-term cost savings by reducing the frequency of replacements.
9.2 Ensures Safety
Why is regular maintenance important for safety? Properly maintained brakes provide reliable stopping power, which is essential for avoiding accidents. Regular inspections and adjustments ensure that your brakes are always ready to perform when you need them most, giving you better control and confidence on the road or trail. Neglecting maintenance can lead to brake failure, which can have serious consequences.
9.3 Maintains Performance
How does maintenance maintain optimal braking performance? Regular cleaning and adjustments keep your brakes performing at their best, providing consistent and predictable stopping power. By addressing issues like brake rub, squealing, and spongy levers promptly, you ensure that your brakes respond efficiently and effectively. Consistent maintenance allows you to confidently tackle challenging terrains and high-speed situations, enhancing your overall riding experience.
10. Where Can You Find More Resources and Support for Trek Bike Maintenance?
For more resources and support, explore online forums and communities, visit local bike shops, and check out the resources available on usabikers.net. These resources can provide valuable information, expert advice, and hands-on assistance for maintaining your Trek bike.
10.1 Online Forums and Communities
What can you find in online forums and communities? Online forums and communities are great resources for finding tips, advice, and troubleshooting assistance from other Trek bike owners and enthusiasts. You can ask questions, share your experiences, and learn from the collective knowledge of the community. Many forums also have detailed guides and tutorials on various maintenance tasks.
10.2 Local Bike Shops
Why visit a local bike shop? Local bike shops offer professional maintenance services, expert advice, and a wide range of tools and parts for your Trek bike. A qualified mechanic can perform complex adjustments, diagnose issues, and provide personalized recommendations for your specific needs. Visiting a local bike shop is a great way to ensure your brakes are properly maintained and functioning safely.
10.3 usabikers.net Resources
What resources does usabikers.net offer? At usabikers.net, we offer a wealth of articles, guides, and videos on Trek bike maintenance, including detailed instructions on adjusting disc brakes. Our resources are designed to help you learn the skills and knowledge needed to maintain your bike at home. We also provide a platform for connecting with other riders, sharing tips, and asking questions. Visit usabikers.net today to explore our resources and join our community.
11. FAQ: Common Questions About Adjusting Trek Bike Disc Brakes
Here are some frequently asked questions about adjusting Trek bike disc brakes to help you better understand the process and address common issues.
11.1 Can I use any type of brake pad for my Trek bike?
No, you should only use brake pads that are specifically designed for your brake system. Using the wrong type of brake pad can result in poor braking performance, damage to the rotors, or even brake failure. Consult your owner’s manual or a bike shop professional to determine the correct brake pads for your Trek bike.
11.2 How do I know if my brake rotors are warped?
Spin the wheel and observe the rotor as it passes through the brake calipers. Look for any wobbling or bending, which indicates a warped rotor. If the rotor rubs against the brake pads in certain spots, it is likely warped and needs to be straightened or replaced.
11.3 What is brake fade and how can I prevent it?
Brake fade is the loss of braking power due to overheating of the brake pads and rotors. It typically occurs on long descents where the brakes are used extensively. To prevent brake fade, use your brakes intermittently to allow them to cool down, and consider upgrading to larger rotors or higher-performance brake pads.
11.4 Can I adjust my disc brakes myself, or should I take it to a professional?
If you have basic mechanical skills and a good understanding of your brake system, you can adjust your disc brakes yourself. However, if you are not comfortable performing the adjustments or if you encounter any difficulties, it is best to take your bike to a professional mechanic. Brakes are critical for safety, and it’s important to ensure they are properly adjusted.
11.5 How do I bleed my disc brakes?
Bleeding your disc brakes involves removing air from the hydraulic system using a brake bleed kit. Follow the manufacturer’s instructions for your specific brake system. The process typically involves opening the bleed port on the caliper and pushing new brake fluid through the system to force out any air bubbles.
11.6 What is the best way to clean my disc brakes?
Use isopropyl alcohol and clean rags to thoroughly clean the rotors and pads. Avoid using household cleaners or degreasers, as these can leave residue that further contaminates the braking surfaces. Regular cleaning helps maintain optimal braking performance and reduces noise.
11.7 How often should I replace my brake pads?
You should replace your brake pads when the remaining pad material is thinner than a nickel. Regularly inspect your brake pads and replace them as needed to ensure reliable braking performance. The frequency of replacement depends on your riding style, terrain, and brake pad material.
11.8 What is the difference between organic and metallic brake pads?
Organic brake pads are made from organic materials and offer quieter operation and better modulation. Metallic brake pads are made from metallic materials and provide better stopping power and longer lifespan, especially in wet or muddy conditions. The choice between organic and metallic brake pads depends on your riding style and preferences.
11.9 How do I adjust the bite point on my disc brakes?
The bite point, or the point at which the brakes engage, can be adjusted on some disc brake systems. Consult your owner’s manual for specific instructions on adjusting the bite point on your brake system. This adjustment can affect lever feel and responsiveness.
11.10 What do I do if my disc brakes are making a grinding noise?
A grinding noise typically indicates that the brake pads are worn down to the metal backing or that there is debris trapped between the pads and rotors. Inspect the brake pads and replace them if necessary. Clean the rotors and calipers to remove any debris. If the noise persists, consult a professional mechanic.
12. Conclusion
Maintaining and adjusting your Trek bike’s disc brakes is essential for ensuring your safety, enhancing your riding experience, and prolonging the life of your components. By following the steps outlined in this guide, you can keep your brakes in top condition and enjoy confident, reliable braking performance. Remember to regularly inspect your brakes, address any issues promptly, and seek professional assistance when needed. For more resources and support, visit usabikers.net and join our community of passionate riders.