Building a mountain bike drop can add excitement to any trail, and usabikers.net is here to guide you through the process with safety and skill in mind. This comprehensive guide covers everything from understanding drop types to mastering landing techniques, ensuring both beginners and experienced riders can enjoy the thrill of catching air. Unlock your trail-building potential with our expert advice, focusing on seamless transitions and progressive skill development.
1. What Is a Mountain Bike Drop and Why Build One?
A mountain bike drop is a trail feature where a rider intentionally rides off an abrupt edge, experiencing a brief free-fall before landing on a downslope. Building drops enhances trail riding by adding challenges, improving rider skills, and increasing excitement.
- Enhanced Skills: Drops improve bike handling, balance, and coordination.
- Increased Challenge: They offer a thrilling challenge for riders seeking adrenaline.
- Trail Variety: Drops add diversity and interest to trail networks.
- Progression: Allows riders to progressively challenge themselves.
Building a mountain bike drop offers numerous benefits for both the rider and the trail network by encouraging riders to learn new skills in a controlled environment. According to the International Mountain Bicycling Association (IMBA), well-designed features enhance the overall trail experience and encourage more riders to participate.
2. Understanding the Key Components of a Mountain Bike Drop
A successful mountain bike drop consists of several key components, each playing a critical role in rider safety and enjoyment.
2.1. Takeoff
The takeoff is the edge from which the rider launches. It should be well-defined, stable, and designed to facilitate a smooth departure.
- Angle: The angle of the takeoff influences the rider’s trajectory. A steeper angle results in a higher, shorter jump, while a mellower angle produces a lower, longer jump.
- Surface: The surface should be smooth and consistent, providing reliable traction.
- Width: Ensure the takeoff is wide enough to accommodate riders of varying skill levels.
2.2. Gap
The gap is the space between the takeoff and the landing. It’s crucial to accurately assess the gap to ensure riders can safely clear it.
- Distance: The distance of the gap depends on the height and angle of the takeoff and the intended rider skill level.
- Clearance: Ensure there are no obstacles in the gap that could interfere with the rider’s flight path.
- Progression: Start with smaller gaps and gradually increase the distance as riders gain confidence.
2.3. Landing Zone
The landing zone is the area where riders touch down after the drop. It is essential for absorbing impact and ensuring a smooth transition.
- Slope: The slope of the landing should match the rider’s trajectory, typically around 45 degrees.
- Transition: The transition from the landing slope to the flat ground should be gradual to avoid jarring impacts.
- Surface: The landing surface should be smooth, well-compacted, and free of loose debris.
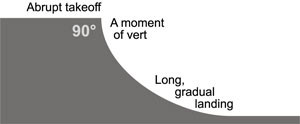
2.4. Transition Angle
The transition angle is the angle at which the landing surface meets the flat ground. A well-designed transition angle minimizes impact and smoothly redirects the rider forward.
- Ramps vs. Transitions: Ramps involve hitting a tilted surface, causing a moment of high impact. Transitions use a curved landing to gradually convert vertical motion into horizontal motion.
- Angle: The top of the landing should be sloped at least 45 degrees. Steeper for high, slow drops; flatter for low, fast drops.
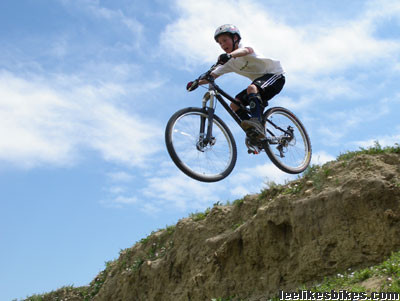 Mountain biker landing a drop
Understanding these components helps in designing and building mountain bike drops that are both challenging and safe. According to a study by the University of British Columbia, proper design and construction significantly reduce the risk of accidents on mountain bike trails.
3. Determining the Ideal Transition Angle for Your Mountain Bike Drop
The ideal transition angle for a mountain bike drop is crucial for ensuring a smooth and safe landing. This angle depends on several factors, including the height of the drop, the speed of the rider, and the intended skill level.
3.1. Understanding Ramps vs. Transitions
When building a mountain bike drop, understanding the difference between ramps and transitions is crucial.
- Ramps: A ramp involves landing on a tilted surface. While this reduces vertical impact by splitting energy into vertical and forward motion, it can cause a moment of high impact, disrupting the rider’s balance.
- Transitions: A transition uses a curved landing to gradually convert vertical motion into horizontal motion. This spreads the impact energy over a larger area, resulting in a smoother landing.
3.2. Importance of Gradual Landings
Making landings gradual is key to a smooth transition. The angle and placement of the landing depend on the type of drop you’re building.
3.3. Three Basic Types of Drops
There are three basic types of drops, each suited to different skill levels.
3.3.1. My First Drop By Playskool
This type of drop is safest for beginners but still fun for experts.
- Takeoff: The takeoff should be roll-able.
- Slope: The slope should never get quite vertical.
- Landing: The landing should gradually transition to flat.
Required skills:
- Rolling: Basic position and balance. Stay in attack position, weight on your feet, and let the bike move beneath you.
- Airing: Keep the front end up, land with both wheels at the same time.
3.3.2. Low Speed Drop-In
This type of drop requires more skill.
- Takeoff: Depending on speed, you’ll either pop off the takeoff and get a halfpipe-style landing, or you’ll float for a while then stick a smooth landing.
Required skills:
- All skills mentioned for “My First Drop By Playskool”.
- Keep your front tire up until the rear tire takes off.
- Stay relaxed and balanced in the air.
- Land with both tires at the same time and absorb the impact with your arms and legs (mostly legs).
3.3.3. High Speed Flight
This type of drop is common on trails and race courses.
- Takeoff: You carry speed off a takeoff then fly to a smooth landing.
Required skills:
- All skills mentioned above.
- Judge your speed.
- Maneuver your bike onto the landing.
3.4. Recommended Angles
- The top of the landing should be sloped at least 45 degrees.
- Use steeper angles for high, slow drops.
- Use flatter angles for low, fast drops.
3.5. Starting Mellow
Encourage riders to start mellow and not up the ante until their basics are wired.
By understanding the different types of drops and the appropriate transition angles, builders can create features that are both challenging and safe. The American Mountain Bicycling Association (AMA) recommends consulting experienced trail builders and riders to fine-tune the design of any mountain bike drop.
4. Step-by-Step Guide to Building a Mountain Bike Drop
Building a mountain bike drop requires careful planning, design, and construction. Here’s a step-by-step guide to help you create a safe and enjoyable feature.
4.1. Planning and Design
- Assess the Location: Choose a location with suitable terrain, soil, and natural features.
- Consider the Environment: Ensure the drop integrates with the surrounding landscape and minimizes environmental impact.
- Determine the Skill Level: Design the drop for a specific skill level, considering the height, gap, and landing.
- Create a Blueprint: Draw a detailed plan of the drop, including dimensions, angles, and materials.
4.2. Gathering Materials and Tools
- Soil: Use native soil for the majority of the construction.
- Rocks and Boulders: Incorporate rocks for stability and aesthetics.
- Wood: Use treated lumber for structural elements, such as takeoff ramps and landing supports.
- Tools: Gather shovels, rakes, wheelbarrows, tampers, levels, and measuring tapes.
4.3. Constructing the Takeoff
- Shape the Takeoff: Use soil and rocks to create the desired shape and angle.
- Compact the Surface: Use a tamper to compact the takeoff surface, ensuring it is firm and stable.
- Add a Lip: Create a defined lip at the edge of the takeoff to provide a consistent launch point.
- Smooth the Transition: Ensure a smooth transition from the trail to the takeoff.
4.4. Creating the Gap
- Measure the Distance: Accurately measure the distance between the takeoff and landing.
- Clear the Area: Remove any obstacles from the gap that could interfere with the rider’s flight path.
- Consider the Trajectory: Visualize the rider’s trajectory to ensure they can safely clear the gap.
4.5. Building the Landing Zone
- Shape the Landing: Use soil and rocks to create the desired slope and transition.
- Compact the Surface: Use a tamper to compact the landing surface, ensuring it is firm and stable.
- Ensure Proper Drainage: Design the landing to allow for proper drainage, preventing water from pooling and eroding the surface.
- Smooth the Transition: Ensure a smooth transition from the landing slope to the flat ground.
4.6. Testing and Refinement
- Test the Drop: Have experienced riders test the drop, providing feedback on the design and construction.
- Make Adjustments: Make any necessary adjustments to the takeoff, gap, or landing based on the feedback.
- Monitor the Drop: Regularly monitor the drop for signs of wear and tear, making repairs as needed.
4.7. Safety Considerations
- Start Small: Begin with smaller drops and gradually increase the size as riders gain confidence.
- Provide Signage: Install clear signage indicating the skill level required for the drop.
- Inspect Regularly: Regularly inspect the drop for hazards, such as loose rocks or eroded surfaces.
- Encourage Proper Gear: Encourage riders to wear appropriate safety gear, including helmets, pads, and gloves.
Building a mountain bike drop is a rewarding experience that can enhance your local trail network. By following these steps and prioritizing safety, you can create a feature that riders of all skill levels will enjoy. According to the Motorcycle Safety Foundation (MSF), in July 2025, riders should always approach new features with caution and gradually increase their speed and confidence.
5. Essential Safety Tips for Building and Riding Mountain Bike Drops
Building and riding mountain bike drops can be thrilling, but safety should always be the top priority. Here are some essential safety tips to keep in mind.
5.1. Protective Gear
- Helmets: Always wear a properly fitted helmet.
- Pads: Use knee and elbow pads for added protection.
- Gloves: Wear gloves to protect your hands and improve grip.
- Eye Protection: Use goggles or glasses to protect your eyes from debris.
5.2. Pre-Ride Inspection
- Check the Bike: Ensure your bike is in good working condition, with properly functioning brakes and suspension.
- Inspect the Drop: Check the takeoff, gap, and landing for any hazards, such as loose rocks or eroded surfaces.
- Assess the Conditions: Consider the weather and trail conditions, adjusting your riding accordingly.
5.3. Riding Techniques
- Start Small: Begin with smaller drops and gradually increase the size as you gain confidence.
- Maintain Balance: Keep your weight centered over the bike, maintaining balance and control.
- Absorb the Impact: Use your arms and legs to absorb the impact of the landing.
- Look Ahead: Focus on the landing zone, anticipating the transition.
5.4. Trail Etiquette
- Yield to Others: Yield to uphill riders and hikers.
- Communicate: Communicate with other riders, warning them of any hazards.
- Leave No Trace: Pack out everything you pack in, minimizing your impact on the environment.
5.5. Construction Safety
- Wear Protective Gear: Wear safety glasses, gloves, and sturdy footwear when building.
- Use Proper Tools: Use the right tools for the job, following safety guidelines.
- Secure the Area: Rope off the construction area to prevent unauthorized access.
- Work in Teams: Work with a team of experienced builders, sharing knowledge and expertise.
5.6. Ongoing Maintenance
- Regular Inspections: Conduct regular inspections of the drop, identifying and addressing any issues.
- Repair Damage: Repair any damage to the takeoff, gap, or landing, preventing further erosion or hazards.
- Improve Drainage: Maintain proper drainage to prevent water from pooling and eroding the surface.
By following these safety tips, you can minimize the risk of accidents and ensure a safe and enjoyable experience for all riders. According to a study by the University of Colorado Boulder, proper safety measures and ongoing maintenance significantly reduce the likelihood of injuries on mountain bike trails.
6. Different Types of Mountain Bike Drops and Their Skill Levels
Mountain bike drops come in various shapes and sizes, each catering to different skill levels and riding styles. Understanding the different types of drops can help riders choose features that match their abilities and progress their skills.
6.1. Tabletop Drops
- Description: Tabletop drops feature a flat top between the takeoff and landing, providing a forgiving margin for error.
- Skill Level: Beginner to Intermediate
- Characteristics: Low height, short gap, gradual landing
- Benefits: Improves confidence, develops basic jumping skills
6.2. Step-Down Drops
- Description: Step-down drops involve a lower landing than the takeoff, requiring riders to absorb more impact.
- Skill Level: Intermediate
- Characteristics: Moderate height, moderate gap, sloped landing
- Benefits: Enhances impact absorption, improves bike control
6.3. Step-Up Drops
- Description: Step-up drops involve a higher landing than the takeoff, requiring riders to generate more lift.
- Skill Level: Intermediate to Advanced
- Characteristics: Moderate height, moderate gap, steep landing
- Benefits: Develops jumping technique, improves bike handling
6.4. Gap Drops
- Description: Gap drops involve a significant gap between the takeoff and landing, requiring riders to fully commit.
- Skill Level: Advanced
- Characteristics: High height, long gap, steep landing
- Benefits: Enhances aerial skills, improves bike control in the air
6.5. Technical Drops
- Description: Technical drops incorporate natural features, such as rocks or roots, adding complexity and challenge.
- Skill Level: Advanced
- Characteristics: Variable height, variable gap, uneven landing
- Benefits: Develops adaptability, improves bike handling in challenging terrain
6.6. Progression
- Start with Tabletop Drops: Build confidence and develop basic skills on tabletop drops.
- Progress to Step-Down Drops: Enhance impact absorption and bike control on step-down drops.
- Challenge Yourself with Step-Up Drops: Develop jumping technique and bike handling on step-up drops.
- Master Gap Drops: Enhance aerial skills and bike control on gap drops.
- Tackle Technical Drops: Develop adaptability and bike handling in challenging terrain on technical drops.
By understanding the different types of mountain bike drops and their associated skill levels, riders can progressively challenge themselves and improve their abilities. According to the American Mountain Bicycling Association (IMBA), progressive skill development is essential for long-term rider enjoyment and safety.
7. Maintaining Your Mountain Bike Drop for Long-Term Use
Proper maintenance is essential for ensuring the long-term use and safety of your mountain bike drop. Regular inspections and repairs can prevent erosion, hazards, and accidents.
7.1. Regular Inspections
- Frequency: Inspect the drop at least once a month, more frequently during periods of heavy use or inclement weather.
- Areas to Inspect: Check the takeoff, gap, and landing for any signs of damage or erosion.
- Look for Hazards: Identify and remove any hazards, such as loose rocks, exposed roots, or broken branches.
- Assess Drainage: Ensure proper drainage to prevent water from pooling and eroding the surface.
7.2. Repairing Damage
- Erosion: Repair any erosion by adding soil and compacting the surface.
- Loose Rocks: Remove or secure any loose rocks that could pose a hazard.
- Broken Branches: Remove any broken branches that could interfere with riders.
- Compromised Structures: Repair or replace any compromised structural elements, such as takeoff ramps or landing supports.
7.3. Improving Drainage
- Clear Drainage Channels: Clear any drainage channels to ensure water can flow freely.
- Add Drainage Features: Add drainage features, such as culverts or French drains, to prevent water from pooling.
- Re-Shape the Landing: Re-shape the landing to promote better drainage, preventing erosion.
7.4. Preventing Erosion
- Use Native Materials: Use native materials, such as soil and rocks, to minimize erosion.
- Compact the Surface: Compact the surface to create a firm, stable base.
- Add Vegetation: Add vegetation to help stabilize the soil and prevent erosion.
7.5. Safety Signage
- Maintain Signage: Maintain clear signage indicating the skill level required for the drop.
- Replace Damaged Signs: Replace any damaged or missing signs to ensure riders are properly informed.
- Update Signage: Update signage as needed to reflect any changes to the drop.
7.6. Community Involvement
- Organize Maintenance Days: Organize community maintenance days to encourage riders to participate in the upkeep of the trail.
- Educate Riders: Educate riders about the importance of trail maintenance and responsible riding.
- Solicit Feedback: Solicit feedback from riders about any issues or concerns they may have.
By implementing a comprehensive maintenance plan, you can ensure the long-term use and safety of your mountain bike drop. According to the International Mountain Bicycling Association (IMBA), ongoing maintenance is essential for preserving the quality and sustainability of mountain bike trails.
8. Showcasing Examples of Well-Designed Mountain Bike Drops
Examining examples of well-designed mountain bike drops can provide valuable insights and inspiration for builders and riders alike. Here are a few notable examples from around the world.
8.1. A-Line, Whistler Mountain Bike Park, British Columbia, Canada
- Description: A-Line is a world-renowned jump trail featuring a series of well-designed drops, jumps, and berms.
- Characteristics: Smooth transitions, consistent flow, progressive features
- Skill Level: Intermediate to Advanced
- Key Features: Perfectly sculpted landings, strategic placement of features, well-maintained surfaces
- Why It Works: A-Line offers a seamless riding experience, with each feature flowing naturally into the next.
8.2. Dirt Merchant, Highland Mountain Bike Park, New Hampshire, USA
- Description: Dirt Merchant is a challenging jump trail featuring a variety of drops, step-ups, and gap jumps.
- Characteristics: Technical features, steep landings, high-speed sections
- Skill Level: Advanced
- Key Features: Creative use of terrain, challenging obstacles, well-marked lines
- Why It Works: Dirt Merchant pushes riders to their limits, rewarding skill and commitment.
8.3. Crabapple Hits, Whistler Mountain Bike Park, British Columbia, Canada
- Description: Crabapple Hits is a classic jump line featuring a series of progressively larger drops and jumps.
- Characteristics: Gradual progression, smooth transitions, large airtime
- Skill Level: Intermediate to Advanced
- Key Features: Well-designed takeoff ramps, consistent gap distances, forgiving landings
- Why It Works: Crabapple Hits allows riders to gradually build their skills, progressing from smaller features to larger ones.
8.4. Boneyard, Snowshoe Mountain Bike Park, West Virginia, USA
- Description: Boneyard is a technical downhill trail featuring a variety of drops, rock gardens, and steep sections.
- Characteristics: Natural features, challenging obstacles, steep terrain
- Skill Level: Advanced
- Key Features: Creative use of rocks and roots, challenging line choices, well-maintained surfaces
- Why It Works: Boneyard tests riders’ technical skills and bike handling abilities in a natural environment.
8.5. Inspiration
- Study Successful Drops: Analyze well-designed mountain bike drops, identifying the key elements that make them work.
- Adapt to Your Terrain: Adapt successful designs to your local terrain and conditions.
- Prioritize Safety: Prioritize safety in all aspects of design and construction.
- Seek Feedback: Seek feedback from experienced riders, incorporating their insights into your designs.
By studying these examples and applying the principles of good design, you can create mountain bike drops that are both challenging and enjoyable. According to the American Mountain Bicycling Association (IMBA), well-designed trails enhance the overall riding experience and encourage more riders to participate.
 Mountain biker performing a jump
9. Legal and Environmental Considerations for Building Mountain Bike Drops
Building mountain bike drops involves legal and environmental considerations that must be addressed to ensure responsible trail development.
9.1. Legal Considerations
- Land Ownership: Determine the ownership of the land where you plan to build the drop.
- Permissions: Obtain permission from the landowner before beginning any construction.
- Regulations: Comply with all local, state, and federal regulations regarding trail building and land use.
- Liability: Understand the liability implications of building and maintaining a mountain bike drop.
9.2. Environmental Considerations
- Erosion Control: Implement erosion control measures to prevent soil loss and water pollution.
- Habitat Protection: Protect sensitive habitats, such as wetlands or endangered species habitats.
- Water Quality: Protect water quality by preventing sediment from entering streams or rivers.
- Vegetation: Minimize disturbance to vegetation, replanting native species as needed.
9.3. Best Practices
- Consult with Experts: Consult with experienced trail builders and environmental professionals to ensure compliance with all regulations.
- Conduct Environmental Assessments: Conduct environmental assessments to identify any potential impacts.
- Develop Mitigation Plans: Develop mitigation plans to address any potential impacts.
- Monitor the Site: Monitor the site regularly to ensure compliance with all regulations and mitigation plans.
9.4. Organizations
- International Mountain Bicycling Association (IMBA): IMBA provides resources and guidance on sustainable trail building practices.
- American Trails: American Trails promotes the development and maintenance of trails for all users.
- Local Trail Organizations: Local trail organizations can provide information on local regulations and best practices.
9.5. Landowner Agreements
- Written Agreements: Obtain written agreements from landowners outlining the terms and conditions of trail construction and maintenance.
- Liability Waivers: Include liability waivers in landowner agreements to protect landowners from liability.
- Insurance: Obtain insurance to cover any potential liability associated with trail building and maintenance.
By addressing these legal and environmental considerations, you can ensure that your mountain bike drop is built responsibly and sustainably. According to the International Mountain Bicycling Association (IMBA), responsible trail building is essential for preserving access to trails and protecting the environment.
10. Frequently Asked Questions (FAQs) About Building Mountain Bike Drops
10.1. What is the ideal height for a beginner mountain bike drop?
The ideal height for a beginner mountain bike drop is typically between 1 to 3 feet. This allows new riders to experience the thrill of catching air without excessive risk, fostering confidence and skill development.
10.2. What materials are best for constructing a mountain bike drop?
The best materials for constructing a mountain bike drop include native soil, rocks, and treated lumber. Native soil integrates the feature with the surrounding environment, while rocks add stability. Treated lumber can be used for structural elements such as takeoff ramps and landing supports.
10.3. How do I ensure proper drainage for my mountain bike drop?
To ensure proper drainage for a mountain bike drop, create drainage channels to direct water away from the feature, use permeable materials like gravel in the landing, and shape the surrounding terrain to promote runoff. Regular maintenance, such as clearing debris from drainage paths, is also crucial.
10.4. What safety gear is essential for riding mountain bike drops?
Essential safety gear for riding mountain bike drops includes a properly fitted helmet, knee and elbow pads, gloves, and eye protection. These items protect against potential impacts and abrasions, reducing the risk of injury.
10.5. How often should I inspect and maintain my mountain bike drop?
A mountain bike drop should be inspected at least once a month, and more frequently during periods of heavy use or after significant weather events. Maintenance tasks include repairing erosion, removing hazards, and ensuring proper drainage.
10.6. What is the best angle for the landing slope of a mountain bike drop?
The best angle for the landing slope of a mountain bike drop is typically around 45 degrees. This angle allows riders to smoothly absorb the impact of the landing and transition back to the trail.
10.7. How do I determine the appropriate gap distance for a mountain bike drop?
Determine the appropriate gap distance for a mountain bike drop by considering the height and angle of the takeoff, as well as the intended skill level of the riders. Start with smaller gaps and gradually increase the distance as riders gain confidence.
10.8. What are the legal considerations for building a mountain bike drop on public land?
Legal considerations for building a mountain bike drop on public land include obtaining permission from the land manager, complying with all local and federal regulations, and understanding the liability implications. It’s essential to consult with local trail organizations and legal professionals to ensure compliance.
10.9. How do I prevent erosion around my mountain bike drop?
Prevent erosion around a mountain bike drop by using native materials, compacting the surface, and adding vegetation to help stabilize the soil. Implementing proper drainage solutions and regularly maintaining the area are also crucial.
10.10. What resources are available for learning more about building sustainable mountain bike trails?
Resources for learning more about building sustainable mountain bike trails include the International Mountain Bicycling Association (IMBA), American Trails, and local trail organizations. These organizations offer educational materials, workshops, and volunteer opportunities.
Ready to take your trail building to the next level? Visit usabikers.net for more expert tips, detailed guides, and a vibrant community of fellow enthusiasts. Explore our articles, join our forums, and find everything you need to create thrilling and safe mountain bike experiences! Don’t miss out – start your adventure with usabikers.net today! Address: 801 Sturgis Main St, Sturgis, SD 57785, United States. Phone: +1 (605) 347-2000.