
How to measure bike frame size correctly? At usabikers.net, we understand the importance of a perfectly fitted bike for your comfort, performance, and safety. This comprehensive guide will provide you with the knowledge and skills needed to accurately measure your bike frame, ensuring you get the right size for your riding style and body. We’ll cover everything from essential tools to step-by-step instructions, empowering you to make informed decisions when buying or renting a bike. Let’s dive into the world of bike geometry, frame measurement techniques, and bike fitting essentials.
1. Understanding Bike Geometry Measurements
What are the key bike geometry measurements I should know? Understanding the numbers that define your bike is crucial. Here’s a breakdown of the essential bike geometry measurements you should be familiar with:
-
Top Tube Length: This is the horizontal distance between the center of the head tube and the center of the seatpost. It’s a primary factor in determining your reach to the handlebars.
-
Seat Tube Length: Measured from the center of the bottom bracket to the top of the seat tube, this length influences the height of your saddle.
-
Reach: This measurement indicates the horizontal distance from the bottom bracket to the top of the head tube. It’s a key factor in determining how stretched out you’ll feel on the bike.
-
Stack: The vertical distance between the bottom bracket and the top of the head tube. Stack height influences your riding posture; a higher stack generally means a more upright position.
-
Wheelbase: The distance between the front and rear axles, affecting the bike’s stability and handling. A longer wheelbase typically provides more stability.
-
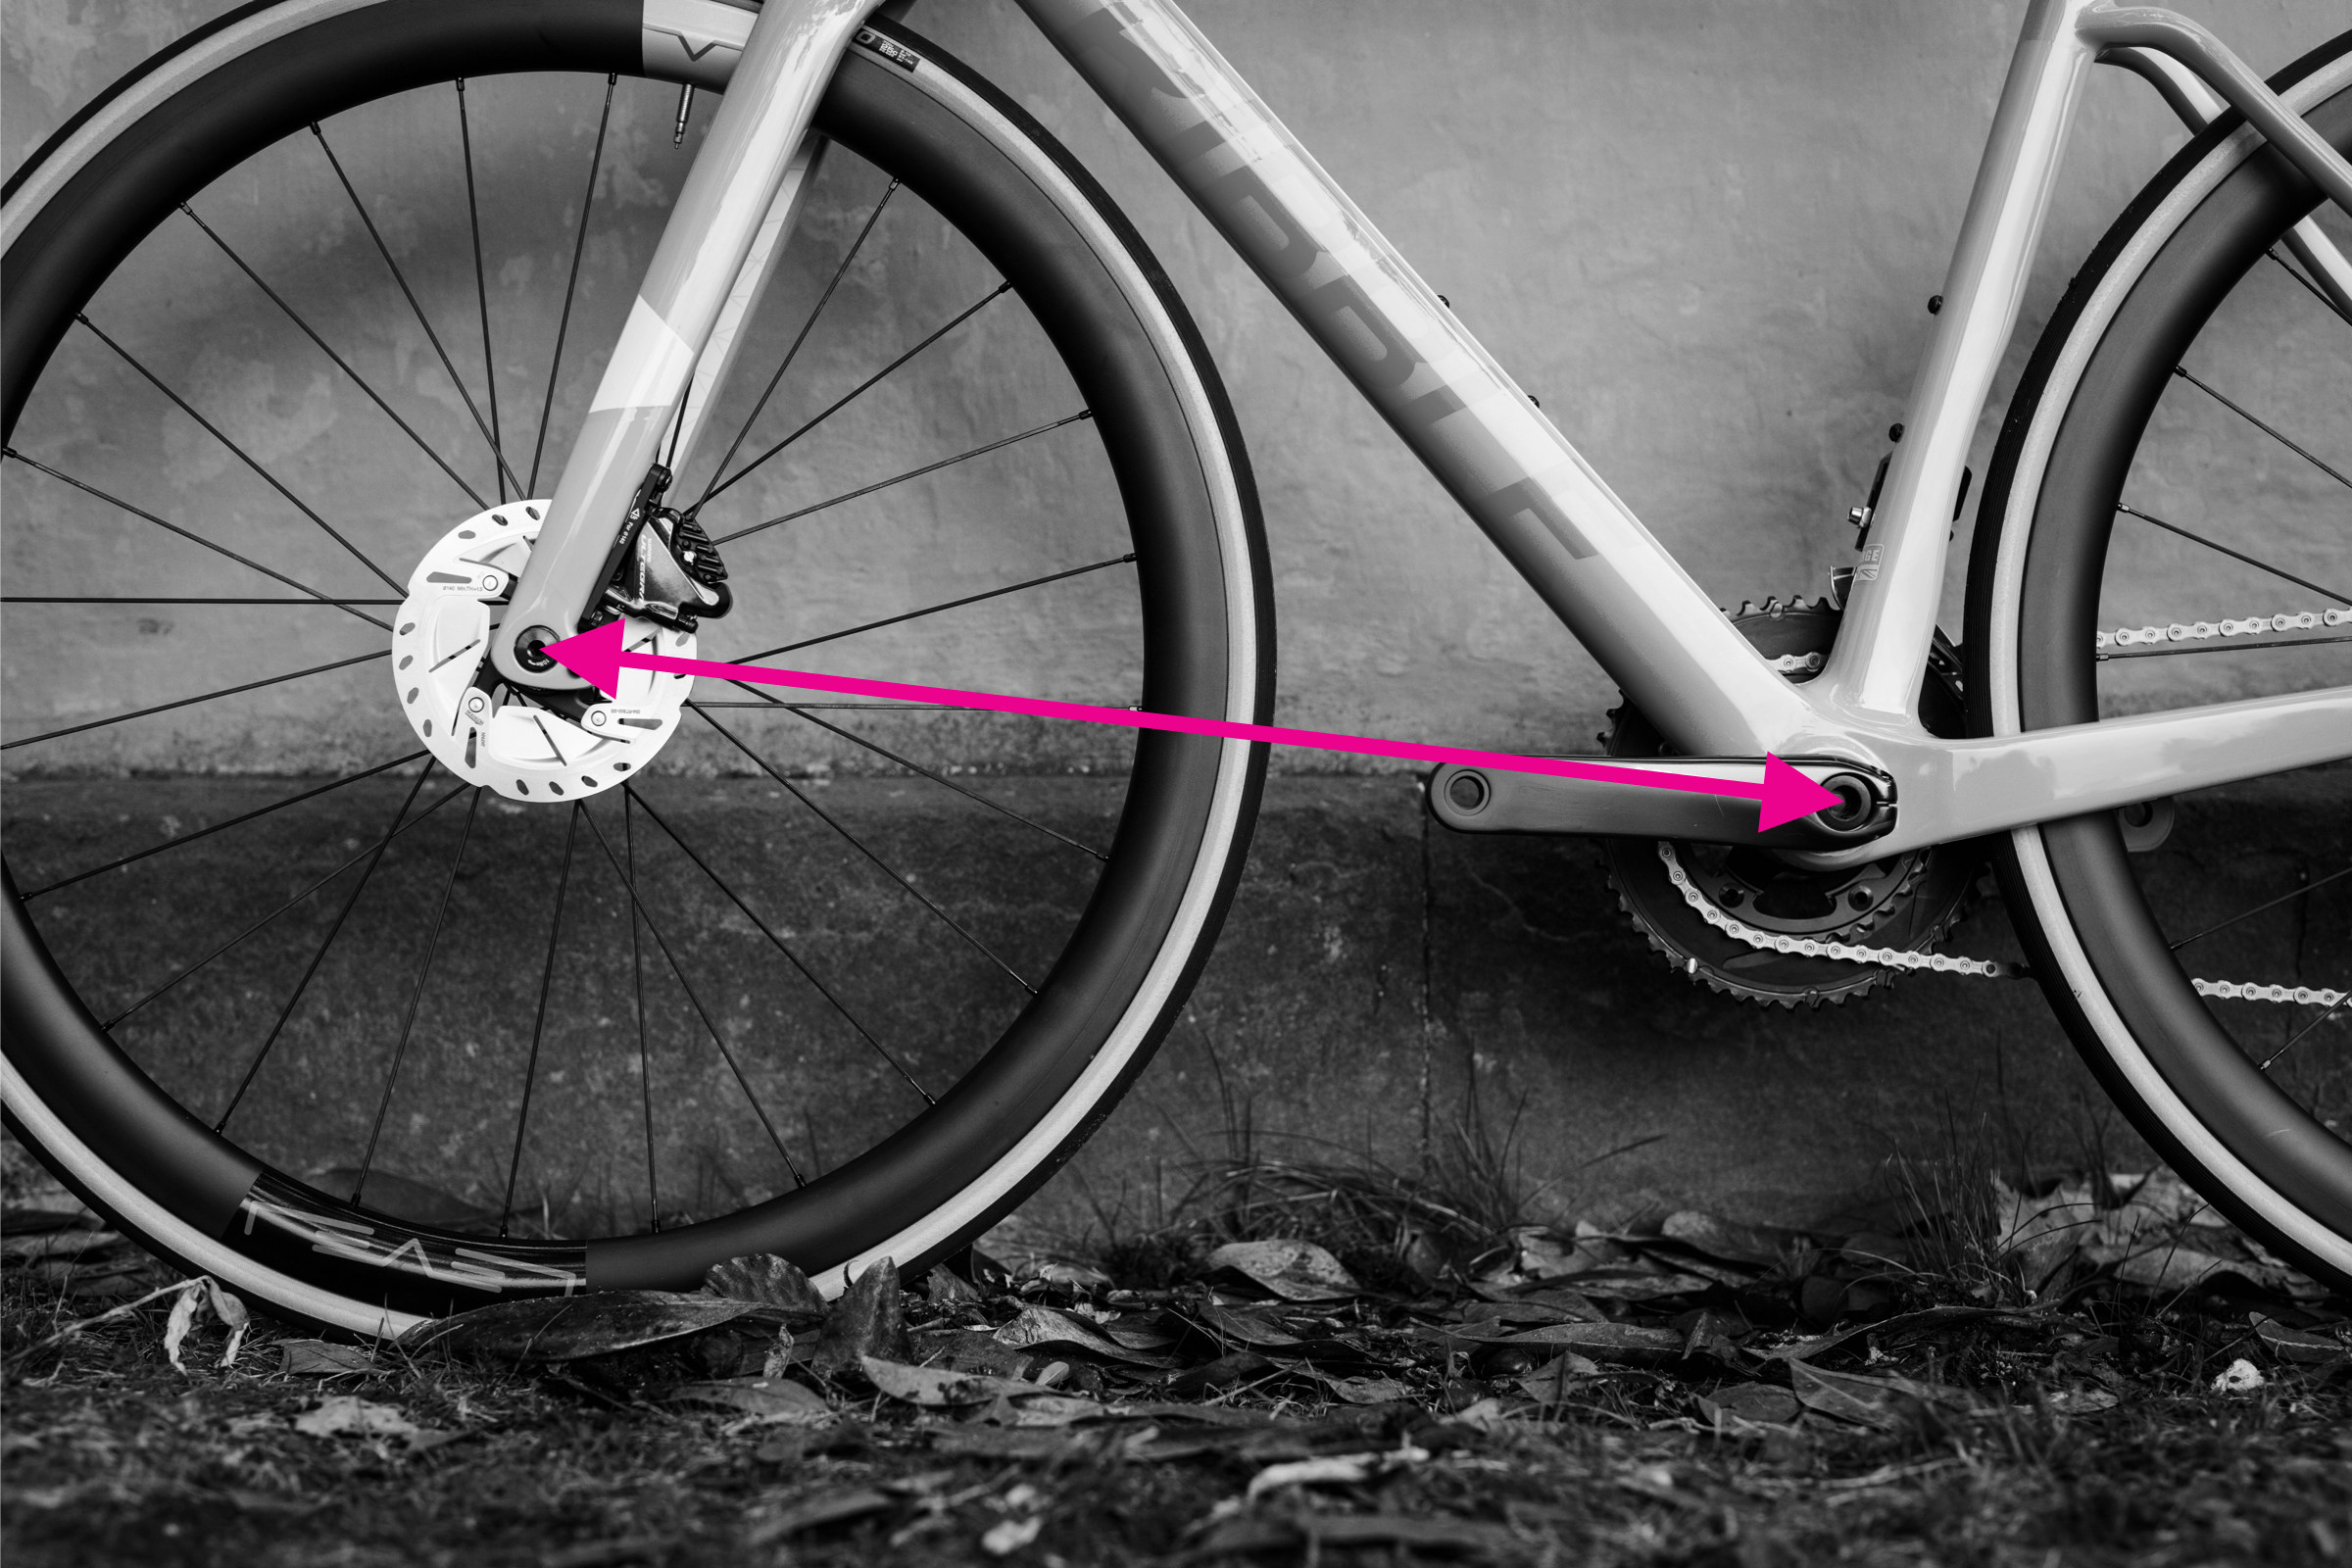
Chainstay Length: The distance between the bottom bracket and the rear dropout, influencing the bike’s agility and traction. Shorter chainstays often result in a more responsive ride.
-
Front Center: The distance from the bottom bracket to the front axle, affecting weight distribution and handling.
-
Seat Tube Angle: The angle of the seat tube relative to the ground, influencing your pedaling efficiency and comfort.
-
Head Tube Angle: The angle of the head tube relative to the ground, affecting steering responsiveness and stability.
-
Bottom Bracket Drop: The difference between the height of the wheel axles and the height of the crank axle, affecting the bike’s center of gravity and stability.
-
Bottom Bracket Height: The distance from the ground to the bottom bracket, influencing clearance and stability.
2. Essential Tools for Measuring a Bike Frame
What tools do I need to accurately measure my bike frame? Measuring a bike frame requires precision. Here’s a list of tools to get the job done right:
-
Tape Measure: A standard tape measure is essential for measuring lengths accurately. Choose one with both metric and imperial units for versatility.
-
Clinometer or Angle Finder: This tool is used to measure angles, such as the seat tube angle and head tube angle. Many free smartphone apps can function as a clinometer.
-
Long Spirit Level: A spirit level ensures that you are measuring horizontal and vertical distances accurately. A long level provides more stability. Alternatively, you can use a straight piece of wood in conjunction with a clinometer app.
-
Plumb Line: A plumb line helps you determine a perfectly vertical line, which is crucial for measuring stack and reach. You can improvise with string and a weight (like a couple of blobs of Blu Tack).
-
Straight Edge: A ruler or any kind of straight object like can be used to find the distance between two points.
3. Metric vs. Imperial Units: Which Should I Use?
Should I measure my bike frame in metric or imperial units? While some manufacturers may still use inches, especially for mountain bikes, it’s highly recommended to stick to metric units (centimeters and millimeters) for consistency and accuracy. Most modern bikes are measured in metric. If you need to convert, remember that 1 inch equals 2.54 centimeters. According to the National Institute of Standards and Technology (NIST), using the metric system ensures greater precision in measurements across different industries, including cycling.
4. Finding a Geometry Chart for Your Bike
Where can I find the geometry chart for my bike frame? If your bike is a current model, the most accurate way to obtain frame measurements is to find the geometry chart on the manufacturer’s website. These charts provide detailed measurements for all sizes of the frame, ensuring you have a reliable reference point. Keep a copy of this chart for future reference, as it’s more accurate than manual measurements.
5. Step-by-Step Guide: How to Measure Top Tube Length
How do I measure the top tube length of my bike frame accurately? Measuring the top tube length is a fundamental step in determining bike fit. Follow these steps for an accurate measurement:
-
Identify the Top Tube: Locate the top tube, which runs horizontally (or at a slope) from the head tube to the seatpost.
-
Determine Effective Top Tube Length: Because many bikes have sloping top tubes, you need to measure the effective or virtual top tube length. This is the horizontal distance between the center of the head tube and the center of the seatpost.
-
Use a Spirit Level: Place the spirit level on the top tube to ensure your measurement is perfectly horizontal. This is crucial for accuracy, especially with sloping top tubes.
-
Measure Horizontally: Measure the horizontal distance from the center of the head tube to the center of the seatpost. This measurement is your effective top tube length.
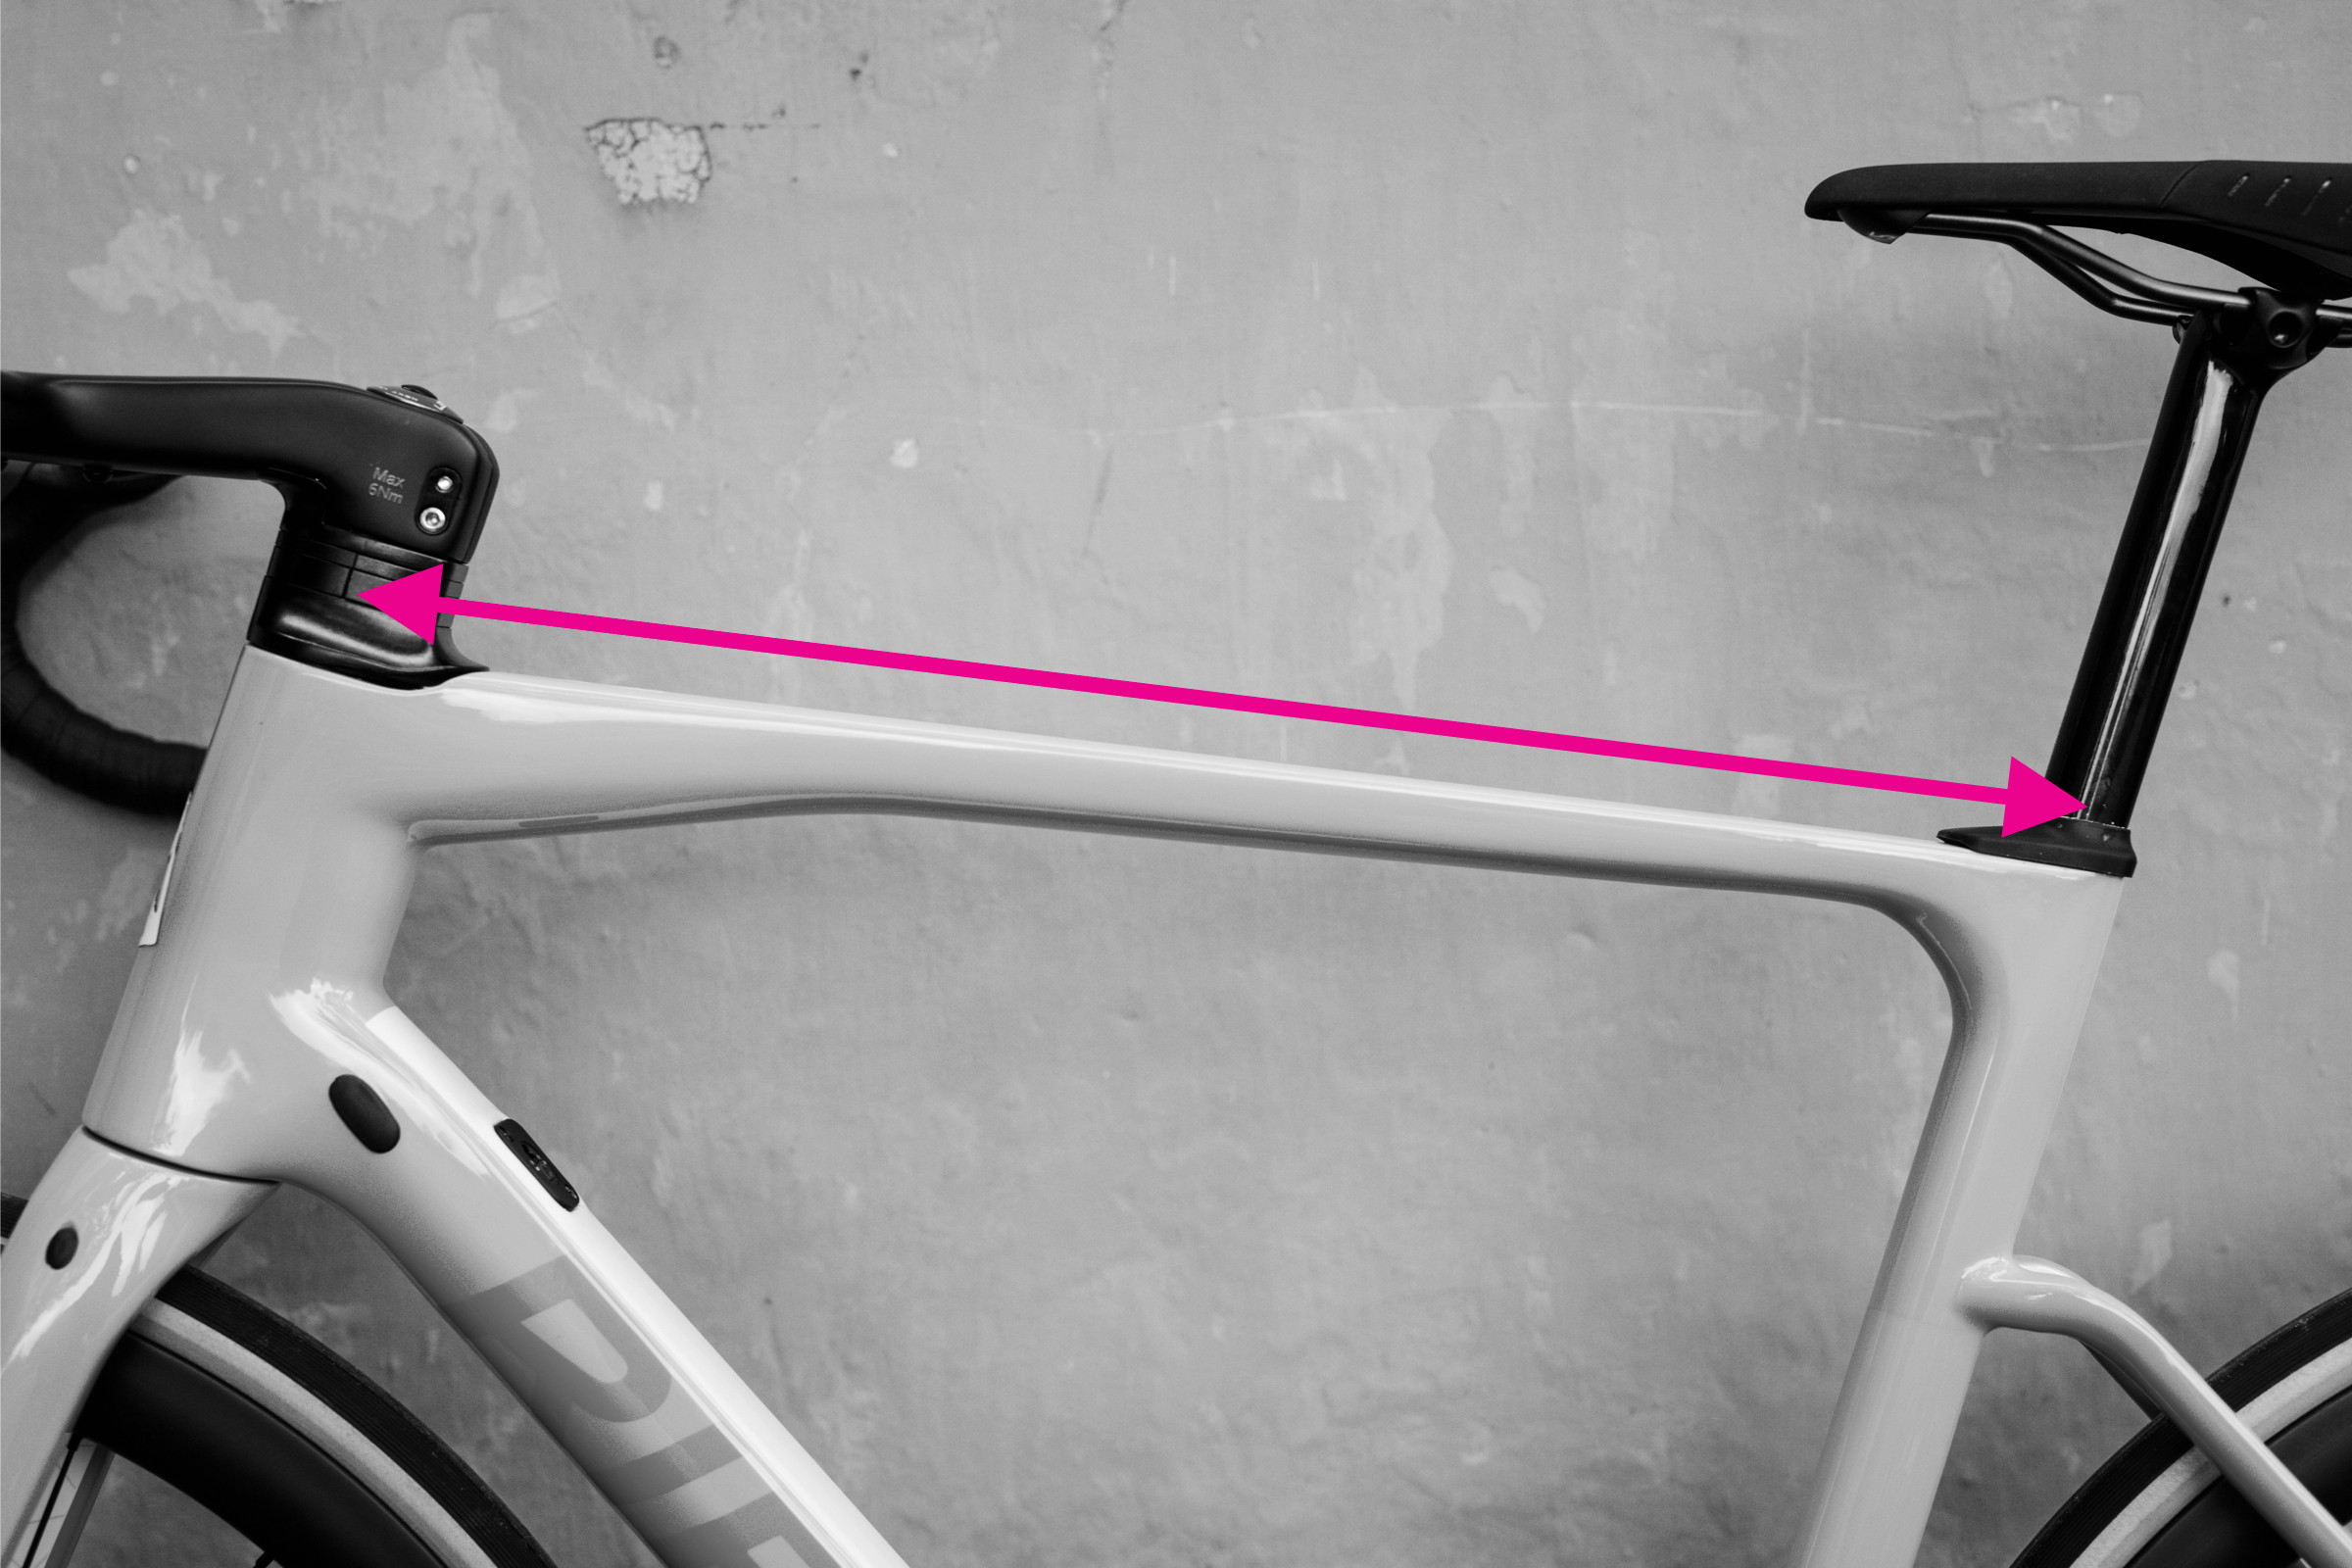 Top tube measurement demonstrated on a bike frame
6. Measuring Seat Tube Length: A Detailed Approach
What’s the best way to measure the seat tube length on different types of bikes? Seat tube length can be tricky to measure accurately, especially on bikes with unique designs. Here’s how to do it right:
-
Locate the Bottom Bracket Center: Find the center of the bottom bracket. This is your starting point.
-
Identify the Top of the Seat Tube: Locate the top of the seat tube. Note that some bikes have seat tube extensions or seat masts that extend above the top tube junction.
-
Use a Straight Edge: Place a straight edge from the center of the bottom bracket to the top of the seat tube. This helps you maintain a straight line, especially if the seat tube has a kink.
-
Measure the Distance: Measure the straight-line distance from the center of the bottom bracket to the top of the seat tube. This is your seat tube length.
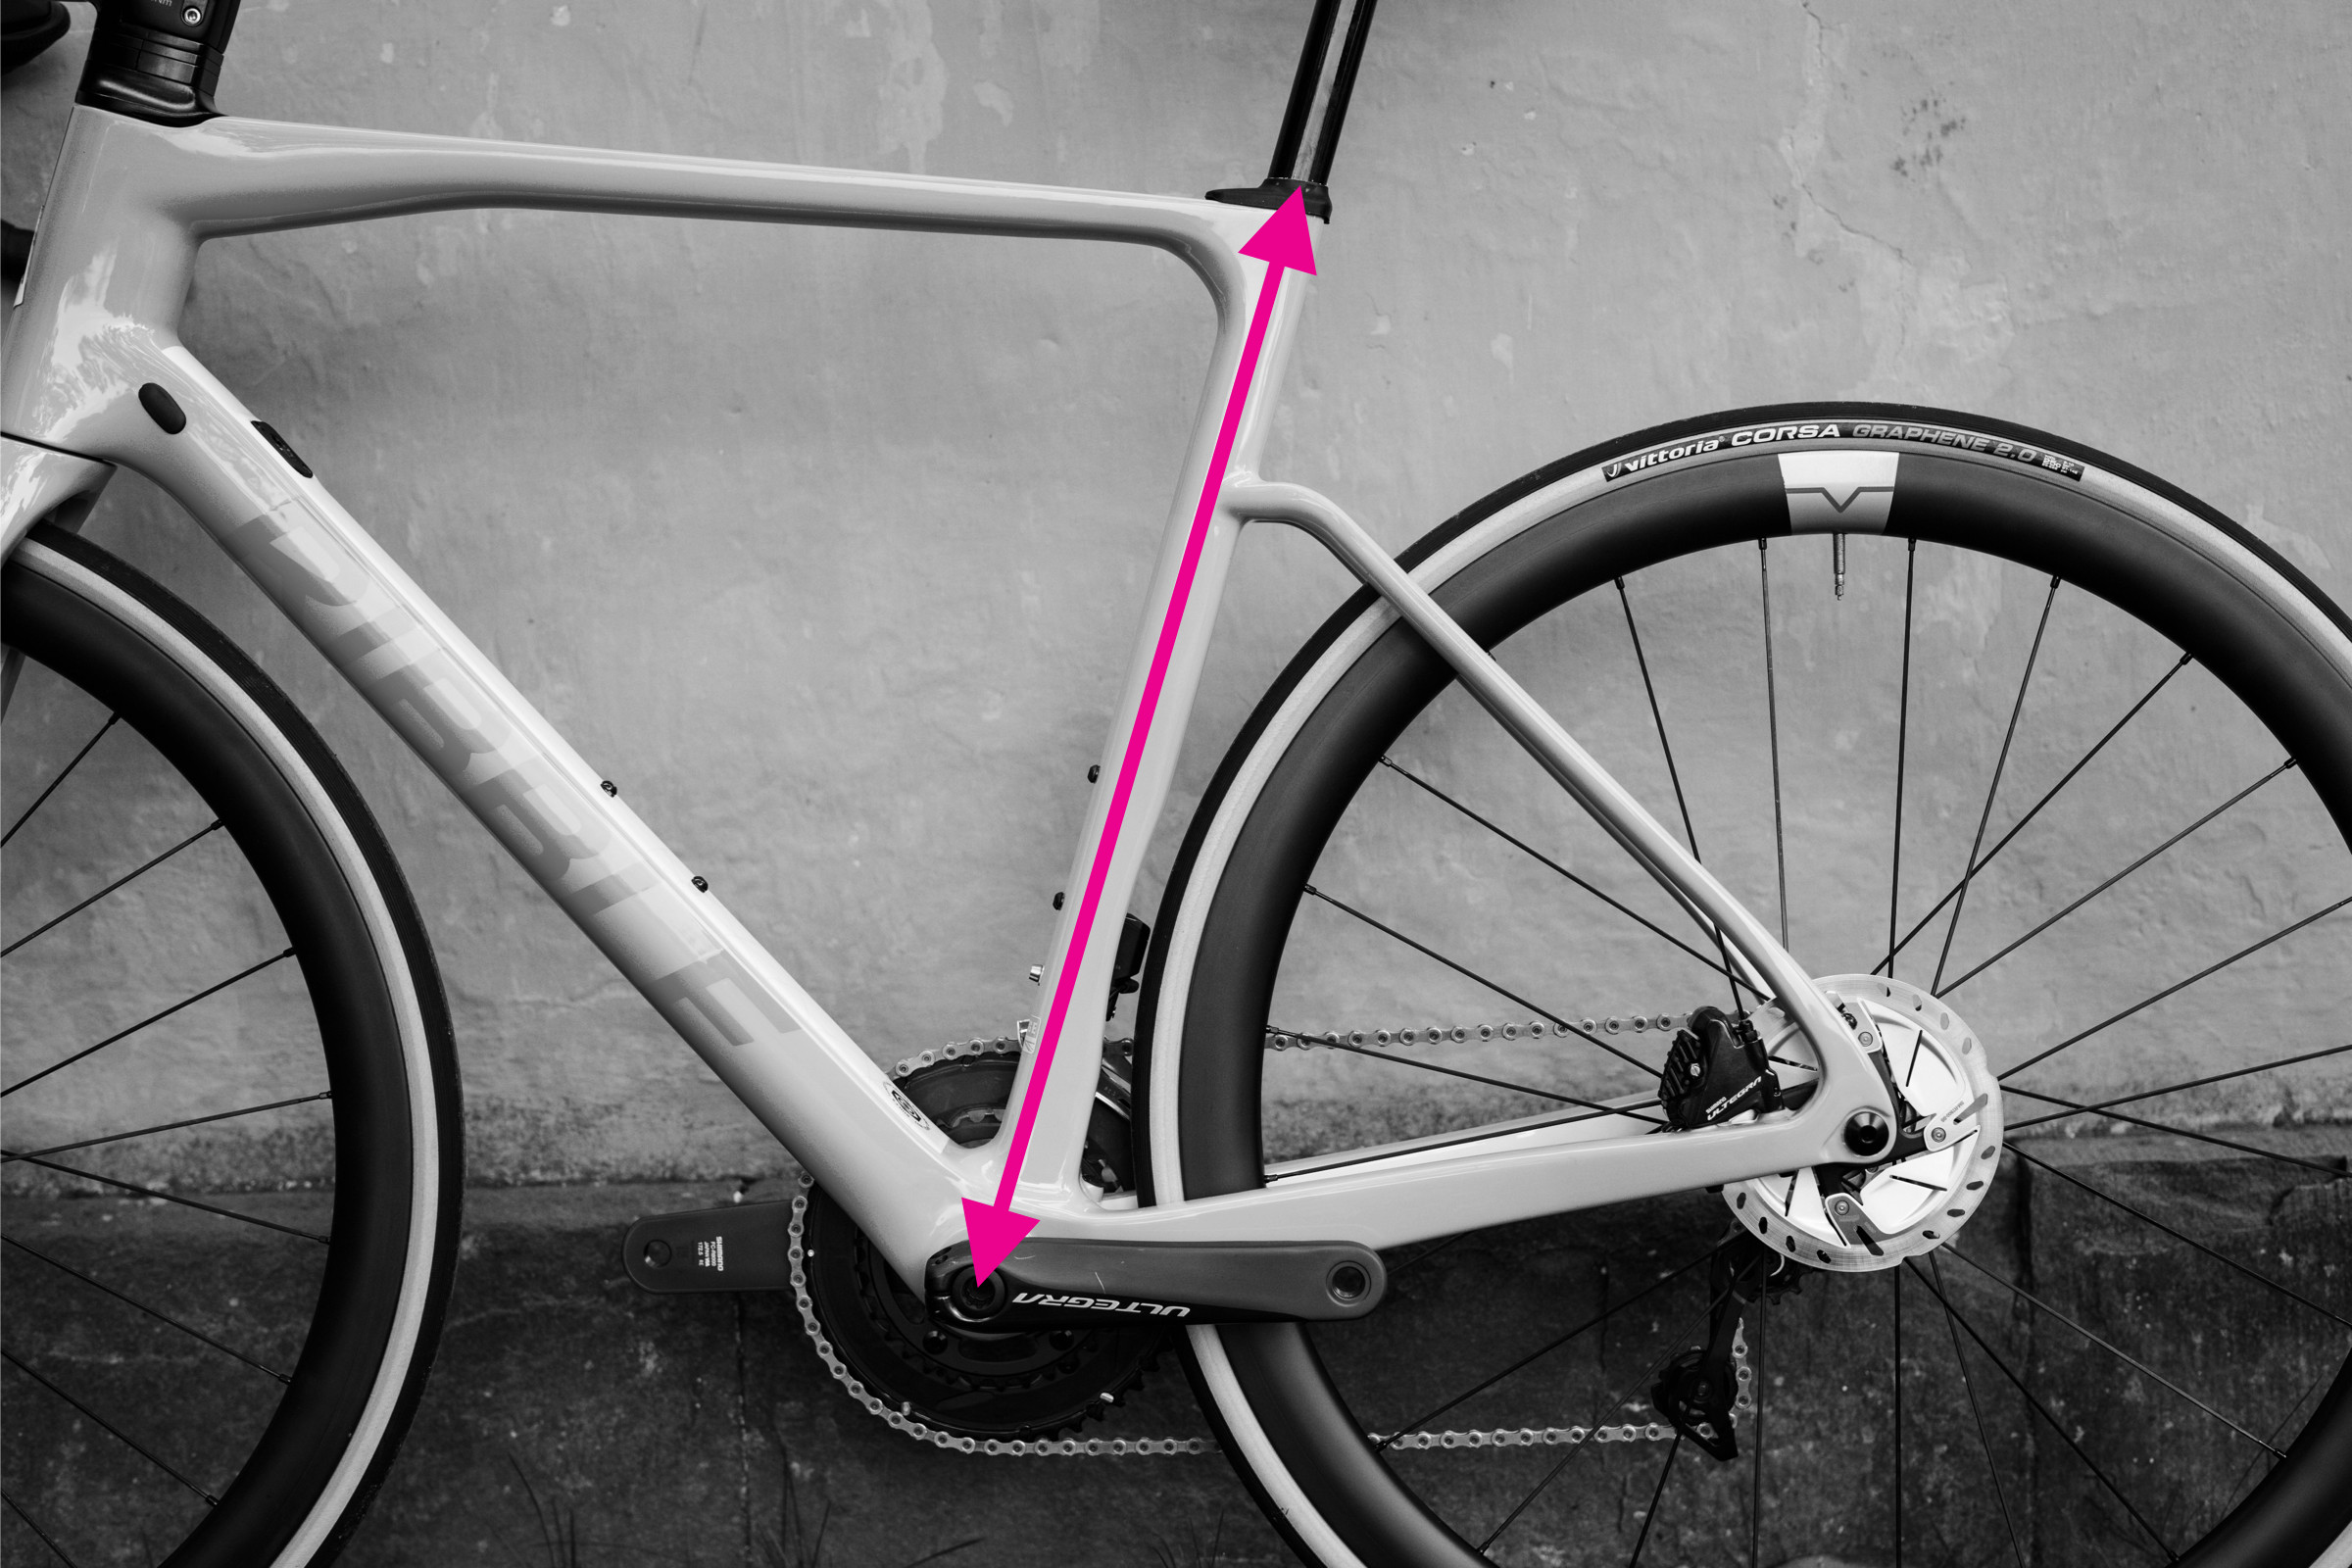 Seat tube measurement demonstrated on a bicycle frame
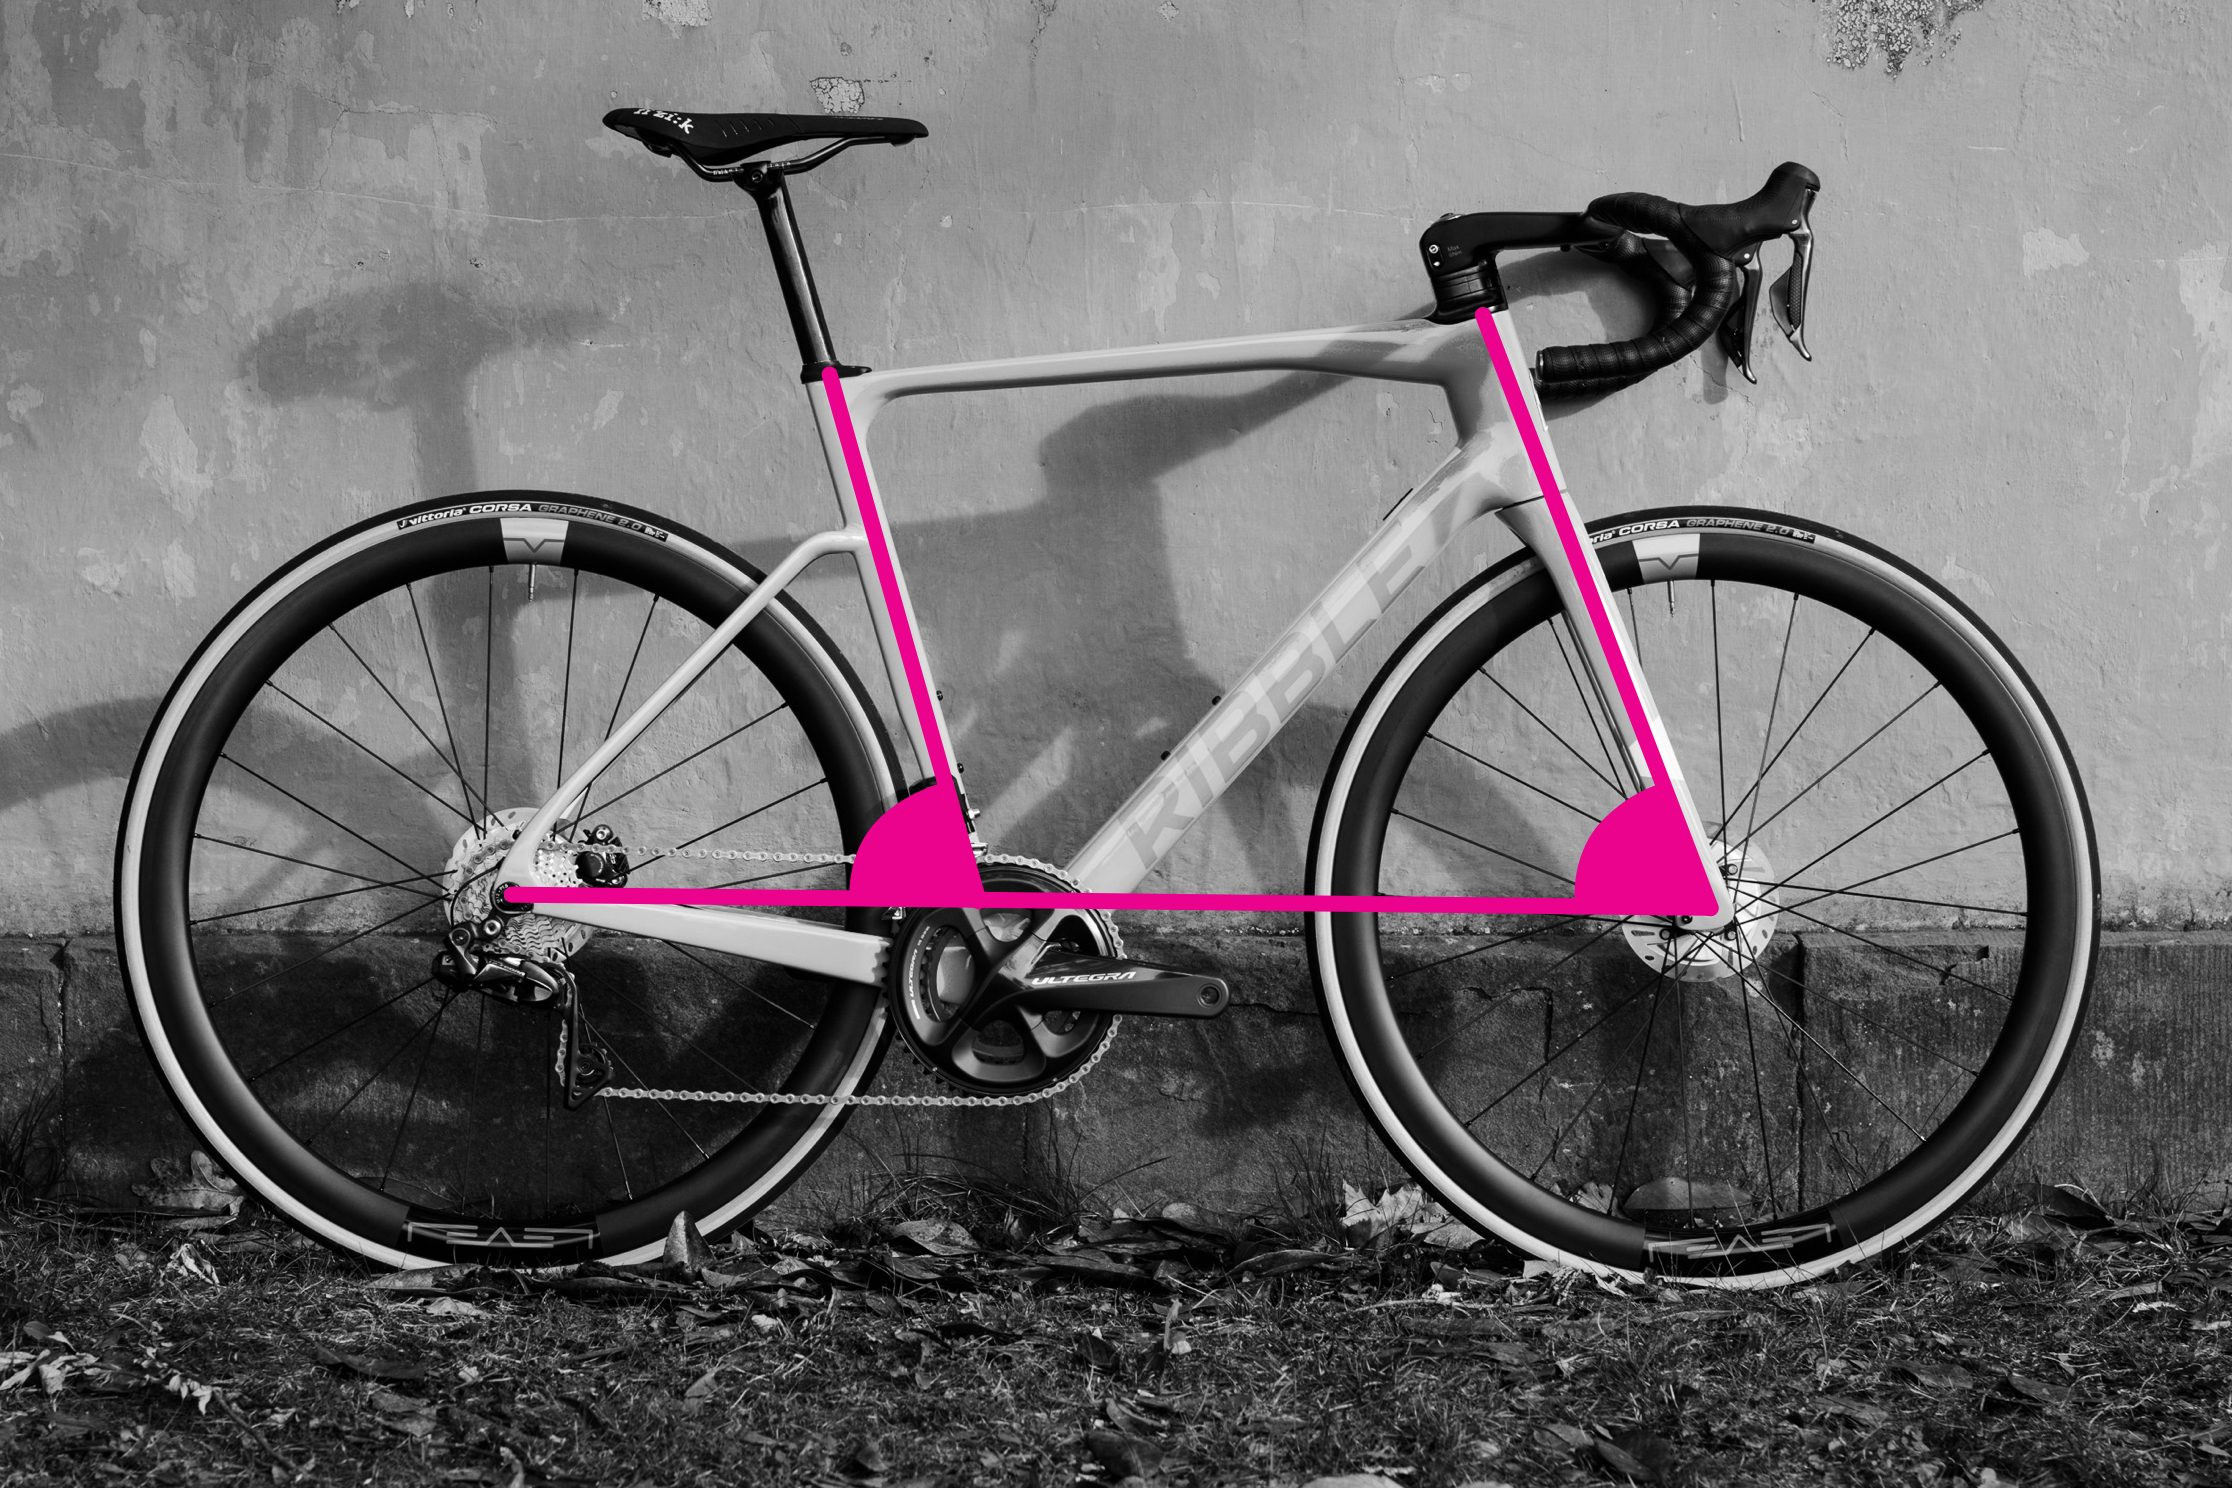
7. Reach and Stack: The Modern Way to Size Bikes
Why are reach and stack measurements important for bike fitting? Reach and stack provide a more consistent way to compare frame sizes, independent of frame design. Here’s how to measure them:
-
Set Up Your Bike: Place your bike on a level surface.
-
Measure Reach:
- Align the top edge of the spirit level with the center of the top of the head tube.
- Attach a plumb line to the end of the level, ensuring it hangs straight down.
- Move the level until the plumb line intersects with the center of the bottom bracket spindle.
- Measure the horizontal distance between the top of the plumb line and the head tube. This is your reach.
-
Measure Stack:
- Once you have the plumb line set up for reach, measure the vertical distance from the bottom bracket to the top of the head tube. This is your stack.
-
Alternative Method:
- Push your bike against a wall.
- Measure the distance from the wall to the top of the head tube and the distance to the bottom bracket.
- Subtract the two measurements to find the reach.
- Measure the vertical distance from the ground to the top of the head tube and the height of the bottom bracket from the ground, then subtract this.
 Stack and reach measurement demonstrated on a bike frame
8. How to Measure Wheelbase Accurately
What’s the most accurate way to measure the wheelbase of my bike? The wheelbase is a critical measurement that affects the bike’s stability and handling. Here’s how to measure it accurately:
-
Straighten the Fork: Ensure the front fork is pointing straight ahead. Any deviation will result in an inaccurate measurement.
-
Measure the Distance: Measure the distance between the front and rear axles.
-
Repeat the Measurement: Take the measurement several times to ensure consistency.
-
Measure Both Sides: Measure the wheelbase on both sides of the bike and take the average. This compensates for any slight misalignment of the fork.
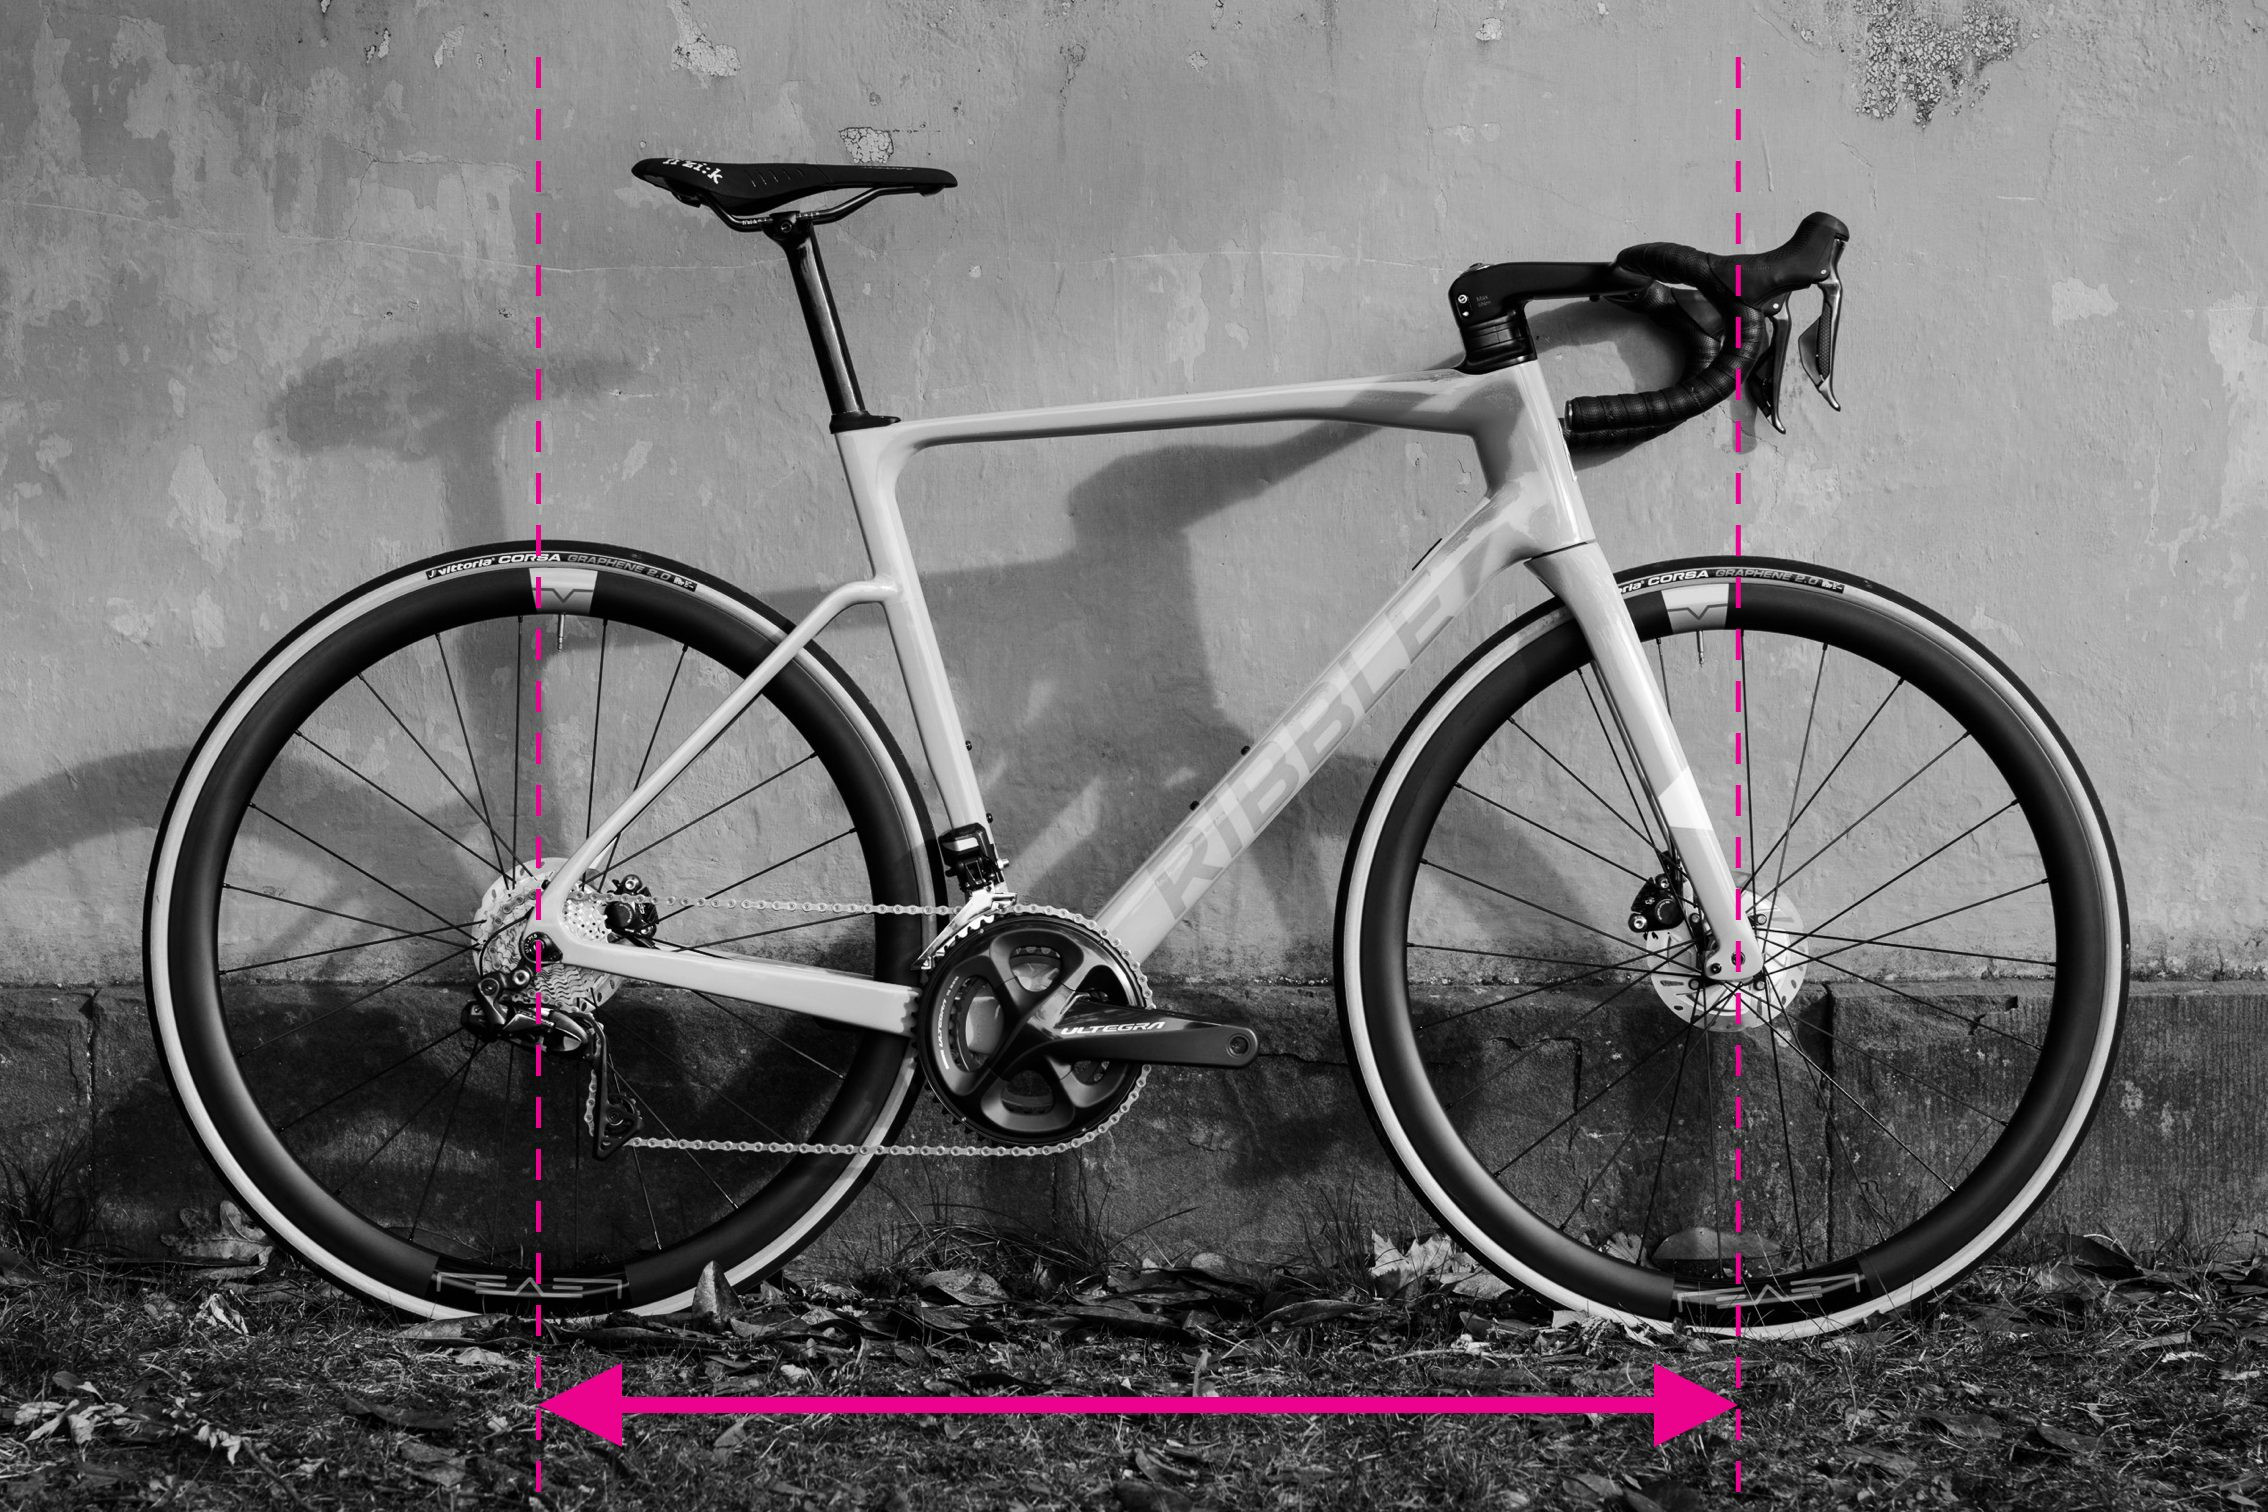 Wheelbase measurement demonstrated on a bike frame
9. Chainstay Length: Measuring for Agility
How does chainstay length affect my bike’s handling, and how do I measure it? Chainstay length significantly impacts a bike’s handling characteristics. Shorter chainstays typically make the bike feel more lively and responsive. Here’s how to measure it:
-
Locate the Bottom Bracket Axle: Find the center of the bottom bracket axle.
-
Identify the Rear Dropout: Locate the center of the rear dropout.
-
Measure the Distance: Measure the straight-line distance between the center of the bottom bracket axle and the center of the rear dropout. This is your chainstay length.
 Chainstay length measurement demonstrated on a bike frame
10. Front Center Measurement: What You Need to Know
Why is front center measurement important, and how do I find it? The front center measurement affects handling and weight distribution. Here’s how to measure it:
-
Locate the Bottom Bracket Axle: Find the center of the bottom bracket axle.
-
Identify the Front Dropout: Locate the center of the front dropout.
-
Measure the Distance: Measure the distance between the center of the bottom bracket axle and the center of the front dropout. This is your front center measurement.
 Front centre measurement demonstrated on a bike frame
11. Measuring Seat Tube and Head Tube Angles
How do seat tube and head tube angles influence bike handling, and how do I measure them? Seat tube and head tube angles are critical in determining a bike’s handling characteristics. More upright angles generally lead to more nimble handling. Here’s how to measure them:
-
Ensure Vertical Position: Make sure your bike is vertical and standing on a horizontal surface.
-
Measure Seat Tube Angle:
- If the seat tube is straight, align your smartphone (using a clinometer app) with the seat tube.
- Read the angle from the clinometer app.
- If there’s a kink in the seat tube, use a straight edge to follow the line between the bottom bracket shell and the top of the seat tube, then align the phone with this.
-
Measure Head Tube Angle:
- For tapered head tubes, estimate the centerline by holding your phone at the angle of the centerline or using a straight edge to line up with the centers of the top and bottom of the head tube.
- Alternatively, if your fork legs are straight, measure the angle of the fork legs, as they will be the same as the head tube angle.
 Seat and head tube measurements demonstrated on a bike frame
12. Bottom Bracket Drop: What It Is and How to Measure
Why is bottom bracket drop important for bike stability, and how do I measure it? Bottom bracket drop affects the bike’s center of gravity and stability. Here’s how to measure it:
-
Measure Rear Axle Height: Find the height of the rear axle from the ground.
-
Measure Bottom Bracket Height: Find the height of the center of the bottom bracket from the ground.
-
Calculate the Difference: Subtract the rear axle height from the bottom bracket height. The result is your bottom bracket drop.
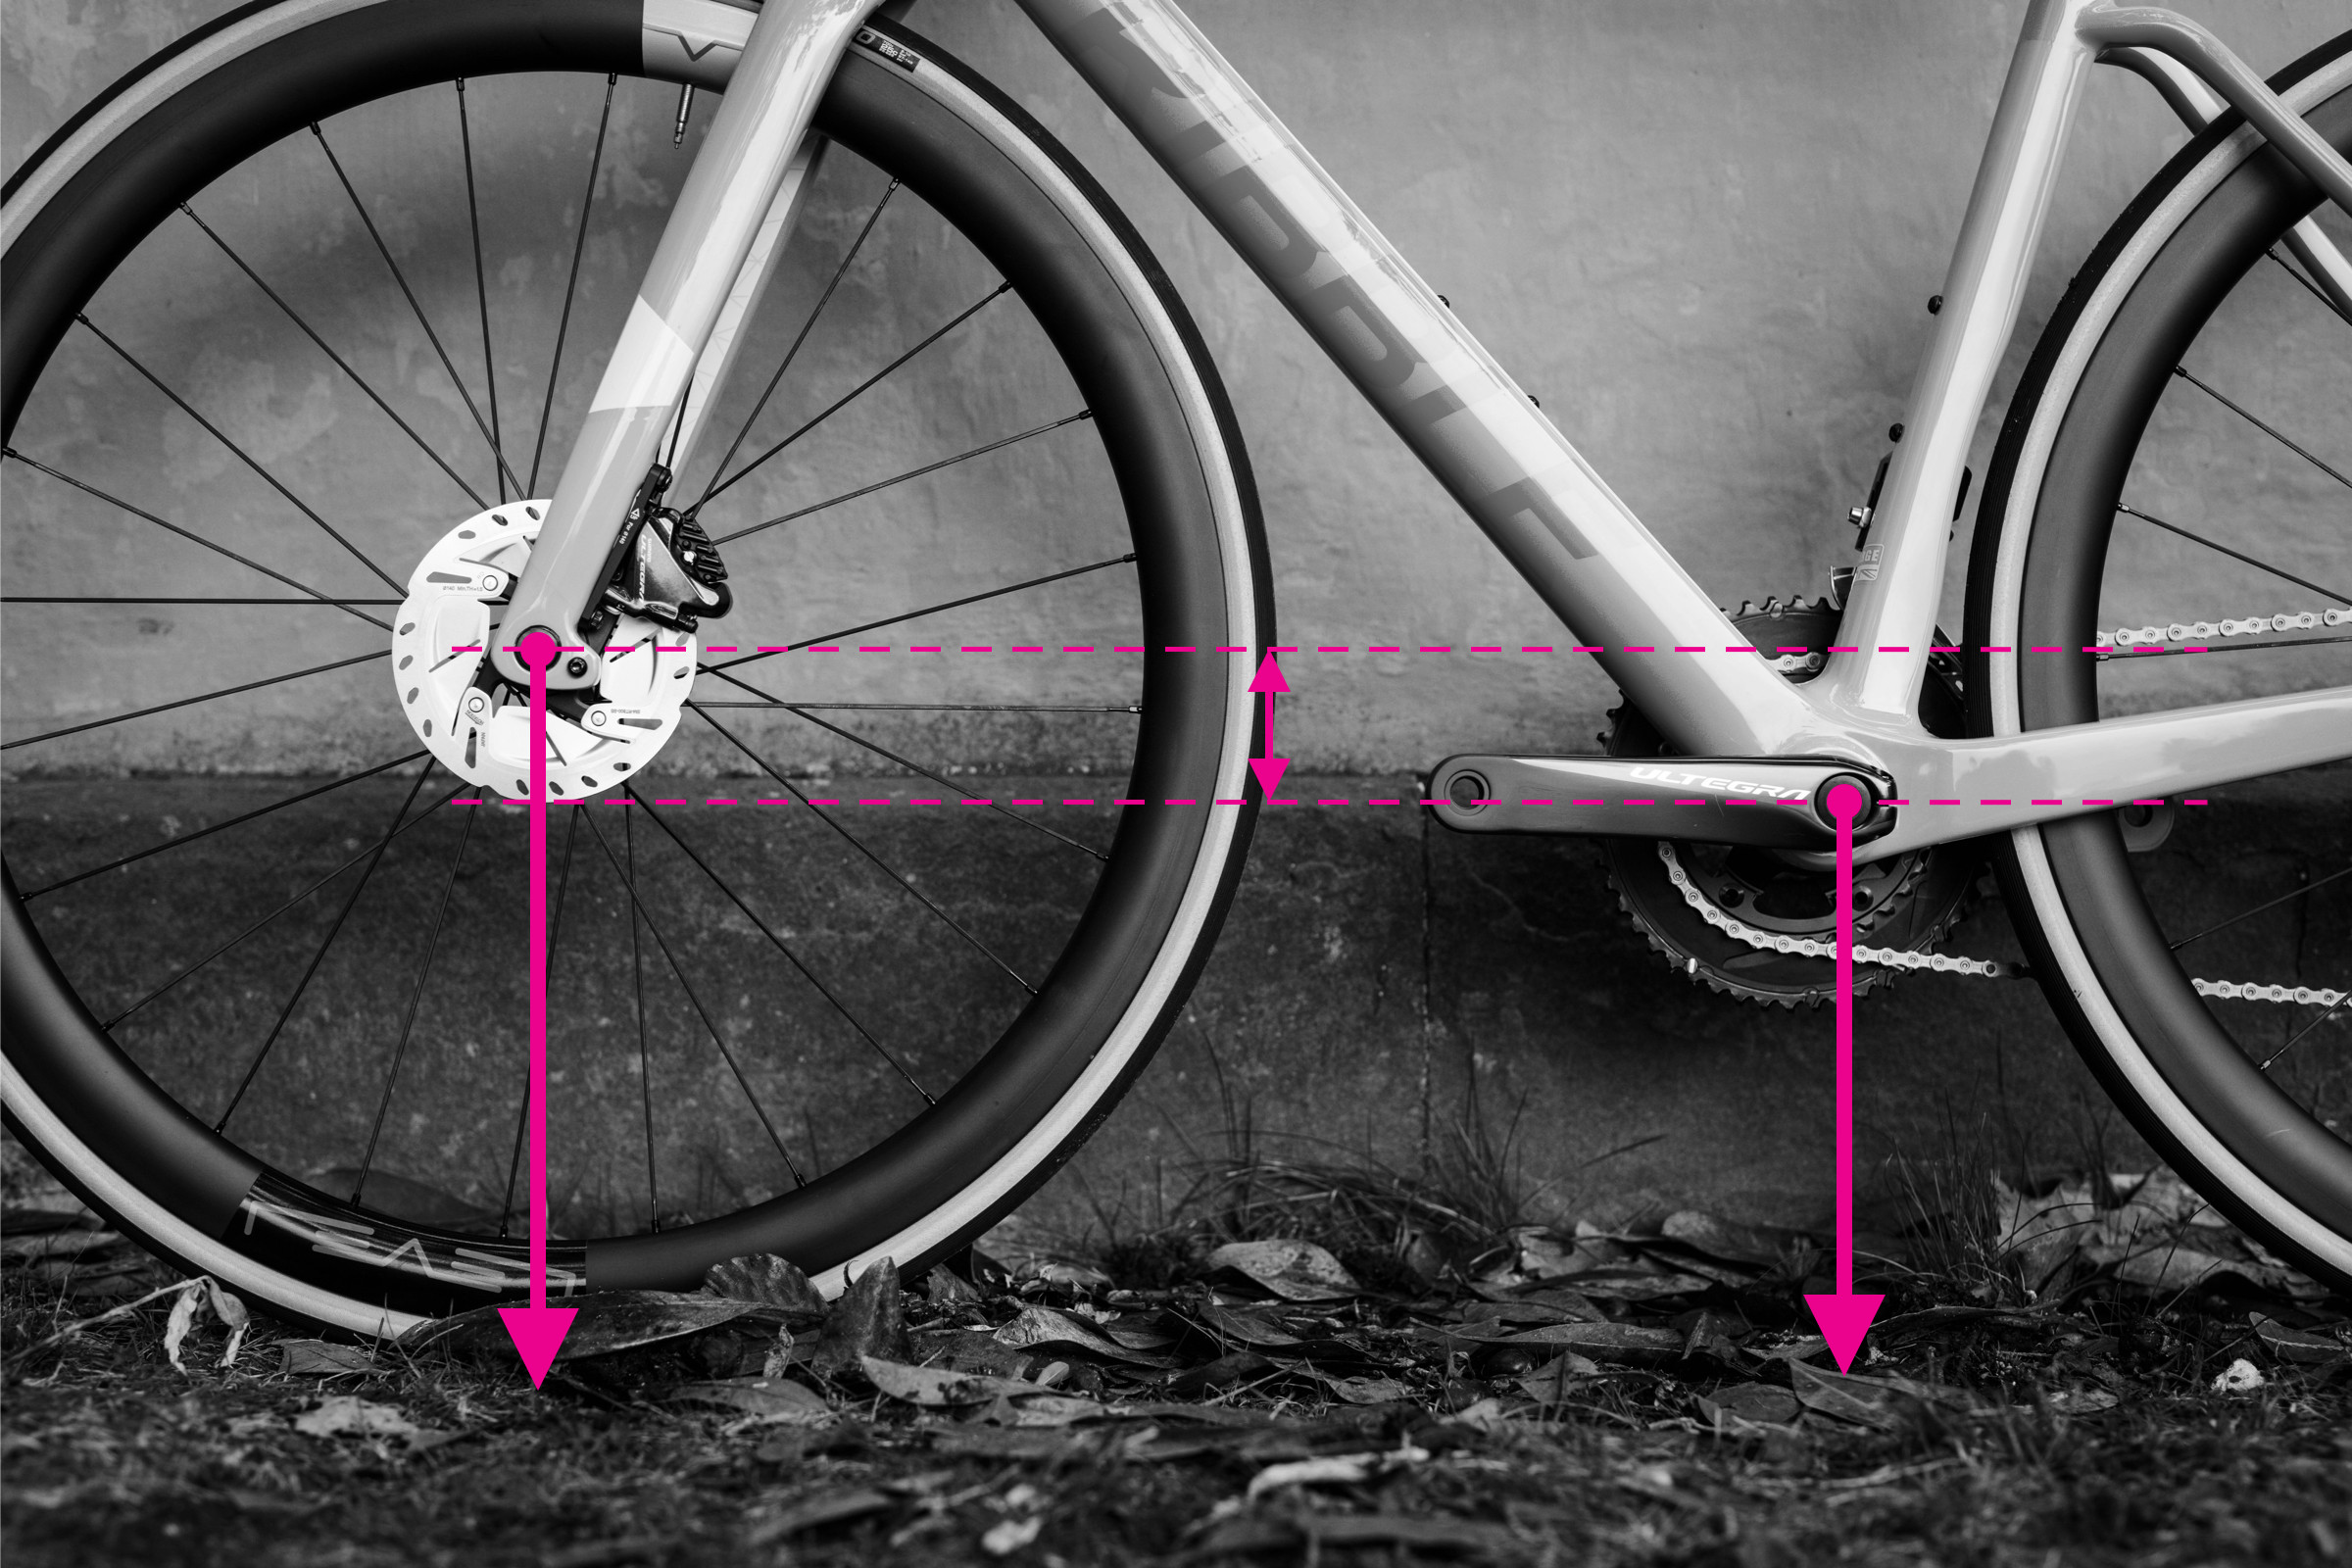 BB drop measurement demonstrated on a bike frame
13. Measuring Bottom Bracket Height
How do I measure the bottom bracket height of my bike? Bottom bracket height influences clearance and stability. Here’s how to measure it accurately:
-
Ensure Upright Position: Keep your bike straight upright.
-
Measure the Distance: Measure the distance from the ground to the center of the bottom bracket shell.
-
Consider Tire Pressure: Inflate your tires to your usual running pressure, as this will slightly affect the measurement.
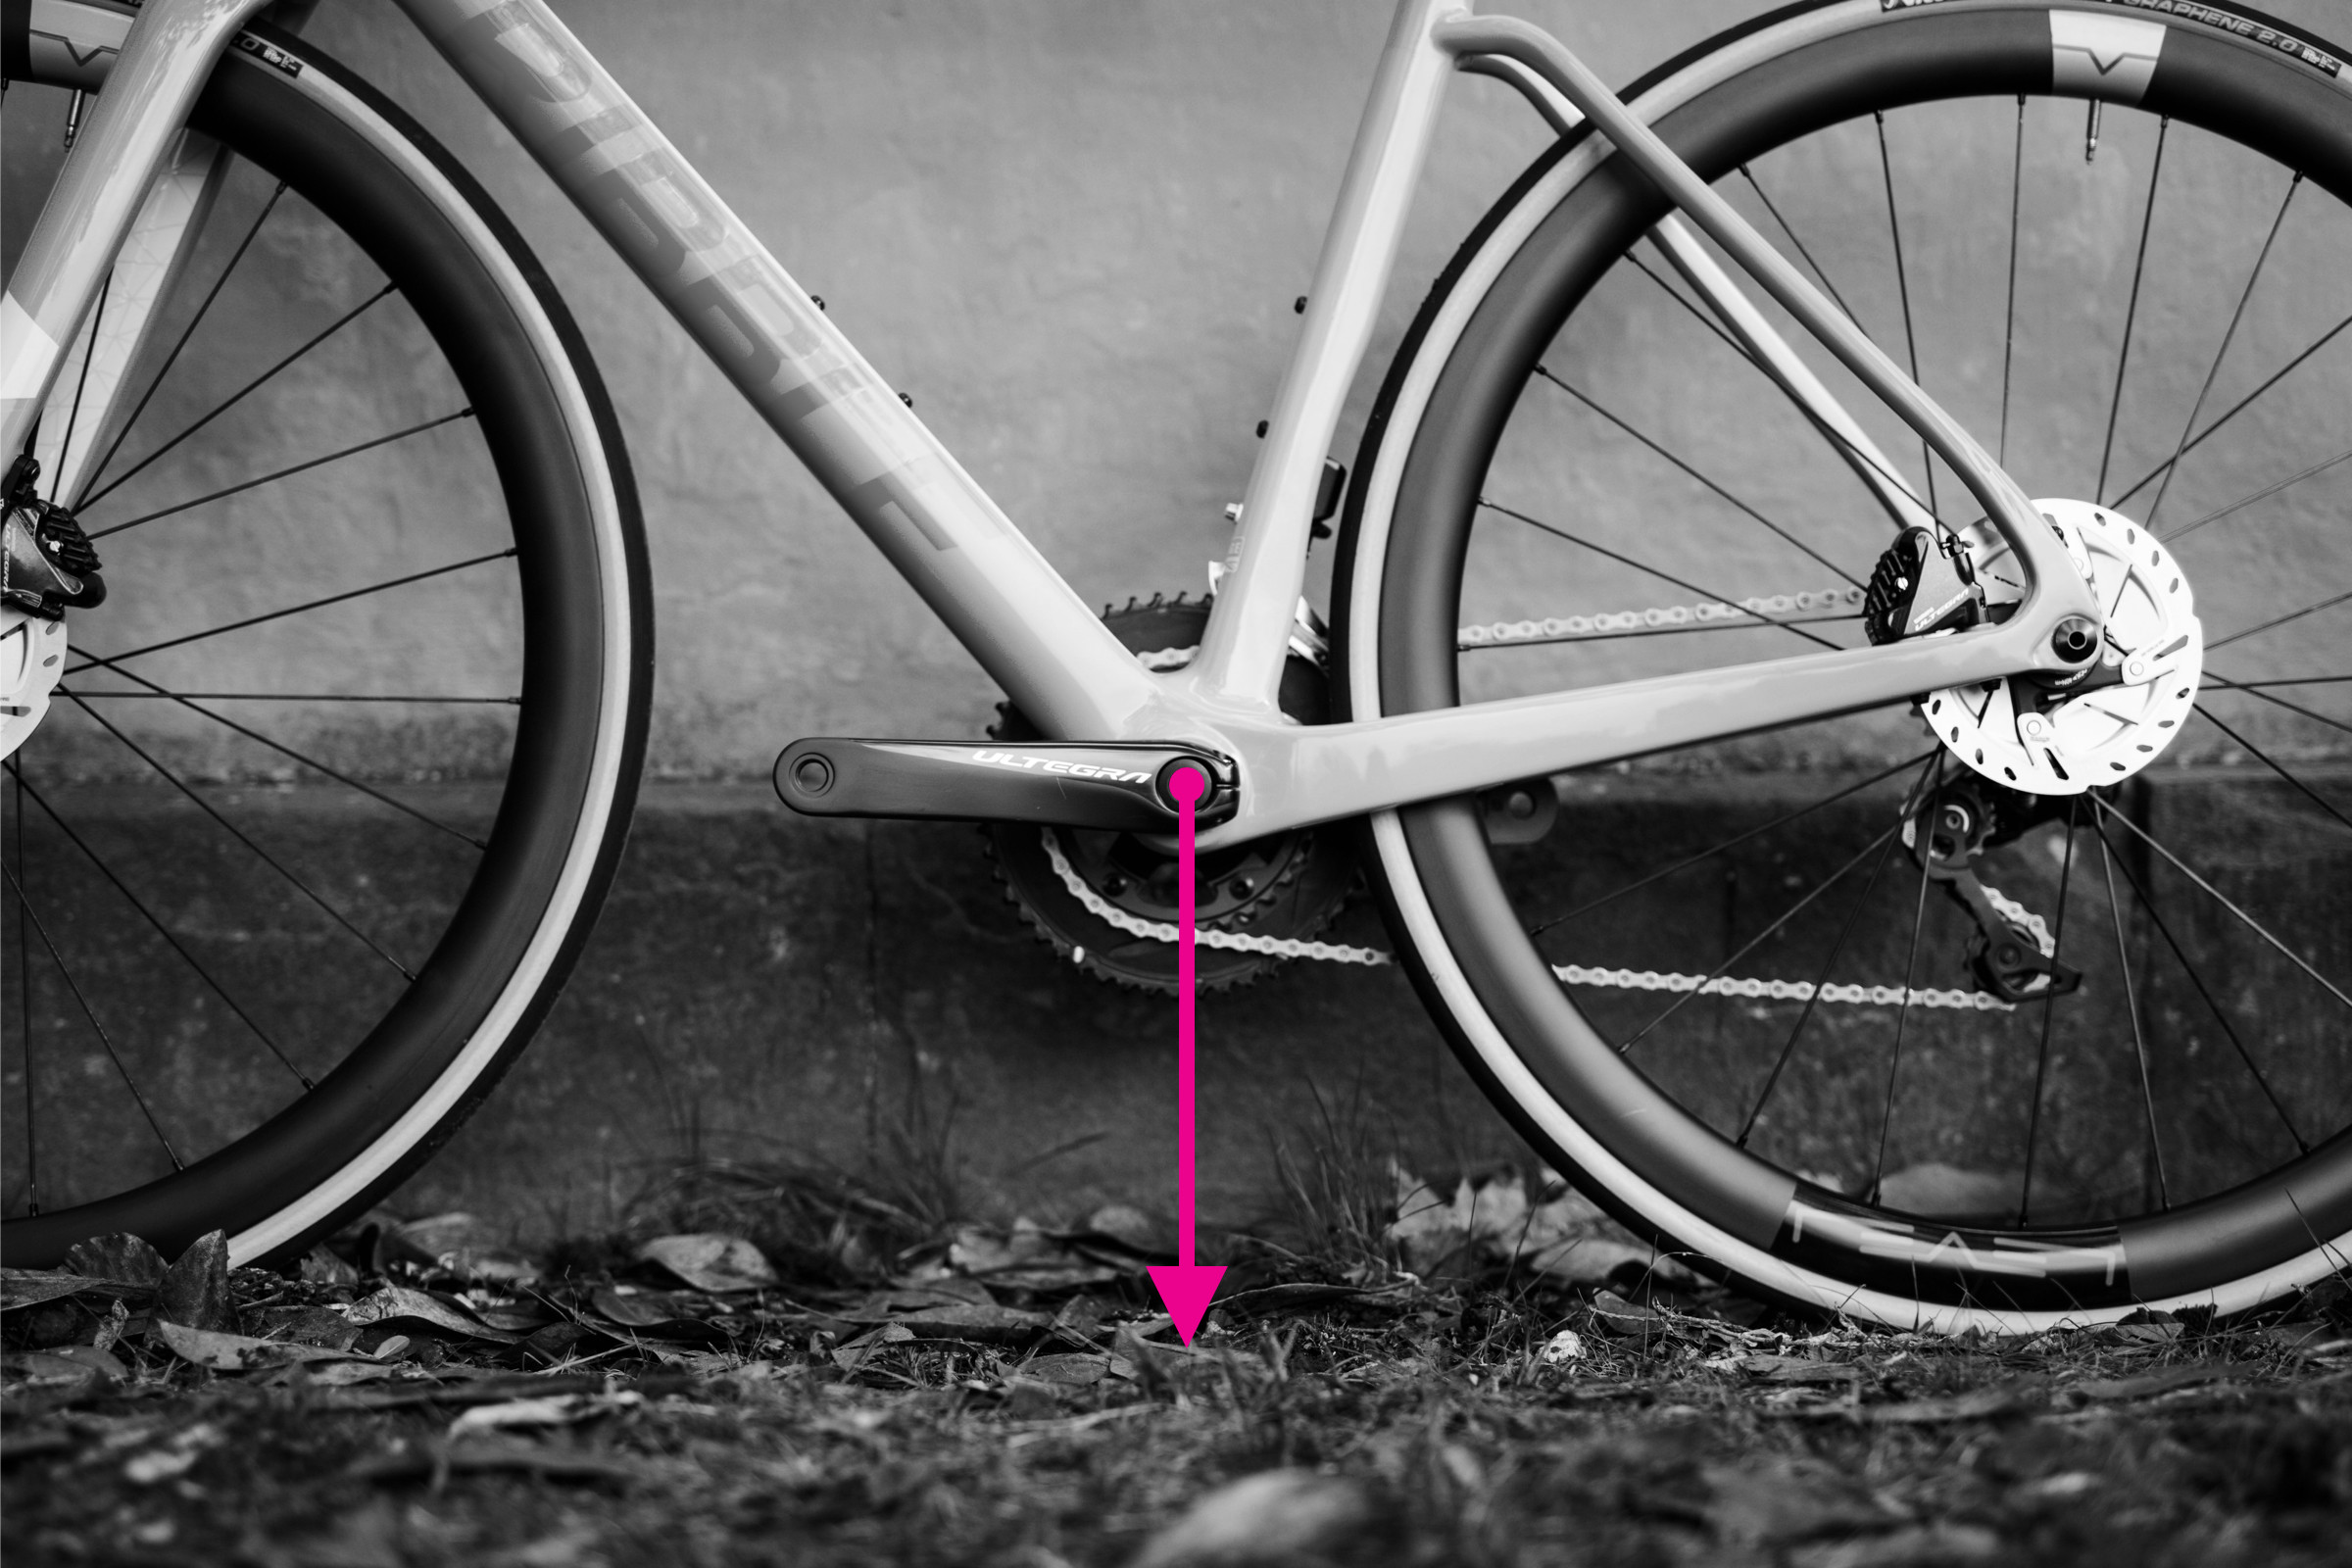 Bottom bracket height measurement demonstrated on bike frame
14. Road Bike Sizing: Key Considerations
What should I consider when sizing a road bike? When sizing a road bike, consider the following key factors:
-
Top Tube Length: As mentioned earlier, the effective top tube length is crucial for determining your reach to the handlebars.
-
Reach and Stack: These measurements provide a more consistent way to compare frame sizes, independent of frame design.
-
Frame Size: Road bikes are often sized in centimeters, corresponding to the seat tube length or a nominal frame size. However, sizing can vary between brands, so always check the geometry chart.
-
Flexibility and Riding Style: Your flexibility and preferred riding style will influence the ideal frame size. A more aggressive, aerodynamic position typically requires a longer reach and lower stack.
According to a study by the American College of Sports Medicine, proper bike fit can significantly improve cycling efficiency and reduce the risk of injuries.
15. Mountain Bike Sizing: What to Look For
What are the key considerations when sizing a mountain bike? Sizing a mountain bike involves different considerations compared to road bikes:
-
Frame Size: Mountain bikes are often sized in inches (corresponding to seat tube length) or using a S, M, L, XL system. Again, sizing can vary between brands.
-
Reach: Reach is particularly important for mountain bikes, as it affects your stability and control on technical terrain. A longer reach can provide more stability at high speeds.
-
Stack: Stack height influences your riding posture. A higher stack can provide a more upright and comfortable position for trail riding.
-
Standover Height: Ensure you have adequate standover clearance (the distance between the top tube and your crotch when standing over the bike) to avoid injury.
-
Riding Style: Your riding style (e.g., cross-country, trail, enduro) will influence the ideal frame size. More aggressive riding styles often benefit from longer reaches and slacker head tube angles.
16. Women’s Bike Sizing: Specific Considerations
Are there specific considerations for women’s bike sizing? Women often have different proportions than men, with shorter torsos and longer legs. As a result, women’s bike sizing may require specific considerations:
-
Frame Geometry: Some brands offer women-specific bikes with adjusted frame geometries to better suit female proportions. These bikes often have shorter top tubes and higher stack heights.
-
Saddle: Women-specific saddles are designed to provide more comfort for female anatomy.
-
Handlebar Width: Women typically have narrower shoulders than men, so a narrower handlebar width may be more comfortable.
-
Reach Adjustments: Pay attention to reach, as women may need a shorter reach to the handlebars. This can be achieved with a shorter stem or adjustable reach levers.
17. The Importance of Professional Bike Fitting
When should I consider getting a professional bike fitting? While measuring your bike frame is a great starting point, a professional bike fitting can provide a more personalized and precise fit. Consider getting a professional bike fitting if:
-
You Experience Discomfort or Pain: If you experience pain or discomfort while riding, a professional bike fitting can help identify and address the underlying issues.
-
You’re a Serious Cyclist: If you’re a competitive cyclist or ride frequently, a professional bike fitting can optimize your performance and reduce the risk of injuries.
-
You’re Buying a New Bike: A professional bike fitting can help you choose the right size and model of bike for your body and riding style.
-
You Have Specific Needs: If you have any physical limitations or specific needs, a professional bike fitting can help you achieve a comfortable and efficient riding position.
According to the International Bike Fitting Institute (IBFI), a proper bike fit should consider your individual anatomy, flexibility, and riding goals to optimize comfort and performance.
18. Understanding Bike Frame Materials
What are the common materials used in bike frames, and how do they affect performance? Bike frames are typically made from a variety of materials, each with its own advantages and disadvantages:
-
Aluminum: Aluminum is a lightweight and affordable material that is commonly used in bike frames. It offers a good balance of stiffness and compliance.
-
Carbon Fiber: Carbon fiber is a lightweight and strong material that allows for highly customizable frame designs. It can be tuned to provide specific ride characteristics, such as stiffness, compliance, and aerodynamics.
-
Steel: Steel is a durable and comfortable material that is often used in classic and touring bikes. It offers a smooth ride quality and can absorb vibrations well.
-
Titanium: Titanium is a lightweight, strong, and corrosion-resistant material that offers a comfortable ride quality. It is more expensive than aluminum or steel.
The material of your bike frame can significantly affect its weight, stiffness, comfort, and durability. Choose a material that suits your riding style and budget.
19. How Bike Geometry Affects Handling
How does bike geometry influence the way a bike handles and performs? Bike geometry plays a crucial role in determining a bike’s handling characteristics. Here are some key aspects:
-
Head Tube Angle: A slacker head tube angle (e.g., 66-68 degrees) provides more stability at high speeds and on rough terrain, making it suitable for downhill and enduro riding. A steeper head tube angle (e.g., 72-74 degrees) results in quicker steering and more nimble handling, making it suitable for cross-country riding.
-
Seat Tube Angle: A steeper seat tube angle positions you more forward over the pedals, improving pedaling efficiency and power transfer. A slacker seat tube angle positions you further back, providing more comfort and stability.
-
Chainstay Length: Shorter chainstays make the bike feel more lively and responsive, while longer chainstays provide more stability and traction.
-
Wheelbase: A longer wheelbase provides more stability at high speeds, while a shorter wheelbase results in quicker turning and more maneuverability.
-
Bottom Bracket Height: A lower bottom bracket height lowers the center of gravity, improving stability and cornering ability. A higher bottom bracket height provides more clearance for obstacles on the trail.
20. Bike Maintenance Tips for Accurate Measurements
How can I ensure my bike measurements remain accurate over time? Proper bike maintenance can help ensure your bike measurements remain accurate over time:
-
Regularly Check Tire Pressure: Consistent tire pressure is essential for accurate measurements, especially for bottom bracket height and wheelbase.
-
Inspect Frame for Damage: Check your frame for any signs of damage, such as cracks or dents, which can affect its geometry.
-
Tighten Loose Components: Loose components, such as the headset or bottom bracket, can affect measurements. Tighten them to the correct torque specifications.
-
Keep Components Clean: Clean components, such as the seatpost and headset, to prevent corrosion and ensure smooth operation.
21. Common Mistakes to Avoid When Measuring
What are some common mistakes to avoid when measuring my bike frame? Avoid these common mistakes for accurate measurements:
-
Not Using a Level Surface: Always measure your bike on a level surface to ensure accurate vertical and horizontal measurements.
-
Inconsistent Tire Pressure: Maintain consistent tire pressure for all measurements, as tire pressure can affect bottom bracket height and wheelbase.
-
Not Straightening the Fork: Ensure the front fork is pointing straight ahead when measuring wheelbase and front center.
-
Measuring Along the Seat Tube: Avoid measuring seat tube length along the actual tube, especially if it has a kink. Use a straight edge to maintain a straight line from the bottom bracket to the top of the seat tube.
-
Not Repeating Measurements: Take each measurement multiple times to ensure consistency and accuracy.
22. How to Choose the Right Bike Size
What factors should I consider when choosing the right bike size for my needs? Choosing the right bike size is crucial for comfort, performance, and injury prevention. Consider these factors:
-
Your Height: Use your height as a starting point for determining the appropriate frame size. Most manufacturers provide size charts based on height.
-
Your Inseam: Measure your inseam (the distance from your crotch to the floor) to determine the appropriate seat tube length and standover height.
-
Your Flexibility: Your flexibility will influence the ideal reach and stack. Less flexible riders may prefer a shorter reach and higher stack.
-
Your Riding Style: Your riding style will influence the ideal frame geometry. More aggressive riding styles often benefit from longer reaches and slacker head tube angles.
-
Test Ride: Always test ride a bike before purchasing to ensure it feels comfortable and handles well.
23. Bike Frame Measurement Tools: Which Is Best?
Which bike frame measurement tools are the most reliable and accurate? When it comes to measuring your bike frame, accuracy is key. Here’s a comparison of some of the best tools available:
| Tool | Pros | Cons | Best For |
|---|---|---|---|
| Tape Measure | Simple, versatile, widely available | Can be difficult to get precise measurements on curved surfaces | Measuring lengths and distances |
| Digital Clinometer | Accurate, easy to read, often has multiple functions | Requires batteries, may be less durable than analog versions | Measuring angles with high precision |
| Spirit Level | Simple, durable, no batteries required | Requires a flat surface, can be bulky | Ensuring horizontal and vertical alignment |
| Plumb Line | Inexpensive, simple to use, accurate for vertical alignment | Requires a stable hanging point, can be affected by wind | Determining true vertical for stack and reach |
24. Why Understanding Bike Frame Size Is Essential
Why should I bother learning how to measure my bike frame? Understanding bike frame size is more than just a technicality; it’s fundamental to your cycling experience. Here’s why:
-
Comfort: A correctly sized frame ensures a comfortable riding position, reducing strain and fatigue on long rides.
-
Performance: The right size optimizes your power output and efficiency, allowing you to ride faster and further with less effort.
-
Injury Prevention: An ill-fitting bike can lead to injuries such as knee pain, back pain, and wrist pain. Proper sizing minimizes these risks.
-
Control: A correctly sized frame enhances your control and handling of the bike, especially on challenging terrain.
-
Enjoyment: Ultimately, a well-fitted bike makes cycling more enjoyable. You’ll feel more confident, comfortable, and connected to your ride.
25. Optimizing Your Bike Fit for Long Rides
How can I optimize my bike fit for longer, more comfortable rides? Optimizing your bike fit for long rides is crucial for endurance and enjoyment. Here are some tips:
-
Handlebar Height: Adjust your handlebar height to achieve a comfortable reach and reduce strain on your back and shoulders.
-
Saddle Position: Experiment with your saddle position (fore/aft and tilt) to find the sweet spot that maximizes power and comfort.
-
Cleat Position: If you use clipless pedals, ensure your cleats are properly aligned to prevent knee pain and optimize pedaling efficiency.
-
Consider Bar Ends: Adding bar ends to your handlebars can provide additional hand positions for long climbs and headwinds.
-
Use Padded Shorts: Invest in a good pair of padded cycling shorts to cushion your sit bones and reduce chafing.
According to a study by the University of California, proper bike fit can increase cycling efficiency by up to 5%.
26. Adjusting Your Bike Fit for Different Cycling Styles
How should I adjust my bike fit for different types of cycling, such as road, mountain, or commuting? Different cycling styles require different bike fits. Here’s how to adjust your bike fit for each:
-
Road Cycling:
- Prioritize aerodynamics and efficiency.
- Set your handlebar height lower for a more aggressive position.
- Use a narrower saddle for efficient pedaling.
-
Mountain Biking:
- Prioritize control and stability.
- Set your handlebar height higher for a more upright position.
- Use a wider saddle for comfort on rough terrain.
-
Commuting:
- Prioritize comfort and visibility.
- Set your handlebar height higher for a more upright position.
- Consider adding fenders and a rack for practicality.
27. The Future of Bike Frame Measurement Technology
What innovative technologies are emerging in bike frame measurement and fitting? The future of bike frame measurement and fitting is exciting, with new technologies constantly emerging:
-
3D Body Scanning: 3D body scanners can create a detailed digital model of your body, allowing for precise frame size recommendations.
-
Motion Capture Analysis: Motion capture systems use sensors to track your movements while cycling, providing real-time feedback on your riding position and efficiency.
-
Virtual Reality Bike Fitting: VR bike fitting allows you to test different frame sizes and geometries in a virtual environment, without having to physically ride the bikes.
-
Smart Bike Components: Smart components, such as adjustable stems and seatposts, can automatically adjust your riding position based on your body metrics and preferences.
28. Bike Frame Measurement for Vintage Bikes
How does measuring a vintage bike frame differ from measuring a modern bike frame? Measuring a vintage bike frame can be different from measuring a modern bike frame due to variations in design and standards:
-
Horizontal Top Tubes: Vintage bikes often have horizontal top tubes, making top tube length a more straightforward measurement.
-
Imperial Units: Vintage bikes are typically measured in inches, so be prepared to convert to metric if needed.
-
Limited Geometry Charts: Geometry charts may not be available for vintage bikes, so you’ll need to rely on manual measurements.
-
Steel Frames: Vintage bikes are often made of steel, which can affect the ride quality and handling compared to modern materials.
29. Bike Frame Measurement for Children’s Bikes
What are the key considerations when measuring bike frames for children? Measuring bike frames for children requires special attention to ensure safety and comfort:
-
Wheel Size: Children’s bikes are typically sized by wheel size (e.g., 12-inch, 16-inch, 20-inch).
-
Standover Height: Ensure the child has adequate standover clearance to avoid injury.
-
Reach: Make sure the child can comfortably reach the handlebars without overstretching.
-
Adjustability: Choose a bike with adjustable components, such as the seatpost and handlebars, to accommodate growth.
30. Safety Tips for Measuring Bike Frames
What safety precautions should I take when measuring my bike frame? Safety should always be a priority when measuring your bike frame:
-
Use a Stable Surface: Measure your bike on a stable, level surface to prevent it from tipping over.
-
Wear Safety Glasses: Protect your eyes from debris when using tools.
-
Use Caution with Tools: Be careful when using sharp or heavy tools, such as tape measures and levels.
-
Get Help if Needed: If you’re unsure about any step, ask a friend or professional for assistance.
FAQ: How to Measure Bike Frame
-
How do I determine the right frame size for my height? Use online sizing charts as a starting point, but consider your inseam and flexibility for a more accurate fit.
-
What’s the difference between frame size and bike size? Frame size typically refers to the seat tube length, while bike size is a more general term that includes other measurements like reach and stack.
-
Can I measure my bike frame myself, or should I go to a professional? You can measure your bike frame yourself using the steps outlined in this guide, but a professional bike fitting can provide a more personalized and precise fit.
-
How often should I measure my bike frame? Measure your bike frame when buying a new bike or if you experience any discomfort or pain while riding.
-
What if my measurements fall between two frame sizes? Choose the smaller size if you prioritize agility and the larger size if you prioritize stability.
-
Are women’s bikes different in size compared to men’s bikes? Yes, women’s bikes often have different frame geometries to better suit female proportions.
-
How important is standover height when choosing a bike frame? Standover height is important for safety, especially for mountain biking.
-
What role does flexibility play in determining bike frame size? Less flexible riders may prefer a shorter reach and higher stack for a more comfortable riding position.
-
Can I adjust my bike frame size after purchasing it? You can adjust some aspects of your bike fit, such as saddle height and handlebar position, but you cannot change the actual frame size.
-
Where can I find more information about bike frame measurement and fitting? You can find more information on usabikers.net, including articles, videos, and a community forum.
Knowing how to measure your bike frame is an invaluable skill for any cyclist. By following the steps outlined in this guide, you can ensure you get the right size bike for your body and riding style, maximizing your comfort, performance, and enjoyment. Whether you’re a seasoned pro or a weekend warrior, a properly fitted bike can make all the difference.
Ready to take your cycling experience to the next level? Visit usabikers.net today to explore our comprehensive collection of articles, reviews, and guides on all things biking. Join our vibrant community of riders and share your passion for the open road. Don’t just ride – ride right with usabikers.net.
Address: 801 Sturgis Main St, Sturgis, SD 57785, United States.
Phone: +1 (605) 347-2000.
Website: usabikers.net.