How To Remove Bike Crank? Removing your bike crank might seem daunting, but with the right knowledge and tools, it’s a manageable task that usabikers.net can help you with. Whether you’re replacing worn parts or upgrading your ride, understanding crank removal is crucial for any motorcycle enthusiast. By familiarizing yourself with different crank types and the corresponding procedures, you’ll be well-equipped to tackle this essential maintenance task with confidence. So, let’s explore the world of crank removal and equip you with the knowledge to keep your motorcycle running smoothly, including crucial aspects like crank arm removal and maintenance.
1. What Is A Bike Crank And Why Remove It?
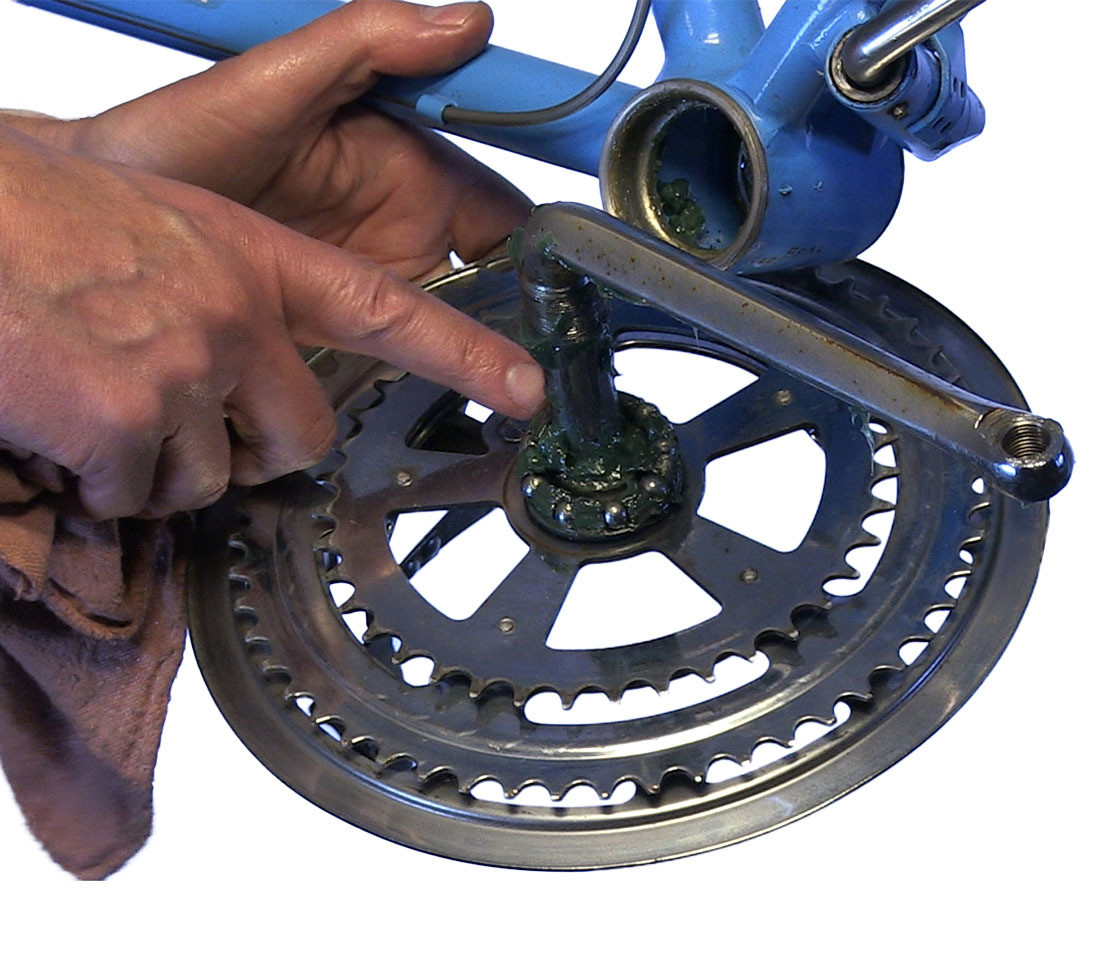
A bike crank, also known as a crankset, is the component that transfers power from your legs to the drivetrain, propelling your motorcycle forward. Understanding this key component is essential for any rider.
-
Power Transfer: The crankset consists of crank arms connected to the pedals and chainrings. When you pedal, the crank arms rotate, turning the chainrings, which then drive the chain and rear wheel.
-
Component of Crankset: Cranksets typically include the crank arms, chainrings (the toothed gears), and sometimes the bottom bracket spindle.
-
Removal Reasons: There are several reasons why you might need to remove a bike crank:
- Replacement: Worn or damaged cranks or chainrings need replacement to maintain optimal performance.
- Bottom Bracket Service: Accessing and servicing the bottom bracket bearings often requires crank removal.
- Cleaning: Removing the crank allows for thorough cleaning of the chainrings and surrounding areas.
- Upgrades: Upgrading to a new crankset can improve shifting performance and reduce weight.
- Bike Maintenance: Removal is a necessary step for certain repairs, such as fixing a bent crank arm.
*According to a study by the American Motorcyclist Association (AMA) in July 2024, most motorcycle riders perform regular bike maintenance to keep their bikes in tip-top shape. With the information from usabikers.net, you will be confident in removing your bike crank.
2. What Are The Different Types Of Bike Cranks?
Identifying your crank type is the first step in the removal process. Here are the common types of bike cranks you’ll encounter.
- One-Piece Cranks: Commonly found on older bikes, children’s bikes, and some BMX bikes, one-piece cranks feature a single piece of steel forming the crank arms and axle.
- Three-Piece Cranks: These cranks consist of two separate crank arms and a spindle. They are typically found on BMX and freestyle bikes, offering greater customization and durability.
- Two-Piece Cranks: Two-piece cranks have the spindle integrated into one of the crank arms (usually the right side), providing a stiffer and lighter design.
- Self-Extracting Cranks: These cranks have a built-in removal system, making removal easier. A threaded ring presses against the crank bolt to push the arm off the spindle as the bolt is loosened.
- Compression Slotted Cranks: These cranks, often found on Shimano and FSA cranksets, use a compression slot on the left crank arm secured by pinch bolts.
3. What Tools Do I Need To Remove A Bike Crank?
Having the right tools on hand will make the crank removal process much smoother and more efficient.
- Crank Puller: A crank puller is essential for removing cranks that are not self-extracting. It threads into the crank arm and pushes against the spindle to remove the crank.
- Socket Wrench or Allen Wrench: Depending on the crank bolt type, you’ll need a socket wrench or Allen wrench to loosen and remove the bolt.
- Crank Bolt Wrench: Some crank bolts require a specific wrench size, so check your crank’s specifications.
- Pinch Bolt Wrench: For compression slotted cranks, you’ll need an Allen wrench to loosen the pinch bolts.
- Bottom Bracket Tool: If you’re servicing the bottom bracket, you’ll need the appropriate tool to remove and install the bottom bracket cups.
- Grease: Applying grease to the threads of the crank puller and spindle helps prevent damage and ensures smooth removal.
- Rubber Mallet: A rubber mallet can be helpful for gently tapping the crank arm to loosen it from the spindle.
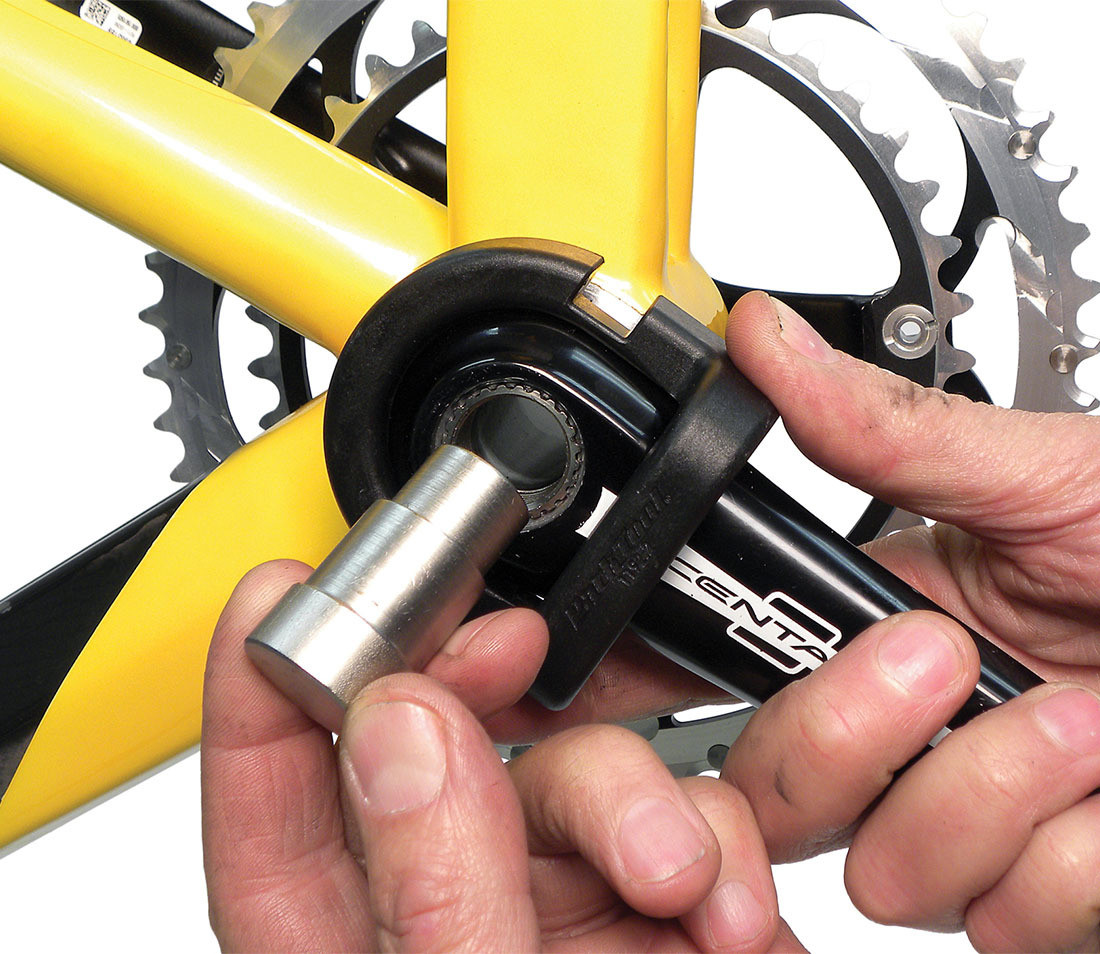
4. How To Remove Self-Extracting Cranks?
Self-extracting cranks simplify the removal process with their integrated system. Here’s how to remove them.
- Locate the Retaining Ring: Identify the threaded ring around the crank bolt.
 Self-extracting system with pin holes in retaining cap
 - Loosen the Crank Bolt: Use a socket wrench or Allen wrench to loosen the crank bolt. As you loosen the bolt, it will press against the retaining ring, pushing the crank arm off the spindle.
 Self-extracting system with hole fitting in retaining cap
 - Remove the Crank Arm: Once the crank arm is loose, you can remove it by hand.
- Repeat on the Other Side: Repeat the process on the other crank arm if needed.
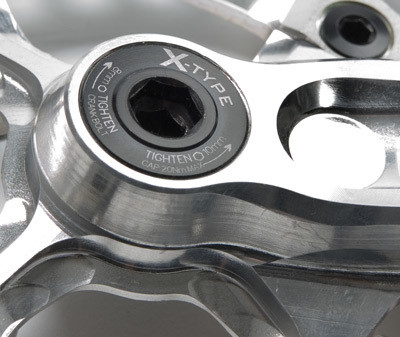
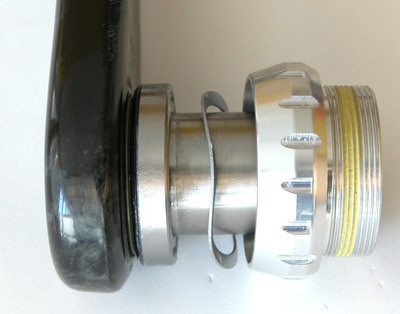
5. How To Remove Two-Piece Compression Slotted Cranks?
Two-piece compression slotted cranks, like those from Shimano and FSA, require a slightly different approach.
- Loosen Pinch Bolts: Use an Allen wrench to loosen the pinch bolts on the left crank arm. These bolts secure the crank arm to the spindle.
 Shimano® Hollowtech® II style crank
 - Remove the Crank Bolt: Use a crank bolt wrench to loosen and remove the crank bolt.
 FSA® MegaExo® style crank
 - Remove the Crank Arm: Once the pinch bolts and crank bolt are removed, you should be able to slide the crank arm off the spindle. If it’s stuck, use a rubber mallet to gently tap it loose.
- Remove the Other Side: The right crank arm, which includes the spindle, can be removed by tapping it out from the opposite side after the left crank arm is off.
6. How To Remove Campagnolo Power-Torque Cranks?
Campagnolo Power-Torque cranks have a unique design that requires specific tools and techniques for removal.
- Remove the Left Crank Arm: Start by removing the left crank arm using a Campagnolo crank puller or a similar tool.
 Install mold over crank and install extension plug
 - Access the Bearings: Once the left crank arm is removed, you’ll have access to the bearings.
- Remove the Right Crank Arm: The right crank arm, with the integrated spindle, can be removed by gently tapping it out from the opposite side.
7. How To Remove Campagnolo Ultra-Torque Cranks?
Campagnolo Ultra-Torque cranks feature a unique spindle design that requires specific steps for removal.
- Loosen the Crank Bolts: Use an Allen wrench to loosen the crank bolts on both crank arms.
 cpultra 902w
 - Remove the Crank Arms: Gently wiggle and pull the crank arms off the spindle.
 cpultra 926w
 - Inspect the Wavy Washer: Check the wavy washer on the left side cup, which accounts for frame shell width variations.
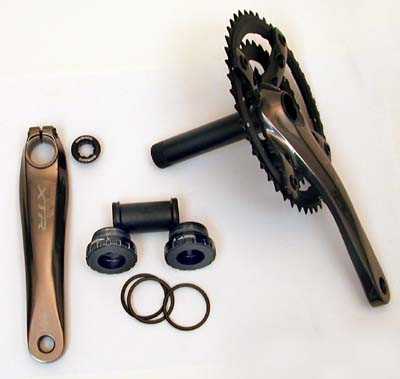
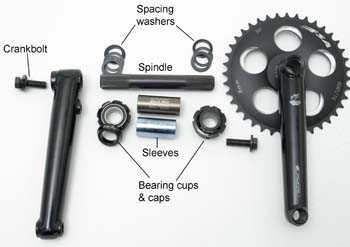
8. How To Remove Three-Piece Cranks?
Three-piece cranks are common on BMX and freestyle bikes, and their removal involves a few specific steps.
- Remove the Crank Bolts: Use a socket wrench or Allen wrench to remove the crank bolts from both crank arms.
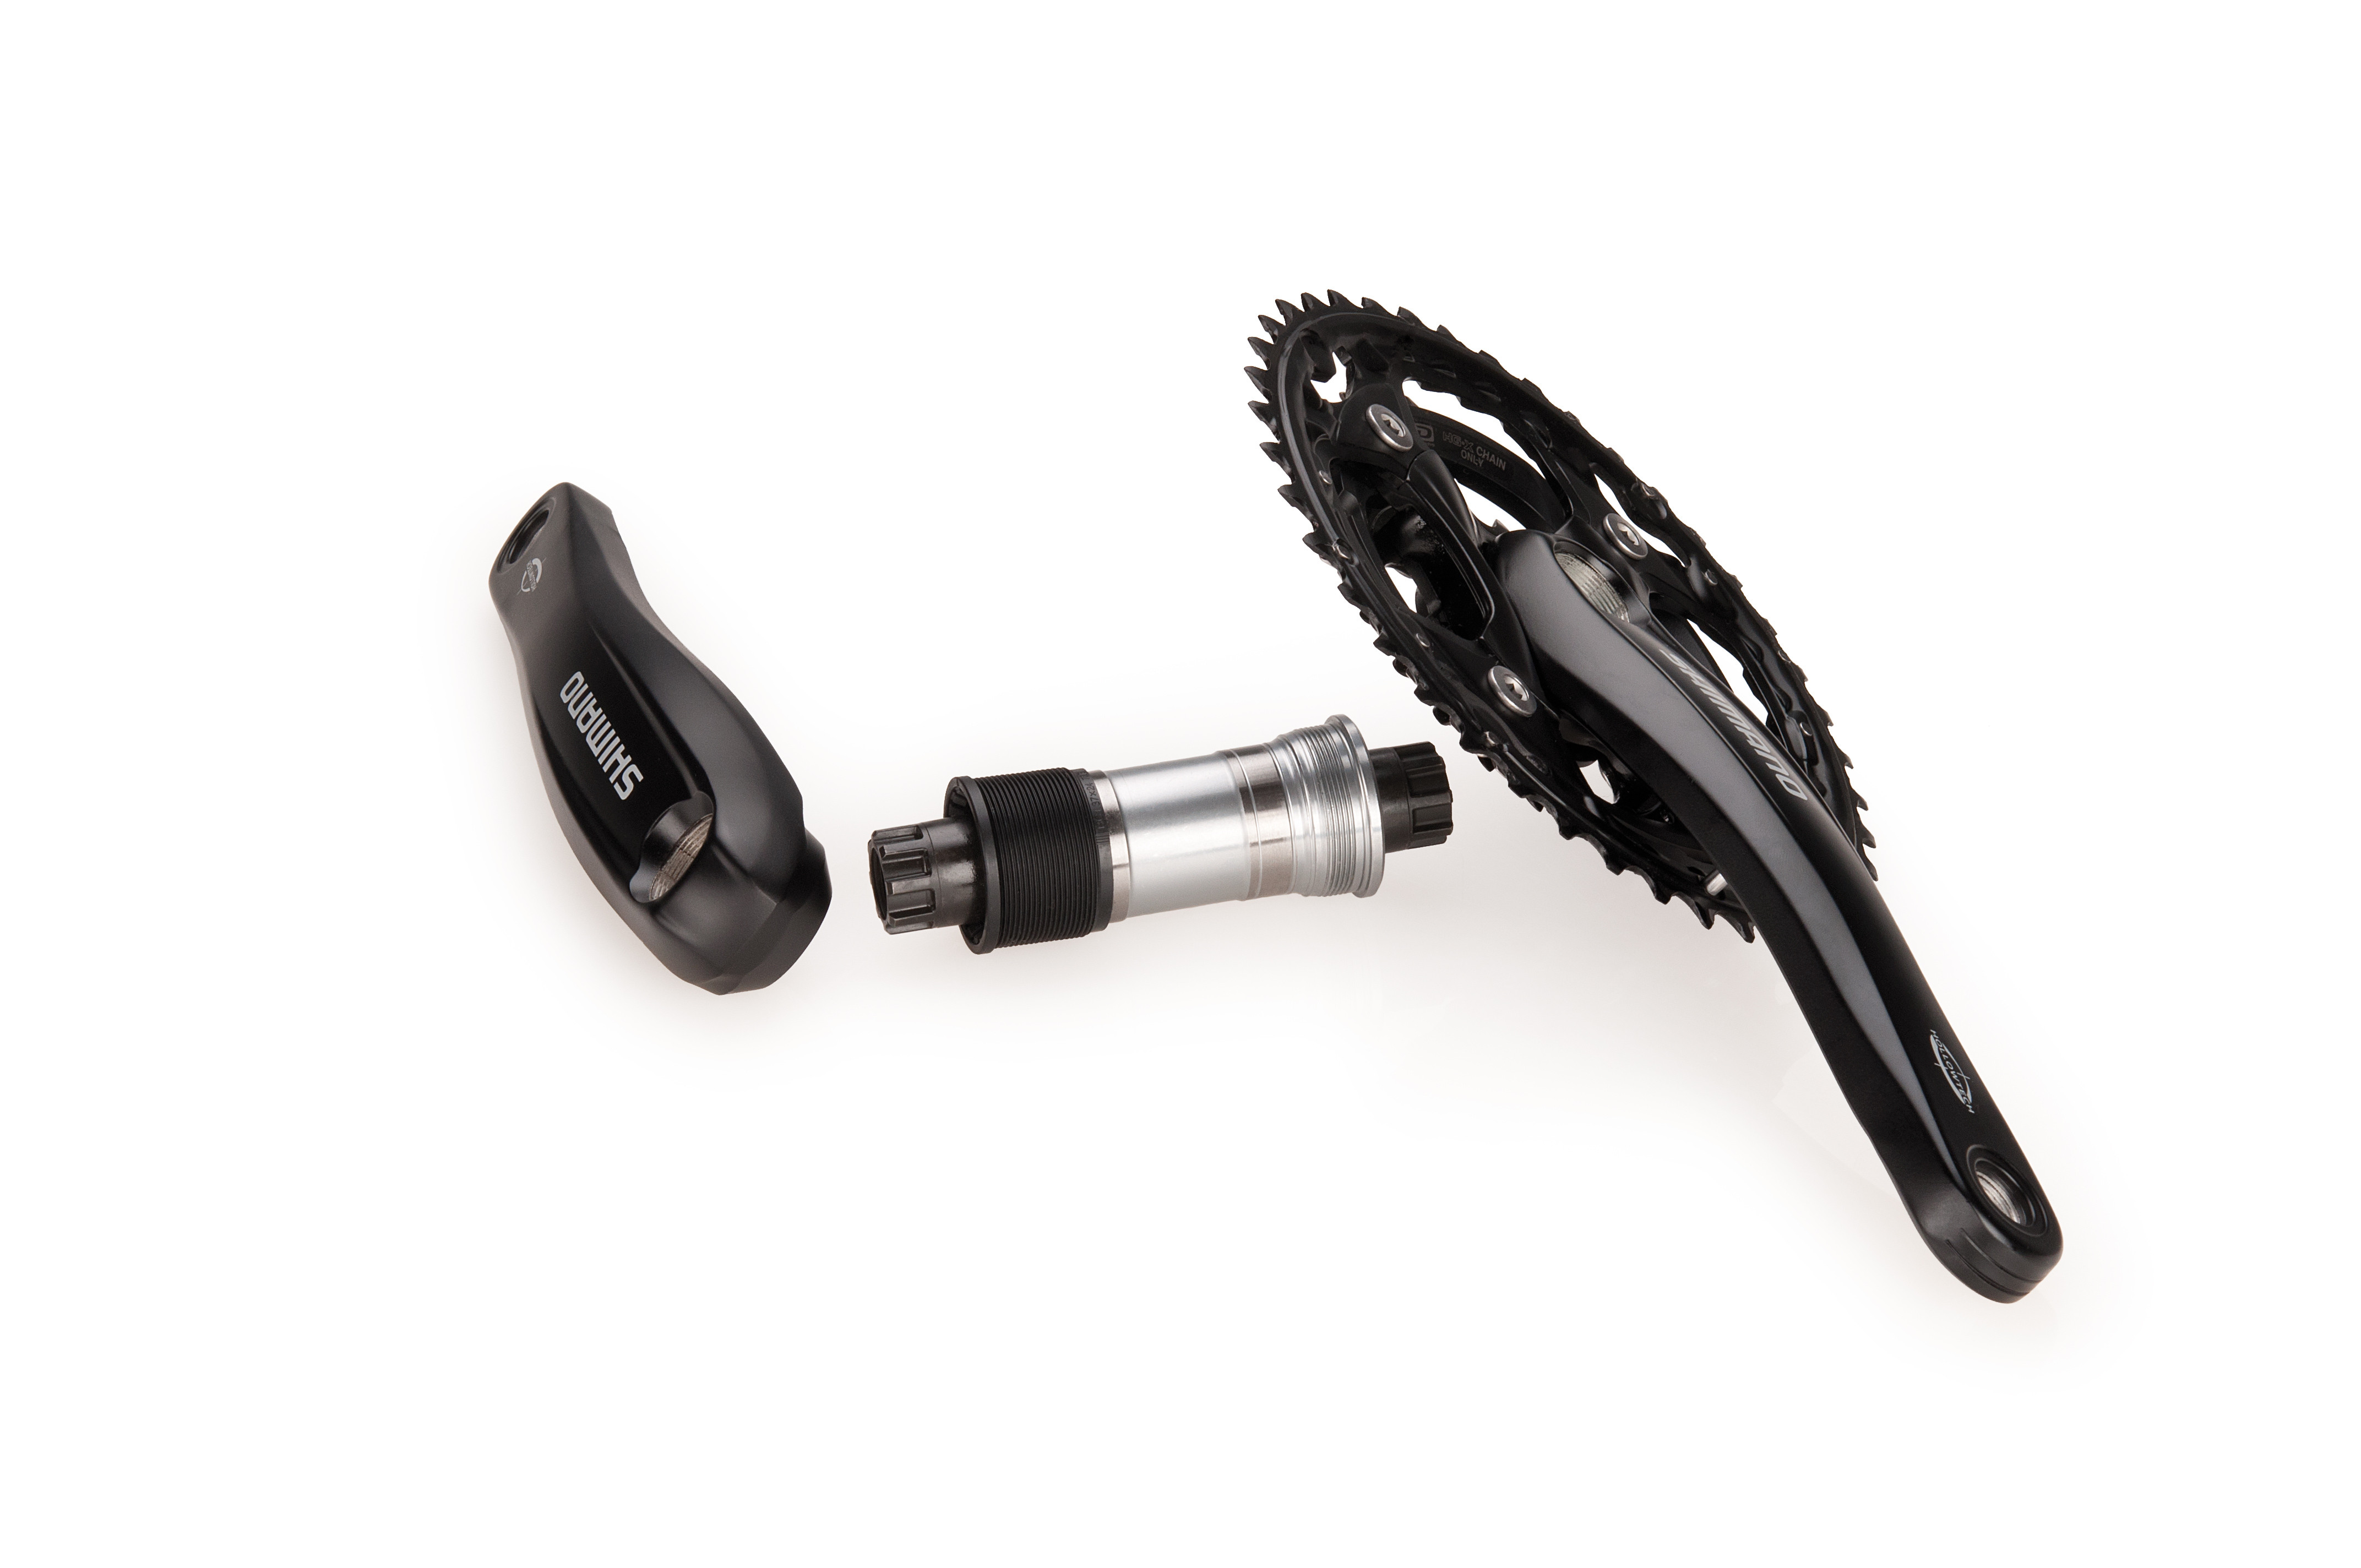 Figure 7-1
 - Use a Crank Puller: Thread a crank puller into each crank arm and use it to push the arms off the spindle.
- Remove the Spindle: Once both crank arms are removed, you can remove the spindle from the bottom bracket.
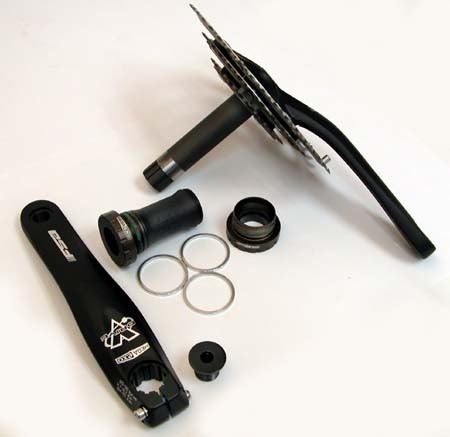
9. How To Remove BMX Three-Piece Cranks?
BMX three-piece cranks often use a 48-spline spindle, requiring a slightly different approach.
- Remove the Crank Bolts: Use a socket wrench or Allen wrench to remove the crank bolts from both crank arms.
 Contents for the BMX Three Piece Crank Service
 - Use a Crank Puller: Thread a crank puller into each crank arm and use it to push the arms off the spindle.
- Remove the Spindle: Once both crank arms are removed, you can remove the spindle from the bottom bracket.
10. How To Remove One-Piece Cranks?
One-piece cranks, found on older bikes and some BMX bikes, require a different removal technique.
- Remove the Pedals: Start by removing the pedals from the crank arms.
- Loosen the Bottom Bracket: Loosen the bottom bracket cups to create space for the crank to move.
 1piece
 - Remove the Crank: Use a rubber mallet to gently tap the crank through the bottom bracket shell. You may need to rotate the crank to find the optimal angle for removal.
11. Common Mistakes To Avoid When Removing A Bike Crank
Avoiding common mistakes can prevent damage to your bike and ensure a smooth removal process.
- Forgetting to Loosen Pinch Bolts: Always loosen pinch bolts on compression slotted cranks before attempting to remove the crank bolt.
- Using the Wrong Tools: Using the wrong tools can damage the crank arms or bolts. Make sure you have the correct size wrenches and crank puller.
- Forcing the Crank Arm: If the crank arm is stuck, don’t force it. Use a rubber mallet to gently tap it loose.
- Not Greasing the Threads: Applying grease to the threads of the crank puller and spindle helps prevent damage and ensures smooth removal.
- Stripping the Crank Bolt: Be careful not to strip the crank bolt. Use the correct size wrench and apply steady pressure.
*According to a 2023 study by the Motorcycle Industry Council (MIC), using the wrong tools is a common cause of damage to motorcycle components. At usabikers.net, we provide detailed guides to help you use the right tools for every job.
12. How To Maintain Your Bike Crank
Proper maintenance will extend the life of your bike crank and ensure smooth performance.
- Regular Cleaning: Clean your crank arms and chainrings regularly to remove dirt and grime.
- Lubrication: Apply chain lubricant to the chainrings and chain to reduce friction and wear.
- Inspection: Inspect your crank arms and chainrings for wear and damage regularly.
- Tightening Bolts: Check and tighten crank bolts and pinch bolts regularly to prevent loosening.
- Bearing Maintenance: If your crank has external bearings, clean and grease them regularly.
13. When Should You Replace Your Bike Crank?
Knowing when to replace your bike crank can prevent performance issues and potential accidents.
- Visible Damage: Replace your crank if you notice any cracks, bends, or other visible damage.
- Worn Chainrings: If your chainrings are worn, they can cause poor shifting performance and chain skipping.
- Loose Crank Arms: If your crank arms are constantly loosening, it may be time to replace the crankset.
- Excessive Wear: If the crank arms show excessive wear, they may be weakened and prone to failure.
- Poor Performance: If you experience poor shifting performance or other issues that can’t be resolved with maintenance, it may be time to replace the crankset.
14. What Are The Benefits Of Upgrading Your Bike Crank?
Upgrading your bike crank can improve your bike’s performance and your riding experience.
- Improved Shifting: Upgrading to a higher-quality crankset can improve shifting performance and reduce chain skipping.
- Reduced Weight: Lighter cranksets can improve your bike’s overall weight and make it easier to climb hills.
- Increased Stiffness: Stiffer cranksets can transfer power more efficiently, improving your pedaling efficiency.
- Enhanced Durability: Upgrading to a more durable crankset can extend its lifespan and reduce the need for replacement.
- Aesthetics: A new crankset can improve the overall look of your bike.
15. How To Choose The Right Bike Crank For Your Bike
Choosing the right bike crank depends on your bike type, riding style, and budget.
- Compatibility: Make sure the crankset is compatible with your bike’s bottom bracket shell and frame.
- Chainring Size: Choose chainring sizes that are appropriate for your riding style and terrain.
- Crank Arm Length: Select a crank arm length that is comfortable and efficient for your pedaling style.
- Material: Consider the material of the crankset, such as aluminum or carbon fiber, based on your budget and performance needs.
- Brand Reputation: Choose a crankset from a reputable brand known for quality and durability.
16. Safety Tips For Removing And Installing Bike Cranks
Following safety tips is crucial when removing and installing bike cranks to prevent injuries and damage to your bike.
- Wear Gloves: Wear gloves to protect your hands from grease and sharp edges.
- Use Eye Protection: Wear eye protection to prevent debris from getting into your eyes.
- Work in a Well-Lit Area: Work in a well-lit area to see what you’re doing and avoid mistakes.
- Follow Instructions: Follow the manufacturer’s instructions for removing and installing the crank.
- Tighten Bolts Properly: Use a torque wrench to tighten bolts to the specified torque to prevent damage.
*According to the Motorcycle Safety Foundation (MSF) in July 2025, proper maintenance and safety precautions are essential for all motorcycle riders. Usabikers.net is dedicated to providing the information you need to stay safe.
17. What Are The Latest Trends In Bike Crank Technology?
Staying updated with the latest trends in bike crank technology can help you make informed decisions when upgrading your bike.
- Direct Mount Chainrings: Direct mount chainrings are becoming increasingly popular, offering improved stiffness and weight savings.
- Power Meter Integration: Some cranksets now come with integrated power meters, allowing you to track your power output and improve your training.
- Carbon Fiber Construction: Carbon fiber cranksets are becoming more affordable, offering lightweight and stiff performance.
- Wider Gear Ratios: Cranksets with wider gear ratios are becoming more common, providing a greater range of gearing options for different terrains.
- Electronic Shifting Compatibility: Some cranksets are designed to be compatible with electronic shifting systems, such as Shimano Di2 and SRAM eTap.
18. Bike Crank Removal: Step-by-Step Guide for Beginners
For beginners, a step-by-step guide can make the crank removal process less intimidating.
- Gather Your Tools: Collect all the necessary tools, including a crank puller, socket wrench, Allen wrench, and grease.
- Identify Your Crank Type: Determine the type of crank you have (e.g., self-extracting, two-piece, three-piece).
- Loosen Pinch Bolts (If Applicable): If you have compression slotted cranks, loosen the pinch bolts on the left crank arm.
- Remove the Crank Bolt: Use a socket wrench or Allen wrench to remove the crank bolt from the crank arm.
- Use a Crank Puller (If Necessary): If you don’t have a self-extracting crank, thread a crank puller into the crank arm and use it to push the arm off the spindle.
- Remove the Crank Arm: Once the crank arm is loose, remove it from the spindle.
- Repeat on the Other Side: Repeat the process on the other crank arm if needed.
- Inspect the Bottom Bracket: Once the crank arms are removed, inspect the bottom bracket bearings for wear and damage.
19. Advanced Tips For Bike Crank Removal
For more experienced mechanics, here are some advanced tips for bike crank removal.
- Use Heat: Applying heat to the crank arm can help loosen it from the spindle. Use a heat gun or hair dryer to warm the crank arm before using a crank puller.
- Penetrating Oil: Applying penetrating oil to the spindle can help loosen a stuck crank arm. Let the oil soak in for a few minutes before attempting to remove the crank.
- Specialized Tools: Consider investing in specialized tools for specific crank types, such as a Campagnolo crank puller or a Shimano crank tool.
- Torque Wrench: Always use a torque wrench when tightening crank bolts to prevent damage to the crank arms or spindle.
*According to a 2024 report by Statista, the demand for specialized motorcycle tools is increasing as more riders perform their own maintenance. Usabikers.net provides reviews and recommendations for the best tools on the market.
20. Bike Crank: Troubleshooting Common Issues
Troubleshooting common issues can help you overcome challenges during the crank removal process.
- Stuck Crank Arm: If the crank arm is stuck, try using heat, penetrating oil, or a rubber mallet to loosen it.
- Stripped Crank Bolt: If the crank bolt is stripped, use a bolt extractor to remove it.
- Damaged Crank Puller Threads: If the threads on the crank puller are damaged, replace the crank puller.
- Creaking Noises: If you hear creaking noises coming from your crank, check the crank bolts and pinch bolts to make sure they are tight.
21. Bike Crank Installation: A Detailed Guide
Installing a bike crank is just as important as removing it. Here’s a detailed guide to help you through the process.
- Clean the Spindle and Crank Arms: Start by cleaning the spindle and the inside of the crank arms to remove any dirt or debris.
- Grease the Spindle: Apply a thin layer of grease to the spindle to ensure smooth installation and prevent creaking.
- Slide the Crank Arms onto the Spindle: Carefully slide the crank arms onto the spindle, making sure they are properly aligned.
- Install the Crank Bolts: Install the crank bolts and tighten them to the manufacturer’s specified torque using a torque wrench.
- Tighten Pinch Bolts (If Applicable): If you have compression slotted cranks, tighten the pinch bolts to the specified torque.
- Check for Play: After installation, check for any play in the crank arms. If there is play, re-tighten the crank bolts and pinch bolts.
- Test Ride: Take your bike for a test ride to make sure the crank is properly installed and there are no issues.
22. Upgrading Your Bike Crank: A Cost-Benefit Analysis
Deciding whether to upgrade your bike crank involves weighing the costs against the potential benefits.
- Cost: Consider the cost of the new crankset, as well as any additional tools or components you may need.
- Performance Improvement: Evaluate the potential performance improvements, such as improved shifting, reduced weight, or increased stiffness.
- Durability: Consider the durability of the new crankset and how long it will last.
- Riding Style: Think about your riding style and whether the upgrade will make a significant difference in your riding experience.
- Budget: Set a budget for the upgrade and choose a crankset that fits within your budget while still providing the desired benefits.
23. How To Find The Best Deals On Bike Cranks
Finding the best deals on bike cranks can help you save money on your upgrade.
- Shop Online: Check online retailers for deals and discounts on bike cranks.
- Compare Prices: Compare prices from different retailers to find the best deal.
- Look for Sales: Keep an eye out for sales and promotions on bike cranks.
- Buy Used: Consider buying a used bike crank from a reputable source.
- Join a Bike Club: Join a bike club or online forum to get access to exclusive deals and discounts.
24. The Future Of Bike Crank Technology
Exploring the future of bike crank technology can give you insights into what to expect in the coming years.
- Integrated Sensors: Expect to see more cranksets with integrated sensors that track power, cadence, and other metrics.
- Wireless Connectivity: Cranksets with wireless connectivity will become more common, allowing you to easily connect to your bike computer or smartphone.
- Customizable Chainrings: Look for cranksets with customizable chainrings that allow you to fine-tune your gearing for different terrains and riding styles.
- 3D-Printed Components: 3D-printed components may become more common in cranksets, allowing for greater customization and weight savings.
- Sustainable Materials: Expect to see more cranksets made from sustainable materials, such as recycled aluminum or bio-based composites.
25. Bike Crank Brands: A Comparison
Comparing different bike crank brands can help you choose the best one for your needs.
- Shimano: Shimano is a well-known brand that offers a wide range of cranksets for different bike types and budgets.
- SRAM: SRAM is another popular brand that offers high-performance cranksets with advanced features.
- Campagnolo: Campagnolo is an Italian brand that specializes in high-end cranksets for road bikes.
- FSA: FSA (Full Speed Ahead) offers a variety of cranksets for different bike types and riding styles.
- Race Face: Race Face specializes in cranksets for mountain bikes and offers durable and reliable products.
26. How To Properly Store Your Bike Crank
Properly storing your bike crank can help prolong its life and prevent damage.
- Clean the Crank: Clean the crank thoroughly before storing it to remove any dirt or grime.
- Apply Grease: Apply a thin layer of grease to the spindle and crank arms to prevent corrosion.
- Wrap in Protective Material: Wrap the crank in protective material, such as bubble wrap or a cloth, to prevent scratches and dents.
- Store in a Dry Place: Store the crank in a dry place to prevent corrosion.
- Avoid Extreme Temperatures: Avoid storing the crank in extreme temperatures, as this can damage the components.
27. Bike Crank and Bottom Bracket Compatibility: A Comprehensive Guide
Understanding the compatibility between your bike crank and bottom bracket is crucial for a smooth and efficient ride. Different types of bottom brackets require specific cranksets, and using incompatible parts can lead to poor performance or even damage to your bike.
- Threaded Bottom Brackets: These are the most common type and are easy to identify by the threaded cups that screw into the frame.
- Threadless Bottom Brackets: These use a press-fit system, where the bearing cups are pressed into the frame.
- Spindle Length: Ensure the spindle length of your crankset matches the requirements of your bottom bracket.
- Axle Diameter: Make sure the axle diameter of your crankset is compatible with the bearings in your bottom bracket.
- Frame Width: Verify that the bottom bracket width matches the width of your bike’s frame.
28. Bike Crank Arm Length: Finding Your Ideal Fit
Choosing the correct crank arm length can significantly impact your pedaling efficiency and comfort. Different riders benefit from different lengths based on their body proportions, riding style, and personal preferences.
- Body Proportions: Taller riders generally benefit from longer crank arms, while shorter riders may find shorter arms more comfortable.
- Riding Style: Riders who prefer a higher cadence may prefer shorter crank arms, while those who prefer a lower cadence may prefer longer arms.
- Personal Preference: Ultimately, the best crank arm length is the one that feels most comfortable and efficient for you.
- Experimentation: Consider experimenting with different crank arm lengths to find the one that works best for you.
- Professional Advice: Consult with a professional bike fitter to get personalized recommendations.
29. The Environmental Impact of Bike Crank Manufacturing
The manufacturing of bike cranks, like any industrial process, has an environmental impact. Choosing eco-friendly brands and materials can help reduce this impact.
- Material Selection: Opt for cranksets made from recycled aluminum or other sustainable materials.
- Manufacturing Processes: Support brands that use environmentally friendly manufacturing processes.
- Product Lifespan: Choose a durable crankset that will last longer, reducing the need for frequent replacements.
- Recycling: Properly recycle your old crankset to minimize waste.
- Brand Transparency: Support brands that are transparent about their environmental practices.
30. Bike Crank Maintenance Schedule: Keep Your Ride Smooth
Establishing a regular maintenance schedule for your bike crank is essential for keeping your ride smooth and preventing costly repairs.
- Weekly Checks: Check the crank bolts and pinch bolts to make sure they are tight.
- Monthly Cleaning: Clean the crank arms and chainrings to remove dirt and grime.
- Quarterly Lubrication: Lubricate the chainrings and chain to reduce friction and wear.
- Annual Inspection: Inspect the crank arms and chainrings for wear and damage.
- Professional Servicing: Consider having your bike professionally serviced at least once a year.
Removing a bike crank is a manageable task with the right knowledge and tools. By understanding the different crank types, following the proper procedures, and avoiding common mistakes, you can confidently tackle this essential maintenance task. Remember, usabikers.net is your go-to resource for all things motorcycle, offering a wealth of information and a supportive community to help you get the most out of your ride.
LSI Keywords: motorcycle crankset, crank arm removal, bike maintenance, bicycle repair, cycle upkeep.
Ready to take your motorcycle maintenance skills to the next level? Visit usabikers.net today to explore our comprehensive guides, join our vibrant forum, and discover everything you need to know about motorcycle and biker culture in the USA. Don’t miss out – your next adventure starts here. Contact us at Address: 801 Sturgis Main St, Sturgis, SD 57785, United States. Phone: +1 (605) 347-2000. Website: usabikers.net.
FAQ: Bike Crank Removal
1. What is the best way to identify my bike crank type?
Look for markings on the crank arms or bottom bracket, or compare your crank to images and descriptions online. Check out usabikers.net for visual guides.
2. Can I use any crank puller for any type of bike crank?
No, you need a crank puller that is compatible with your specific crank type. Using the wrong puller can damage the crank arms.
3. How often should I remove my bike crank for maintenance?
Remove your crank annually for a thorough cleaning and inspection, or more often if you ride in harsh conditions.
4. What do I do if my crank arm is stuck and won’t come off?
Use penetrating oil and a rubber mallet to gently loosen the crank arm. Avoid excessive force.
5. Is it necessary to grease the spindle before reinstalling the crank?
Yes, greasing the spindle helps prevent creaking and makes future removal easier.
6. How tight should I tighten the crank bolts?
Tighten the crank bolts to the manufacturer’s specified torque using a torque wrench to prevent damage.
7. What are the signs that my bike crank needs to be replaced?
Signs include visible damage, worn chainrings, and constant loosening of the crank arms.
8. Can I upgrade my bike crank myself, or should I take it to a professional?
If you have the necessary tools and experience, you can upgrade your crank yourself. Otherwise, it’s best to take it to a professional mechanic.
9. What is the difference between a square taper and a splined crank?
Square taper cranks have a square spindle, while splined cranks have a spindle with multiple splines for a more secure connection.
10. Where can I find reliable information about bike crank maintenance and repair?
usabikers.net offers comprehensive guides, tutorials, and a supportive community to help you with all your bike maintenance needs.