
Adjusting the headset on your bike is crucial for smooth handling and safe riding, and at usabikers.net, we’re dedicated to providing you with the knowledge to keep your motorcycle in top shape. A properly adjusted headset ensures that your forks turn freely without any wobbling or tightness. This guide will walk you through the process step by step, ensuring your ride is both enjoyable and secure. We’ll also touch on motorcycle maintenance, steering performance, and essential biker tips.
What is the Purpose of a Bike Headset and Why Should You Adjust It?
The primary purpose of a bike headset is to provide a smooth, stable interface between the frame and the fork, allowing the fork to turn freely for steering. Proper adjustment is essential for maintaining control and comfort while riding.
A bike headset is a critical component, comprising bearings that sit between the frame and fork, enabling the fork to rotate independently. According to the American Motorcyclist Association (AMA), a well-maintained headset is essential for safe handling and responsiveness. Over time, headsets can loosen or tighten, leading to poor handling and potential safety hazards. Regular adjustments can prevent these issues and ensure a smooth, controlled riding experience.
What are the Different Types of Bike Headsets and How Do They Vary?
Bike headsets come in various types, each with its own design and functionality. Understanding these differences is crucial for proper adjustment and maintenance.
Here’s a breakdown of the common types:
| Type of Headset | Description | Advantages | Disadvantages |
|---|---|---|---|
| Threaded Headsets | An older design where the fork steerer tube is threaded, and the headset is secured with nuts. | Simple to adjust and maintain. | Less durable and less precise than newer designs. |
| Threadless | A more modern design where the headset is clamped to the fork steerer tube using a stem. | More durable, stiffer, and offers better handling. | Requires more specialized tools for installation and adjustment. |
| Integrated | Bearings sit directly in the frame’s head tube without separate cups. | Lighter and cleaner look. | Can be more challenging to replace bearings, and the frame can be damaged if the bearing seats are not properly maintained. |
| Semi-Integrated | Similar to integrated, but with cups pressed into the frame to hold the bearings. | Combines some of the benefits of integrated and threadless headsets. | More complex than threadless headsets, and cup installation requires specific tools. |
| External Cup | Bearings sit in cups that are pressed into the frame, with the cups extending outside the head tube. | Durable and easy to service. | Adds more stack height to the front of the bike. |
Choosing the right headset depends on your bike’s frame and fork compatibility. Regardless of the type, consistent maintenance and adjustment are crucial for optimal performance.
What Tools Do You Need to Adjust a Bike Headset Safely?
Having the right tools is essential for safely and effectively adjusting your bike’s headset. Using the correct tools prevents damage to components and ensures accurate adjustments.
Here’s a list of the tools you’ll typically need:
- Allen Wrench Set: Essential for loosening and tightening bolts on the stem and top cap.
- Torque Wrench: Crucial for tightening bolts to the manufacturer’s specified torque, preventing over-tightening, especially on carbon forks.
- Grease: To lubricate the bearings and threads, ensuring smooth operation and preventing corrosion.
- Headset Press: For installing headset cups into the frame (usually needed for new installations or replacements).
- Crown Race Setting Tool: Used to install the crown race onto the fork.
According to the Motorcycle Safety Foundation (MSF), using a torque wrench is vital when working on critical components like the headset to avoid damage and ensure safety. Always refer to your bike’s manual for the recommended torque specifications.
How to Identify Common Symptoms of a Loose or Tight Bike Headset?
Recognizing the symptoms of a poorly adjusted headset is the first step in addressing the issue. Common signs include loose steering, difficulty turning, and unusual noises.
Here are the symptoms to watch out for:
- Loose Steering: If the front end of your bike feels wobbly or unstable, the headset may be too loose.
- Difficulty Turning: If the steering feels tight or sticky, the headset may be too tight.
- Knocking or Clicking: Unusual noises from the headset area when turning or braking can indicate loose bearings.
- Visible Play: With the front brake engaged, rocking the bike back and forth can reveal noticeable movement or play in the headset.
Ignoring these symptoms can lead to further damage and compromise your safety. Regular checks can help identify and address headset issues promptly.
Step-by-Step Guide: How to Adjust Threadless Bike Headsets?
Adjusting a threadless headset involves a series of precise steps to ensure proper alignment and tension. Follow this guide for a smooth and safe adjustment.
1. Loosen the Stem Bolts

Start by loosening the stem bolts that clamp the stem to the fork’s steerer tube. Use an Allen wrench to partially undo these bolts, but don’t remove them completely. This allows the stem to move independently of the fork.
2. Loosen the Top Cap Bolt
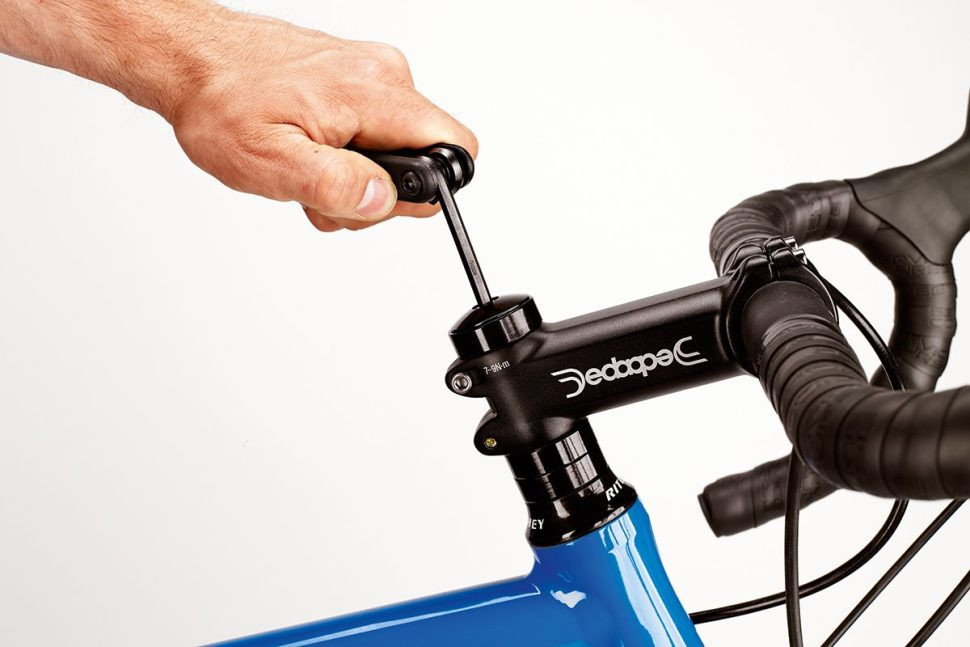
Next, use an Allen key to loosen the bolt in the top cap. This releases the pressure on the headset bearings, known as preload. Ensure the top cap presses against the top of the stem or a spacer, not the end of the fork steerer tube.
3. Tighten the Top Cap Bolt
Carefully tighten the top cap bolt, applying minimal force. The goal is to eliminate any play in the headset without overtightening it.
4. Test for Play
Hold the front brake and rock the bike back and forth. Place your hand behind the stem to feel for any rocking or knocking in the head tube. If you feel movement, slightly increase the tension on the top cap.
5. Perform a Swing Test
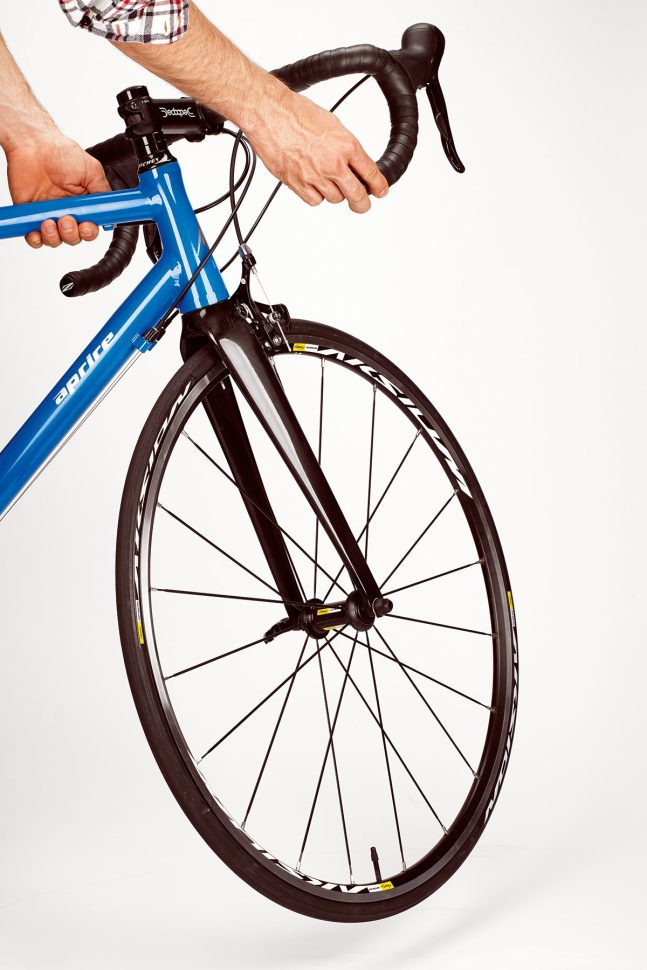
Lift the front wheel off the ground and let it swing from side to side. The wheel should move freely. If it doesn’t, loosen the top cap slightly. Check for any grittiness, which may indicate the bearings need replacing.
6. Align and Tighten the Stem Bolts
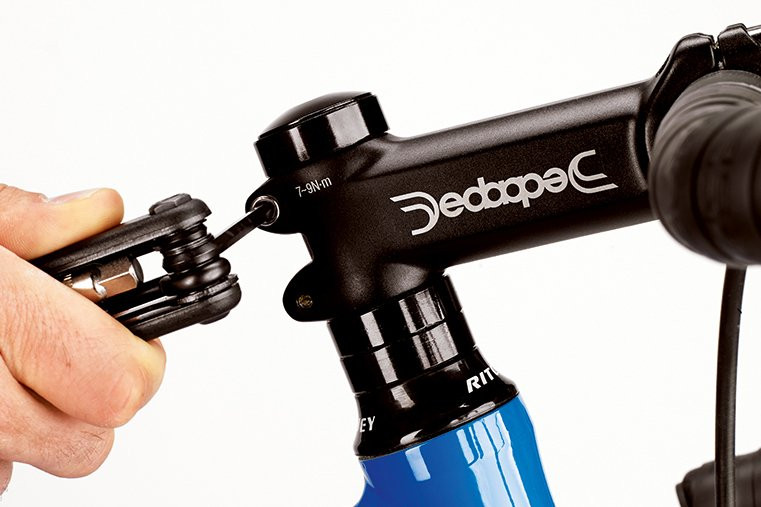
Ensure the handlebars are aligned with the front wheel. Tighten the stem bolts to the torque specified on the stem, using a torque wrench to prevent damage, especially on carbon forks.
Following these steps ensures your threadless headset is properly adjusted for optimal performance.
How to Adjust Threaded Bike Headsets?
Adjusting a threaded headset requires a different approach compared to threadless designs. Here’s how to do it:
- Loosen the Locknut: Use two wrenches to loosen the locknut on top of the headset.
- Adjust the Top Race: Turn the top race (adjusting cup) to tighten or loosen the headset. Tighten until there is no play, but the steering remains smooth.
- Tighten the Locknut: Hold the top race in place and tighten the locknut against it to secure the adjustment.
- Test the Adjustment: Check for play and smooth steering, readjusting as necessary.
Threaded headsets require careful balancing of tension to ensure proper function.
What are the Key Differences Between Adjusting Integrated and Semi-Integrated Headsets?
Integrated and semi-integrated headsets have unique designs that affect the adjustment process.
- Integrated Headsets: These have bearings that sit directly in the frame without separate cups. Adjustment is similar to threadless headsets but requires careful attention to bearing alignment.
- Semi-Integrated Headsets: These use cups pressed into the frame. Adjustment is similar to threadless headsets, but ensure the cups are properly seated and aligned.
Both types require precise adjustments to maintain smooth steering and prevent damage to the frame.
How Can You Troubleshoot Common Problems During Headset Adjustments?
Even with careful adjustments, problems can arise. Here are some common issues and how to troubleshoot them:
| Problem | Possible Cause | Solution |
|---|---|---|
| Headset Still Loose | Insufficient top cap tension | Tighten the top cap bolt slightly and retest. |
| Steering Still Tight | Overtightened top cap or damaged bearings | Loosen the top cap bolt slightly. If still tight, inspect and replace bearings if necessary. |
| Noise Persists | Loose components or damaged bearings | Check all bolts and components for tightness. Inspect and replace bearings if necessary. |
| Difficulty Aligning Stem | Stem not properly seated on the steerer tube | Loosen stem bolts, realign the stem, and retighten to the specified torque. |
| Stripped Bolts | Overtightening | Replace stripped bolts. Use a torque wrench to prevent over-tightening in the future. |
| Top Cap Bottoms Out | Steerer tube too long | Add spacers above the stem or cut the steerer tube to the correct length (professional assistance recommended). |
| Creaking Sound From Headset | Dry or Contaminated Bearings | Disassemble, clean, re-grease or replace the headset bearings. Ensure proper lubrication. |
| Play Develops Quickly | Damaged Headset Cups or Races | Inspect headset cups and races for wear or damage. Replace the entire headset if necessary. |
| Uneven Turning Resistance | Binding Cables or Hoses | Ensure that brake cables and hoses are properly routed and not causing binding or obstruction. |
| Vibration or Shimmy at Speed | Loose Headset or Fork | Check headset adjustment and fork installation to ensure everything is properly tightened. |
| Poor Handling Despite Adjustments | Frame or Fork Damage | Inspect frame and fork for cracks, bends, or other damage. Consult a professional if needed. |
Addressing these issues promptly can prevent further complications and ensure a safe riding experience.
How Often Should You Check and Adjust Your Bike Headset?
Regular maintenance is key to keeping your headset in optimal condition. The frequency of checks and adjustments depends on your riding habits and conditions.
Here are some guidelines:
- Regular Riders (Daily/Weekly): Check every 1-2 months.
- Occasional Riders (Monthly): Check every 3-6 months.
- Hard Riding Conditions (Off-Road, Rough Terrain): Check monthly.
Additionally, check your headset after any significant impact or crash. Regular checks can catch minor issues before they become major problems.
What Maintenance Tips Can Extend the Life of Your Bike Headset?
Proper maintenance can significantly extend the life of your bike headset. Here are some essential tips:
- Keep it Clean: Regularly clean the headset area to remove dirt and debris.
- Grease the Bearings: Periodically re-grease the bearings to ensure smooth operation and prevent corrosion.
- Check for Wear: Inspect the bearings and races for signs of wear or damage, replacing them as needed.
- Tighten Bolts Correctly: Use a torque wrench to tighten bolts to the manufacturer’s specified torque.
- Store Your Bike Properly: Store your bike in a dry place to prevent corrosion.
- Avoid Over-Tightening: Overtightening bolts can damage the headset and frame.
- Inspect Seals: If your headset has seals, check them regularly for damage and replace them as needed to keep contaminants out.
- Use Quality Components: When replacing headset parts, invest in high-quality components for better durability and performance.
- Professional Servicing: Consider having a professional mechanic service your headset annually to catch any issues you might miss.
- Monitor Performance: Pay attention to how your bike handles and address any changes in steering feel promptly.
By following these maintenance tips, you can keep your headset in top condition and enjoy a smooth, safe ride.
How Does Climate Affect Headset Maintenance and Adjustment Needs?
Climate plays a significant role in how often you need to maintain and adjust your bike’s headset. Different weather conditions can accelerate wear and tear.
- Wet Climates: Moisture can lead to corrosion and wash away grease, requiring more frequent cleaning and lubrication.
- Dry, Dusty Climates: Dust and grit can contaminate the bearings, leading to increased wear. Regular cleaning is essential.
- Cold Climates: Cold temperatures can stiffen grease, affecting headset performance. Use a cold-weather-specific grease for optimal function.
- Hot Climates: High temperatures can cause grease to thin out, reducing its effectiveness. Use a high-temperature grease for better performance.
Adapting your maintenance routine to your local climate can help prolong the life of your headset.
Are There Any Safety Precautions to Consider When Adjusting a Bike Headset?
Safety should always be a priority when working on your bike. Here are some safety precautions to keep in mind when adjusting your headset:
- Use Proper Tools: Using the correct tools prevents damage to components and reduces the risk of injury.
- Follow Torque Specifications: Use a torque wrench to tighten bolts to the manufacturer’s specified torque, preventing over-tightening.
- Work in a Clean Area: A clean workspace helps prevent contamination of parts and ensures you can see what you’re doing.
- Wear Safety Glasses: Protect your eyes from dirt and debris.
- Consult a Professional: If you’re unsure about any step, consult a professional mechanic.
According to the MSF, proper maintenance and adjustment of your bike’s components are crucial for safe riding. Always prioritize safety when working on your bike.
How Can Usabikers.net Help You With Your Bike Maintenance Needs?
At usabikers.net, we’re committed to providing comprehensive resources and a supportive community for motorcycle enthusiasts. Whether you’re a beginner or an experienced biker, our platform offers valuable information to help you maintain and enjoy your motorcycle.
Comprehensive Guides and Tutorials
We offer detailed guides and tutorials on various aspects of motorcycle maintenance, including headset adjustments, chain maintenance, and more. Our step-by-step instructions and videos make it easy to tackle these tasks yourself.
Community Forum
Our community forum is a great place to connect with other bikers, ask questions, and share your experiences. Whether you need advice on a specific issue or just want to chat about your latest ride, our community is here to support you.
Product Reviews and Recommendations
We provide honest reviews and recommendations on motorcycle parts, accessories, and tools. Our team of experts tests and evaluates products to help you make informed decisions.
Event Calendar
Stay up-to-date with the latest motorcycle events, rallies, and races in the USA. Our event calendar is constantly updated to keep you in the loop.
Expert Advice
Get access to expert advice from experienced mechanics and riders. Our experts can help you troubleshoot issues, recommend maintenance procedures, and offer tips for improving your riding experience.
Contact Us
Have questions or need assistance? Contact us at:
- Address: 801 Sturgis Main St, Sturgis, SD 57785, United States
- Phone: +1 (605) 347-2000
- Website: usabikers.net
Join us at usabikers.net and discover a wealth of information, a supportive community, and everything you need to enhance your motorcycle experience. Explore our articles, join the forum, and connect with fellow bikers today.