Taking a bike tire off might seem daunting, but usabikers.net is here to guide you through the process, making it simple and straightforward. Whether you’re dealing with a flat, swapping tires for different terrains, or simply performing routine maintenance, mastering this skill is essential for any cyclist. This guide will provide expert tips and step-by-step instructions to ensure you can confidently handle this task yourself, keeping you rolling smoothly on your two-wheeled adventures. So, let’s dive in and discover the world of tire levers, bead breaking, and inner tube replacements!
1. Understanding the Basics of Bike Tires
Before we dive into how to remove a bike tire, let’s cover some basics. Understanding the different parts and types of tires can make the process smoother.
1.1. Types of Bike Tires
Bike tires come in various types, each designed for specific riding conditions and bikes. Knowing the differences will help you choose the right tools and techniques.
| Tire Type | Description | Best For |
|---|---|---|
| Clincher | The most common type, using a separate inner tube. The tire bead hooks onto the rim. | Road cycling, commuting, general use |
| Tubeless | These tires don’t require an inner tube. They seal directly to the rim, offering lower rolling resistance and fewer punctures. | Mountain biking, road cycling |
| Tubular (Sew-Up) | The tire is sewn around the inner tube and glued to the rim. Used mainly in professional racing for their lightweight and high-performance characteristics. | Professional racing, high-performance road cycling |
| Folding | Made with flexible aramid or Kevlar beads, making them lightweight and foldable for easy storage. | Touring, travel bikes, situations where space is a concern |
1.2. Key Components of a Bike Tire
Understanding the parts of a tire can help you troubleshoot issues and make the removal process easier.
- Bead: The edge of the tire that sits inside the rim.
- Sidewall: The side of the tire connecting the bead to the tread.
- Tread: The rubber compound that contacts the road, providing grip.
- Casing: The underlying structure of the tire, made of fabric threads (TPI or Threads Per Inch indicate the thread density).
- Inner Tube: (For clincher tires) The inflatable rubber tube that holds air inside the tire.
1.3. Why You Might Need to Remove a Bike Tire
There are several reasons why you might need to remove a bike tire:
- Flat Tire: The most common reason. Removing the tire allows you to replace or patch the inner tube.
- Tire Replacement: Tires wear out over time and need to be replaced.
- Maintenance: Cleaning the rim or inspecting the tire for damage.
- Upgrading: Switching to a different type of tire for better performance or different riding conditions.
2. Essential Tools for Removing a Bike Tire
Having the right tools makes the job much easier and reduces the risk of damaging your tire or rim. Here’s what you’ll need.
2.1. Tire Levers
Tire levers are essential for prying the tire bead off the rim. Opt for durable plastic or composite levers to avoid scratching your rims.
Alt Text: A set of plastic tire levers in use on a bike wheel rim, showing how they are used to pry the tire bead.
2.2. Bike Pump or CO2 Inflator
After fixing a flat or replacing a tire, you’ll need to inflate the tire. A reliable bike pump or CO2 inflator is a must-have.
2.3. Multi-Tool or Wrenches
Depending on your bike, you might need wrenches or a multi-tool to loosen the wheel axle.
2.4. Patch Kit or Spare Inner Tube
If you’re removing the tire due to a flat, have a patch kit or a spare inner tube ready.
2.5. Gloves (Optional)
Gloves can help protect your hands and provide a better grip.
3. Step-by-Step Guide: How to Remove a Clincher Bike Tire
Clinchers are the most common type of bike tires, so let’s start with these.
3.1. Deflate the Tire
Why is this important? Deflating the tire completely is crucial because it reduces the pressure against the rim, making it easier to dislodge the tire bead and preventing potential damage to the tire or rim during removal.
How to do it: Use a tire lever or a small tool to press the valve core inside the valve stem. Ensure all the air is out before proceeding.
3.2. Break the Tire Bead
Why is this important? Breaking the bead separates the tire from the rim, which is necessary for removing the tire. If the bead is stuck, it can be extremely difficult to remove the tire without tire levers.
How to do it:
- Position: Start by holding the wheel firmly. Grip the tire with both hands, positioning your thumbs close to the rim.
- Squeeze: Apply firm, inward pressure with your thumbs to push the tire bead towards the center of the rim.
- Work Around: Continue this process around the entire circumference of the tire on both sides. You should hear or feel the bead loosen from the rim.
- Alternative Method: If your hands aren’t strong enough, place the wheel on the ground and use your body weight to push the tire bead inwards. Stand on the tire close to the rim, applying gentle but firm pressure. Rotate the wheel and repeat until the bead is loose all around.
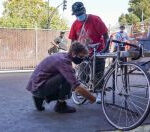
Alt Text: A cyclist using their hands to break the tire bead away from the rim, pushing the tire inward to create slack.
3.3. Insert Tire Levers
Why is this important? Tire levers are used to pry the tire bead over the rim edge. Using tire levers correctly prevents damage to the rim and tire.
How to do it:
- First Lever: Insert one tire lever under the tire bead. Pry the bead over the rim edge. Hook the lever onto a spoke to hold it in place.
- Second Lever: Insert a second tire lever a few inches away from the first. Pry this section of the bead over the rim.
- Slide and Remove: Once a section of the tire is off the rim, you can often slide one lever around the tire to completely remove one side of the tire.
Alt Text: Close-up of tire levers being used to lift the bike tire bead over the rim edge, demonstrating the proper technique.
3.4. Remove the Inner Tube
Why is this important? Removing the inner tube is necessary to inspect it for punctures or replace it.
How to do it:
- Pull One Side: With one side of the tire off the rim, pull out the inner tube starting from the valve stem.
- Inspect: Check the tube for any punctures or damage. If you find a puncture, remember to inspect the inside of the tire for any sharp objects that may have caused it.
3.5. Completely Remove the Tire
Why is this important? Removing the tire entirely allows you to inspect it for wear, damage, or embedded objects. It also makes it easier to install a new tube or tire.
How to do it:
- Pull off the Tire: With the inner tube removed, you can now pull the rest of the tire off the rim by hand.
- Inspect the Tire: Check the inside of the tire for any sharp objects, such as glass or thorns, that may have caused the puncture.
4. Removing a Tubeless Bike Tire
Tubeless tires offer several benefits, but removing them can be a bit more challenging due to the tight seal with the rim.
4.1. Deflate the Tire
Why is this important? Similar to clincher tires, deflating the tire completely is essential. Tubeless tires often have sealant inside, so be prepared for some liquid to come out.
How to do it: Remove the valve core using a valve core tool to ensure all air and sealant are removed.
4.2. Break the Tire Bead
Why is this important? Tubeless tire beads tend to stick more firmly to the rim. Breaking the bead evenly around the tire is crucial for removal.
How to do it:
- Use a Tire Bead Breaker: If you have one, a tire bead breaker tool can make this process easier. Place the tool on the tire near the rim and use the lever to push the tire bead inward.
- Hands and Knees: If you don’t have a bead breaker, use your hands and knees. Place the wheel on the ground and use your knees to push the tire sidewalls inward towards the center of the rim. Work around the tire until the bead is loose on both sides.
4.3. Insert Tire Levers
Why is this important? Tubeless tires often fit very tightly on the rim. Tire levers provide the necessary leverage to pry the tire bead over the rim edge.
How to do it:
- First Lever: Insert one tire lever under the tire bead. Pry the bead over the rim edge and hook the lever onto a spoke.
- Second Lever: Insert a second tire lever a few inches away from the first. Pry this section of the bead over the rim.
- Slide and Remove: Slide one lever around the tire to completely remove one side of the tire.
4.4. Remove the Tire
Why is this important? Once one side of the tire is off the rim, you can remove the rest of the tire by hand.
How to do it: Pull the tire off the rim. Be prepared for some sealant to spill out.
4.5. Clean the Rim
Why is this important? Cleaning the rim ensures a good seal when you reinstall the tire.
How to do it: Use a clean rag to wipe away any sealant residue from the rim.
5. Removing a Tubular (Sew-Up) Bike Tire
Tubular tires are glued to the rim, making their removal a bit more involved.
5.1. Deflate the Tire
Why is this important? Deflating the tire is necessary to reduce any remaining pressure.
How to do it: Use a valve core tool to remove the valve core and deflate the tire completely.
5.2. Loosen the Glue
Why is this important? Tubular tires are glued to the rim, so you need to break the glue bond.
How to do it:
- Work Around: Start by gripping the tire firmly with both hands.
- Pull and Roll: Pull a section of the tire away from the rim, then roll it off the rim.
- Continue: Continue this process around the entire circumference of the tire. This can be quite challenging, especially if the glue is old and strong.
5.3. Remove the Tire
Why is this important? Once the glue is loosened, you can remove the tire completely.
How to do it: Pull the tire off the rim, working your way around until it is completely removed.
5.4. Clean the Rim
Why is this important? Cleaning the rim is essential before installing a new tubular tire to ensure a good bond.
How to do it:
- Scrape Off Old Glue: Use a scraper or a solvent designed for removing tire glue to scrape off any old glue residue from the rim.
- Clean: Wipe the rim clean with a cloth.
6. Tips for Easier Tire Removal
Here are some additional tips to make the tire removal process easier.
6.1. Use the Right Tire Levers
Why is this important? Using high-quality tire levers designed for the specific type of tire you’re removing can make the process smoother and prevent damage.
How to do it:
- Plastic or Composite Levers: For clincher tires, plastic or composite levers are generally sufficient and less likely to scratch the rims.
- Metal Levers: For tubeless tires or particularly tight clinchers, consider metal levers with a protective coating to prevent rim damage.
- Ergonomic Design: Look for levers with a comfortable grip and a hooked end that secures to the spokes.
6.2. Warm the Tire
Why is this important? Warming the tire can make it more pliable, making it easier to stretch and remove from the rim.
How to do it:
- Sunlight: If possible, leave the wheel in the sun for a few minutes to warm up the tire.
- Warm Room: Alternatively, bring the wheel into a warm room.
6.3. Lubricate the Tire Bead
Why is this important? Lubricating the tire bead reduces friction between the tire and the rim, making it easier to break the bead and remove the tire.
How to do it:
- Soapy Water: Apply a small amount of soapy water to the tire bead where it contacts the rim.
- Commercial Lubricant: Use a tire mounting lubricant specifically designed for this purpose.
6.4. Practice Makes Perfect
Why is this important? Like any skill, removing bike tires becomes easier with practice. Practicing in a controlled environment can build confidence and efficiency.
How to do it:
- Controlled Setting: Practice removing and reinstalling a tire in your garage or workshop before you need to do it on the road.
- Repeat: Repeat the process several times to become comfortable with each step.
7. Common Mistakes to Avoid
Avoiding these common mistakes can save you time and prevent damage.
7.1. Using Metal Tools on Alloy Rims
Why avoid? Metal tools can scratch or damage alloy rims.
Solution: Always use plastic or composite tire levers on alloy rims. If you must use metal levers for stubborn tires, ensure they have a protective coating.
7.2. Pinching the Inner Tube
Why avoid? Pinching the inner tube between the tire lever and the rim can cause punctures.
Solution: Be careful when inserting tire levers to avoid pinching the tube. Ensure the tube is pushed away from the rim edge.
7.3. Forcing the Tire
Why avoid? Forcing the tire can damage the tire bead or the rim.
Solution: If the tire is too tight, double-check that the bead is fully seated in the center of the rim. Use lubricant and take your time.
7.4. Not Inspecting the Tire
Why avoid? Failing to inspect the tire for debris can lead to repeat punctures.
Solution: Always inspect the inside of the tire for sharp objects, such as glass or thorns, before reinstalling.
8. Reinstalling the Tire: A Quick Guide
Once you’ve removed the tire, you’ll need to reinstall it. Here’s a quick guide.
8.1. Inspect the Rim and Tire
Why is this important? Before reinstalling the tire, it’s crucial to inspect both the rim and tire for any damage or debris. This step ensures a safe and reliable ride and prevents potential issues like punctures or improper seating of the tire.
How to do it:
- Rim Inspection:
- Check for Damage: Carefully examine the rim for any dents, cracks, or bends. Pay close attention to the rim bed where the tire sits.
- Remove Debris: Clear away any dirt, grit, or old sealant from the rim bed using a clean cloth.
- Tire Inspection:
- Check for Wear: Look for signs of wear, such as cuts, bulges, or excessive tread wear.
- Remove Debris: Inspect the inside of the tire for any embedded objects like glass, thorns, or metal shards. Run your fingers along the inside of the tire to feel for anything sharp.
- Clean the Tire: Wipe down the inside and outside of the tire with a clean, damp cloth to remove any dirt or residue.
8.2. Install One Side of the Tire
Why is this important? Ensuring one side of the tire is properly seated on the rim before inserting the inner tube makes the process smoother and reduces the risk of pinching the tube.
How to do it:
- Start at the Valve Hole: Begin by aligning the tire with the valve hole in the rim.
- Seat the Bead: Carefully push the tire bead over the rim edge, working your way around the circumference of the wheel. Use your thumbs to press the tire bead into the rim channel.
- Ensure Proper Seating: Make sure the tire bead is fully seated inside the rim all the way around. The tire should sit evenly on the rim.
8.3. Insert the Inner Tube (for Clinchers)
Why is this important? Proper inner tube installation prevents pinches and ensures the tire sits correctly on the rim.
How to do it:
- Inflate Slightly: Add a small amount of air to the inner tube to give it some shape. This helps prevent it from twisting or getting pinched during installation.
- Insert Valve Stem: Insert the valve stem into the valve hole in the rim.
- Tuck in the Tube: Carefully tuck the inner tube into the tire, working your way around the wheel. Make sure the tube is evenly distributed inside the tire.
Alt Text: A cyclist carefully installing an inner tube inside a bike tire, ensuring it is properly seated before seating the other side of the tire bead.
8.4. Seat the Second Side of the Tire
Why is this important? Properly seating the second side of the tire ensures a secure fit and prevents blowouts or uneven rides.
How to do it:
- Work with Thumbs: Starting opposite the valve, use your thumbs to push the tire bead over the rim edge.
- Use Tire Levers if Necessary: If the tire is tight, use tire levers to gently pry the last section of the tire bead over the rim. Be careful not to pinch the inner tube.
- Check Seating: Inspect the tire to ensure the bead is evenly seated all around the rim. Look for a consistent gap between the tire and the rim.
8.5. Inflate the Tire
Why is this important? Inflating the tire to the correct pressure ensures optimal performance, handling, and tire longevity.
How to do it:
- Check Pressure Range: Look for the recommended pressure range printed on the tire sidewall.
- Inflate Gradually: Use a bike pump or CO2 inflator to inflate the tire to the recommended pressure. Check the pressure with a gauge to avoid over-inflation.
- Inspect Again: As you inflate, continue to check that the tire bead is seating evenly around the rim. If you notice any bulges or uneven spots, deflate the tire slightly and readjust the bead.
9. Safety Tips for Working on Bike Tires
Safety should always be a priority when working on your bike.
9.1. Wear Gloves
Why is this important? Wearing gloves protects your hands from dirt, grease, and potential cuts or scrapes.
How to do it: Put on a pair of work gloves or nitrile gloves before starting any maintenance task on your bike.
9.2. Protect Your Eyes
Why is this important? Debris or sealant can sometimes spray out when working on tires, potentially harming your eyes.
How to do it: Wear safety glasses or goggles to protect your eyes from flying debris or liquids.
9.3. Work in a Safe Area
Why is this important? Working in a safe, well-lit area reduces the risk of accidents and makes it easier to see what you’re doing.
How to do it: Choose a workspace that is well-lit, clean, and free from obstructions. If working outdoors, make sure you are away from traffic and on a stable surface.
9.4. Be Careful with Sharp Tools
Why is this important? Tire levers and other tools can be sharp and cause injury if not handled carefully.
How to do it: Always handle tools with care and keep your fingers away from sharp edges. Avoid applying excessive force that could cause the tool to slip.
10. Troubleshooting Common Issues
Even with the best preparation, you might encounter some issues.
10.1. Tire Won’t Come Off
Problem: The tire is stuck and won’t come off the rim.
Solution:
- Check Bead Seating: Ensure the tire bead is fully pushed into the center of the rim channel.
- Lubricate: Apply soapy water or tire mounting lubricant to the tire bead.
- Use Stronger Levers: If necessary, use metal tire levers with a protective coating.
- Warm the Tire: Warm the tire with a hairdryer or by placing it in the sun.
10.2. Tire Won’t Seat Properly
Problem: The tire bead won’t seat evenly on the rim.
Solution:
- Check Tire Position: Make sure the tire is centered on the rim.
- Inflate Further: Try inflating the tire to a higher pressure (within the recommended range) to help seat the bead.
- Lubricate: Apply soapy water to the tire bead.
- Deflate and Readjust: Deflate the tire completely and readjust the tire bead before reinflating.
10.3. Repeated Flat Tires
Problem: You keep getting flat tires.
Solution:
- Inspect Tire and Rim: Thoroughly inspect the inside of the tire and the rim for any sharp objects or damage.
- Check Tire Pressure: Ensure you are inflating the tire to the correct pressure.
- Use Tire Liners: Consider using tire liners to provide an extra layer of protection against punctures.
- Switch to Tubeless: If you’re using clincher tires, consider switching to tubeless tires for better puncture resistance.
11. The Benefits of Knowing How to Remove a Bike Tire
Knowing how to remove and reinstall a bike tire isn’t just a useful skill—it’s an empowering one.
11.1. Save Money
How does it help? By handling tire maintenance yourself, you avoid costly trips to the bike shop for simple repairs like fixing a flat or changing a tire.
Example: A typical tire change at a bike shop can cost anywhere from $20 to $50, depending on the location and complexity. Over time, these costs can add up.
11.2. Be Self-Sufficient
How does it help? You become more independent and capable, able to handle unexpected issues during your rides without relying on others.
Scenario: Imagine you’re miles from home on a scenic bike path when you get a flat tire. Knowing how to fix it yourself means you can quickly get back on the road, rather than waiting for assistance.
11.3. Deeper Understanding of Your Bike
How does it help? Working on your bike gives you a better understanding of its components and how they work together, which can improve your overall cycling experience.
Benefit: You’ll be better equipped to diagnose and address other mechanical issues, potentially preventing more significant problems down the road.
12. Riding Safely on New Bike Tires
So you’ve successfully replaced your old tire, it’s time to hit the road. But before you do, here are a few safety tips to make sure your first ride is a smooth one.
12.1. First Ride Cautiously
Why is this important? New tires can have a slippery surface due to manufacturing residues. Riding cautiously on your first ride helps you avoid accidents while the tire surface wears in.
How to do it:
- Avoid Sharp Turns: Take corners at a slower speed to ensure the tires grip properly.
- Brake Gradually: Allow for a longer braking distance, as new tires may not provide maximum grip immediately.
- Ride on Familiar Terrain: Stick to routes you know well, so you can anticipate potential hazards.
12.2. Check Tire Pressure
Why is this important? Maintaining the correct tire pressure ensures optimal performance, handling, and safety. Overinflated tires can be prone to blowouts, while underinflated tires can increase the risk of pinch flats.
How to do it:
- Use a Reliable Gauge: Always use a reliable tire pressure gauge to measure the pressure accurately.
- Follow Recommended Pressure: Inflate the tire to the pressure range recommended on the tire sidewall. Adjust the pressure based on your weight, riding conditions, and tire type.
- Check Regularly: Check your tire pressure before each ride to ensure it remains within the optimal range.
12.3. Inspect After a Short Ride
Why is this important? After a short ride, inspecting the tire ensures that it is seating correctly and that there are no initial issues.
How to do it:
- Check for Even Seating: Look around the tire to ensure the bead is evenly seated in the rim. There should be a consistent gap between the tire and the rim all the way around.
- Inspect for Cuts or Damage: Check the tire for any cuts, bulges, or other signs of damage.
- Listen for Unusual Noises: Pay attention to any unusual noises, such as rubbing or clicking, which could indicate a problem with the tire or wheel.
13. Contributing Factors to Tire Wear and Longevity
Understanding what affects your bike tires can help you extend their life and save money.
13.1. Riding Style
How does it affect tires? Aggressive riding, frequent braking, and hard cornering can accelerate tire wear.
Tips:
- Smooth Riding: Practice smooth, controlled riding to minimize wear.
- Avoid Skidding: Avoid skidding your tires, as this quickly wears down the tread.
13.2. Road Conditions
How do they affect tires? Rough roads, gravel, and debris can cause cuts, punctures, and faster wear.
Tips:
- Choose Appropriate Tires: Use tires designed for the terrain you’re riding on.
- Avoid Hazards: Be vigilant and avoid riding over glass, potholes, and other hazards.
13.3. Tire Pressure
How does it affect tires? Incorrect tire pressure can lead to premature wear, pinch flats, and poor handling.
Tips:
- Maintain Correct Pressure: Always inflate your tires to the recommended pressure.
- Check Regularly: Check your tire pressure before each ride.
13.4. Storage Conditions
How do they affect tires? Exposure to sunlight, extreme temperatures, and harsh chemicals can degrade the rubber compound.
Tips:
- Store Indoors: Store your bike indoors in a cool, dry place.
- Avoid Chemicals: Keep your tires away from solvents, oils, and other chemicals.
14. Understanding Tire Pressure and Its Impact
Understanding tire pressure is crucial for optimal performance and safety.
14.1. Importance of Proper Tire Pressure
Why is this important? Proper tire pressure ensures optimal performance, handling, and safety.
Benefits:
- Improved Rolling Resistance: Correctly inflated tires roll more efficiently, reducing effort and increasing speed.
- Better Handling: Proper pressure provides better grip and control, especially in corners.
- Reduced Risk of Flats: Correct pressure minimizes the risk of pinch flats and other types of punctures.
14.2. Factors Affecting Tire Pressure
What factors should you consider? Several factors influence the ideal tire pressure.
Factors:
- Rider Weight: Heavier riders require higher tire pressure.
- Tire Width: Wider tires can be run at lower pressures.
- Road Conditions: Rough roads may require slightly lower pressure for comfort and grip.
- Tire Type: Different tire types (e.g., road, mountain, tubeless) have different pressure requirements.
14.3. How to Determine the Correct Tire Pressure
How can you find the right pressure? Finding the correct tire pressure involves a combination of manufacturer recommendations and personal preference.
Steps:
- Check Tire Sidewall: Look for the recommended pressure range printed on the tire sidewall.
- Use a Tire Pressure Chart: Consult a tire pressure chart for general guidelines based on rider weight and tire width.
- Experiment: Adjust the pressure slightly to find what feels best for your riding style and conditions.
15. Storing Your Bike Tires Properly
Proper storage can significantly extend the life of your bike tires.
15.1. Ideal Storage Conditions
What are the best conditions? Storing tires in the right conditions can prevent degradation and prolong their lifespan.
Conditions:
- Cool, Dry Place: Store tires in a cool, dry place away from direct sunlight.
- Avoid Sunlight: UV rays can cause the rubber to dry out and crack.
- Away from Chemicals: Keep tires away from solvents, oils, and other chemicals that can damage the rubber.
15.2. How to Store Spare Tires
How should you store spare tires? Proper storage of spare tires ensures they are ready when you need them.
Steps:
- Clean the Tires: Clean the tires thoroughly before storing them to remove any dirt or debris.
- Wrap in Plastic: Wrap the tires in plastic to protect them from dust and moisture.
- Store Flat or Hanging: Store the tires flat or hanging to prevent them from deforming.
15.3. Checking Stored Tires
How often should you check them? Regularly checking stored tires can help you identify any issues before you need to use them.
Steps:
- Inspect Regularly: Inspect the tires every few months for signs of cracking, drying, or other damage.
- Flex the Rubber: Flex the rubber to check for pliability. If the rubber feels stiff or brittle, it may be time to replace the tires.
16. Exploring Bike Tire Technology and Innovations
Bike tire technology is constantly evolving, with new innovations aimed at improving performance, durability, and safety.
16.1. Tubeless Technology
What is it? Tubeless tires eliminate the need for an inner tube, offering several advantages.
Advantages:
- Reduced Puncture Risk: Sealant inside the tire can seal small punctures automatically.
- Lower Rolling Resistance: Tubeless tires can be run at lower pressures, improving rolling resistance.
- Better Grip: Lower pressures also provide better grip, especially on rough terrain.
16.2. Tire Compounds
What are they? Tire compounds are the rubber mixtures used in the tire tread, each designed for specific characteristics.
Types:
- Hard Compounds: More durable and longer-lasting, but offer less grip.
- Soft Compounds: Provide excellent grip but wear down more quickly.
- Dual Compounds: Combine a hard compound in the center for durability with softer compounds on the edges for grip.
16.3. Tire Tread Patterns
What are they? Tire tread patterns are the designs on the tire surface, each optimized for different riding conditions.
Types:
- Smooth Treads: Ideal for road cycling, offering low rolling resistance.
- Knobby Treads: Designed for off-road riding, providing maximum grip on loose surfaces.
- Hybrid Treads: Combine smooth and knobby sections for versatile performance on various terrains.
17. Bike Tire Maintenance Tips
Regular maintenance can significantly extend the life and performance of your bike tires.
17.1. Regular Cleaning
Why is this important? Cleaning your tires regularly removes dirt, debris, and road grime, which can degrade the rubber compound.
How to do it:
- Use Soapy Water: Wash your tires with mild soapy water and a soft brush or cloth.
- Rinse Thoroughly: Rinse the tires thoroughly with clean water to remove any soap residue.
- Dry Completely: Allow the tires to dry completely before riding.
17.2. Inspecting for Wear and Damage
Why is this important? Regularly inspecting your tires for wear and damage can help you identify potential problems before they lead to a flat or other issue.
What to look for:
- Cuts and Cracks: Check for any cuts, cracks, or bulges in the tire sidewall or tread.
- Tread Wear: Monitor the tread depth and replace the tire when it becomes worn down.
- Embedded Objects: Look for any embedded objects, such as glass or thorns, and remove them carefully.
17.3. Checking Tire Pressure
Why is this important? Maintaining the correct tire pressure is essential for optimal performance, handling, and safety.
How to do it:
- Use a Reliable Gauge: Use a reliable tire pressure gauge to check the pressure accurately.
- Check Before Each Ride: Check your tire pressure before each ride to ensure it is within the recommended range.
18. Addressing Specific Tire Issues
Certain tire issues require specific attention and solutions.
18.1. Sidewall Cuts
What are they? Sidewall cuts are tears or punctures in the tire sidewall, which can compromise the tire’s structural integrity.
Solutions:
- Small Cuts: For small cuts, you may be able to use a tire boot to reinforce the sidewall.
- Large Cuts: Large cuts usually require replacing the tire.
18.2. Bulges
What are they? Bulges in the tire indicate that the casing has been damaged and the tire is no longer safe to ride.
Solution: Replace the tire immediately if you notice any bulges.
18.3. Uneven Wear
What is it? Uneven wear can occur due to various factors, such as improper inflation or misalignment.
Solutions:
- Check Tire Pressure: Ensure you are maintaining the correct tire pressure.
- Inspect Wheel Alignment: Check your wheel alignment and adjust if necessary.
- Rotate Tires: Rotate your tires periodically to even out wear.
19. Bike Tire Brands and Models
Choosing the right tire brand and model can significantly impact your riding experience.
19.1. Popular Tire Brands
What are some top brands? Several brands are known for producing high-quality bike tires.
Brands:
- Continental: Known for their durable and high-performance tires.
- Michelin: Offers a wide range of tires for various riding styles.
- Schwalbe: Renowned for their innovative and reliable tires.
- Pirelli: Provides high-performance tires with advanced technology.
- Maxxis: Popular among mountain bikers for their grippy and durable tires.
19.2. Recommended Tire Models
What are some popular models? Here are some recommended tire models for different riding styles.
Models:
- Road Cycling: Continental Grand Prix 5000, Michelin Power Road, Pirelli P Zero Race.
- Mountain Biking: Maxxis Minion DHF, Schwalbe Nobby Nic, Continental Cross King.
- Gravel Riding: Pan