Adjusting bike cable tension is essential for achieving smooth and precise shifting. At usabikers.net, we understand the importance of a well-maintained bike, especially for riders who value performance and reliability. By properly adjusting your bike’s cable tension, you can ensure optimal gear changes and a more enjoyable riding experience. This guide will walk you through the process, covering everything from identifying the need for adjustment to fine-tuning your derailleurs.
1. Why Is Adjusting Bike Cable Tension Important?
Adjusting bike cable tension is crucial for maintaining smooth and reliable gear changes. Proper cable tension ensures that your derailleurs move the chain accurately between gears, preventing skipping, hesitation, and overall poor shifting performance. According to the Motorcycle Safety Foundation (MSF), in July 2025, a well-maintained drivetrain significantly enhances rider safety and control.
1.1. Improves Shifting Performance
Optimal cable tension ensures that your derailleurs respond accurately to your shifter inputs. This results in crisp, clean gear changes, whether you’re climbing a steep hill or accelerating on a flat road. Precise shifting not only enhances your riding experience but also improves your overall efficiency.
1.2. Prevents Wear and Tear
When cable tension is off, your derailleurs may struggle to move the chain smoothly between gears. This can cause excessive wear on your chain, cassette, and derailleurs. By maintaining proper cable tension, you can extend the lifespan of your drivetrain components and save money on replacements.
1.3. Enhances Safety
Reliable shifting is essential for safe riding, especially in varying terrains and traffic conditions. When your gears shift smoothly and predictably, you can maintain better control of your bike and react quickly to changing situations.
1.4. Consistent Performance
Bike cables can stretch and loosen over time, leading to inconsistent shifting performance. Regular adjustments ensure that your shifting remains consistent, regardless of how long or how frequently you ride.
1.5. Avoids Costly Repairs
Addressing cable tension issues early can prevent more significant problems from developing in your drivetrain. Neglecting these adjustments can lead to costly repairs or even the need to replace entire components.
2. Identifying the Need to Adjust Bike Cable Tension
Recognizing the signs that your bike’s cable tension needs adjustment is the first step toward resolving shifting issues. Common indicators include sluggish shifting, difficulty shifting into certain gears, and chain skipping.
2.1. Sluggish Shifting
If your gears take longer than usual to shift or feel hesitant, it may indicate that your cable tension is too low. This delay in response can be frustrating and affect your riding rhythm.
2.2. Difficulty Shifting into Certain Gears
Struggling to shift into specific gears, especially smaller cogs on the rear cassette or the larger chainring in the front, is a common sign of inadequate cable tension. You might find yourself pressing the shifter repeatedly to get the chain to move.
2.3. Chain Skipping
Chain skipping, where the chain jumps over the teeth of the cassette or chainring, can occur when cable tension is too high or too low. This can be dangerous, especially when climbing or descending hills.
2.4. Noisy Shifting
Unusual noises, such as clicking or grinding, during gear changes can indicate that your cable tension is not properly adjusted. These sounds often accompany poor shifting performance.
2.5. Inconsistent Shifting
If your shifting performance varies from ride to ride or even during a single ride, it’s a sign that your cable tension may be inconsistent. This can be caused by cable stretch or other factors affecting cable tension.
2.6. Visual Inspection
Visually inspect your shift cables and housing for signs of wear, fraying, or damage. Damaged cables can affect tension and lead to poor shifting. Also, check the cable anchor point on the derailleur to ensure the cable is securely fastened.
3. Tools You’ll Need to Adjust Bike Cable Tension
Having the right tools on hand is essential for efficiently adjusting your bike’s cable tension. Essential tools include Allen wrenches, cable cutters, and a screwdriver.
3.1. Allen Wrenches
Allen wrenches (also known as hex wrenches) are necessary for loosening and tightening the cable anchor bolt on your derailleurs. A set of Allen wrenches in various sizes will ensure you have the right tool for the job.
3.2. Cable Cutters
Cable cutters are designed to cleanly cut shift cables without fraying them. This is important for ensuring that the cable ends fit properly into the cable housing and remain securely attached to the derailleurs.
3.3. Screwdriver
A screwdriver, typically a Phillips or flathead, may be needed to adjust the limit screws on your derailleurs. Limit screws control how far the derailleurs can move, preventing the chain from falling off the cassette or chainring.
3.4. Bike Stand (Optional)
A bike stand can make the adjustment process easier by allowing you to rotate the pedals and shift gears while keeping both hands free. While not essential, a bike stand can significantly improve your working conditions.
3.5. Cleaning Supplies
Before making any adjustments, it’s a good idea to clean your drivetrain. Use a degreaser and a brush to remove dirt and grime from the chain, cassette, and derailleurs. This will help ensure accurate adjustments and smooth shifting.
3.6. Cable and Housing Lubricant
Applying a small amount of cable and housing lubricant can reduce friction and improve shifting performance. Lubricate the cables where they enter the housing and at the derailleur pivot points.
4. Understanding Derailleurs and Cable Tension
Understanding the basics of derailleurs and how cable tension affects their operation is key to making effective adjustments. The rear derailleur moves the chain across the cassette, while the front derailleur moves it across the chainrings.
4.1. Rear Derailleur
The rear derailleur is responsible for shifting the chain across the cassette, allowing you to select different gears for varying terrains and speeds. It consists of a cage, jockey wheels, and a body that attaches to the frame.
4.2. Front Derailleur
The front derailleur shifts the chain between the chainrings, providing a wider range of gear ratios. It also helps to maintain proper chain alignment and prevent chain rub.
4.3. Cable Tension and Shifting
Cable tension plays a crucial role in how accurately and smoothly your derailleurs shift gears. Proper tension ensures that the derailleurs move the chain to the correct position on the cassette or chainrings.
4.4. Adjusting Cable Tension
Cable tension can be adjusted using barrel adjusters located on the derailleurs and shifters. Turning the barrel adjuster changes the amount of tension on the cable, which in turn affects the position of the derailleurs.
4.5. Limit Screws
Limit screws (H and L) control the range of movement of the derailleurs. The H screw limits the derailleur’s movement toward the smallest cog or chainring, while the L screw limits movement toward the largest cog or chainring.
4.6. B-Tension Screw
The B-tension screw adjusts the distance between the upper jockey wheel and the cassette. Proper B-tension ensures smooth shifting, especially in the larger cogs of the cassette.
5. Step-by-Step Guide: How to Adjust Rear Derailleur Cable Tension
Adjusting rear derailleur cable tension involves setting the limit screws, tightening the cable, and fine-tuning the tension using the barrel adjuster. Follow these steps for optimal results.
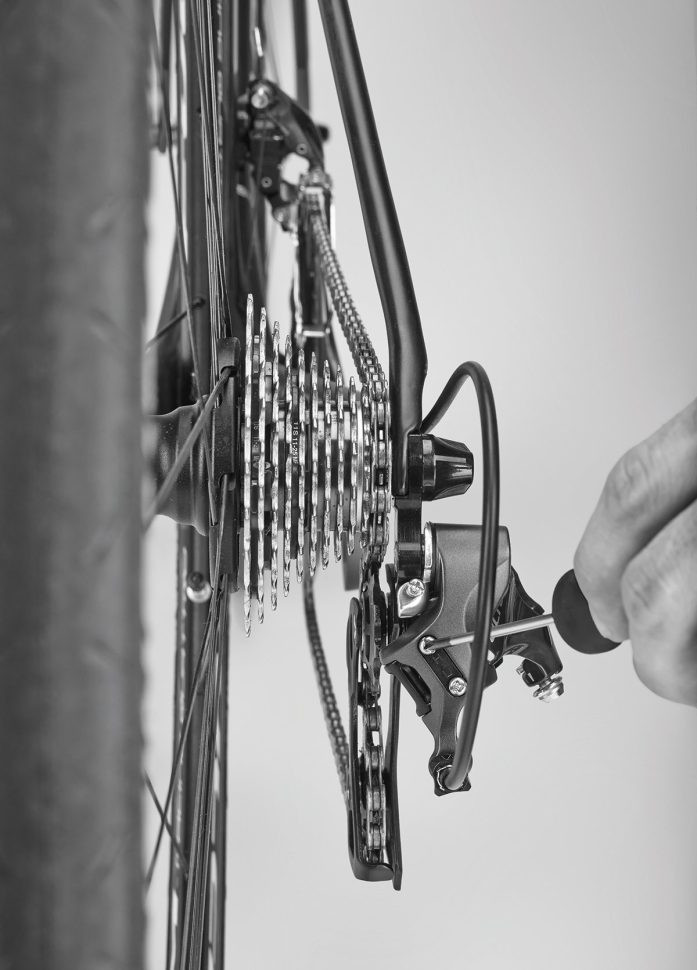
5.1. Set the Limit Screws
 how_to_adjust_a_rear_derailleur_setting_limit_screws-1
Start by disconnecting the gear cable and gently pedal forwards until the chain drops onto the smallest sprocket. Locate the screw marked “H” (for high) at the back of the derailleur. The H screw controls how far the derailleur can move away from the hub. Turn it clockwise to move the jockey wheel closer to the spokes and counterclockwise to move it closer to the frame. Adjust the H screw so that the uppermost jockey wheel sits directly below the smallest sprocket.
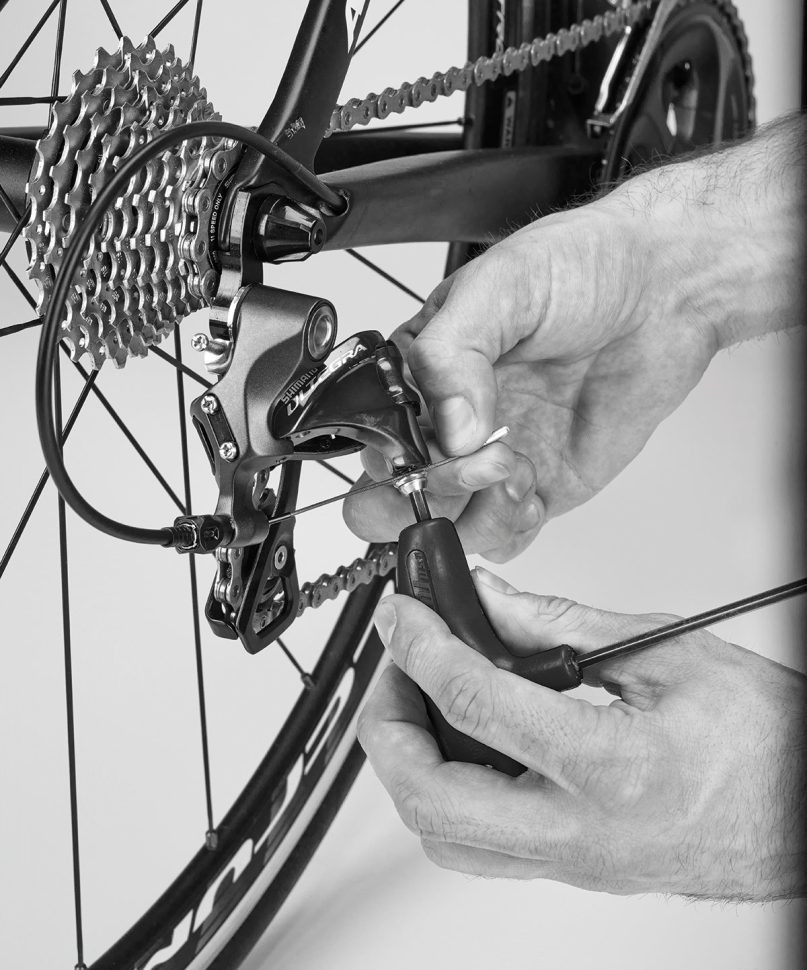
5.2. Tighten the Cable
 how_to_adjust_a_rear_derailleur_tighten_the_cable-1
Turn the barrel adjuster on the derailleur clockwise until it is almost fully screwed in. Select the highest gear (smallest sprocket) on the shifter. Pull the cable as tight as possible at the derailleur and attach it to the body via the cable anchor. Once you’ve done this, select the third gear on the shifter and gently pedal forwards to shift the chain. Don’t worry at this point if it doesn’t shift smoothly. Visually check the position of the jockey wheel relative to the cassette – it should fall directly beneath the third sprocket.
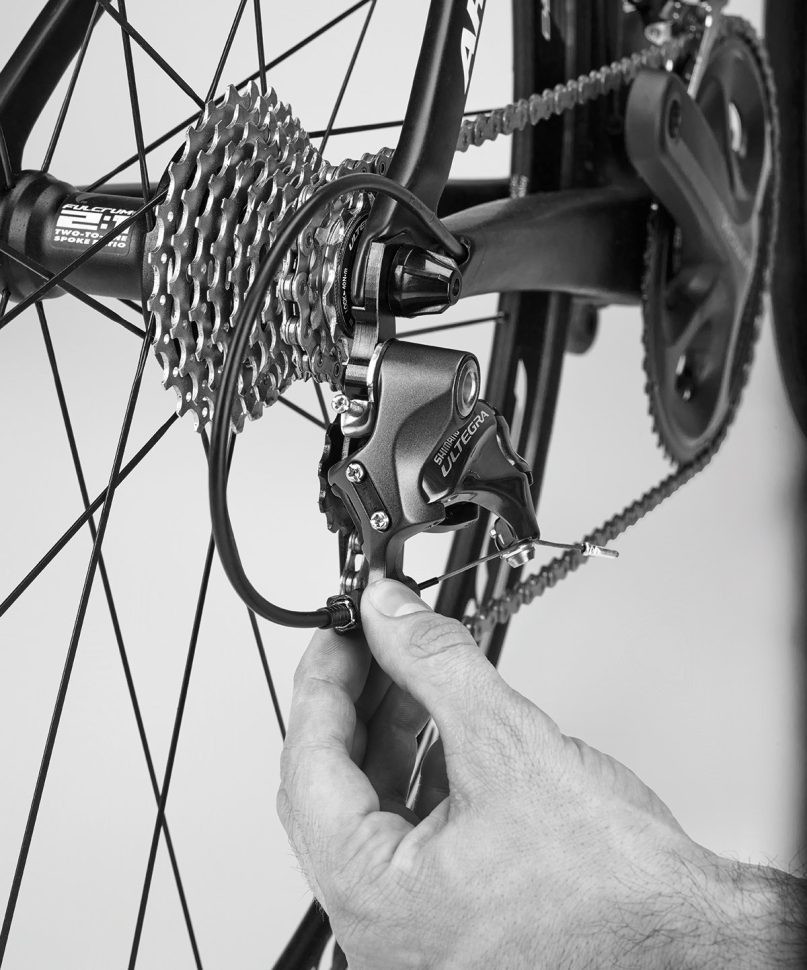
5.3. Adjust the Cable Tension
 how_to_adjust_a_rear_derailleur_adjust_cable_tension-1
Use the barrel adjuster to fine-tune its position. Turning the adjuster anticlockwise increases tension on the cable, bringing the derailleur closer to the wheel. Clockwise decreases the tension, moving it back towards the frame. If the chain seems hesitant to shift up, increase the cable tension by turning the barrel adjuster anticlockwise. If it skips over a gear, turn the adjuster clockwise to decrease the tension. Listening to the noise coming from the drivetrain will tell you when it’s set up correctly. You want it to run as quietly as possible.
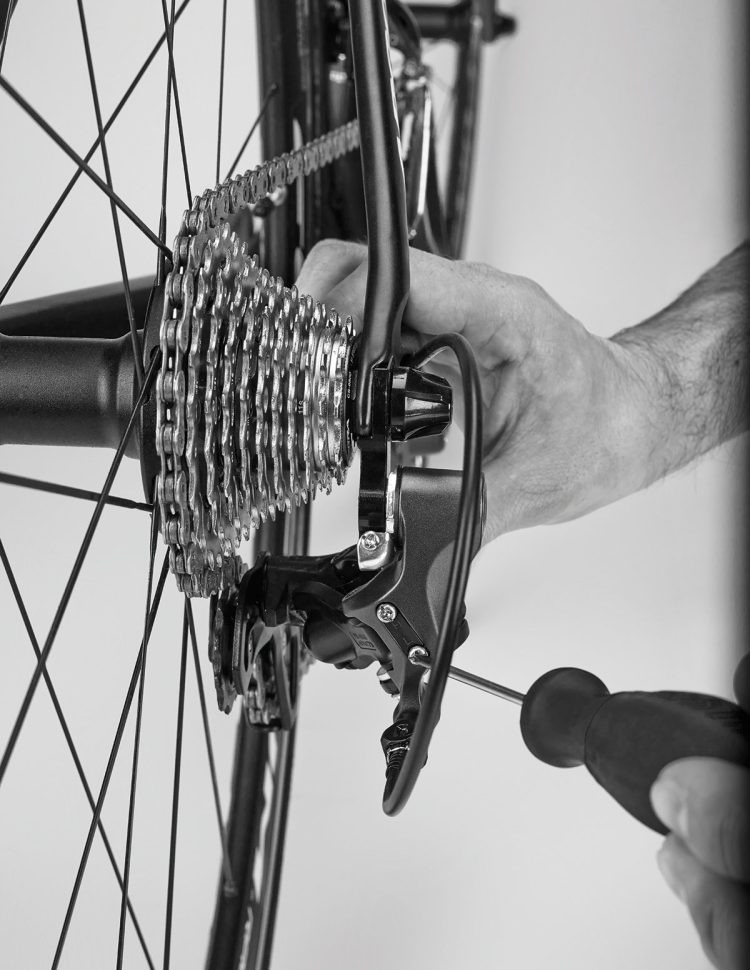
5.4. Shift It Up
 how_to_adjust_a_rear_derailleur_set_the_limit_screws-1
Shift into the largest sprocket. Find the screw marked “L” (below the H screw). It dictates how far towards the wheel the derailleur can move (the lower limit). Push the body of the derailleur until it’s as close to the wheel as it’ll go. The jockey wheel cage shouldn’t be able to move further than a position directly below the largest sprocket. Turn the screw clockwise until the derailleur is unable to move beyond this point. This is crucial in order to prevent the derailleur getting tangled in the spokes.
5.5. B-Tension Screw
With the chain still on the largest sprocket, it’s time to adjust the B-tension screw – find it on the uppermost part of the derailleur, next to where it mounts on the frame. This dictates how close the upper jockey wheel sits to the cassette; it should be as close to the sprockets as possible without actually touching them. Turning the B screw clockwise moves the jockey wheel away from the cassette. Tweak it until there is a gap of approximately 3mm.
6. Fine-Tuning Front Derailleur Cable Tension
Adjusting front derailleur cable tension is similar to adjusting the rear derailleur but requires a slightly different approach due to the front derailleur’s function.
6.1. Set the Limit Screws
Start by setting the limit screws on the front derailleur. The L screw limits the derailleur’s movement toward the frame, preventing the chain from falling off the smallest chainring. The H screw limits movement away from the frame, preventing the chain from falling off the largest chainring.
6.2. Adjust Cable Tension
With the chain on the smallest chainring and the rear cassette in the middle, loosen the cable anchor bolt on the front derailleur. Pull the cable taut and re-tighten the anchor bolt.
6.3. Use the Barrel Adjuster
Use the barrel adjuster on the shifter or cable to fine-tune the cable tension. Turning the adjuster increases or decreases tension, which affects how the derailleur moves the chain between the chainrings.
6.4. Check for Chain Rub
As you shift between chainrings, check for chain rub on the derailleur cage. Adjust the cable tension and limit screws as needed to eliminate any rubbing.
6.5. Test the Shifting
Test the shifting performance by shifting through all the chainrings. Make sure the chain shifts smoothly and without hesitation. If necessary, make small adjustments to the cable tension or limit screws until the shifting is perfect.
7. Common Issues and Troubleshooting
Even with careful adjustment, you may encounter common issues such as persistent shifting problems or cable slippage. Troubleshooting these issues can help you achieve optimal shifting performance.
7.1. Persistent Shifting Problems
If you continue to experience shifting problems after adjusting cable tension, check for other potential issues, such as worn cables, damaged cable housing, or a bent derailleur hanger.
7.2. Cable Slippage
Cable slippage can occur if the cable anchor bolt is not tightened sufficiently or if the cable is frayed. Ensure that the anchor bolt is properly tightened and replace the cable if it shows signs of fraying.
7.3. Bent Derailleur Hanger
A bent derailleur hanger can cause significant shifting problems. Use a derailleur hanger alignment tool to check and correct the alignment of the hanger.
7.4. Worn Cables and Housing
Worn cables and housing can increase friction and affect shifting performance. Replace the cables and housing if they are old, damaged, or contaminated with dirt and grime.
7.5. Incorrect Limit Screw Adjustment
Incorrect limit screw adjustment can prevent the derailleurs from shifting properly. Double-check the limit screw settings to ensure they are correctly adjusted for your bike.
8. Regular Maintenance for Optimal Shifting
Regular maintenance is essential for maintaining optimal shifting performance. Clean and lubricate your drivetrain components regularly, and inspect your cables and housing for wear and damage.
8.1. Clean and Lubricate
Clean your chain, cassette, and derailleurs regularly to remove dirt and grime. Apply a high-quality chain lubricant to keep your drivetrain running smoothly.
8.2. Inspect Cables and Housing
Inspect your cables and housing for signs of wear, fraying, or damage. Replace them as needed to maintain optimal shifting performance.
8.3. Check Cable Tension
Check your cable tension regularly and adjust it as needed to ensure smooth and reliable shifting.
8.4. Replace Worn Components
Replace worn components, such as the chain, cassette, and chainrings, to maintain optimal drivetrain performance.
8.5. Professional Check-Ups
Consider taking your bike to a professional mechanic for regular check-ups. A professional can identify and address potential issues before they become major problems.
9. The Role of Cable Tension in E-Bike Shifting
Cable tension is just as critical in e-bike shifting as it is in traditional bikes. E-bikes, with their added power and torque, require precise and reliable shifting to handle varied terrains and speeds. Proper cable tension ensures the motor’s power is efficiently translated into smooth gear changes, enhancing the overall riding experience and safety.
9.1. Handling Increased Torque
E-bikes generate significant torque, which places additional stress on the drivetrain. Accurate cable tension is vital for the derailleurs to manage the chain effectively, preventing slippage and ensuring smooth transitions between gears, especially under heavy load.
9.2. Extending Component Life
The added power of an e-bike can accelerate wear on drivetrain components if the shifting isn’t smooth. Maintaining correct cable tension reduces strain on the chain, cassette, and derailleurs, prolonging their lifespan and saving on costly replacements.
9.3. Optimizing Battery Efficiency
Smooth and efficient shifting contributes to better battery efficiency in e-bikes. When the gears shift seamlessly, the motor doesn’t have to work as hard to maintain speed, resulting in less energy consumption and longer ride times.
9.4. Enhanced Safety
Reliable shifting is essential for safety, particularly on e-bikes that can reach higher speeds. Proper cable tension ensures predictable gear changes, allowing riders to maintain control and react quickly to changing conditions, such as sudden stops or steep inclines.
9.5. Tailoring Adjustments for E-Bikes
While the general principles of adjusting cable tension remain the same, e-bike riders should pay closer attention to the initial setup and ongoing maintenance. Regularly check and adjust cable tension, especially after the first few rides, as new cables tend to stretch more quickly.
10. How Cable Tension Affects Different Types of Bikes
The significance of cable tension varies across different types of bikes, each with its unique gearing needs. Road bikes demand precise shifting for optimal performance, while mountain bikes require robust adjustments to handle rugged terrains.
10.1. Road Bikes
Road bikes prioritize speed and efficiency, making precise shifting crucial. Accurate cable tension ensures seamless transitions between gears, allowing riders to maintain optimal cadence and power output, especially during races or long-distance rides.
10.2. Mountain Bikes
Mountain bikes encounter diverse and challenging terrains, necessitating reliable shifting under demanding conditions. Proper cable tension prevents chain skipping and ensures quick gear changes, helping riders navigate steep climbs, technical descents, and rough trails.
10.3. Hybrid Bikes
Hybrid bikes, designed for versatility, benefit from consistent shifting performance in varied environments, from urban commutes to light trails. Regular cable tension adjustments ensure smooth transitions between gears, making rides more enjoyable and efficient.
10.4. Commuter Bikes
Commuter bikes require dependable shifting for daily use in city traffic. Accurate cable tension ensures smooth gear changes, allowing riders to maintain pace with traffic, navigate intersections, and handle unexpected stops and starts safely.
10.5. Touring Bikes
Touring bikes, built for long-distance travel, depend on robust and reliable shifting over extended periods. Proper cable tension maintains consistent gear changes, ensuring riders can efficiently tackle varied terrains and long distances with minimal mechanical issues.
11. Common Mistakes to Avoid When Adjusting Cable Tension
Avoiding common mistakes when adjusting cable tension ensures efficient and accurate shifting. These mistakes include over-tightening cable anchor bolts, neglecting limit screws, and ignoring cable housing issues.
11.1. Over-Tightening Cable Anchor Bolts
Over-tightening cable anchor bolts can damage the cable or derailleur. Tighten the bolts just enough to secure the cable, and use a torque wrench to ensure proper tension.
11.2. Neglecting Limit Screws
Neglecting limit screws can cause the chain to fall off the cassette or chainrings. Always set the limit screws before adjusting cable tension to prevent this issue.
11.3. Ignoring Cable Housing Issues
Ignoring cable housing issues, such as cracks or bends, can affect shifting performance. Replace damaged cable housing to ensure smooth cable movement.
11.4. Not Cleaning Drivetrain Components
Not cleaning drivetrain components before adjustment can lead to inaccurate settings. Clean the chain, cassette, and derailleurs to ensure proper adjustments.
11.5. Forgetting to Test the Shifting
Forgetting to test the shifting after adjustment can result in unresolved issues. Test the shifting through all gears to ensure smooth and accurate performance.
12. Integrating Electronic Shifting Systems with Cable Tension Knowledge
Even with electronic shifting systems like Shimano Di2 or SRAM eTap, understanding cable tension principles can be beneficial. While these systems don’t use mechanical cables, knowledge of derailleur function and adjustment is still essential for setup and maintenance.
12.1. Initial Setup and Calibration
Electronic shifting systems require initial setup and calibration to ensure proper derailleur alignment and function. Understanding how derailleurs move and interact with the chain and cassette is crucial during this process.
12.2. Micro-Adjustments
Electronic systems often have micro-adjustment features that allow fine-tuning of derailleur position. Knowledge of cable tension principles can help you make these adjustments effectively, optimizing shifting performance.
12.3. Troubleshooting
If you encounter issues with your electronic shifting system, understanding derailleur mechanics can aid in troubleshooting. You can check for proper alignment, battery life, and other factors that may affect shifting performance.
12.4. Maintenance
Although electronic systems don’t have cables that stretch or fray, they still require regular maintenance. Keeping the derailleurs clean and properly lubricated ensures smooth and reliable shifting.
12.5. Compatibility
When upgrading or replacing components in an electronic shifting system, understanding derailleur compatibility is essential. Knowledge of cable tension principles can help you ensure that the new components work seamlessly with your existing system.
13. Advanced Techniques for Optimizing Bike Cable Tension
For experienced riders and mechanics, advanced techniques can further optimize bike cable tension. These include using cable tension meters, adjusting for specific riding conditions, and understanding the impact of cable routing.
13.1. Using Cable Tension Meters
Cable tension meters provide precise measurements of cable tension, allowing for more accurate adjustments. These tools can be particularly useful for riders who demand the highest levels of performance.
13.2. Adjusting for Riding Conditions
Adjusting cable tension based on specific riding conditions can improve shifting performance. For example, riders who frequently encounter steep climbs may prefer slightly higher cable tension for quicker upshifts.
13.3. Understanding Cable Routing
Cable routing can affect cable tension and shifting performance. Ensure that the cables are routed smoothly and without sharp bends, which can increase friction and reduce shifting accuracy.
13.4. Optimizing Derailleur Hanger Alignment
Optimizing derailleur hanger alignment is crucial for precise shifting. Use a derailleur hanger alignment tool to ensure that the hanger is perfectly straight, which can significantly improve shifting performance.
13.5. Using High-Quality Cables and Housing
Using high-quality cables and housing can reduce friction and improve shifting performance. Invest in premium cables and housing for smoother and more reliable shifting.
14. The Benefits of Professional Bike Maintenance
While adjusting bike cable tension can be done at home, professional bike maintenance offers significant benefits. Professional mechanics have the expertise, tools, and experience to ensure your bike is running at its best.
14.1. Expert Knowledge
Professional mechanics have in-depth knowledge of bike mechanics and can quickly diagnose and resolve shifting problems.
14.2. Specialized Tools
Professional mechanics have access to specialized tools, such as cable tension meters and derailleur hanger alignment tools, which can improve the accuracy of adjustments.
14.3. Comprehensive Service
Professional bike maintenance often includes a comprehensive service that addresses all aspects of your bike, from shifting performance to brake function and overall safety.
14.4. Prevents Costly Repairs
Regular professional maintenance can prevent small issues from becoming major problems, saving you money on costly repairs in the long run.
14.5. Peace of Mind
Knowing that your bike has been professionally maintained provides peace of mind, allowing you to focus on enjoying your ride.
15. Exploring usabikers.net for More Biker Resources
For more information and resources on bike maintenance, riding tips, and biker culture, visit usabikers.net. Our website offers a wealth of articles, guides, and community forums to help you get the most out of your biking experience.
15.1. Maintenance Guides
Access detailed maintenance guides on various topics, including adjusting brakes, cleaning your bike, and troubleshooting common issues.
15.2. Riding Tips
Learn valuable riding tips to improve your skills, enhance your safety, and make your rides more enjoyable.
15.3. Biker Culture
Explore the rich culture of biking, including biker events, clubs, and community forums where you can connect with other riders.
15.4. Product Reviews
Read expert reviews of bikes, gear, and accessories to help you make informed purchasing decisions.
15.5. Community Forums
Join our community forums to ask questions, share experiences, and connect with other bikers from around the country.
Adjusting your bike’s cable tension is a fundamental skill that ensures smooth and reliable shifting, enhancing your riding experience and safety. By following this comprehensive guide and exploring the resources available at usabikers.net, you can keep your bike in top condition and enjoy every ride to the fullest. So, embrace the freedom of the road and the camaraderie of the biker community, knowing that you have the knowledge and resources to keep your bike running smoothly.
Address: 801 Sturgis Main St, Sturgis, SD 57785, United States
Phone: +1 (605) 347-2000
Website: usabikers.net
FAQ: Adjusting Bike Cable Tension
1. How often should I adjust my bike cable tension?
You should adjust your bike cable tension every few months or whenever you notice shifting problems. Cables can stretch over time, affecting shifting performance.
2. What tools do I need to adjust bike cable tension?
You’ll need Allen wrenches, cable cutters, and a screwdriver. A bike stand can also be helpful.
3. Can I adjust bike cable tension myself, or should I take it to a professional?
You can adjust bike cable tension yourself if you have the right tools and follow a step-by-step guide. However, if you’re not comfortable doing it yourself, it’s best to take it to a professional mechanic.
4. What are the signs that my bike cable tension needs adjustment?
Signs include sluggish shifting, difficulty shifting into certain gears, and chain skipping.
5. How does cable tension affect shifting performance?
Proper cable tension ensures that your derailleurs move the chain accurately between gears, preventing skipping and hesitation.
6. What is a barrel adjuster, and how do I use it?
A barrel adjuster is a small knob located on the derailleurs and shifters. Turning it adjusts the cable tension, which affects the position of the derailleurs.
7. What are limit screws, and how do they affect shifting?
Limit screws control the range of movement of the derailleurs, preventing the chain from falling off the cassette or chainrings.
8. How do I adjust the B-tension screw on my rear derailleur?
The B-tension screw adjusts the distance between the upper jockey wheel and the cassette. Proper B-tension ensures smooth shifting, especially in the larger cogs of the cassette.
9. Can worn cables and housing affect shifting performance?
Yes, worn cables and housing can increase friction and affect shifting performance. Replace them if they are old, damaged, or contaminated.
10. Where can I find more information and resources on bike maintenance?
Visit usabikers.net for detailed maintenance guides, riding tips, and community forums to connect with other riders.