Applying bike decals is a fantastic way to personalize your ride and express your unique style. At usabikers.net, we’re here to guide you through every step of the process, ensuring a smooth and stylish transformation for your motorcycle. Explore this guide to discover the best techniques, tips, and tricks for applying decals, plus, we will share insights on maintenance and care to keep your bike looking its best.
1. What are Bike Decals and Why Apply Them?
Bike decals, also known as stickers or graphics, are adhesive designs applied to a motorcycle’s surface. They serve various purposes, from adding a personal touch to showcasing brand loyalties or even providing safety markings. According to the American Motorcyclist Association (AMA), personalizing your motorcycle is a core part of biker culture, and decals are a popular way to achieve this.
1.1. Personalization and Aesthetics
Decals allow you to express your individuality and make your bike stand out. You can choose from a wide range of designs, colors, and styles to reflect your personality and preferences.
1.2. Branding and Promotion
Many riders use decals to display their favorite brands, motorcycle clubs, or sponsors. This can be a way to support companies you believe in or promote your own brand.
1.3. Protection and Visibility
Some decals, like reflective strips, enhance visibility, especially during nighttime riding. Others can protect the paint from scratches and minor abrasions.
2. What Types of Bike Decals Are Available?
Understanding the different types of decals available is crucial for choosing the right ones for your needs. Here’s a breakdown:
2.1. Vinyl Decals
Vinyl decals are the most common type, known for their durability and weather resistance. They come in various finishes, including glossy, matte, and metallic.
2.2. Reflective Decals
Reflective decals enhance visibility at night, making your bike safer. They are often used on helmets, fenders, and side panels.
2.3. Die-Cut Decals
Die-cut decals are custom-cut to the exact shape of the design, without any background. They offer a clean, professional look.
2.4. Transfer Decals
Transfer decals involve transferring the design from a carrier sheet to the bike’s surface using a transfer tape. They are ideal for intricate designs and lettering.
2.5. Domed Decals
Domed decals have a clear, three-dimensional epoxy coating that protects the design and adds a premium look.
3. What Tools and Materials Do You Need to Apply Bike Decals?
Having the right tools and materials ensures a smooth and professional decal application. Here’s a comprehensive list:
3.1. Cleaning Supplies
- Soap and Water: To clean the bike’s surface.
- Isopropyl Alcohol: To remove any residual grease or wax.
- Microfiber Cloths: To avoid scratching the paint.
3.2. Application Tools
- Heat Gun or Hair Dryer: To soften the decal and improve adhesion.
- Squeegee or Soft Card: To smooth out the decal and remove air bubbles.
- Masking Tape: To position the decal accurately.
- Scissors or Utility Knife: To trim excess material.
- Measuring Tape or Ruler: To ensure precise placement.
3.3. Safety Gear
- Gloves: To keep your hands clean and protect the decal from fingerprints.
- Safety Glasses: To protect your eyes from debris.
4. How to Prepare Your Bike’s Surface for Decal Application?
Proper surface preparation is essential for ensuring the decal adheres correctly and lasts long. According to experts at Motorcycle.com, a clean surface is the most critical factor in decal application.
4.1. Cleaning the Surface
- Wash the Area: Use soap and water to remove dirt and grime.
- Rinse Thoroughly: Ensure no soap residue remains.
- Dry Completely: Use a clean microfiber cloth.
4.2. Removing Wax and Grease
- Apply Isopropyl Alcohol: Dampen a microfiber cloth with isopropyl alcohol.
- Wipe the Surface: Gently wipe the area to remove wax and grease.
- Dry Again: Use a clean, dry microfiber cloth.
4.3. Addressing Imperfections
- Inspect for Scratches: Check for any scratches or imperfections on the surface.
- Smooth Out: Use a fine-grit sandpaper to gently smooth out any rough spots.
- Clean Again: Repeat the cleaning process to remove any sanding residue.
5. How to Apply Bike Decals: A Step-by-Step Guide?
Follow these steps to apply your bike decals like a pro.
5.1. Positioning the Decal
- Use Masking Tape: Secure the decal in the desired position using masking tape.
- Check Alignment: Ensure the decal is straight and aligned correctly.
- Mark the Position: Use a marker to mark the edges of the decal on the masking tape.
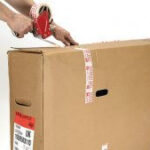
5.2. Applying the Decal
 Positioning bike decals using tape
- Peel the Backing: Carefully peel off the backing paper from the decal.
- Align with Marks: Align the decal with the marks on the masking tape.
- Apply Slowly: Gently apply the decal to the surface, starting from one edge and working your way across.
5.3. Smoothing Out the Decal
- Use a Squeegee: Use a squeegee or soft card to smooth out the decal.
- Apply Pressure: Apply firm, even pressure to remove air bubbles and wrinkles.
- Work from the Center Outward: Start from the center of the decal and work your way towards the edges.
5.4. Removing the Transfer Tape
- Peel Slowly: Slowly peel off the transfer tape at a 45-degree angle.
- Check for Bubbles: Check for any remaining air bubbles or wrinkles.
- Smooth Again: If necessary, smooth out any imperfections with the squeegee.
5.5. Final Touches
- Heat Application: Use a heat gun or hair dryer to gently heat the decal.
- Press Firmly: Press firmly on the decal to ensure it adheres properly.
- Trim Excess: Use scissors or a utility knife to trim any excess material.
6. What Are the Best Practices for Applying Large Decals?
Applying large decals can be challenging, but these best practices will help you achieve a flawless finish.
6.1. Working in Sections
- Divide the Decal: Divide the large decal into smaller, manageable sections.
- Apply One Section at a Time: Apply each section separately, following the same steps as for smaller decals.
6.2. Using a Helper
- Get Assistance: Enlist a helper to hold the decal and ensure proper alignment.
- Communicate Clearly: Communicate clearly with your helper to avoid mistakes.
6.3. Wet Application Method
- Spray the Surface: Lightly spray the bike’s surface with a mixture of water and a few drops of mild soap.
- Apply the Decal: Apply the decal to the wet surface.
- Smooth Out: Use a squeegee to smooth out the decal, removing the excess water and air bubbles.
7. How to Handle Air Bubbles and Wrinkles When Applying Decals?
Air bubbles and wrinkles can ruin the appearance of your decals. Here’s how to deal with them effectively:
7.1. Air Bubbles
- Puncture with a Pin: Use a fine needle or pin to gently puncture the air bubble.
- Squeeze Out Air: Use a squeegee to gently squeeze out the air.
- Smooth the Area: Smooth the area with your finger or a soft cloth.
7.2. Wrinkles
- Heat the Decal: Use a heat gun or hair dryer to gently heat the wrinkled area.
- Stretch Gently: Gently stretch the decal to remove the wrinkle.
- Smooth Out: Use a squeegee to smooth out the area.
8. How to Maintain and Care for Your Bike Decals?
Proper maintenance ensures your decals stay looking great for years to come.
8.1. Regular Cleaning
- Wash with Mild Soap: Wash the decals regularly with mild soap and water.
- Avoid Harsh Chemicals: Avoid using harsh chemicals or abrasive cleaners.
- Dry with Microfiber Cloth: Dry the decals with a soft microfiber cloth.
8.2. Protecting from the Elements
- Park in the Shade: Park your bike in the shade to protect the decals from sun damage.
- Use a Bike Cover: Use a bike cover to protect the decals from rain, snow, and UV rays.
8.3. Avoiding Damage
- Be Careful When Washing: Be careful when washing your bike to avoid scratching or peeling the decals.
- Avoid Pressure Washers: Avoid using pressure washers, as they can damage the decals.
9. How to Remove Bike Decals Without Damaging the Paint?
Removing old or unwanted decals requires care to avoid damaging the paint.
9.1. Heating the Decal
- Use a Heat Gun: Use a heat gun or hair dryer to gently heat the decal.
- Soften the Adhesive: Heat the decal until the adhesive softens.
9.2. Peeling the Decal
- Lift an Edge: Use a plastic scraper or your fingernail to gently lift an edge of the decal.
- Peel Slowly: Slowly peel the decal away from the surface, applying heat as needed.
9.3. Removing Adhesive Residue
- Apply Adhesive Remover: Apply an adhesive remover to a clean cloth.
- Wipe the Area: Gently wipe the area to remove any adhesive residue.
- Clean and Polish: Clean and polish the area to restore the paint’s shine.
10. Where to Find High-Quality Bike Decals?
Finding high-quality decals is essential for ensuring they look great and last long. Here are some reliable sources:
10.1. Online Retailers
- Etsy: Offers a wide variety of custom and pre-made decals from independent sellers.
- Amazon: Provides a vast selection of decals from various brands.
- специализированные сайты: Сайты, специализирующиеся на мотоциклетных наклейках, такие как мотоциклетные наклейки и наклейки мотоциклов.
10.2. Local Shops
- Motorcycle Dealerships: Often sell decals and can provide expert advice.
- Custom Graphics Shops: Can create custom decals to your specifications.
10.3. Motorcycle Clubs and Communities
- AMA Events: Often feature vendors selling motorcycle accessories, including decals.
- Online Forums: Biker forums like usabikers.net can provide recommendations and reviews.
11. What Are the Common Mistakes to Avoid When Applying Bike Decals?
Avoiding common mistakes can save you time, money, and frustration.
11.1. Not Cleaning the Surface Properly
- Mistake: Applying decals to a dirty or greasy surface.
- Solution: Thoroughly clean the surface with soap, water, and isopropyl alcohol.
11.2. Applying Decals in Extreme Temperatures
- Mistake: Applying decals in very hot or cold weather.
- Solution: Apply decals in a temperature range of 60-80°F (15-27°C).
11.3. Not Using a Squeegee
- Mistake: Applying decals without using a squeegee.
- Solution: Use a squeegee to smooth out the decal and remove air bubbles.
11.4. Rushing the Application
- Mistake: Rushing the application process.
- Solution: Take your time and follow the steps carefully.
11.5. Not Properly Aligning the Decal
- Mistake: Failing to align the decal properly.
- Solution: Use masking tape to position the decal accurately before applying it.
12. How Can Usabikers.net Help You With Your Bike Decal Projects?
At usabikers.net, we’re dedicated to providing you with the resources and community support you need for all your motorcycle customization projects.
12.1. Comprehensive Guides and Tutorials
We offer detailed guides and tutorials on applying bike decals, covering everything from surface preparation to maintenance.
12.2. Community Forum
Our forum is a great place to connect with other bikers, share tips and experiences, and get advice on your decal projects.
12.3. Product Recommendations
We provide recommendations for high-quality decals, tools, and materials, ensuring you get the best products for your needs.
12.4. Custom Decal Design Services
We partner with custom graphics shops to offer design services, helping you create unique decals that reflect your personal style.
13. How to Choose the Right Colors and Designs for Your Bike Decals?
Selecting the right colors and designs is crucial for creating a visually appealing look.
13.1. Consider Your Bike’s Color Scheme
Choose colors that complement your bike’s existing paint job. Consider using contrasting colors for a bold look or similar shades for a more subtle effect.
13.2. Reflect Your Personal Style
Select designs that reflect your personality and interests. Whether it’s a vintage logo, a modern graphic, or a custom design, make sure it represents you.
13.3. Think About Visibility
If you’re using decals for safety, choose bright, reflective colors that enhance visibility, especially at night.
13.4. Get Inspired
Browse online galleries, motorcycle shows, and biker communities like usabikers.net to get inspiration for your decal designs.
14. How to Create Custom Bike Decals?
Creating custom bike decals allows you to express your unique style and make your bike truly one-of-a-kind.
14.1. Design Software
Use design software like Adobe Illustrator, CorelDRAW, or Inkscape to create your decal design. These programs offer a wide range of tools and features for creating detailed graphics.
14.2. Cricut or Silhouette Machines
Use a Cricut or Silhouette cutting machine to cut your design from vinyl. These machines are easy to use and allow you to create precise, intricate cuts.
14.3. Online Custom Decal Services
Utilize online custom decal services like Sticker Mule or Vistaprint to upload your design and have it professionally printed and cut.
14.4. Local Graphics Shops
Work with local graphics shops to create custom decals. They can offer expert advice and handle the entire process, from design to printing and cutting.
15. What Are the Legal Considerations for Bike Decals?
Before applying decals to your bike, it’s important to consider any legal regulations that may apply.
15.1. Local Laws and Regulations
Check local laws and regulations regarding the placement and size of decals on motorcycles. Some areas may have restrictions on reflective materials or obscuring license plates.
15.2. Trademark and Copyright
Be mindful of trademark and copyright laws when using logos or designs. Obtain permission from the copyright holder if you’re using copyrighted material.
15.3. Safety Standards
Ensure that your decals comply with safety standards, especially if they’re reflective or used for visibility.
15.4. Club and Organization Rules
If you’re part of a motorcycle club or organization, check their rules and guidelines regarding decals and patches.
16. How to Store Bike Decals Properly Before Application?
Proper storage is essential for maintaining the quality of your bike decals before application.
16.1. Keep in a Cool, Dry Place
Store decals in a cool, dry place away from direct sunlight and extreme temperatures.
16.2. Protect from Moisture
Protect decals from moisture to prevent the adhesive from deteriorating. Use a waterproof container or bag to store them.
16.3. Lay Flat
Lay decals flat to prevent them from curling or creasing. Use a rigid backing board to provide support.
16.4. Avoid Sharp Objects
Avoid storing decals near sharp objects that could scratch or damage them.
17. How to Troubleshoot Common Bike Decal Problems?
Even with careful application, problems can sometimes arise. Here’s how to troubleshoot common bike decal issues:
17.1. Decal Not Sticking
- Problem: Decal not sticking to the surface.
- Solution: Clean the surface thoroughly, use a heat gun to warm the decal, and apply firm pressure with a squeegee.
17.2. Decal Peeling
- Problem: Decal peeling at the edges.
- Solution: Clean the area, apply a small amount of adhesive, and press the decal firmly into place.
17.3. Decal Fading
- Problem: Decal fading due to sun exposure.
- Solution: Protect the decal with a UV-resistant clear coat or park your bike in the shade.
17.4. Decal Cracking
- Problem: Decal cracking due to age or extreme temperatures.
- Solution: Replace the decal with a new one.
18. What Are the Latest Trends in Bike Decal Designs?
Staying up-to-date with the latest trends can inspire your next decal project.
18.1. Retro and Vintage Designs
Retro and vintage designs are making a comeback, with classic logos, fonts, and graphics.
18.2. Minimalist Graphics
Minimalist graphics are popular for their clean, modern look. Simple lines, shapes, and text create a subtle yet stylish effect.
18.3. Reflective and Glow-in-the-Dark Decals
Reflective and glow-in-the-dark decals are functional and eye-catching, enhancing visibility and adding a unique touch.
18.4. Custom Typography
Custom typography allows you to create unique, personalized decals with your name, initials, or favorite quotes.
19. How to Finance Your Bike Decal Projects?
If you’re on a budget, there are several ways to finance your bike decal projects.
19.1. Budgeting
Create a budget for your decal project, including the cost of decals, tools, and materials.
19.2. DIY Options
Save money by creating your own decals using DIY methods.
19.3. Sales and Discounts
Take advantage of sales and discounts offered by online retailers and local shops.
19.4. Payment Plans
Consider using payment plans or credit cards with rewards programs to finance your decal projects.
20. What Are Some Inspiring Bike Decal Ideas for Different Motorcycle Styles?
Get inspired by these bike decal ideas for different motorcycle styles:
20.1. Cruiser Bikes
- Idea: Vintage logos, flames, and pinstripes for a classic look.
- Example: Harley-Davidson logo, Route 66 sign, eagle wings.
20.2. Sport Bikes
- Idea: Modern graphics, racing stripes, and sponsor logos for a sporty look.
- Example: Carbon fiber patterns, speed numbers, brand names.
20.3. Adventure Bikes
- Idea: Adventure-themed graphics, map coordinates, and rugged designs for an adventurous look.
- Example: Mountain ranges, compasses, world maps.
20.4. Cafe Racers
- Idea: Minimalist graphics, racing stripes, and custom typography for a sleek look.
- Example: Simple lines, vintage numbers, custom names.
21. How to Join a Bike Community and Share Your Decal Projects?
Joining a bike community is a great way to share your decal projects, get feedback, and connect with other enthusiasts.
21.1. Online Forums
Join online forums like usabikers.net to share your projects, ask questions, and get advice.
21.2. Social Media Groups
Join social media groups on Facebook, Instagram, and other platforms to connect with other bikers and share your decal projects.
21.3. Local Bike Clubs
Join local bike clubs to participate in events, meet other riders, and showcase your bike.
21.4. Motorcycle Shows
Attend motorcycle shows to display your bike and get feedback from other enthusiasts.
22. How Bike Decals Can Reflect Your Personality and Passion?
Bike decals are a powerful way to express your personality and passion for riding.
22.1. Personal Expression
Use decals to showcase your interests, hobbies, and beliefs.
22.2. Brand Loyalty
Display your favorite brands and products with decals.
22.3. Group Affiliation
Show your affiliation with motorcycle clubs, organizations, and communities.
22.4. Unique Identity
Create a unique identity for your bike with custom decals that set it apart from the crowd.
23. FAQ about How to Apply Bike Decals?
23.1. What is the best way to clean my bike before applying decals?
The best way to clean your bike before applying decals is to use soap and water to remove dirt and grime, followed by isopropyl alcohol to remove any residual wax or grease.
23.2. Can I apply decals in cold weather?
It is not recommended to apply decals in cold weather as the adhesive may not stick properly. Apply decals in a temperature range of 60-80°F (15-27°C) for best results.
23.3. How do I remove air bubbles from my decals?
To remove air bubbles from your decals, use a fine needle or pin to gently puncture the air bubble, then use a squeegee to gently squeeze out the air.
23.4. What type of squeegee should I use for applying decals?
Use a soft, plastic squeegee or a soft card to smooth out the decal and remove air bubbles without scratching the surface.
23.5. How can I protect my bike decals from fading?
Protect your bike decals from fading by parking your bike in the shade, using a bike cover, and applying a UV-resistant clear coat.
23.6. Can I use a pressure washer to clean my bike decals?
Avoid using pressure washers to clean your bike decals as they can damage the decals. Instead, wash the decals with mild soap and water.
23.7. How do I remove old decals without damaging the paint?
To remove old decals without damaging the paint, use a heat gun or hair dryer to gently heat the decal, then slowly peel the decal away from the surface. Use an adhesive remover to remove any adhesive residue.
23.8. What are the legal considerations for bike decals?
Legal considerations for bike decals include local laws and regulations regarding the placement and size of decals, trademark and copyright laws, and safety standards.
23.9. Where can I find high-quality bike decals?
You can find high-quality bike decals at online retailers like Etsy and Amazon, local motorcycle dealerships, and custom graphics shops.
23.10. How can I create custom bike decals?
You can create custom bike decals using design software like Adobe Illustrator, Cricut or Silhouette cutting machines, online custom decal services, or by working with local graphics shops.
Applying bike decals is a rewarding way to personalize your motorcycle and express your passion for riding. By following these tips and best practices, you can achieve a professional-looking finish that lasts for years. Don’t forget to visit usabikers.net for more resources, community support, and inspiration for your next bike decal project. Join our community today and share your experiences with fellow bikers.
CTA
Ready to transform your ride? Visit usabikers.net now to explore our extensive collection of articles, guides, and community forums. Discover the best tips, tricks, and resources for customizing your motorcycle and connecting with fellow enthusiasts. Join us today and take your biking experience to the next level. Address: 801 Sturgis Main St, Sturgis, SD 57785, United States. Phone: +1 (605) 347-2000.