Trueing a bike wheel is essential for maintaining performance and extending component life. At usabikers.net, we provide expert guidance on achieving perfectly aligned wheels, enhancing your ride and ensuring safety, so you can experience the open road with confidence. Learn how to achieve optimal wheel alignment.
1. What Is Wheel Truing and Why Is It Essential for Bikers?
Wheel truing is the process of adjusting spoke tension to correct deviations in a bicycle wheel’s alignment, and it’s crucial because it affects ride quality, braking efficiency, and the lifespan of wheel components. Proper wheel truing ensures a smoother, safer ride, prevents uneven wear, and maximizes the overall performance of your motorcycle. According to research from the Motorcycle Safety Foundation (MSF), maintaining your wheels is as important as any other regular maintenance on your bike.
1.1. What Are the Main Aspects of Wheel Truing?
The main aspects of wheel truing involve four key adjustments to ensure optimal wheel performance and longevity. These adjustments include lateral trueness, radial trueness, dish or centering, and spoke tension, each playing a critical role in maintaining the wheel’s integrity and overall ride quality. These are the cornerstones of a durable and strong wheel.
- Lateral Trueness: This refers to the side-to-side straightness of the wheel. Correcting lateral deviations ensures smooth handling and efficient braking, especially for motorcycles with rim brakes.
- Radial Trueness: This relates to the wheel’s roundness and the absence of up-and-down movements as it spins. Adjusting radial trueness enhances ride comfort and minimizes wear on the tires and suspension.
- Dish/Centering: Proper dish ensures that the wheel is centered within the frame. Accurate centering is essential for balance and stability, contributing to safer handling and improved overall performance.
- Spoke Tension: Maintaining consistent and optimal spoke tension is vital for wheel strength and durability. Balanced tension distributes load evenly, preventing spoke breakage and ensuring the wheel remains true over time.
1.2. What Tools and Setup Are Needed for Effective Wheel Truing?
To effectively true a bike wheel, you need a few essential tools and a proper setup that ensures accuracy and stability. These include a truing stand, spoke wrench, and indicators for tracking deviations, all of which contribute to achieving precise wheel alignment. Having the right equipment makes the process smoother and more effective.
- Truing Stand: A truing stand is crucial for holding the wheel steady while you make adjustments. It allows you to isolate truing issues and work more efficiently.
- Spoke Wrench: A spoke wrench is necessary for adjusting the tension of the spokes. Selecting the correct size and type of spoke wrench ensures you can make precise adjustments without damaging the spoke nipples.
- Indicators: Stationary indicators are needed to track lateral and radial deviations. These can be built-in indicators on a truing stand or DIY solutions like zip ties attached to the bike’s frame.
1.3. How Do Lateral and Radial Trueness Affect a Bike’s Performance?
Lateral and radial trueness significantly impact a bike’s performance by influencing handling, braking, and overall ride comfort. Correcting these aspects ensures a smoother and safer riding experience. According to the American Motorcyclist Association (AMA), properly trued wheels are essential for optimal motorcycle performance.
- Lateral Trueness: Correcting side-to-side wobbles improves handling and stability, particularly at high speeds. It also ensures consistent braking performance, especially for bikes with rim brakes.
- Radial Trueness: Ensuring the wheel is round minimizes up-and-down movements, providing a smoother and more comfortable ride. This also reduces wear and tear on the tires and suspension components.
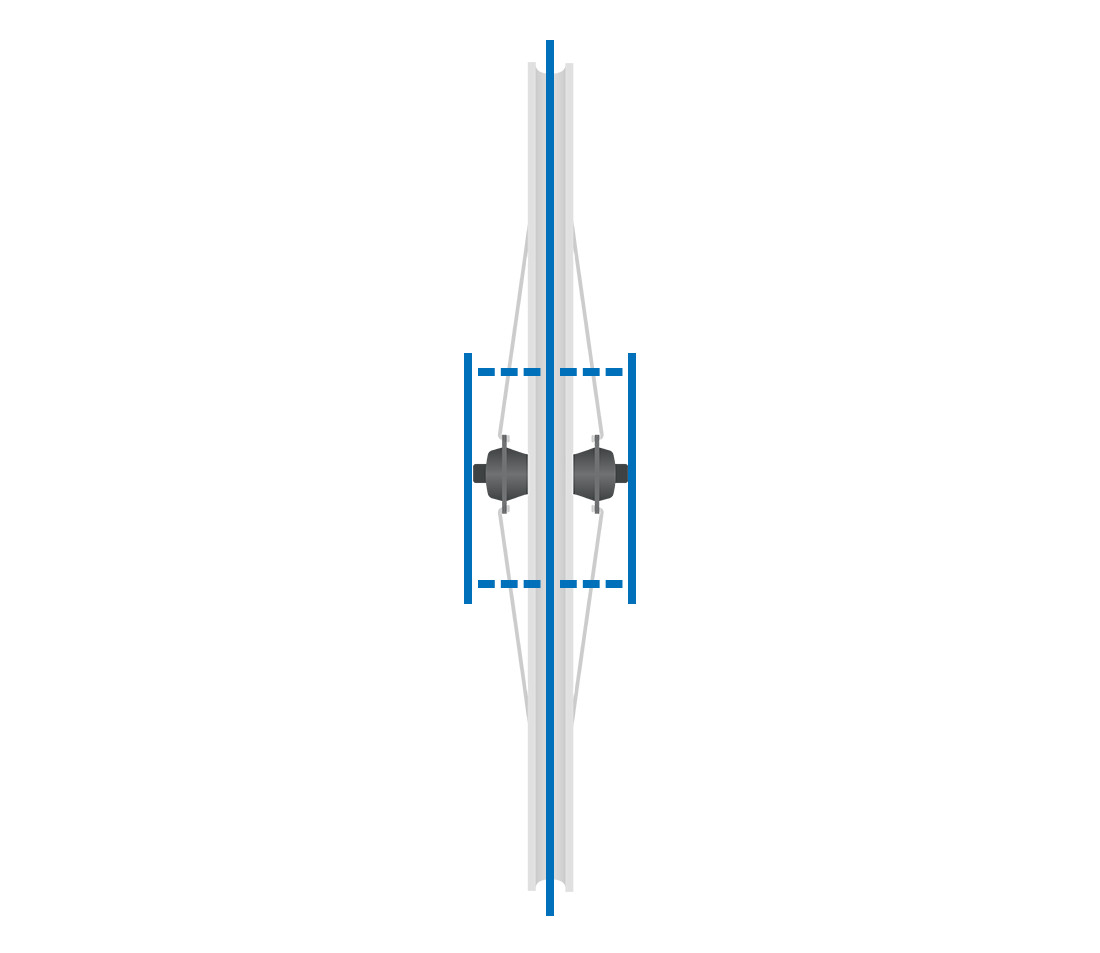
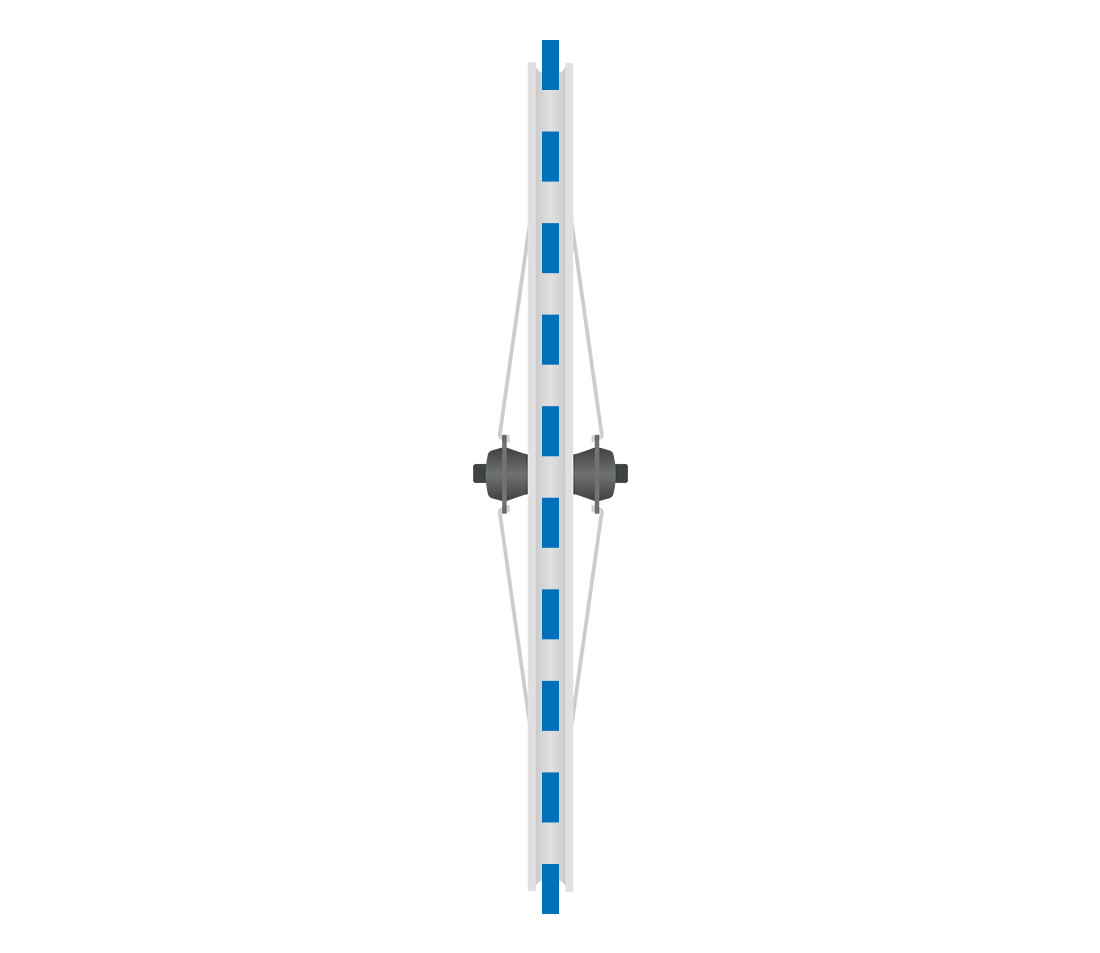 Head-on view of bicycle wheel, with vertical axis aligned with rim showing where lateral deviation is measured
Lateral trueness (side-to-side straightness)
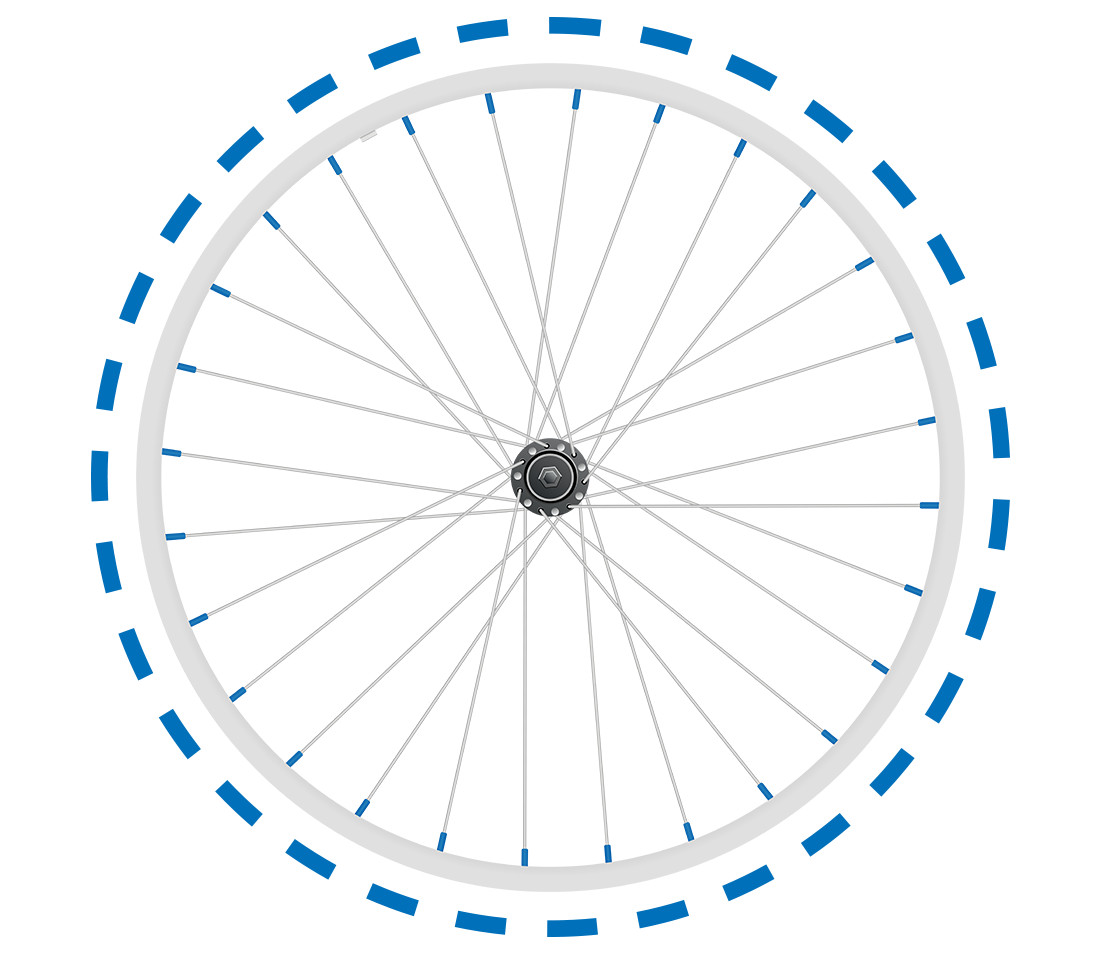 Side view of bicycle wheel with circular axis along its circumference showing how radial deviance is measured
Radial trueness (up-and-down straightness/roundness)
2. Step-by-Step Guide to Lateral Truing
Lateral truing involves a systematic process of locating, isolating, and correcting deviations to ensure the wheel spins straight from side to side. This process is essential for maintaining optimal handling and braking performance. By following these steps, you can achieve a laterally true wheel.
2.1. How to Locate Lateral Deviations on a Bike Wheel?
To locate lateral deviations, mount the wheel in a truing stand or the bike’s frame and use an indicator to identify areas where the rim wobbles from side to side. This process involves careful observation and precise adjustments to the indicator. Locating these deviations accurately is the first step in correcting them.
- Mount the Wheel: Secure the wheel in a truing stand or the bike’s frame, ensuring it can spin freely.
- Adjust the Indicator: Position the indicator near the outer edge of the rim, but not touching it.
- Spin the Wheel: Slowly spin the wheel and watch for areas where the rim gets close to the indicator.
- Fine-Tune the Indicator: Gradually move the indicator closer to the rim until it lightly contacts the spinning rim.
- Identify Deviations: The point where the rim touches the indicator is the most severe lateral deviation on that side.
2.2. How Do You Isolate the Spokes Responsible for Lateral Wobbles?
Isolating the spokes responsible for lateral wobbles involves identifying which spokes need adjustment to pull the rim back into alignment. Typically, you’ll focus on the spokes originating from the opposite side of the deviation. This ensures that tightening those spokes will draw the rim away from the indicator.
- Find the Center of Deviation: If the indicator touches over a long area, find the spoke nearest the center of the deviation.
- Identify Spokes to Tighten: Choose a spoke originating from the flange on the opposite side of the indicator. This ensures that tightening the spoke will pull the rim away from the indicator.
- Visualize the Correction: Squeeze the selected spoke and its neighbors to see how the rim moves. This gives you an idea of how the rim will respond when you adjust the spoke tension.
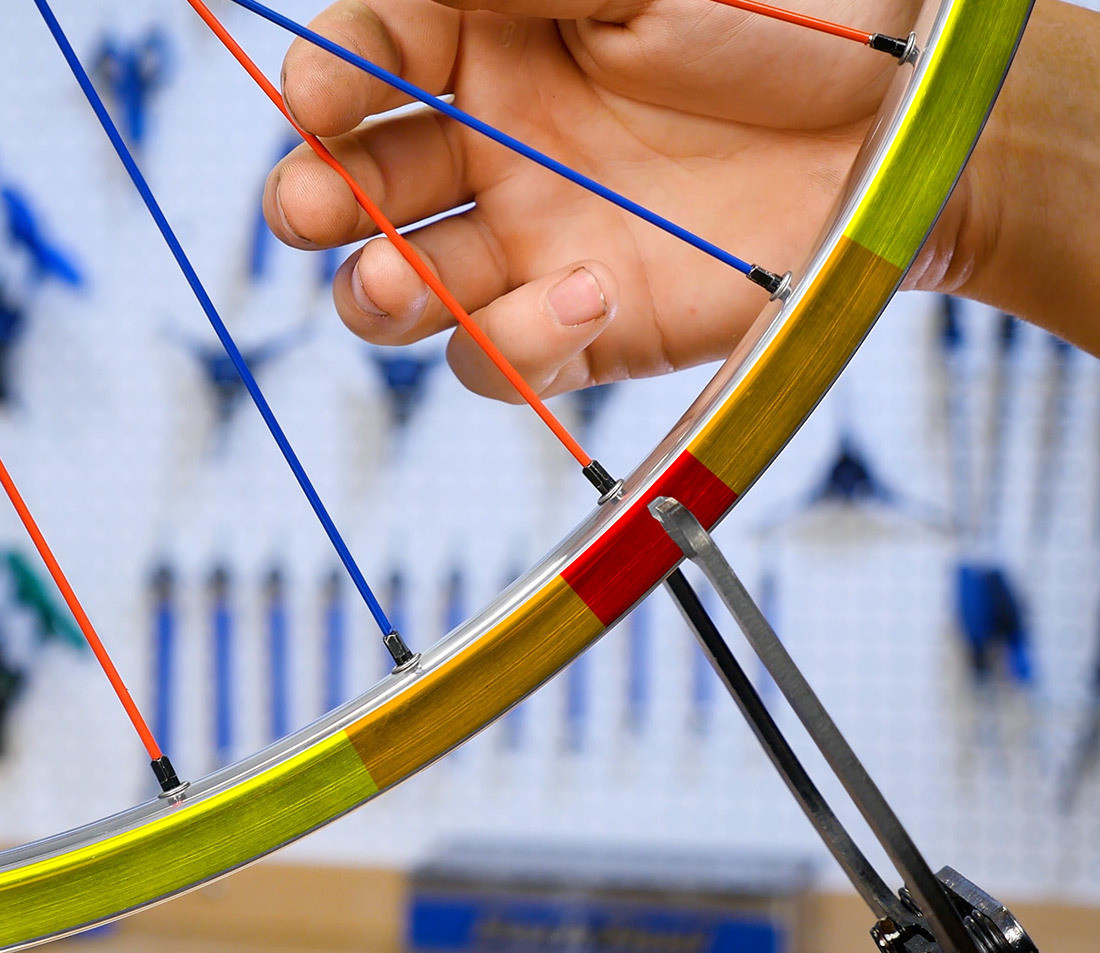 Bicycle wheel in truing stand with red, orange, and yellow highlights radiating from a spoke
In this example, the section of rim highlighted in red is at the center of our deviation. The spoke at this position originates from the opposite side of the indicator. We need to tighten the spoke nipple from the right flange spoke to draw this part of the rim to the right, away from the indicator.
2.3. What Is the Best Technique for Correcting Lateral Deviations?
The best technique for correcting lateral deviations involves making small, incremental adjustments to the spoke nipples, alternating between sides to maintain wheel centering. Consistent adjustments are key to achieving a straight and balanced wheel. The goal is to gradually pull the rim into alignment without creating new deviations.
- Tighten the Nipple: Use a spoke wrench to tighten the nipple of the selected spoke by about 1/4 turn (90 degrees). For larger deviations, you might need up to 1/2 turn (180 degrees). For minor deviations, start with 1/8 turn (45 degrees).
- Check Progress: Spin the wheel and move it back and forth through the adjusted area to see if the adjustment made any progress.
- Find the Next Deviation: Move the indicator closer in small increments until you find the next-largest deviation on the same side.
- Repeat the Process: Repeat the process of finding the spoke to adjust and making a correction.
- Alternate Sides: After making three corrections on one side, switch to the opposite indicator and repeat the process.
3. Mastering Radial Truing: Achieving a Perfectly Round Wheel
Radial truing is essential for achieving a perfectly round wheel by correcting high and low spots. This enhances ride comfort and reduces wear on tires and suspension components. Mastering this technique requires careful attention to detail and consistent adjustments.
3.1. What Are High and Low Spots, and How Do They Affect Ride Quality?
High and low spots are radial deviations where sections of the rim move away from or toward the hub, respectively, and they significantly affect ride quality. High spots cause bumps and vibrations, while low spots create a sinking sensation. Correcting these issues results in a smoother, more comfortable ride.
- High Spots: These occur when a section of the rim moves away from the hub. They create a noticeable bump or vibration as the wheel rotates.
- Low Spots: These occur when a section of the rim moves inward toward the hub. They can cause a sinking or jarring sensation during the ride.
- Impact on Ride Quality: Both high and low spots can make the ride uncomfortable and less efficient, leading to increased fatigue and potential damage to the bike’s components.
3.2. How Can You Locate Radial Deviations on a Bike Wheel?
Locating radial deviations involves using an indicator to identify high and low spots as the wheel spins. This process requires careful observation and precise adjustments to ensure accurate detection. Identifying these deviations is the first step in achieving a perfectly round wheel.
- Set Up the Indicator: Position the indicator below the outer edge of the rim, but not touching it.
- Spin the Wheel: Slowly spin the wheel and observe the gap between the indicator and the rim.
- Identify High Spots: Move the indicator upward until it lightly contacts the spinning rim. The point of contact is a high spot.
- Identify Low Spots: Look for areas where the gap between the rim and the indicator is the largest. These are low spots.
 Truing stand making contact with bottom of bicycle rim
3.3. What Are the Techniques for Correcting High and Low Spots?
Correcting high and low spots involves adjusting spoke tension to move the rim closer to or further from the hub, respectively. For high spots, tighten spokes evenly in pairs; for low spots, loosen them. Balancing these adjustments is essential for maintaining radial trueness.
- Correcting High Spots:
- Isolate the High Spot: Slowly move the rim back and forth through the area to determine where the high spot begins and ends.
- Tighten Spokes: Tighten an even number of spokes from both flanges associated with the high spot. Give each spoke about a half-turn.
- Verify Correction: Spin the wheel to ensure that the high spot has been reduced and the rim no longer rubs against the indicator.
- Correcting Low Spots:
- Isolate the Low Spot: Locate the area where the gap between the rim and the indicator is the largest.
- Loosen Spokes: Loosen the sets of spokes associated with the low spot instead of tightening them.
- Verify Correction: Move the rim back and forth through the low area to see if the radial deviation has gotten smaller.
4. Achieving Optimal Spoke Tension for a Durable Wheel
Achieving optimal spoke tension is crucial for a durable wheel, ensuring it can withstand the stresses of riding and remain true over time. Proper spoke tension balances wheel strength and longevity. A good rule is 3 broken spokes = 1 new wheel.
4.1. Why Is Consistent Spoke Tension Important for Wheel Durability?
Consistent spoke tension is vital because it evenly distributes the load across all spokes, preventing stress concentrations and reducing the risk of spoke breakage. This ensures the wheel remains strong and true, enhancing its durability and performance. Wheels with extremely varied spoke tension will not stay true, or straight, for very long.
- Even Load Distribution: When spoke tension is consistent, the load is distributed evenly across all spokes, preventing any single spoke from bearing too much stress.
- Reduced Risk of Breakage: Consistent tension reduces the likelihood of spoke breakage, as no single spoke is overloaded.
- Enhanced Wheel Strength: Balanced spoke tension contributes to overall wheel strength, allowing it to withstand impacts and other stresses without deforming.
4.2. How Do You Measure Spoke Tension Accurately?
Spoke tension is best measured using a spoke tension meter, also known as a tensiometer, which provides precise readings of spoke tension. Accurate measurements ensure you can make informed adjustments for optimal wheel performance. Spoke tension is best measured using a spoke tension meter (tensiometer) such as the Park Tool TM-1.
- Use a Spoke Tension Meter: A spoke tension meter provides a numerical reading of the spoke tension.
- Calibrate the Meter: Ensure the meter is properly calibrated according to the manufacturer’s instructions.
- Measure Each Spoke: Measure the tension of each spoke on both sides of the wheel, noting any significant variations.
- Compare Readings: Compare the readings to the recommended tension range for your specific wheel and spoke type.
4.3. What Steps Should You Take to Adjust Spoke Tension Effectively?
Adjusting spoke tension effectively involves making small, controlled adjustments to the spoke nipples based on tension meter readings. This ensures that the tension is balanced and within the recommended range. According to research from the American Motorcyclist Association (AMA), maintaining proper spoke tension is essential for wheel durability and performance.
- Identify Spokes Needing Adjustment: Based on the tension meter readings, identify spokes that need to be tightened or loosened.
- Make Small Adjustments: Use a spoke wrench to make small, controlled adjustments to the nipples. Typically, 1/4 turn (90 degrees) is a good starting point.
- Re-Measure Tension: After each adjustment, re-measure the spoke tension to ensure you are moving in the right direction and that the tension is becoming more balanced.
- Alternate Sides: Alternate between sides of the wheel to maintain centering and even tension distribution.
 Head-on view of bicycle wheel with distances marked from hub contact points to rim center
Dish (Centering)
 Side view of bicycle wheel with spokes highlighted to indicate tension
Tension (overal tightness)
5. Fine-Tuning and Final Checks for a Perfectly Trued Wheel
Fine-tuning and final checks are essential for ensuring a perfectly trued wheel, involving detailed inspections and adjustments to achieve optimal alignment and tension. This ensures that your wheel performs at its best and provides a smooth, safe ride.
5.1. How Do You Check for Overall Wheel Dish and Centering?
Checking for overall wheel dish and centering involves measuring the distance from the rim to the frame on both sides of the wheel to ensure it is equidistant. This guarantees the wheel is properly centered within the frame. Proper wheel dish ensures that the wheel is centered in the frame, which is essential for balance and handling.
- Use a Dish Tool: A dish tool is designed to accurately measure the distance from the rim to the hub on both sides of the wheel.
- Measure Both Sides: Place the dish tool on the rim and measure the distance to the hub on one side, then flip the wheel and measure the other side.
- Compare Measurements: The measurements should be equal. If they are not, adjust the spoke tension on both sides of the wheel until the dish is correct.
5.2. What Is the Best Way to De-Stress a Wheel After Truing?
The best way to de-stress a wheel after truing is to apply pressure to the rim and spokes to relieve any residual tension. This can be done by hand or by briefly riding the bike, allowing the components to settle. After have adjusted quite a few spoke nipples, it is common that the wheel might need “de-stressing”. Destressing a wheel allows spokes that were wound up from turning the nipple to unwind.
- Manual De-Stressing:
- Hold the wheel and apply pressure to the rim with your hands, pushing and pulling to flex it slightly.
- Squeeze pairs of spokes together to help relieve tension.
- Ride the Bike: Install the wheel on the bike and take it for a short ride, paying attention to any unusual sounds or vibrations. This allows the wheel to settle under normal riding conditions.
5.3. When Is It Time to Conclude the Truing Process?
It’s time to conclude the truing process when the wheel meets the desired level of trueness, spoke tension is balanced, and the wheel is properly de-stressed. This ensures optimal performance and durability. 1 millimeter or less of radial deviation is an acceptable measurement. 1mm is about 10 sheets of typical printing paper. Use this as a feeler gauge to help you visualize what 1mm looks like.
- Lateral Trueness: Aim for 0.5 millimeters or less of lateral deviation.
- Radial Trueness: Aim for 1 millimeter or less of radial deviation.
- Spoke Tension: Ensure spoke tension is consistent and within the recommended range.
- Wheel Dish: Verify that the wheel is properly dished and centered in the frame.
- De-Stressing: Make sure the wheel has been de-stressed to relieve any residual tension.
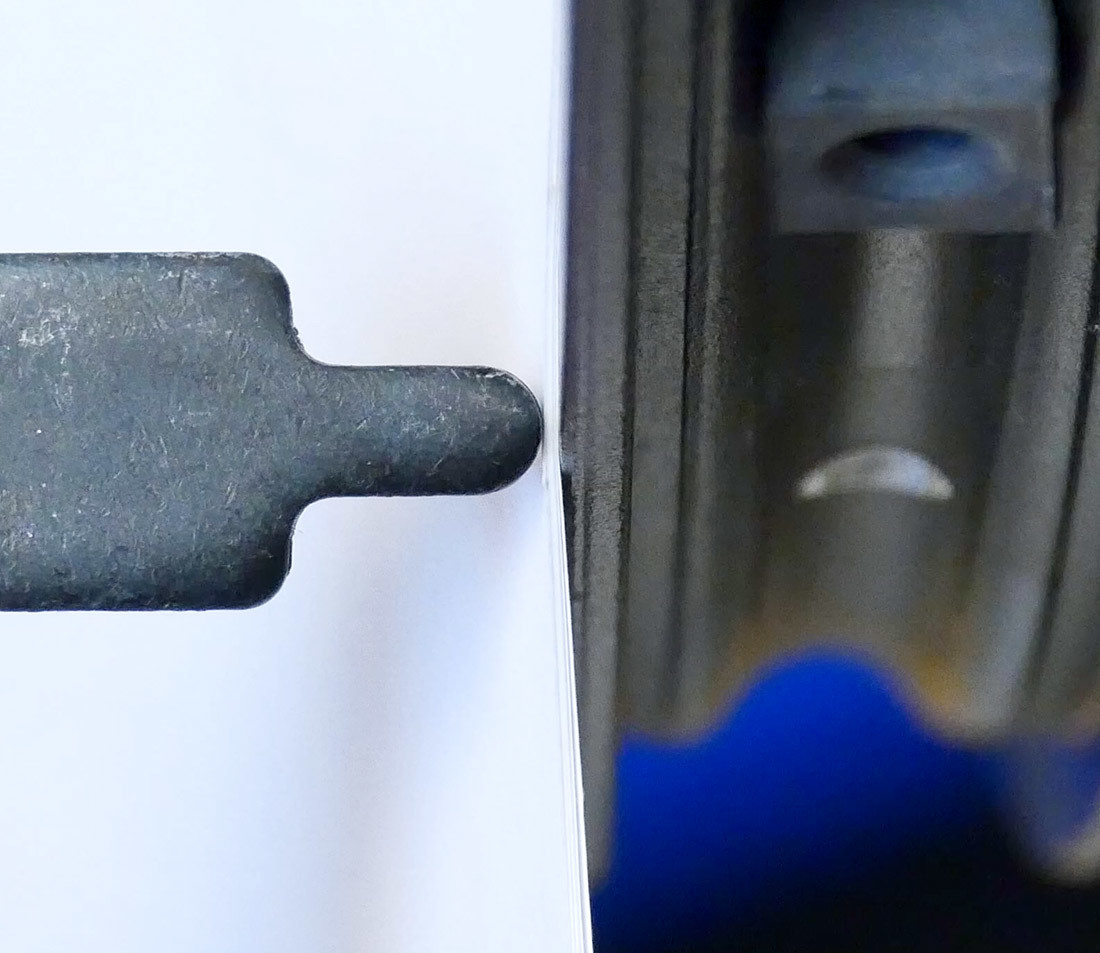 Stack of paper between truing stand indicator and wheel being trued
If 5 pieces of paper can fit in the gap between indicator and rim at the point of the largest deviation, the wheel needs more work
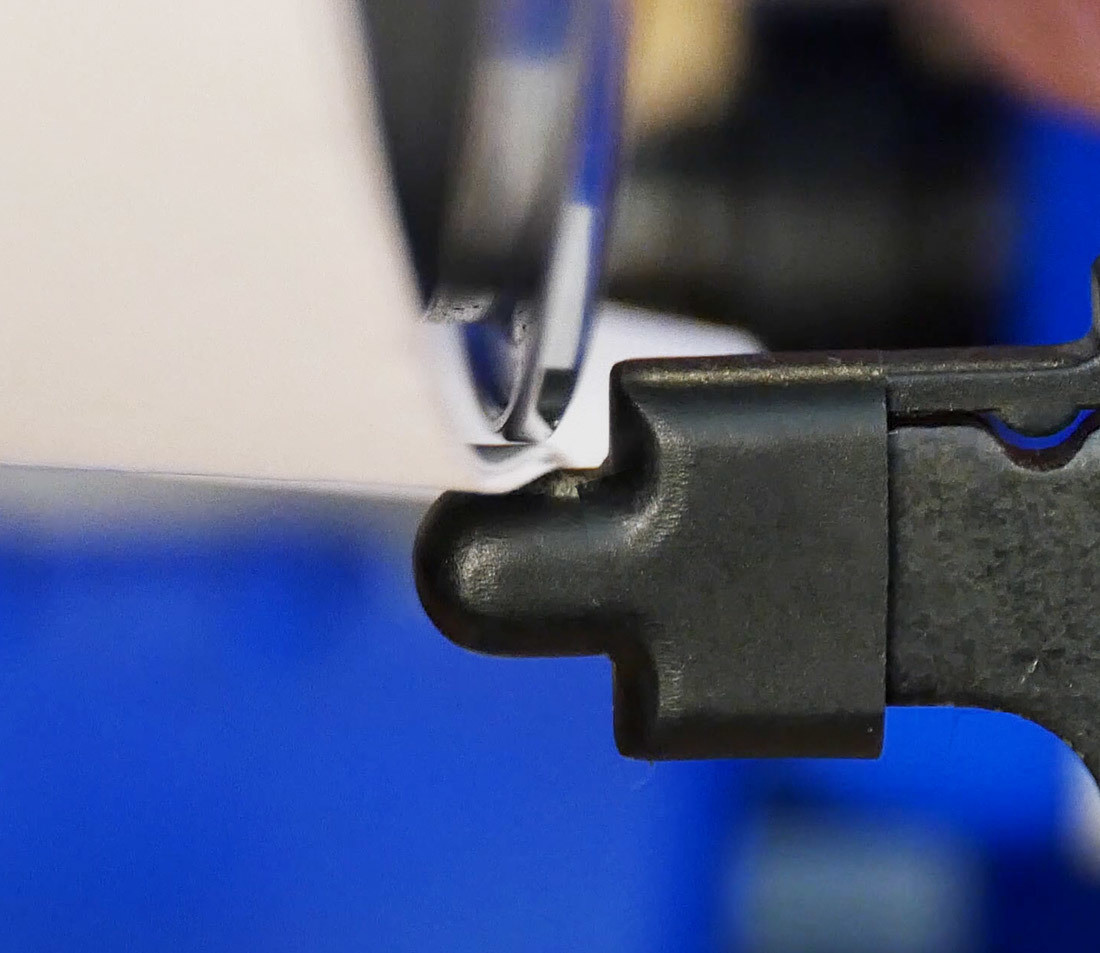 Bottom edge of rim and truing stand indicator underneath with 10 pieces of paper in between
If 10 pieces of paper can fit in the gap between indicator and rim at the point of the largest deviation, the wheel needs more work
6. Common Pitfalls and How to Avoid Them
Avoiding common pitfalls in wheel truing is essential for achieving optimal results and preventing damage to your wheels. Being aware of these issues and how to address them can save time and ensure a successful truing process.
6.1. What Are the Signs of Rim Damage That Prevent Effective Truing?
Signs of rim damage that prevent effective truing include bends, cracks, or dents in the rim, which can compromise its structural integrity and make it impossible to achieve proper alignment. Impacts to the side of the rim from falling down or crashing can also cause damage. In these cases, the rim may need replacement rather than truing.
- Visible Bends or Dents: Obvious deformations in the rim’s shape.
- Cracks: Any cracks in the rim, especially around the spoke holes.
- Inconsistent Spoke Tension: Difficulty achieving consistent spoke tension due to rim irregularities.
6.2. How Can Corroded Nipples Affect the Truing Process?
Corroded nipples can seize and become difficult to turn, preventing accurate spoke tension adjustments and hindering the truing process. The lubrication of nipple threads should be done routinely because corrosion and rust in these threads will make the wheel un-true-able. Regular lubrication can help prevent this issue.
- Difficulty Turning Nipples: Nipples that are hard to turn or feel stuck.
- Creaking Sounds: Noises coming from the nipples as you try to adjust them.
- Risk of Stripping: Increased risk of stripping the nipple threads due to excessive force.
6.3. What Should You Do If You Encounter a Bent or Mangled Spoke?
If you encounter a bent or mangled spoke, it should be replaced immediately to maintain wheel integrity and prevent further damage. Ignoring a damaged spoke can lead to wheel failure. Typically, this is just a cosmetic flaw. When spokes are manufactured, they begin as stainless steel wire on huge spools. A piece of wire is cut, and a head is stamped on one end. The other end is rolled in a die to form threads. The end with the head is then bent 90 degrees.
- Assess the Damage: Determine the extent of the damage to the spoke.
- Replace the Spoke: Replace the bent or mangled spoke with a new one of the same length and type.
- Re-True the Wheel: After replacing the spoke, re-true the wheel to ensure proper alignment and tension.
7. Advanced Techniques for Expert Wheel Maintenance
Mastering advanced techniques for expert wheel maintenance elevates your ability to maintain and optimize your bike’s wheels for peak performance and longevity.
7.1. Understanding Spoke Patterns and Their Impact on Wheel Strength
Different spoke patterns, such as radial, tangential, and crow’s foot, affect wheel strength and ride quality by influencing how loads are distributed across the wheel. Understanding these patterns helps in selecting the right wheel build for specific riding conditions.
- Radial Patterns: Spokes radiate directly from the hub to the rim, providing a stiff but less compliant ride.
- Tangential Patterns: Spokes cross each other from the hub to the rim, offering a more compliant ride and better load distribution.
- Crow’s Foot Patterns: Combine radial and tangential spokes for a balance of stiffness and compliance.
7.2. How to Use a Spoke Tension Meter for Precision Adjustments
Using a spoke tension meter for precision adjustments involves taking accurate tension measurements and making small, controlled adjustments to achieve balanced spoke tension. This ensures optimal wheel strength and durability. Spoke tension is best measured using a spoke tension meter (tensiometer) such as the Park Tool TM-1.
- Calibrate the Meter: Ensure the meter is properly calibrated.
- Measure Spoke Tension: Measure the tension of each spoke, recording the readings.
- Calculate Average Tension: Calculate the average tension for each side of the wheel.
- Adjust Spokes: Adjust individual spokes to bring their tension closer to the average, ensuring balanced tension across the wheel.
7.3. Tips for Maintaining Wheel Bearings and Hubs
Maintaining wheel bearings and hubs involves regular cleaning, lubrication, and inspection to ensure smooth rotation and prevent wear. Proper maintenance extends the lifespan of these components and enhances overall wheel performance.
- Regular Cleaning: Clean the hubs and bearings regularly to remove dirt and grime.
- Proper Lubrication: Lubricate the bearings with high-quality grease to reduce friction and prevent corrosion.
- Inspect for Wear: Check the bearings for signs of wear, such as roughness or play, and replace them as needed.
- Adjust Bearing Preload: Adjust the bearing preload to ensure smooth rotation without excessive play.
8. Integrating Wheel Truing into Your Regular Bike Maintenance Routine
Integrating wheel truing into your regular bike maintenance routine ensures that your wheels remain in optimal condition, enhancing performance, safety, and longevity. This proactive approach helps prevent major issues and keeps your bike running smoothly.
8.1. How Often Should You True Your Bike Wheels?
You should true your bike wheels at least every 6 months or after any significant impact or rough riding conditions. Regular checks and adjustments can prevent minor issues from becoming major problems. Wheels that are used regularly may need to be trued more often than those that are not.
- Every 6 Months: Perform a thorough wheel truing as part of your regular maintenance routine.
- After Impacts: Check and true the wheels after hitting potholes, rocks, or other obstacles.
- Rough Riding Conditions: Inspect and true the wheels after riding on rough or challenging terrain.
- Pre-Season Check: Ensure your wheels are trued before the start of each riding season.
8.2. What Are the Benefits of Regular Wheel Maintenance?
The benefits of regular wheel maintenance include improved handling, increased efficiency, extended component life, and enhanced safety. Consistent maintenance ensures that your wheels perform optimally and provide a smooth, reliable ride.
- Improved Handling: Properly trued wheels provide better stability and control.
- Increased Efficiency: Well-maintained wheels roll more smoothly, reducing rolling resistance and improving efficiency.
- Extended Component Life: Regular maintenance prevents premature wear and extends the lifespan of tires, spokes, and bearings.
- Enhanced Safety: Properly maintained wheels reduce the risk of wheel failure and improve overall safety.
8.3. How to Spot Potential Issues Early and Prevent Costly Repairs
Spotting potential issues early involves regularly inspecting your wheels for signs of damage or wear, such as loose spokes, rim damage, or bearing play. Addressing these issues promptly can prevent costly repairs and ensure your wheels remain in good condition.
- Check Spoke Tension: Regularly check spoke tension and adjust as needed.
- Inspect the Rim: Look for signs of damage, such as bends, cracks, or dents.
- Test Bearing Play: Check for play or roughness in the wheel bearings.
- Listen for Noises: Pay attention to any unusual sounds coming from the wheels while riding.
9. Advanced Tools and Technologies for Wheel Truing
Exploring advanced tools and technologies for wheel truing can significantly enhance the precision, efficiency, and overall quality of wheel maintenance. These innovations offer benefits ranging from improved accuracy to streamlined processes.
9.1. Review of Modern Truing Stands and Their Features
Modern truing stands come equipped with features such as digital indicators, adjustable calipers, and enhanced stability, providing more accurate and efficient wheel truing. These stands streamline the truing process and allow for more precise adjustments.
- Digital Indicators: Provide precise measurements of lateral and radial deviations.
- Adjustable Calipers: Allow for easy adjustment and positioning of the calipers.
- Enhanced Stability: Offer a stable platform for accurate wheel truing.
- Compatibility: Designed to accommodate a wide range of wheel sizes and types.
9.2. How to Use Digital Indicators for Ultra-Precise Adjustments
Digital indicators provide ultra-precise measurements of lateral and radial deviations, allowing for fine-tuned adjustments and ensuring wheels are trued to the highest standards. These tools enhance the accuracy and efficiency of the truing process.
- Mount the Indicator: Secure the digital indicator to the truing stand.
- Zero the Indicator: Zero the indicator against the rim.
- Measure Deviations: Measure lateral and radial deviations as the wheel spins.
- Adjust Spokes: Adjust spoke tension based on the digital readings, making small, precise adjustments.
9.3. Exploring Wheel Balancing Machines and Their Benefits
Wheel balancing machines ensure even weight distribution around the wheel, reducing vibrations and improving ride quality, particularly at high speeds. These machines are a valuable addition to any advanced wheel maintenance setup.
- Mount the Wheel: Secure the wheel to the balancing machine.
- Spin the Wheel: Spin the wheel and allow it to come to a stop.
- Identify Heavy Spots: The machine will indicate where the heavy spots are on the wheel.
- Add Weights: Add weights to the opposite side of the heavy spots to balance the wheel.
10. Case Studies: Real-World Wheel Truing Success Stories
Examining real-world wheel truing success stories highlights the tangible benefits of proper wheel maintenance and demonstrates how addressing wheel issues can transform the riding experience.
10.1. Restoring a Vintage Motorcycle Wheel to Its Former Glory
A case study detailing the restoration of a vintage motorcycle wheel, showcasing how meticulous truing and spoke replacement can revive a classic wheel. By restoring a vintage motorcycle wheel to its former glory, it highlights the benefits of meticulous truing and spoke replacement can revive a classic wheel.
- The Challenge: A vintage motorcycle wheel with corroded nipples, bent spokes, and a severely out-of-true rim.
- The Solution:
- Carefully removed each spoke and cleaned the hub and rim.
- Replaced the corroded nipples and bent spokes with new components.
- Meticulously trued the wheel using a truing stand and spoke tension meter.
- The Result: A restored wheel that looked and performed like new, enhancing the bike’s overall appearance and ride quality.
10.2. Improving the Performance of a Modern Sportbike with Precision Truing
A case study demonstrating how precision truing can enhance the performance of a modern sportbike, improving handling and stability at high speeds. Precision truing can enhance the performance of a modern sportbike, improving handling and stability at high speeds.
- The Challenge: A modern sportbike with wheels that were slightly out of true, causing vibrations at high speeds.
- The Solution:
- Used a truing stand with digital indicators to measure lateral and radial deviations.
- Made precise adjustments to spoke tension using a spoke tension meter.
- Balanced the wheels using a wheel balancing machine.
- The Result: Improved handling and stability at high speeds, reducing vibrations and enhancing the overall riding experience.
10.3. Enhancing the Durability of an Off-Road Bike for Rugged Terrain
A case study focusing on enhancing the durability of an off-road bike by optimizing spoke tension and truing for rugged terrain, preventing wheel damage and ensuring reliable performance. Wheel damage can be prevented and reliable performance can be ensured by optimizing spoke tension and truing for rugged terrain.
- The Challenge: An off-road bike with wheels that were prone to damage and spoke breakage due to rough terrain.
- The Solution:
- Inspected the wheels for signs of damage and wear.
- Optimized spoke tension using a spoke tension meter, ensuring even load distribution.
- Trued the wheels to minimize lateral and radial deviations.
- The Result: Enhanced wheel durability, reducing the risk of damage and spoke breakage, and ensuring reliable performance on rugged terrain.
Ready to take your bike maintenance skills to the next level? Visit usabikers.net to explore more articles, participate in our forums, and find the information you need to keep your motorcycle running smoothly. Join our community of passionate bikers today and share your experiences!
Address: 801 Sturgis Main St, Sturgis, SD 57785, United States.
Phone: +1 (605) 347-2000
Website: usabikers.net
FAQ: How To True Bike Wheel
1. What is wheel truing?
Wheel truing is the process of adjusting spoke tension to correct deviations in a bicycle wheel’s alignment, ensuring it spins straight and true.
2. Why is wheel truing important?
Wheel truing improves ride quality, braking efficiency, and the lifespan of wheel components, ensuring a smoother and safer riding experience.
3. What tools are needed for wheel truing?
You need a truing stand, spoke wrench, and indicators to track lateral and radial deviations.
4. How do I locate lateral deviations?
Mount the wheel in a truing stand or bike frame, use an indicator to find areas where the rim wobbles from side to side.
5. How do I isolate the spokes responsible for lateral wobbles?
Identify the spoke originating from the opposite side of the deviation; tightening this spoke will pull the rim back into alignment.
6. What is the technique for correcting lateral deviations?
Make small, incremental adjustments to the spoke nipples, alternating between sides to maintain wheel centering.
7. What are high and low spots in radial truing?
High spots are sections of the rim that move away from the hub, while low spots move inward toward the hub.
8. How do I correct high and low spots?
For high spots, tighten spokes evenly in pairs; for low spots, loosen them.
9. Why is consistent spoke tension important?
Consistent spoke tension evenly distributes the load across all spokes, preventing stress concentrations and reducing the risk of spoke breakage.
10. How often should I true my bike wheels?
True your bike wheels at least every 6 months or after any significant impact or rough riding conditions.