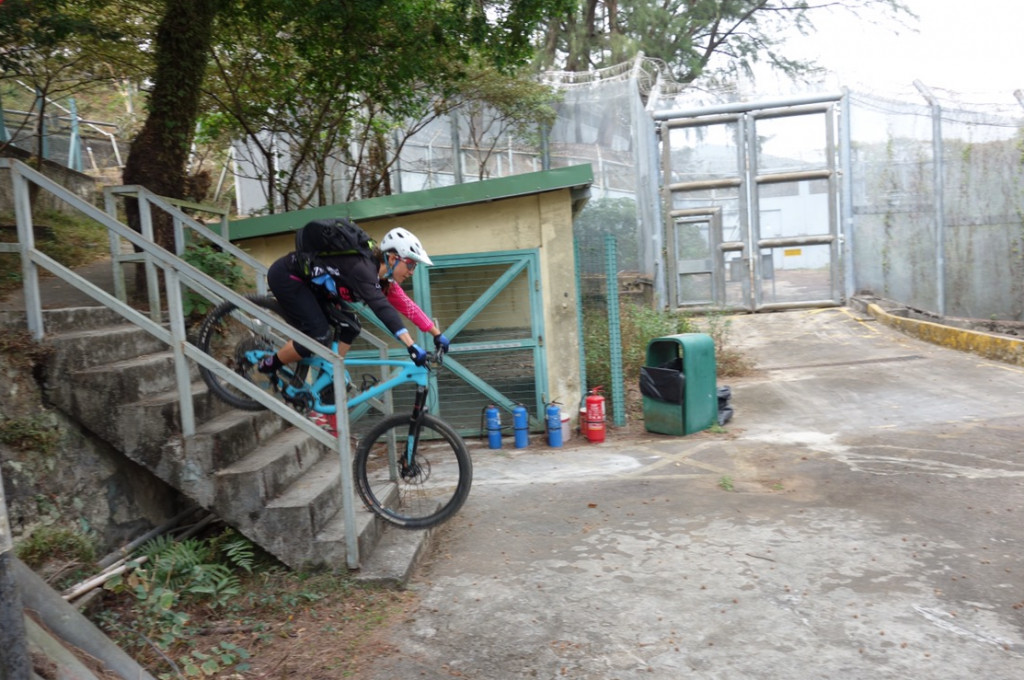
Biking down stairs might seem like an intimidating stunt, but with the right techniques and a bit of practice, it can become a thrilling part of your riding repertoire; usabikers.net is here to guide you. Mastering this skill not only boosts your confidence but also prepares you for tackling various technical terrains, enhancing your overall biking experience. Ready to conquer those steps? This comprehensive guide covers everything from essential techniques to advanced strategies, ensuring you ride those stairs with confidence and flair.
1. What Are The Fundamental Techniques For Biking Down Stairs?
The fundamental techniques involve mastering the ready position, maintaining balance, controlling speed, and absorbing impact; by combining these, you can confidently navigate any set of stairs. Let’s break down each of these key elements to set you up for success:
- The Ready Position: This is the foundation of all successful stair descents.
- Balance and Weight Distribution: Proper balance ensures stability.
- Speed Control: Managing your speed is essential for control.
- Impact Absorption: Absorb the bumps for a smoother ride.
- Look Ahead: Guide your bike with your vision.
1.1. How To Achieve The Ready Position For Descending Stairs On A Bike?
The ready position involves standing on your pedals, bending your knees and elbows, and keeping your weight centered, allowing your body to act as suspension. Here’s how to perfect it:
- Stand on the Pedals: Keep your pedals level and your weight balanced evenly over them. This allows you to use your legs as shock absorbers.
- Bend Your Knees and Elbows: A slight bend in your knees and elbows is crucial. This flex allows you to absorb bumps and maintain balance.
- Centered Weight: Keep your weight centered between the front and rear wheels. Avoid leaning too far forward or backward, as this can destabilize you.
- Relaxed Grip: Maintain a firm but relaxed grip on the handlebars. Avoid a death grip, as it restricts your ability to make quick adjustments.
- Eyes Forward: Look ahead to where you want to go. Your body will naturally follow your gaze, helping you maintain balance and direction.
- Body as Suspension: Think of your body as an extension of the bike’s suspension. Use your arms and legs to absorb the impacts of each stair.
1.2. How To Distribute Weight Evenly For Balance While Biking Down Stairs?
Even weight distribution is crucial for maintaining control and stability; avoid leaning too far back, which reduces front wheel control, or too far forward, which can cause an over-the-bars situation. Here’s how to distribute your weight effectively:
- Centered Stance: Keep your weight centered between the front and rear wheels. This provides optimal balance and control.
- Avoid Leaning Back Excessively: While it’s natural to lean back slightly on a descent, avoid hanging too far off the back of the bike. This reduces your ability to steer and control the front wheel.
- Subtle Adjustments: Make subtle adjustments to your weight distribution as you navigate the stairs. Shift your weight slightly forward or backward as needed to maintain balance.
- Engage Your Core: Keep your core muscles engaged to stabilize your body. This helps maintain balance and control, especially on uneven terrain.
- Feel the Bike: Pay attention to how the bike is moving beneath you. Adjust your weight and position based on the feedback you receive from the bike.
1.3. How To Control Speed When Biking Down Stairs?
Effective speed control involves using your brakes judiciously and choosing a pace that allows you to maintain control without being too slow. Aim for a moderate speed that smooths out the bumps while allowing you to react to any unexpected obstacles. Here’s how to manage your speed:
- Use Brakes Judiciously: Apply your brakes smoothly and evenly. Avoid sudden, jerky braking, which can cause you to lose control.
- Feather Your Brakes: Use a technique called feathering, where you lightly apply and release the brakes repeatedly. This helps maintain control without locking up the wheels.
- Anticipate the Terrain: Look ahead and anticipate the terrain. Adjust your speed accordingly to prepare for upcoming obstacles.
- Moderate Speed: Choose a speed that’s fast enough to smooth out the bumps but slow enough to maintain control. Experiment to find the sweet spot for different sets of stairs.
- Body Position: Use your body position to help control your speed. Lowering your center of gravity can increase stability and control.
1.4. How To Absorb Impact From Each Step?
To absorb the impact, use your arms and legs as natural suspension; bend your joints to soak up the bumps and keep the bike stable. Here’s how to master impact absorption:
- Bent Joints: Keep your knees and elbows bent to act as shock absorbers. This allows you to soak up the impacts of each stair.
- Active Suspension: Use your arms and legs actively to absorb the bumps. Push down with your legs and pull up with your arms to keep the bike stable.
- Relaxed Upper Body: Keep your upper body relaxed to allow your arms to move freely. Avoid tensing up, which can transmit the impacts directly to your body.
- Weight in Feet: Focus your weight in your feet, allowing your legs to do the majority of the work. This keeps your upper body light and responsive.
- Anticipate Impacts: Look ahead and anticipate the impacts of each stair. Prepare your body to absorb the shock.
1.5. How To Look Ahead To Maintain Balance And Direction?
Direct your vision to the end of the stairs and beyond to anticipate the terrain and maintain balance; focus on where you want to go, and your body will naturally follow. Here’s how to use your vision effectively:
- Eyes Up: Keep your eyes up and look ahead to where you want to go. This helps you maintain balance and direction.
- Scan the Terrain: Scan the terrain for obstacles, such as rocks, roots, or other hazards. This allows you to anticipate and react to potential problems.
- Focus Point: Choose a focal point at the end of the stairs and concentrate on that point. This helps you maintain focus and direction.
- Peripheral Vision: Use your peripheral vision to stay aware of your surroundings. This helps you avoid surprises and stay safe.
- Head Position: Keep your head level and your chin up. This helps maintain balance and improves your field of vision.
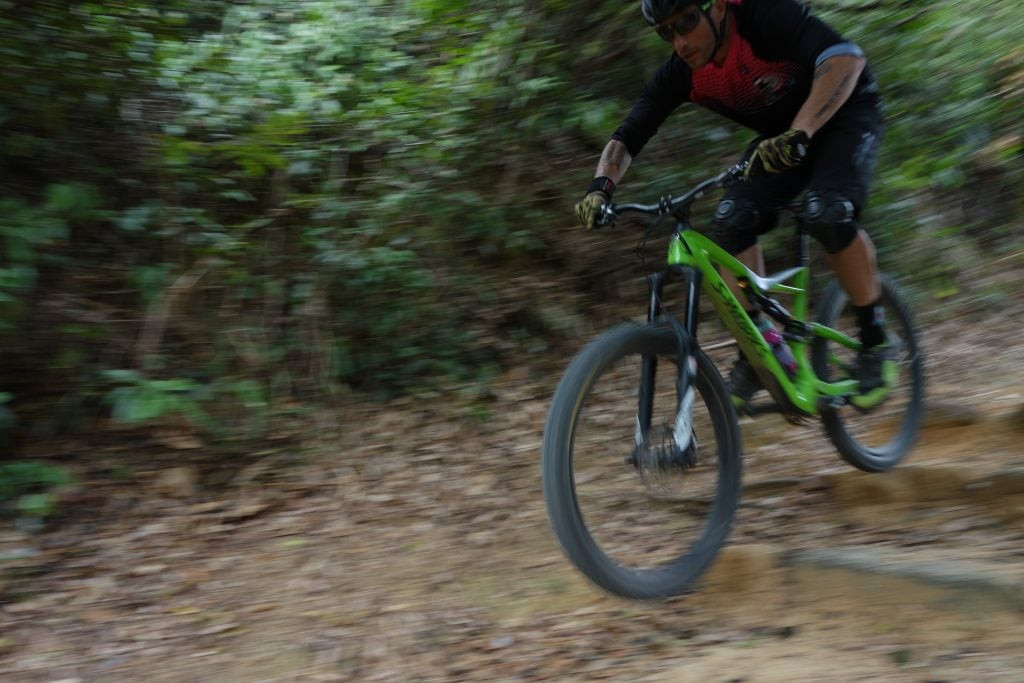
2. What Are The Best Bikes For Riding Down Stairs?
Full suspension mountain bikes with durable frames and reliable disc brakes are ideal for riding down stairs, offering enhanced control, comfort, and safety. Let’s explore the types of bikes, key features, and recommended models.
- Types of Bikes: Understanding the options.
- Key Features: What to look for.
- Recommended Models: Top choices for stair riding.
2.1. Which Types Of Bikes Are Suitable For Riding Down Stairs?
Full suspension mountain bikes, dirt jumpers, and even some hardtails with good front suspension can handle stairs, each offering different strengths. Each type of bike offers a unique riding experience.
- Full Suspension Mountain Bikes: These bikes offer the best combination of control, comfort, and performance for riding down stairs.
- Dirt Jumpers: Dirt jumpers are designed for performing tricks and jumps, making them capable of handling stairs.
- Hardtails: Hardtails with good front suspension can also be used for riding down stairs.
2.2. What Key Features Should A Bike Have For Riding Stairs?
Durable frames, reliable disc brakes, and quality suspension are crucial features for a bike intended for stair riding, ensuring safety and performance. These components will greatly enhance your riding experience and safety.
- Durable Frame: A sturdy frame is essential for absorbing the impacts of riding down stairs. Look for frames made from high-quality materials like aluminum or carbon fiber.
- Reliable Disc Brakes: Disc brakes provide excellent stopping power, which is crucial for controlling your speed on stairs.
- Quality Suspension: Suspension helps absorb the bumps and keep your tires in contact with the ground. Look for bikes with adjustable suspension to fine-tune the ride.
- Wide Tires: Wider tires provide better traction and stability. Look for tires with a width of at least 2.3 inches.
- Dropper Post: A dropper post allows you to lower your saddle on the fly, which can improve your control and maneuverability on stairs.
2.3. What Are Some Recommended Bike Models For Riding Down Stairs?
Models like the Trek Slash, Specialized Stumpjumper, and Canyon Spectral are highly recommended for their superior suspension, robust build, and overall performance. These bikes are popular among experienced riders for their quality and reliability.
- Trek Slash: Known for its aggressive geometry and long-travel suspension, the Trek Slash is a top choice for technical terrain.
- Specialized Stumpjumper: The Stumpjumper offers a balanced ride with efficient pedaling and capable suspension, making it great for all-around trail riding.
- Canyon Spectral: The Canyon Spectral is praised for its playful handling and excellent suspension performance, making it a fun and capable bike for riding down stairs.
- Santa Cruz Nomad: The Santa Cruz Nomad is a versatile bike that can handle everything from bike park laps to backcountry adventures.
- YT Jeffsy: The YT Jeffsy is known for its value and performance, offering a great ride at a competitive price.
 Full suspension mountain bike
3. What Safety Gear Is Essential For Biking Down Stairs?
A helmet, gloves, knee pads, and elbow pads are essential for protecting yourself when biking down stairs; proper gear can significantly reduce the risk of injury. Let’s look into why each piece of gear is indispensable.
- Helmets: The most critical piece of safety gear.
- Gloves: Providing grip and protection.
- Knee Pads: Shielding your knees from impact.
- Elbow Pads: Protecting your elbows from scrapes and bruises.
3.1. Why Is A Helmet Crucial When Biking Down Stairs?
A helmet is crucial because it protects your head from serious injuries in case of a fall; always wear a certified helmet that fits properly. Look for helmets that meet safety standards and fit snugly on your head.
- Impact Absorption: Helmets are designed to absorb the impact of a fall, reducing the risk of head injuries.
- Coverage: Choose a helmet that provides adequate coverage for your head, including the back of your head.
- Fit: Make sure your helmet fits properly and is snug on your head. A loose helmet won’t provide adequate protection.
- Certification: Look for helmets that are certified by safety organizations.
- Replacement: Replace your helmet after any significant impact, even if it doesn’t appear damaged.
3.2. How Do Gloves Enhance Safety While Biking?
Gloves enhance safety by providing a better grip on the handlebars and protecting your hands from abrasions and impacts; choose gloves with padding and a secure fit. A good pair of gloves can make a significant difference in your control and comfort.
- Grip: Gloves provide a better grip on the handlebars, which can improve your control and prevent accidents.
- Protection: Gloves protect your hands from abrasions, cuts, and bruises in the event of a fall.
- Padding: Look for gloves with padding in the palms to absorb impacts and reduce hand fatigue.
- Fit: Choose gloves that fit snugly and comfortably. Loose gloves can reduce your grip and control.
- Full Finger vs. Fingerless: Decide whether you prefer full-finger gloves or fingerless gloves based on your riding style and weather conditions.
3.3. Why Are Knee Pads Important For Biking Down Stairs?
Knee pads are important because they protect your knees from impacts and abrasions, which are common in falls; opt for pads that offer good coverage, comfort, and mobility. Proper knee protection can save you from serious injuries.
- Impact Protection: Knee pads are designed to absorb the impact of a fall, protecting your knees from injuries.
- Abrasion Resistance: Knee pads provide a layer of protection against abrasions and cuts, which can occur when sliding on rough surfaces.
- Coverage: Choose knee pads that provide adequate coverage for your knees, including the sides and top of the knee.
- Fit: Make sure your knee pads fit properly and stay in place while riding. Loose knee pads won’t provide adequate protection.
- Types: Consider different types of knee pads, such as soft pads for trail riding or hard-shell pads for more aggressive riding.
3.4. How Do Elbow Pads Add To Overall Safety?
Elbow pads add to overall safety by protecting your elbows from scrapes and impacts, especially when combined with other protective gear; look for pads that offer a snug fit and adequate coverage. Protecting your elbows can prevent painful injuries.
- Impact Protection: Elbow pads are designed to absorb the impact of a fall, protecting your elbows from injuries.
- Abrasion Resistance: Elbow pads provide a layer of protection against abrasions and cuts, which can occur when sliding on rough surfaces.
- Coverage: Choose elbow pads that provide adequate coverage for your elbows, including the sides and back of the elbow.
- Fit: Make sure your elbow pads fit properly and stay in place while riding. Loose elbow pads won’t provide adequate protection.
- Types: Consider different types of elbow pads, such as soft pads for trail riding or hard-shell pads for more aggressive riding.
 Biker wearing safety gear
4. How Should You Prepare Your Bike Before Riding Down Stairs?
Checking brakes, tires, suspension, and loose parts is essential for ensuring your bike is in optimal condition for stair riding; a well-maintained bike is safer and more reliable. Let’s go through each step in detail.
- Brake Check: Ensuring reliable stopping power.
- Tire Inspection: Checking for proper inflation and wear.
- Suspension Adjustment: Optimizing suspension for stair riding.
- Loose Parts: Tightening bolts and ensuring everything is secure.
4.1. How To Check Your Brakes Before Riding?
Check your brakes by ensuring they engage smoothly and provide sufficient stopping power; inspect brake pads for wear and adjust cables if necessary. Properly functioning brakes are crucial for controlling your speed.
- Lever Feel: Squeeze the brake levers and make sure they feel firm and responsive. If the levers feel spongy or pull all the way to the handlebars, your brakes may need to be bled.
- Pad Inspection: Inspect your brake pads for wear. If the pads are worn down to the metal, they need to be replaced.
- Cable Adjustment: If your brakes are cable-actuated, check the cables for fraying or damage. Adjust the cable tension as needed to ensure the brakes engage properly.
- Rotor Condition: Inspect your brake rotors for damage or warping. If the rotors are damaged, they need to be replaced.
- Brake Bleeding: If your brakes are hydraulic, they may need to be bled to remove air bubbles from the system. This is best done by a qualified mechanic.
4.2. What Should You Inspect On Your Tires?
Inspect your tires for proper inflation, wear, and damage before riding; ensure they are inflated to the recommended pressure and have sufficient tread. Well-maintained tires provide better traction and reduce the risk of flats.
- Inflation Pressure: Check the inflation pressure of your tires using a tire gauge. Inflate the tires to the recommended pressure, which is usually printed on the sidewall of the tire.
- Tread Depth: Inspect the tread depth of your tires. If the tread is worn down, the tires need to be replaced.
- Sidewall Condition: Inspect the sidewalls of your tires for cuts, bulges, or other damage. If the sidewalls are damaged, the tires need to be replaced.
- Tire Seating: Make sure your tires are properly seated on the rims. If the tires are not seated properly, they can cause a flat tire.
- Valve Condition: Check the condition of your tire valves. If the valves are damaged, they need to be replaced.
4.3. How To Adjust Your Suspension For Stair Riding?
Adjust your suspension by setting the sag and rebound to match your weight and riding style; proper suspension settings improve control and comfort. A well-tuned suspension can make a significant difference in your ride quality.
- Sag: Set the sag of your suspension by measuring how much the suspension compresses when you sit on the bike. Adjust the air pressure or spring preload to achieve the recommended sag for your weight.
- Rebound: Adjust the rebound damping of your suspension to control how quickly the suspension returns after being compressed. Too much rebound damping can cause the suspension to pack up, while too little rebound damping can cause the suspension to bounce.
- Compression: Adjust the compression damping of your suspension to control how much the suspension compresses when you hit a bump. More compression damping will make the suspension feel firmer, while less compression damping will make the suspension feel softer.
- Fine-Tuning: Experiment with different suspension settings to find what works best for your riding style and terrain.
- Professional Help: If you’re not sure how to adjust your suspension, consult a qualified mechanic.
4.4. Why Is It Important To Check For Loose Parts?
Checking for loose parts is important because loose bolts or components can compromise your bike’s performance and safety; tighten any loose bolts and inspect all critical components. Regular checks can prevent mechanical failures.
- Bolt Inspection: Inspect all of the bolts on your bike to make sure they are tight. Pay special attention to the bolts that hold the handlebars, stem, seatpost, and brakes in place.
- Component Check: Check all of the critical components on your bike, such as the wheels, brakes, and suspension, to make sure they are in good working order.
- Chain Condition: Inspect your chain for wear and damage. If the chain is worn or damaged, it needs to be replaced.
- Cable Condition: Check the condition of your cables. If the cables are frayed or damaged, they need to be replaced.
- Regular Maintenance: Perform regular maintenance on your bike to keep it in good working order.
 Biker checking his bike
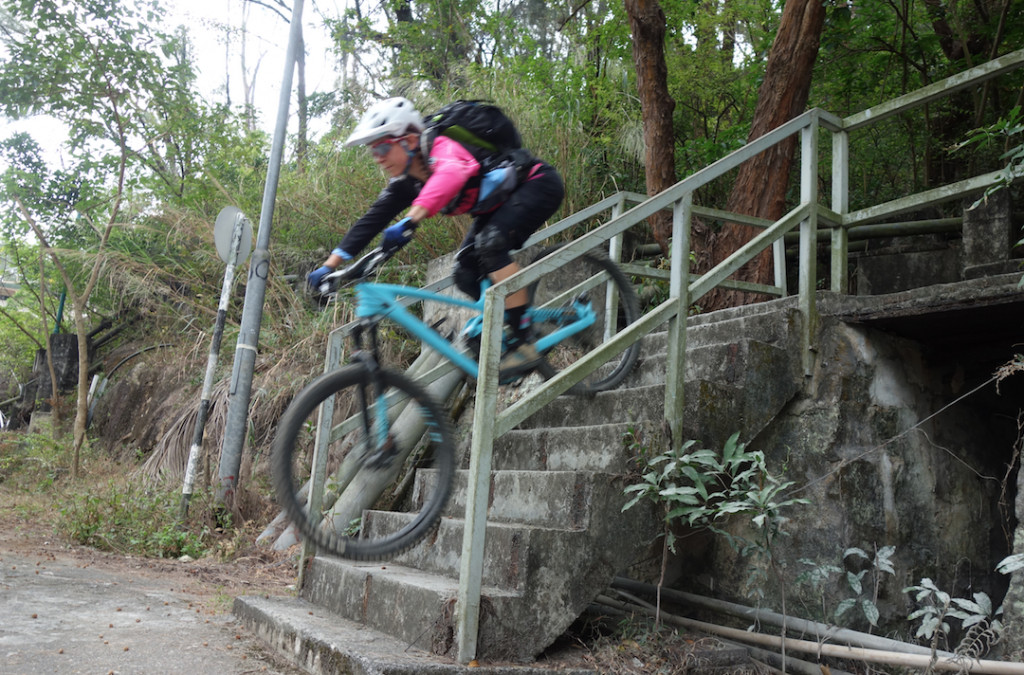
5. What Techniques Help Maintain Control On Steep Stairs?
Maintaining control on steep stairs involves shifting your weight back, using the dropper post, and feathering the brakes to manage speed and stability; these techniques are crucial for navigating challenging descents.
- Weight Shift: Adjusting your weight for balance.
- Dropper Post: Utilizing the dropper post for better maneuverability.
- Brake Feathering: Precise brake control for speed management.
5.1. How To Shift Your Weight Back On Steep Stairs?
Shift your weight back by moving your hips behind the saddle, which lowers your center of gravity and improves stability; this is particularly important on steep descents. Shifting your weight correctly can prevent you from going over the handlebars.
- Hips Behind the Saddle: Move your hips behind the saddle to lower your center of gravity and improve stability.
- Bent Elbows: Keep your elbows bent to allow your arms to absorb the bumps and maintain control.
- Relaxed Grip: Maintain a relaxed grip on the handlebars to avoid tensing up and losing control.
- Eyes Forward: Keep your eyes focused on the end of the stairs to maintain balance and direction.
- Core Engagement: Engage your core muscles to stabilize your body and maintain control.
5.2. How Does A Dropper Post Improve Control On Stairs?
A dropper post improves control by allowing you to lower your saddle, which increases maneuverability and lowers your center of gravity; this is especially helpful on steep, technical sections. Dropping your saddle can make a significant difference in your confidence and control.
- Lower Center of Gravity: Lowering your saddle lowers your center of gravity, which improves stability and control.
- Increased Maneuverability: Lowering your saddle allows you to move the bike around more easily, which is helpful for navigating tight turns and obstacles.
- Confidence Boost: Dropping your saddle can give you a confidence boost, allowing you to tackle more challenging terrain.
- Quick Adjustment: Use the remote lever to quickly adjust the saddle height on the fly, depending on the terrain.
- Proper Height: Experiment with different saddle heights to find what works best for your riding style and terrain.
5.3. How To Use Brake Feathering For Speed Control?
Use brake feathering by gently applying and releasing the brakes in quick succession to control your speed without locking up the wheels; this technique provides smooth and consistent speed management. Effective brake feathering is crucial for maintaining control on steep stairs.
- Gentle Application: Apply the brakes gently and avoid squeezing them too hard.
- Quick Release: Release the brakes quickly to prevent the wheels from locking up.
- Alternating Brakes: Alternate between the front and rear brakes to maintain balance and control.
- Consistent Pressure: Apply consistent pressure to the brake levers to maintain a consistent speed.
- Practice: Practice brake feathering on flat ground to get a feel for the technique before attempting it on stairs.
 Biker using dropper post
6. What Are Drills To Improve Your Stair Riding Skills?
Practicing on small stairs, using cones for obstacle avoidance, and doing balance drills can significantly improve your stair riding skills; consistent practice builds confidence and refines your technique.
- Small Stairs: Starting with smaller stairs to build confidence.
- Cone Drills: Using cones to practice obstacle avoidance.
- Balance Drills: Enhancing balance and stability.
6.1. Why Should You Start With Smaller Stairs?
Starting with smaller stairs builds confidence and allows you to practice basic techniques without the risk of serious injury; gradually increase the size of the stairs as your skills improve. This approach helps you develop a solid foundation.
- Confidence Building: Starting with smaller stairs builds confidence and reduces the fear of falling.
- Technique Practice: Smaller stairs allow you to practice basic techniques, such as the ready position, weight distribution, and brake feathering, without the risk of serious injury.
- Gradual Progression: Gradually increase the size of the stairs as your skills improve.
- Consistency: Practice consistently to improve your skills and build muscle memory.
- Patience: Be patient with yourself and don’t get discouraged if you don’t see results immediately.
6.2. How Do Cone Drills Help Improve Bike Control?
Cone drills help improve bike control by practicing weaving around obstacles, which enhances your steering and balance; set up cones at varying distances and practice navigating them smoothly. This drill improves your ability to react to changing conditions.
- Obstacle Avoidance: Cone drills help you practice avoiding obstacles, which is an important skill for riding down stairs.
- Steering Practice: Cone drills allow you to practice your steering skills, which is essential for maintaining control.
- Balance Enhancement: Cone drills help you improve your balance, which is crucial for staying upright.
- Varying Distances: Set up the cones at varying distances to challenge yourself and improve your skills.
- Smooth Navigation: Focus on navigating the cones smoothly and efficiently.
6.3. What Are Effective Balance Drills For Biking?
Effective balance drills include track stands, slow rolls, and practicing riding in a straight line; these exercises improve your stability and control on the bike. Improved balance translates to better control on any terrain.
- Track Stands: Practice balancing on your bike without moving. This helps you develop your balance and control.
- Slow Rolls: Practice riding slowly in a straight line. This helps you improve your balance and coordination.
- Straight Line Riding: Practice riding in a straight line, focusing on keeping your body centered and your eyes focused on the end of the line.
- One-Footed Riding: Practice riding with one foot on the pedal and the other foot off the pedal. This helps you develop your balance and coordination.
- Core Engagement: Engage your core muscles to stabilize your body and maintain balance.
 Biker practicing with cones
7. What Common Mistakes Should You Avoid When Biking Down Stairs?
Leaning too far back, fixating on the front wheel, and tensing up are common mistakes that can compromise your safety and control; avoiding these errors helps ensure a smoother and safer ride.
- Leaning Back: Avoiding excessive rearward lean.
- Front Wheel Fixation: Looking ahead instead of at the front wheel.
- Tensing Up: Staying relaxed and loose.
7.1. Why Should You Avoid Leaning Too Far Back?
Avoid leaning too far back because it reduces your ability to control the front wheel, which is crucial for steering and maintaining balance; keep your weight centered for optimal control. Centered weight distribution ensures better maneuverability.
- Loss of Control: Leaning too far back reduces your ability to control the front wheel, which is essential for steering and maintaining balance.
- Weight Distribution: Keep your weight centered between the front and rear wheels to maintain optimal control.
- Front Wheel Traction: Ensure that your front wheel has adequate traction by keeping your weight balanced.
- Steering Precision: Maintain precise steering by keeping your weight centered and your eyes focused on the end of the stairs.
- Body Position: Adjust your body position as needed to maintain balance and control.
7.2. Why Should You Not Fixate On The Front Wheel?
Do not fixate on the front wheel because it limits your ability to anticipate the terrain and maintain balance; look ahead to where you want to go. Looking ahead helps you react more effectively to changes in terrain.
- Limited Anticipation: Fixating on the front wheel limits your ability to anticipate the terrain and react to changes.
- Balance Disruption: Looking down can disrupt your balance and make it harder to maintain control.
- Eyes Up: Keep your eyes up and look ahead to where you want to go.
- Terrain Scanning: Scan the terrain for obstacles and adjust your riding accordingly.
- Focal Point: Choose a focal point at the end of the stairs and concentrate on that point.
7.3. How Does Tensing Up Affect Your Riding?
Tensing up restricts your movement and reduces your ability to absorb impacts, making the ride bumpier and less controlled; stay relaxed and let your body act as suspension. A relaxed body absorbs impacts more effectively.
- Restricted Movement: Tensing up restricts your movement and makes it harder to react to changes in terrain.
- Impact Absorption: A tense body is less able to absorb impacts, which can lead to discomfort and fatigue.
- Relaxation Techniques: Practice relaxation techniques, such as deep breathing, to stay relaxed while riding.
- Loose Grip: Maintain a loose grip on the handlebars to avoid tensing up your arms and shoulders.
- Smooth Movement: Focus on moving smoothly and fluidly over the terrain.
Biker using dropper post
8. What Are The Benefits Of Joining A Biker Community?
Joining a biker community offers opportunities for learning, sharing experiences, and finding support, which enhances your skills and enjoyment of the sport; connecting with other riders provides valuable insights.
- Learning Opportunities: Gaining knowledge from experienced riders.
- Experience Sharing: Sharing your own experiences and insights.
- Support and Motivation: Finding encouragement and camaraderie.
8.1. How Can You Learn From Experienced Riders In A Biker Community?
You can learn from experienced riders by asking questions, observing their techniques, and participating in group rides, which provide valuable insights and practical knowledge; learning from others accelerates your skill development.
- Questioning: Ask experienced riders questions about their techniques, gear, and experiences.
- Observation: Observe experienced riders in action and pay attention to their body position, line choices, and braking techniques.
- Group Rides: Participate in group rides and learn from the other riders in the group.
- Mentorship: Seek out a mentor who can provide guidance and support.
- Feedback: Ask for feedback on your riding and be open to constructive criticism.
8.2. Why Is Sharing Your Experiences Important?
Sharing your experiences is important because it helps others learn from your successes and mistakes, creating a supportive and informative environment; contributing to the community benefits everyone involved.
- Knowledge Contribution: Sharing your experiences helps others learn from your successes and mistakes.
- Support System: Contributing to the community creates a supportive and informative environment.
- Community Building: Sharing your experiences helps build a stronger and more connected community.
- Personal Growth: Reflecting on your experiences can help you grow as a rider.
- Networking: Sharing your experiences can help you connect with other riders and build relationships.
8.3. How Does A Biker Community Provide Support And Motivation?
A biker community provides support and motivation by offering encouragement, camaraderie, and a sense of belonging; this helps riders stay motivated and overcome challenges. A supportive community can make all the difference in your riding journey.
- Encouragement: A biker community provides encouragement and support when you’re feeling discouraged or struggling with a particular skill.
- Camaraderie: The camaraderie of a biker community can make riding more fun and enjoyable.
- Sense of Belonging: A biker community provides a sense of belonging and helps you connect with other riders who share your passion.
- Shared Goals: A biker community helps you set and achieve your riding goals.
- Inspiration: A biker community provides inspiration and motivation to push yourself and improve your skills.
9. How Does Understanding Trail Features Enhance Stair Riding?
Understanding trail features such as water bars, rocky ledges, and drops helps you apply stair riding techniques to natural terrain; this translates to improved handling and confidence on trails.
- Water Bars: Applying stair riding skills to water bars.
- Rocky Ledges: Navigating rocky ledges with confidence.
- Drops: Handling small drops with control.
9.1. How To Apply Stair Riding Skills To Water Bars?
Apply stair riding skills to water bars by using the ready position, controlling your speed, and absorbing the impact with your legs; water bars are essentially natural stairs on the trail. By using these techniques, you can navigate water bars smoothly and efficiently.
- Ready Position: Use the ready position to maintain balance and control.
- Speed Control: Control your speed to prevent losing control.
- Impact Absorption: Absorb the impact with your legs to smooth out the ride.
- Line Choice: Choose the smoothest line over the water bar to minimize the impact.
- Eyes Forward: Keep your eyes focused on the end of the water bar to maintain balance and direction.
9.2. How To Approach Rocky Ledges Confidently?
Approach rocky ledges confidently by maintaining a balanced position, controlling your speed, and using your suspension to absorb the impacts; rocky ledges require similar techniques as stairs. A confident approach ensures better control and reduces the risk of mishaps.
- Balanced Position: Maintain a balanced position to maintain control.
- Speed Control: Control your speed to prevent losing control.
- Suspension Use: Use your suspension to absorb the impacts and smooth out the ride.
- Line Choice: Choose the smoothest line over the rocky ledge to minimize the impact.
- Eyes Forward: Keep your eyes focused on the end of the rocky ledge to maintain balance and direction.
9.3. What Techniques Are Needed For Small Drops?
Use techniques such as the ready position, weight shifting, and proper landing to handle small drops effectively; drops are similar to the last step of a set of stairs. By applying these techniques, you can land smoothly and maintain control.
- Ready Position: Use the ready position to maintain balance and control.
- Weight Shifting: Shift your weight slightly back to prepare for the landing.
- Proper Landing: Land with your knees bent to absorb the impact.
- Eyes Forward: Keep your eyes focused on the landing area to maintain balance and direction.
- Smooth Transition: Smoothly transition from the air to the ground to maintain control.
10. What Are Some Advanced Stair Riding Techniques?
Mastering advanced techniques like bunny hops onto stairs, manuals down stairs, and riding switchbacks on stairs can elevate your stair riding skills and impress fellow bikers.
- Bunny Hops Onto Stairs: Popping up onto stairs with finesse.
- Manuals Down Stairs: Balancing on the rear wheel for a smooth descent.
- Switchbacks On Stairs: Navigating tight turns on staircases.
10.1 How To Bunny Hop Onto Stairs?
To bunny hop onto stairs, approach with speed, compress your body, and explode upward, lifting both wheels simultaneously; practice on flat ground first. This advanced technique requires timing and coordination.
- Approach Speed: Approach the stairs with enough speed to clear the gap.
- Compression: Compress your body by bending your knees and elbows.
- Explosive Movement: Explode upward, lifting both wheels simultaneously.
- Timing: Time your jump so that you land smoothly on the stairs.
- Practice: Practice bunny hopping on flat ground before attempting it on stairs.
10.2 How To Perform A Manual Down Stairs?
To manual down stairs, find the balance point, lean back, and extend your arms to maintain balance while keeping the front wheel elevated; this requires a smooth and controlled motion. Manuals are a stylish way to descend stairs.
- Balance Point: Find the balance point by leaning back and extending your arms.
- Controlled Motion: Maintain a smooth and controlled motion.
- Arm Extension: Extend your arms to maintain balance and control.
- Practice: Practice manuals on flat ground before attempting them on stairs.
- Spotter: Have a spotter help you practice manuals on stairs.
10.3 How To Ride Switchbacks On Stairs?
To ride switchbacks on stairs, use a combination of body positioning, steering, and momentum to navigate tight turns; this technique requires precise control and balance. Mastering switchbacks allows you to tackle challenging staircases with confidence.
- Body Positioning: Use your body position to lean into the turn and maintain balance.
- Steering Technique: Use a combination of steering and body weight to turn the bike.
- Momentum Management: Manage your momentum to maintain control through the turn.
- Line Choice: Choose the best line through the switchback to minimize the difficulty.
- Practice: Practice switchbacks on flat ground before attempting them on stairs.
Biking down stairs is a skill that combines technique, confidence, and the right gear. By following these guidelines and practicing regularly, you can conquer any set of stairs and enhance your overall biking experience. Remember to prioritize safety, start with the basics, and gradually progress to more advanced techniques.
Ready to take your stair riding skills to the next level? Visit usabikers.net for more in-depth guides, community forums, and the latest information on biking gear and events across the USA. Join our community, share your experiences, and explore the world of biking with us. Whether you’re a beginner or an experienced rider