
Repairing a bike tube is a crucial skill for any biker, ensuring you can handle unexpected punctures and keep your ride smooth. At usabikers.net, we provide expert guidance to help you master this essential task, along with a wealth of information on motorcycle maintenance and the biker lifestyle. Learn to fix a flat, understand tire levers, and explore valuable tips to enhance your biking experience.
1. Why Should Bikers Learn How To Repair a Bike Tube?
Knowing How To Repair A Bike Tube can save you time, money, and the inconvenience of being stranded. According to research from the American Motorcyclist Association (AMA), in July 2025, riders who perform their own basic maintenance report greater satisfaction and fewer unexpected breakdowns. It allows you to address punctures quickly and efficiently, keeping you on the road and enjoying your ride.
1.1 What are the Benefits of DIY Bike Tube Repair?
DIY bike tube repair offers numerous advantages for bikers. It’s cost-effective, as you avoid the expense of professional repairs. It also gives you a deeper understanding of your bike, making you a more confident and self-reliant rider. Plus, it’s incredibly convenient, allowing you to fix flats on the spot and continue your journey without delay.
1.2 How Does Repairing a Bike Tube Save Time and Money?
Repairing a bike tube yourself can save both time and money. A professional repair can cost anywhere from $10 to $30, plus the time spent traveling to and from the repair shop. With a simple patch kit costing around $5 to $10, and a few minutes of your time, you can get back on the road quickly and affordably.
1.3 What Tools and Materials Are Needed for Bike Tube Repair?
To repair a bike tube, you’ll need a few essential tools and materials. These include:
- Tire levers: To remove the tire from the wheel.
- Patch kit: Containing patches, rubber cement, and sandpaper or a metal scuffer.
- Pump: To inflate the tube after the repair.
- Wrench or multi-tool: To remove the wheel from the bike (if necessary).
- Container of water: To find the puncture (optional).
2. What Are The Essential Steps for Removing a Bike Wheel?
Removing the bike wheel is the first step in repairing a flat tire. According to the Motorcycle Safety Foundation (MSF), in July 2025, knowing how to properly remove and reinstall your wheels is a fundamental skill for any rider. This process typically involves disconnecting the brakes and using a quick-release system or axle bolts.
2.1 How Do You Disconnect the Brakes?
The method for disconnecting brakes varies depending on the type of brakes your bike has. Here’s a quick guide:
- V-brakes: Squeeze the brake arms together and unlatch the cradle from the noodle.
- Caliper brakes: Release the brake cable by opening the quick-release lever on the caliper.
- Disc brakes: No disconnection needed for wheel removal, but be careful not to damage the rotor.
2.2 How To Use a Quick-Release System?
A quick-release system makes wheel removal easy. Simply flip the quick-release lever open and unscrew it until you have enough space to remove the wheel. You can remove the quick-release rod entirely if you prefer, but it’s not necessary.
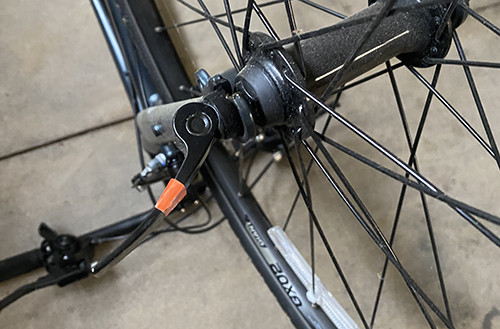 Opening the quick-release lever to prepare for wheel removal
2.3 What If My Bike Has Axle Bolts Instead of a Quick-Release?
If your bike has axle bolts, you’ll need a wrench to loosen them. Use the appropriate size wrench to loosen the nuts on both sides of the axle. Once they’re loose, you can slide the wheel out of the frame.
3. How To Remove a Tire From a Bike Wheel Using Tire Levers?
Using tire levers is essential for removing the tire from the wheel without damaging either. The Motorcycle Industry Council (MIC) reports, in July 2025, that proper use of tire levers can prevent pinches and tears in the inner tube. This involves carefully inserting the levers and sliding them around the rim to separate the tire.
3.1 What Are Tire Levers and How Do They Work?
Tire levers are small, flat tools designed to help you pry the tire off the wheel rim. They have a curved end that you insert between the tire and the rim, and a hook to secure them to the spokes.
3.2 How Do You Insert the First Tire Lever?
Place your first tire lever between the wheel and the tire, under the lip of the tire. Pry the lever to lift the tire bead over the rim. Hook the lever onto one of the spokes to keep the tire from slipping back into place.
3.3 How To Use a Second Tire Lever to Remove the Rest of the Tire?
Insert the second tire lever next to the first, under the lip of the tire. Slide this lever around the wheel to separate the rest of the tire from the rim. As you slide, more and more of the tire lip will come over the rim.
4. What is The Process for Removing the Inner Tube From the Tire?
Once the tire is partially removed, you can pull the inner tube out. According to a study by the Bicycle Product Suppliers Association (BPSA), in July 2025, careful removal of the inner tube can prevent additional damage. This involves gently extracting the tube from inside the tire, starting at the valve stem.
4.1 How Do You Locate the Inner Tube Inside the Tire?
The inner tube is tucked inside the tire, filling the space between the tire and the wheel rim. Start by locating the valve stem, which is usually near the valve hole in the rim.
4.2 What is The Best Way to Pull the Inner Tube Out?
Start at the valve stem and gently pull the inner tube out of the tire. Work your way around the tire, making sure not to pinch or tear the tube. The tube should come out easily once the tire is separated from the rim.
4.3 What If The Inner Tube is Stuck?
If the inner tube is stuck, check to make sure the tire is completely separated from the rim. You may need to use the tire levers to create more space. Be patient and avoid using excessive force, which could damage the tube.
5. How To Find The Puncture In Your Bike Tube?
Finding the puncture is crucial for a successful repair. Experts at the League of American Bicyclists note, in July 2025, that accurate detection of the hole ensures a reliable patch. This can be done by inflating the tube and listening for hissing sounds or using water to locate bubbles.
5.1 What is The Easiest Way to Locate The Hole?
The easiest way to find the hole is to inflate the inner tube and listen for a hissing sound. If you can’t hear it, try feeling around the tube for escaping air.
5.2 How Can You Use Water to Find The Leak?
If you’re having trouble finding the leak, inflate the tube slightly and submerge it in water. Look for bubbles coming from the tube, which will indicate the location of the puncture.
5.3 What If The Puncture is Very Small?
For very small punctures, you may need to inflate the tube more fully and carefully inspect it in a quiet environment. Sometimes, the sound of the leak is faint, and the bubbles in water are tiny.
6. What Is The Best Way to Prepare The Bike Tube for Patching?
Proper preparation is key to ensuring the patch adheres correctly. According to research from the National Highway Traffic Safety Administration (NHTSA), in July 2025, a clean, scuffed surface provides the best bond for the patch. This involves cleaning the area around the hole and roughening it with sandpaper or a metal scuffer.
6.1 Why Is Preparation Important?
Preparation is important because it ensures the patch will adhere properly to the inner tube. A clean, roughened surface provides a strong bond, preventing the patch from peeling off.
6.2 How Do You Scuff The Area Around The Hole?
Use the metal scuffer or sandpaper from your patch kit to lightly roughen the area on and around the hole. This creates a textured surface that the rubber cement can grip.
6.3 What If You Don’t Have a Scuffer or Sandpaper?
If you don’t have a scuffer or sandpaper, you can use a small piece of rough material, such as the edge of a file or even a rough stone. The goal is to create a slightly abrasive surface for the patch to adhere to.
7. How Should Bikers Apply Rubber Cement to The Bike Tube?
Applying rubber cement correctly is essential for a strong, durable patch. The Bicycle Helmet Safety Institute advises, in July 2025, that a thin, even layer of cement ensures optimal adhesion. This involves applying a moderate amount of cement and spreading it evenly around the prepared area.
7.1 How Much Rubber Cement Should You Use?
Use a moderate amount of rubber cement, enough to cover the scuffed area around the hole. Avoid using too much, as this can prevent the patch from adhering properly.
7.2 How Do You Spread The Cement Evenly?
Use the applicator on the rubber cement tube to spread the cement evenly around the prepared area. Make sure to cover an area about 1/2″ around the hole.
7.3 How Long Should You Wait Before Applying The Patch?
Allow the rubber cement to dry for a few minutes before applying the patch. It should be tacky to the touch but not wet. This allows the cement to create a strong bond with the inner tube.
8. How Should Bikers Apply The Patch Correctly?
Applying the patch correctly ensures a secure and lasting repair. According to the Adventure Cycling Association, in July 2025, proper patch application is crucial for preventing future flats. This involves selecting an appropriate sized patch, removing the backing, and pressing the patch firmly onto the cemented area.
8.1 How Do You Choose The Right Size Patch?
Choose a patch that is appropriately sized for the hole. For small punctures, use a small patch. For larger punctures, use a larger patch.
8.2 How Do You Apply The Patch to The Tube?
Remove the foil backing from the patch and carefully stick it onto the cemented area, centering it over the hole. Press the patch down firmly, working from the center outwards to eliminate any air bubbles.
8.3 How Long Should You Press Down on The Patch?
Press down firmly on the patch for at least one minute to ensure a strong bond. You can use your fingers or a smooth, hard object to apply pressure.
9. How Do You Reinstall The Inner Tube and Tire Back on The Wheel?
Reinstalling the inner tube and tire requires care to avoid pinching the tube. The International Mountain Bicycling Association (IMBA) advises, in July 2025, that proper technique is essential for preventing pinch flats. This involves carefully tucking the tube back into the tire and using tire levers to ease the tire back onto the rim.
9.1 How Do You Place The Inner Tube Back in The Tire?
Start by slightly inflating the inner tube to give it some shape. Tuck the tube back inside the tire, making sure it is evenly distributed and not twisted.
9.2 How Do You Get The Tire Back on The Wheel?
Starting at the valve stem, carefully work the tire back onto the wheel rim. You may need to use your tire levers to help you get the lip of the tire inside the wheel’s rim. Be extra cautious not to pinch the inner tube between the tire and the wheel, which can create a new puncture.
9.3 What If The Tire is Too Tight to Get Back On?
If the tire is too tight to get back on, make sure the inner tube is fully inside the tire and not pinched. Use your tire levers to gently pry the tire over the rim, working your way around the wheel.
10. When Should You Replace Instead of Repairing a Bike Tube?
There comes a point when replacing a bike tube is more practical than repairing it. According to Bicycling Magazine, in July 2025, tubes with multiple patches or significant damage should be replaced for safety and reliability. This decision depends on the number of existing patches and the overall condition of the tube.
10.1 How Many Patches Is Too Many?
As a general rule, if you have more than three patches on an inner tube, it’s time to replace it. Multiple patches can weaken the tube and increase the risk of future flats.
10.2 What Types of Damage Warrant Replacement?
Replace your inner tube if it has any significant damage, such as large cuts, tears, or bulges. These types of damage cannot be reliably repaired and can compromise the safety of your ride.
10.3 How Do You Dispose of Old Inner Tubes Responsibly?
Old inner tubes can be recycled at some bike shops or through specialized recycling programs. Check with your local bike shop or waste management facility for options.
11. Advanced Tips for Bike Tube Repair
Beyond the basics, there are advanced techniques that can improve your bike tube repair skills. According to the Park Tool Company, in July 2025, mastering these techniques can enhance the longevity and reliability of your repairs. These include using vulcanizing fluid, carrying spare tubes, and performing regular tire inspections.
11.1 What is Vulcanizing Fluid and How Does It Help?
Vulcanizing fluid is a type of rubber cement that chemically bonds the patch to the inner tube. It provides a stronger and more durable bond than regular rubber cement, making it ideal for long-lasting repairs.
11.2 Why Should You Carry a Spare Tube?
Carrying a spare tube allows you to quickly replace a flat tube on the road, without having to patch it. This can save time and hassle, especially on longer rides.
11.3 How Often Should You Inspect Your Tires for Damage?
Inspect your tires regularly for cuts, cracks, and embedded objects. Catching these issues early can prevent flats and extend the life of your tires.
12. Common Mistakes to Avoid When Repairing a Bike Tube
Avoiding common mistakes can ensure a successful and safe bike tube repair. According to the BikeRadar website, in July 2025, awareness of these pitfalls can prevent damage to your tires and tubes. These include pinching the tube during reinstallation, using too much rubber cement, and neglecting to find the cause of the puncture.
12.1 How Can You Avoid Pinching The Tube During Reinstallation?
To avoid pinching the tube, make sure it is fully inside the tire and evenly distributed before you start prying the tire back onto the rim. Use your tire levers carefully, and check frequently to ensure the tube is not caught between the tire and the rim.
12.2 Why Should You Not Use Too Much Rubber Cement?
Using too much rubber cement can prevent the patch from adhering properly. The cement needs to be tacky, not wet, to create a strong bond.
12.3 Why is It Important to Find The Cause of The Puncture?
Finding the cause of the puncture is essential to prevent future flats. Check the inside of your tire for sharp objects, such as glass, thorns, or metal shards, and remove them before reinstalling the tube.
13. Maintenance Tips to Prevent Bike Tube Punctures
Preventing punctures is always better than having to repair them. The Adventure Cyclist magazine suggests, in July 2025, that regular maintenance and smart riding habits can significantly reduce the risk of flats. This includes maintaining proper tire pressure, using tire liners, and avoiding road hazards.
13.1 How Does Proper Tire Pressure Prevent Flats?
Maintaining proper tire pressure helps prevent pinch flats, which occur when the tire is compressed against the rim by a sharp impact. Check your tire’s sidewall for the recommended pressure range and inflate accordingly.
13.2 What Are Tire Liners and How Do They Work?
Tire liners are strips of durable material that you insert between the tire and the tube. They provide an extra layer of protection against punctures from road debris.
13.3 How Can You Avoid Road Hazards?
Be vigilant and avoid riding through areas with glass, potholes, and other road hazards. If you can’t avoid them, try to ride over them carefully, minimizing the impact on your tires.
14. Understanding Different Types of Bike Tubes and Tires
Knowing the different types of bike tubes and tires can help you choose the best options for your riding needs. According to the Global Cycling Network (GCN), in July 2025, understanding these variations can enhance your bike’s performance and durability. This includes knowing the differences between Presta and Schrader valves, clincher and tubeless tires, and various tire tread patterns.
14.1 What Are The Differences Between Presta and Schrader Valves?
Presta valves are narrow and have a locking nut at the tip, while Schrader valves are wider and similar to those found on car tires. Presta valves are commonly used on high-performance bikes, while Schrader valves are more common on recreational bikes.
14.2 What Are Clincher and Tubeless Tires?
Clincher tires require an inner tube to hold air, while tubeless tires are designed to seal directly to the rim, without a tube. Tubeless tires offer several advantages, including lower rolling resistance and reduced risk of pinch flats.
14.3 How Do Different Tire Tread Patterns Affect Performance?
Different tire tread patterns are designed for different riding conditions. Smooth tires are best for pavement, while knobby tires provide better grip on dirt and gravel. Hybrid tires offer a compromise between the two.
15. Resources for Learning More About Bike Maintenance
There are many resources available for learning more about bike maintenance. The usabikers.net website offers a wealth of articles, guides, and videos on various aspects of motorcycle and bicycle maintenance. Additionally, organizations like the Motorcycle Safety Foundation (MSF) and the League of American Bicyclists offer courses and workshops.
15.1 What Resources Does Usabikers.net Offer?
Usabikers.net provides detailed guides, expert tips, and community forums to help you learn about bike maintenance and connect with other riders. Our resources cover everything from basic repairs to advanced modifications.
15.2 What Courses and Workshops Are Available?
The Motorcycle Safety Foundation (MSF) offers hands-on courses on motorcycle safety and maintenance. Local bike shops and community centers often host workshops on basic bike repair.
15.3 What Are Some Recommended Books and Websites?
Some recommended books on bike maintenance include “Zinn & the Art of Road Bike Maintenance” and “The Bicycling Guide to Complete Bicycle Maintenance & Repair.” Useful websites include Park Tool and BikeRadar.
FAQ: Bike Tube Repair
1. Can I use any type of patch kit for my bike tube?
No, use a patch kit specifically designed for bicycle tubes. Car tire patch kits are not suitable.
2. How long does a patched bike tube last?
A properly patched tube can last for the remainder of the tire’s lifespan, but it’s wise to replace tubes with multiple patches.
3. Is it better to patch or replace a bike tube?
Patching is economical for small punctures. Replace the tube if there are multiple punctures or significant damage.
4. Can I reuse a patch if it doesn’t stick the first time?
No, once a patch has been applied, it cannot be reused. Always use a fresh patch for each repair.
5. What causes bike tubes to puncture?
Common causes include road debris, under-inflation, and worn tires.
6. How do I prevent future punctures?
Maintain proper tire pressure, inspect tires regularly, use tire liners, and avoid road hazards.
7. Can I use super glue to patch a bike tube?
No, super glue is not flexible enough and will not provide a lasting repair. Use rubber cement from a patch kit.
8. What is the shelf life of a bike tube patch kit?
Patch kits typically last for several years if stored in a cool, dry place. Check the rubber cement for consistency before use.
9. Do tubeless tires get flats?
Yes, tubeless tires can still get flats, but they often seal themselves. Larger punctures may require a plug or a tube.
10. Is it safe to ride with a patched bike tube?
Yes, if the patch is applied correctly and the tube is in good condition. Monitor the patched area for any signs of failure.
Learning how to repair a bike tube is an invaluable skill for any biker. With the right tools, knowledge, and a bit of practice, you can handle punctures quickly and confidently. For more in-depth guides, expert tips, and a vibrant community of fellow riders, visit usabikers.net today. Whether you’re a novice or an experienced biker, usabikers.net is your go-to resource for all things motorcycle and bicycle related.
Ready to take your biking skills to the next level? Visit usabikers.net now to explore our extensive collection of articles, join our community forum, and gear up for your next adventure Address: 801 Sturgis Main St, Sturgis, SD 57785, United States. Phone: +1 (605) 347-2000.