
How Often Should You Change The Chain On Your Bike? On usabikers.net, we understand that maintaining your motorcycle chain is crucial for optimal performance and longevity. Changing your motorcycle chain regularly prevents costly damage to other components and ensures a smoother, safer ride.
1. Why Does a Motorcycle Chain “Stretch?”
Essentially, a motorcycle chain doesn’t actually stretch. Instead, what we perceive as stretching is the result of wear and tear on the chain’s components over time. Pin and roller wear allows the chain to lengthen slightly at each link, accumulating along the entire chain length, creating slack.
1.1. The Anatomy of Chain “Stretch”
Wear happens due to friction between the chain’s pins, rollers, and bushings. Over time, these components gradually erode, increasing the space between them. This minute wear at each link adds up, resulting in an overall lengthening of the chain.
1.2. The Impact of Chain “Stretch” on Your Motorcycle
A worn or “stretched” chain doesn’t mesh as precisely with the teeth on the sprockets. This mismatch causes accelerated wear on the sprockets, leading to poor power transfer, slipping, and potentially dangerous situations. Neglecting this wear can significantly impact your bike’s performance and safety.
2. Understanding Chain Wear and Its Effects
Understanding the causes and effects of chain wear is crucial for motorcycle maintenance. This knowledge will help you make informed decisions about when to replace your chain and how to maintain it.
2.1. Causes of Chain Wear
Chain wear is influenced by several factors, including riding conditions, maintenance habits, and the quality of the chain itself.
- Riding Conditions: Riding in dusty, muddy, or sandy conditions accelerates chain wear. Abrasive particles get into the chain, acting like sandpaper and grinding down the components.
- Maintenance Habits: Lack of proper lubrication is a major contributor to chain wear. Without lubrication, friction increases, leading to faster erosion of the pins, rollers, and bushings.
- Chain Quality: Higher-quality chains are made from more durable materials and often feature better seals, which help keep contaminants out. Investing in a good chain can extend its lifespan.
2.2. Effects of a Worn Chain
A worn chain can lead to several problems, affecting your motorcycle’s performance and safety.
- Sprocket Wear: A stretched chain doesn’t fit properly on the sprockets, causing the sprocket teeth to wear prematurely. This can lead to costly replacements of both the chain and sprockets.
- Poor Power Transfer: A worn chain reduces the efficiency of power transfer from the engine to the rear wheel. You may notice a decrease in acceleration and overall performance.
- Chain Slipping: A severely worn chain can slip off the sprockets, especially under hard acceleration or deceleration. This is a dangerous situation that can cause loss of control.
- Increased Vibration and Noise: A worn chain often causes increased vibration and noise, making your ride uncomfortable.
3. How to Determine When to Change Your Motorcycle Chain
Determining when to change your motorcycle chain involves both visual inspections and measurement tools to ensure accuracy. Regularly checking your chain can help you identify wear early and prevent further damage.
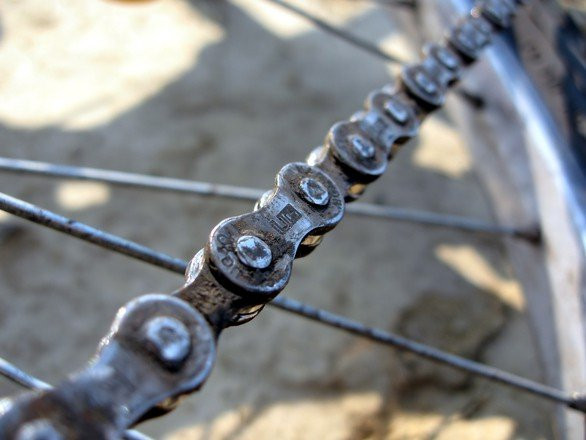
3.1. Visual Inspection
Regular visual inspections can provide clues about the condition of your chain. Look for the following signs:
- Rust and Corrosion: Rust indicates a lack of lubrication and potential internal damage.
- Stiff Links: Stiff links that don’t move freely indicate dirt or corrosion inside the chain.
- Excessive Slack: Excessive slack, even after adjusting the chain tension, suggests significant wear.
- Damaged or Missing O-Rings: If your chain has O-rings, check for damage or missing rings, as these seals keep lubrication in and contaminants out.
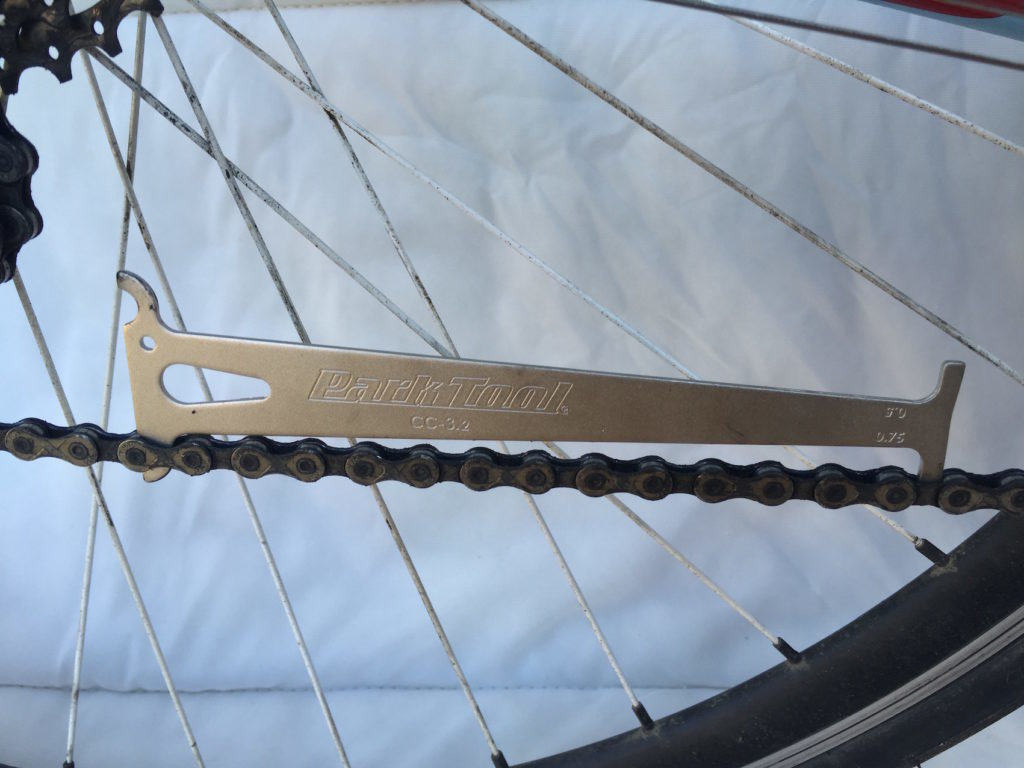
3.2. Using a Chain Wear Indicator Tool
A chain wear indicator tool is a precise way to measure chain elongation. These tools typically have two prongs; you insert them into the chain links, and the tool indicates the percentage of wear.
- How to Use: Place the tool on the chain, ensuring the prongs fit snugly between the links. If the tool shows wear exceeding 0.5%, it’s time to consider a new chain. If it reaches 0.75%, replacement is necessary.
- Accuracy: Chain wear indicator tools provide a more accurate assessment than visual inspection alone, helping you make informed decisions about chain replacement.
3.3. The Ruler Method
If you don’t have a chain wear indicator tool, you can use a ruler to measure chain elongation. This method involves measuring a specific number of links and comparing the measurement to the original length.
- How to Use: Measure 12 links (12 full links, meaning 13 pins) on the chain. A new chain should measure exactly 12 inches over those 12 links. If the measurement exceeds 12 1/8 inches, the chain is worn and should be replaced. If it exceeds 12 1/4 inches, it’s severely worn, and you risk damaging the sprockets.
- Considerations: Ensure the ruler is held straight and measure from the center of one pin to the center of the 13th pin for accurate results.
3.4. Consulting Your Motorcycle’s Manual
Your motorcycle’s manual provides specific maintenance schedules and recommendations for chain replacement.
- Manufacturer’s Recommendations: Follow the manufacturer’s guidelines for inspecting and replacing your chain. These recommendations are tailored to your specific motorcycle model.
- Adjustments: The manual also provides instructions on how to properly adjust chain tension. Proper chain tension minimizes wear and ensures optimal performance.
 Motorcycle chain wear indicator tool
4. Factors Influencing Chain Replacement Frequency
Several factors influence how often you need to replace your motorcycle chain. Understanding these factors can help you optimize your maintenance schedule.
4.1. Riding Style
Aggressive riding styles, such as frequent hard acceleration and deceleration, put more stress on the chain, leading to faster wear.
- Aggressive Acceleration: Rapid acceleration causes significant strain on the chain and sprockets.
- Frequent Gear Changes: Frequent gear changes, especially under load, increase wear.
- Off-Road Riding: Off-road riding exposes the chain to more dirt and debris, accelerating wear.
4.2. Environmental Conditions
Riding in harsh environmental conditions can significantly impact chain life.
- Dust and Dirt: Dusty and dirty conditions cause abrasive wear on the chain components.
- Mud and Water: Mud and water can wash away lubrication and promote rust and corrosion.
- Salt: Exposure to salt, especially near coastal areas, accelerates corrosion.
4.3. Chain Maintenance Practices
Proper chain maintenance is crucial for extending chain life.
- Regular Cleaning: Cleaning the chain regularly removes dirt and debris, preventing abrasive wear.
- Proper Lubrication: Lubricating the chain ensures smooth operation and reduces friction.
- Correct Tension: Maintaining correct chain tension minimizes stress and wear.
4.4. Type of Chain
The type of chain you use affects its durability and lifespan.
- Standard Chains: Standard chains are the most basic type and require more frequent maintenance.
- O-Ring Chains: O-ring chains have rubber seals that keep lubrication in and contaminants out, extending chain life.
- X-Ring Chains: X-ring chains have a more advanced seal design than O-ring chains, providing even better protection and longer life.
5. Signs That Indicate It’s Time for a New Chain
Recognizing the signs that indicate it’s time for a new chain can prevent further damage to your motorcycle.
5.1. Excessive Slack
Excessive slack, even after adjusting the chain, indicates significant wear and elongation.
- Consistent Adjustments: If you find yourself constantly adjusting the chain tension, it’s likely that the chain is worn and needs replacement.
- Uneven Slack: Uneven slack in different sections of the chain indicates uneven wear, which is a sign of a failing chain.
5.2. Stiff Links
Stiff links that don’t move freely are a sign of internal corrosion or dirt buildup.
- Inability to Flex: Stiff links prevent the chain from flexing properly around the sprockets, causing jerky movement and increased wear.
- Difficulty in Cleaning: Stiff links can be difficult to clean and lubricate, exacerbating the problem.
5.3. Visible Wear on Sprockets
Wear on the sprockets often accompanies a worn chain.
- Hooked Teeth: Sprocket teeth that are hooked or pointed indicate wear from a stretched chain.
- Missing Teeth: Missing teeth on the sprocket are a clear sign of severe wear and the need for replacement.
5.4. Noise and Vibration
Unusual noise and vibration can indicate a worn chain or sprockets.
- Grinding Noise: A grinding noise from the chain area suggests excessive friction and wear.
- Vibration: Increased vibration, especially at higher speeds, can be caused by a worn chain or sprockets.
6. Step-by-Step Guide to Replacing Your Motorcycle Chain
Replacing your motorcycle chain involves several steps to ensure safety and proper installation.
6.1. Gather Necessary Tools and Supplies
Before starting, gather all the necessary tools and supplies.
- New Chain: Purchase a high-quality chain that is compatible with your motorcycle model.
- Chain Tool: A chain tool is essential for breaking and joining the chain.
- Wrenches and Sockets: Wrenches and sockets are needed to remove the sprocket cover and other components.
- Torque Wrench: A torque wrench is crucial for tightening bolts to the correct specifications.
- Gloves and Safety Glasses: Protect your hands and eyes during the replacement process.
6.2. Prepare the Motorcycle
Prepare the motorcycle by placing it on a stand and removing any necessary parts.
- Secure the Bike: Place the motorcycle on a stable stand to lift the rear wheel off the ground.
- Remove Sprocket Cover: Remove the sprocket cover to access the front sprocket.
- Loosen Rear Axle Nut: Loosen the rear axle nut to allow for chain removal.
6.3. Remove the Old Chain
Remove the old chain using a chain tool.
- Break the Chain: Use the chain tool to break the old chain at one of the links.
- Remove the Chain: Pull the old chain off the sprockets and discard it properly.
6.4. Install the New Chain
Install the new chain, ensuring it is the correct length and properly connected.
- Thread the Chain: Thread the new chain around the sprockets.
- Join the Chain: Use the chain tool to join the ends of the new chain.
- Adjust Chain Length: Ensure the chain has the correct number of links for proper tension.
6.5. Adjust Chain Tension
Adjust the chain tension to the manufacturer’s specifications.
- Locate Adjusters: Find the chain tension adjusters on the swingarm.
- Adjust Tension: Use the adjusters to achieve the correct amount of slack in the chain.
- Tighten Axle Nut: Tighten the rear axle nut to the correct torque specification.
6.6. Lubricate the New Chain
Lubricate the new chain thoroughly.
- Apply Lubricant: Apply chain lubricant evenly along the entire length of the chain.
- Allow Penetration: Allow the lubricant to penetrate the chain before riding.
6.7. Final Check
Perform a final check to ensure everything is properly installed and adjusted.
- Inspect Chain Alignment: Ensure the rear wheel is properly aligned with the front wheel.
- Check Tension: Double-check the chain tension after a short ride and readjust if necessary.
7. Chain Maintenance Best Practices
Adopting best practices for chain maintenance can significantly extend the life of your chain and sprockets.
7.1. Regular Cleaning and Lubrication
Regular cleaning and lubrication are essential for maintaining your chain.
- Cleaning Frequency: Clean the chain every 300-500 miles, or more often in dirty conditions.
- Lubrication Frequency: Lubricate the chain after each cleaning and after riding in the rain.
- Proper Products: Use chain cleaners and lubricants specifically designed for motorcycle chains.
7.2. Proper Chain Tension Adjustment
Maintaining proper chain tension is crucial for minimizing wear.
- Check Tension Regularly: Check chain tension every 500 miles, or more often if you ride aggressively.
- Follow Manual: Follow the manufacturer’s recommendations for chain tension adjustment.
- Avoid Overtightening: Avoid overtightening the chain, as this can cause excessive wear and damage.
7.3. Choosing the Right Chain Lubricant
Choosing the right chain lubricant can make a significant difference in chain life.
- Type of Lubricant: Use a lubricant specifically designed for motorcycle chains.
- Wet vs. Dry Lubricants: Choose a wet lubricant for wet conditions and a dry lubricant for dry conditions.
- Application: Apply the lubricant evenly along the entire length of the chain.
7.4. Inspecting and Maintaining Sprockets
Inspecting and maintaining your sprockets is just as important as maintaining your chain.
- Regular Inspection: Inspect the sprockets for wear, damage, and missing teeth.
- Replacement: Replace the sprockets when they show signs of wear or damage.
- Matching Set: Replace the chain and sprockets as a matching set to ensure proper fit and performance.
 Motorcycle chain and sprockets
8. Types of Motorcycle Chains
Understanding the different types of motorcycle chains can help you choose the best one for your riding needs.
8.1. Standard Chains
Standard chains are the most basic type and are typically found on older or less expensive motorcycles.
- Simple Design: Standard chains have a simple design with no seals to protect the internal components.
- Frequent Maintenance: They require more frequent cleaning and lubrication than other types of chains.
- Shorter Lifespan: Standard chains typically have a shorter lifespan due to increased wear and corrosion.
8.2. O-Ring Chains
O-ring chains feature rubber O-rings between the side plates to seal in lubricant and keep out contaminants.
- Sealed Design: The O-rings create a seal that protects the internal components from dirt, water, and debris.
- Reduced Friction: The sealed design reduces friction, resulting in smoother operation and longer chain life.
- Less Maintenance: O-ring chains require less frequent cleaning and lubrication than standard chains.
8.3. X-Ring Chains
X-ring chains are an advanced version of O-ring chains, featuring a more complex seal design.
- Advanced Seal: The X-rings have a unique shape that provides a better seal than O-rings, further reducing friction and wear.
- Superior Performance: X-ring chains offer superior performance and longer life compared to O-ring chains.
- Premium Option: They are typically more expensive than O-ring chains but offer better value in the long run.
8.4. Choosing the Right Chain Type for Your Bike
Choosing the right chain type depends on your motorcycle model, riding style, and budget.
- Consider Your Needs: Consider your riding conditions, maintenance preferences, and budget when choosing a chain.
- Consult Your Manual: Consult your motorcycle’s manual for recommended chain types and specifications.
- Read Reviews: Read reviews and compare different chain types to make an informed decision.
9. Common Mistakes to Avoid When Replacing a Motorcycle Chain
Avoiding common mistakes when replacing your motorcycle chain can prevent damage and ensure safety.
9.1. Using the Wrong Tools
Using the wrong tools can damage the chain and sprockets.
- Chain Tool: Always use a chain tool specifically designed for breaking and joining motorcycle chains.
- Wrenches and Sockets: Use the correct size wrenches and sockets to avoid damaging bolts and nuts.
- Torque Wrench: Use a torque wrench to tighten bolts to the correct specifications.
9.2. Incorrect Chain Tension
Incorrect chain tension can cause excessive wear and damage.
- Too Tight: Overtightening the chain can cause excessive stress and wear on the chain, sprockets, and wheel bearings.
- Too Loose: A loose chain can slip off the sprockets and cause damage to the motorcycle.
- Follow Manual: Follow the manufacturer’s recommendations for chain tension adjustment.
9.3. Neglecting Sprocket Condition
Neglecting the condition of the sprockets can reduce the lifespan of the new chain.
- Replace Together: Replace the chain and sprockets as a matching set to ensure proper fit and performance.
- Inspect Sprockets: Inspect the sprockets for wear, damage, and missing teeth before installing a new chain.
9.4. Improper Lubrication
Improper lubrication can lead to premature chain wear and failure.
- Use Proper Lubricant: Use a chain lubricant specifically designed for motorcycle chains.
- Apply Evenly: Apply the lubricant evenly along the entire length of the chain.
- Lubricate Regularly: Lubricate the chain regularly, especially after cleaning or riding in the rain.
10. Maximizing Chain Life: Tips and Tricks
Maximizing chain life involves a combination of proper maintenance, riding habits, and chain selection.
10.1. Consistent Maintenance Schedule
Adhering to a consistent maintenance schedule is crucial for extending chain life.
- Regular Cleaning: Clean the chain every 300-500 miles, or more often in dirty conditions.
- Proper Lubrication: Lubricate the chain after each cleaning and after riding in the rain.
- Tension Adjustment: Check and adjust chain tension every 500 miles.
10.2. Smooth Riding Habits
Adopting smooth riding habits can reduce stress on the chain.
- Smooth Acceleration: Avoid abrupt acceleration and deceleration.
- Proper Gear Changes: Shift gears smoothly and avoid lugging the engine.
- Avoid Overloading: Avoid carrying excessive weight on the motorcycle.
10.3. Protecting the Chain from the Elements
Protecting the chain from the elements can prevent corrosion and wear.
- Storage: Store the motorcycle in a dry place when not in use.
- Cleaning: Clean the chain after riding in wet or dirty conditions.
- Lubrication: Lubricate the chain after cleaning or riding in the rain.
10.4. Upgrading to a Higher Quality Chain
Upgrading to a higher quality chain can provide better performance and longer life.
- O-Ring or X-Ring Chains: Consider upgrading to an O-ring or X-ring chain for better protection and reduced maintenance.
- Premium Brands: Choose a chain from a reputable brand known for quality and durability.
- Match to Riding Style: Select a chain that is appropriate for your riding style and conditions.
Conclusion
Maintaining your motorcycle chain is crucial for optimal performance and safety. By understanding the factors that influence chain wear, following best practices for maintenance, and replacing your chain when necessary, you can extend its life and prevent costly damage. Remember, a well-maintained chain ensures a smoother, safer, and more enjoyable ride.
Visit usabikers.net today to explore more articles, join our community, and find all the information you need about motorcycle maintenance and biker culture in the USA!
Address: 801 Sturgis Main St, Sturgis, SD 57785, United States
Phone: +1 (605) 347-2000
Website: usabikers.net
FAQ: Motorcycle Chain Replacement
1. How do I know if my motorcycle chain needs replacing?
Check for excessive slack, stiff links, visible wear on sprockets, and unusual noise or vibration. Use a chain wear indicator tool or measure 12 links with a ruler; if it exceeds 12 1/8 inches, replace the chain.
2. What happens if I don’t replace my motorcycle chain when needed?
Ignoring chain wear can damage sprockets, reduce power transfer, cause chain slipping, and increase vibration and noise, potentially leading to dangerous situations.
3. How often should I clean and lubricate my motorcycle chain?
Clean the chain every 300-500 miles, or more often in dirty conditions, and lubricate it after each cleaning and after riding in the rain.
4. Can I replace just the chain and not the sprockets?
It’s best to replace the chain and sprockets as a matching set to ensure proper fit and performance, especially if the sprockets show signs of wear.
5. What type of chain lubricant should I use?
Use a lubricant specifically designed for motorcycle chains. Choose a wet lubricant for wet conditions and a dry lubricant for dry conditions.
6. How tight should my motorcycle chain be?
Follow the manufacturer’s recommendations for chain tension adjustment, as overtightening can cause excessive wear and damage.
7. What tools do I need to replace a motorcycle chain?
You’ll need a new chain, chain tool, wrenches, sockets, a torque wrench, gloves, and safety glasses.
8. Are O-ring chains better than standard chains?
Yes, O-ring chains have rubber seals that keep lubrication in and contaminants out, extending chain life and reducing maintenance.
9. How do environmental conditions affect chain life?
Riding in dusty, muddy, or salty conditions accelerates chain wear due to abrasive particles and corrosion.
10. What are some common mistakes to avoid when replacing a motorcycle chain?
Avoid using the wrong tools, incorrect chain tension, neglecting sprocket condition, and improper lubrication.