Can You Replace Spokes On A Bike Wheel? Absolutely, you can replace spokes on a bike wheel, and usabikers.net is here to guide you through the process. Replacing spokes is a crucial skill for any dedicated biker, ensuring your ride remains smooth and safe. With the right tools and a bit of patience, you can master spoke replacement and keep your wheels in top condition. Learn how to replace broken spokes and maintain optimal wheel tension.
1. Why Spokes Break: Understanding the Culprits
Spokes are the unsung heroes of your bike wheels, tirelessly working to distribute load and maintain wheel integrity. But what causes these vital components to fail? Let’s explore the common reasons:
- Material Fatigue: Over time, the constant stress and strain of riding can cause spokes to weaken and eventually snap due to material fatigue.
- Impact Damage: Hitting potholes, curbs, or other obstacles can subject spokes to sudden, high-impact forces, leading to breakage.
- Improper Tension: Spokes rely on proper tension to evenly distribute load. If some spokes are too loose or too tight, it can create stress points and cause failures.
- Corrosion: Exposure to moisture, salt, and other corrosive elements can weaken spokes, especially at the threads or where they enter the hub or nipple.
- Manufacturing Defects: Although rare, manufacturing flaws in the spoke material or threading can lead to premature failure.
Understanding these common causes can help you take preventative measures, such as regularly inspecting your spokes for signs of wear or damage, maintaining proper tension, and avoiding harsh riding conditions when possible. Remember, a little maintenance goes a long way in keeping your wheels rolling smoothly. For more detailed guides on wheel maintenance and safety tips, check out usabikers.net.
2. Identifying a Broken Spoke: Spotting the Signs
A broken spoke can compromise the integrity of your bike wheel, leading to a wobbly ride and potential safety hazards. Here’s how to identify a broken spoke:
- Visual Inspection: Look for any spokes that are visibly broken, bent, or detached from the hub or rim.
- Audible Cues: Listen for a clicking or rattling sound coming from the wheel while riding, which could indicate a loose or broken spoke.
- Wheel Wobble: A noticeable wobble or instability in the wheel while riding is a strong indication of a broken spoke.
- Uneven Tension: Pluck each spoke like a guitar string. A broken or loose spoke will sound significantly different from the others.
- Rim Deviation: Inspect the rim for any noticeable bends or deviations, which can be caused by uneven tension due to a broken spoke.
Regularly inspecting your wheels for these signs can help you catch a broken spoke early, preventing further damage and ensuring a safer riding experience. If you notice any of these symptoms, it’s best to address the issue promptly. Visit usabikers.net for expert advice and community support on maintaining your bike wheels.
3. Essential Tools for Spoke Replacement
Before you dive into replacing spokes on your bike wheel, gather the necessary tools to make the job easier and more efficient. Here’s a list of essential tools you’ll need:
- Spoke Wrench: Also known as a spoke key, this tool is used to adjust the tension of the spokes by turning the spoke nipples. Ensure you have the correct size for your spoke nipples.
- Tire Levers: These are used to remove the tire from the rim, providing access to the spoke nipples inside the rim.
- New Spoke: Make sure you have a replacement spoke of the correct length and type. Measure the old spoke or consult your bike’s specifications.
- Nipple Driver (Optional): This tool helps to thread the nipple onto the spoke, especially useful when the nipple is difficult to reach.
- Truing Stand (Optional): A truing stand makes it easier to check the wheel’s trueness and tension while adjusting the spokes, but it’s not essential.
- Gloves: Protect your hands from grease and sharp edges.
- Lubricant: A drop of oil or grease can help prevent the spoke nipples from seizing and make them easier to turn.
Having these tools on hand will streamline the spoke replacement process, making it more manageable and ensuring you achieve the best results. For recommendations on quality tools and maintenance tips, visit usabikers.net.
4. Step-by-Step Guide to Replacing a Spoke
Replacing a spoke on your bike wheel might seem daunting, but with the right approach, it’s a manageable task. Here’s a step-by-step guide to help you through the process:
- Remove the Wheel: Start by removing the wheel from your bike. For a rear wheel, you may need to remove the cassette first.
- Take out the Tire and Tube: Use tire levers to carefully remove one side of the tire from the rim. Then, pull out the inner tube.
- Access the Nipple: Pry back the rim tape to reveal the spoke nipples. There should be a hole in the rim above each nipple.
- Remove the Broken Spoke: If the spoke broke at the hub, unscrew it using a spoke key, leaving the nipple in place. If the nipple needs replacement, remove it from the rim. If the nipple falls inside the rim, shake the wheel gently until it drops out.
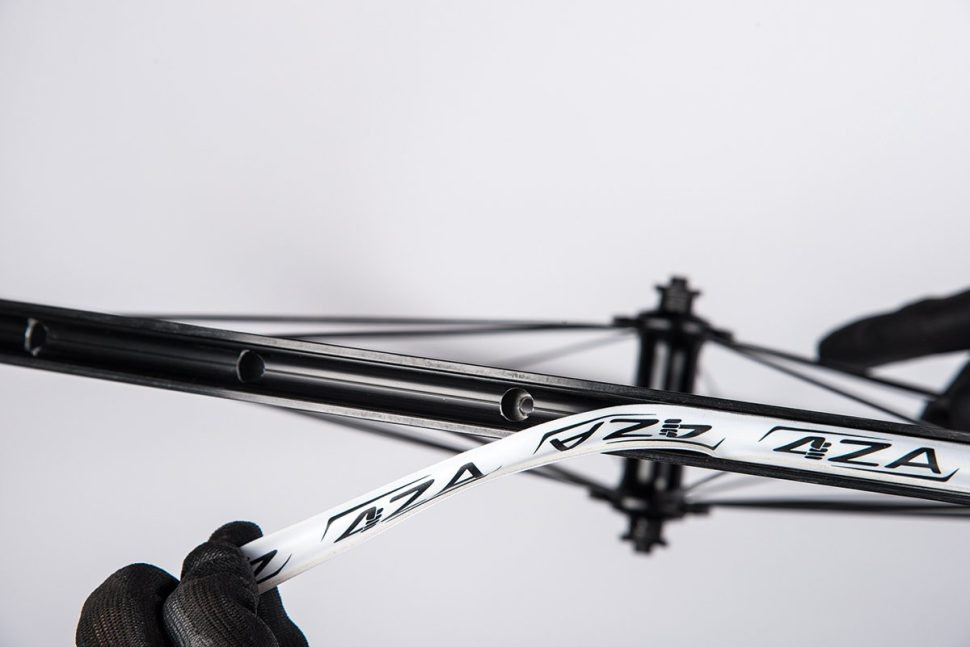 Access the Nipple
- Install the New Spoke: Insert the new spoke through the hub flange, ensuring it follows the same pattern as the other spokes. Lace it either over or under the adjoining spokes, depending on your wheel’s design.
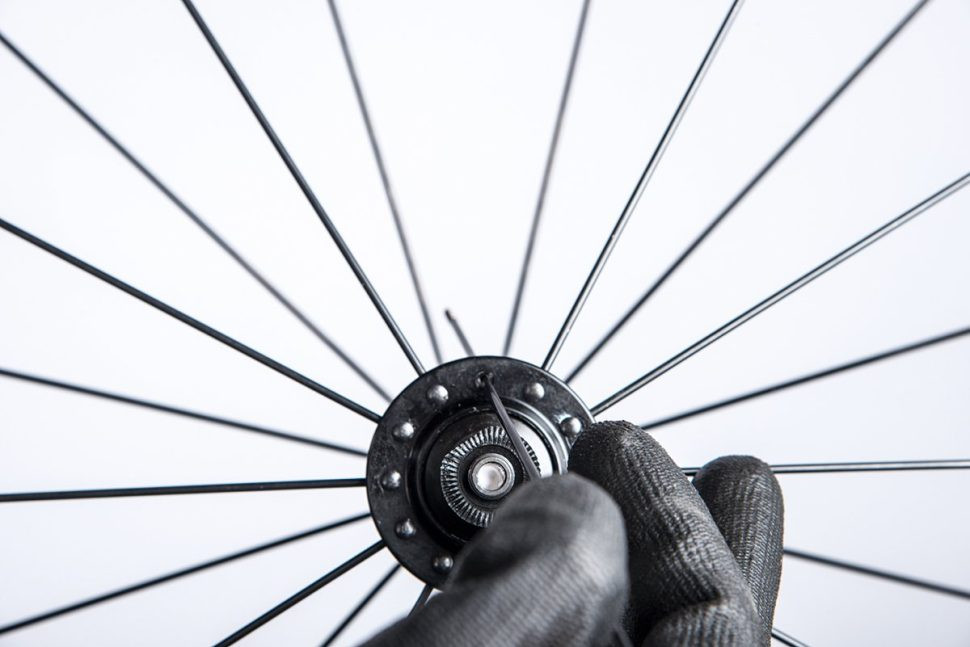 Lace it up
- Secure the Nipple: Replace the nipple into the rim and tighten it onto the new spoke. You can start with your fingers or use a flathead screwdriver.
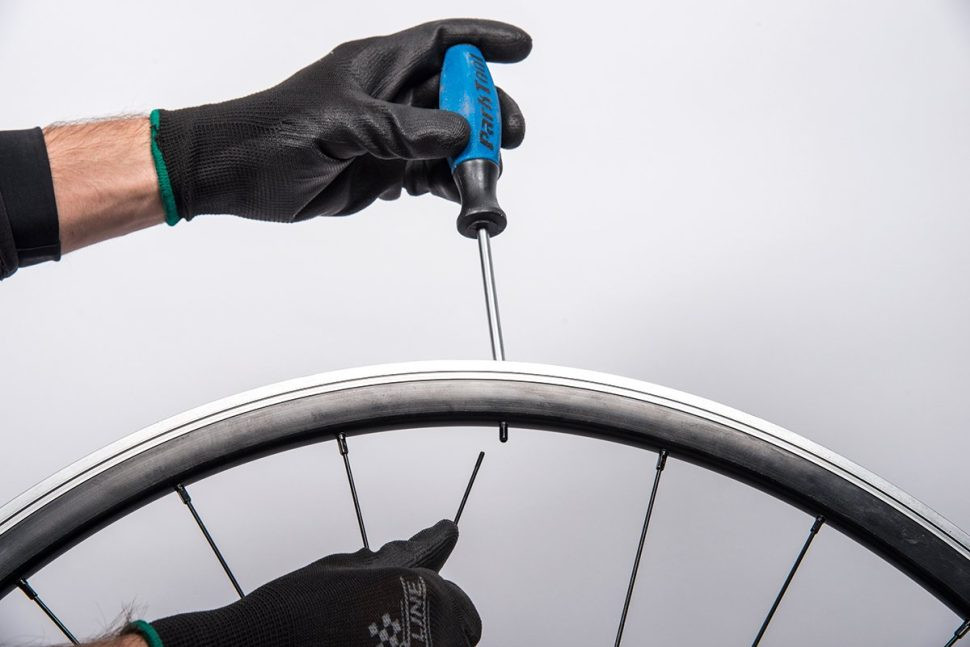 Fix in place
- Tension the Spoke: Using the correct spoke key, slowly tighten the nipple clockwise to tension the spoke. Ensure it’s evenly tensioned with the surrounding spokes.
- True the Wheel: Spin the wheel and check for trueness. Adjust the spoke tension as needed to remove any wobbles or deviations.
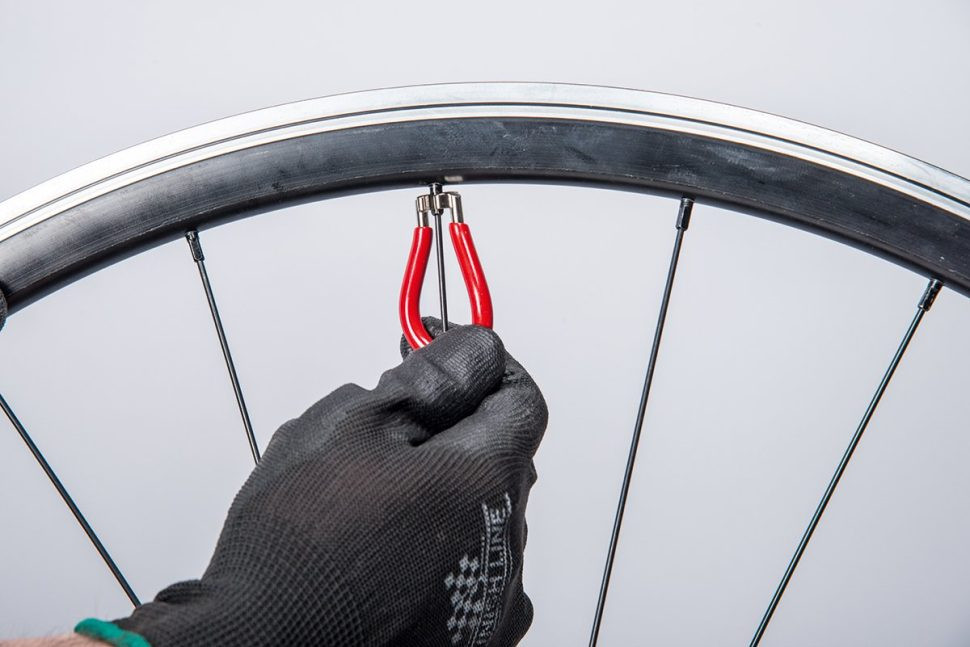 Tension and true
- Reinstall Tire and Tube: Place the inner tube back into the tire and carefully seat the tire back onto the rim using your thumbs or tire levers.
- Reinstall the Wheel: Put the wheel back on your bike and secure it properly.
Follow these steps carefully, and you’ll be back on the road in no time. For more detailed instructions and video tutorials, visit usabikers.net.
5. Truing Your Wheel: Achieving Perfect Balance
Truing your bike wheel is a crucial step after replacing a spoke to ensure it spins straight and true. A properly trued wheel enhances your riding experience by providing better stability, smoother handling, and reduced wear on your tires and other components. Here’s how to true your wheel:
- Check for Lateral Trueness: Spin the wheel and observe the gap between the rim and the brake pads or frame. If the rim moves side to side, it’s out of lateral true. Tighten the spokes on the side where the rim deviates away from and loosen the spokes on the opposite side.
- Check for Radial Trueness: Look at the vertical distance between the rim and the brake pads or frame as the wheel spins. If the rim moves up and down, it’s out of radial true. Tighten or loosen spokes to even out the rim’s height.
- Adjust Spoke Tension: Use a spoke wrench to make small adjustments to the spoke nipples. Tightening a nipple pulls the rim towards that spoke, while loosening it allows the rim to move away.
- Work Incrementally: Make small, incremental adjustments to avoid over-correcting. Check the trueness after each adjustment.
- Relieve Spoke Stress: After making adjustments, squeeze pairs of spokes together to relieve any stress. This helps the wheel maintain its trueness.
Truing a wheel takes practice, so be patient and methodical. For additional tips and tricks on wheel truing, visit usabikers.net and connect with experienced riders who can offer guidance.
6. Maintaining Proper Spoke Tension: Preventing Future Breakage
Maintaining proper spoke tension is essential for the longevity and performance of your bike wheels. Correct tension ensures that the load is evenly distributed across all spokes, preventing stress concentrations that can lead to breakage. Here’s how to maintain proper spoke tension:
- Regular Inspections: Periodically check your spoke tension by plucking each spoke like a guitar string. They should all produce a similar tone.
- Use a Spoke Tension Meter: For more accurate measurements, use a spoke tension meter. This tool provides a numerical reading of spoke tension, allowing you to make precise adjustments.
- Adjust Tension as Needed: If you find spokes that are significantly looser or tighter than others, use a spoke wrench to adjust the tension accordingly.
- Consider Professional Servicing: If you’re unsure about adjusting spoke tension yourself, take your wheels to a professional bike mechanic for servicing.
- Avoid Overloading: Be mindful of the weight limits for your wheels and avoid overloading your bike, as this can put excessive stress on the spokes.
By following these tips, you can maintain proper spoke tension, prevent future breakage, and enjoy a smoother, more reliable ride. Visit usabikers.net for more expert advice on wheel maintenance and care.
7. When to Seek Professional Help: Recognizing Limitations
While replacing a spoke and truing your wheel can be a rewarding DIY project, there are times when it’s best to seek professional help. Recognizing your limitations can prevent further damage and ensure your wheels are in optimal condition. Here are some situations where professional assistance is recommended:
- Multiple Broken Spokes: If you have multiple broken spokes on a wheel, it could indicate a more significant underlying issue, such as a bent rim or hub damage.
- Damaged Rim: If the rim is bent, cracked, or severely dented, it may be beyond repair and require replacement.
- Hub Issues: Problems with the hub, such as worn bearings or a damaged flange, can affect spoke tension and wheel integrity.
- Lack of Experience: If you’re uncomfortable with the spoke replacement or truing process, seeking professional help is always a good idea.
- Specialized Wheels: High-end or specialized wheels may require specific tools and expertise to repair properly.
A professional bike mechanic has the knowledge, experience, and tools to diagnose and address complex wheel issues. For trusted bike shops and mechanics in your area, check out usabikers.net’s community resources and reviews.
8. Upgrading Your Spokes: Enhancing Performance and Durability
If you find yourself frequently replacing spokes, it might be time to consider upgrading to higher-quality options. Upgrading your spokes can enhance your wheel’s performance, durability, and overall riding experience. Here are some factors to consider when upgrading your spokes:
- Material: Look for spokes made from high-quality stainless steel or titanium, which offer superior strength, corrosion resistance, and fatigue life.
- Gauge: The gauge of the spoke refers to its thickness. Thicker spokes are generally stronger but may add weight to the wheel.
- Butting: Butted spokes are thicker at the ends and thinner in the middle, providing a balance of strength and weight savings.
- Nipples: Upgrade to high-quality brass or alloy nipples, which are less prone to corrosion and provide a more secure connection to the rim.
- Brand Reputation: Choose spokes from reputable brands known for their quality and reliability.
Upgrading your spokes can be a worthwhile investment, especially if you ride frequently or in challenging conditions. For recommendations on the best spoke upgrades, visit usabikers.net and consult with experienced riders in the community.
9. Understanding Spoke Patterns: Radial, Tangential, and More
Spoke patterns play a crucial role in the strength, stiffness, and overall performance of your bike wheels. Understanding the different spoke patterns can help you appreciate the engineering behind your wheels and make informed decisions about maintenance and upgrades. Here are some common spoke patterns:
- Radial: In a radial spoke pattern, the spokes run straight from the hub to the rim, creating a direct connection. This pattern is lightweight and provides good aerodynamics but is less effective at transmitting torque.
- Tangential: In a tangential spoke pattern, the spokes cross each other, creating an angle between the hub and the rim. This pattern is stronger and more effective at transmitting torque but may be slightly heavier than a radial pattern.
- Three-Cross: A three-cross spoke pattern is a common type of tangential pattern where each spoke crosses three other spokes. This pattern provides a good balance of strength, stiffness, and torque transmission.
- Two-Cross and Four-Cross: These are variations of the tangential pattern with fewer or more crossings, respectively. Two-cross patterns are lighter but less strong, while four-cross patterns are stronger but heavier.
The choice of spoke pattern depends on the intended use of the wheel and the rider’s preferences. For more detailed information on spoke patterns and their characteristics, visit usabikers.net.
10. The Biker Community and Shared Knowledge
One of the greatest assets for any biker is the community. Sharing knowledge, experiences, and tips can make everyone a better and safer rider. Online platforms like usabikers.net serve as hubs where bikers can connect, ask questions, and learn from each other.
- Forums and Discussions: Engage in forums and discussions to ask specific questions about spoke replacement, wheel maintenance, or any other bike-related topic.
- DIY Guides and Tutorials: Share your own DIY guides and tutorials to help other bikers learn new skills and save money on repairs.
- Local Meetups and Rides: Organize or join local meetups and rides to connect with bikers in your area and share knowledge in person.
- Mentorship Programs: Participate in mentorship programs to learn from experienced bikers or mentor newer riders.
- Safety Workshops: Attend or lead safety workshops to promote safe riding practices and share essential maintenance tips.
By actively participating in the biker community, you can expand your knowledge, improve your skills, and forge lasting friendships. Visit usabikers.net to find local biker groups and events in your area.
11. Safety First: Important Considerations When Working on Wheels
When working on your bike wheels, safety should always be your top priority. Taking the necessary precautions can prevent injuries and ensure a safe and successful repair. Here are some important safety considerations:
- Wear Safety Glasses: Protect your eyes from debris and sharp edges by wearing safety glasses.
- Use Gloves: Protect your hands from grease, dirt, and sharp objects by wearing gloves.
- Work in a Well-Lit Area: Ensure you have adequate lighting to see what you’re doing and avoid mistakes.
- Use the Right Tools: Using the correct tools for the job can prevent damage to your bike and reduce the risk of injury.
- Follow Instructions Carefully: Read and follow instructions carefully when replacing spokes or truing your wheel.
- Take Breaks: If you’re feeling fatigued or frustrated, take a break to avoid mistakes.
- Inspect Your Work: After completing the repair, thoroughly inspect your work to ensure everything is properly installed and functioning correctly.
- Test Ride: Before going on a long ride, take a short test ride to ensure your wheel is spinning true and there are no issues.
By following these safety guidelines, you can minimize the risk of injury and ensure a safe and enjoyable bike maintenance experience. For more safety tips and resources, visit usabikers.net.
12. Spoke Length Calculation: Getting It Right
Choosing the correct spoke length is crucial for building or repairing a bike wheel. Spokes that are too long or too short can compromise the wheel’s strength, trueness, and overall performance. Here’s how to calculate the correct spoke length:
- Measure Hub Dimensions: Measure the hub flange diameter, flange spacing, and center-to-flange distance.
- Measure Rim Dimensions: Measure the effective rim diameter (ERD), which is the diameter at the base of the spoke nipples.
- Use a Spoke Length Calculator: Use an online spoke length calculator to input the hub and rim dimensions and calculate the required spoke length.
- Consider Spoke Pattern: The spoke pattern (radial, tangential, etc.) can affect the required spoke length. Be sure to select the correct pattern in the calculator.
- Round Up or Down: Round the calculated spoke length to the nearest millimeter. If the result is close to the midpoint, consider rounding up for added safety.
- Consult a Professional: If you’re unsure about calculating spoke length, consult a professional bike mechanic for assistance.
Getting the spoke length right is essential for building a strong, reliable wheel. For more detailed information on spoke length calculation, visit usabikers.net.
13. Common Mistakes to Avoid When Replacing Spokes
Replacing spokes can be a straightforward process, but it’s easy to make mistakes that can compromise the wheel’s integrity. Here are some common mistakes to avoid:
- Using the Wrong Spoke Length: Ensure you use the correct spoke length for your wheel. Spokes that are too long or too short can cause problems.
- Over-Tightening Spokes: Over-tightening spokes can damage the rim and hub and lead to spoke breakage.
- Under-Tightening Spokes: Under-tightening spokes can cause the wheel to be weak and unstable.
- Ignoring Spoke Pattern: Be sure to follow the correct spoke pattern when lacing the spokes.
- Using the Wrong Tools: Using the wrong tools can damage the spokes, nipples, and rim.
- Forgetting to True the Wheel: Truing the wheel after replacing spokes is essential for ensuring it spins straight and true.
- Neglecting Spoke Tension: Maintaining proper spoke tension is crucial for the wheel’s long-term performance.
- Rushing the Process: Take your time and work carefully to avoid mistakes.
By avoiding these common mistakes, you can ensure a successful spoke replacement and maintain the integrity of your bike wheels. For more tips and advice on wheel maintenance, visit usabikers.net.
14. Tools of the Trade: Spoke Wrenches and Tension Meters
Having the right tools can make spoke replacement and wheel truing much easier and more efficient. Two essential tools for wheel work are spoke wrenches and tension meters.
Spoke Wrenches:
- Purpose: Spoke wrenches, also known as spoke keys, are used to adjust the tension of the spokes by turning the spoke nipples.
- Types: Spoke wrenches come in various sizes to fit different spoke nipples. Be sure to use the correct size to avoid damaging the nipples.
- Features: Look for spoke wrenches with comfortable handles and precise sizing. Some wrenches also have ergonomic designs for improved grip and leverage.
Tension Meters:
- Purpose: Tension meters are used to measure the tension of the spokes, providing a numerical reading.
- Benefits: Using a tension meter allows you to accurately adjust spoke tension, ensuring the wheel is strong, stable, and durable.
- Features: Look for tension meters with easy-to-read displays and durable construction.
Investing in quality spoke wrenches and a tension meter can greatly improve your wheel maintenance capabilities. For recommendations on the best tools for wheel work, visit usabikers.net.
15. Spoke Materials: Steel, Stainless Steel, and Titanium
Spokes are typically made from steel, stainless steel, or titanium, each offering different properties and benefits. Understanding the characteristics of these materials can help you choose the best spokes for your needs.
Steel Spokes:
- Pros: Steel spokes are strong, durable, and relatively inexpensive.
- Cons: Steel spokes are prone to corrosion, especially in wet or salty conditions.
Stainless Steel Spokes:
- Pros: Stainless steel spokes offer excellent corrosion resistance, making them ideal for riding in all weather conditions. They are also strong and durable.
- Cons: Stainless steel spokes are slightly more expensive than steel spokes.
Titanium Spokes:
- Pros: Titanium spokes are lightweight, strong, and corrosion-resistant. They also offer excellent fatigue life.
- Cons: Titanium spokes are the most expensive option.
The choice of spoke material depends on your budget, riding conditions, and performance requirements. For more information on spoke materials and their properties, visit usabikers.net.
16. Rim Types and Spoke Compatibility: Alloy, Carbon, and More
The type of rim you have can affect the type of spokes you need and the spoke pattern you can use. Different rim materials and designs have different requirements for spoke compatibility.
Alloy Rims:
- Compatibility: Alloy rims are compatible with most types of spokes, including steel, stainless steel, and titanium.
- Considerations: When using alloy rims, be sure to use spoke nipples made from brass or alloy to prevent corrosion.
Carbon Rims:
- Compatibility: Carbon rims require special spokes and nipples that are designed to be compatible with carbon fiber.
- Considerations: When using carbon rims, be sure to follow the manufacturer’s instructions for spoke tension and lacing.
Tubeless Rims:
- Compatibility: Tubeless rims are compatible with most types of spokes, but you may need to use special rim tape or sealant to create an airtight seal.
- Considerations: When using tubeless rims, be sure to use tubeless-compatible tires and valves.
Understanding the compatibility between your rim type and spokes is essential for building a strong, reliable wheel. For more information on rim types and spoke compatibility, visit usabikers.net.
17. The Importance of Nipple Material: Brass vs. Alloy
Spoke nipples play a crucial role in connecting the spokes to the rim and adjusting spoke tension. The material of the nipples can affect their durability, corrosion resistance, and overall performance. The two most common nipple materials are brass and alloy.
Brass Nipples:
- Pros: Brass nipples are strong, durable, and corrosion-resistant. They also offer excellent thread engagement.
- Cons: Brass nipples are slightly heavier than alloy nipples.
Alloy Nipples:
- Pros: Alloy nipples are lightweight and offer good corrosion resistance.
- Cons: Alloy nipples are not as strong or durable as brass nipples. They are also more prone to thread damage.
The choice of nipple material depends on your riding conditions and performance requirements. For more information on nipple materials and their properties, visit usabikers.net.
18. Spoke Threading: Ensuring a Secure Fit
Proper spoke threading is essential for a secure and reliable connection between the spoke and the nipple. The threads must be clean, undamaged, and properly lubricated to ensure smooth and consistent tension.
- Inspect Threads: Before installing spokes, inspect the threads for any damage or debris.
- Clean Threads: Clean the threads with a wire brush or thread cleaner if necessary.
- Lubricate Threads: Apply a small amount of lubricant to the threads to prevent corrosion and ensure smooth tension.
- Use the Right Tools: Use the correct size spoke wrench to avoid damaging the nipples.
- Avoid Cross-Threading: Be careful not to cross-thread the nipples when installing the spokes.
Proper spoke threading is essential for building a strong, reliable wheel. For more tips on spoke threading and installation, visit usabikers.net.
19. The Role of Spoke Prep: Preventing Corrosion and Seizing
Spoke prep is a process of applying a special lubricant or thread locker to the spoke threads to prevent corrosion and seizing. This can help ensure that the spokes remain easy to adjust and maintain over time.
- Types of Spoke Prep: There are various types of spoke prep available, including liquid lubricants, thread lockers, and anti-seize compounds.
- Application: Apply spoke prep to the spoke threads before installing the nipples.
- Benefits: Spoke prep can help prevent corrosion, seizing, and thread damage.
- Considerations: Be sure to choose a spoke prep that is compatible with your spoke and nipple materials.
Using spoke prep is a simple and effective way to improve the longevity and performance of your bike wheels. For recommendations on the best spoke prep products, visit usabikers.net.
20. Wheel Building vs. Wheel Repair: Knowing the Difference
Wheel building and wheel repair are two distinct processes that require different skills and tools. Understanding the difference between them can help you determine whether to tackle a project yourself or seek professional help.
Wheel Building:
- Definition: Wheel building is the process of constructing a wheel from scratch, using a hub, rim, spokes, and nipples.
- Skills Required: Wheel building requires a high level of skill, patience, and attention to detail.
- Tools Required: Wheel building requires specialized tools, such as a truing stand, spoke tension meter, and spoke wrench.
Wheel Repair:
- Definition: Wheel repair is the process of fixing a damaged wheel, such as replacing a broken spoke or truing a wobbly rim.
- Skills Required: Wheel repair requires basic mechanical skills and a good understanding of wheel mechanics.
- Tools Required: Wheel repair requires basic tools, such as a spoke wrench, tire levers, and a truing stand (optional).
While some wheel repairs can be done at home, wheel building is best left to professionals. For more information on wheel building and repair, visit usabikers.net.
21. The Impact of Spoke Count on Wheel Strength and Weight
The number of spokes in a wheel can significantly impact its strength, weight, and overall performance. Generally, wheels with more spokes are stronger and more durable, while wheels with fewer spokes are lighter and more aerodynamic.
- High Spoke Count: Wheels with a high spoke count (32 or 36 spokes) are typically used for heavy-duty applications, such as touring, mountain biking, and cargo bikes.
- Low Spoke Count: Wheels with a low spoke count (20 or 24 spokes) are typically used for lightweight applications, such as road racing and time trialing.
- Considerations: When choosing a spoke count, consider your riding style, weight, and the type of terrain you’ll be riding on.
The optimal spoke count depends on your individual needs and preferences. For more information on spoke count and its impact on wheel performance, visit usabikers.net.
22. Breaking Down Wheel Lacing Patterns: Tangent, Radial, and More
Wheel lacing patterns refer to the way the spokes are arranged and connected between the hub and the rim. Different lacing patterns offer different characteristics in terms of strength, stiffness, and weight.
Tangent Lacing:
- Description: In tangent lacing, the spokes cross each other at an angle, creating a triangular pattern.
- Characteristics: Tangent lacing is strong, durable, and efficient at transferring torque.
Radial Lacing:
- Description: In radial lacing, the spokes run straight from the hub to the rim, without crossing each other.
- Characteristics: Radial lacing is lightweight and aerodynamic but less strong and efficient at transferring torque.
Mixed Lacing:
- Description: Mixed lacing combines tangent and radial lacing in the same wheel.
- Characteristics: Mixed lacing can offer a balance of strength, stiffness, and weight.
The choice of lacing pattern depends on your riding style and performance requirements. For more information on wheel lacing patterns, visit usabikers.net.
23. Tools to Help You Succeed
- Spoke wrench set
- Spoke tension meter
- Truing stand
- Tire levers
- New spoke
24. Step-By-Step Instructions for Replacing Spokes
- Remove the wheel.
- Remove the tire, tube, and rim strip.
- Insert new spoke.
- Thread on the spoke nipple.
- Repeat with all broken spokes.
- True the wheel.
- Install the rim strip, tube, and tire.
- Install the wheel.
25. Proper Spoke Tension
Proper spoke tension will help your wheel last and be strong.
26. The Biker Community at usabikers.net
At usabikers.net, we understand the unique challenges and needs of motorcycle enthusiasts. Our platform is designed to be a comprehensive resource for all things мото, offering detailed information, community support, and expert advice. Whether you’re a new rider or a seasoned biker, here’s how usabikers.net can help you:
- Detailed Information and Reviews: Access in-depth reviews and specifications of popular motorcycle models in the USA. Our articles cover everything from performance and handling to comfort and reliability, helping you make informed decisions.
- Safety Guides and Tips: Learn essential safety tips and techniques for safe riding. We cover topics like defensive riding, emergency maneuvers, and gear recommendations to help you stay safe on the road.
- Event Calendar and Biker Meetups: Stay updated on the latest biker events, rallies, and meetups across the USA. Connect with other riders in your area and share your passion for motorcycles.
- Community Forum and Discussions: Join our active community forum to discuss motorcycle-related topics, ask questions, and share your experiences with other riders.
- Maintenance and Repair Guides: Access step-by-step guides on motorcycle maintenance and repair, helping you keep your bike in top condition.
FAQ: Your Questions Answered
- How often should I replace spokes on my bike wheel? Spokes should be replaced when they are damaged or broken. Regular inspection can help identify issues early.
- Can I replace spokes on a carbon fiber rim? Replacing spokes on a carbon fiber rim requires specialized knowledge and tools. It’s best to consult a professional.
- What size spoke wrench do I need? The size of the spoke wrench depends on the size of the spoke nipples. Consult your bike’s specifications or measure the nipples to determine the correct size.
- How do I know if my spokes are properly tensioned? Properly tensioned spokes will produce a similar tone when plucked like a guitar string. You can also use a spoke tension meter for more accurate measurements.
- Is it necessary to true my wheel after replacing a spoke? Yes, truing the wheel after replacing a spoke is essential for ensuring it spins straight and true.
- Can I use different types of spokes on the same wheel? It’s best to use the same type of spokes on the same wheel to ensure consistent tension and performance.
- What is spoke prep, and why is it important? Spoke prep is a lubricant or thread locker applied to the spoke threads to prevent corrosion and seizing. It helps ensure that the spokes remain easy to adjust and maintain over time.
- How do I choose the correct spoke length? Choose the correct spoke length by measuring the hub dimensions, rim dimensions, and considering the spoke pattern. Use an online spoke length calculator for accurate results.
- What are the benefits of upgrading to stainless steel spokes? Stainless steel spokes offer excellent corrosion resistance, making them ideal for riding in all weather conditions. They are also strong and durable.
- Can I replace spokes myself, or should I seek professional help? Replacing spokes can be a DIY project, but it requires basic mechanical skills and the right tools. If you’re uncomfortable with the process, it’s best to seek professional help.
Replacing spokes on a bike wheel doesn’t have to be a daunting task. With the proper knowledge, tools, and a bit of patience, you can keep your wheels in top shape and enjoy a smooth, safe ride. Remember to visit usabikers.net for all your мото needs and to connect with a community of passionate riders.
Ready to dive deeper into the world of motorcycle maintenance and connect with a community of like-minded riders? Visit usabikers.net today to explore our extensive collection of articles, guides, and resources. Join our forum, share your experiences, and discover everything you need to enhance your мото lifestyle. Whether you’re looking for expert advice, event updates, or simply a place to connect with fellow enthusiasts, usabikers.net has you covered. Don’t miss out on the ultimate online resource for motorcycle lovers!