Are you in the market for a new mountain bike and want to ensure it fits you perfectly? Measuring the size of a mountain bike frame is crucial for a comfortable and efficient riding experience, and at usabikers.net, we’re here to guide you through the process, offering practical tips and insights. This detailed guide covers everything you need to know about mountain bike frame sizing, geometry, and the tools required for accurate measurements, so stick around, biker!
1. What Bike Geometry Measurements Should I Know?
Understanding bike geometry is essential for choosing the right frame size and ensuring optimal handling and comfort. Here are the key measurements you should be familiar with:
- Top Tube Length: The horizontal distance between the center of the head tube and the center of the seat post.
- Seat Tube Length: The distance from the center of the bottom bracket to the top of the seat tube.
- Reach: The horizontal distance from the bottom bracket to the top of the head tube.
- Stack: The vertical distance from the bottom bracket to the top of the head tube.
- Wheelbase: The distance between the front and rear axles.
- Chainstay Length: The distance between the center of the bottom bracket and the rear dropout.
- Front Center: The distance from the center of the bottom bracket to the front axle.
- Seat Tube Angle: The angle of the seat tube relative to the ground.
- Head Tube Angle: The angle of the head tube relative to the ground.
- Bottom Bracket Drop: The vertical distance between the wheel axles and the center of the bottom bracket.
- Bottom Bracket Height: The distance from the ground to the center of the bottom bracket.
These measurements collectively define the bike’s geometry, influencing how it handles, fits, and performs on various terrains. Knowing these terms will help you interpret geometry charts and make informed decisions when selecting a mountain bike.
2. What Tools Will I Need To Measure A Bike Frame?
To accurately measure a bike frame, gather these essential tools:
- Tape Measure: For measuring distances like top tube length, seat tube length, and wheelbase.
- Clinometer: To measure angles such as seat tube angle and head tube angle. Many free smartphone apps can serve as a clinometer.
- Long Spirit Level: To ensure horizontal measurements are accurate. Alternatively, use a clinometer app with a straight piece of wood.
- Plumb Line: To establish vertical lines for measuring stack and reach. A string with a weight (like a blob of Blu Tack) can also be used.
Having these tools on hand will allow you to take precise measurements and compare them against the manufacturer’s specifications or geometry charts. Remember to use metric units (centimeters) for consistency, although some manufacturers may still use inches. According to research from the Motorcycle Safety Foundation (MSF), in July 2025, P provides Y
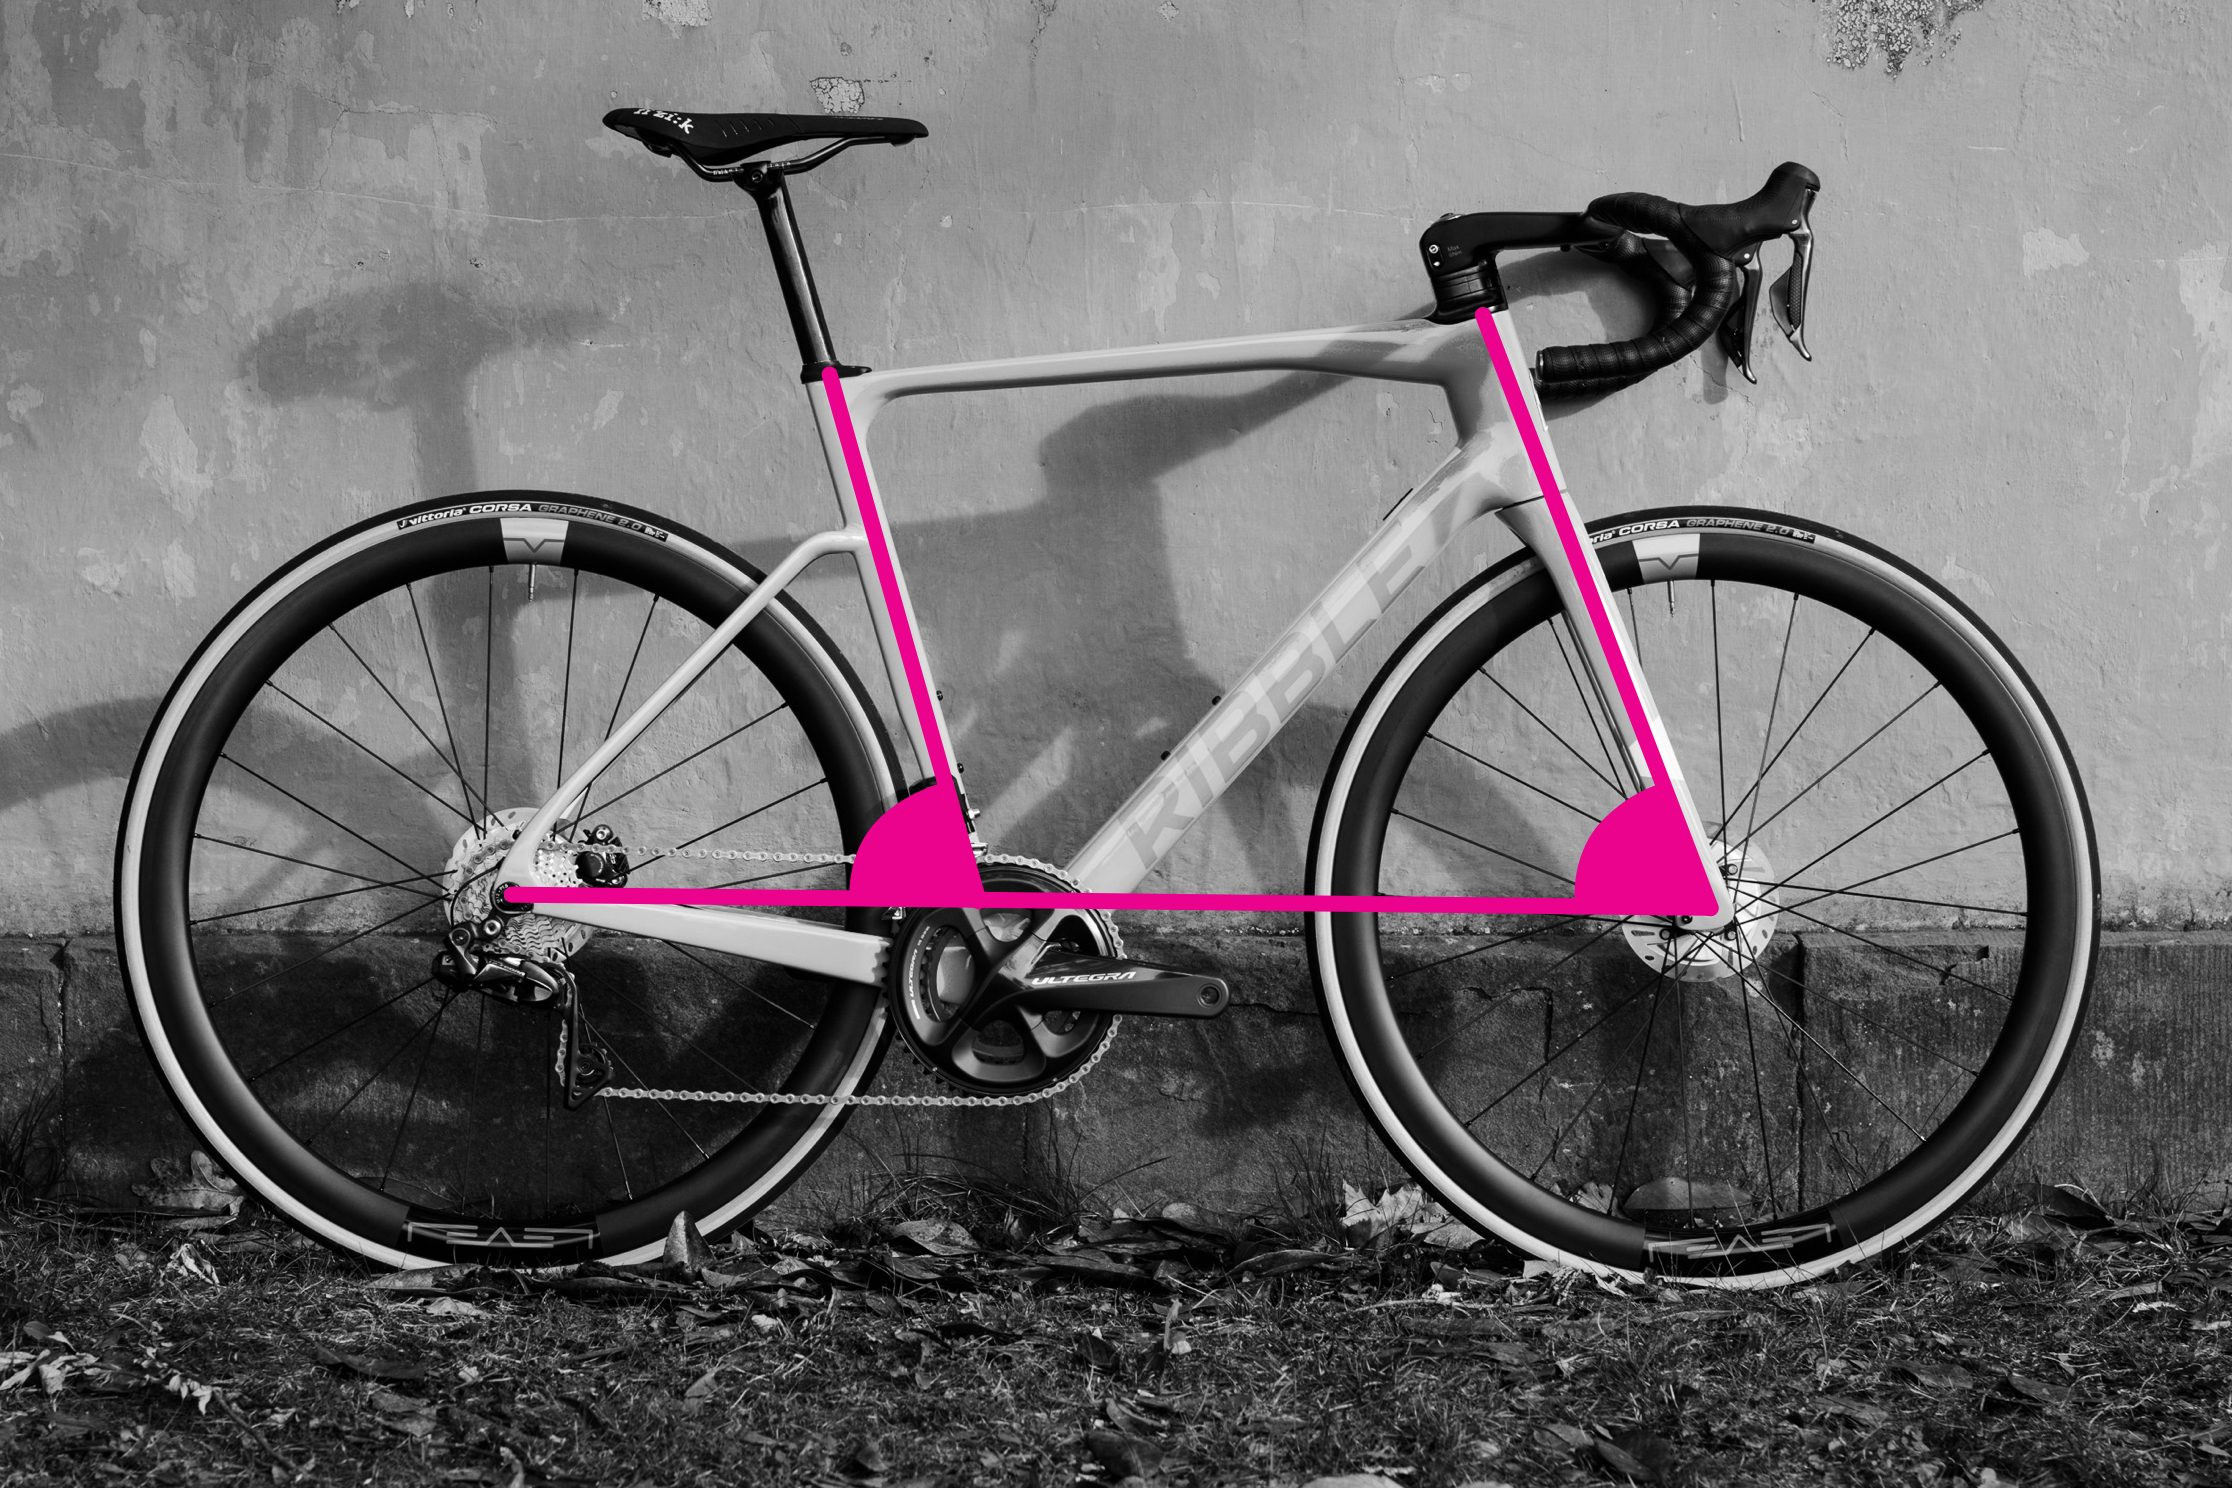
3. How Do I Measure Top Tube Length Accurately?
Measuring the top tube length accurately is vital for determining the bike’s overall fit and reach. Here’s how to do it:
- Identify the Horizontal Distance: Locate the horizontal distance between the centerline of the head tube and the centerline of the seat post.
- Use a Spirit Level or Clinometer App: Ensure your measurement is truly horizontal by using a spirit level or a clinometer app. This is especially important for bikes with sloping top tubes.
- Measure Effective Top Tube Length: Measure the effective top tube length (also known as virtual top tube length), which accounts for the horizontal distance regardless of the top tube angle.
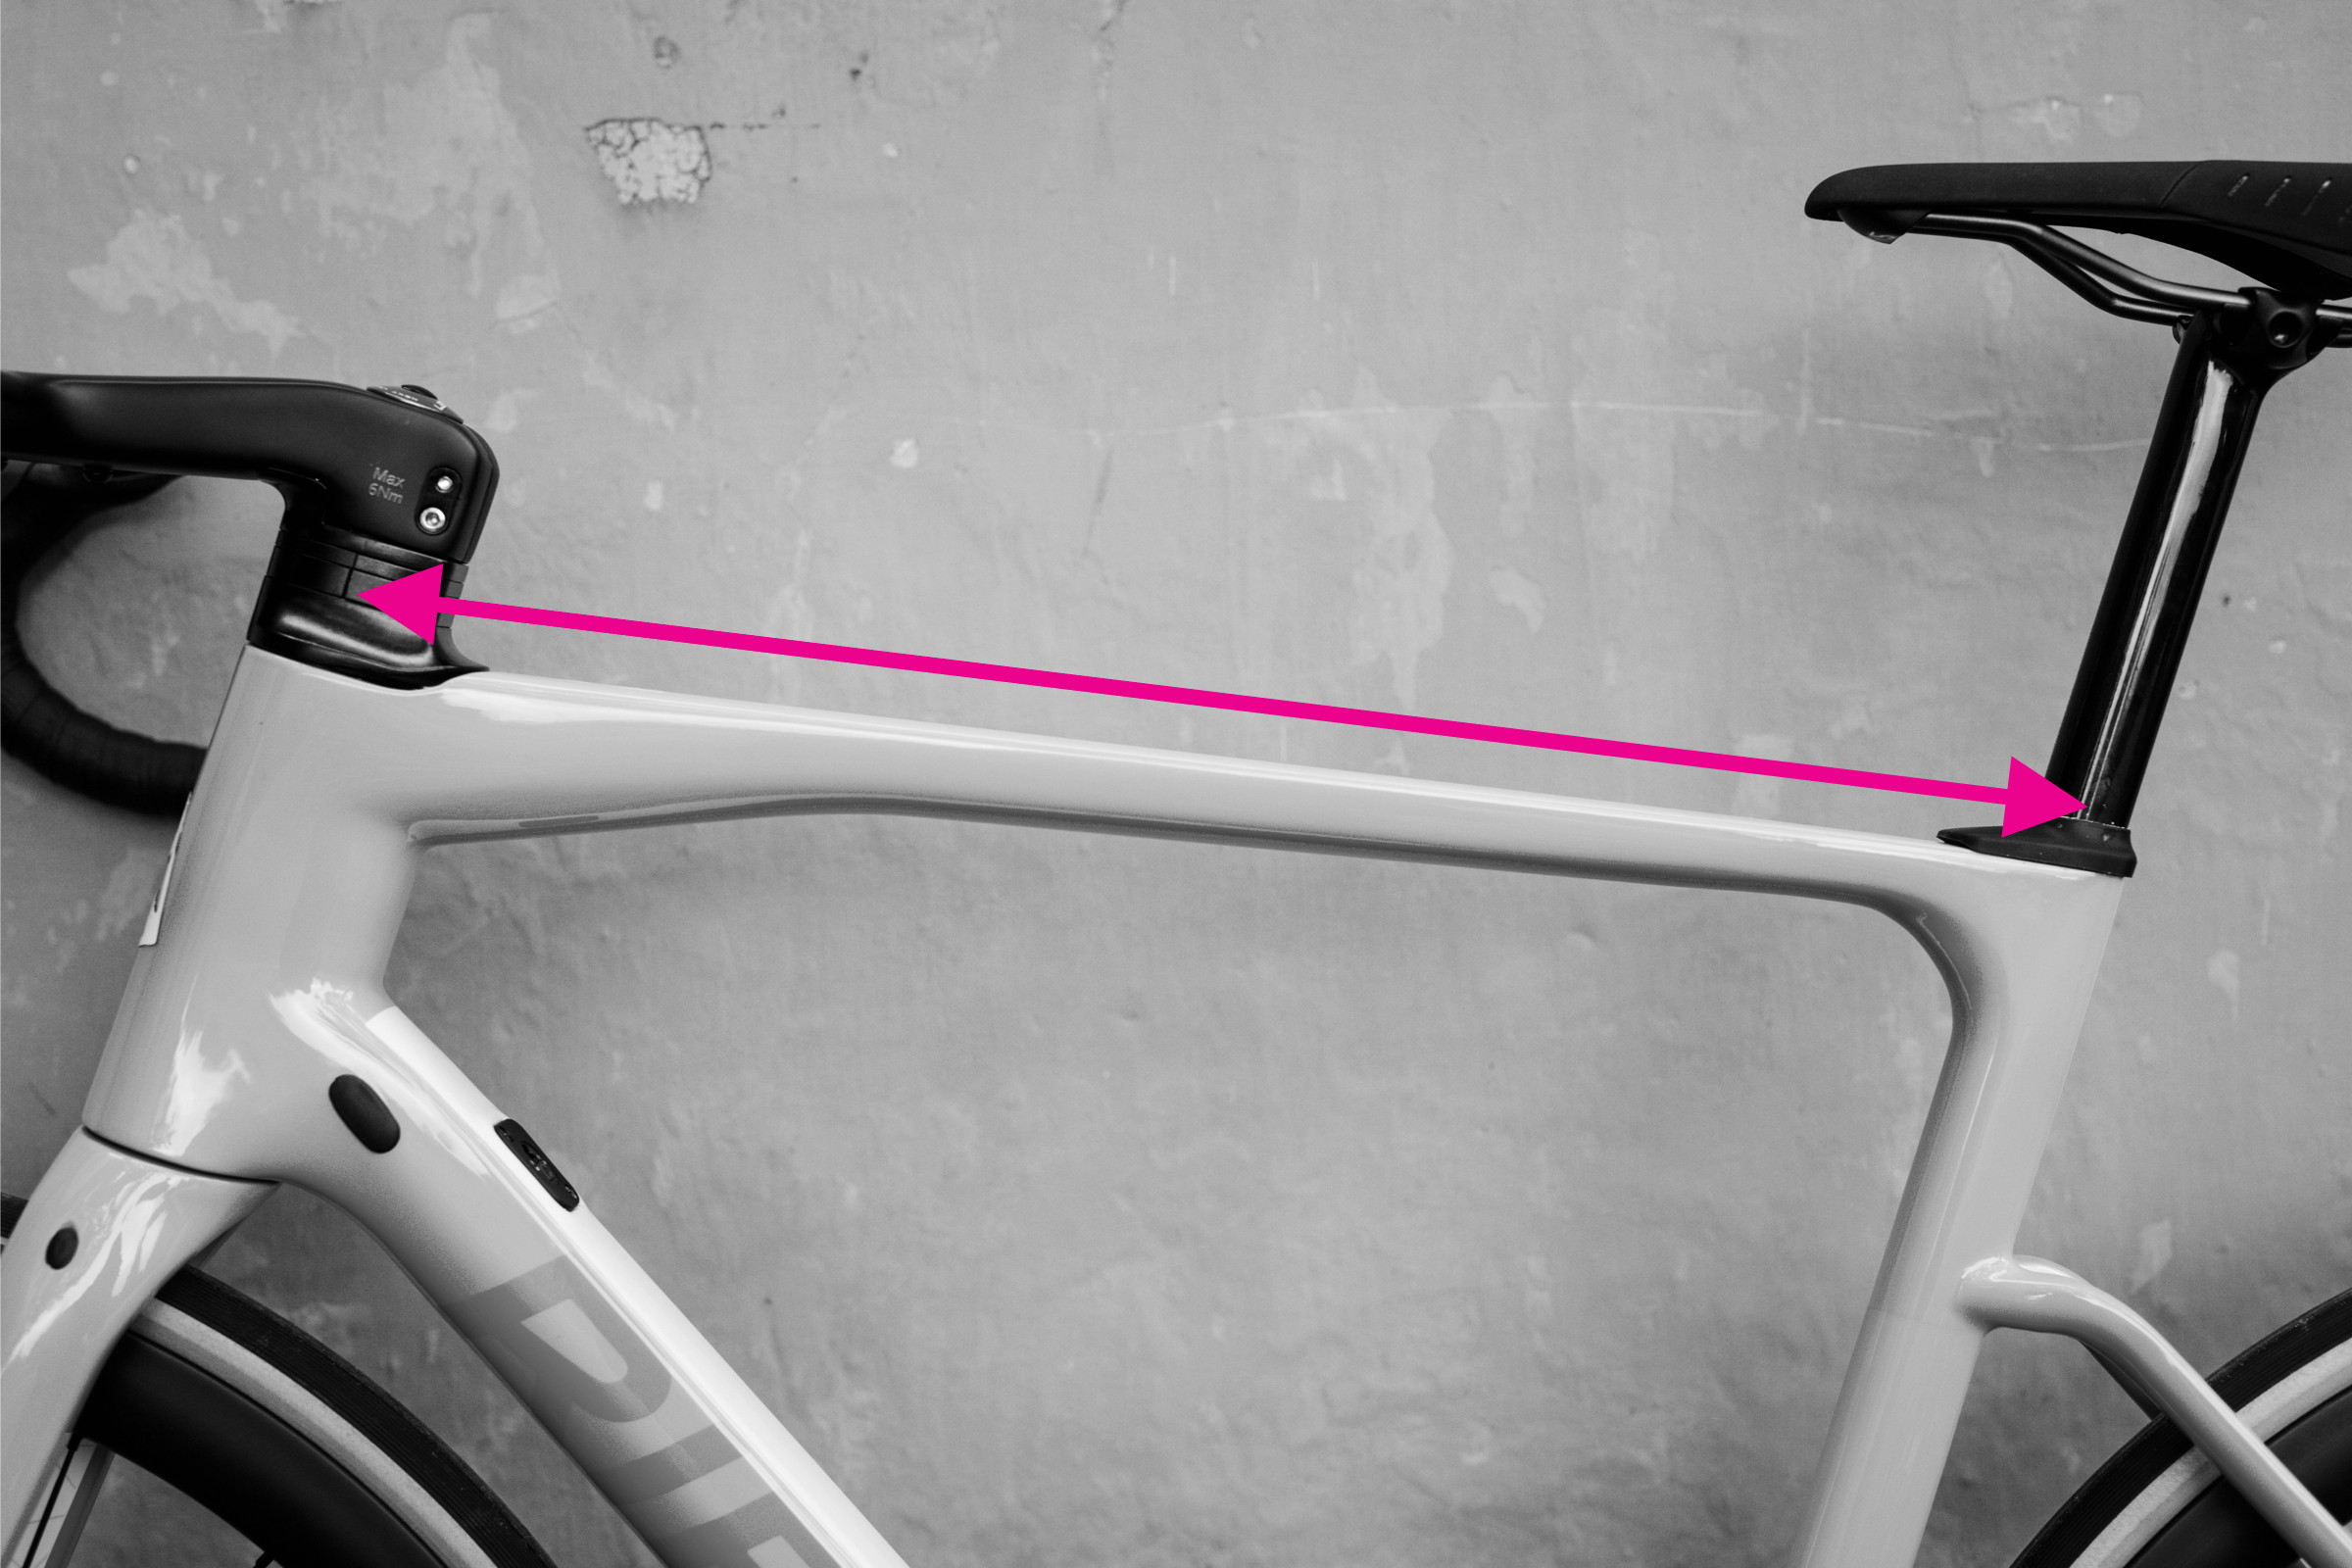 Top tube measurement demonstrated on a bike frame
Understanding how to measure top tube length is crucial because it directly impacts your riding posture and comfort. Many manufacturers use top tube length to size road bikes, although mountain bikes are often sized using S, M, L, etc.
4. How Do I Measure Seat Tube Length Correctly?
Measuring seat tube length accurately is essential for determining the correct saddle height and overall bike fit. Follow these steps:
- Measure Straight-Line Distance: Measure the straight-line distance between the center of the bottom bracket and the top of the seat tube.
- Account for Seat Tube Extensions: Be aware that some bikes, like the Trek Madone, have seat tube extensions above the top tube junction, which can complicate the measurement.
- Avoid Following the Tube’s Line: For mountain bikes, which often have a kink in the seat tube, avoid following the line of the tube itself, as this will result in a longer measurement.
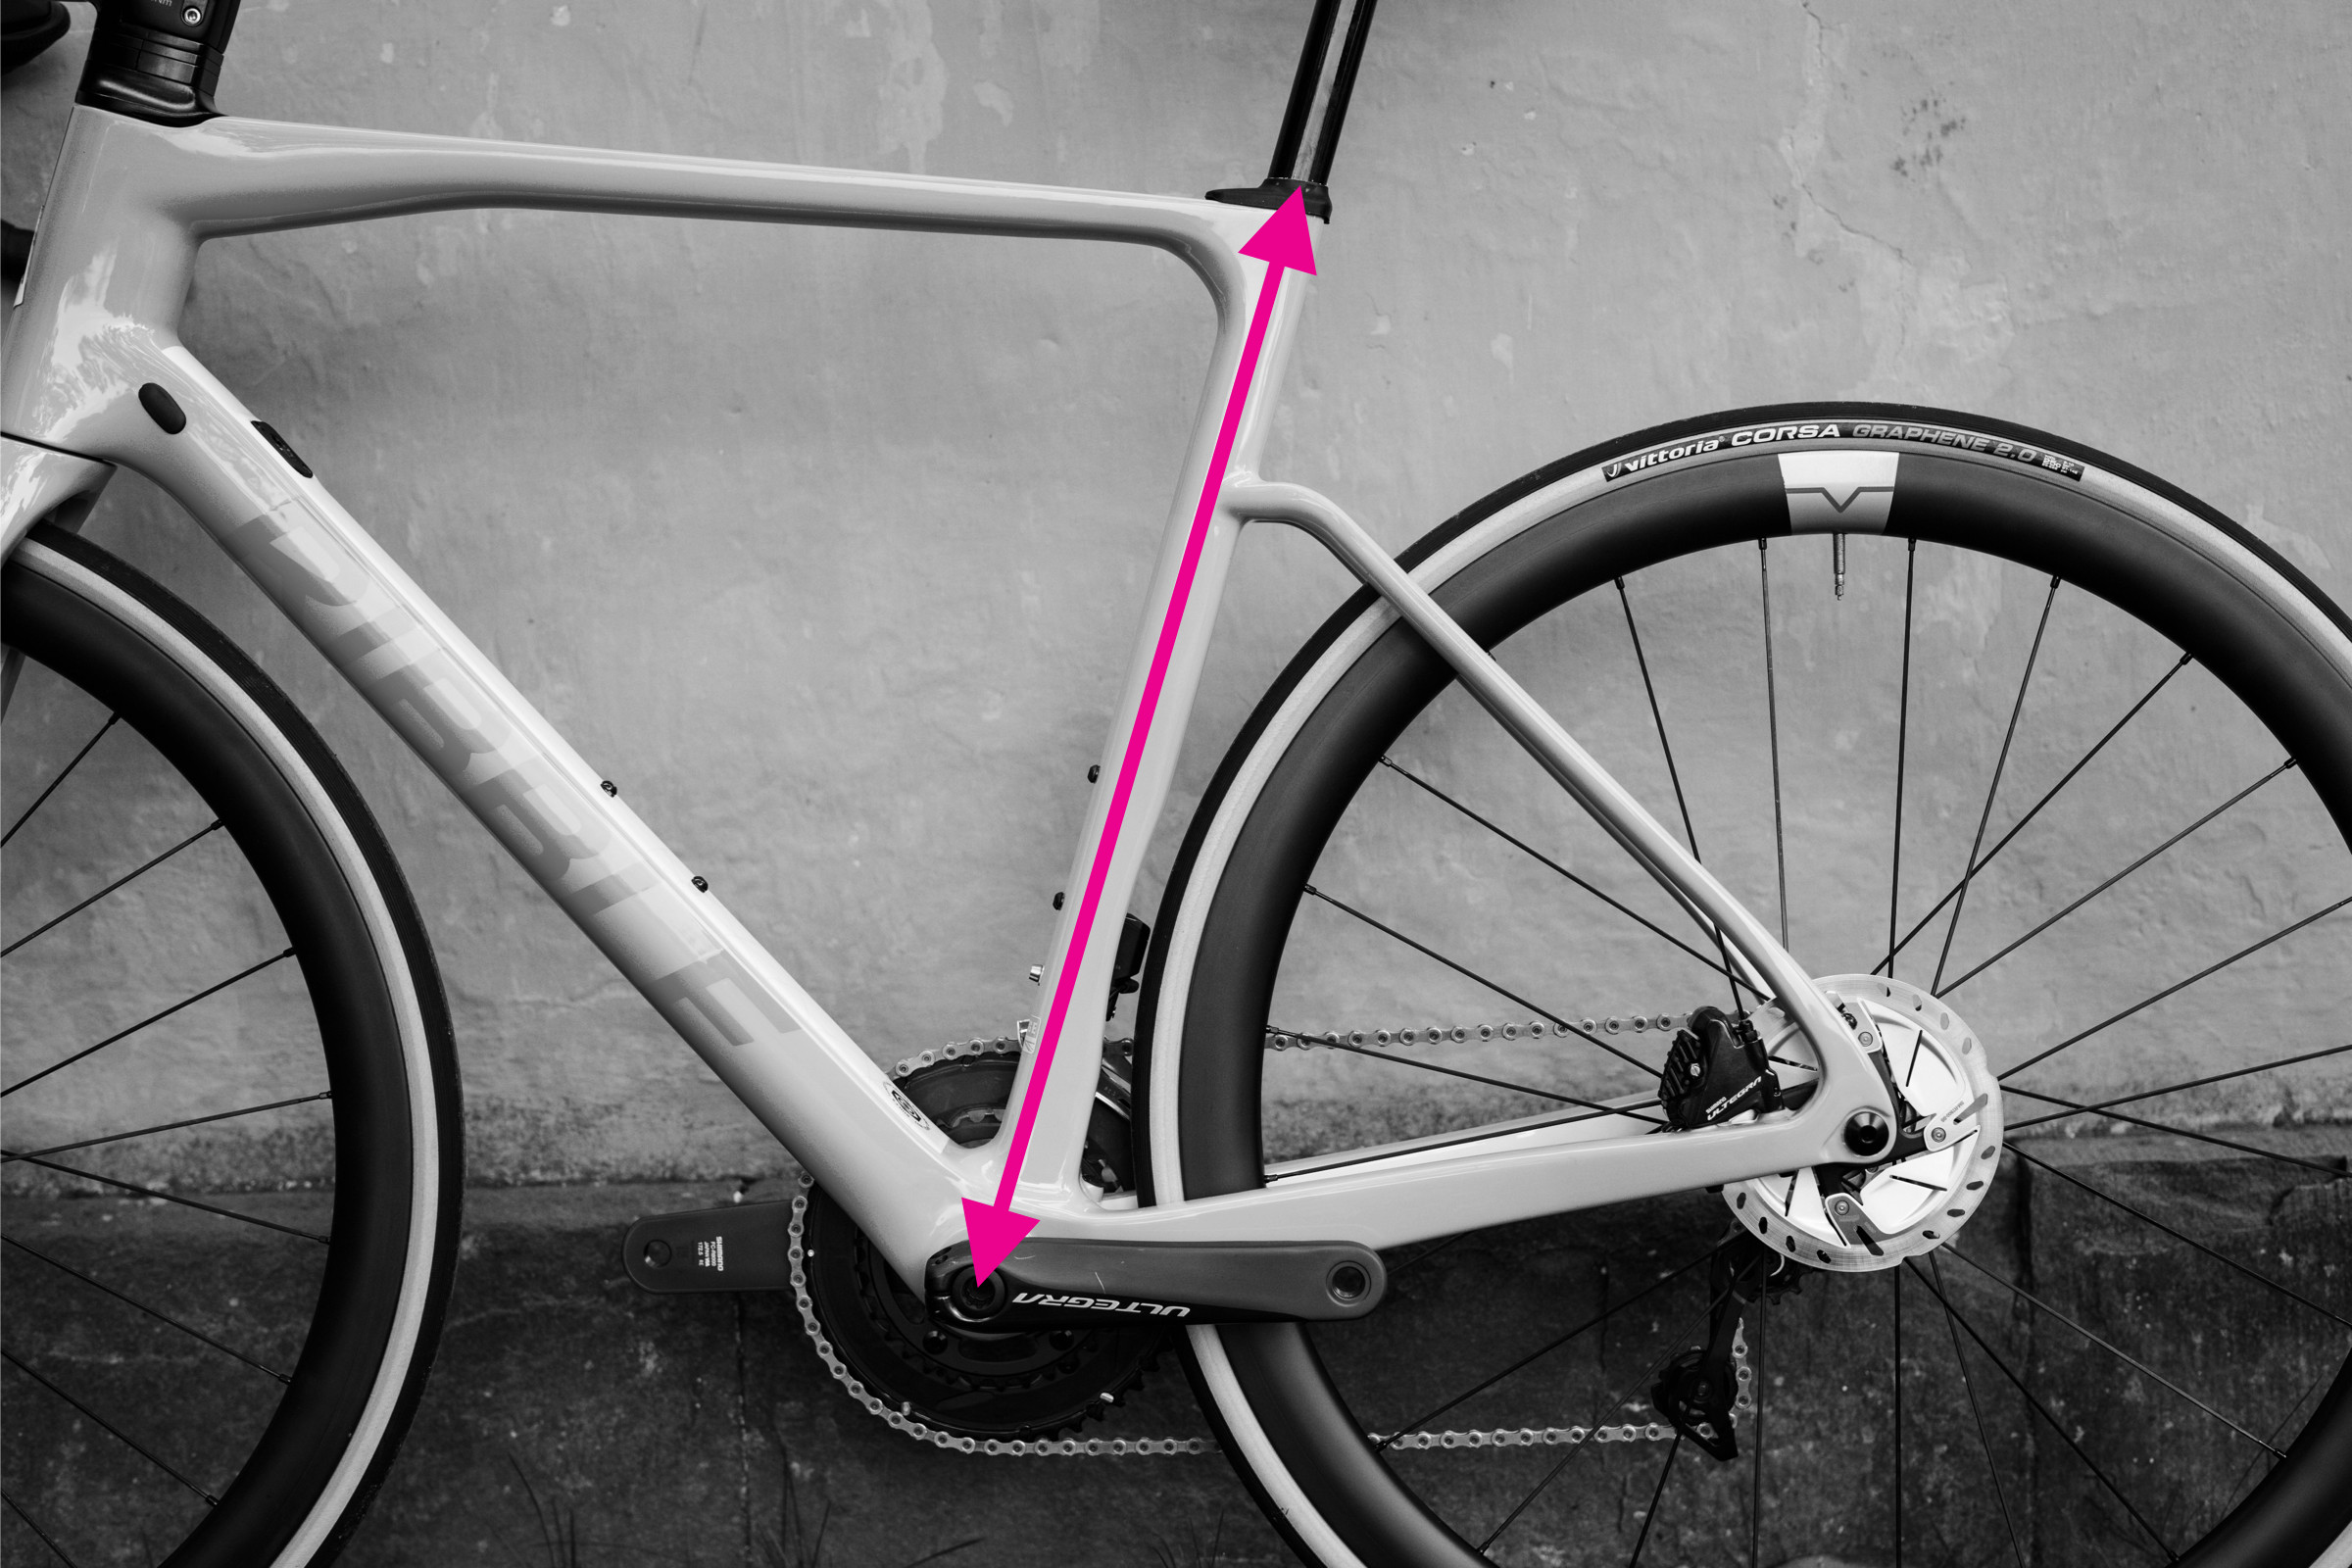 Seat tube measurement demonstrated on a bicycle frame
To ensure accuracy, line up your straight edge with the bottom bracket center and the top of the seat tube and measure along this line. This measurement is vital for setting your saddle height correctly.
5. What Is The Best Way To Measure Reach And Stack?
Reach and stack are key measurements for comparing frames and determining bike fit, as they are independent of frame design. Here’s how to measure them:
- Measure Reach: The reach is the horizontal distance between the bottom bracket and the top of the head tube.
- Use a spirit level and plumb line to ensure accurate horizontal and vertical references.
- Align the top edge of the level with the centerline of the top of the head tube.
- Move the level until the plumb line intersects with the center of the bottom bracket spindle.
- Measure the distance between the top of the plumb line and the head tube to get your reach.
- Measure Stack: The stack is the vertical distance between the bottom bracket and the top of the head tube.
- Once you’ve set up to record your reach, you can also measure your stack by following the plumb line.
- Alternatively, measure the vertical distance from the ground to the top of your head tube and subtract the height of your bottom bracket from the ground.
 Stack and reach measurement demonstrated on a bike frame
Measuring reach and stack can be tricky and may require a second pair of hands. Repeating the measurements ensures consistency and accuracy. These values are critical for achieving a comfortable and efficient riding position.
6. How Do I Measure Wheelbase For My Bike Frame?
The wheelbase is a crucial measurement that affects a bike’s ride quality and stability. Here’s how to measure it:
- Measure Between Axles: The wheelbase is the distance between the front and rear axles.
- Ensure Fork Alignment: Make sure the fork is straight ahead, or the measurement will be incorrect.
- Repeat Measurement: Like reach and stack, it’s worth repeating the measurement several times to ensure you get the same number.
- Average Both Sides: Increase accuracy by measuring the wheelbase on both sides of the bike and taking the average to compensate for any slight fork misalignment.
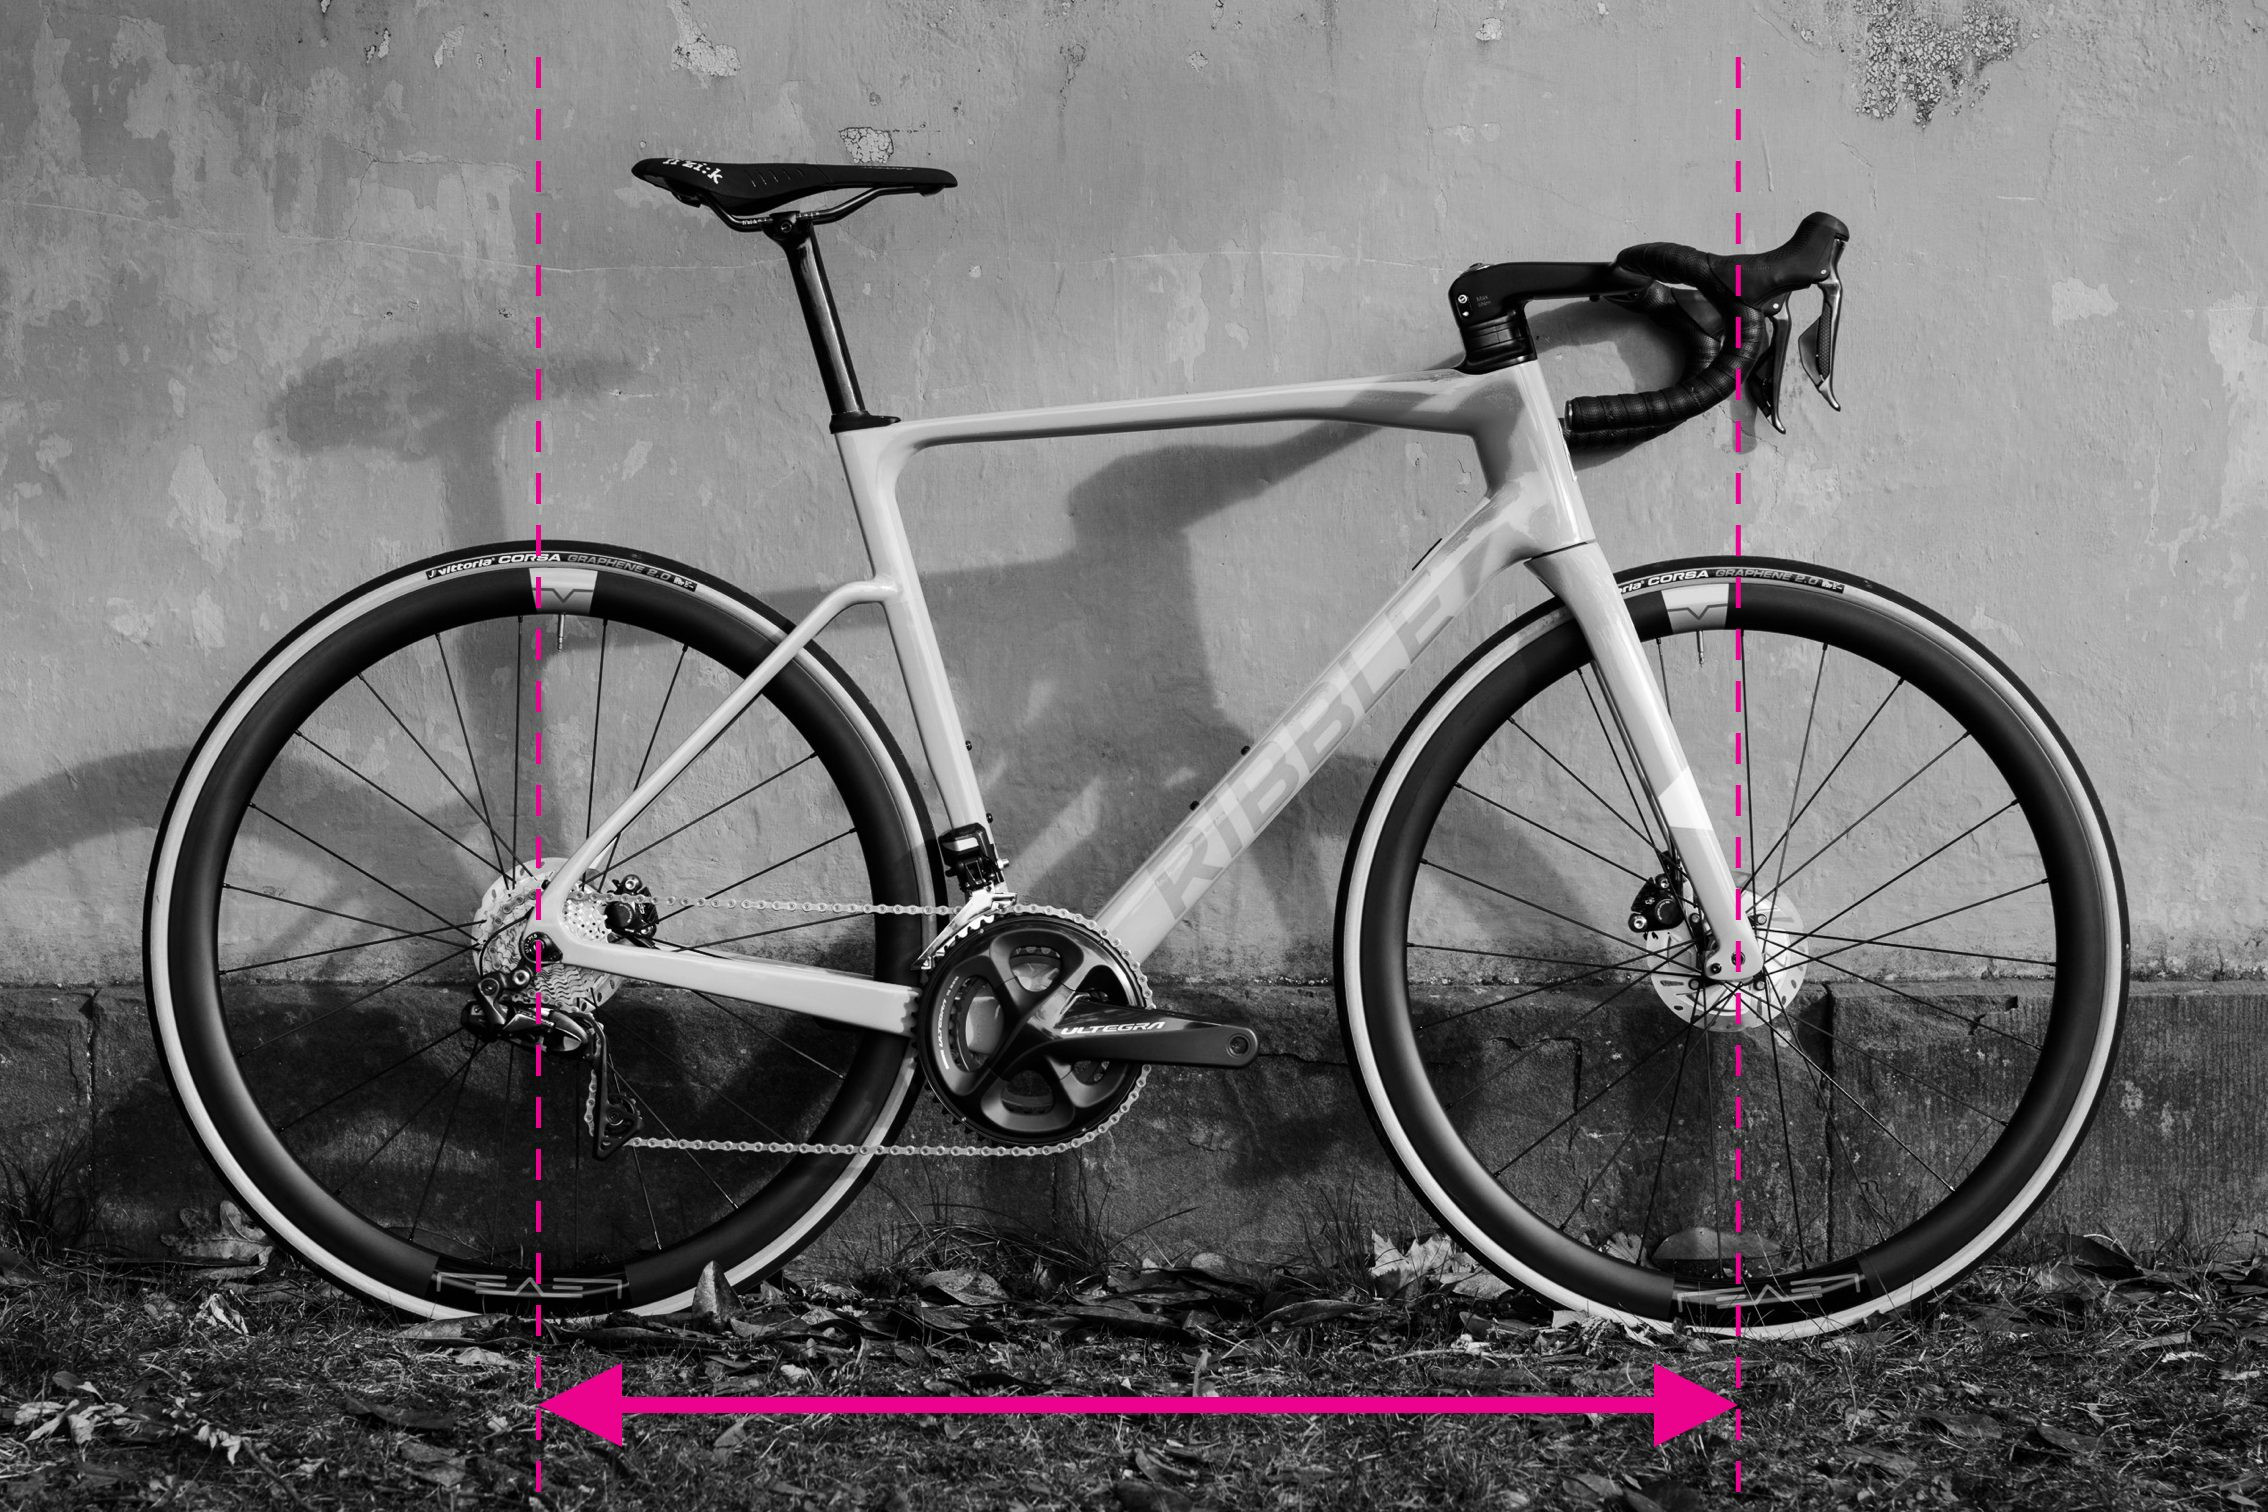 Wheelbase measurement demonstrated on a bike frame
Measuring the wheelbase accurately helps you understand how stable and responsive your bike will be. A longer wheelbase typically offers more stability, while a shorter one can make the bike feel more nimble.
7. How Can I Measure Chainstay Length Precisely?
Chainstay length significantly influences a bike’s handling characteristics. Here’s how to measure it precisely:
- Measure Straight-Line Distance: The chainstay length is the straight-line distance between the center of the bottom bracket axle and the center of the rear dropout.
- Use a Ruler or Tape Measure: Use a ruler or tape measure to accurately measure this distance.
 Chainstay length measurement demonstrated on a bike frame
A frame with shorter chainstays will typically feel more lively, while longer chainstays can enhance stability, especially at higher speeds. Knowing your chainstay length helps you understand the bike’s handling dynamics.
8. What Is The Proper Way To Measure Front Center?
The front center measurement, along with the chainstay length, determines the wheelbase and affects handling. Here’s how to measure it correctly:
- Measure from Axle to Front Dropout: The front center is the distance from the center of the bottom bracket axle to the front dropout.
- Use a Tape Measure: Use a tape measure to accurately determine this distance.
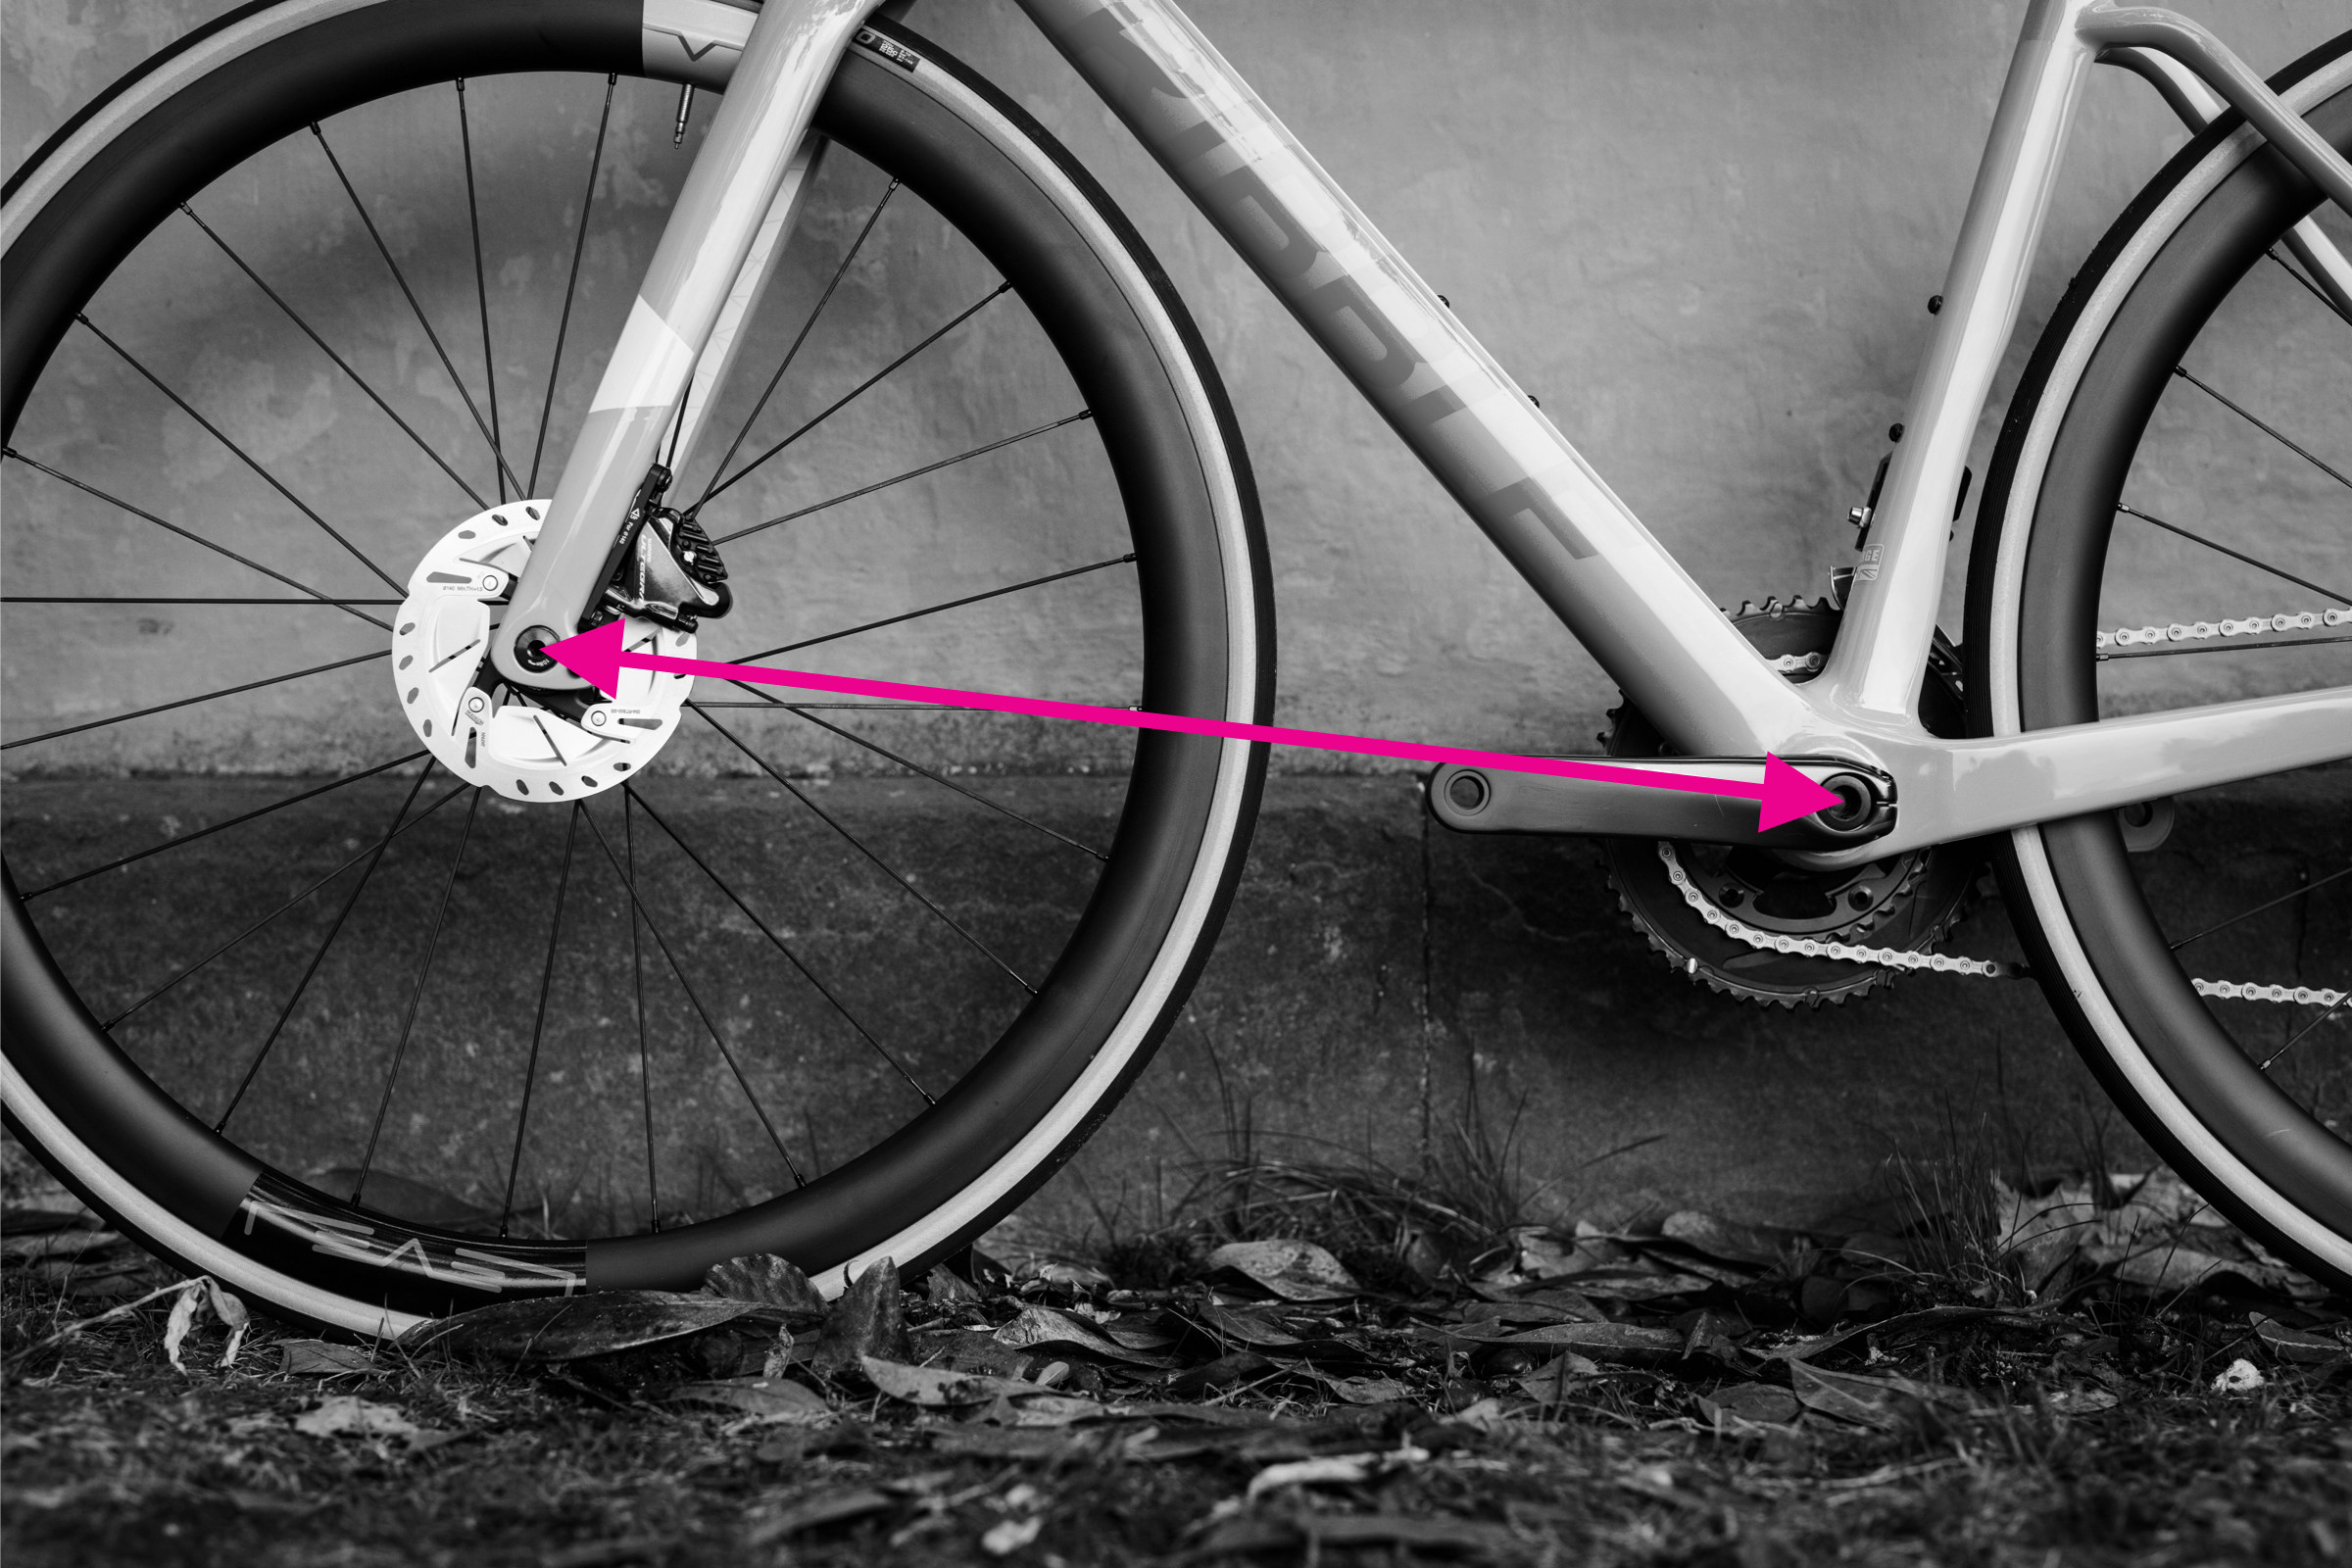 Front centre measurement demonstrated on a bike frame
While not often quoted by bike makers, the front center is a valuable measurement for understanding a bike’s overall geometry and handling characteristics. It affects weight distribution and how the bike responds to steering inputs.
9. How Do I Measure Seat Tube And Head Tube Angles Accurately?
Seat tube and head tube angles are crucial for determining a bike’s handling and riding position. Here’s how to measure them accurately using a clinometer app:
- Measure Seat Tube Angle:
- For straight seat tubes, line up your smartphone and read the number from the clinometer app.
- Ensure the bike is vertical and standing on a horizontal surface for an accurate reading.
- If there’s a kink in your seat tube, use a straight edge to follow the line between the bottom bracket shell and the top of the seat tube, then line up the phone with this.
- Measure Head Tube Angle:
- Most newer bikes have tapered head tubes, so the angle of the front of the head tube will not be the same as the angle of its centerline.
- Get close to the centerline by holding your phone at the angle of the centerline or by using a straight edge to line up with the centers of the top and bottom of the head tube.
- Alternatively, if you have straight fork legs without an angle at their crown, the angle of the legs will be the same as the head tube angle, so you can measure this instead. Again, it’s important to have the bike standing vertically.
 Seat and head tube measurements demonstrated on a bike frame
More upright tube angles typically lead to more nimble handling. These angles play a significant role in how the bike feels and performs.
10. How Can I Measure Bottom Bracket Drop Precisely?
The bottom bracket drop affects the bike’s stability and cornering ability. Here’s how to measure it precisely:
- Measure Axle and Bottom Bracket Heights: Find the height of the rear axle and the height of the bottom bracket.
- Subtract the Values: Subtract the height of the rear axle from the height of the bottom bracket to find the bottom bracket drop.
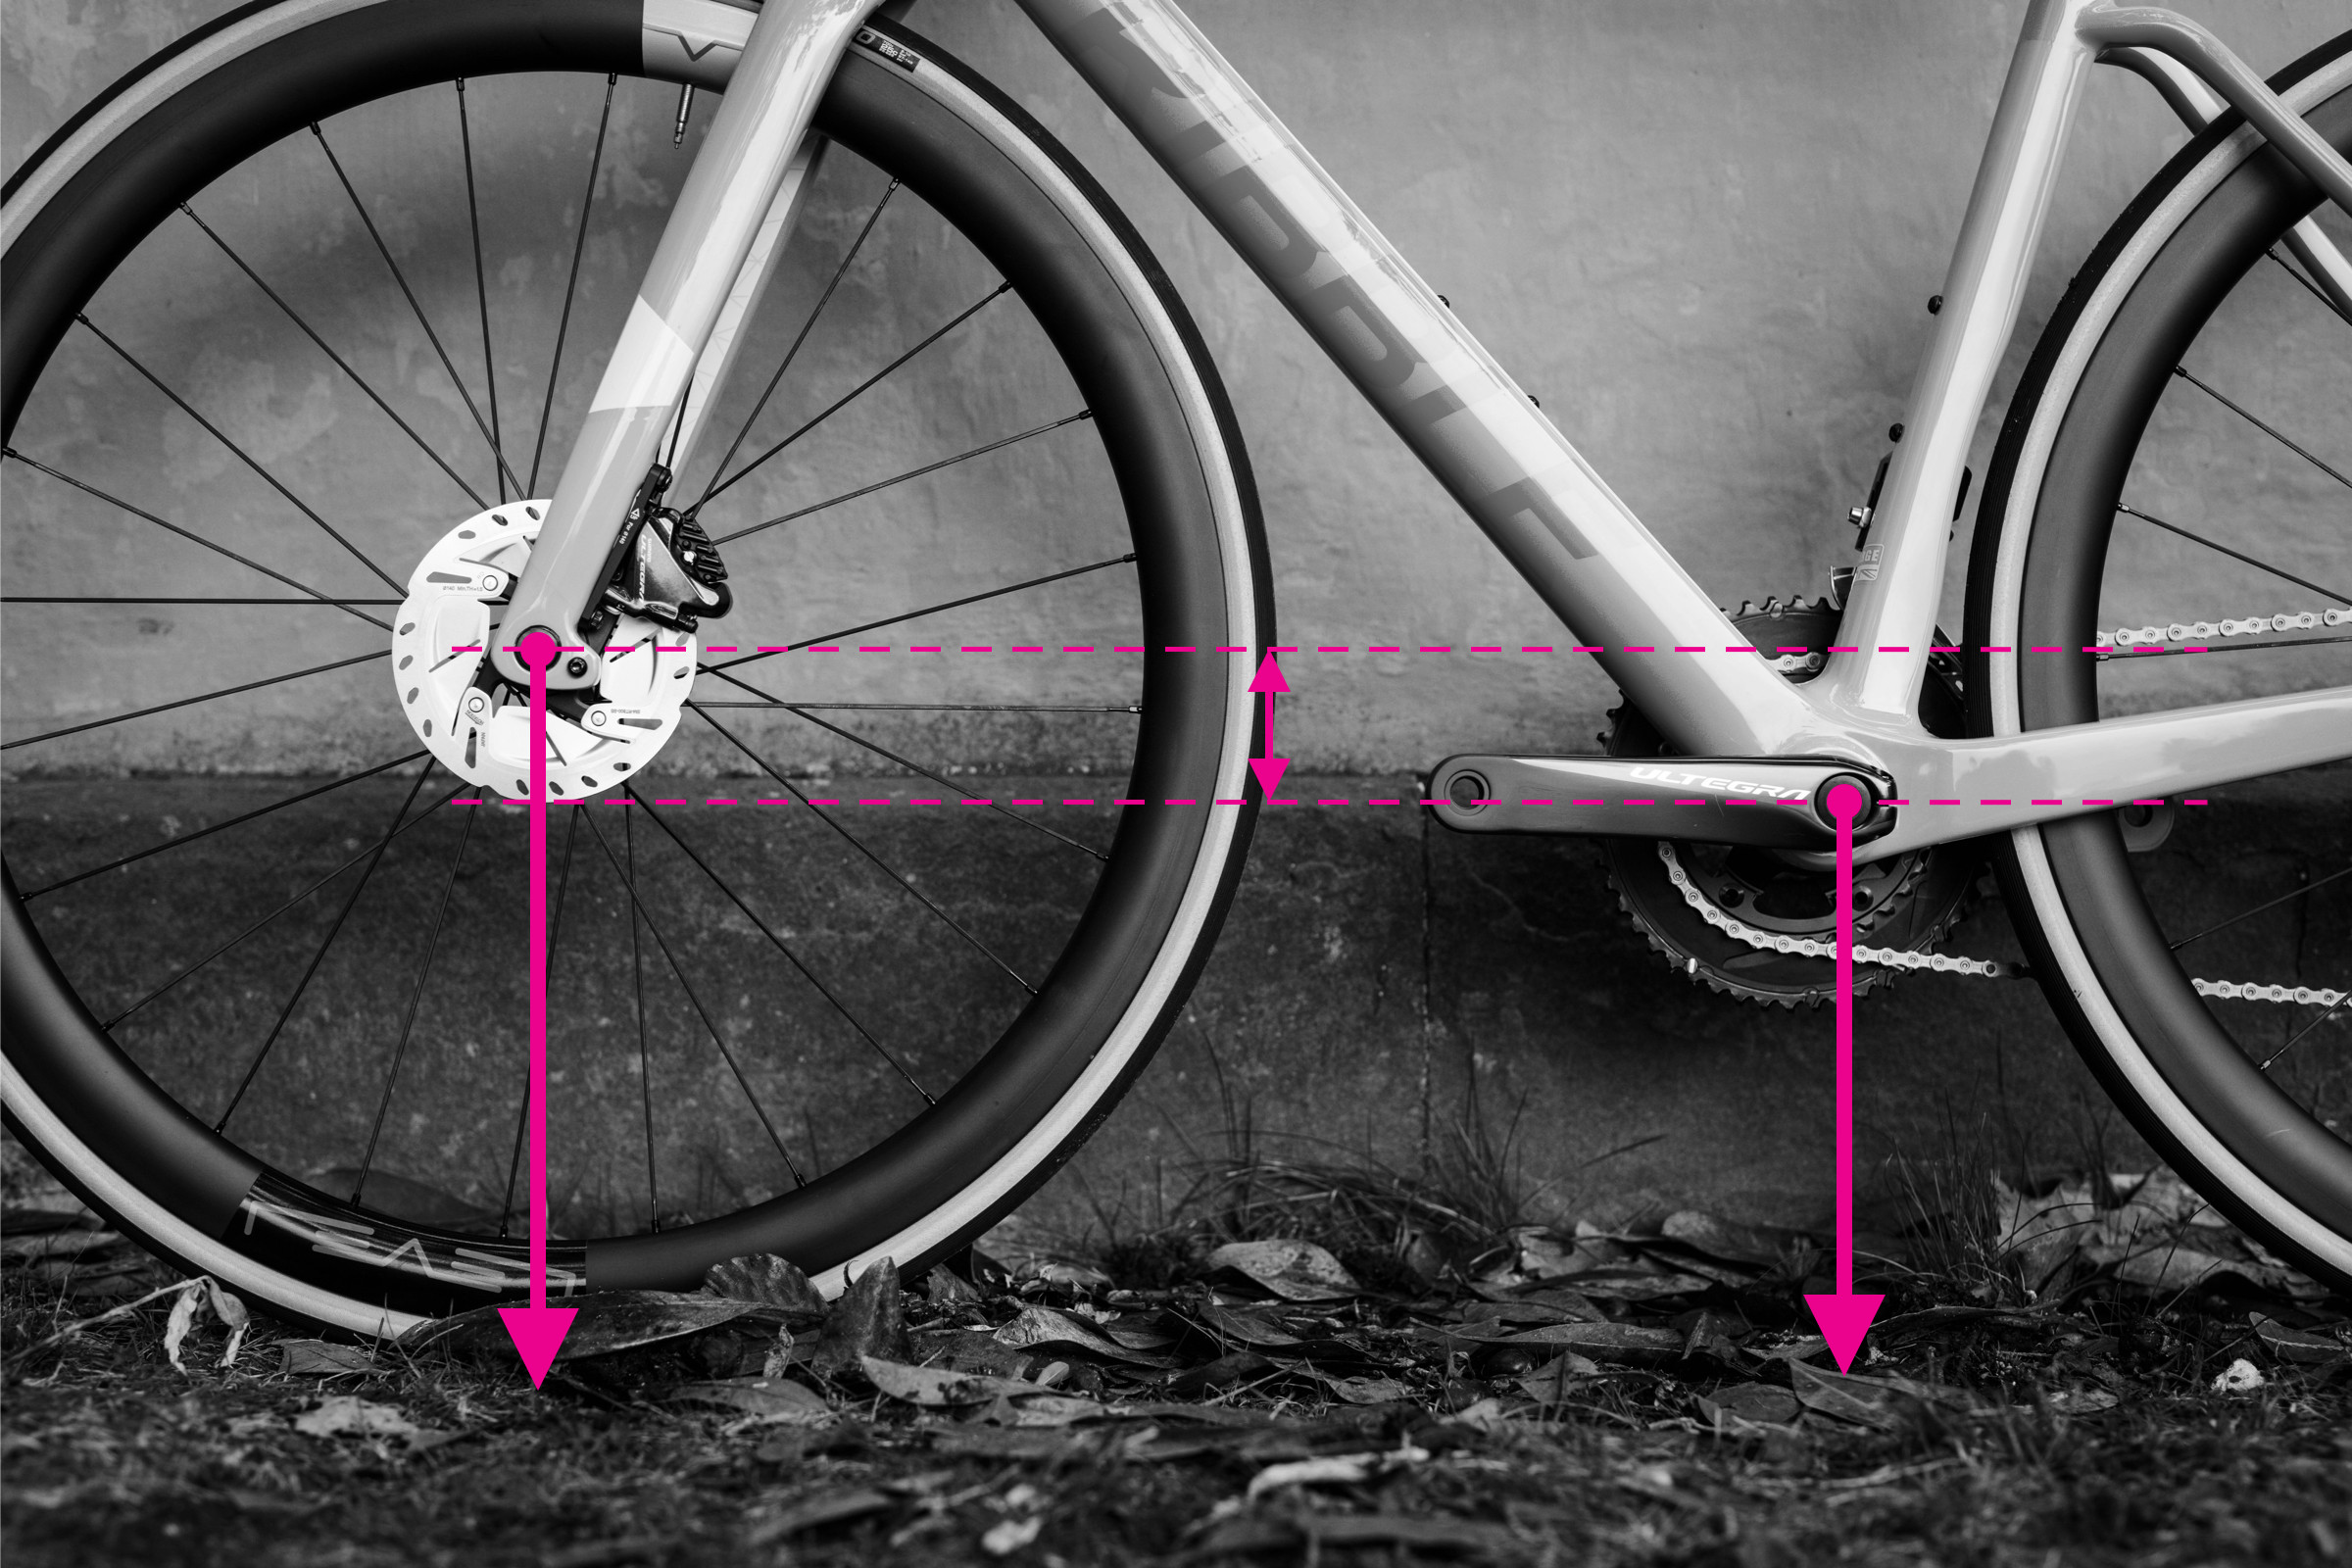 BB drop measurement demonstrated on a bike frame
This measurement is a key value quoted by bike brands on their geometry charts. A larger bottom bracket drop can enhance stability, while a smaller drop may improve cornering clearance.
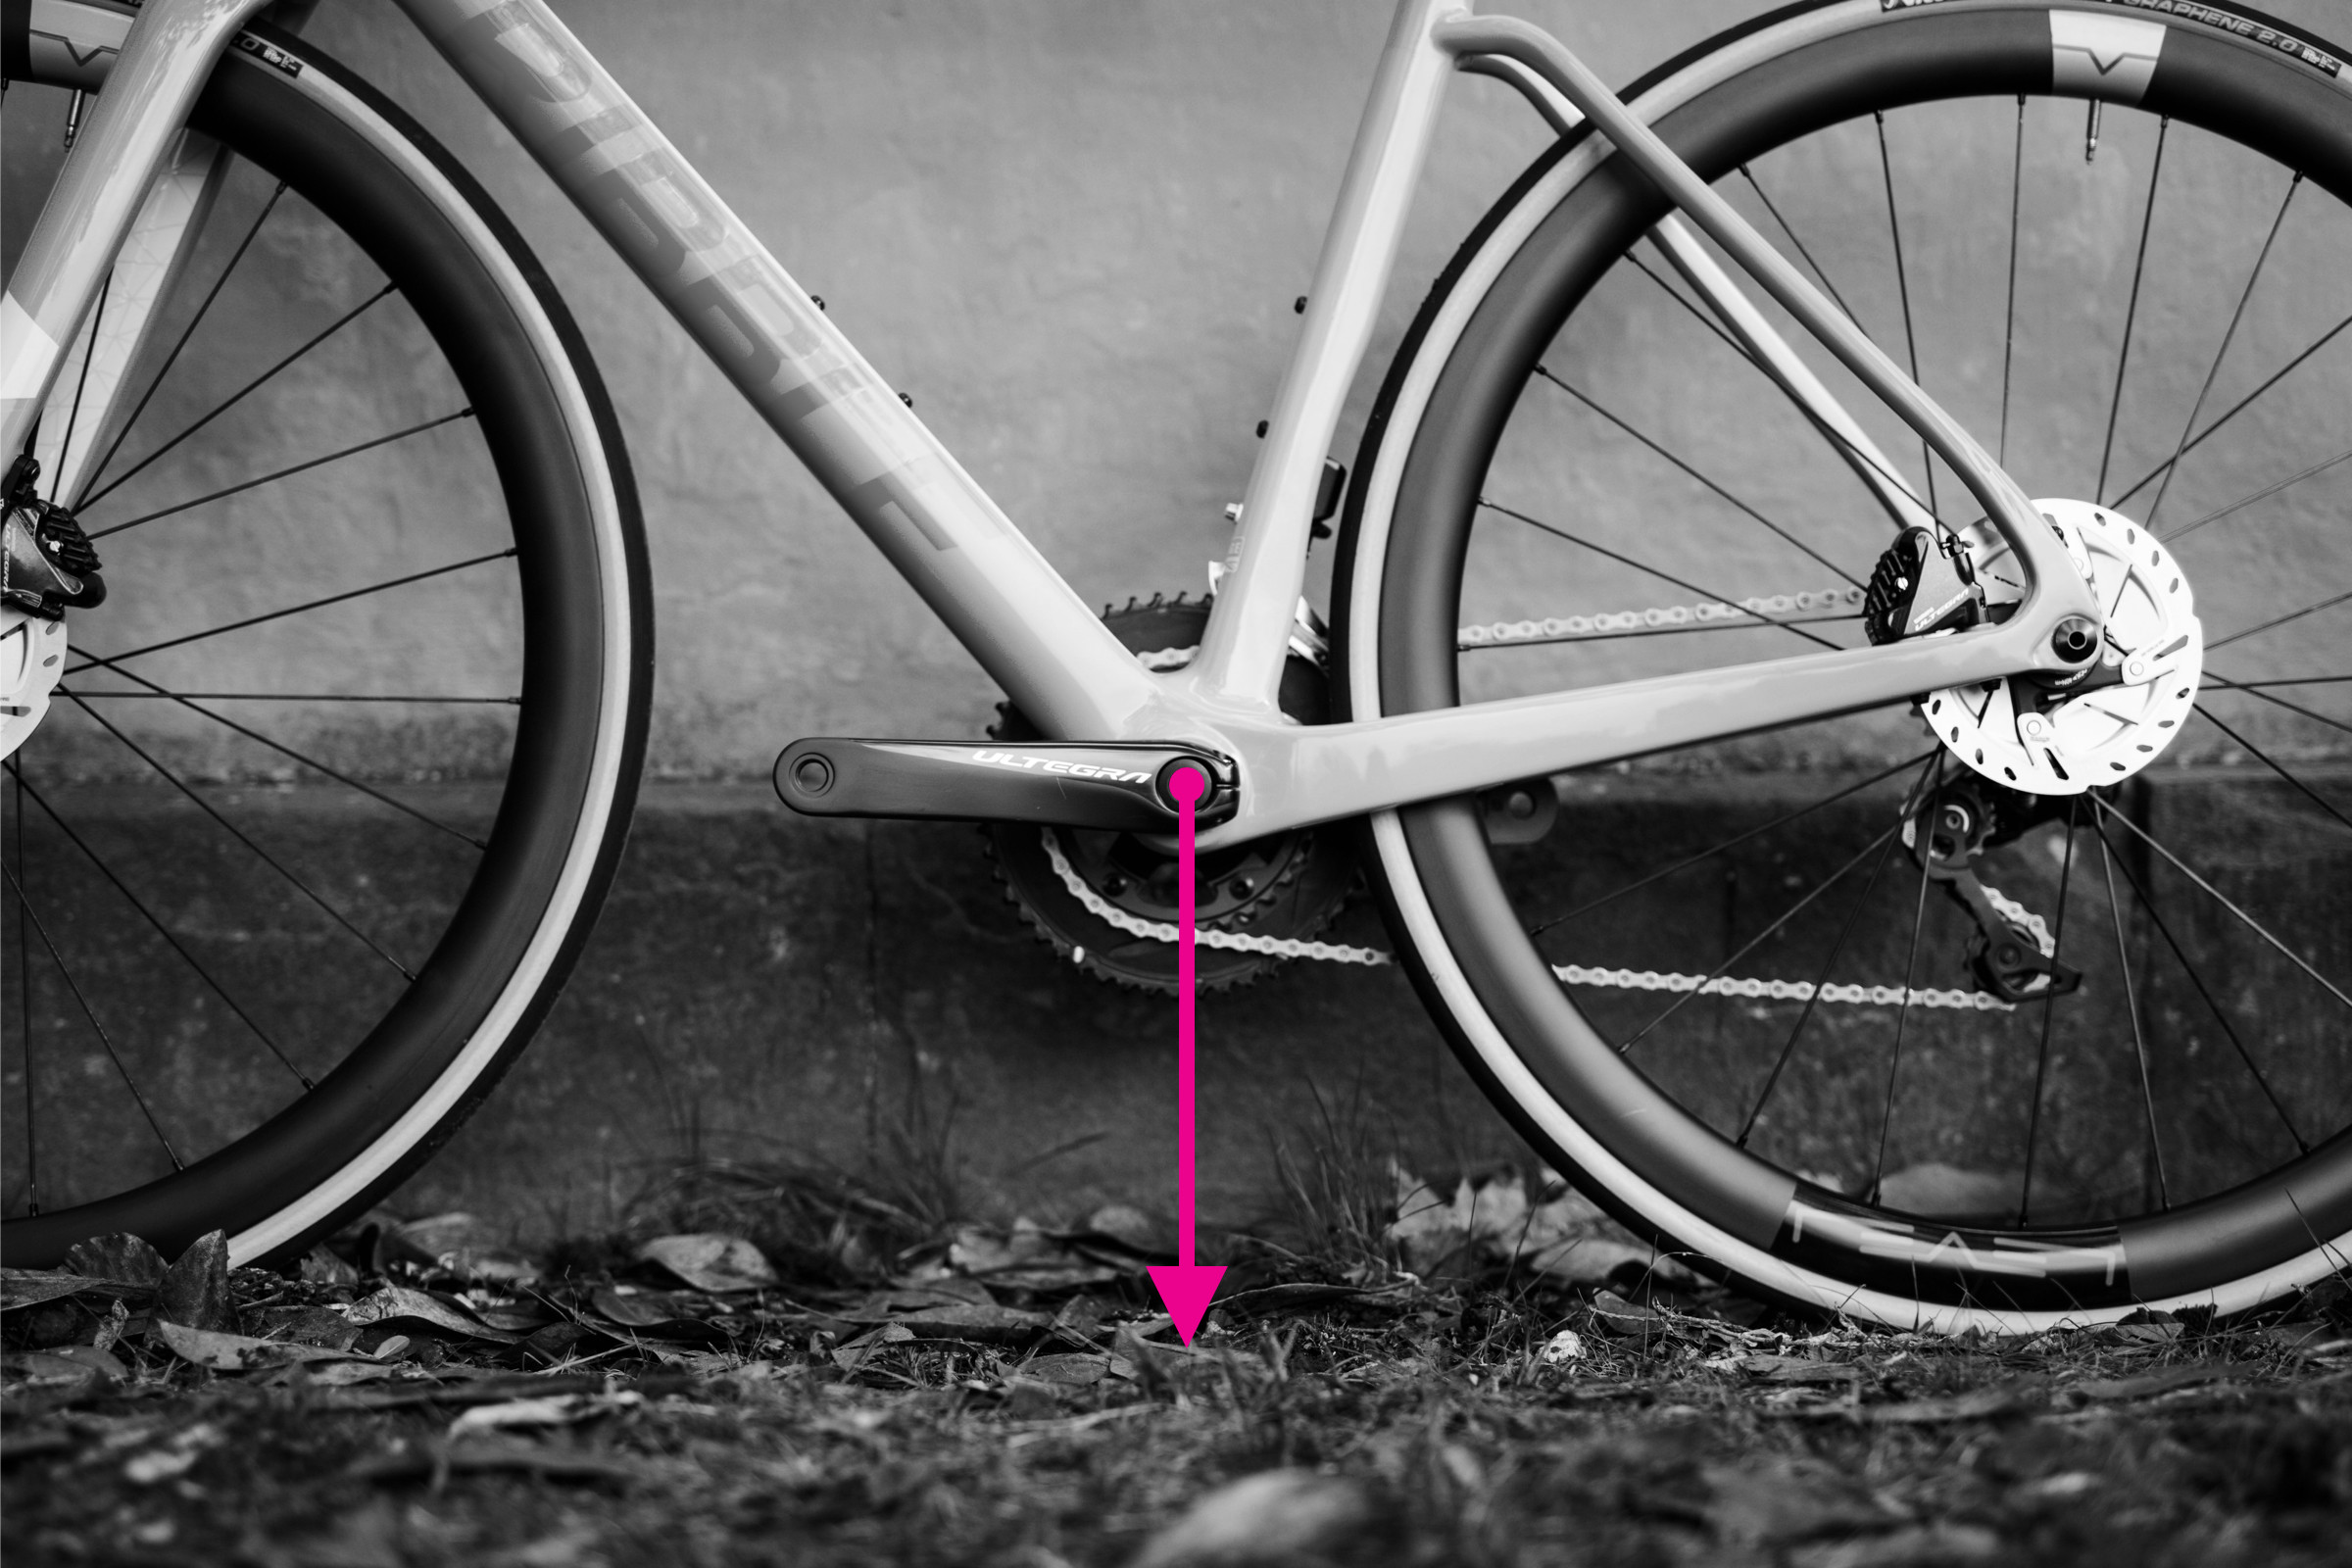
11. What Is The Best Way To Measure Bottom Bracket Height?
Bottom bracket height influences the bike’s stability and clearance over obstacles. Follow these steps to measure it accurately:
- Measure Distance from Ground to Bottom Bracket: Measure the distance from the ground to the center of the bottom bracket shell.
- Keep Bike Upright: Be careful to keep your bike straight upright for an accurate reading.
- Inflate Tires: Inflate your tires to your usual running pressure, as tire pressure can slightly affect the measurement.
 Bottom bracket height measurement demonstrated on bike frame
Measuring bottom bracket height accurately helps you understand how the bike will handle on different terrains.
12. How To Choose The Right Mountain Bike Frame Size For Your Height?
Choosing the right mountain bike frame size is crucial for comfort, control, and overall riding experience. Here’s a general guide based on height:
| Height (Feet) | Height (cm) | Frame Size (Inches) | Frame Size (Typical) |
|---|---|---|---|
| 4’11” – 5’3″ | 150 – 160 | 13 – 15 | Extra Small (XS) |
| 5’3″ – 5’7″ | 160 – 170 | 15 – 17 | Small (S) |
| 5’7″ – 5’11” | 170 – 180 | 17 – 19 | Medium (M) |
| 5’11” – 6’2″ | 180 – 190 | 19 – 21 | Large (L) |
| 6’2″ – 6’6″ | 190 – 200 | 21 – 23 | Extra Large (XL) |
Note: These are general guidelines. Actual sizing can vary based on the manufacturer and bike geometry. Always check the manufacturer’s sizing chart for the most accurate recommendation.
13. Why Are Reach And Stack Important For Mountain Bike Sizing?
Reach and stack are essential measurements because they provide a more accurate indication of how a bike will fit, regardless of traditional frame sizing conventions.
- Reach: Determines the horizontal distance between the bottom bracket and the handlebars. It influences how stretched out or upright your riding position will be.
- Stack: Determines the vertical distance between the bottom bracket and the handlebars. It affects how high or low your handlebars will be relative to your saddle.
By focusing on reach and stack, you can compare bikes from different manufacturers more effectively and find a frame that matches your preferred riding posture and body dimensions. According to research from the American Motorcyclist Association (AMA), reach and stack measurements offer a consistent method for evaluating bike fit.
14. What Are The Common Mistakes To Avoid When Measuring A Mountain Bike Frame?
When measuring a mountain bike frame, avoid these common mistakes to ensure accuracy:
- Not Using the Right Tools: Relying on inaccurate tools like flimsy tape measures or not using a spirit level can lead to incorrect measurements.
- Measuring on Uneven Surfaces: Ensure the bike is on a level surface to get accurate vertical and horizontal measurements.
- Ignoring Sloping Top Tubes: Failing to account for sloping top tubes when measuring top tube length can result in an incorrect virtual top tube length.
- Not Repeating Measurements: Taking measurements only once can lead to errors. Repeat each measurement to confirm accuracy.
- Overlooking Tire Inflation: Not inflating tires to the correct pressure can affect bottom bracket height and other ground-related measurements.
- Misinterpreting Geometry Charts: Not understanding the definitions and implications of different geometry measurements can lead to poor frame size choices.
Avoiding these mistakes will help you obtain accurate measurements and make informed decisions when selecting a mountain bike frame.
15. How Do Different Frame Materials Affect Mountain Bike Sizing And Fit?
The frame material of a mountain bike can influence its overall feel and performance, but it doesn’t directly affect the sizing or fit. Frame materials like aluminum, carbon fiber, steel, and titanium have different properties that impact ride quality, weight, and durability.
- Aluminum: Offers a balance of stiffness, weight, and affordability. Aluminum frames are often more rigid, providing efficient power transfer.
- Carbon Fiber: Known for its lightweight and vibration-damping properties. Carbon frames can be designed to offer a comfortable ride while remaining stiff and responsive.
- Steel: Provides a smooth and compliant ride quality. Steel frames are durable and can absorb bumps and vibrations effectively.
- Titanium: Offers a combination of durability, lightweight, and excellent ride quality. Titanium frames are corrosion-resistant and can provide a comfortable and responsive ride.
While the material doesn’t change the frame’s dimensions, it can affect how the bike feels and responds to different riding conditions.
16. How Do I Adjust My Mountain Bike After Measuring To Achieve Optimal Comfort?
After measuring your mountain bike frame and ensuring it’s the right size, make these adjustments to achieve optimal comfort:
- Saddle Height: Adjust the saddle height so that your leg has a slight bend at the bottom of the pedal stroke. Your knee should not be fully extended or too bent.
- Saddle Fore/Aft Position: Adjust the saddle’s fore/aft position to ensure your knee is aligned over the pedal spindle when the crank is in the horizontal position.
- Handlebar Height: Adjust the handlebar height by moving spacers above or below the stem. Experiment to find a comfortable position that doesn’t strain your back or neck.
- Handlebar Reach: Adjust the handlebar reach by changing the stem length. A shorter stem will bring the handlebars closer, while a longer stem will increase the reach.
- Handlebar Angle: Adjust the handlebar angle by rotating the handlebars in the stem clamp. Find an angle that feels comfortable and natural for your wrists.
- Brake Lever and Shifter Position: Adjust the position of your brake levers and shifters on the handlebars to ensure they are easily accessible and comfortable to use.
Making these adjustments will help you fine-tune your bike’s fit and achieve a comfortable and efficient riding position.
17. What Are The Signs That My Mountain Bike Frame Is Too Big Or Too Small?
Recognizing the signs that your mountain bike frame is the wrong size is crucial for avoiding discomfort and potential injuries. Here are some indicators that your frame may be too big:
- Excessive Reach: Feeling overly stretched out to reach the handlebars, leading to discomfort in your back, shoulders, and wrists.
- Difficulty Handling: Difficulty maneuvering the bike, especially on technical trails, due to the bike’s large size.
- Saddle Height Issues: Difficulty achieving the correct saddle height, even with the seat post fully extended.
Here are some signs that your frame may be too small:
- Cramped Cockpit: Feeling cramped and unable to move freely on the bike.
- Knee Pain: Experiencing knee pain due to excessive knee bend at the top of the pedal stroke.
- Limited Handling Control: Feeling unstable and having difficulty controlling the bike, especially at higher speeds.
If you experience any of these issues, it’s essential to reassess your frame size and make adjustments or consider a different bike.
18. How Does Mountain Bike Frame Sizing Differ For Men And Women?
Mountain bike frame sizing can differ slightly for men and women due to differences in average body proportions. Women typically have shorter torsos and longer legs compared to men of the same height. As such, women’s-specific bikes often have:
- Shorter Top Tubes: To accommodate shorter torsos and reduce reach to the handlebars.
- Narrower Handlebars: To better fit narrower shoulders.
- Women’s-Specific Saddles: Designed to provide more comfort for female anatomy.
- Lower Standover Height: To improve clearance and comfort when standing over the bike.
While women can ride unisex bikes, women’s-specific models often provide a more comfortable and efficient fit for female riders.
19. Can I Use An Online Bike Sizing Calculator To Determine My Mountain Bike Frame Size?
Yes, online bike sizing calculators can be a useful starting point for determining your mountain bike frame size. These calculators typically ask for information such as your height, inseam, arm length, and riding style. Based on this information, they provide a recommended frame size range.
However, keep in mind that online calculators are not a substitute for a professional bike fit. They provide a general recommendation, but individual body proportions and riding preferences can significantly impact the ideal frame size. Always verify the results with a test ride and consider consulting with a bike fit specialist for personalized advice.
20. What Are The Latest Trends In Mountain Bike Frame Geometry And Sizing?
The latest trends in mountain bike frame geometry and sizing focus on improving stability, handling, and overall rider confidence. Some key trends include:
- Longer Reach: Providing more room to move on the bike and improving stability at higher speeds.
- Slacker Head Tube Angles: Improving downhill performance and stability.
- Steeper Seat Tube Angles: Improving climbing efficiency and positioning the rider over the pedals.
- Lower Bottom Bracket Heights: Enhancing stability and cornering ability.
- Shorter Chainstays: Improving agility and responsiveness.
These trends are aimed at creating bikes that are more capable and confidence-inspiring on a wider range of terrain. Stay updated with the latest developments in mountain bike frame geometry to make informed decisions when purchasing a new bike.
21. How Does Mountain Bike Frame Size Affect Handling And Performance?
Mountain bike frame size significantly affects handling and performance. A frame that’s too large can make the bike feel cumbersome and difficult to control, especially on technical trails. It can also lead to discomfort and strain on your back, shoulders, and wrists.
A frame that’s too small can feel cramped and unstable, limiting your ability to move freely and control the bike effectively. It can also cause knee pain and reduce your climbing efficiency.
The right frame size provides a balanced and comfortable riding position, allowing you to maintain control, efficiently transfer power, and confidently tackle various terrains. Proper frame sizing is crucial for optimizing your mountain biking experience.
22. What Are The Benefits Of Getting A Professional Bike Fit After Measuring My Frame?
Getting a professional bike fit after measuring your frame offers numerous benefits:
- Personalized Fit: A professional bike fitter will assess your unique body proportions, flexibility, and riding style to optimize your bike’s fit to your specific needs.
- Injury Prevention: Proper bike fit can help prevent common cycling injuries such as knee pain, back pain, and neck pain.
- Increased Comfort: A well-fitted bike will be more comfortable to ride, allowing you to enjoy longer rides without discomfort.
- Improved Efficiency: Optimizing your riding position can improve your pedaling efficiency and power output.
- Enhanced Performance: A professional bike fit can help you ride faster, climb more efficiently, and handle the bike with more confidence.
Investing in a professional bike fit is a worthwhile investment for any serious cyclist looking to maximize their comfort, performance, and enjoyment of the sport.
Measuring your mountain bike frame is the first step towards achieving a comfortable and efficient ride. By understanding the key measurements, using the right tools, and following our detailed instructions, you can ensure your bike fits you perfectly. And don’t forget to visit usabikers.net for more expert tips, reviews, and community discussions about all things biking!
Ready to take your mountain biking experience to the next level? Visit usabikers.net today to explore our extensive collection of articles, reviews, and community forums. Connect with fellow bikers, share your experiences, and discover the latest trends in the world of mountain biking. Don’t miss out – join the usabikers.net community now and ride on! Address: 801 Sturgis Main St, Sturgis, SD 57785, United States. Phone: +1 (605) 347-2000.