
Fixing a bike cable can seem daunting, but it’s a manageable task with the right knowledge. At usabikers.net, we offer detailed guidance on adjusting your bike’s cables for optimal performance, ensuring smooth rides and preventing potential damage. Whether you’re dealing with shifting problems or brake issues, understanding how to properly adjust your cables is essential for any biker. Learn how to adjust your derailleurs, replace worn cables, and maintain your braking system with our expert tips. This ensures that you’re always ready for the open road with confidence and safety. By understanding the importance of maintaining your bike cables, and utilizing keywords LSI for better tuning, you are set for a safe riding experience.
1. What Are The Common Issues Related To Bike Cable?
The common issues related to bike cables include stretched or frayed cables, corroded cable housings, and improper cable tension, all of which can lead to poor shifting or braking performance. Addressing these issues promptly ensures a safe and enjoyable riding experience.
Here are some common issues and their solutions:
- Stretched Cables: Over time, cables can stretch, leading to slack and reduced responsiveness.
- Solution: Adjust cable tension using barrel adjusters or re-tension the cable at the derailleur or brake caliper.
- Frayed Cables: Cables can fray near the ends or where they pass through housings, causing friction and binding.
- Solution: Replace the frayed cable immediately to prevent breakage and ensure smooth operation.
- Corroded Cable Housings: Moisture and dirt can corrode the inside of cable housings, increasing friction and hindering cable movement.
- Solution: Replace corroded housings and lubricate new cables to prevent future corrosion.
- Improper Cable Tension: Too little tension can cause slow or incomplete shifting and braking, while too much tension can lead to premature wear and difficult lever operation.
- Solution: Adjust cable tension according to the manufacturer’s specifications, using barrel adjusters for fine-tuning.
- Contaminated Cables: Dirt, grease, and other contaminants can accumulate on cables, increasing friction and reducing performance.
- Solution: Clean cables regularly with a degreaser and lubricate them to maintain smooth operation. According to the Motorcycle Safety Foundation (MSF), cleaning and lubricating cables every three months can significantly improve performance.
- Kinked Cables: Cables that are bent or kinked can experience increased friction and reduced flexibility.
- Solution: Replace kinked cables, as they cannot be reliably straightened without compromising their integrity.
- Incorrect Cable Routing: Improperly routed cables can rub against the frame or other components, causing wear and reducing performance.
- Solution: Ensure cables are routed according to the bike manufacturer’s instructions, using cable guides to prevent rubbing.
- Binding Cables: Cables that bind within the housings can cause sticky or unresponsive shifting and braking.
- Solution: Check for tight bends or obstructions in the cable path and ensure housings are properly seated in their ferrules.
- Worn Cable Ends: The ends of cables can fray or become damaged, making it difficult to secure them properly.
- Solution: Use crimp-on cable ends to prevent fraying and ensure a secure connection.
- Incompatible Cables: Using the wrong type of cable for your bike’s components can lead to poor performance and premature wear.
- Solution: Always use cables that are specifically designed for your bike’s brake and derailleur systems.
 Bicycle Brake Cable Fray
2. How Do You Identify A Bike Cable That Needs Fixing Or Replacement?
You can identify a bike cable that needs fixing or replacement by checking for visible signs of wear, such as fraying or rust, and by noticing functional issues like sluggish shifting or braking. Regular inspection ensures timely maintenance and safety.
Here’s a detailed breakdown:
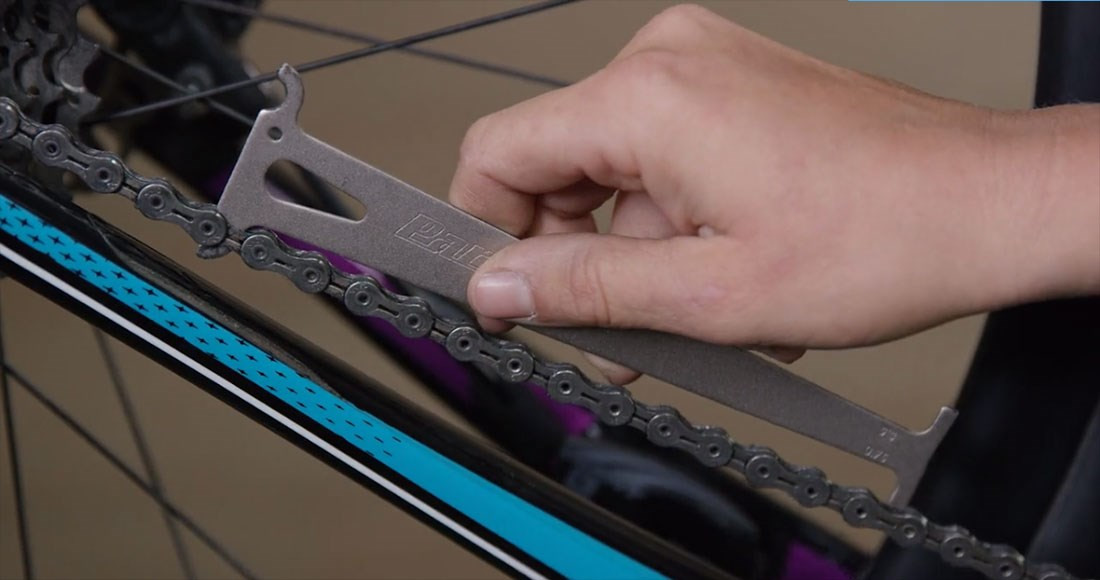
- Visual Inspection:
- Fraying: Look for frayed strands at the ends of the cable, especially near the derailleur or brake levers. Fraying indicates the cable is weakening and needs replacement. According to a study by the American Motorcyclist Association (AMA), frayed cables are a leading cause of mechanical failures in motorcycles and bicycles.
- Rust or Corrosion: Check for rust or corrosion on the cable, particularly where it enters the cable housing. Rust can increase friction and reduce cable performance.
- Kinks or Bends: Inspect the cable for any kinks or sharp bends. These can cause the cable to bind within the housing, affecting shifting and braking.
- Housing Condition: Examine the cable housing for cracks, splits, or compression. Damaged housing can allow dirt and moisture to enter, leading to corrosion and increased friction.
- Functional Assessment:
- Sluggish Shifting: If shifting is slow, hesitant, or requires excessive force, the cable may be stretched, dirty, or damaged.
- Poor Braking Performance: If brake levers feel spongy, require excessive travel, or provide weak stopping power, the brake cables may be stretched, frayed, or contaminated.
- Inconsistent Shifting or Braking: Inconsistent performance, such as difficulty shifting into certain gears or brakes grabbing unevenly, can indicate cable issues.
- Sticking Levers: If brake or shift levers stick or are slow to return to their original position, the cable may be binding within the housing.
- Audible Cues: Listen for unusual noises, such as squeaking or grinding, when operating the shifters or brakes. These sounds can indicate cable friction or corrosion.
- Cable Tension:
- Too Loose: If the cable feels slack or requires excessive lever travel to engage, it may be stretched or improperly adjusted.
- Too Tight: If the cable is overly tight, it can cause stiff lever action and premature wear on the components.
- Maintenance History:
- Regular Inspections: Schedule regular inspections of your bike’s cables as part of your maintenance routine.
- Replacement Intervals: Be aware of the recommended replacement intervals for cables, as specified by the bike manufacturer or component supplier. According to research from Park Tool, replacing cables every 12-24 months can prevent many common shifting and braking issues.
3. What Tools Do I Need To Fix A Bike Cable?
To fix a bike cable, you’ll need cable cutters, Allen wrenches, pliers, a new cable, cable housing (if needed), ferrules, and cable end crimps. Having these tools ensures you can efficiently and safely replace or adjust your bike cables.
Here’s a list of essential tools and their uses:
- Cable Cutters:
- Purpose: To cleanly cut the brake and shift cables without fraying the ends.
- Features: Look for cable cutters with hardened steel blades and ergonomic handles for comfortable use.
- Example: Park Tool CN-10 Professional Cable and Housing Cutter
- Allen Wrenches (Hex Keys):
- Purpose: To loosen and tighten bolts that secure the cables to the derailleurs and brake calipers.
- Sizes: A set of Allen wrenches in various sizes (typically 2mm to 8mm) is essential.
- Example: Bondhus Balldriver L-Wrench Set
- Pliers:
- Purpose: To grip and manipulate cables, housings, and small parts.
- Types: Needle-nose pliers and standard pliers are useful for different tasks.
- Example: Klein Tools D203-7 Side-Cutting Pliers
- Cable Housing Cutter:
- Purpose: To cleanly cut cable housing without crushing or deforming it.
- Features: Look for cutters with a built-in awl to open up the housing after cutting.
- Example: Jagwire Pro Cable Housing Cutter
- Cable and Housing Lubricant:
- Purpose: To reduce friction and prevent corrosion inside the cable housing.
- Types: Teflon-based lubricants are commonly used for their low friction properties.
- Example: Finish Line Dry Teflon Bicycle Chain Lube
- Ferrules:
- Purpose: To cap the ends of the cable housing, preventing fraying and ensuring a snug fit into the component.
- Sizes: Different sizes are available for brake and shift cable housings.
- Example: Shimano Shift Cable Housing Ferrules
- Cable End Crimps (Cable Tips):
- Purpose: To prevent the ends of the cut cables from fraying.
- Application: Crimp onto the cable end after cutting.
- Example: SRAM Cable Tips
- Third Hand Tool (Cable Puller):
- Purpose: To hold the brake pads against the rim or rotor while tightening the cable bolt.
- Features: Useful for brake adjustments, especially on mechanical disc brakes.
- Example: Park Tool BT-2 Cable Stretcher
- Torque Wrench:
- Purpose: To tighten bolts to the manufacturer’s specified torque, preventing damage to components.
- Range: A torque wrench with a range suitable for bicycle components (e.g., 2Nm to 25Nm) is recommended.
- Example: Park Tool TW-5.2 Torque Wrench
- Work Gloves:
- Purpose: To protect your hands from dirt, grease, and sharp edges.
- Example: Mechanix Wear Original Gloves
- Cleaning Supplies:
- Purpose: To clean cables, housings, and components before and after adjustments.
- Items: Rags, degreaser, and brushes are useful for cleaning.
- Example: Park Tool CB-4 Bio ChainBrite Degreaser
4. How To Fix A Bike Cable: Step-By-Step Guide
To fix a bike cable, start by loosening the old cable, removing it, and then threading the new cable through the housing. Secure it at the component, adjust the tension, and trim the excess cable, ensuring smooth operation of your brakes or gears.
Here’s a detailed guide on how to fix a bike cable:
Step 1: Gather Your Tools and Materials
Before you begin, make sure you have all the necessary tools and materials:
- New brake or shift cable
- Cable cutters
- Allen wrenches
- Pliers
- Cable housing (if needed)
- Ferrules
- Cable end crimps
- Lubricant
Step 2: Remove the Old Cable
- Shift Cables:
- Shift the derailleur to the smallest cog (for rear derailleur) or the inner chainring (for front derailleur).
- Loosen the cable anchor bolt on the derailleur using an Allen wrench.
- Pull the old cable out of the derailleur.
- Remove the cable from the shifter lever by pushing it through the opening.
- Brake Cables:
- Squeeze the brake lever to expose the cable anchor bolt on the brake caliper.
- Loosen the cable anchor bolt using an Allen wrench.
- Detach the cable from the brake caliper.
- Remove the cable from the brake lever, usually by maneuvering it through a slot or opening.
Step 3: Inspect and Replace Cable Housing (If Necessary)
- Inspect the Housing:
- Check the cable housing for cracks, kinks, or corrosion.
- If the housing is damaged, replace it to ensure smooth cable movement.
- Cut the Housing:
- Use a cable housing cutter to cut the new housing to the correct length.
- Ensure the cut is clean and the housing end is round.
- Install Ferrules:
- Place ferrules on both ends of the cable housing to protect the housing and provide a secure fit.
Step 4: Thread the New Cable
- Lubricate the Cable:
- Apply a thin layer of lubricant to the new cable to reduce friction inside the housing.
- Thread Through Housing:
- Carefully thread the cable through the cable housing, starting from the lever end.
- Ensure the cable passes smoothly through the entire length of the housing.
- Attach to the Component:
- For derailleurs, thread the cable through the cable anchor bolt on the derailleur.
- For brakes, thread the cable through the cable anchor bolt on the brake caliper.
Step 5: Secure and Adjust the Cable
- Pull the Cable Taut:
- Use pliers to pull the cable taut, removing any slack.
- Tighten the Anchor Bolt:
- Tighten the cable anchor bolt to secure the cable in place.
- Ensure the cable is properly seated and does not slip.
- Adjust Cable Tension:
- Use the barrel adjusters on the brake levers or derailleurs to fine-tune the cable tension.
- Turning the barrel adjuster counterclockwise increases tension, while turning it clockwise decreases tension.
Step 6: Test and Fine-Tune
- Test Shifting/Braking:
- Shift through all gears to ensure smooth and accurate shifting.
- Squeeze the brake levers to ensure firm and responsive braking.
- Fine-Tune Adjustments:
- Make small adjustments to the cable tension as needed to optimize performance.
- Ensure the brakes do not rub and the gears shift cleanly.
Step 7: Trim and Finish
- Trim Excess Cable:
- Use cable cutters to trim the excess cable, leaving about 1-2 inches beyond the anchor bolt.
- Install Cable End Crimp:
- Place a cable end crimp on the end of the cable to prevent fraying.
- Use pliers to crimp the end securely.
Step 8: Final Check
- Inspect Connections:
- Double-check all connections to ensure they are secure.
- Test Ride:
- Take the bike for a short test ride to verify that the shifting and braking are working properly.
 Bike Brake Cable Install
5. What Are The Best Practices For Maintaining Bike Cables To Prolong Their Lifespan?
Best practices for maintaining bike cables include regular cleaning, lubrication, and inspection for wear, along with prompt replacement of damaged housings and cables, ensuring optimal performance and longevity.
Here are some detailed practices:
- Regular Cleaning:
- Frequency: Clean your bike cables at least once a month, or more often if you ride in wet or dirty conditions.
- Process: Use a clean rag to wipe down the cables and housings, removing dirt, grime, and old lubricant. For tougher grime, use a mild degreaser.
- Rationale: Cleaning prevents the buildup of debris that can cause friction and wear.
- Proper Lubrication:
- Frequency: Lubricate your bike cables every 1-3 months, depending on riding conditions.
- Type of Lubricant: Use a Teflon-based lubricant designed for bicycle cables. Avoid using heavy oils or grease, as they can attract dirt.
- Application: Apply a small amount of lubricant to the cable where it enters the housing. Work the lubricant in by repeatedly squeezing the brake levers or shifting gears.
- Rationale: Lubrication reduces friction, allowing the cables to move smoothly within the housings.
- Inspect Regularly:
- Frequency: Inspect your bike cables before each ride, or at least once a week.
- What to Look For: Check for fraying, rust, kinks, and other signs of wear. Pay close attention to the cable ends and areas where the cable passes through housings.
- Rationale: Early detection of wear can prevent cable failure and ensure safe riding.
- Replace Worn Cables and Housings:
- When to Replace: Replace cables and housings as soon as you notice signs of wear, such as fraying, rust, or stiffness.
- Complete Replacement: When replacing a cable, it’s often a good idea to replace the housing as well, as the housing can also wear out over time.
- Rationale: Replacing worn components ensures optimal performance and prevents unexpected failures.
- Proper Cable Tension:
- Adjustment: Maintain proper cable tension to ensure accurate shifting and braking. Use the barrel adjusters on the brake levers and derailleurs to fine-tune the tension.
- Too Loose: Loose cables can result in sluggish shifting and braking.
- Too Tight: Overly tight cables can cause stiff lever action and premature wear.
- Rationale: Proper tension ensures responsive and reliable performance.
- Correct Cable Routing:
- Ensure Smooth Paths: Make sure your bike cables are routed correctly, following the manufacturer’s guidelines. Avoid sharp bends or kinks in the cable path.
- Use Cable Guides: Utilize cable guides to prevent the cables from rubbing against the frame or other components.
- Rationale: Proper routing minimizes friction and prevents damage to the cables and frame.
- Protect Cable Ends:
- Cable End Crimps: Use cable end crimps (also known as cable tips) to prevent the ends of the cut cables from fraying.
- Application: Crimp the end securely after cutting.
- Rationale: Prevents fraying, which can make it difficult to secure the cable properly.
- Store Your Bike Properly:
- Avoid Extreme Conditions: Store your bike in a cool, dry place away from direct sunlight and extreme temperatures.
- Rationale: Extreme conditions can accelerate cable wear and corrosion.
- Professional Maintenance:
- Regular Check-Ups: Take your bike to a professional mechanic for regular check-ups and maintenance.
- Expert Advice: A mechanic can identify potential issues and provide expert advice on cable maintenance and replacement.
- Rationale: Professional maintenance ensures your bike is in top condition and can help prevent major problems. According to a study by the Bicycle Product Suppliers Association (BPSA), bikes that receive regular professional maintenance have a significantly longer lifespan.
6. What Is The Cost Of Fixing A Bike Cable Vs. Hiring A Professional?
The cost of fixing a bike cable yourself ranges from $10 to $30 for parts and tools, while hiring a professional typically costs between $30 and $60, plus parts. DIY repairs save money, but professional service ensures expertise and proper adjustments.
Here’s a detailed cost comparison:
DIY (Do-It-Yourself) Repair
- Cost of Parts:
- Brake or Shift Cable: $5 – $15 per cable
- Cable Housing (if needed): $5 – $10 per section
- Ferrules and Cable End Crimps: $2 – $5 for a set
- Cost of Tools (if not already owned):
- Cable Cutters: $15 – $40 (a good quality cable cutter is a worthwhile investment)
- Allen Wrench Set: $10 – $30 (essential for most bike maintenance tasks)
- Pliers: $5 – $15 (for gripping and manipulating cables)
- Total DIY Cost:
- Minimum: $10 (if you already have the necessary tools and only need a cable)
- Maximum: $90 (if you need to purchase all the tools and parts)
- Pros:
- Cost Savings: Significantly cheaper than hiring a professional, especially if you already own the tools.
- Learning Experience: Provides an opportunity to learn about bike maintenance and repair.
- Convenience: You can do the repair on your own schedule.
- Cons:
- Initial Investment: Requires an initial investment in tools if you don’t already own them.
- Time Commitment: Can be time-consuming, especially if you are new to bike repair.
- Potential for Errors: If not done correctly, you could damage the bike or compromise safety.
Professional Repair
- Labor Costs:
- Basic Cable Replacement: $20 – $40 per cable
- Cable and Housing Replacement: $30 – $60 per cable
- Additional Adjustments: $10 – $20 (if additional adjustments are needed to ensure proper shifting or braking)
- Cost of Parts:
- Similar to DIY: The bike shop will typically charge a similar price for the parts as you would pay yourself.
- Total Professional Cost:
- Minimum: $30 (for a simple cable replacement with no housing replacement or additional adjustments)
- Maximum: $80 (for a cable and housing replacement with additional adjustments)
- Pros:
- Expertise: Professional mechanics have the knowledge and experience to diagnose and fix the problem correctly.
- Quality Work: Ensures the repair is done properly, with attention to detail and safety.
- Convenience: Saves you time and effort.
- Warranty: Many bike shops offer a warranty on their work.
- Cons:
- Higher Cost: More expensive than doing the repair yourself.
- Scheduling: Requires scheduling an appointment and taking your bike to the shop.
7. Can The Wrong Bike Cable Cause Further Damage To My Bike?
Yes, the wrong bike cable can cause further damage to your bike by leading to improper shifting or braking, which can strain other components and potentially cause accidents. Using the correct cable type and tension is essential for your bike’s health and your safety.
Here’s how using the wrong bike cable can lead to further damage:
- Incorrect Shifting:
- Strained Derailleur: If the wrong shift cable is used, it may not provide the correct amount of tension or travel needed for precise shifting. This can cause the derailleur to work harder to move the chain between gears. Over time, this can strain the derailleur mechanism, leading to premature wear or damage.
- Damaged Cassette and Chainrings: Poor shifting can cause the chain to skip or grind against the cassette and chainrings. This can damage the teeth of these components, reducing their lifespan and performance.
- Bent Derailleur Hanger: An improperly adjusted or incompatible shift cable can cause the chain to get stuck between the cassette and the spokes, potentially bending the derailleur hanger. A bent hanger can lead to further shifting problems and may require replacement.
- Compromised Braking Performance:
- Reduced Stopping Power: If the wrong brake cable is used, it may not provide the necessary strength or flexibility for effective braking. This can result in reduced stopping power, increasing the risk of accidents.
- Worn Brake Pads: An improperly adjusted or incompatible brake cable can cause the brake pads to rub against the rim or rotor, even when the brakes are not engaged. This can lead to premature wear of the brake pads and reduce their effectiveness.
- Damaged Brake Calipers: Excessive tension or strain on the brake cable can damage the brake calipers, affecting their ability to apply even pressure to the braking surface.
- Cable and Housing Damage:
- Friction and Wear: Using the wrong cable can cause increased friction within the cable housing, leading to premature wear of both the cable and housing.
- Corrosion: If the cable is not properly lubricated or is made of a material that is susceptible to corrosion, it can corrode and cause further damage to the cable housing and components.
- Safety Risks:
- Loss of Control: Malfunctioning brakes or gears due to incorrect cables can lead to a loss of control, especially in challenging riding conditions.
- Accidents: In severe cases, compromised braking or shifting performance can increase the risk of accidents and injuries.
8. How Often Should I Replace My Bike Cables?
You should replace your bike cables every 12 to 24 months, or more frequently if you ride often or in harsh conditions. Regular replacement ensures optimal braking and shifting performance, enhancing safety and the overall riding experience.
Here’s a more detailed guide:
- General Recommendation:
- Frequency: Replace your bike cables every 12 to 24 months. This interval is a good balance between maintaining performance and preventing unexpected failures.
- Rationale: Cables stretch, fray, and corrode over time, leading to reduced performance. Regular replacement ensures optimal braking and shifting.
- Factors Influencing Replacement Frequency:
- Riding Frequency:
- High Mileage: If you ride your bike frequently (e.g., several times a week or for long distances), you should replace the cables more often, perhaps every 12 months.
- Low Mileage: If you ride your bike less frequently, you may be able to extend the replacement interval to 24 months.
- Riding Conditions:
- Harsh Conditions: If you ride in wet, muddy, or dusty conditions, the cables are more likely to corrode or become contaminated. Replace them more frequently, perhaps every 6-12 months.
- Clean Conditions: If you primarily ride in dry, clean conditions, you can extend the replacement interval to 18-24 months.
- Cable Quality:
- High-Quality Cables: High-quality cables made from stainless steel or coated with Teflon are more resistant to corrosion and wear. They may last longer than cheaper cables.
- Low-Quality Cables: Low-quality cables may stretch or fray more quickly and require more frequent replacement.
- Type of Bike:
- Mountain Bikes: Mountain bikes are often subjected to more demanding conditions, so their cables may need to be replaced more frequently than those on road bikes.
- Road Bikes: Road bikes typically experience less contamination, so their cables may last longer.
- Riding Frequency:
- Signs That Indicate It’s Time to Replace Your Cables:
- Sluggish Shifting: If shifting is slow, hesitant, or requires excessive force.
- Poor Braking Performance: If brake levers feel spongy, require excessive travel, or provide weak stopping power.
- Inconsistent Performance: If shifting or braking performance is inconsistent.
- Sticking Levers: If brake or shift levers stick or are slow to return to their original position.
- Visible Wear: If you notice fraying, rust, or kinks on the cables.
- Best Practices for Cable Maintenance:
- Regular Cleaning: Clean your bike cables at least once a month to remove dirt and grime.
- Proper Lubrication: Lubricate your bike cables every 1-3 months to reduce friction.
- Inspect Regularly: Inspect your bike cables before each ride to check for signs of wear.
- Recommendations from Experts:
According to the Motorcycle Safety Foundation (MSF), regular maintenance of your bike’s cables can significantly improve its performance and safety. They recommend inspecting and lubricating cables every month and replacing them every 12-24 months, depending on riding conditions.
9. What Are The Different Types Of Bike Cables And When Should Each Be Used?
The different types of bike cables include brake cables, shift cables, and specific variations like Teflon-coated or stainless steel cables. Brake cables are thicker and designed for stopping power, while shift cables are thinner for precise gear changes. Choosing the right cable ensures optimal performance and safety.
Here’s an overview of the different types of bike cables and their ideal uses:
1. Brake Cables:
- Purpose: Brake cables are designed to transmit force from the brake levers to the brake calipers, enabling the rider to stop the bicycle.
- Characteristics:
- Thickness: Brake cables are typically thicker than shift cables to withstand the high tension and force required for braking.
- Construction: They are made of strong, durable materials like steel or stainless steel.
- Ends: Brake cables have specific ends (often called “nipples”) that fit into the brake levers and calipers. Common types include:
- Road Brake Cable Ends: Barrel-shaped ends designed for road bike brake levers.
- Mountain Bike Brake Cable Ends: Mushroom-shaped ends designed for mountain bike brake levers.
- When to Use:
- Brake Systems: Always use brake cables for brake systems to ensure reliable and safe stopping power.
- Compatibility: Ensure the cable end matches the brake lever type (road or mountain).
- Examples:
- Shimano Brake Cables
- SRAM Brake Cables
2. Shift Cables (Derailleur Cables):
- Purpose: Shift cables, also known as derailleur cables, are used to control the derailleurs, allowing the rider to shift gears.
- Characteristics:
- Thickness: Shift cables are thinner than brake cables to provide more flexibility and precision in shifting.
- Construction: They are made of steel or stainless steel and are designed to be low-stretch for accurate gear changes.
- Ends: Shift cables have specific ends that fit into the shift levers and derailleurs. Common types include:
- Shimano/SRAM Shift Cable Ends: Universal ends that fit most Shimano and SRAM shifters.
- When to Use:
- Shifting Systems: Always use shift cables for shifting systems to ensure accurate and smooth gear changes.
- Compatibility: Ensure the cable end matches the shifter type (Shimano, SRAM, or other).
- Examples:
- Shimano Shift Cables
- SRAM Shift Cables
3. Coated Cables:
- Purpose: Coated cables are designed to reduce friction and improve the smoothness and responsiveness of braking and shifting.
- Types:
- Teflon-Coated Cables: Teflon (PTFE) is a low-friction material that reduces friction between the cable and housing.
- Polymer-Coated Cables: Similar to Teflon, polymer coatings provide a smooth surface for reduced friction.
- Characteristics:
- Reduced Friction: The coating minimizes friction, resulting in smoother and more precise operation.
- Durability: Coated cables are often more resistant to corrosion and wear.
- When to Use:
- High-Performance Applications: Use coated cables for riders who want the best possible shifting and braking performance.
- Demanding Conditions: Use coated cables in wet or dirty conditions to maintain smooth operation.
- Examples:
- Shimano Optislick Cables (Polymer-Coated)
- Gore Ride-On Cables (Teflon-Coated)
4. Stainless Steel Cables:
- Purpose: Stainless steel cables are designed to provide excellent durability and corrosion resistance.
- Characteristics:
- Corrosion Resistance: Stainless steel is highly resistant to rust and corrosion, making these cables ideal for use in wet or humid conditions.
- Durability: They are strong and durable, providing reliable performance over a long period.
- When to Use:
- All-Weather Riding: Use stainless steel cables for riders who frequently ride in wet or humid conditions.
- Long-Term Reliability: Use stainless steel cables for riders who want a durable and low-maintenance option.
- Examples:
- Jagwire Stainless Steel Cables
- Shimano Stainless Steel Cables
5. Cable Housing:
- Purpose: Cable housing protects the inner cable from dirt, moisture, and damage, while also providing a smooth surface for the cable to slide through.
- Types:
- Brake Housing: Designed to withstand high compression forces.
- Shift Housing: Designed for flexibility and low compression.
- Characteristics:
- Construction: Typically made of coiled steel or spiral-bound strands covered in a plastic outer layer.
- Compression Resistance: Brake housing is more compression-resistant than shift housing.
- When to Use:
- Matching Cable Type: Use brake housing with brake cables and shift housing with shift cables.
- Replacement: Replace housing when it becomes damaged, compressed, or contaminated.
 Bike Cables
10. How Do Electronic Bike Cables Differ From Mechanical Ones?
Electronic bike cables, used in electronic shifting systems like Shimano Di2 or SRAM eTap, are wires that transmit electronic signals for gear changes, unlike mechanical cables that rely on physical tension. Electronic systems offer precise, consistent shifting and often require less maintenance.
Here’s a detailed breakdown of the differences between electronic and mechanical bike cables:
1. Functionality:
- Mechanical Cables:
- Mechanism: Mechanical cables rely on physical tension to operate. When you shift gears or apply the brakes, you are physically pulling or releasing a cable that is connected to the derailleur or brake caliper.
- Operation: The rider’s force is directly transmitted through the cable to the component.
- Electronic Cables:
- Mechanism: Electronic cables are wires that transmit electronic signals from the shifters to the derailleurs or brakes.
- Operation: When you press a button on the shifter, it sends an electronic signal to the derailleur or brake, which then activates a servo motor to perform the shift or apply the brakes.
2. Components:
- Mechanical Cables:
- Cable: A steel or stainless steel cable that runs through a housing.
- Housing: A protective outer layer that guides the cable and reduces friction.
- Levers/Shifters: Mechanical levers or shifters that pull or release the cable.
- Derailleurs/Brakes: Mechanical derailleurs or brakes that are activated by the cable tension.
- Electronic Cables:
- Wires: Electrical wires that transmit electronic signals.
- Connectors: Specialized connectors that ensure a secure and reliable connection between components.
- Shifters: Electronic shifters with buttons or paddles that send electronic signals.
- Derailleurs/Brakes: Electronic derailleurs or brakes with servo motors that are activated by the electronic signals.
- Battery: A battery that powers the electronic system.
3. Performance:
- Mechanical Cables:
- Shifting Precision: Shifting precision can be affected by cable stretch, friction, and contamination.
- Maintenance: Requires regular maintenance, including cable adjustments, lubrication, and replacement.
- Effort: Requires more physical effort to shift or brake, especially with older or poorly maintained cables.
- Electronic Cables:
- Shifting Precision: Provides precise and consistent shifting, regardless of cable condition.
- Maintenance: Requires less maintenance than mechanical systems, primarily involving battery charging and occasional software updates.
- Effort: Requires minimal physical effort to shift or brake, as the electronic system does most of the work.
4. Adjustments:
- Mechanical Cables:
- Barrel Adjusters: Uses barrel adjusters to fine-tune cable tension and shifting performance.
- Manual Adjustments: Requires manual adjustments to compensate for cable stretch and wear.
- Electronic Cables:
- Micro-Adjustments: Allows for precise micro-adjustments through the electronic system, often via a mobile app or head unit.
- Automatic Trimming: Some systems offer automatic trimming, which automatically adjusts the derailleur position to prevent chain rub.
5. Maintenance:
- Mechanical Cables:
- Lubrication: Requires regular lubrication to reduce friction