
Crafting a bicycle frame by welding is an ambitious yet rewarding endeavor for any cycling enthusiast with a penchant for DIY projects. While it demands a certain level of expertise, particularly in Tungsten Inert Gas (TIG) welding of thin-walled tubing, this guide aims to provide a comprehensive overview of the tools, techniques, and considerations involved in welding your own Bike Frame. Consider this your entry point into the nuanced world of bicycle frame fabrication, designed for those with some existing welding knowledge but looking to specialize in the art of joining bike frame components. Think of mastering TIG welding for bike frames as conquering a black diamond trail in mountain biking – challenging, but immensely satisfying.
In this guide, we’ll frequently refer to “4130” steel, a common material in bike frame construction. While specific tube sets may have slight variations in their composition, for the purpose of this discussion, we’ll use 4130 as a general term. This simplification also safely includes mild steel often used in components like dropouts and head tubes. Keep in mind that high-performance tube sets may have different specifications.
This guide incorporates personal preferences based on practical experience, which will be noted throughout. There are numerous approaches to welding a bike frame that will result in a structurally sound product. However, by incorporating a few refined techniques, you can significantly enhance the durability and resilience of your bike frame, ensuring it can withstand demanding conditions without failure.
Essential Welding Equipment for Bike Frames
To embark on the journey of welding a bike frame, having the right equipment is paramount. Let’s delve into the specifics:
Welding Machine
A DC TIG welding machine with high-frequency start capability is essential. The high-frequency start allows for non-contact arc initiation, crucial for delicate thin-walled tubing used in bike frames. A foot pedal control is highly recommended. While technically possible to weld without one, the foot pedal offers unparalleled control over amperage, allowing for real-time adjustments during the weld – a necessity for managing heat input on thin bike frame tubes.
For personal use, machines like the Everlast Powertig 210EXT are more than sufficient, offering features beyond basic bike frame welding needs. However, more affordable models from Everlast or similar brands, equipped with high-frequency start and foot pedal compatibility, will work exceptionally well for bike frame projects. The key is to prioritize these core functionalities.
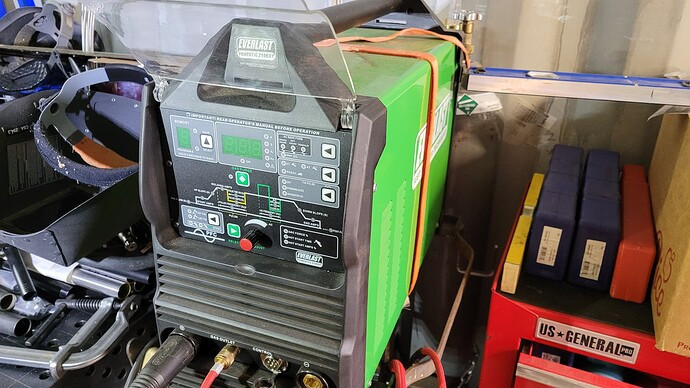 Everlast Powertig 210EXT Welding Machine
Image showing an Everlast Powertig 210EXT welding machine, suitable for bike frame welding.
TIG Torch
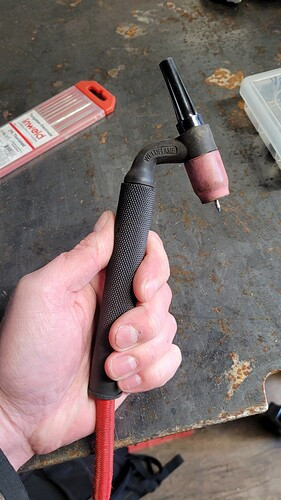
A #9 air-cooled TIG torch is a preferred choice for bike frame welding. Its compact size allows for better maneuverability in tight corners and around complex bike frame joints. With a maximum amperage rating of 150 amps, it comfortably handles the amperage range required for thin-walled steel tubing. While a smaller #24 air-cooled torch (80 amp max) exists, its lower duty cycle can lead to frequent pauses for cooling, hindering workflow efficiency when welding a bike frame. Duty cycle ratings indicate the percentage of time a torch can operate at its rated amperage within a ten-minute period.
Water-cooled torches, while offering higher amperage capacity and duty cycles, are generally overkill for bike frame welding. The added complexity and cost are not justified for occasional bike frame fabrication. For production environments, the benefits may outweigh the drawbacks, but for hobbyists, air-cooled torches are more practical.
A flex-head torch is a valuable upgrade. Its flexible head allows for bending and shaping to access awkward welding positions common in bike frame construction. The slight increase in cost compared to standard torches is a worthwhile investment for improved accessibility and weld quality on a bike frame. Coupling a flex-head torch with super-flexible hoses further enhances maneuverability and reduces welder fatigue.
 #9 Air-cooled TIG Torch
Image showcasing a #9 air-cooled TIG torch, ideal for precise bike frame welding.
 Flex-head TIG Torch
Image highlighting a flex-head TIG torch, demonstrating its flexibility for intricate bike frame welds.
Cups and Gas Lenses
The standard, more economical setup utilizes a collet body and ceramic cup. Collet bodies direct argon shielding gas through small holes, while the cup focuses the gas onto the weld area and tungsten electrode. While functional, gas lenses offer superior gas diffusion and coverage. Gas lenses incorporate fine mesh screens to create a laminar, less turbulent gas flow, resulting in improved weld bead appearance and reduced porosity, especially crucial for the aesthetic and structural integrity of a bike frame.
A gas lens paired with a #8 alumina cup is a recommended starting point for bike frame welding. This combination provides a good balance of gas coverage and accessibility for most bike frame joints. A small back cap is also highly recommended, particularly the medium-length style, to minimize tungsten waste. Button caps are useful in confined spaces. While oversized or Pyrex glass cups are available, they offer minimal practical advantage over standard alumina cups for bike frame applications. Pyrex cups are primarily for visual appeal.
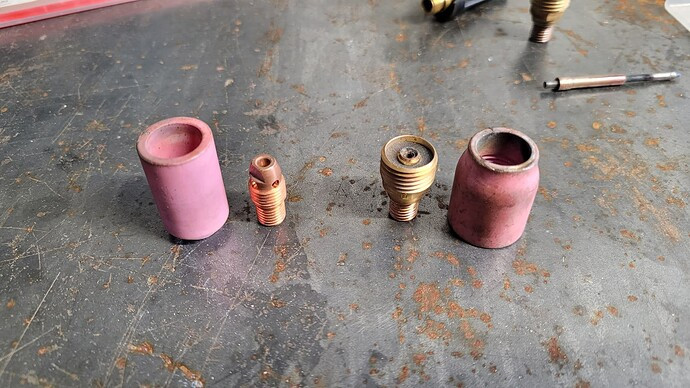 Standard Collet Body vs. Gas Lens
Image comparing a standard collet body and cup setup with a gas lens and #8 alumina cup, emphasizing the benefits of gas lenses for bike frame welding.
Tungsten Electrodes
Selecting the correct tungsten electrode is less critical for hobbyist welders compared to automated welding processes. Minor differences in arc stability or tungsten longevity between tungsten types are often overshadowed by the common practice of electrode contamination and re-grinding during manual bike frame welding.
Traditionally, 2% thoriated tungsten (red band) was favored. However, due to health concerns associated with inhaling thorium grinding dust, it is being phased out. A suitable and widely recommended alternative is 2% lanthanated tungsten (blue band). It performs well in DC TIG welding of steel, including bike frame materials, and is also versatile enough for aluminum welding with AC TIG machines.
For bike frame welding amperage ranges, a 1/16” diameter tungsten electrode is a good all-around choice. While 3/32” or 0.040” diameters can be used, 1/16” provides a balanced size. 0.040” tungsten can be less readily available.
Filler Metal
For bike frame welding, 0.040” ER70s-2 filler rod is highly recommended. Its smaller diameter facilitates precise filler addition, crucial for controlling heat input and weld bead size on thin-walled bike frame tubing. While smaller diameters are available, they can be harder to source. 1/16” filler rod can be used, but it demands greater welder skill to achieve aesthetically pleasing welds on bike frames.
A general guideline suggests using filler rod diameter equal to or smaller than the base material thickness. For thin bike frame tubing, this reinforces the preference for smaller diameter filler.
The type of filler metal warrants further discussion. While “strong welds” are a common objective, understanding material properties like toughness and ductility is crucial, especially for bike frames that endure dynamic stresses. Toughness refers to a material’s ability to absorb energy and deform without fracturing, while ductility describes its ability to bend before breaking. These properties are more desirable for bike frames than ultimate yield strength alone.
ER70s-2, although having lower tensile strength than 4130 steel, is a suitable choice for bike frames for several reasons. Firstly, the slight strength mismatch enhances weld ductility, providing a margin of safety against crack propagation in imperfect welds. Secondly, bike frame welds are typically oversized fillet welds. This oversizing compensates for the slightly lower filler strength, ensuring adequate joint strength. A common rule of thumb for fillet welds is to match the weld size to the material thickness. Given the thin walls of bike frame tubing (around 0.035”), even a 1/16” fillet weld significantly exceeds this guideline, contributing to joint robustness.
ER70s-6 is another acceptable filler option, being widely available and mechanically similar to ER70s-2. The primary advantage of ER70s-2 lies in its enhanced deoxidizers, which improve weld cleanliness, particularly beneficial when welding without back purging – a common practice in bike frame fabrication. ER70s-2 was originally developed for open-root pipe welding without back purge, highlighting its self-shielding capabilities.
For further reading, Miller Electric offers valuable resources on TIG welding 4130 chrome-moly tubing, relevant to bike frame construction: https://www.millerwelds.com/resources/article-library/best-practices-for-tig-welding-of-4130-chrome-moly-tubing-in-general-motorsports-and-aerospace-applications. This resource includes welding procedure specifications (WPS) useful for beginners.
In summary, specialized fillers like ER80s-D2 or Weldmold variants are generally not necessary and can be more expensive for most bike frame applications.
Welding Settings and Techniques for Bike Frames
Optimal machine settings and welding techniques are crucial for achieving strong and aesthetically pleasing welds on a bike frame.
Amperage and Foot Pedal Control
A general rule of thumb for amperage setting is 1 amp per 0.001” of material thickness. For 0.035” bike frame tubing, this translates to approximately 35 amps. However, bike frame welding often involves joining thin tubing to thicker components. Utilizing a foot pedal provides dynamic amperage control. A common practice is to set the machine to around 80 amps and use the foot pedal to regulate the actual welding amperage, typically in the 50-60 amp range for most bike frame welds. Setting the machine amperage higher provides headroom for increased heat input when needed, while excessive amperage can reduce fine control, making it easier to overheat and damage thin tubing.
The foot pedal functions as a variable resistor, controlling amperage output from 0% to 100% of the machine’s set amperage. For instance, with a target amperage of 50 amps:
- Machine set to 50 amps: Pedal fully depressed yields 50 amps.
- Machine set to 100 amps: Pedal halfway depressed yields 50 amps.
- Machine set to 200 amps: Pedal quarter-way depressed yields 50 amps.
Higher machine amperage settings necessitate finer foot pedal control, increasing the risk of accidentally overshooting the desired amperage and causing burn-through on thin bike frame tubing. A practical approach is to set the machine amperage approximately 20 amps above the anticipated welding amperage to provide adequate headroom without sacrificing fine control.
Pulsing
Pulse welding is not strictly necessary for producing sound bike frame welds, but it can offer advantages in certain situations. TIG pulse welding can be categorized into low-speed and high-speed pulsing.
Low-speed pulsing, at rates of 2 pulses per second (PPS) or less, can create a visually appealing “stack of dimes” weld bead appearance. It can also potentially reduce overall heat input when executed correctly.
High-speed pulsing, typically 20 PPS and above, primarily serves to reduce heat input and enhance puddle control. The rapid pulsing action agitates the molten weld puddle, making it more controllable, particularly beneficial when welding thin bike frame tubing. However, many experienced welders find traditional continuous welding techniques equally effective for bike frames.
For those prioritizing budget, a TIG welder without pulse functionality is perfectly adequate for bike frame welding.
Gas Shielding
Adequate argon shielding gas coverage is critical for preventing weld contamination and porosity, which can compromise the structural integrity of a bike frame. Insufficient gas shielding leads to weld defects, while excessive flow is wasteful and can even induce turbulence, drawing in atmospheric air and causing contamination similar to insufficient shielding.
With a #8 gas lens, a flow rate of 15-20 cubic feet per hour (CFH) is generally suitable. Pre-flow, if available on the machine, is beneficial, with 0.5 seconds typically sufficient to purge air from the torch before arc initiation. Post-flow, extending gas shielding after arc termination, is essential for preventing oxidation as the weld cools. A post-flow duration of 10 seconds is usually adequate for bike frame welding.
Weld discoloration, often referred to as “pretty colors,” is not a reliable indicator of proper shielding without further analysis. Consistent gas coverage throughout the welding process is paramount.
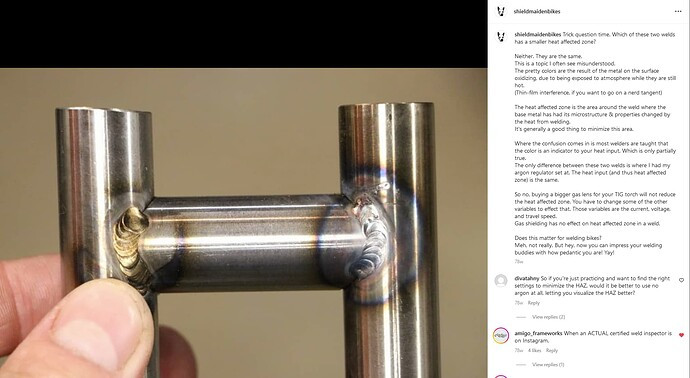 Heat Affected Zone (HAZ) in Welding
Image depicting the Heat Affected Zone (HAZ) in a weld, highlighting the importance of gas shielding in preventing oxidation and maintaining weld quality in bike frames.
Back Purging and Heat Sinks in Bike Frame Welding
Back Purging
Back purging involves introducing shielding gas to the inside of bike frame tubes during welding. While often debated, back purging is generally not necessary for welding 4130 steel bike frames, unlike stainless steel or titanium. Titanium welding invariably requires back purging due to its extreme reactivity with oxygen.
However, back purging can offer benefits, particularly for less experienced welders or when fit-up is less than ideal. Overheating welds or poor joint fit-up can draw oxides from the unshielded backside of the metal into the molten weld pool, weakening the joint. Back purging mitigates oxide formation on the backside, enhancing weld quality in such scenarios.
For most 4130 bike frame welding applications, focusing on proper welding technique and fit-up negates the need for back purging.
Heat Sinks
Heat sinks, typically made of copper, aluminum, or bronze, can be used to dissipate heat away from the weld zone. In bike frame welding, where thin tubing is involved, managing heat input is crucial to minimize distortion. Heat sinks can theoretically aid in heat management. However, in practice, for bike frame fabrication, heat sinks are not essential.
Proper weld sequencing, patience, and refined TIG welding technique are significantly more effective in controlling heat input and distortion in bike frame welding than relying on heat sinks.
Conclusion
This guide provides a comprehensive overview of essential equipment, settings, and techniques for TIG welding bike frames. While welding your own bike frame is a challenging undertaking, understanding these fundamental principles is a crucial first step. Mastering TIG welding for bike frames requires practice and attention to detail, but the reward is a custom-built bike frame crafted with your own hands. Further exploration and hands-on experience will solidify your skills in this specialized welding niche.
