
Are you itching for a bike ride but unsure where to go? Finding a fantastic bike route near you can unlock a world of local exploration and outdoor fun. Whether you’re a seasoned cyclist or just starting out, discovering scenic and safe paths is key to enjoying your ride. You might be new to the area, looking to expand your cycling horizons beyond your usual streets, or simply wanting to find the best bike route nearby for a weekend adventure.
Like many cyclists, I often rely on maps and a bit of intuition to uncover hidden gems for biking. It’s an exciting process that can lead to unexpected discoveries. Join me as I guide you through the process of finding the perfect bike route wherever you are, regardless of the existing infrastructure.
We’ll explore how to effectively use Google Maps to plan a safe and enjoyable bike route. To illustrate this, I’ll use Nashville, Tennessee – a city I haven’t personally explored yet – to demonstrate how to find exciting bike routes that I would be thrilled to ride.
For those who prefer visual learning, I’ve also created a video tutorial covering the same material.
Before we dive into Google Maps, I want to mention another invaluable resource for bike route planning: bicycle heatmaps available on platforms like Strava or Ride with GPS. These heatmaps visually represent popular cycling routes based on aggregated user data, clearly indicating the most frequented and often best routes. But for now, let’s focus on harnessing the power of Google Maps.
Unlocking the Bicycling Layer in Google Maps
Google Maps, despite some limitations, is an excellent tool for pinpointing bike paths and getting cycling directions. It contains comprehensive data on bike trails, dedicated bike lanes, bike-friendly streets, and even unpaved roads suitable for cycling. However, this valuable information layer isn’t automatically visible. You need to activate it to effectively research and plan your bike route.
Here’s how to turn on the Bicycling layer:
- On Mobile: Tap the layers icon, typically found in the top left corner of the screen. Then, select the “Biking” details layer.
- On Desktop: Hover your mouse over the “Layers” icon, usually located in the bottom left corner. Then, click on the “Biking” details layer.
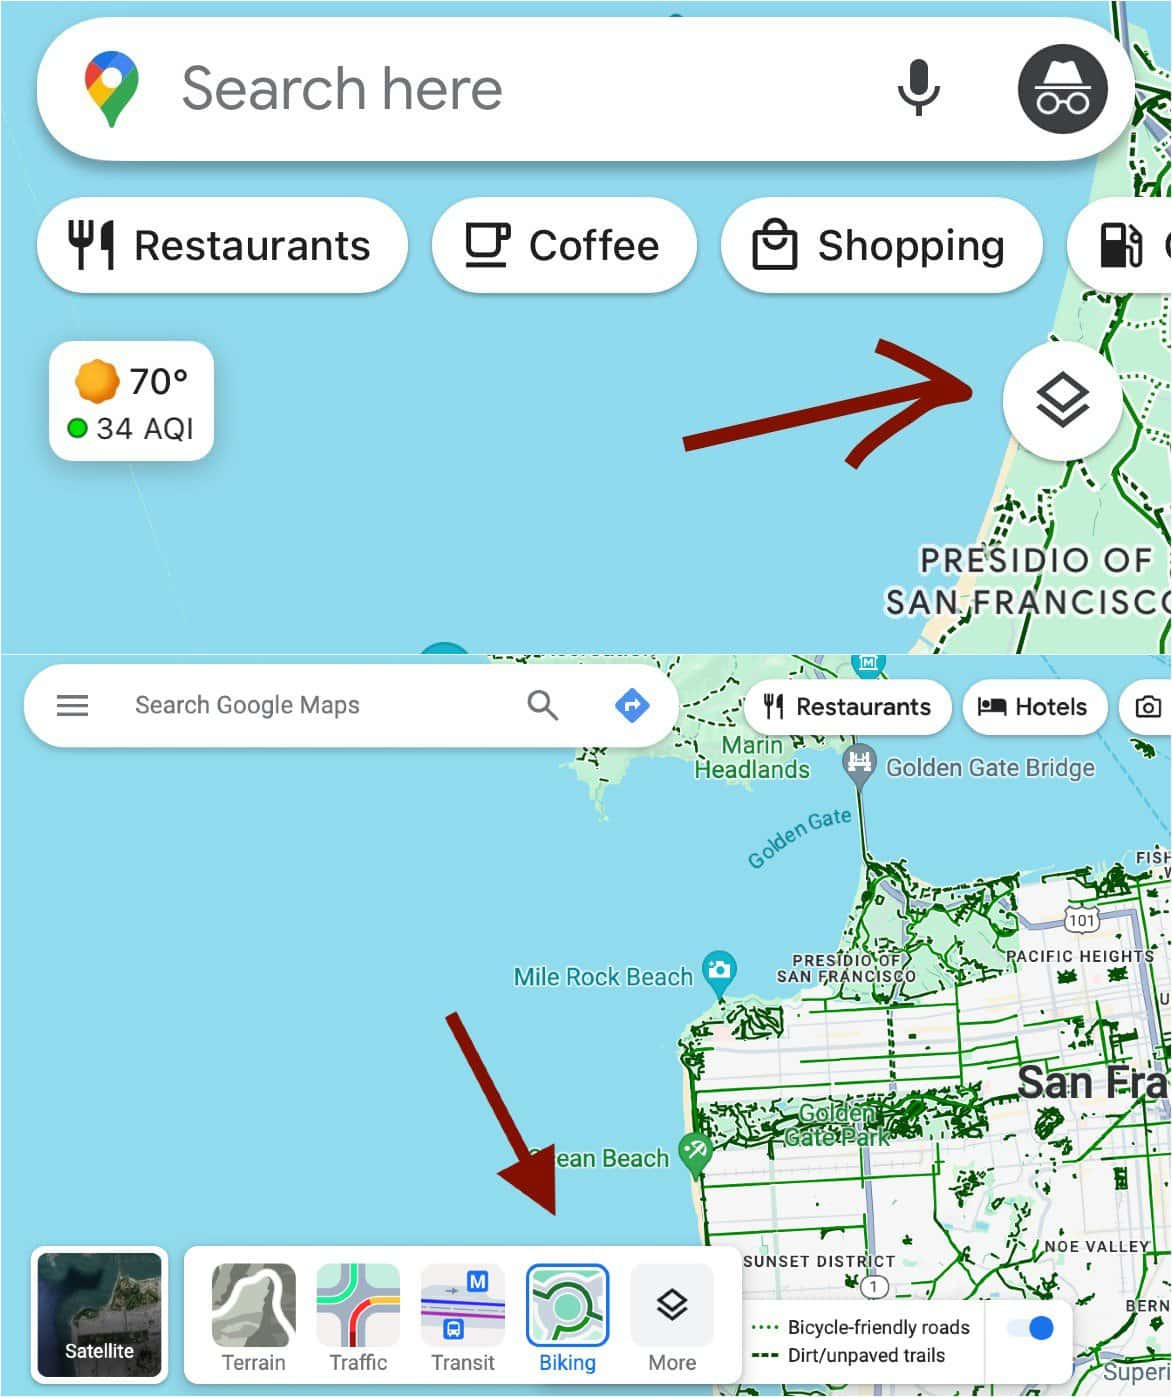 How to access layers on mobile (top) and desktop after a hover (bottom).
Once activated, you’ll see all the bike-friendly routes displayed on the map. Now you’re ready to start exploring!
Leveraging Street View and Satellite View for Route Insight
Seeing bike-friendly routes on Google Maps is a great starting point. However, to truly understand what a route is like, nothing beats experiencing it in person or virtually through Street View. Street View provides a ground-level perspective, allowing you to assess the road conditions, traffic, and overall environment.
Here’s how to access Street View:
- Mobile: Long press anywhere on the map. A red pin will drop, and if Street View is available for that location, a thumbnail image will appear in the lower left corner with a circular arrow icon. Tap this thumbnail to enter Street View.
- Desktop: Click on a location on the map. The address will appear at the bottom of the screen. If Street View is available, a thumbnail image will be displayed next to the address. Click on this image to enter Street View.
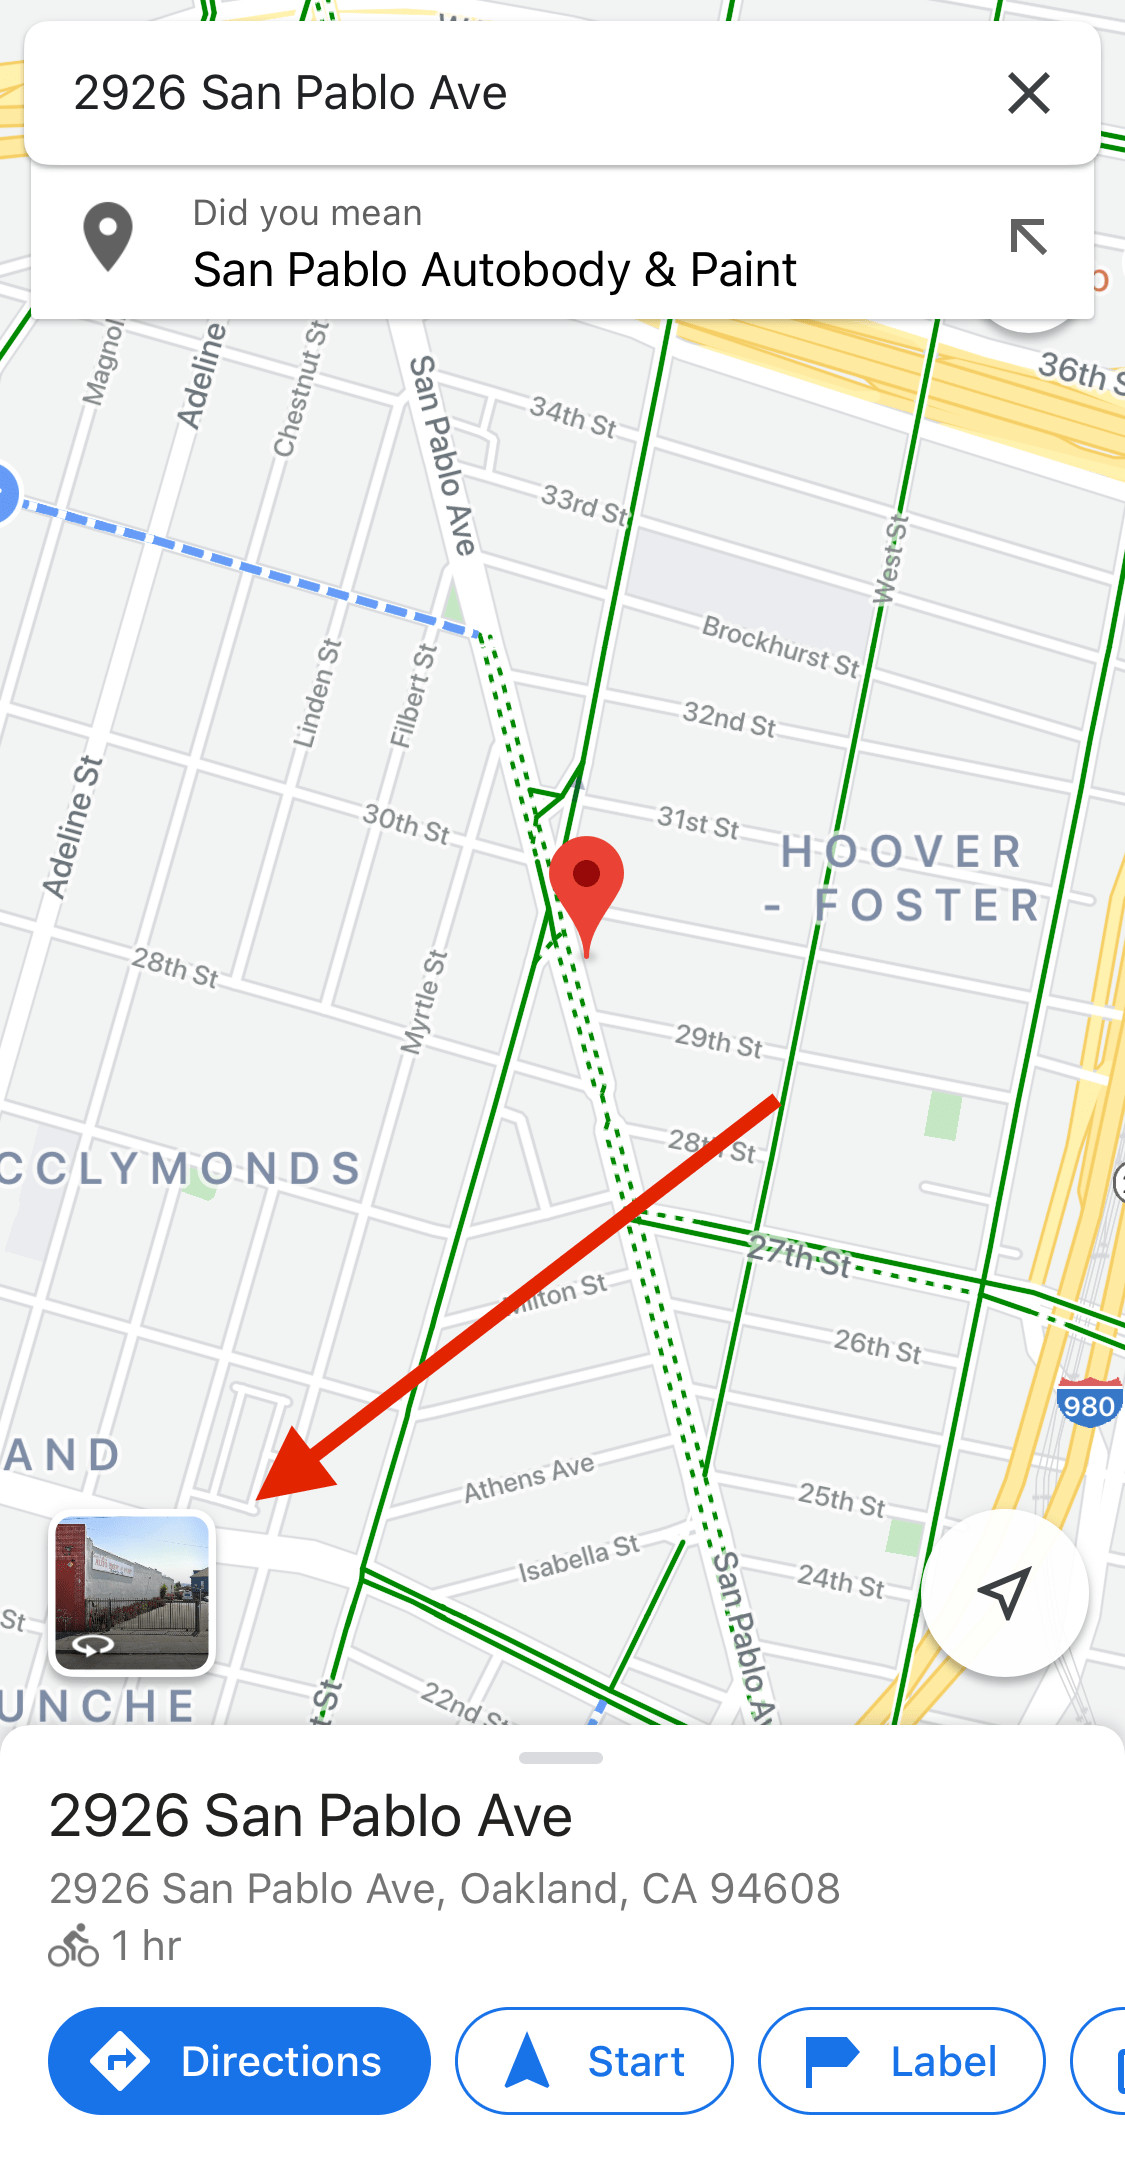 How to find the street view button on google maps mobile
 How to find the street view button on google maps desktop
Satellite view is another powerful tool for quickly scanning areas and identifying potential bike routes from above. It’s particularly useful for spotting bike lanes and trails that might not be immediately obvious on the standard map layer. I’ve even discovered trails in Satellite view that weren’t visible on the default map!
Identifying Green Lines, Parks, and Green Spaces for Scenic Rides
For leisurely bike rides, routes that incorporate nature and attractive scenery are often the most enjoyable. I typically look for long, solid green lines on Google Maps, as these usually indicate dedicated bike trails or bike lanes. Street View is again helpful to confirm the actual conditions of these green routes. Off-street trails, lacking Street View, often signal paths separated from vehicle traffic, enhancing safety and tranquility.
Parks and landmarks serve as excellent destinations or rest stops along your bike route. Sometimes, the scenic bike lane itself becomes the destination, offering a pleasant journey with beautiful surroundings.
Linear parks, long and narrow parks often following rivers, lakes, or former railway lines, are particularly appealing. River and lakeside paths are generally flat, offering easier cycling.
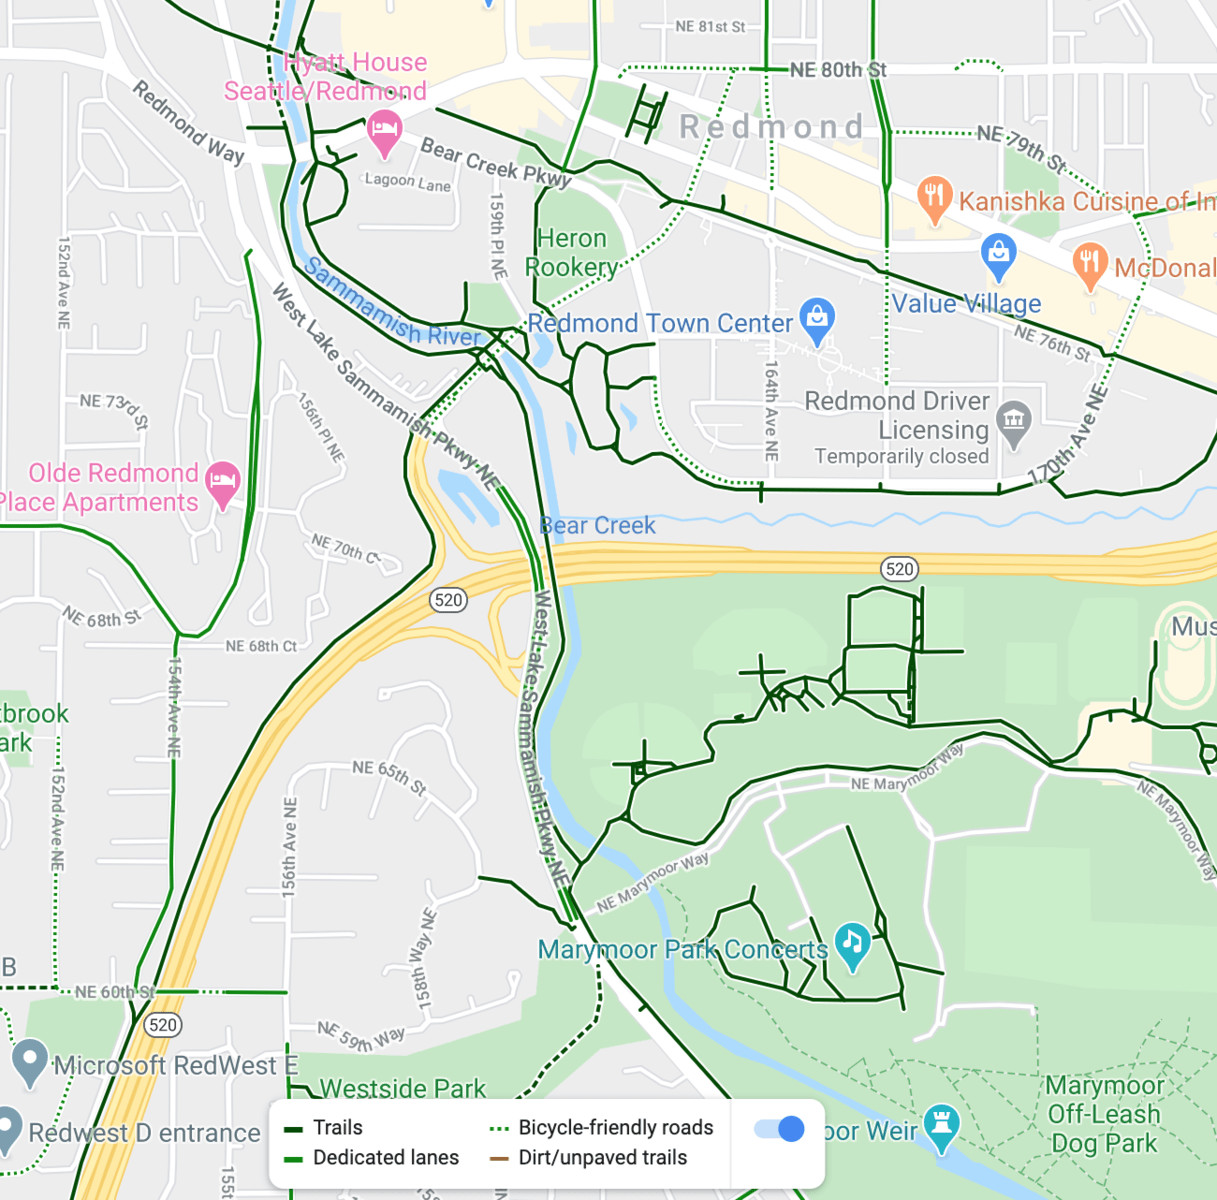 Lots of bike paths along rivers, roads, highways, and parks on this google maps screenshot
The image above showcases a variety of potentially enjoyable routes, including a trail alongside the Sammamish River and numerous other green lines extending in different directions. Reaching any of these paths promises a rewarding cycling adventure.
Understanding Google’s “Bike-Friendly Streets” Designations
Beyond solid lines, Google Maps uses dotted lines to denote “bike-friendly roads.” (Distinguish this from dashed lines, which indicate unpaved or dirt roads).
“Bike-friendly roads” typically fall into two categories:
- Safe and Pleasant Residential Streets: These are usually located in quiet residential areas, lacking painted bike lanes but offering low traffic volume and a safe cycling environment.
- Busy Streets with Shared Lane Markings: These can be busier streets, possibly designated as “official” bike routes by local authorities, with lane markings for cars but no dedicated bike lane. They might be the most practical option for cyclists despite potentially higher traffic.
While “bike-friendly roads” are often safe, caution is advised. Sometimes, these designations can be misleading. If a “bike-friendly road” appears to be a major or arterial road, always use Street View to assess the actual conditions. Look for features like wide shoulders, which can provide sufficient space for safe cycling even with adjacent car traffic, provided they are clear of obstacles, as discussed in this article on avoiding road hazards.
Uncovering Hidden Bike-Friendly Streets
Just because a street isn’t marked as “bike-friendly” on Google Maps doesn’t mean it’s unsuitable for cycling. Google Maps’ bike-friendly designations are not exhaustive. Many streets are perfectly bikeable but haven’t been officially labeled as such. These are often quieter neighborhood streets running parallel to busier arterial roads.
If you don’t immediately spot a clearly marked bike route, explore these less-prominent streets. Experimenting with these routes while cycling can reveal hidden gems.
Los Angeles provides a good example. In flatter neighborhoods, Street View often reveals numerous streets ideal for biking, experiencing minimal local car traffic. The challenge in LA can be crossing large, multi-lane roads to continue onto another quiet street. In such cases, cycling one block behind the main road and using traffic lights for safer crossings can be a useful strategy.
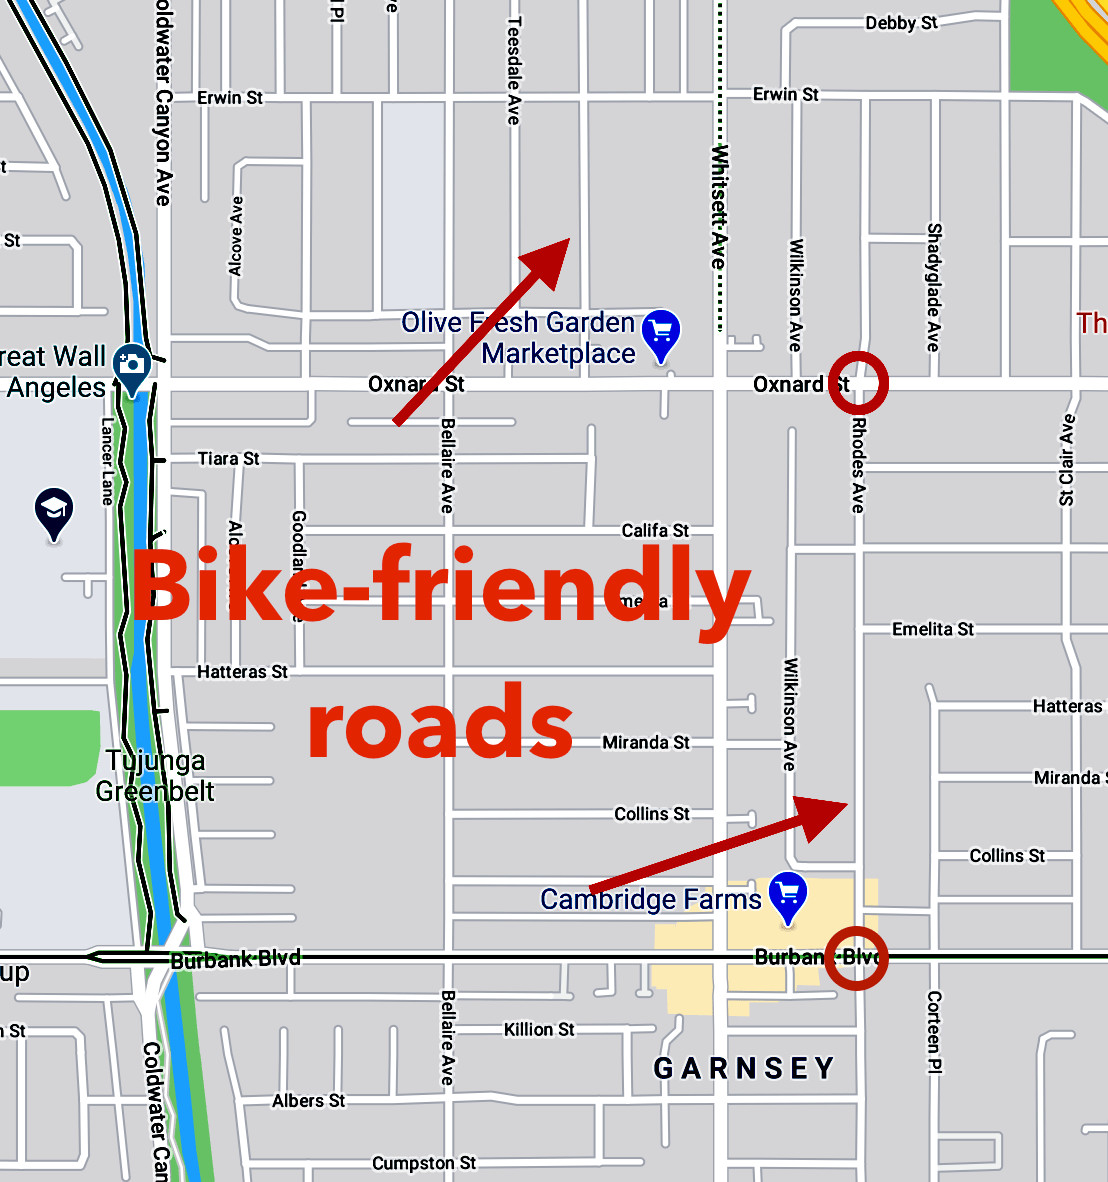 Bike friendly roads on google maps that aren
The arrows in the image highlight north-south streets confirmed via Street View to be bike-friendly, despite lacking official designation. Likely, most smaller streets in this area are also suitable for cycling. The circles indicate large intersections without traffic lights, which could be difficult to cross from streets like Rhodes. However, using the main street, Whitsett, for crossings at traffic lights offers a safer alternative.
Gauging Hills with Biking Directions and Elevation Data
While Google Maps offers a Terrain layer, it can be insufficient for detailed hill assessment. The most accurate way to understand the elevation profile of your bike route is to create a route in Google Maps and examine the elevation graph. You can add, modify, or remove stops, and on desktop, drag the route to explore different paths and their elevation changes. Once a route is mapped, hovering over it on desktop reveals the locations of the steepest hills, allowing you to plan detours if desired.
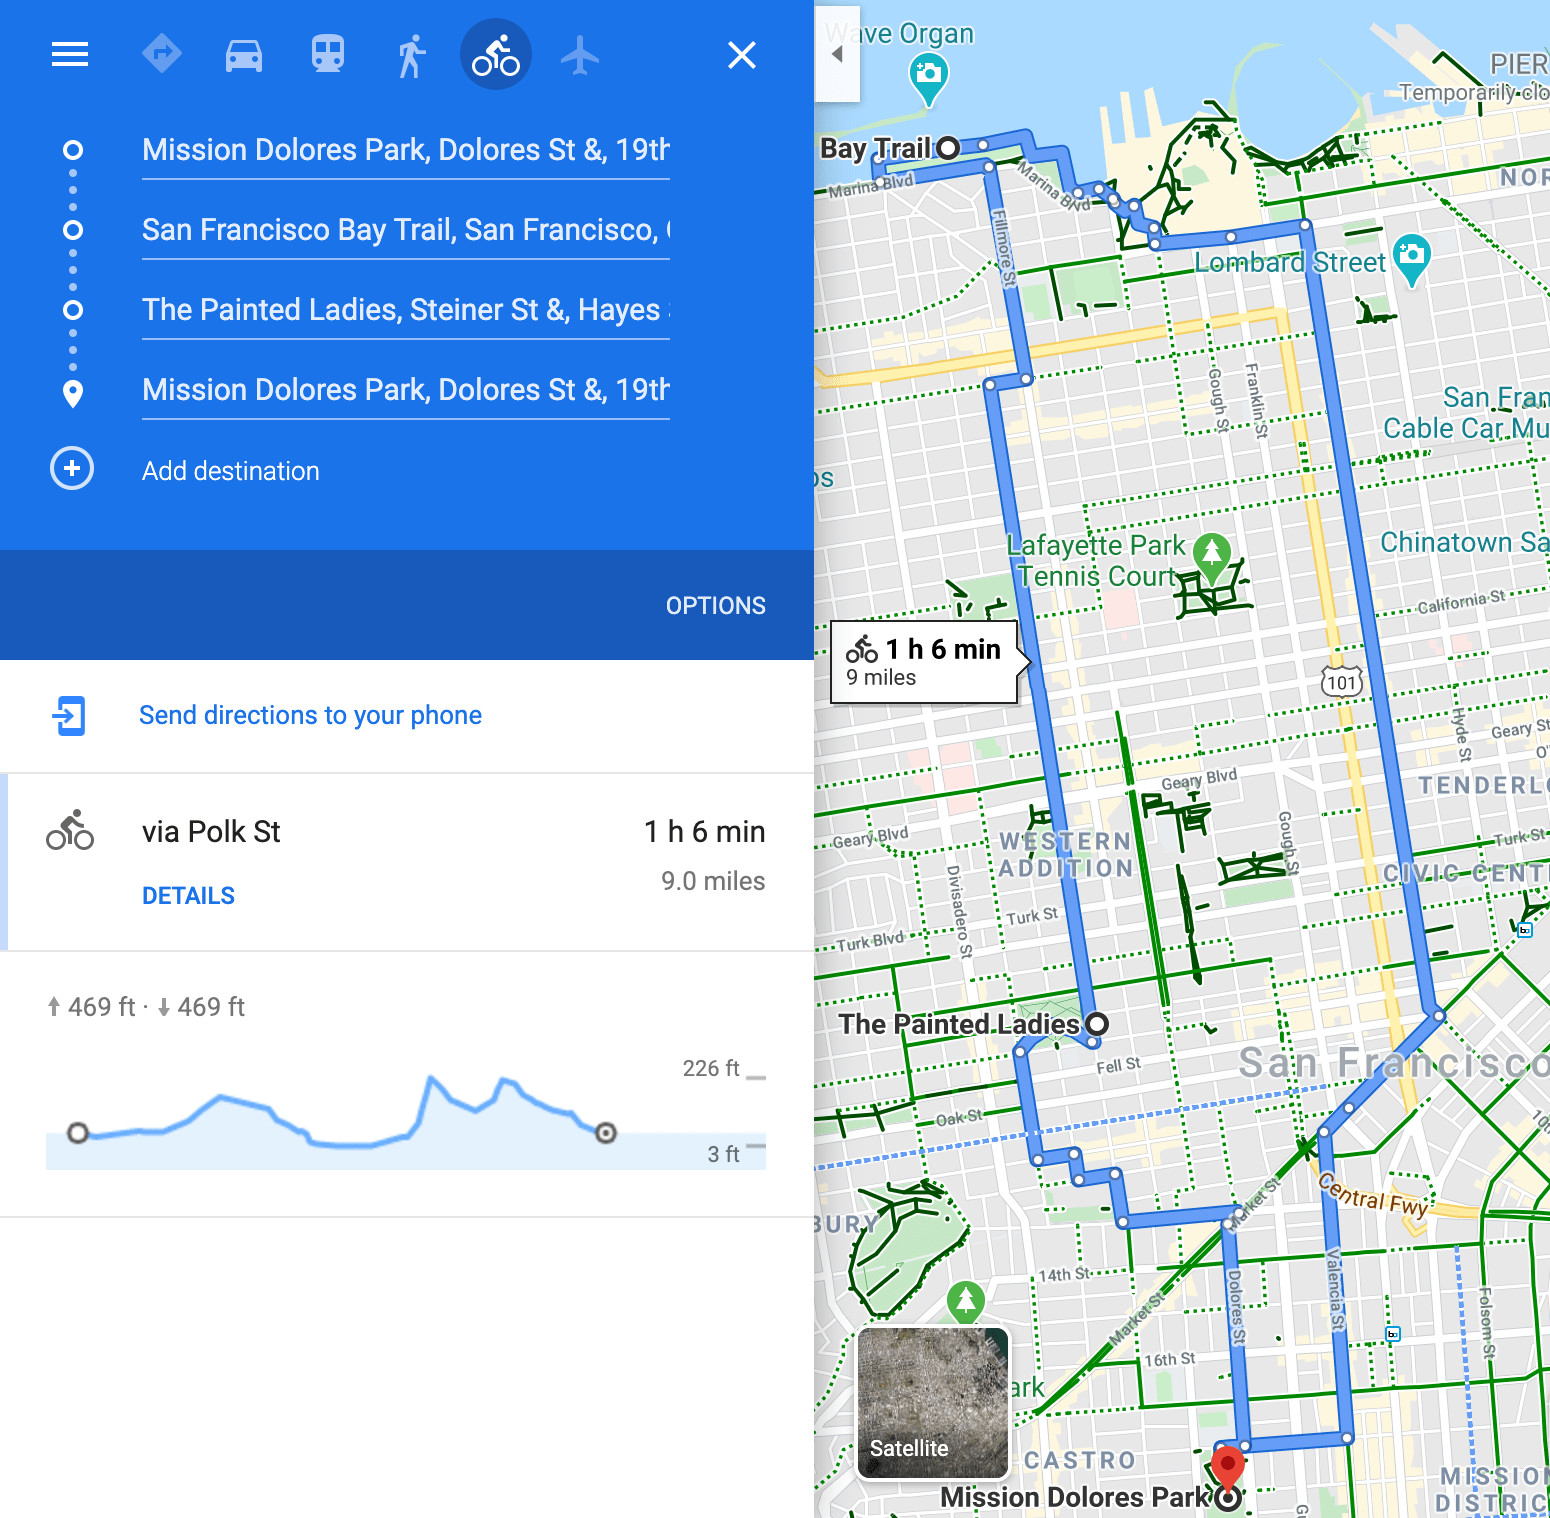 A loop of a nice hilly bike ride around San Francisco, going to the Marina, the Painted Ladies, and Dolores park.
This image shows a hilly San Francisco bike loop, with stops added to create a circular route hitting popular landmarks. The elevation chart beneath the route options clearly shows a significant hill. This visual representation allows you to decide whether to tackle the climb, find an alternate route, or prepare for a good workout. Note that route lines can obscure bike-friendly road designations on the map itself – a minor Google Maps interface issue.
Be wary of the “Mostly flat” label when planning your ride. Always expand the elevation details to see the actual elevation gain. For instance, even on a short ride on Valencia Street in San Francisco, one direction is noticeably uphill, the other downhill. While “mostly flat” might be technically accurate, the elevation change can still significantly impact your cycling effort, depending on your bike and fitness level.
 Showing the slight, but existing hill on Valencia Street in San Francisco on Google Maps.
Expanding the dropdown on these directions reveals a 46ft climb when cycling south on Valencia St. As someone who commuted this route daily, the difference in effort between directions is considerable and crucial to know beforehand!
Example: Exploring Bike Routes in Nashville
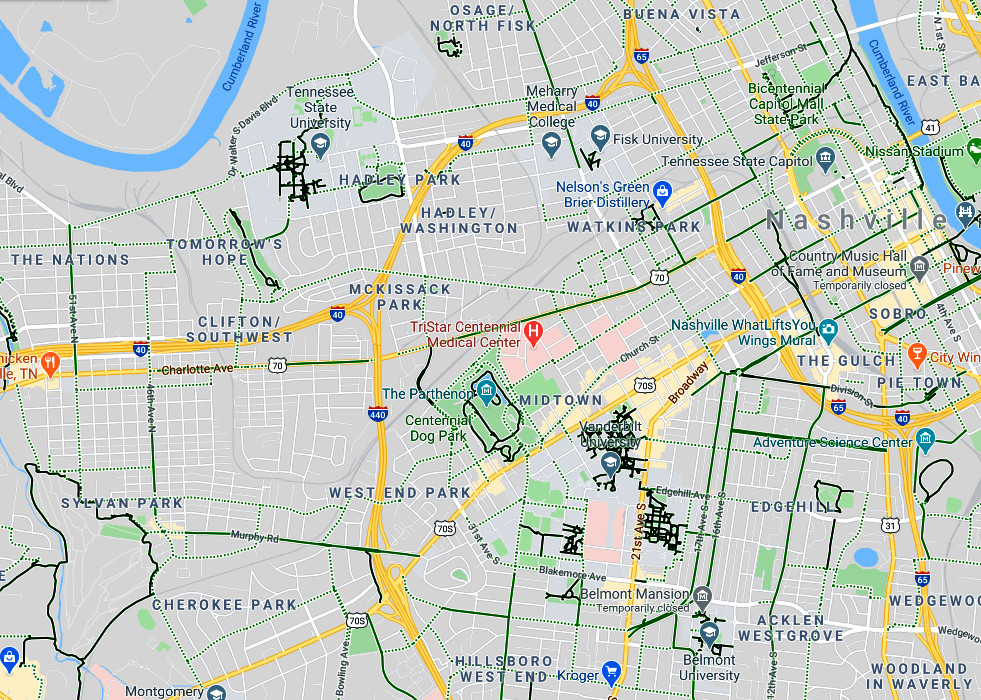
Let’s plan a bike route in Nashville, Tennessee, a city I’m not yet familiar with. The map of central Nashville reveals numerous green lines, suggesting ample bike route potential.
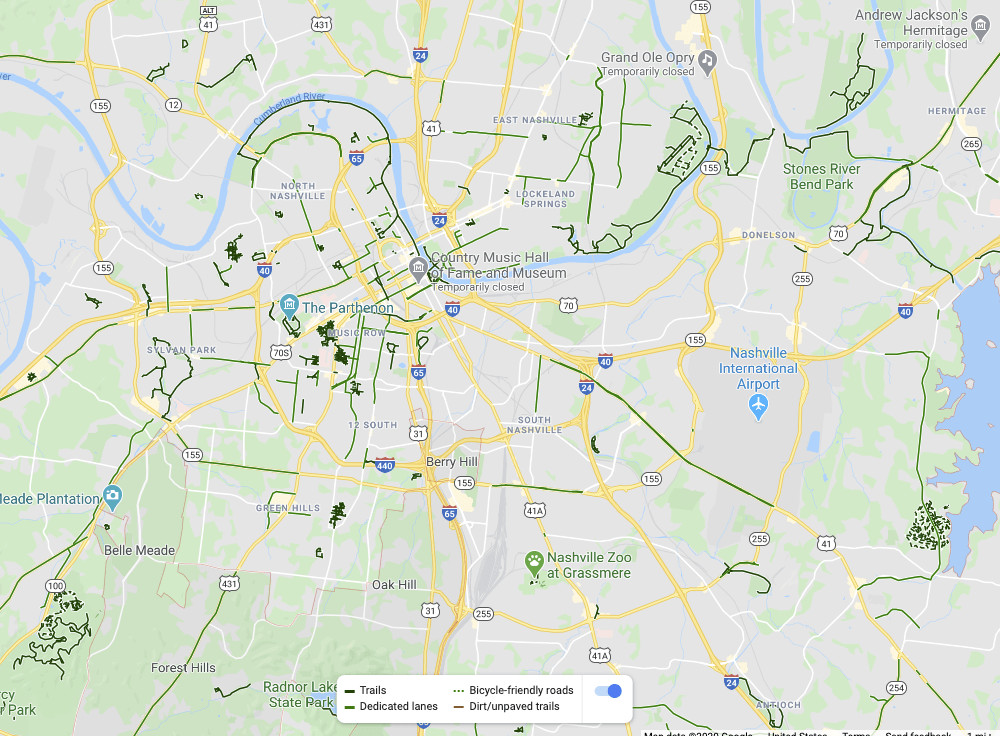 Nashville and all it
As visible in the map:
- Riverfront paths, both downtown and slightly east, appear promising.
- A potential mountain bike park is indicated in the lower right (dashed lines denote dirt roads).
- Bike trails in the lower-left region also look interesting.
- Zooming in further might reveal urban routes and commute-friendly paths downtown.
I’ll focus on the lower-left area to assess the terrain. The winding paths suggest potential hills. Activating the terrain layer (using the same method as the biking layer) confirms this.
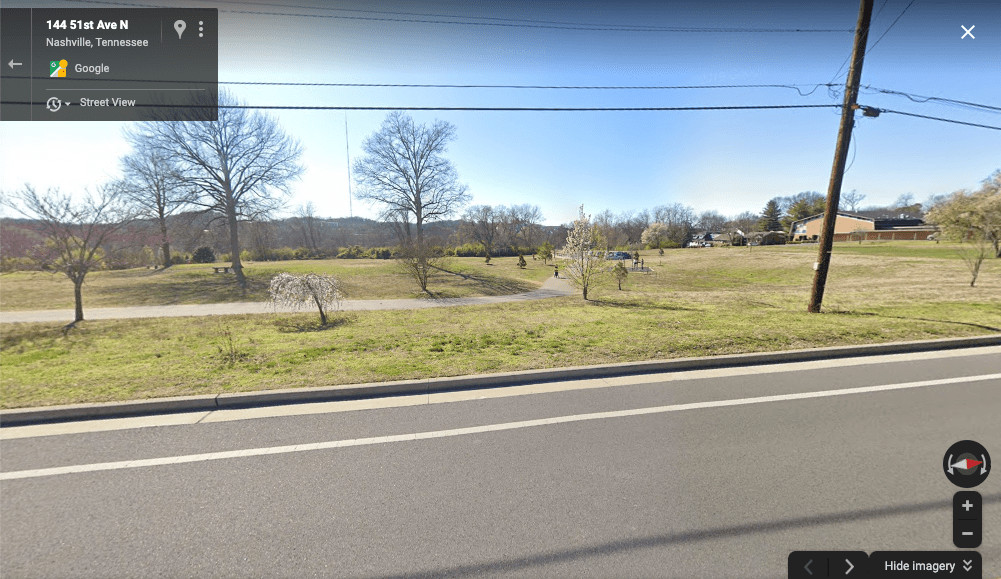
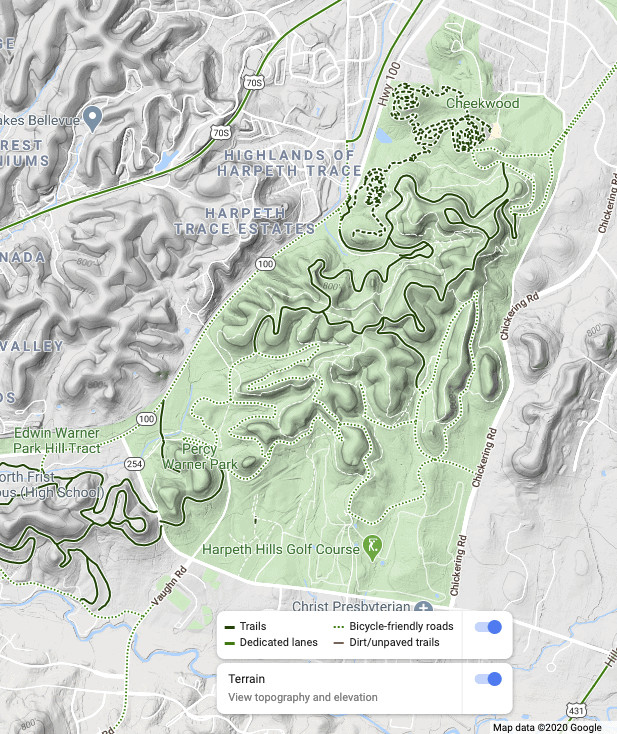 A park with a shared use biking/walking path in Nashville.
While hilly, the terrain layer alone doesn’t provide precise elevation data. It could be a ridge route with relatively flat sections along the hilltop. To get specifics, I’ll drop a pin and request directions to a point within this area. This is easier on desktop but doable on mobile.
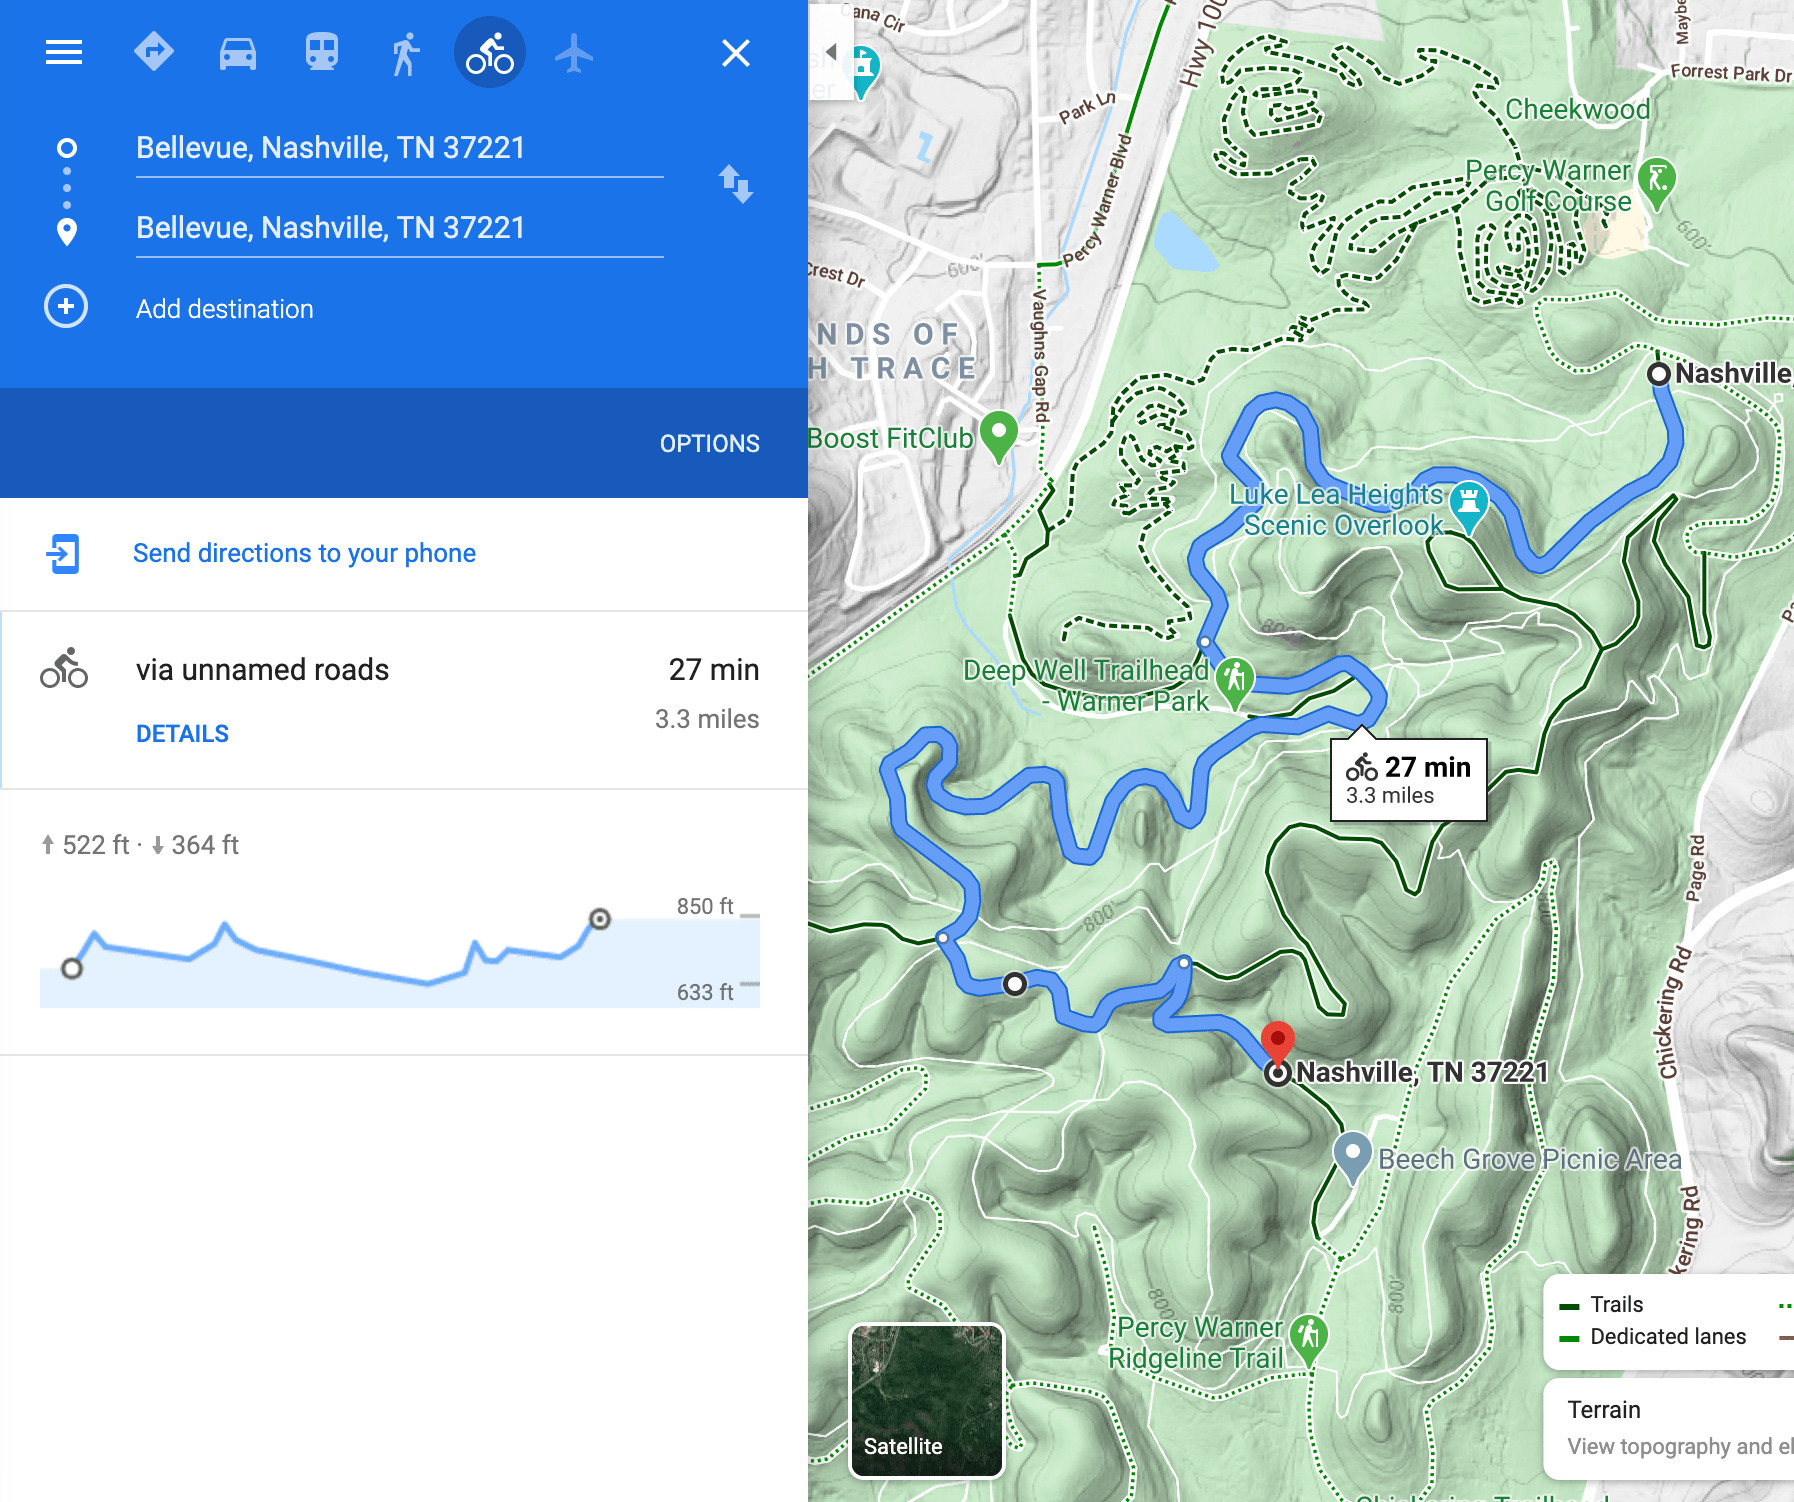 The hills of the bicycle park in Nashville.
This provides a clearer elevation profile. The route shows 522ft of climbing and 364ft of descending. On desktop, you can easily drag and adjust the route to explore different segments and optimize for your preferred level of climbing.
Returning to downtown and zooming in reveals more details.
 Close up of bike routes in Nashville, Tennessee.
Zooming in reveals “bike-friendly streets” and a loop path near Sylvan Park. Curious about the quality of a “bike-friendly road,” I click on one.
 Looking at Street view for a street in Nashville on Google Maps
Clicking the map drops the gray pin, and a Street View thumbnail appears. Selecting the thumbnail opens Street View.
 Street View of Nashville.
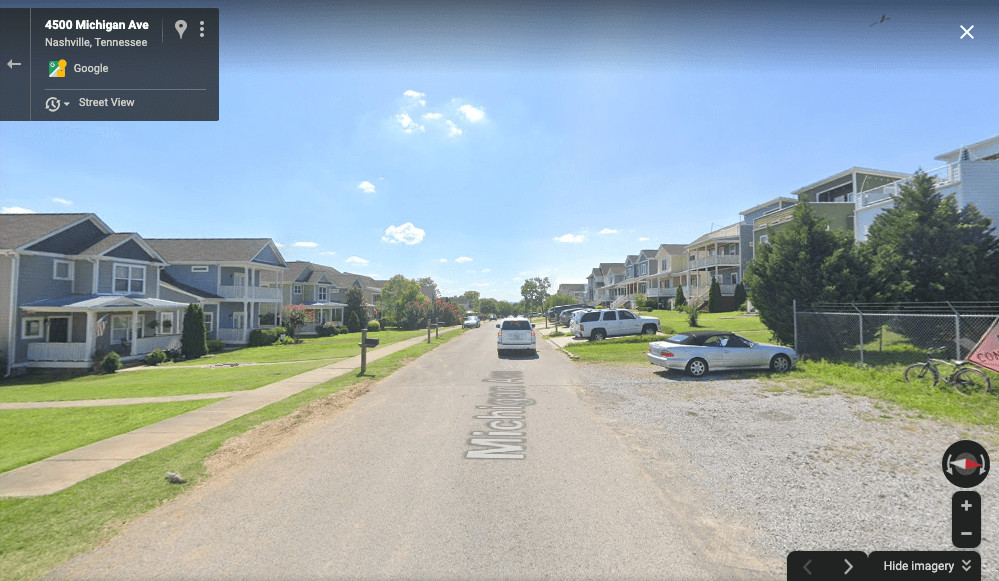
The Street View reveals a low-traffic residential street, suitable for cycling. Finally, to see the path itself, I find a Street View image adjacent to the park.
 Street View of a bike path in Nashville.
The path within the park looks inviting! Now I have a solid plan for biking in Nashville. I have since visited Nashville and enjoyed riding this path, the Richland Creek Greenway.
Satellite view offers another way to assess paths and road connections. Zooming in closely provides a detailed aerial perspective.
Exploring Alternative Mapping Tools
Google Maps is user-friendly and widely accessible, but supplementary tools can enhance your route planning, especially given the sometimes opaque and outdated nature of Google Maps data.
Local Bike Maps (Physical and Digital)
Consult local bike shops or cycling organizations for high-quality local bike maps. When I first moved to San Francisco, before Google Maps was as bike-friendly, the SF Walking & Biking Map was invaluable for city cycling. Obtained through the SF Bike Coalition and available at bike shops, this map helped me discover safe routes and avoid San Francisco’s hills.
Online searches can also uncover bike-specific maps. For example, searching “napa bike map” quickly leads to Napa Valley bike ride PDFs. Comparing these maps with Google Maps helps verify route quality and identify bike lanes, bike-friendly roads, and nearby points of interest.
Global Heatmaps and Custom Route Creation
Cycling heatmaps often surpass Google Maps’ Biking layer in identifying ideal bike routes. Heatmaps visualize actual cyclist activity, highlighting the safest and most popular routes with proven cyclist usage. Using a phone mount and cycling with a heatmap displayed significantly expands route discovery possibilities.
Strava & Ride with GPS are my preferred heatmap apps. Strava is widely used (over 120 million users), though not exclusively by cyclists. Ride with GPS is dedicated to cycling and includes destination routing.
Ride with GPS allows you to activate the heatmap by pressing “Record,” removing map clutter. You can search for a destination, and the app will route you there while keeping the heatmap visible. This is excellent for navigating to specific locations.
Strava lacks direct destination routing and frustratingly limits zoom levels.
Strava Pro subscribers can use a finger-draw route creation feature, where drawing a line on the map generates a route. This is useful for leisure rides when you have a general route idea but don’t want to build it from scratch.
Beyond Strava and Ride with GPS, other online maps exist, potentially offering unique data not found in Google Maps.
Conclusion: Your Next Bike Route Awaits
The opportunities for bike rides are endless. Starting your exploration close to home is always a great idea, eliminating the need for car transport and bike racks, which can be cumbersome.
Share your bike route discoveries using this guide in the comments! Also, let me know any other route-finding tips you use.
Remember to bring essential bike gear and comfort items on your ride. If you plan to stop, a bike lock is essential for securing your bike.
You might also find these posts interesting:
Happy cycling!
Like this:
Like Loading…