
Dreaming of the open road, the wind in your hair, and the thrill of exploration on two wheels? Cycling is a fantastic way to exercise, commute, and discover new places. But before you hop on your bike, the question arises: where should you ride? Whether you’re a seasoned cyclist looking for fresh routes or a beginner venturing beyond your neighborhood, finding the ideal path is key. That’s where a Bike Trail Planner becomes your best friend.
Perhaps you’ve relied on guesswork and local knowledge in the past, or maybe you’re new to cycling route planning altogether. Join us as we delve into the world of bike trail planners and show you how to effortlessly map out safe and enjoyable bike routes, no matter where you are or what kind of cycling infrastructure is available.
We’ll primarily focus on leveraging the power of Google Maps as a comprehensive bike trail planner. We’ll guide you through the essential features and techniques to uncover hidden bike paths, dedicated lanes, and bike-friendly streets. To illustrate these concepts, we’ll even plan some exciting routes in Nashville, Tennessee – a city we’ll explore virtually to demonstrate the versatility of a good bike trail planner.
For those who prefer visual learning, we’ve also created a video tutorial (https://youtu.be/H4d2VUlFpy4) covering the same ground.
Before we dive into Google Maps, it’s worth mentioning another excellent resource for planning bike routes: bicycle heatmaps on platforms like Strava and Ride with GPS. These heatmaps visually represent popular cycling routes, highlighting areas frequently ridden by other cyclists. This can be invaluable for identifying local favorites and ensuring you’re on a well-traveled and likely safe path. But for now, let’s concentrate on mastering Google Maps as your primary bike trail planner.
Unlocking the Bicycling Layer in Google Maps: Your Essential Bike Trail Planner Feature
Google Maps is more than just a navigation tool; it’s a powerful bike trail planner right at your fingertips. It intelligently catalogs a vast network of bike trails, dedicated bike lanes, bike-friendly streets, and even unpaved roads suitable for cycling. However, this wealth of cycling-specific information isn’t displayed by default. To unleash the full potential of Google Maps as your bike trail planner, you need to activate the Bicycling layer.
Turning on the Bicycling layer is straightforward:
- On your phone: Locate the layers icon, typically found in the top left corner of the screen. Tap it, and then select the “Biking” details layer from the menu.
- On your computer: Hover your mouse over the “Layers” icon in the bottom left corner of the map interface. A menu will appear, allowing you to click and activate the “Biking” details layer.
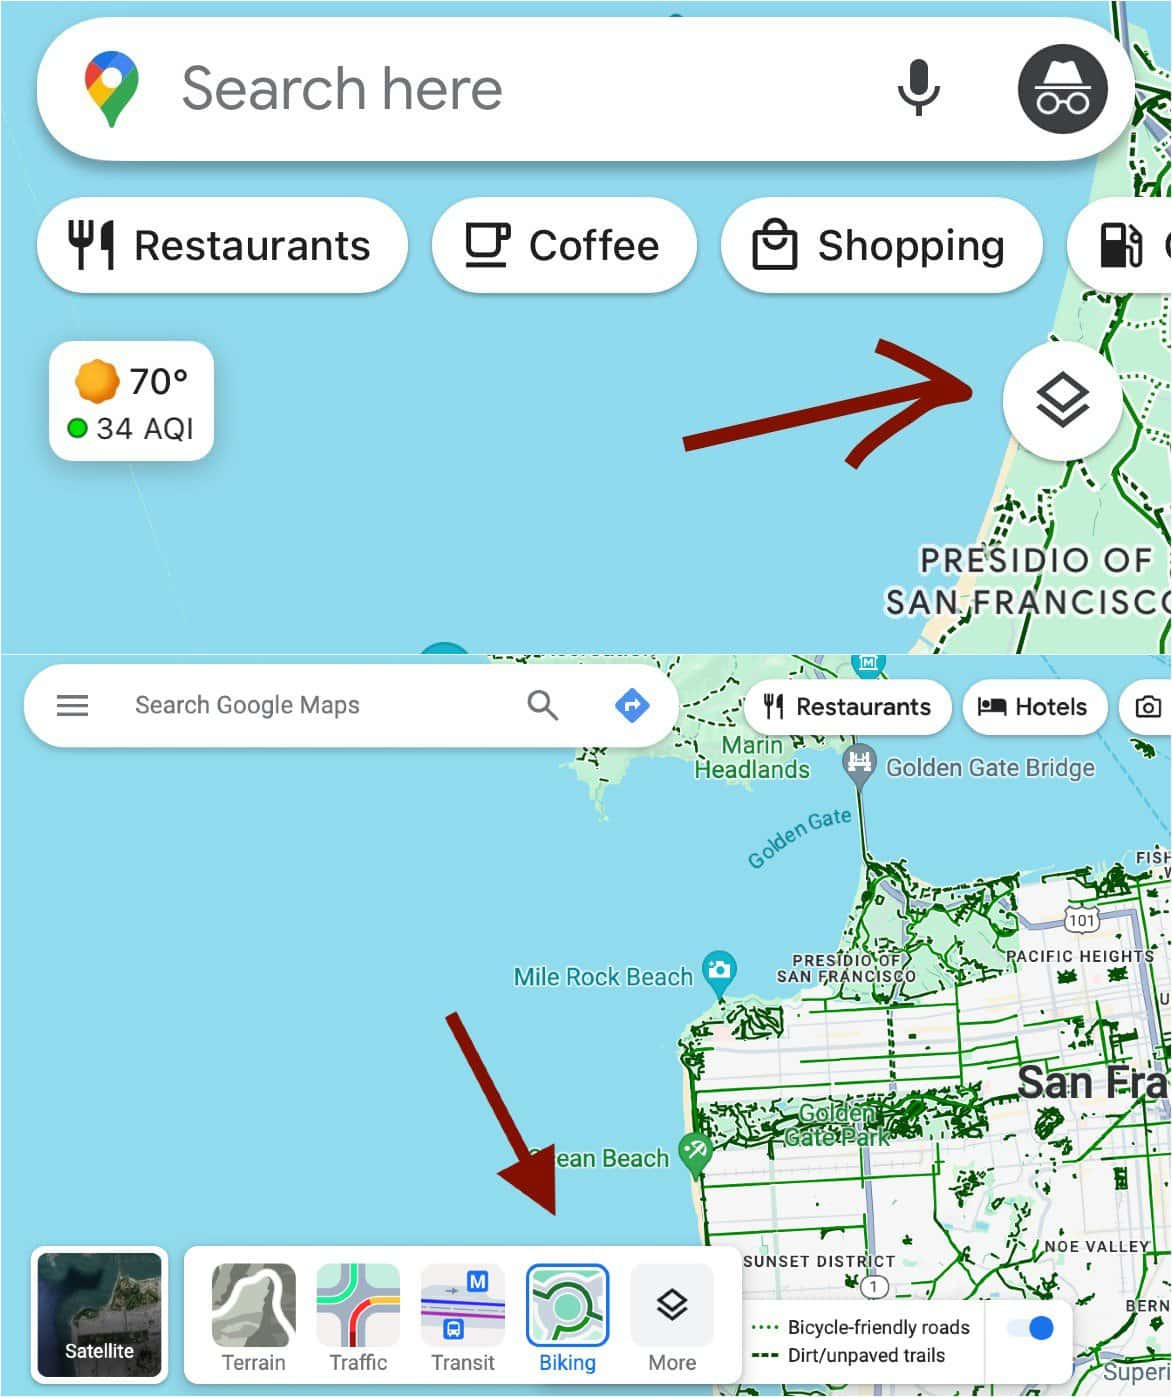 How to access layers on mobile (top) and desktop after a hover (bottom).
Alt text: Accessing the layers menu in Google Maps on mobile and desktop to enable the Biking layer for bike trail planning.
Once activated, the magic unfolds! Google Maps will overlay your map with cycling-specific information. Solid green lines denote dedicated bike trails and lanes, while dotted green lines indicate bike-friendly streets. Dashed green lines may represent unpaved or dirt roads suitable for more adventurous cyclists. With the Bicycling layer active, you now have a comprehensive bike trail planner at your disposal, ready to explore countless cycling possibilities.
Street View and Satellite View: Visualizing Your Bike Trail Planner Routes
While the Bicycling layer provides a fantastic overview of available routes, a true bike trail planner goes beyond lines on a map. To truly understand the nature of a route, Google Maps offers invaluable visual tools: Street View and Satellite View. These features let you virtually explore your planned path, ensuring it aligns with your comfort and safety preferences.
Street View offers a ground-level, panoramic perspective, allowing you to “walk” the route virtually. This is crucial for assessing road conditions, traffic levels, and the presence of bike lanes or shoulders.
Here’s how to access Street View:
- Mobile: Long-press anywhere on the map. A red pin will drop, and if Street View is available for that location, a thumbnail image will appear in the lower left corner, accompanied by a circular icon. Tap this thumbnail to enter Street View.
- Desktop: Click on a location on the map. The address will appear at the bottom of the screen. If Street View is available, a thumbnail image will also be displayed. Click the thumbnail to activate Street View.
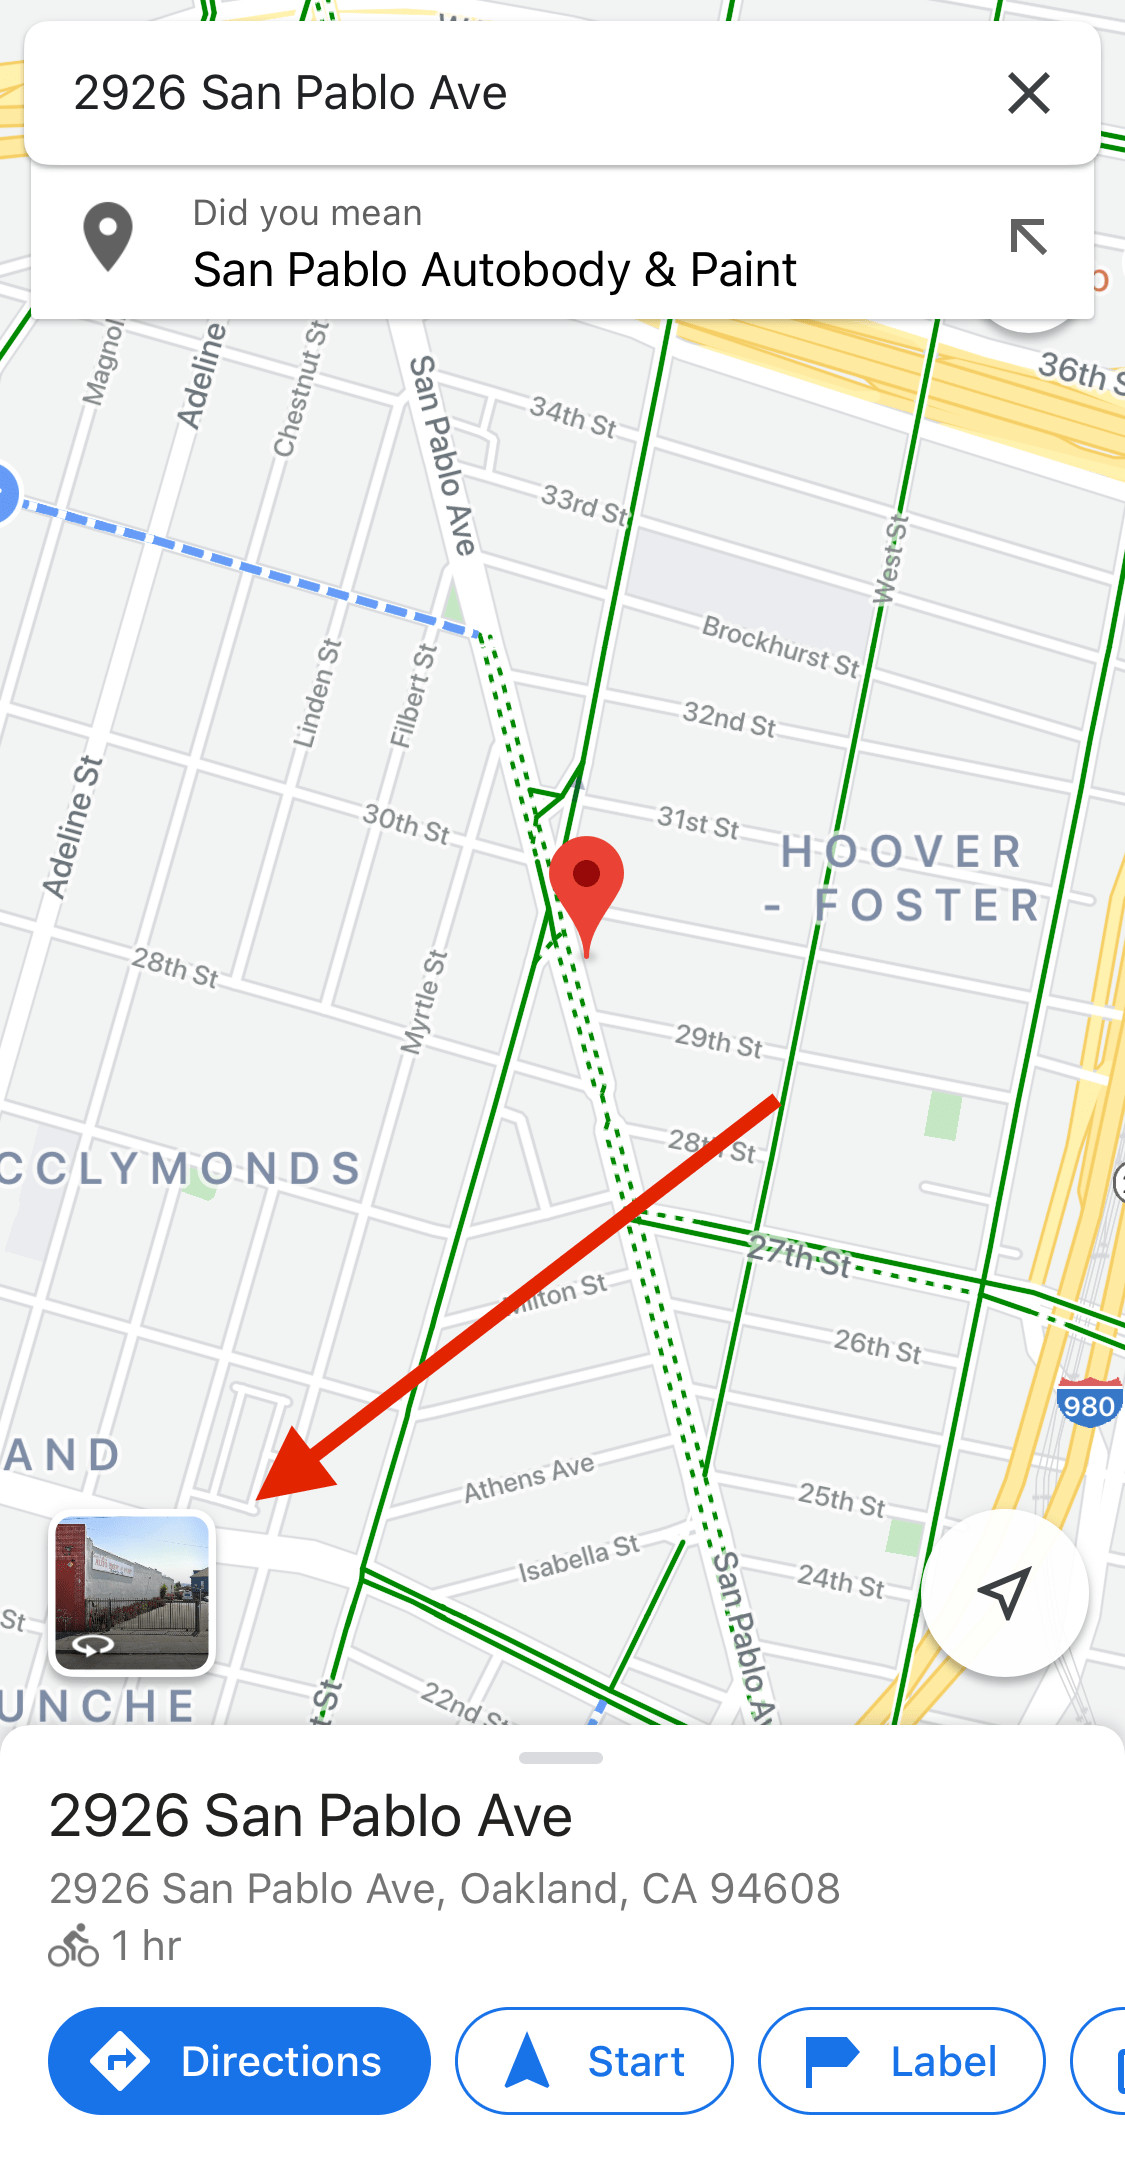 How to find the street view button on google maps mobile
Alt text: Locating the Street View feature on Google Maps mobile for visual bike trail planning.
 How to find the street view button on google maps desktop
Alt text: Finding the Street View option on Google Maps desktop to preview bike routes.
Satellite View provides an overhead perspective, ideal for quickly surveying larger areas. It’s excellent for identifying potential bike paths and trails that might not be immediately obvious on the standard map view. Sometimes, trails visible in Satellite View may even be missing from the default map layer, making it a valuable tool for uncovering hidden gems with your bike trail planner. Switch between map views using the “Layers” menu to easily access Satellite View.
By combining the Bicycling layer with Street View and Satellite View, you transform Google Maps into a sophisticated bike trail planner, allowing for informed route selection and a more confident cycling experience.
Following Green Lines and Seeking Green Spaces: Finding Scenic Routes with Your Bike Trail Planner
For many cyclists, the joy of riding lies not just in the destination, but in the journey itself. Leisurely bike rides often prioritize scenic beauty and tranquility. When using a bike trail planner for such rides, focus on seeking out “green” elements on the map.
Long, solid green lines are your visual cues for dedicated bike trails or bike lanes. These routes often offer uninterrupted cycling and are separated from car traffic, enhancing safety and enjoyment. Always use Street View to confirm the actual conditions of these green routes, as appearances on the map can sometimes be misleading. Off-street trails, frequently lacking Street View, often indicate paths completely removed from vehicular traffic, perfect for peaceful rides.
Parks and green spaces also serve as excellent focal points when planning bike routes. These areas often feature dedicated paths and offer natural beauty or interesting landmarks. Consider incorporating parks as destinations for rest stops or picnics, enriching your cycling experience. Sometimes, a long, continuous bike lane itself can be a rewarding route, offering extended stretches of scenic views and enjoyable riding.
Linear parks, often following rivers, lakes, or former railway lines, are particularly appealing for cyclists. These long, narrow parks typically feature shared-use trails and are often relatively flat, making for easier and more relaxing rides. River and lake paths, in particular, tend to be level, minimizing strenuous climbs.
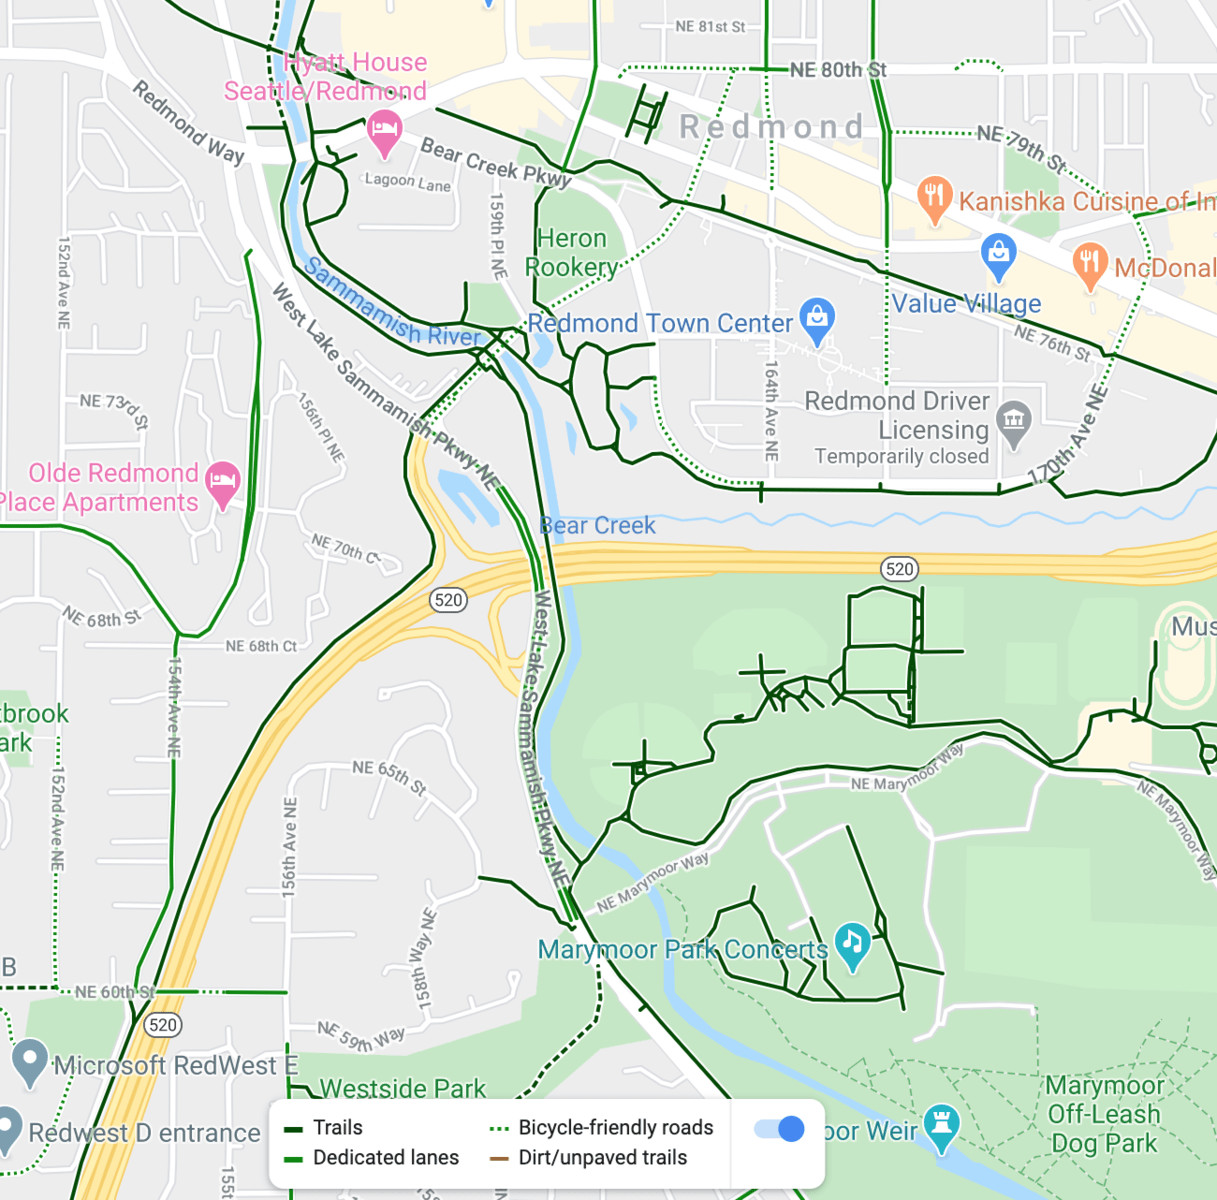 Lots of bike paths along rivers, roads, highways, and parks on this google maps screenshot
Alt text: A Google Maps screenshot showcasing various types of bike routes, including river trails, road bike lanes, and park paths, ideal for bike trail planning.
In this example, the Sammamish River Trail and numerous other green lines illustrate the potential for diverse and enjoyable bike routes. By utilizing your bike trail planner to identify and connect these green routes and spaces, you can create cycling adventures filled with natural beauty and enjoyable scenery.
Navigating “Bike-Friendly Streets” on Google Maps: Critical Evaluation with Your Bike Trail Planner
Beyond dedicated bike trails and lanes, Google Maps designates certain roads as “bike-friendly streets,” indicated by dotted green lines. While seemingly helpful for bike trail planning, it’s crucial to understand that this designation can encompass a range of road types, requiring careful evaluation.
“Bike-friendly streets” typically fall into two categories:
- Truly Bike-Friendly Roads: These are often quieter residential streets with low traffic volume, making them pleasant and safe for cycling, even without dedicated bike lanes.
- Potentially Busy Roads: In some cases, “bike-friendly streets” may refer to busier roads that, despite lacking bike lanes, are designated as official bike routes or are simply the most convenient option for cyclists navigating an area. These may have lane markings for cars but no specific bike infrastructure.
While many “bike-friendly streets” are indeed suitable for cycling, caution is advised. Some may be busier or less comfortable than others. If a “bike-friendly street” appears to be a major road or arterial street on the map, it’s essential to utilize Street View to gain a realistic understanding of the road conditions. Pay close attention to traffic volume, the presence of shoulders, and any potential hazards. A wide shoulder can significantly improve safety even on roads with car traffic, provided it’s free of obstacles. Remember, your bike trail planner is a tool, but your judgment and careful observation are paramount for safe route selection.
Discovering Hidden Bike-Friendly Streets: Expanding Your Bike Trail Planner Horizons
Google Maps’ “bike-friendly street” designation is a helpful starting point for bike trail planning, but it doesn’t capture the full picture. Many streets that are perfectly pleasant and safe for cycling are not officially labeled as bike-friendly. This is simply because not every street has been formally assessed by cycling experts.
This reality presents an opportunity for cyclists to discover “secret” bike-friendly streets. Often, these are local neighborhood streets situated between major arterial roads. These quieter streets often carry minimal through traffic, making them ideal for cycling.
When your bike trail planner doesn’t immediately reveal a clear, safe route, explore these less obvious neighborhood streets. Experimentation while riding can uncover hidden gems.
Los Angeles provides a good example. Zooming into flatter residential areas and using Street View reveals numerous north-south streets that are excellent for cycling, despite not being marked as bike-friendly on Google Maps. These streets typically experience only local traffic. The challenge in such urban environments can be crossing major multi-lane roads to continue on neighborhood streets. In these situations, consider cycling slightly behind the main road to reach a traffic light for a safer crossing.
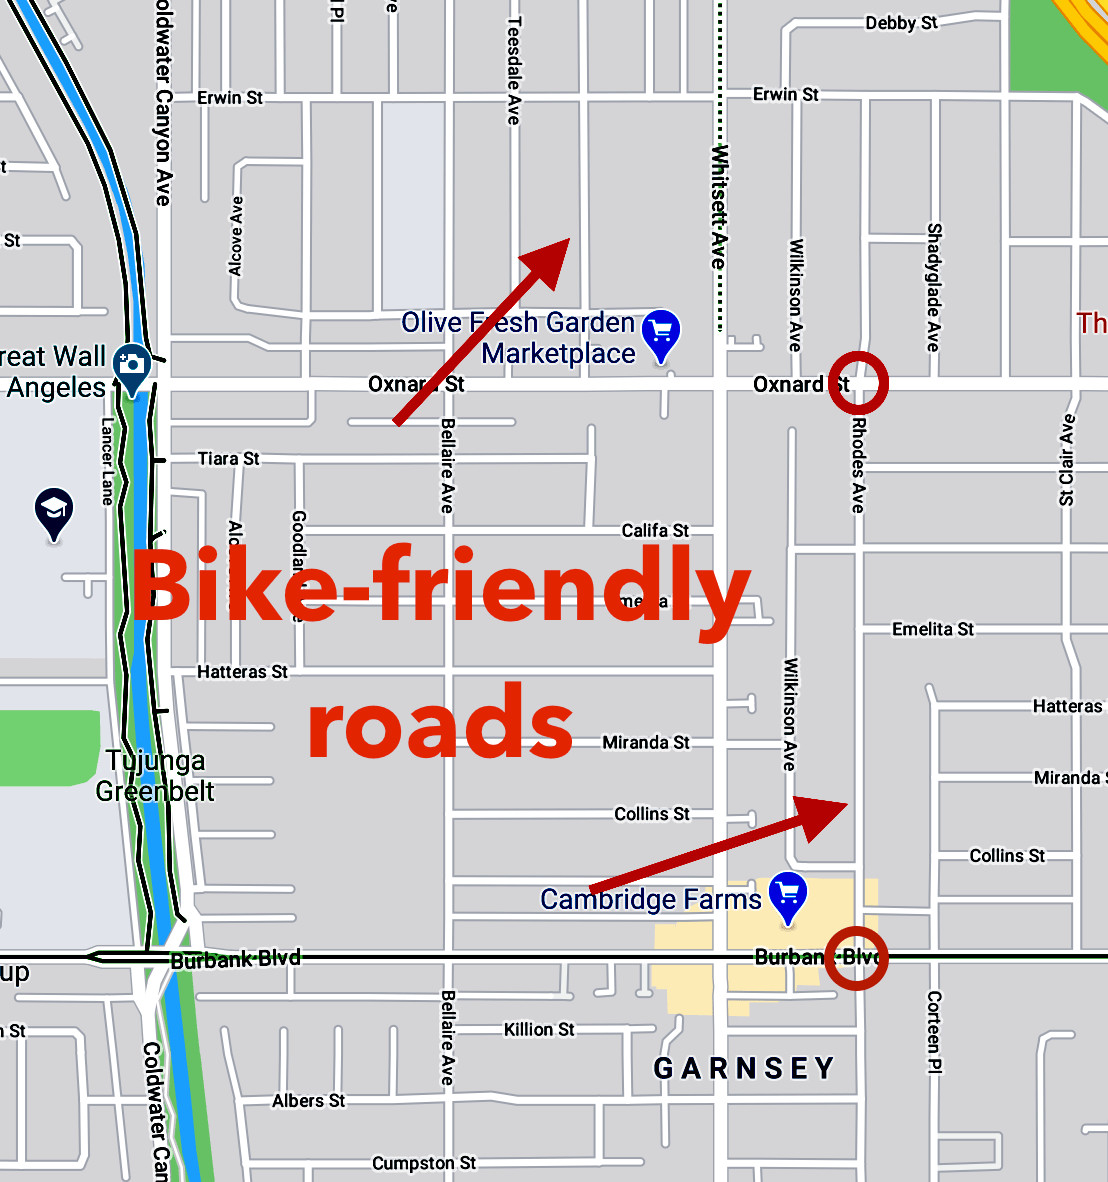 Bike friendly roads on google maps that aren
Alt text: Undesignated bike-friendly streets in Los Angeles identified using Street View on Google Maps for enhanced bike trail planning.
As indicated by the arrows, several unmarked north-south streets in this Los Angeles neighborhood are suitable for cycling, confirmed through Street View. While major intersections without traffic lights (circled) might pose crossing challenges, utilizing nearby traffic lights on main streets provides safer alternatives. A comprehensive bike trail planner encourages this kind of exploration and local knowledge building.
Elevation Insights: Using Your Bike Trail Planner to Anticipate Hills
While Google Maps offers a Terrain layer, it provides a generalized view of elevation changes. For cyclists, understanding the specific hills along a route is crucial. The most effective way to assess elevation using Google Maps as a bike trail planner is to create a route and examine the elevation graph.
When planning a route using biking directions, Google Maps generates an elevation profile. This graph visually represents the hills along your route. On the desktop version, you can hover over the route line to pinpoint the location of significant inclines. You can also adjust your route by adding, removing, or dragging waypoints to minimize or incorporate hills as desired.
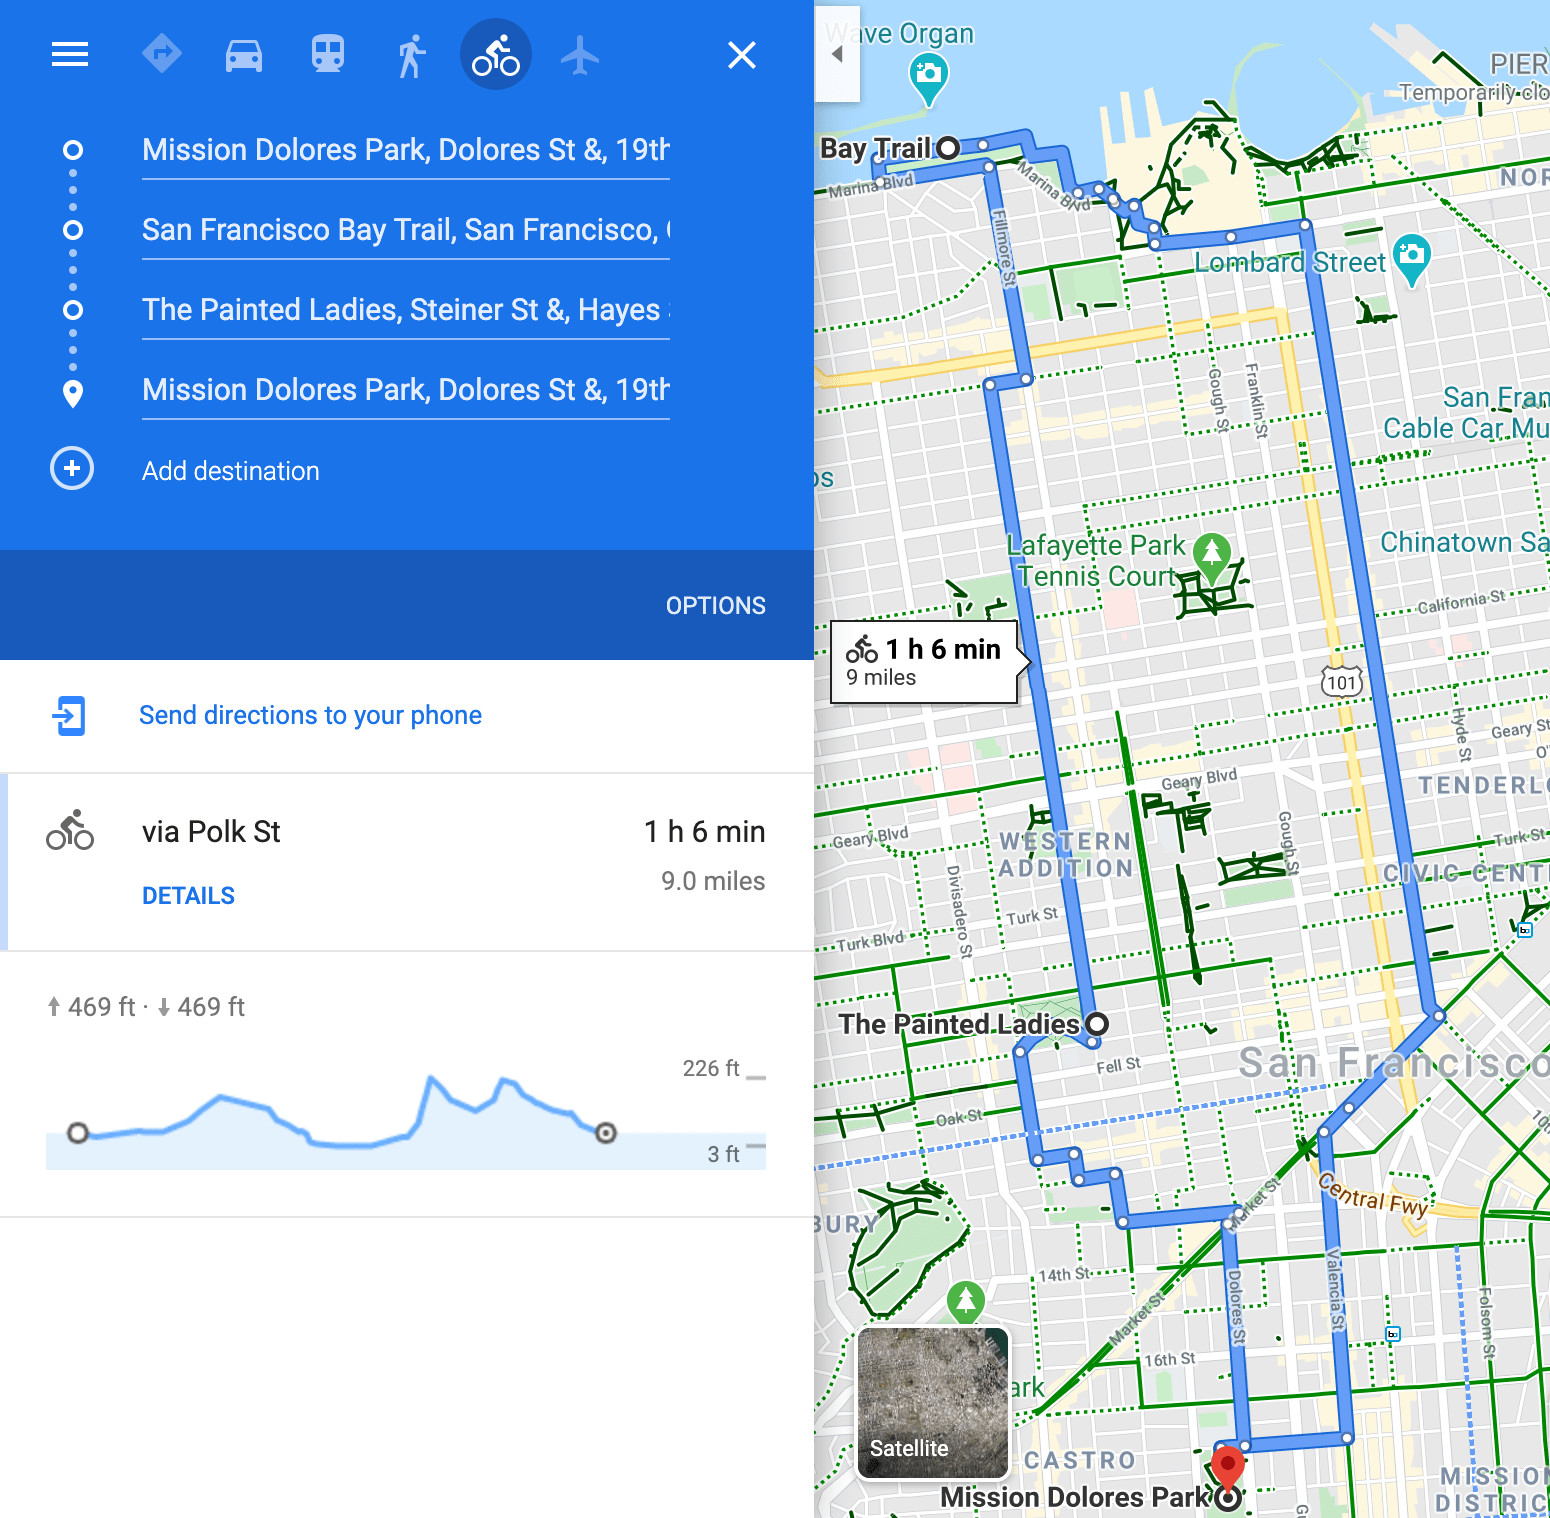 A loop of a nice hilly bike ride around San Francisco, going to the Marina, the Painted Ladies, and Dolores park.
Alt text: A San Francisco bike route planned on Google Maps, showcasing the elevation profile for hill assessment in bike trail planning.
This example route in San Francisco illustrates the elevation graph. The profile clearly shows a steep hill, allowing you to decide whether to detour, prepare for a climb, or even walk that section. This route also incorporates bike-friendly streets, although these are temporarily obscured by the route line – a minor interface limitation within Google Maps.
Be wary of the “Mostly flat” designation when planning routes. Always click the dropdown arrow to view the actual elevation profile. Even seemingly “mostly flat” routes can contain noticeable hills, especially for cyclists on certain types of bikes. For example, a seemingly flat route on Valencia Street in San Francisco still involves a 46-foot climb in one direction, a detail revealed by examining the elevation profile within your bike trail planner.
 Showing the slight, but existing hill on Valencia Street in San Francisco on Google Maps.
Alt text: Elevation details revealed in Google Maps for a “mostly flat” bike route, emphasizing the importance of detailed elevation checks in bike trail planning.
By carefully analyzing elevation profiles within your bike trail planner, you can effectively anticipate and prepare for hills, ensuring a more comfortable and enjoyable ride.
Example: Crafting Fun Bike Routes with a Bike Trail Planner in Nashville
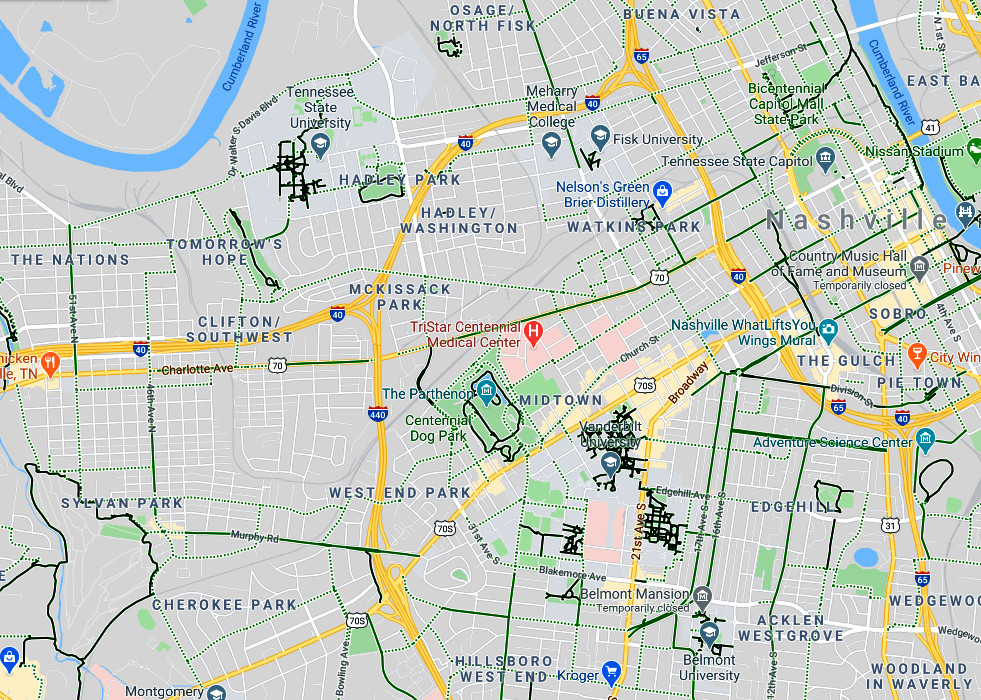
Let’s put these bike trail planner techniques into practice by planning some routes in Nashville, Tennessee – a city we’ll explore virtually. Looking at a map of Nashville with the Bicycling layer activated reveals numerous green lines, indicating potential bike routes.
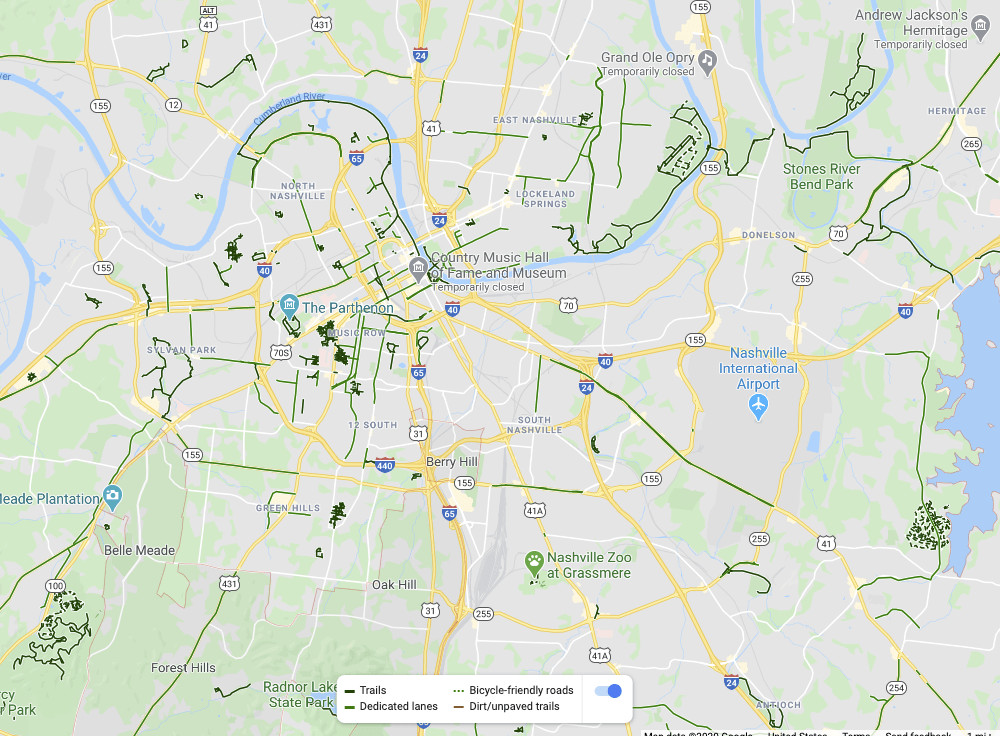 Nashville and all it
Alt text: Overview of Nashville bike paths visible on Google Maps, demonstrating the starting point for bike trail planning.
As seen on the map:
- Riverside paths both downtown and east of downtown appear promising.
- A potential mountain bike park is indicated in the lower right (dashed lines denote unpaved roads).
- Bike trails in the lower-left area also look interesting.
- Zooming in further might reveal urban routes and commute options.
Focusing on the lower-left area, we can investigate the terrain. Activating the Terrain layer reveals a hilly landscape.
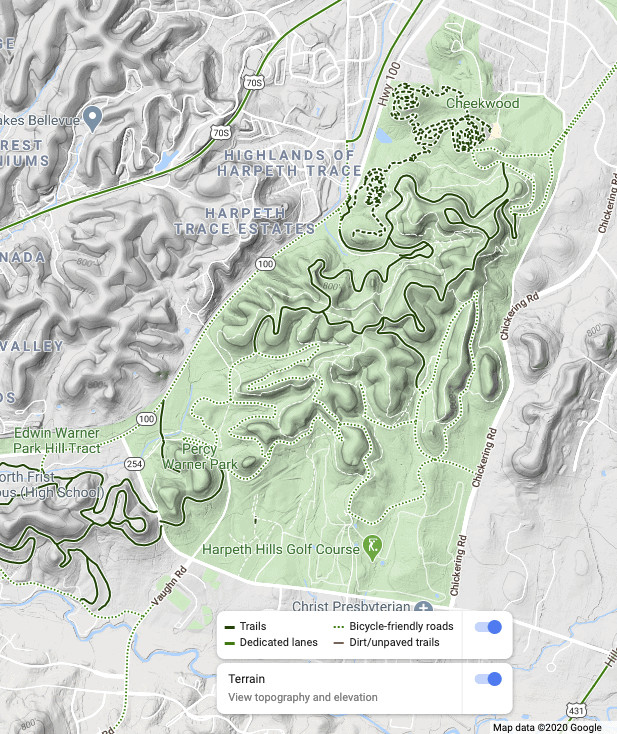 A park with a shared use biking/walking path in Nashville.
Alt text: Terrain view of a Nashville park with bike paths, highlighting elevation changes for consideration in bike trail planning.
However, the Terrain layer provides only a general sense of elevation. For precise hill data, we use the routing feature of our bike trail planner. By selecting a starting point and destination within the park, Google Maps generates a route and elevation profile.
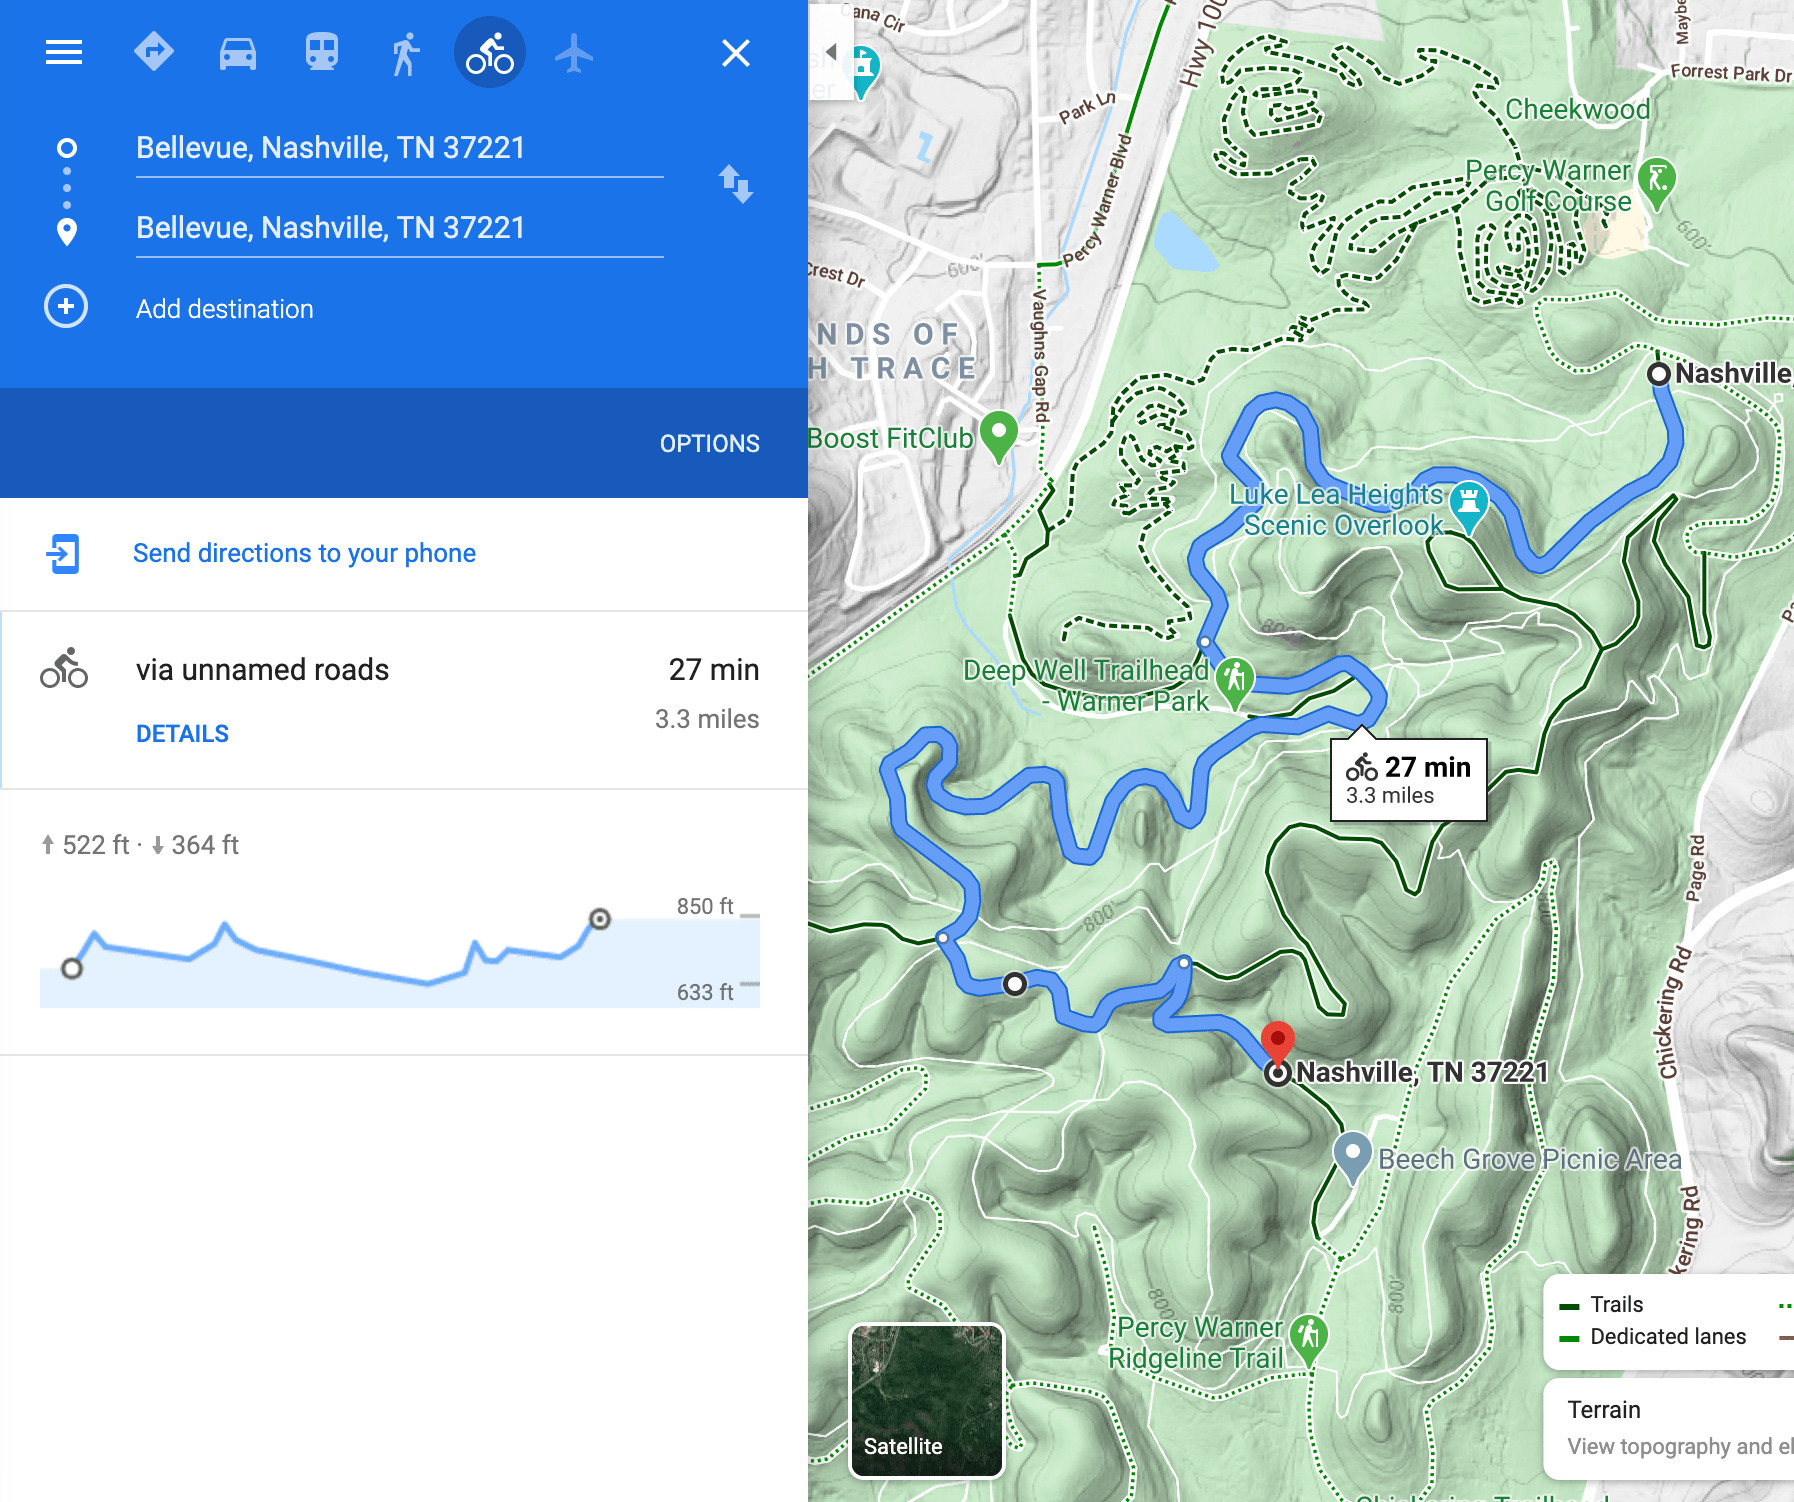 The hills of the bicycle park in Nashville.
Alt text: Elevation profile generated by Google Maps for a Nashville park bike route, providing detailed hill information for effective bike trail planning.
The elevation profile now shows a more precise picture, indicating 522 feet of climbing and 364 feet of descending on this route. On desktop, you can drag waypoints to adjust the route and explore different elevation options.
Returning to downtown Nashville and zooming in reveals more detail.
 Close up of bike routes in Nashville, Tennessee.
Alt text: Closer view of downtown Nashville bike routes on Google Maps, revealing bike-friendly streets and path loops for bike trail planning.
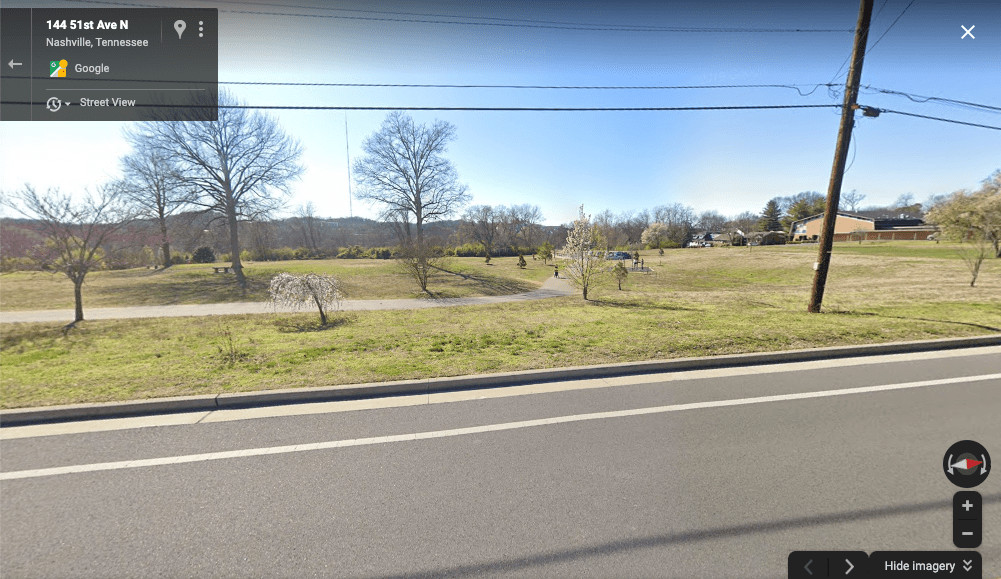
“Bike-friendly streets” now appear, along with a bike path loop near Sylvan Park. To assess the quality of a “bike-friendly street,” we use Street View. Clicking on a street near the park and activating Street View provides a ground-level perspective.
 Looking at Street view for a street in Nashville on Google Maps
Alt text: Accessing Street View for a Nashville street on Google Maps to evaluate bike-friendliness during bike trail planning.
 Street View of Nashville.
Alt text: Street View image of a low-traffic Nashville neighborhood street, confirming its suitability for cycling as part of bike trail planning.
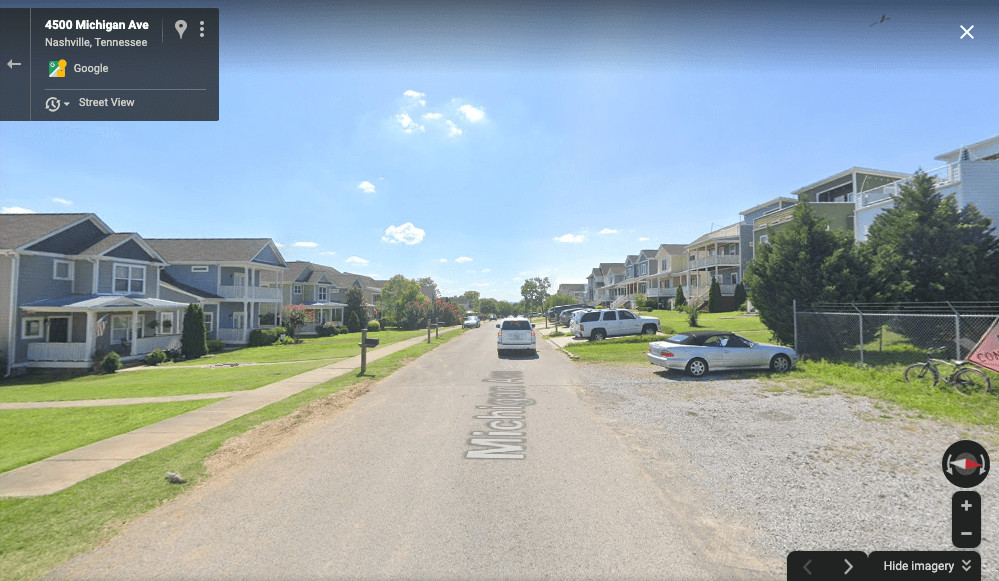
The Street View confirms a low-traffic neighborhood street, suitable for cycling. Finally, examining Street View near the park reveals the actual bike path.
 Street View of a bike path in Nashville.
Alt text: Street View of a bike path in a Nashville park, visually confirming the bike route quality for bike trail planning.
The Street View image shows a pleasant path within the park. This virtual exploration using a bike trail planner confirms the Richland Creek Greenway as a desirable cycling destination in Nashville. Satellite view can further enhance this process by providing an overhead perspective to verify path connections and overall route conditions.
Beyond Google Maps: Expanding Your Bike Trail Planner Toolkit
Google Maps is a highly accessible and user-friendly bike trail planner, but supplementing it with other resources can further refine your route planning. Google’s data, while extensive, can be occasionally outdated or incomplete.
Local Maps: Connecting with Local Cycling Knowledge
Local bike shops and cycling coalitions are invaluable resources for bike route information. They often produce high-quality local bike maps, either in physical or online formats. These maps frequently incorporate local knowledge and insights not found in general mapping tools. For example, upon moving to San Francisco, physical maps from the SF Bike Coalition proved essential for navigating the city’s bike routes and hills, especially when digital mapping was less refined. Searching online for “[city name] bike map” can also reveal valuable local map resources, often in PDF format, offering curated route recommendations. Always compare these local maps with Google Maps to cross-reference and verify route details, paying attention to bike lanes, bike-friendly streets, and potential points of interest.
Heatmaps and Custom Route Creation: Leveraging Cyclist Community Data
Cycling heatmaps, available on platforms like Strava and Ride with GPS, offer a powerful alternative approach to bike trail planning. Heatmaps aggregate ride data from millions of cyclists, visually highlighting popular routes as “hot” areas on the map. This provides a direct indication of routes favored by the cycling community, often signifying safer and more enjoyable options. Using a phone mount to display heatmaps while riding can be incredibly effective for discovering new routes organically.
Ride with GPS excels by allowing you to overlay heatmaps while simultaneously routing to a specific destination. This feature combines the wisdom of the heatmap with point-to-point navigation. Strava, while immensely popular, lacks direct destination routing and limits zoom levels on its heatmap, which can be less convenient for detailed planning. Strava Premium subscribers gain access to a route drawing tool, enabling quick route creation by simply drawing a line on the map, ideal for leisure rides when precise routing is less critical. Beyond Strava and Ride with GPS, numerous other online mapping tools exist, potentially offering unique datasets and perspectives for your bike trail planner toolkit.
Conclusion: Embrace the Freedom of Bike Trail Planning
The possibilities for bike rides are truly limitless. Starting your explorations close to home is always a great idea, eliminating the need for car transport and bike racks. Utilize the techniques and tools discussed to become your own expert bike trail planner.
We encourage you to share your route discoveries and additional planning tips in the comments below!
Remember to pack essential bike gear for every ride and consider bringing a bike lock for secure stops along your route.
Explore these related articles for further reading:
Happy Biking!
Like this:
Like Loading…