Can You Bike With A Sprained Ankle? At usabikers.net, we understand the frustration of being sidelined from riding due to an injury. While getting back on your motorcycle depends on the severity of the sprain, understanding the injury and following proper recovery steps can help you get back in the saddle sooner and safer. Let’s explore how to manage a sprained ankle and when it’s safe to return to biking and motorcycle culture, incorporating insights from the Motorcycle Safety Foundation (MSF) and the American Motorcyclist Association (AMA), along with tips on motorcycle safety, motorcycle gear, and biker events.
1. Understanding Ankle Sprains for Bikers
An ankle sprain occurs when the ligaments supporting your ankle are stretched or torn, often due to a sudden twist or roll. For bikers, this can happen on or off the road, impacting your ability to handle your motorcycle safely. Recognizing the severity of the sprain is crucial for determining the appropriate recovery plan.
1.1. What Happens During an Ankle Sprain?
Typically, an ankle sprain involves the ligaments on the outer side of the ankle, which provide stability to the joint. According to research from the American Academy of Orthopaedic Surgeons in July 2025, these ligaments can be damaged when the ankle is forced beyond its normal range of motion.
1.2. Severity Levels of Ankle Sprains
Sprains are categorized into three grades based on the extent of ligament damage:
- Grade 1: Mild sprain with slight stretching and microscopic tearing of the ligaments.
- Grade 2: Moderate sprain with partial tearing of the ligaments.
- Grade 3: Severe sprain with complete tear or rupture of the ligaments.
Understanding the grade of your sprain is critical for determining the recovery timeline and when it’s safe to resume biking.
1.3. Common Causes of Ankle Sprains for Bikers
For motorcycle enthusiasts, ankle sprains can occur due to several reasons:
- Accidents: A fall or accident can directly injure the ankle.
- Off-Road Riding: Navigating uneven terrain increases the risk of twisting an ankle.
- Poor Footwear: Inadequate ankle support can lead to sprains, especially when handling heavy bikes.
- Mounting/Dismounting: A misstep while getting on or off your motorcycle.
 Ankle-Sprain-Running
2. Initial Treatment: RICE Protocol for Ankle Sprains
When you first sprain your ankle, immediate treatment is essential to minimize swelling, pain, and further damage. The RICE protocol is the standard first-aid approach recommended by medical professionals.
2.1. What is the RICE Protocol?
The RICE protocol stands for Rest, Ice, Compression, and Elevation. Following these steps in the first few days after the injury can significantly improve your recovery.
2.2. Applying the RICE Protocol
Here’s how to apply each component of the RICE protocol:
- Rest: Avoid any activity that aggravates the injury. Stay off your feet as much as possible to allow the ankle to heal.
- Ice: Apply an ice pack to the injured area for 15-20 minutes every 2-3 hours. Ice helps reduce swelling and numb the pain.
- Compression: Wrap the ankle with a bandage to provide support and minimize swelling. Make sure the bandage is snug but not too tight, as this can restrict circulation.
- Elevation: Keep your ankle elevated above your heart as much as possible. This helps reduce swelling by promoting fluid drainage.
2.3. Additional Tips for Initial Treatment
- Pain Management: Over-the-counter pain relievers like ibuprofen or acetaminophen can help manage pain and inflammation.
- Support: Use crutches or a walking boot to keep weight off the injured ankle, especially for more severe sprains.
- Consult a Doctor: Seek medical advice to determine the severity of the sprain and rule out any fractures or other complications.
3. When Can You Start Biking Again After an Ankle Sprain?
Returning to biking too soon after an ankle sprain can lead to re-injury and prolong your recovery. Knowing when it’s safe to get back on your motorcycle is crucial.
3.1. Factors Determining Return to Biking
Several factors influence when you can safely return to biking:
- Severity of the Sprain: Grade 1 sprains typically require less recovery time than Grade 2 or Grade 3 sprains.
- Pain Level: You should be able to walk without significant pain before considering biking.
- Range of Motion: Your ankle should have a near-normal range of motion to control the motorcycle effectively.
- Strength: You need sufficient ankle strength to manage the bike’s weight and movements.
- Stability: Your ankle must be stable enough to handle uneven surfaces and sudden maneuvers.
3.2. General Timeline for Recovery
- Grade 1 Sprain: You might be able to return to light activity in 1-3 weeks.
- Grade 2 Sprain: Recovery typically takes 3-6 weeks.
- Grade 3 Sprain: It may take several months to fully recover, and surgery might be necessary in some cases.
3.3. Consulting a Medical Professional
Before returning to biking, consult with a doctor or physical therapist. They can assess your ankle’s condition and provide personalized recommendations based on your progress.
4. Rehabilitation Exercises for Bikers with Ankle Sprains
Rehabilitation exercises are crucial for restoring strength, stability, and range of motion to your ankle. These exercises will help you regain the necessary control and confidence to ride safely.
4.1. Early-Stage Exercises (1-2 Weeks)
These exercises focus on reducing pain and swelling while gently restoring movement:
- Ankle Pumps: Gently move your foot up and down to improve circulation and reduce stiffness.
- Alphabet Tracing: Use your foot to trace the letters of the alphabet to improve range of motion.
- Towel Scrunches: Place a towel on the floor and use your toes to scrunch it towards you to strengthen the muscles in your foot and ankle.
4.2. Mid-Stage Exercises (2-4 Weeks)
These exercises focus on building strength and stability:
- Resistance Band Exercises: Use a resistance band to perform ankle inversions, eversions, dorsiflexion, and plantarflexion.
- Calf Raises: Stand on a flat surface and raise up onto your toes, then slowly lower back down.
- Single-Leg Balance: Stand on the injured leg for 30 seconds, gradually increasing the duration as your balance improves.
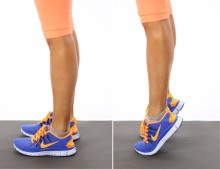 Calf raises
4.3. Late-Stage Exercises (4+ Weeks)
These exercises focus on regaining agility and preparing for biking:
- Heel-to-Toe Walking: Walk in a straight line, placing your heel directly in front of your toes with each step.
- Agility Ladder Drills: Perform various footwork patterns on an agility ladder to improve coordination and agility.
- Jumping Jacks: Perform jumping jacks to improve cardiovascular fitness and ankle stability.
4.4. Importance of Consistency
Perform these exercises consistently to ensure a full recovery. Work with a physical therapist to tailor the program to your specific needs and monitor your progress.
5. Protective Gear and Support for Biking with a Recovering Ankle
Even after completing rehabilitation, providing extra support and protection to your ankle while biking is important.
5.1. Ankle Braces
Ankle braces can provide additional stability and support to the joint, reducing the risk of re-injury. Choose a brace that fits comfortably inside your motorcycle boots and doesn’t restrict movement excessively.
5.2. Motorcycle Boots
Invest in high-quality motorcycle boots that offer excellent ankle support. Look for boots with reinforced ankle protection and a secure fit.
5.3. Custom Orthotics
Consider using custom orthotics to provide additional arch support and improve ankle alignment. These can be especially helpful if you have flat feet or other foot conditions that contribute to ankle instability.
5.4. Strapping
Strapping can be helpful to give extra support and is preferable to an ankle brace. You can be taught to do your own strappings. These should be continued for at least 6 months.
6. Modifying Your Biking Technique
Adjusting your riding technique can help minimize stress on your ankle while it continues to heal.
6.1. Minimizing Ankle Movement
Focus on using your core and upper body to control the motorcycle as much as possible. Avoid excessive ankle movements, especially when shifting gears or braking.
6.2. Adjusting Foot Position
Experiment with different foot positions on the footpegs to find the most comfortable and supportive position for your ankle.
6.3. Smooth and Controlled Movements
Ride smoothly and avoid sudden, jerky movements that can strain your ankle. Anticipate turns and brake gradually to minimize stress on the joint.
6.4. Gradual Reintroduction
When you’ve returned to full fitness it is important to keep doing the basic exercises described above. This will have the aim of preventing a re-injury.
7. Listening to Your Body: Pain Management While Biking
Pay close attention to your body’s signals and avoid pushing yourself too hard. Pain is an indication that something is wrong, and ignoring it can lead to further injury.
7.1. Recognizing Pain Signals
Differentiate between normal muscle fatigue and pain that indicates a problem. Sharp, persistent pain or swelling are signs that you need to stop and rest.
7.2. Adjusting Your Ride
If you experience pain while biking, adjust your ride accordingly. Reduce your speed, take more frequent breaks, or shorten your ride.
7.3. Post-Ride Care
After each ride, ice your ankle and elevate it to reduce swelling and inflammation. Continue performing your rehabilitation exercises to maintain strength and flexibility.
8. Returning to Biking: A Gradual Approach
Returning to biking should be a gradual process, starting with short, easy rides and gradually increasing the duration and intensity as your ankle becomes stronger.
8.1. Start with Short Rides
Begin with short rides on smooth, flat surfaces to assess your ankle’s response. Gradually increase the duration and complexity of your rides as your confidence grows.
8.2. Avoid Challenging Terrain
Avoid off-road riding or challenging terrain until your ankle is fully healed and you have regained full strength and stability.
8.3. Gradual Re-introduction of sport
There should be a gradual re-introduction of sport, for example in football, playing 45 minutes of a match then 60 minutes for the next game leading into a full 90 minutes.
8.4. Monitor Your Progress
Keep track of your progress and adjust your riding schedule as needed. If you experience any setbacks, don’t hesitate to consult with a doctor or physical therapist.
9. Preventing Future Ankle Sprains
Preventing future ankle sprains is crucial for maintaining your biking lifestyle.
9.1. Strengthening Exercises
Continue performing ankle strengthening exercises regularly to maintain joint stability.
9.2. Proper Footwear
Always wear supportive motorcycle boots that provide adequate ankle protection.
9.3. Warm-Up Exercises
Warm up your ankles before each ride with gentle stretching and range-of-motion exercises.
9.4. Awareness
Be mindful of your surroundings and avoid situations that could lead to ankle injuries.
10. The Role of Sports and Exercise Medicine
Consulting with a sports and exercise medicine doctor can be highly beneficial for managing and rehabilitating ankle sprains.
10.1. Thorough Examination
A sports medicine doctor will conduct a thorough clinical examination to assess the extent of the injury.
10.2. Ultrasound Scan
If necessary, an ultrasound scan can be performed during the appointment to aid in diagnosis, avoiding delays associated with advanced imaging scans like MRI.
10.3. Personalized Program
A management and rehabilitation program can be devised specifically for your injury, ensuring a safe return to activity as soon as possible while minimizing the risk of future injury.
FAQ: Biking with a Sprained Ankle
1. Can I bike with a Grade 1 ankle sprain?
Yes, you might be able to bike with a Grade 1 ankle sprain after a week or two, but only if you can walk without significant pain and have regained some range of motion. Consult your doctor or physical therapist before returning to biking.
2. Is it safe to ride a motorcycle with an ankle brace?
Riding with an ankle brace can provide additional support, but make sure the brace fits comfortably inside your motorcycle boots and doesn’t restrict movement excessively.
3. What exercises can I do to strengthen my ankle for biking?
Resistance band exercises, calf raises, single-leg balance, and agility ladder drills can help strengthen your ankle for biking.
4. How long should I wait before returning to biking after an ankle sprain?
The recovery time depends on the severity of the sprain. Grade 1 sprains may take 1-3 weeks, Grade 2 sprains 3-6 weeks, and Grade 3 sprains several months.
5. Can poor footwear cause ankle sprains while biking?
Yes, inadequate ankle support from poor footwear can increase the risk of sprains, especially when handling heavy bikes or navigating uneven terrain.
6. Should I ice my ankle after biking with a sprain?
Yes, icing your ankle after each ride can help reduce swelling and inflammation. Apply ice for 15-20 minutes every 2-3 hours.
7. How can I modify my biking technique to protect my ankle?
Minimize ankle movement, adjust your foot position on the footpegs, and ride smoothly to reduce stress on the joint.
8. What are the signs that I should stop biking and rest my ankle?
Sharp, persistent pain or swelling are signs that you need to stop biking and rest your ankle.
9. Can custom orthotics help with ankle stability while biking?
Yes, custom orthotics can provide additional arch support and improve ankle alignment, which can enhance stability while biking.
10. Is it important to consult a doctor before returning to biking after an ankle sprain?
Yes, consulting a doctor or physical therapist is essential to assess your ankle’s condition and provide personalized recommendations based on your progress.
Experiencing an ankle sprain can be a significant setback, but understanding the injury, following proper treatment and rehabilitation, and taking precautions can help you get back to biking safely and confidently. Remember to listen to your body, seek professional advice, and prioritize your safety. For more information on motorcycle safety, gear reviews, and community events, visit usabikers.net and join our community of passionate riders. Whether you’re looking for information on motorcycle maintenance, safe riding tips, or local biker gatherings, usabikers.net is your go-to resource for everything biker-related. Connect with fellow enthusiasts, share your experiences, and stay up-to-date with the latest trends in the motorcycling world. Check out our guides on motorcycle maintenance, gear reviews, and local biker gatherings.
Address: 801 Sturgis Main St, Sturgis, SD 57785, United States
Phone: +1 (605) 347-2000
Website: usabikers.net.