
Tired of tripping over bikes in your garage? If you’re like many cycling enthusiasts, your collection of bikes might be taking over your space. Inspired by previous DIY successes like a homemade bike work stand and a roof rack modification, this guide tackles the challenge of bike clutter head-on with a Diy Bike Rack solution. Say goodbye to bikes leaning haphazardly against walls and potentially damaging each other – or your car! This floor-mounted bike rack is designed for simplicity, affordability, and customization, perfect for families and solo riders alike.
Why Build a DIY Bike Rack?
Commercial bike racks can be expensive, and often fall short in terms of stability or durability. Building a diy bike rack offers several key advantages:
- Cost-Effective: Significantly cheaper than store-bought racks, especially for multiple bikes.
- Customizable: Tailor the rack to your specific needs, bike types, and available space.
- Durable and Stable: Built from sturdy wood, this rack provides a solid and reliable storage solution.
- Satisfying DIY Project: Enjoy the accomplishment of building your own functional and space-saving bike storage.
This project provides a practical and budget-friendly way to organize your garage and protect your bikes. Let’s get started on building your own diy bike rack!
Materials You’ll Need
For a standard six-bike rack with approximately 16-inch spacing, gather these materials. Adjustments can be made for fewer or more bikes, as we’ll discuss later.
- Two 8ft 2×4 boards: These will form the base and top supports of your bike rack.
- Three 8ft 2×6 boards: These will be cut to create the vertical dividers and wheel slots.
- One pound box of 3-inch deck screws: For sturdy and weather-resistant assembly.
- Sandpaper: To smooth out any rough edges and prevent splinters.
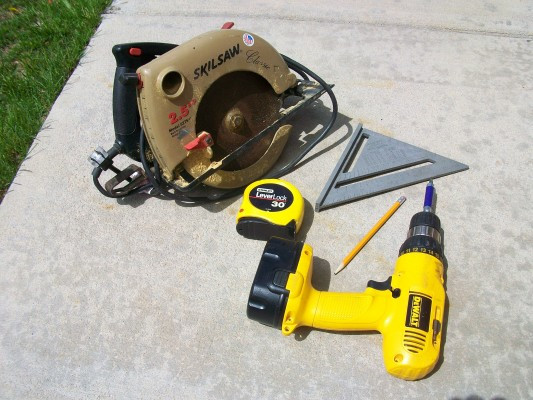
Tools Required
Here’s a list of tools that will make this project easier. Don’t worry if you don’t have power tools; we’ll also suggest manual alternatives.
- Circular Saw: For making quick and accurate cuts through the lumber. *Alternatively, a hand saw will work, but will require more time and effort.
- Cordless Drill: Essential for pre-drilling holes and driving in screws. *A screwdriver and some elbow grease can be substituted, but pre-drilling is highly recommended to prevent wood splitting.
- Tape Measure: For precise measurements to ensure proper bike spacing.
- Straight Edge: To guide your saw for straight cuts.
 Wooden DIY bike rack frame being assembled with screws, showcasing the initial construction process.
Step-by-Step Instructions: Building Your DIY Bike Rack
Let’s walk through the construction process to create your own diy bike rack.
-
Cut the 2×6 boards: Decide on your desired bike spacing. The original design uses 16 inches, but 24 inches is recommended for more wiggle room, especially for kids’ bikes or wider handlebars. Cut the 2×6 boards into vertical dividers. For a six-bike rack with 16-inch spacing, you’ll need eleven dividers. The height of these dividers is up to you, but around 12-18 inches is a good starting point.
-
Prepare the base and top supports: Cut the 2×4 boards to your desired rack length. For a six-bike rack with 16-inch spacing, the base and top supports should be approximately 96 inches (8 feet) long.
-
Assemble the frame: Lay the 2×4 base supports parallel to each other. Position the 2×6 dividers vertically between the base supports, spacing them evenly according to your chosen bike spacing (e.g., 16 inches or 24 inches center-to-center).
-
Secure the dividers: Pre-drill holes through the base supports and into the bottom of each divider. This prevents the wood from splitting. Then, use deck screws to firmly attach each divider to the base supports.
-
Attach the top support: Place the 2×4 top support pieces on top of the dividers, aligning them directly above the base supports. Pre-drill holes and screw the top supports to the top of each divider, mirroring the base assembly.
-
Create wheel slots: Now, you’ll create the slots that hold the bike wheels. From the remaining 2×6 lumber, cut pieces to create the wheel slots. The length of these pieces will depend on your desired slot width. A 2.5-inch slot width is generally suitable for most mountain bike tires. For wider tires, like fat bike tires, adjust accordingly.
-
Attach wheel slot pieces: Position two wheel slot pieces parallel to each other on top of the base support, creating a slot between them. The dividers should be positioned in the center of these slots to separate each bike space. Screw the wheel slot pieces to the base support, ensuring they are securely fastened. Repeat this process for each bike slot.
-
Sanding: Once assembled, use sandpaper to smooth any rough edges or splinters, making the rack safer and more aesthetically pleasing.
Customizing Your Bike Rack
This diy bike rack design is highly adaptable. Consider these customization options:
-
Spacing Adjustments: As mentioned, 16-inch spacing is standard, but 24 inches offers more room. For road bikes or narrower tires, you could reduce spacing. For downhill bikes with wide handlebars, consider increasing it further.
-
Number of Bikes: Easily adjust the rack length and material quantities to accommodate fewer or more bikes. Halve the materials for a three-bike rack, or extend it for more.
-
Finishing Touches: Leave the wood unfinished for a rustic look, or personalize it with paint, stain, or stickers to match your garage décor.
-
Fat Bike Compatibility: If you own a fat bike, create a wider slot (around 4 inches) to accommodate its tires. You can integrate this into a standard rack or build a dedicated fat bike slot.
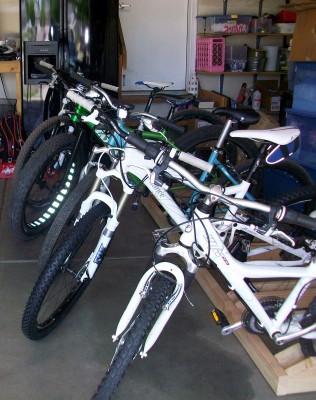 DIY wooden bike rack holding multiple bikes, showcasing its functionality and garage organization.
Bike Fit and Considerations
This rack is designed to accommodate a variety of bike sizes. Here are a few points to consider for optimal bike fit:
-
Wheel Size: The 2.5-inch slots generally fit most mountain bike tires and even accommodate larger 29er tires snugly. Smaller wheeled bikes, like 24-inch kids’ bikes, might be slightly looser but will still remain stable.
-
Derailleur Clearance: Rear derailleur clearance is typically not an issue. Even bikes with long-cage derailleurs should have sufficient space. Be mindful when placing bikes with particularly long derailleurs and adjust positioning if needed.
-
Handlebar Width: Wider handlebars may require slightly more spacing between bikes to prevent them from bumping into each other.
Total Cost and Benefits
The total cost for this diy bike rack is approximately $30 (USD), primarily for lumber and screws. This is a fraction of the cost of most commercial bike racks, offering significant savings while providing a customized and durable storage solution.
By building your own diy bike rack, you’ll not only declutter your garage but also gain a sense of accomplishment and a storage solution perfectly tailored to your needs.
Conclusion: Get Your Garage Organized!
Ready to reclaim your garage space? This diy bike rack project is a simple, affordable, and effective way to organize your bikes and keep them protected. Follow these instructions, customize as needed, and enjoy a clutter-free garage and easy access to your bikes for your next ride!
Your Turn: Share photos of your DIY bike storage setups in the comments below! We’d love to see your creative solutions and customizations!