
Are you tired of tripping over bikes in your garage or watching them topple over in your yard? Like many families, we found ourselves facing a bike storage dilemma. After enclosing the underside of our deck to create extra storage, we thought we had the perfect bike hideaway. We even added doors and pavers for easy rolling access. From the outside, with the doors closed, it looked tidy and organized.
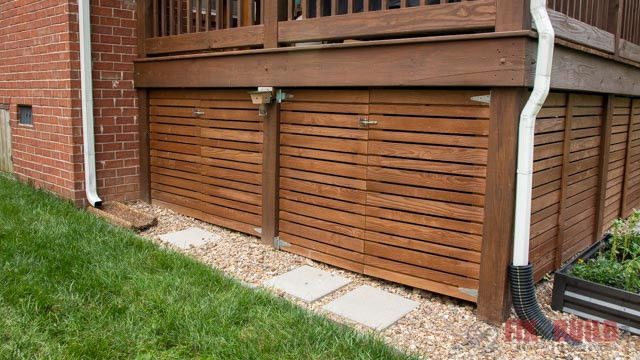 under deck storage area
However, opening those doors revealed a different story. A jumbled mess of bikes, tangled pedals, and frustration awaited. The sloping ground under the deck, designed to direct water away from the house, made standard kickstands useless. The bikes were constantly falling, creating a chaotic storage situation.
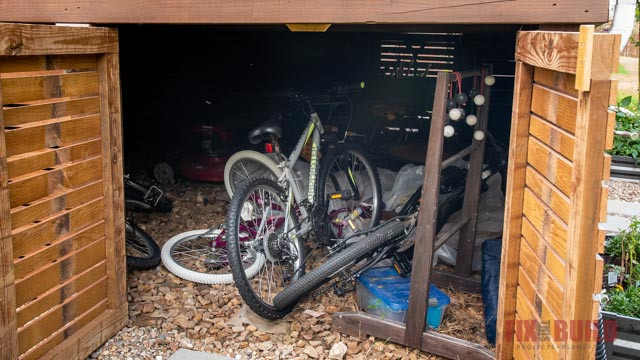 under deck bike storage
This disarray had a predictable outcome: one child abandoned their bike in the driveway permanently, while the others simply stopped riding altogether. Retrieving bikes from the under-deck storage became too much of a hassle. It was clear we needed a solution to reclaim our storage space and, more importantly, get the kids back on their bikes. That’s when the idea for a simple Do It Yourself Bike Stand struck me. These easy-to-build bike stands promised to be the answer to our bike storage woes.
Simple Steps to Build Your Own DIY Bike Stand
This project utilizes readily available and inexpensive materials, making it a budget-friendly way to organize your bikes. Plus, it’s a great beginner-friendly DIY project that you can complete in under an hour.
Materials You’ll Need:
- 2×4 Lumber: Scrap wood is ideal!
- Wood Screws: For sturdy assembly.
Tools Required:
- Circular Saw: For quick and accurate wood cuts.
- Drill/Driver: To pre-drill holes and drive screws.
- Measuring Tape: Ensuring precise dimensions.
Step-by-Step Guide: Creating Your DIY Bike Stand
Building these do it yourself bike stands is straightforward. Follow these simple steps to create your own bike organization solution:
Step 1: Cut the Wood for Each Bike Stand
For each individual bike stand, you will need to cut the following pieces from your 2×4 lumber:
- Two pieces at 22 inches long.
- Two pieces at 18 inches long.
I used my Dewalt 20V Max 7-1/4 inch Cordless Circular Saw for this task. Cordless circular saws are incredibly convenient and powerful, making quick work of cutting 2x4s. The brushless motor and high RPM ensure clean and fast cuts, perfect for projects like this.
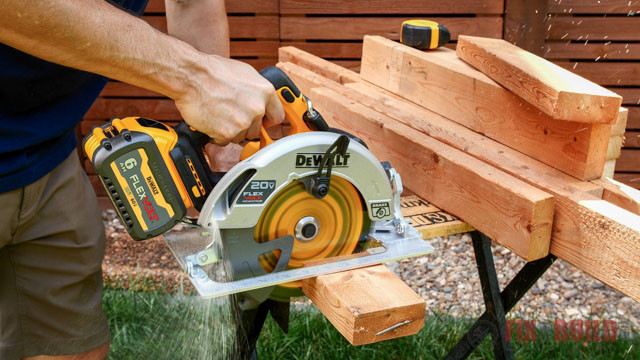 cutting 2x4s with circular saw
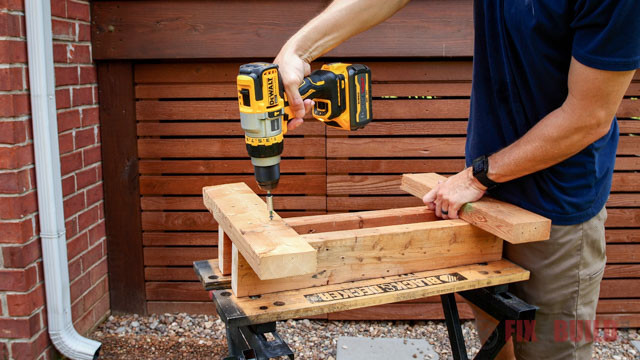
Step 2: Assemble the DIY Bike Stand
Before assembling, it’s important to measure the width of your bike tires. This will determine the correct spacing for your bike stand to ensure a snug fit. Consider the widest point of your tires, especially if you have mountain bike tires with knobby treads.
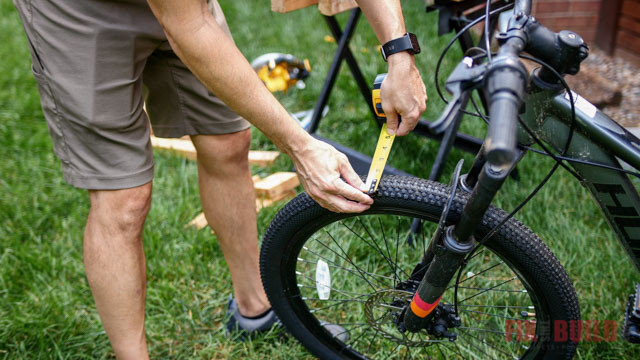 measuring bike tire
Lay the two 22-inch boards on their sides on your work surface. Then, position the 18-inch boards across the top and bottom of the 22-inch boards, creating a channel. This channel formed by the 22-inch boards is where the bike tire will rest.
Once everything is aligned, use your Dewalt 20V MAX 1/2 in. Cordless Hammer Drill/Driver to pre-drill holes and then screw the boards together. Cordless drill/drivers are essential for DIY projects, offering power and portability. Using a hammer drill function, while not necessary for this soft wood, is beneficial for tougher materials and masonry projects.
 assemble DIY bike stand
Step 3: Optional – Secure to the Ground
For added stability, especially on uneven surfaces or in high-traffic areas, you can secure the DIY bike stand to the ground. Simply drill a hole through each of the 18-inch boards and use stakes to anchor the stand into the ground.
Testing and Enjoying Your New Bike Stands
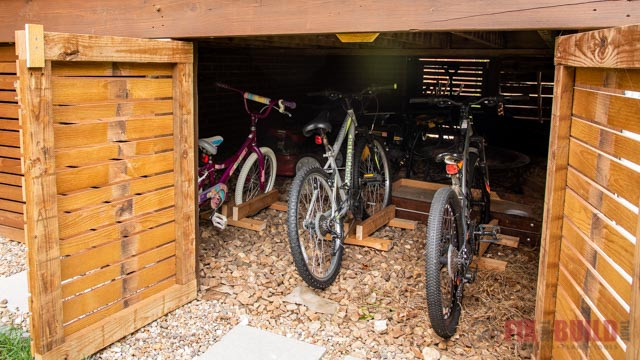
With the do it yourself bike stands assembled, flip them upright and place them in your desired storage area. It’s time for a test run!
These simple stands work incredibly well. They make parking bikes effortless for kids and prevent bikes from tipping over. More importantly, they make it much easier to get bikes in and out of storage, encouraging more bike riding!
 under deck diy bike stand
After building the DIY bike stands, I placed them under the deck, and the bikes finally had a proper home. No more bike avalanches! It’s amazing how such a simple solution can make such a big difference.
Keeping the Workspace Neat
While organizing the bikes, I also took the opportunity to tidy up the surrounding area. We have a paver-edged garden bed nearby, which looks great but tends to get overgrown with grass. To tackle this, I used the Dewalt 60V Max Cordless String Trimmer. The Flexvolt battery system from Dewalt is fantastic because the same batteries work with both 20V and 60V tools, offering great versatility and cost savings.
Switching batteries between tools is seamless and reduces the need for multiple chargers and batteries. The string trimmer is lightweight and easy to maneuver, making yard work less of a chore.
With the workspace cleaned up and the DIY bike stands in place, the bikes are truly ready to roll! Hopefully, this simple project has solved at least one organizational challenge for my family and inspired you to create your own do it yourself bike stand!
If you enjoyed this project, be sure to check out my other Outdoor Projects for more DIY inspiration.