Changing your bike chain is an essential maintenance task that keeps your ride smooth and your drivetrain in top condition. At usabikers.net, we understand the importance of a well-maintained bike, so we’re here to guide you through the process with easy-to-follow steps. Replacing your bicycle chain can seem daunting, but with the right tools and a bit of know-how, you can easily handle this task at home. Regular bicycle maintenance, drivetrain care, and gear replacement are key to extending the life of your bike.
1. Why Should I Learn How to Change a Bike Chain?
Learning how to change a bike chain is vital for maintaining your bike’s performance and preventing costly repairs. Replacing a worn chain ensures smooth gear shifts, prevents damage to your cassette and chainrings, and keeps you riding safely.
Think of your bike chain as the unsung hero of your ride. It’s constantly working, transferring power from your pedals to your wheels. Over time, this tireless effort takes its toll. The constant friction and strain cause the chain to stretch and wear down. Ignoring this wear can lead to significant problems down the road. According to research from Park Tool, a worn chain can accelerate wear on your cassette and chainrings, leading to more expensive replacements.
1.1. What are the benefits of a new bike chain?
A new bike chain offers several key benefits, including:
- Improved Shifting: A fresh chain meshes better with your cassette and chainrings, resulting in smoother and more precise gear changes.
- Extended Drivetrain Life: Replacing your chain before it becomes excessively worn prevents damage to other drivetrain components like the cassette and chainrings.
- Enhanced Power Transfer: A new chain ensures efficient power transfer from your pedals to the wheels, improving your overall riding experience.
- Cost Savings: Regularly replacing your chain is cheaper than replacing the entire drivetrain due to excessive wear.
 The old chain needs to be removed first before any other maintenance can be done. Make sure you have the right tools.
1.2. How often should I replace my bike chain?
The lifespan of a bike chain depends on factors like riding conditions, maintenance habits, and the quality of the chain itself. However, a general guideline is to replace your chain every 2,000 to 3,000 miles. According to Shimano, regularly checking your chain for wear can help you determine the optimal replacement time. For those who ride frequently or in harsh conditions, more frequent replacements may be necessary.
1.3. What happens if I don’t change my bike chain?
Failing to replace your bike chain can lead to a cascade of problems:
- Worn Cassette and Chainrings: A stretched chain wears down the teeth on your cassette and chainrings, eventually causing them to skip or slip.
- Poor Shifting Performance: A worn chain doesn’t engage properly with the gears, leading to sluggish and inaccurate shifting.
- Increased Risk of Chain Breakage: A severely worn chain is more likely to snap under stress, potentially causing an accident.
- Higher Repair Costs: Neglecting chain replacement can result in the need to replace the entire drivetrain, which is significantly more expensive than replacing a chain.
2. What Tools and Materials Do I Need to Change a Bike Chain?
To successfully change your bike chain, you’ll need to gather the following tools and materials:
- New Bike Chain: Ensure it’s compatible with your bike’s drivetrain (number of speeds).
- Chain Tool: Used to remove and install chain pins.
- Chain Checker: Measures chain wear to determine if replacement is needed.
- Quick Link Pliers (Optional): Simplifies the installation and removal of quick links.
- Cleaning Supplies: Degreaser, brushes, and rags for cleaning the drivetrain.
- Work Gloves: To protect your hands from grease and grime.
2.1. How do I choose the right bike chain?
Choosing the right bike chain involves several considerations:
- Number of Speeds: Select a chain that matches the number of gears on your bike’s cassette (e.g., 8-speed, 9-speed, 10-speed, 11-speed, or 12-speed).
- Compatibility: Ensure the chain is compatible with your bike’s drivetrain components (Shimano, SRAM, Campagnolo). Most chains are cross-compatible, but it’s always best to check.
- Quality: Opt for a reputable brand known for durability and performance (e.g., Shimano, SRAM, KMC).
- Type: Consider the type of riding you do. Some chains are designed for specific applications like road cycling, mountain biking, or e-bikes.
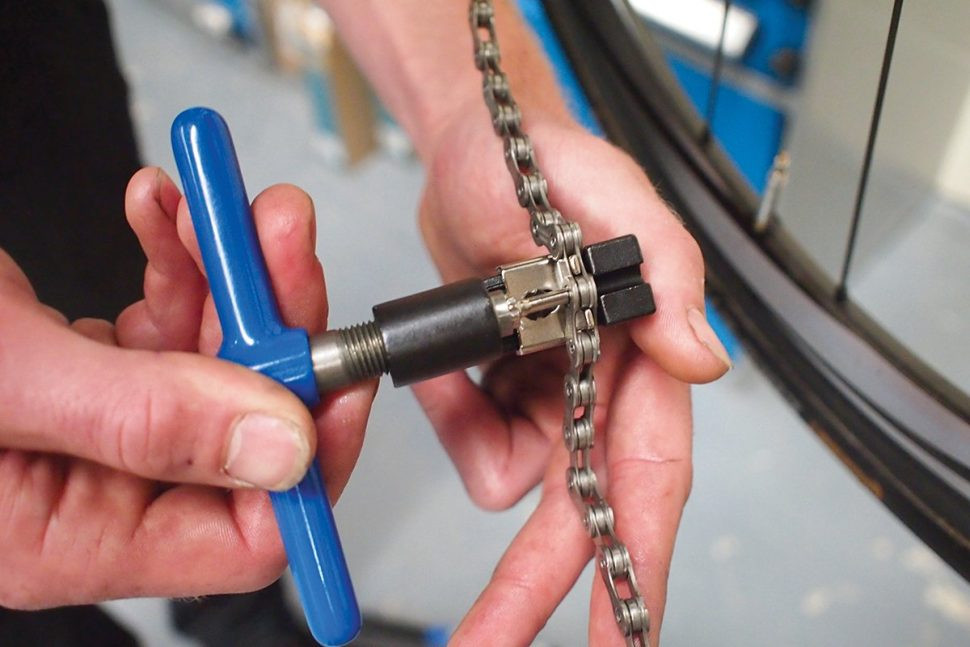
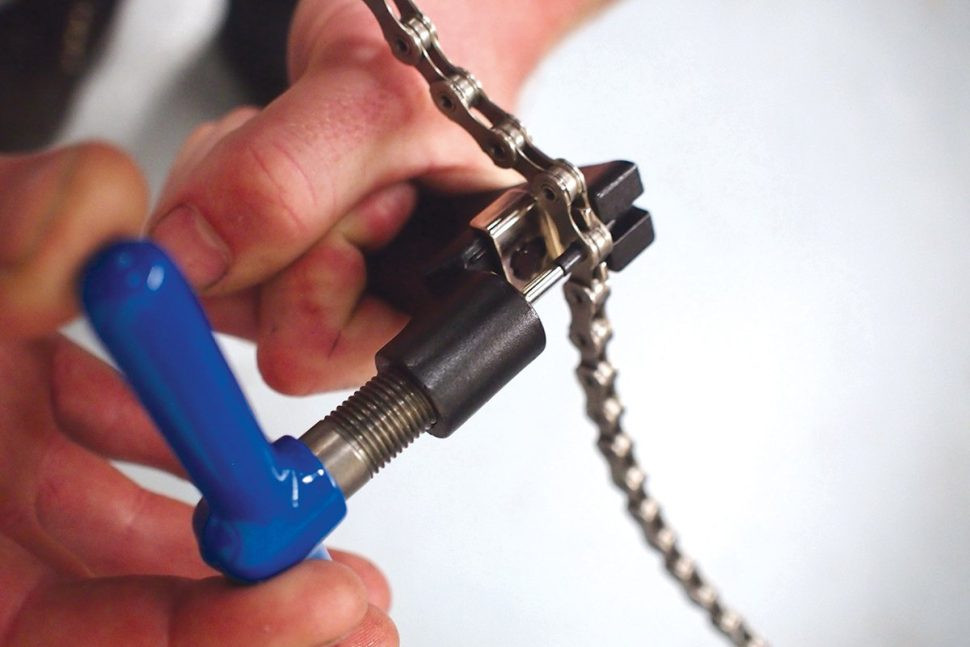
2.2. What is a chain tool and how do I use it?
A chain tool, also known as a chain breaker, is a small device used to push chain pins in and out. It consists of a threaded handle, a pin pusher, and a chain cradle. To use it:
- Place the chain in the cradle of the tool, aligning the pin pusher with a chain pin.
- Turn the handle to push the pin partially out of the link.
- To reinstall a pin, align the chain ends and use the tool to push the pin back in until it’s flush with the outer plate.
2.3. What is a chain checker and how do I use it?
A chain checker, also known as a chain wear indicator, is a tool used to measure chain stretch. It has two prongs: one that fits into a chain link and another that indicates the degree of wear. To use it:
- Insert the first prong into a chain link.
- Attempt to insert the second prong into a link a few inches away.
- If the second prong drops in easily, the chain is worn and needs to be replaced.
3. Step-by-Step Guide: How to Change a Bike Chain
Follow these steps to replace your bike chain like a pro:
- Remove the Old Chain: Use a chain tool or quick link pliers to break the old chain.
- Clean the Drivetrain: Thoroughly clean the cassette, chainrings, and derailleurs to remove dirt and grime.
- Thread the New Chain: Route the new chain through the derailleurs and around the cassette and chainrings.
- Determine the Correct Length: Size the chain by overlapping the ends and ensuring proper tension on the rear derailleur.
- Break the Chain to the Correct Length: Use a chain tool to remove excess links.
- Connect the Chain: Use a new quick link or chain pin to join the ends of the chain.
- Inspect and Adjust: Check the chain for proper movement and adjust the derailleurs if necessary.
- Test Ride: Take your bike for a spin to ensure smooth shifting and proper chain function.
3.1. How do I remove the old bike chain?
To remove the old bike chain, you have two options: using a chain tool or using quick link pliers.
- Using a Chain Tool: Place the chain in the cradle of the tool, aligning the pin pusher with a chain pin. Turn the handle to push the pin partially out of the link. Once the pin is almost out, you can break the chain by hand.
- Using Quick Link Pliers: If your chain has a quick link, use quick link pliers to compress the link and release it.
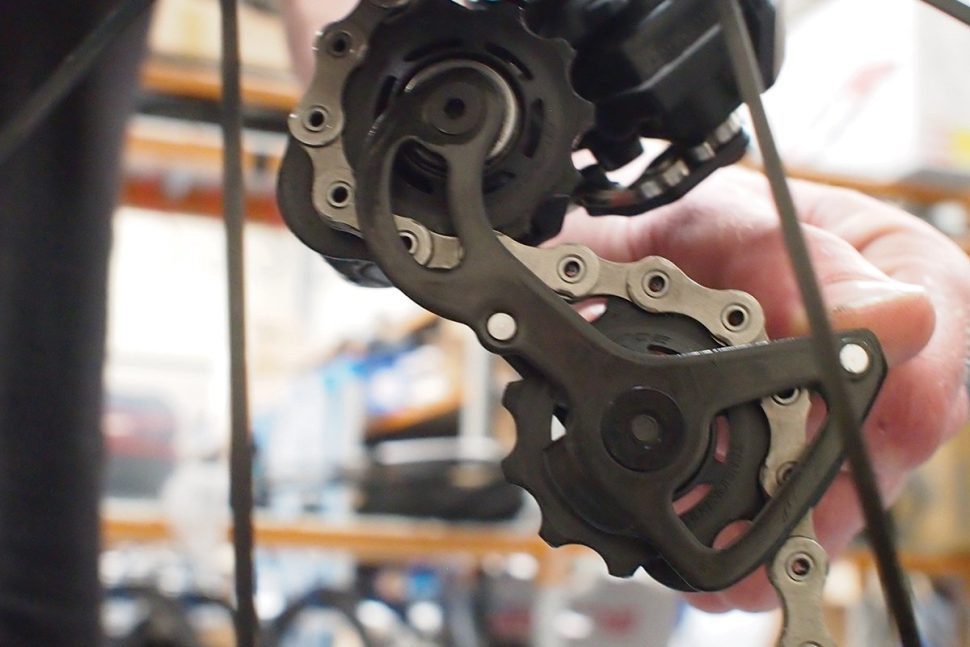
 It’s time to clean and inspect your chainrings and cassette.
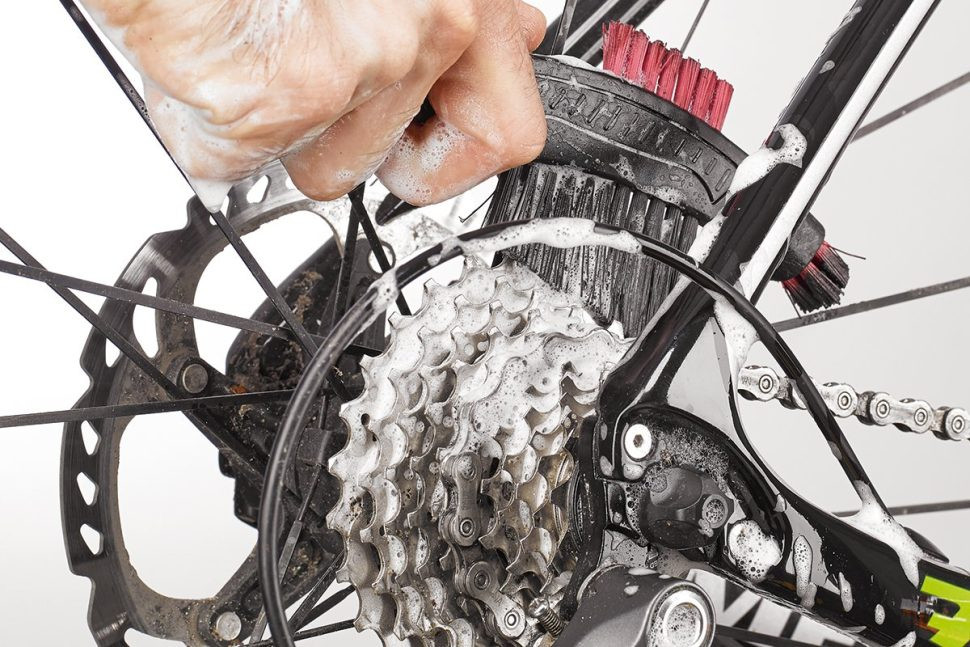
3.2. How do I clean my bike’s drivetrain?
Cleaning the drivetrain is an essential step in the chain replacement process. A clean drivetrain ensures smooth shifting and prolongs the life of your components.
- Apply Degreaser: Apply a degreaser to the cassette, chainrings, and derailleurs.
- Scrub: Use brushes to scrub away dirt and grime.
- Rinse: Rinse the components with water.
- Dry: Dry the components with a clean rag.
3.3. How do I thread the new bike chain?
Threading the new bike chain involves routing it through the derailleurs and around the cassette and chainrings.
- Shift to Smallest Gears: Shift the front and rear derailleurs to the smallest gears.
- Route Through Front Derailleur: Thread the chain through the front derailleur cage.
- Route Through Rear Derailleur: Loop the chain around the rear cassette and through the rear derailleur pulleys.
- Connect the Ends: Bring the ends of the chain together, ready to be connected.
3.4. How do I determine the correct bike chain length?
Determining the correct chain length is crucial for optimal shifting performance. There are two common methods:
- Using the Old Chain: Compare the length of the new chain to the old chain, removing or adding links as necessary.
- Using the Derailleur Method: With the chain routed through the derailleurs and around the largest cassette cog and chainring, overlap the ends of the chain. The correct length is achieved when the rear derailleur is slightly forward of vertical.
 Thread the new chain by making sure it goes through the front derailleur cage.
3.5. How do I break the bike chain to the correct length?
Once you’ve determined the correct chain length, use a chain tool to remove any excess links.
- Position the Chain: Place the chain in the cradle of the chain tool.
- Align the Pin Pusher: Align the pin pusher with the pin of the link you want to remove.
- Push Out the Pin: Turn the handle to push the pin partially out of the link.
- Break the Chain: Once the pin is almost out, you can break the chain by hand.
3.6. How do I connect the bike chain?
To connect the bike chain, you can use either a quick link or a chain pin.
- Using a Quick Link: Insert the ends of the chain into the quick link halves. Pull the chain taut to snap the link together.
- Using a Chain Pin: Align the ends of the chain and insert a new chain pin using a chain tool. Ensure the pin is flush with the outer plate.
 The new chain will need to be cut to size.
3.7. How do I inspect and adjust the bike chain?
After connecting the chain, inspect it for proper movement. The chain should move freely without any stiff links. If you find a stiff link, gently flex the chain horizontally to loosen it. If necessary, adjust the derailleurs to ensure smooth shifting. According to SRAM, proper derailleur alignment is crucial for optimal chain performance.
3.8. How do I test ride my bike with the new chain?
Take your bike for a test ride to ensure the new chain is functioning properly. Pay attention to shifting performance. The gears should shift smoothly and accurately. If you experience any issues, such as skipping or slipping, double-check the chain installation and derailleur alignment.
4. Common Mistakes to Avoid When Changing a Bike Chain
Avoid these common mistakes to ensure a successful chain replacement:
- Using the Wrong Chain: Always use a chain that is compatible with your bike’s drivetrain.
- Incorrect Chain Length: Sizing the chain incorrectly can lead to poor shifting and damage to the drivetrain.
- Reusing Old Chain Pins: Always use new chain pins when connecting a chain.
- Skipping Drivetrain Cleaning: Cleaning the drivetrain is essential for optimal chain performance.
- Over-Tightening Chain Pins: Over-tightening chain pins can damage the chain.
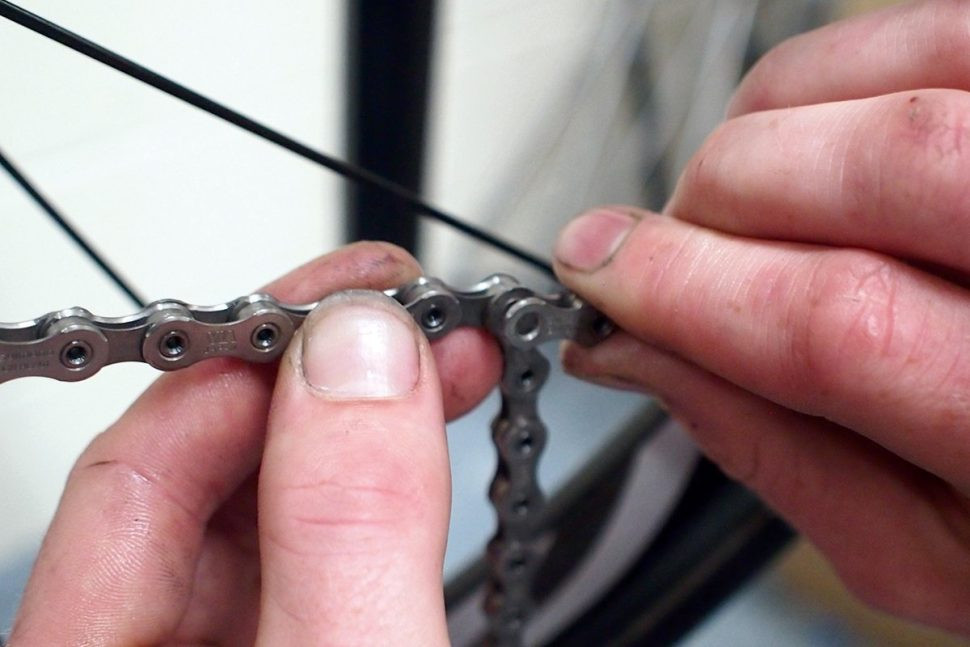
 Drop the link you want to work on in between the jaws of the tool.
4.1. Why is it important to use the right bike chain?
Using the wrong chain can lead to a host of problems. A chain that is not compatible with your bike’s drivetrain may not mesh properly with the cassette and chainrings, resulting in poor shifting and accelerated wear. Additionally, an incompatible chain may not be able to handle the stress of your riding style, increasing the risk of chain breakage.
4.2. What happens if the bike chain length is incorrect?
Incorrect chain length can have a significant impact on shifting performance and drivetrain longevity. A chain that is too short can put excessive strain on the rear derailleur, leading to damage or failure. A chain that is too long can cause the chain to sag, resulting in poor shifting and an increased risk of chain drop.
4.3. Why should I always use new bike chain pins?
Reusing old chain pins is a risky practice that can compromise the integrity of the chain. Old pins may be weakened or damaged, making them more likely to fail under stress. Using new pins ensures a secure and reliable connection.
5. Bike Chain Maintenance Tips
Extend the life of your bike chain with these maintenance tips:
- Regular Cleaning: Clean your chain regularly to remove dirt and grime.
- Proper Lubrication: Lubricate your chain with a quality chain lube.
- Check for Wear: Use a chain checker to monitor chain wear.
- Replace When Necessary: Replace your chain when it reaches the wear limit.
5.1. How often should I clean my bike chain?
The frequency of chain cleaning depends on your riding conditions. If you ride in wet or muddy conditions, clean your chain after every ride. Otherwise, clean your chain every 100-200 miles.
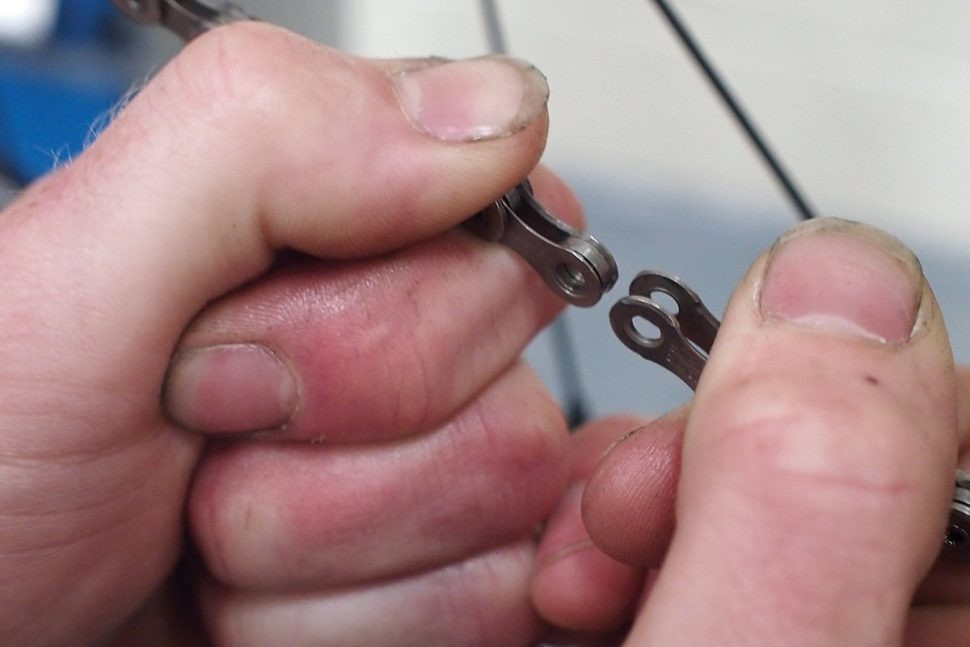
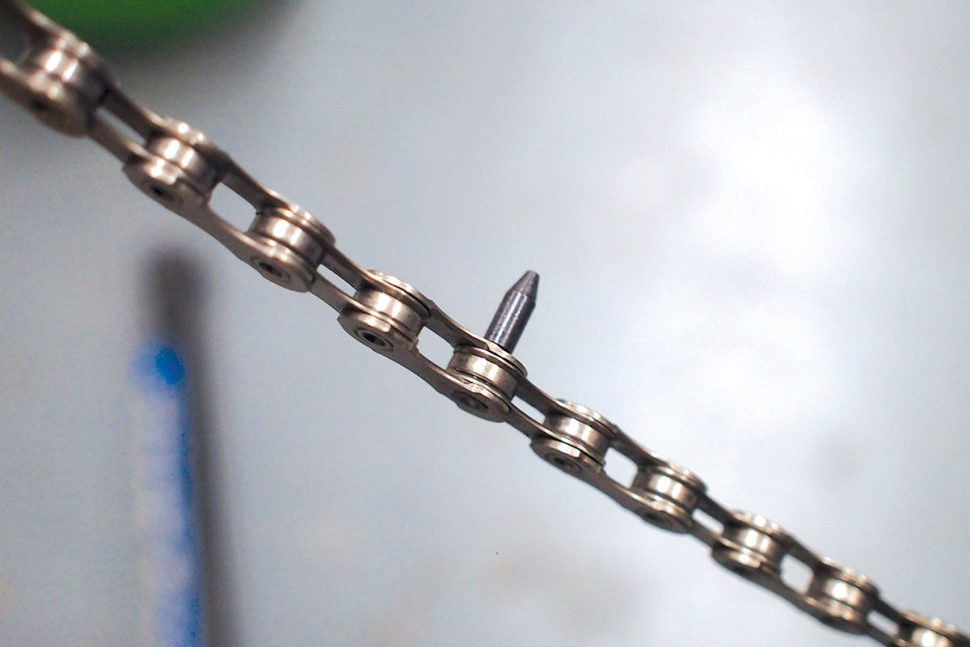
 Find the pointy end of the joining pin that came packaged with your new chain.
5.2. What is the best way to lubricate a bike chain?
Proper lubrication is crucial for chain longevity and performance. Apply a small amount of chain lube to the inside of the chain while rotating the pedals backward. Allow the lube to penetrate the links, then wipe off any excess with a clean rag. According to Finish Line, a well-lubricated chain reduces friction and prolongs component life.
5.3. What type of lubricant should I use on my bike chain?
The type of lubricant you use depends on your riding conditions. For dry conditions, use a dry lube. For wet conditions, use a wet lube. Dry lubes repel dirt and dust, while wet lubes provide better water resistance.
6. Understanding Bike Chain Wear and Replacement
Knowing when to replace your bike chain can save you money and prevent damage to other drivetrain components. A worn chain stretches over time, causing it to mesh poorly with the cassette and chainrings. This can lead to accelerated wear and poor shifting performance.
6.1. What causes bike chain wear?
Chain wear is primarily caused by friction. As the chain moves around the cassette and chainrings, the links rub against each other, causing wear and stretching. Dirt and grime can accelerate this process.
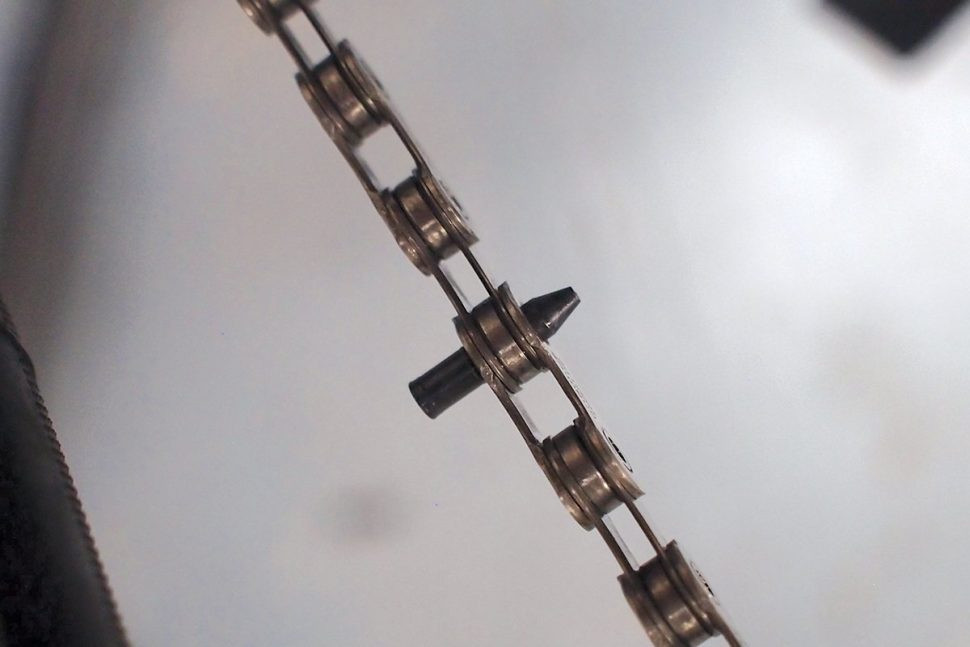
 Work very slowly and be precise when the end of the pin is exactly flush with the outside of the plate.
6.2. How can I measure bike chain wear?
The most accurate way to measure chain wear is with a chain checker. This tool measures the amount of stretch in the chain. If the chain exceeds the wear limit, it needs to be replaced.
6.3. What is chain stretch and why is it important?
Chain stretch refers to the elongation of the chain over time due to wear. As the chain stretches, it no longer meshes properly with the cassette and chainrings, leading to poor shifting and accelerated wear. Replacing the chain before it becomes excessively stretched can prevent damage to these components.
7. Upgrading Your Bike Chain: Performance and Durability
If you’re looking to improve your bike’s performance and durability, consider upgrading your chain. High-end chains often feature advanced materials and construction techniques that enhance shifting precision, reduce friction, and extend chain life.
7.1. What are the benefits of a high-performance bike chain?
High-performance chains offer several advantages:
- Improved Shifting: Advanced designs and materials contribute to smoother and more precise shifting.
- Reduced Friction: Low-friction coatings and optimized link designs minimize energy loss.
- Enhanced Durability: High-quality materials and construction techniques extend chain life.
- Weight Savings: Some high-performance chains are lighter than standard chains.
 Now, you can check that the link you’ve joined moves freely.
7.2. What materials are used in high-end bike chains?
High-end chains often incorporate materials like:
- Hardened Steel: For increased durability and wear resistance.
- Titanium: For weight savings and corrosion resistance.
- Specialized Coatings: To reduce friction and enhance shifting performance.
7.3. How do I choose the right high-performance bike chain?
When choosing a high-performance chain, consider factors like:
- Compatibility: Ensure the chain is compatible with your bike’s drivetrain.
- Features: Look for features like low-friction coatings, optimized link designs, and hollow pins for weight savings.
- Reviews: Read reviews from other cyclists to get an idea of the chain’s performance and durability.
- Budget: High-performance chains can be expensive, so set a budget before you start shopping.
8. Bike Chain Compatibility with Different Drivetrains
Understanding chain compatibility is crucial for ensuring optimal performance and preventing damage to your drivetrain. Different drivetrains (Shimano, SRAM, Campagnolo) have different chain requirements.
8.1. Are bike chains cross-compatible between different brands?
In general, most chains are cross-compatible between Shimano and SRAM drivetrains. However, Campagnolo drivetrains often require Campagnolo-specific chains. Always check the manufacturer’s recommendations to ensure compatibility.
8.2. How does the number of speeds affect bike chain compatibility?
The number of speeds (e.g., 8-speed, 9-speed, 10-speed, 11-speed, 12-speed) directly affects chain compatibility. Chains are designed to match the spacing between the cogs on the cassette. Using a chain designed for a different number of speeds can lead to poor shifting and accelerated wear.
8.3. What happens if I use an incompatible bike chain?
Using an incompatible chain can result in:
- Poor Shifting Performance: The chain may not mesh properly with the cassette and chainrings, leading to sluggish and inaccurate shifting.
- Accelerated Wear: The chain may wear down the cassette and chainrings more quickly.
- Chain Breakage: An incompatible chain may be more likely to snap under stress.
9. Troubleshooting Common Bike Chain Issues
Even with proper maintenance, you may encounter issues with your bike chain. Here are some common problems and their solutions:
- Chain Skipping: This can be caused by a worn chain, cassette, or chainrings. Replace the worn components.
- Chain Dropping: This can be caused by a misaligned derailleur or a chain that is too long. Adjust the derailleur or shorten the chain.
- Stiff Links: This can be caused by a tight chain pin. Gently flex the chain horizontally to loosen the link.
- Chain Noise: This can be caused by a dry or dirty chain. Clean and lubricate the chain.
9.1. Why is my bike chain skipping gears?
Chain skipping is a common issue that can be caused by several factors. A worn chain is the most common culprit. As the chain stretches, it no longer meshes properly with the cassette and chainrings, causing it to skip. Other potential causes include a worn cassette or chainrings, a misaligned derailleur, or a stiff chain link.
9.2. Why does my bike chain keep falling off?
A chain that frequently falls off can be frustrating and dangerous. The most common causes include a misaligned derailleur, a chain that is too long, or a bent derailleur hanger. Inspect the derailleur alignment and chain length, and replace the derailleur hanger if it’s bent.
9.3. How do I fix a stiff link in my bike chain?
A stiff link can cause rough shifting and chain noise. This is often caused by a tight chain pin. To fix a stiff link, gently flex the chain horizontally to loosen the link. If that doesn’t work, use a chain tool to slightly loosen the pin.
10. The Future of Bike Chain Technology
Bike chain technology continues to evolve, with manufacturers constantly seeking ways to improve performance, durability, and efficiency. Some emerging trends include:
- Advanced Coatings: New coatings are being developed to reduce friction and enhance wear resistance.
- Optimized Link Designs: Manufacturers are experimenting with new link designs to improve shifting precision and reduce weight.
- Wireless Shifting Systems: Wireless shifting systems eliminate the need for traditional cables, potentially leading to new chain designs.
10.1. What are the latest innovations in bike chain design?
Recent innovations in chain design include:
- Diamond-Like Carbon (DLC) Coatings: These coatings reduce friction and increase wear resistance.
- Hollow Pins and Plates: These designs reduce weight without sacrificing strength.
- Asymmetrical Link Designs: These designs optimize shifting performance.
10.2. How are e-bikes influencing bike chain technology?
E-bikes place greater demands on chains due to the increased power and torque. As a result, manufacturers are developing e-bike-specific chains that are stronger and more durable. These chains often feature thicker plates and pins to withstand the added stress.
10.3. What can we expect from bike chains in the next 5-10 years?
In the coming years, we can expect to see:
- More Durable Chains: Manufacturers will continue to develop chains that last longer and require less maintenance.
- More Efficient Chains: New designs and materials will reduce friction and improve power transfer.
- Smarter Chains: Some chains may incorporate sensors to monitor wear and provide maintenance alerts.
Changing your bike chain is a straightforward process that can significantly improve your riding experience. By following the steps outlined in this guide and taking care of your chain regularly, you can keep your bike running smoothly for years to come.
For more information on bike maintenance, community rides, and biker events, visit usabikers.net today.
Address: 801 Sturgis Main St, Sturgis, SD 57785, United States.
Phone: +1 (605) 347-2000.
Website: usabikers.net.
FAQ: Frequently Asked Questions About Bike Chains
1. What is the best way to clean a bike chain?
The best way to clean a bike chain is to use a degreaser and a brush to remove dirt and grime, then rinse with water and dry thoroughly. Proper chain cleaning will help extend the life of your bike.
2. How do I know when my bike chain needs to be replaced?
You’ll know your bike chain needs to be replaced when it shows signs of wear such as stretching, skipping gears, or if a chain checker indicates it’s time. Check usabikers.net for maintenance tips.
3. Can I use any chain on my bike?
No, you cannot use any chain on your bike; it must be compatible with the number of speeds and the drivetrain components (Shimano, SRAM, Campagnolo). Always check compatibility before purchasing a bicycle chain.
4. What tools do I need to change a bike chain?
To change a bike chain, you need a chain tool, new bike chain, chain checker, quick link pliers (optional), cleaning supplies, and work gloves. Having the proper tools is essential to replacing your chain.
5. How do I measure bike chain wear?
You can measure bike chain wear using a chain checker, which indicates the degree of wear and whether the chain needs replacement. It’s a good idea to check regularly.
6. What is chain stretch and why is it important?
Chain stretch refers to the elongation of the chain over time due to wear. It’s important because a stretched chain can cause poor shifting and damage to the cassette and chainrings.
7. How often should I lubricate my bike chain?
You should lubricate your bike chain every 100-200 miles, or more frequently if riding in wet or muddy conditions. Regular bicycle maintenance will keep your gears working properly.
8. What type of lubricant should I use on my bike chain?
The type of lubricant to use on your bike chain depends on the riding conditions: use a dry lube for dry conditions and a wet lube for wet conditions. usabikers.net has articles about which products are the best.
9. Can I reuse a quick link on my bike chain?
Some quick links are designed for single use, while others can be reused. Check the manufacturer’s recommendations for your specific quick link. Always check for wear and tear as well.
10. What are the benefits of upgrading to a high-performance bike chain?
The benefits of upgrading to a high-performance bike chain include improved shifting, reduced friction, enhanced durability, and sometimes weight savings. With a new chain, your bike will feel like new.
Ready to Ride?
Now that you’re equipped with the knowledge to change your bike chain, it’s time to hit the road with confidence. Remember, a well-maintained bike is a happy bike, and usabikers.net is here to support you every step of the way.
Explore more articles, connect with fellow riders, and gear up for your next adventure at usabikers.net!