Removing and changing bike pedals is a fundamental skill for any motorcycle enthusiast, especially if you’re assembling a new bike or considering upgrading to clipless pedals. At usabikers.net, we provide you with a comprehensive guide to help you master this essential maintenance task. This guide will cover everything from identifying the correct tools to understanding the differences between left and right pedals, ensuring a smooth and efficient pedal replacement process.
Let’s dive into the world of motorcycle maintenance and explore pedal replacement, crank arm, and pedal axle.
1. What Tools Are Required to Remove Bike Pedals?
To remove bike pedals effectively, you’ll typically need either a 15mm spanner or an 8mm Allen key, although some pedals may use a 6mm Allen key.
The right tools are essential for removing bike pedals safely and efficiently. Most pedals are designed to be removed using either a 15mm spanner or an 8mm hex key, also known as an Allen key. Understanding which tool is needed for your specific pedals is the first step in the removal process.
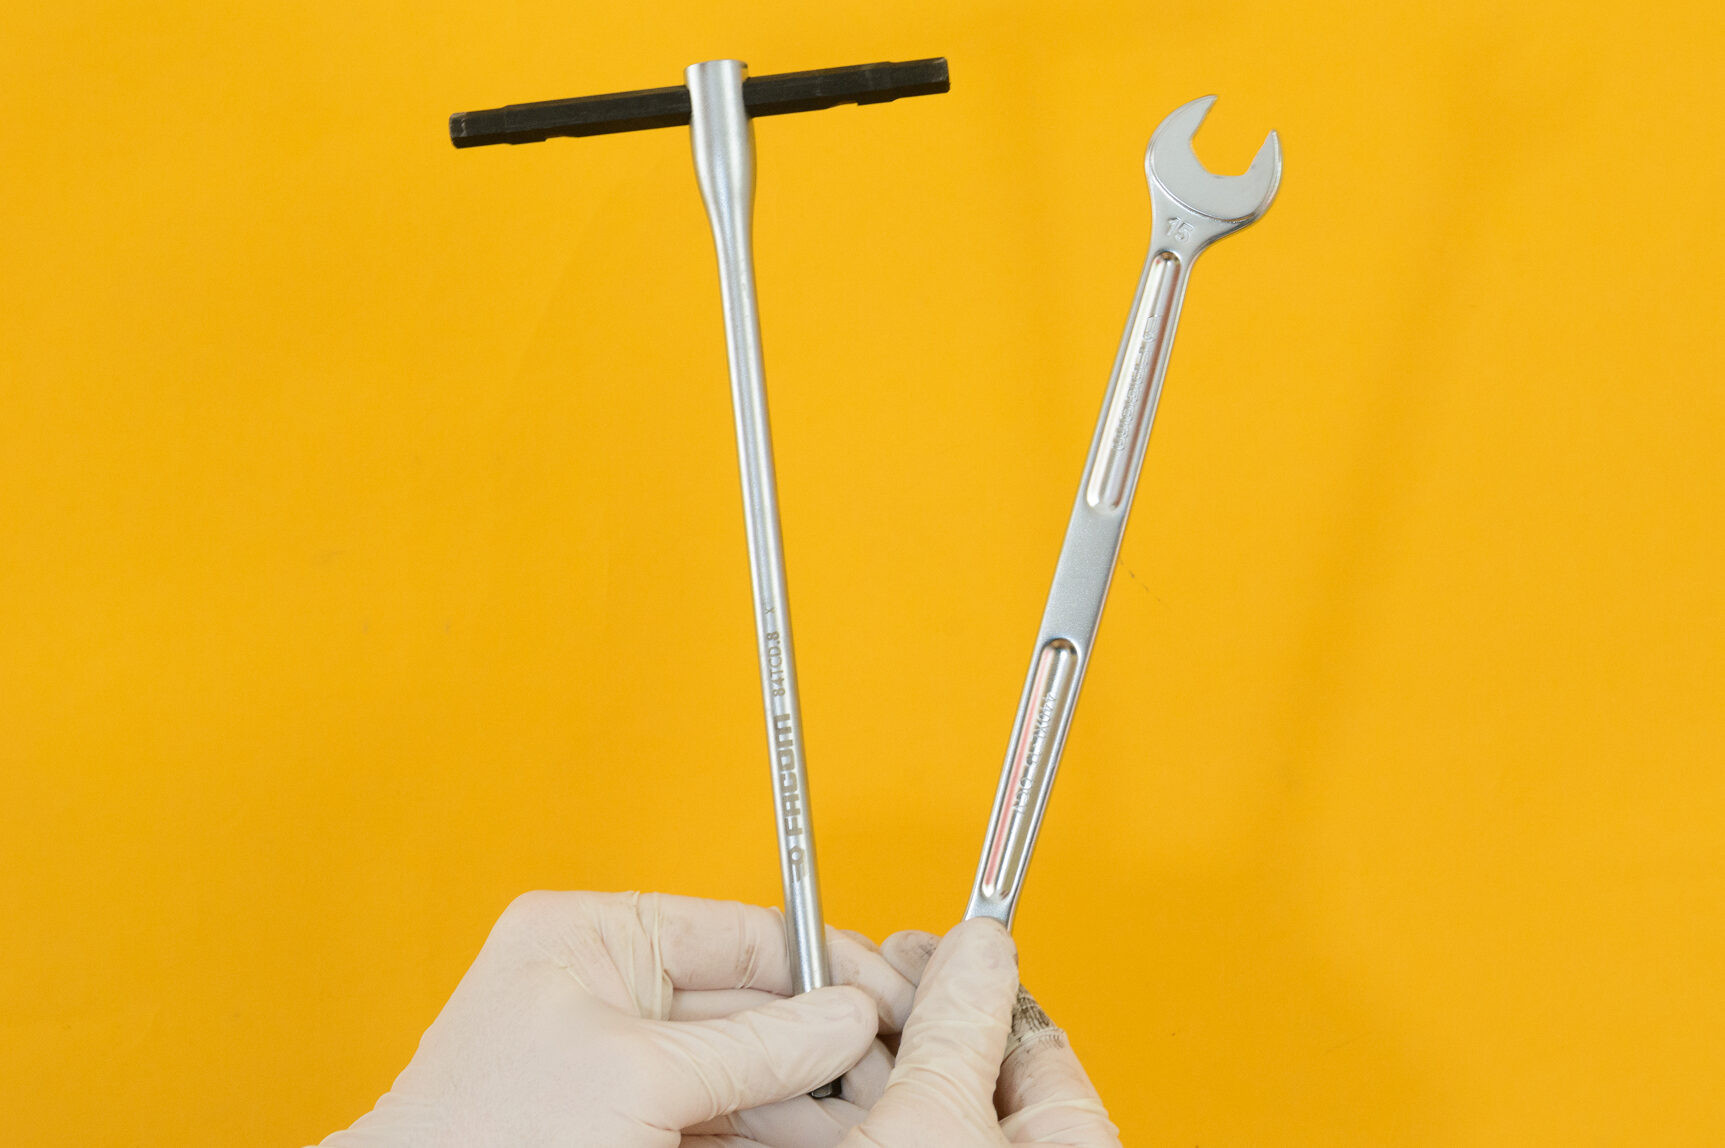 Tools required for bike pedal removal, including a 15mm spanner and 8mm hex key
1.1. Why is a 15mm Spanner Important for Pedal Removal?
A 15mm spanner is crucial for pedals with parallel faces on the spindle, fitting snugly between the crank and pedal body.
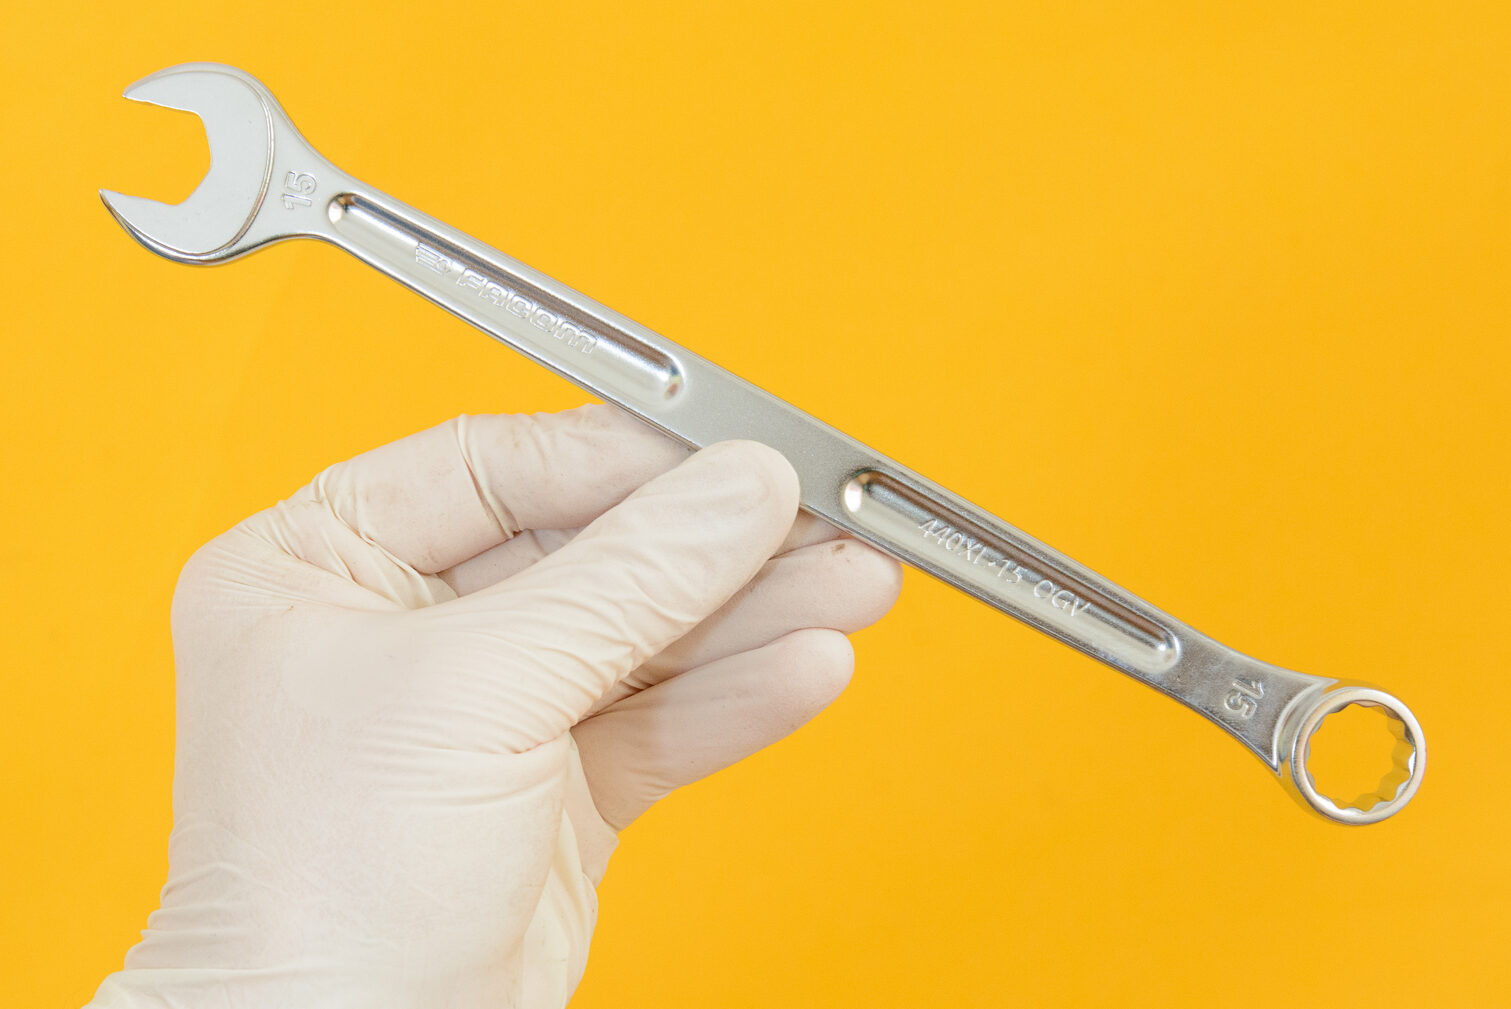 Close-up of a 15mm spanner used for bike pedal removal
The design of some pedals includes parallel faces on the spindle, located between the pedal body and the crank. These pedals require a 15mm spanner for removal. When selecting a spanner, ensure it is not too thick to fit comfortably in the space between the crank and pedal body. Adjustable spanners may not always fit due to their bulkier design.
1.2. What is the Role of an Allen Key in Removing Bike Pedals?
An Allen key, typically 8mm, is used for pedals with a hexagonal socket on the spindle’s end, accessible from the crank’s inside.
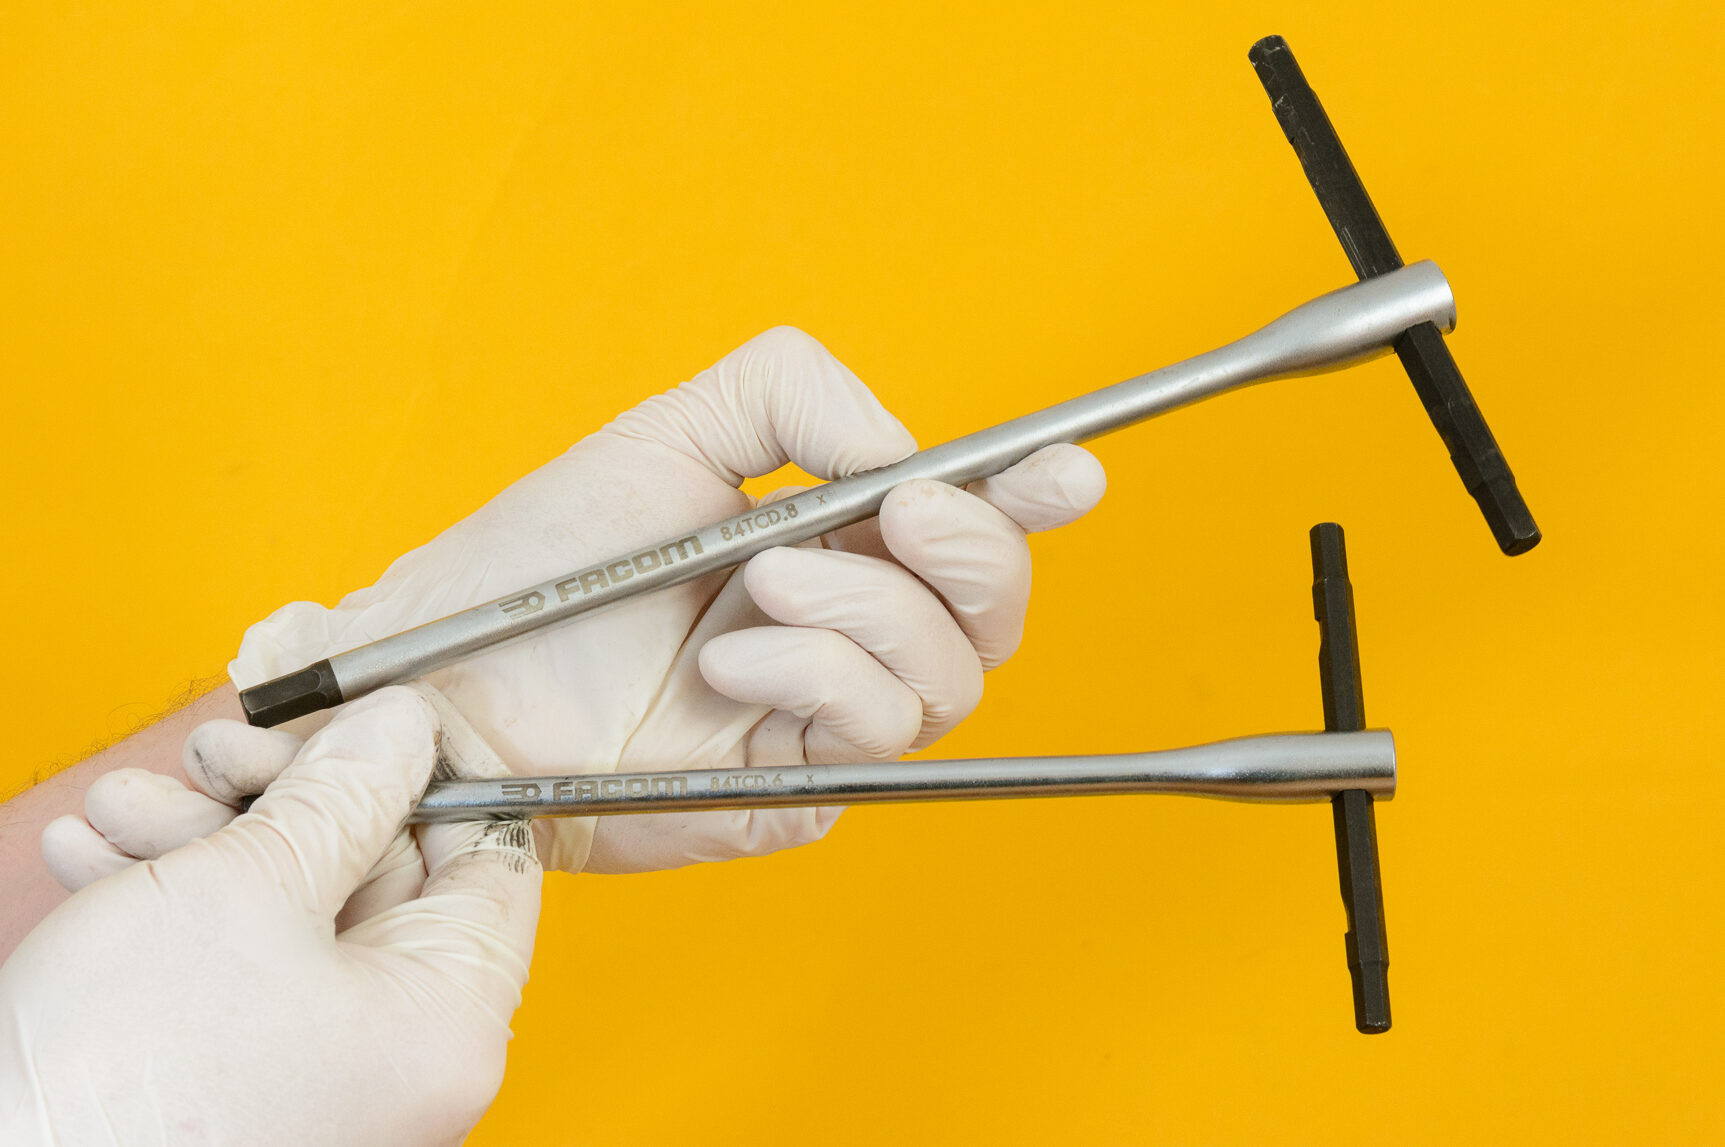 Image of an 8mm Allen key used for bike pedal removal
For pedals that feature a hexagonal socket at the end of the spindle, an 8mm hex key is necessary. Some pedals might use a 6mm hex key, though this is less common. When using a hex key, a long handle provides better leverage, and a T-shaped hex key with a sliding end is particularly useful for avoiding the bike’s chainrings.
1.3. How to Avoid Confusion with Other Pedal Components?
Avoid confusing lockrings or dust caps with removal interfaces; these are for servicing the pedal’s internals, not for removal.
 Dust cap on a bike pedal, not to be confused with removal interfaces
It’s important not to confuse the components used for servicing the pedal with those used for removal. Some pedals, especially high-end Shimano models, have a locking nut that is larger than 15mm. This nut is used to access the internal parts of the pedal for maintenance and should not be mistaken for the removal interface. Similarly, dust caps on the outside face of the pedal are for servicing the bearings and not for pedal removal. Always ensure you are using the correct tool on the appropriate part of the pedal spindle.
2. How to Differentiate Left and Right Bike Pedals?
Left and right pedals have different threads; the right pedal has a standard thread, while the left has a reverse thread, which is critical for installation and removal.
Understanding the difference between left and right pedals is crucial to avoid damaging your bike’s crank arms. Each pedal is designed with a specific threading that corresponds to its side of the bike.
2.1. What is the Threading of the Right Pedal?
The right pedal (driveside) uses a standard thread, tightening clockwise and loosening counter-clockwise.
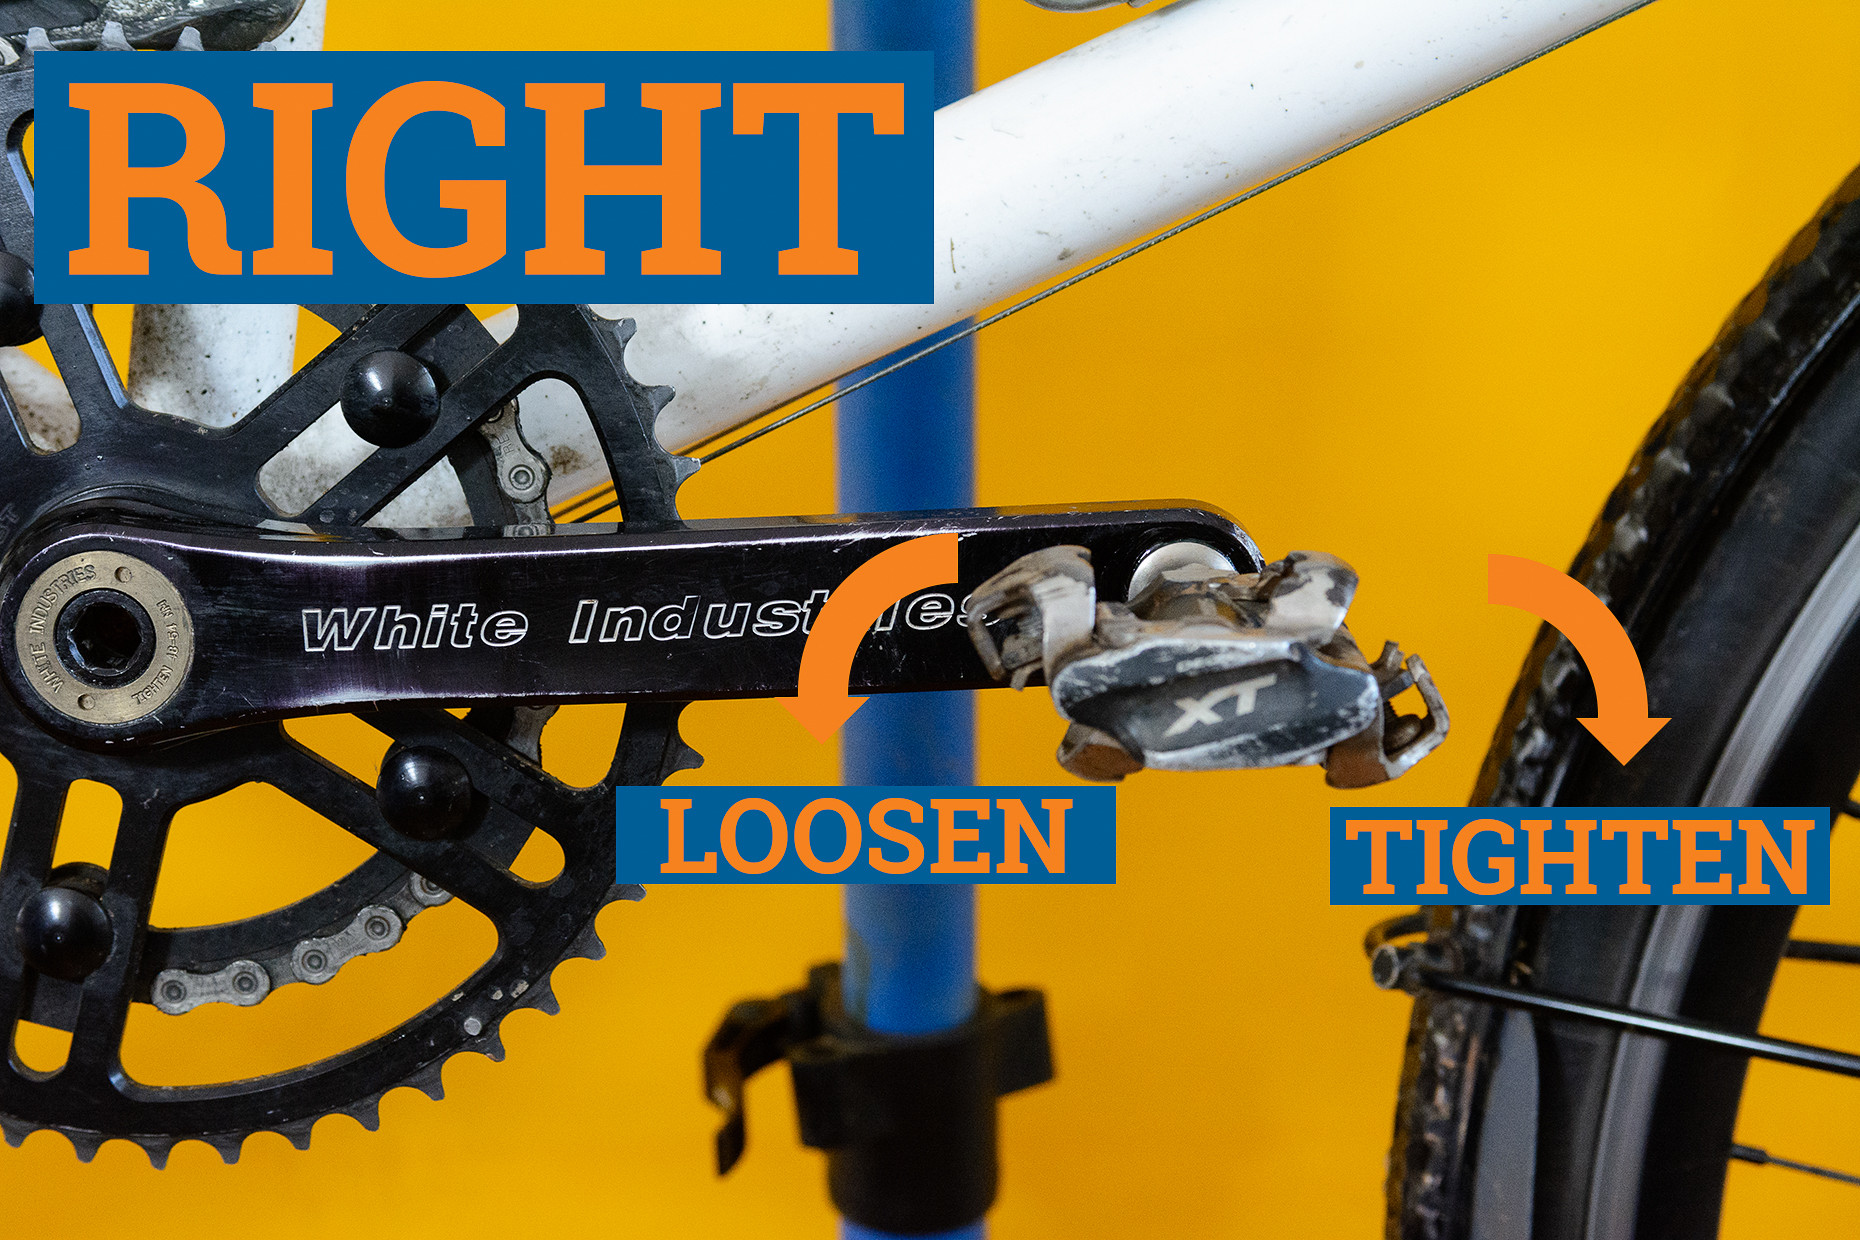 Diagram illustrating the threading direction of the right bike pedal
The right pedal, located on the driveside (the side with the gears), has a standard thread. This means that you tighten the pedal by turning it clockwise and loosen it by turning it counter-clockwise. This is the same threading you’ll find on most other threaded parts of a bike, making it relatively straightforward to remember.
2.2. What is Unique About the Threading of the Left Pedal?
The left pedal (non-driveside) has a reverse thread, tightening counter-clockwise and loosening clockwise.
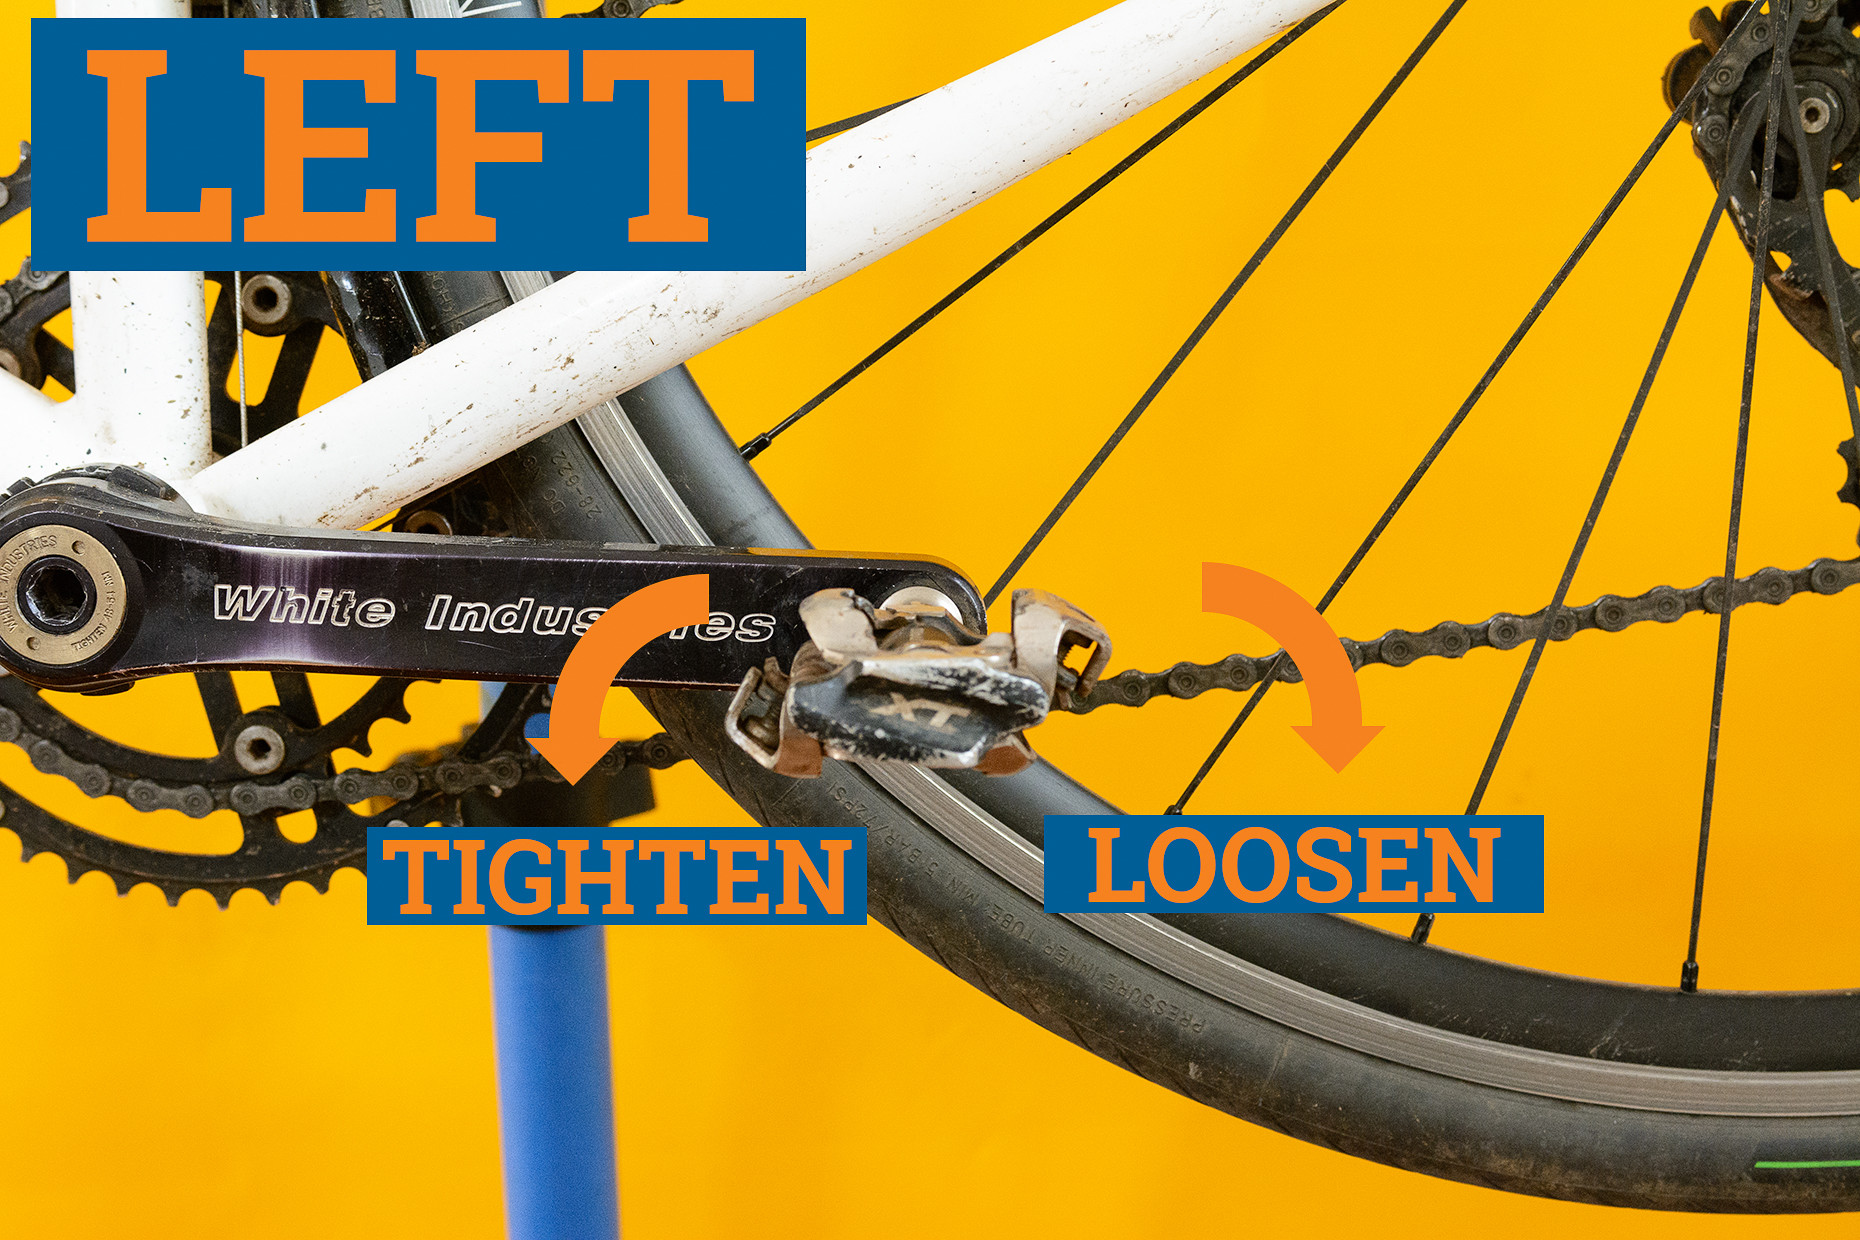 Diagram illustrating the reverse threading direction of the left bike pedal
The left pedal, found on the non-driveside (the side without gears), features a reverse thread. This means you tighten the pedal by turning it counter-clockwise and loosen it by turning it clockwise. This is the opposite of the driveside pedal and most other threaded components on a bike. The reverse threading is designed to prevent the pedal from loosening as you ride.
2.3. How Can You Easily Identify Left and Right Pedals?
Pedals are typically marked with “L” or “R” on the spindle or body; if not, examine the thread direction to determine left from right.
 Close-up of "L" and "R" markings on bike pedals for easy identification
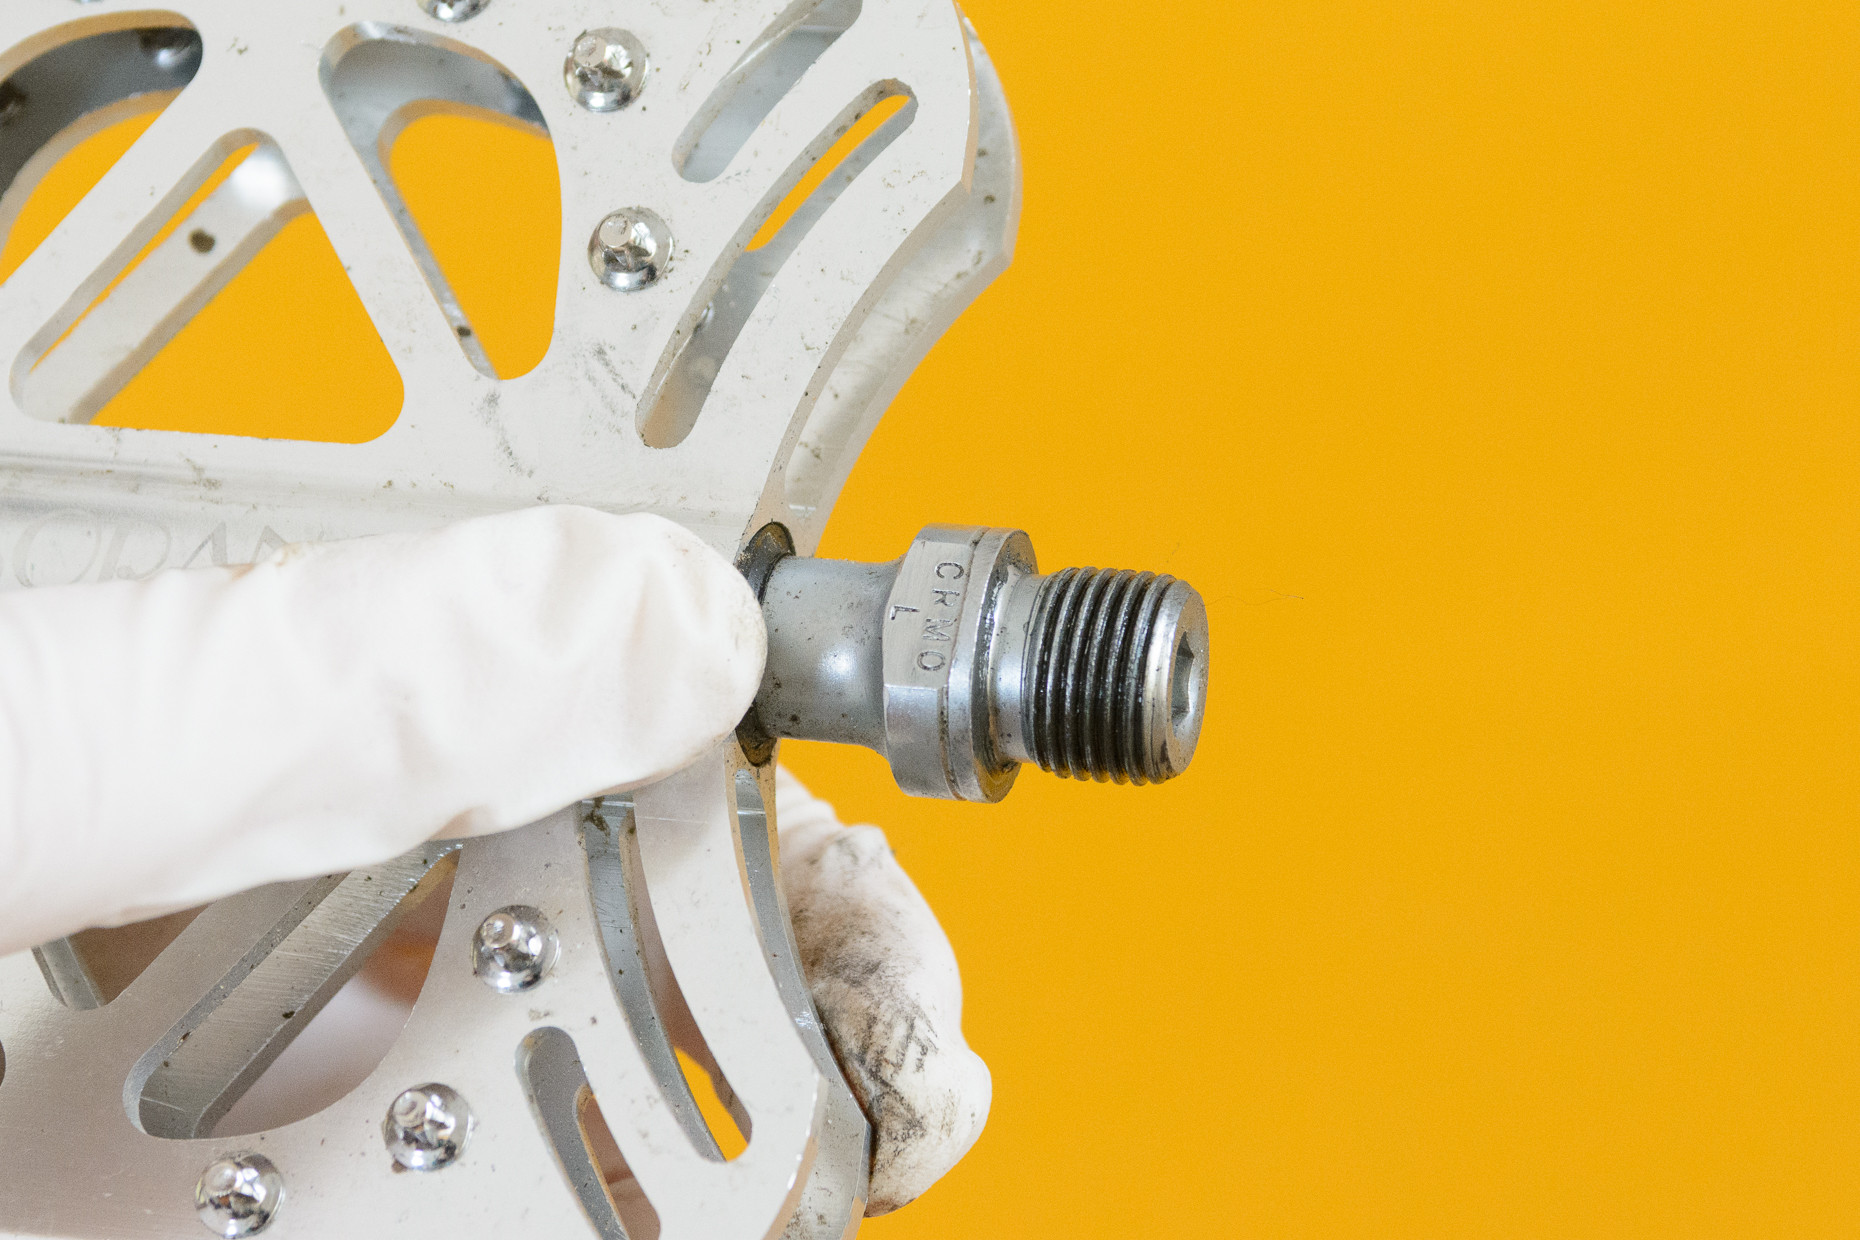
To easily distinguish between the left and right pedals, manufacturers typically mark each pedal with either an “L” (for left) or an “R” (for right). These markings can be found on the end of the spindle, the wrench flats, or even printed on the body of the pedal. If the pedals lack these markings, you can identify them by examining the threads. On a right pedal, the threads angle upwards to the right, while on a left pedal, the threads angle upwards to the left.
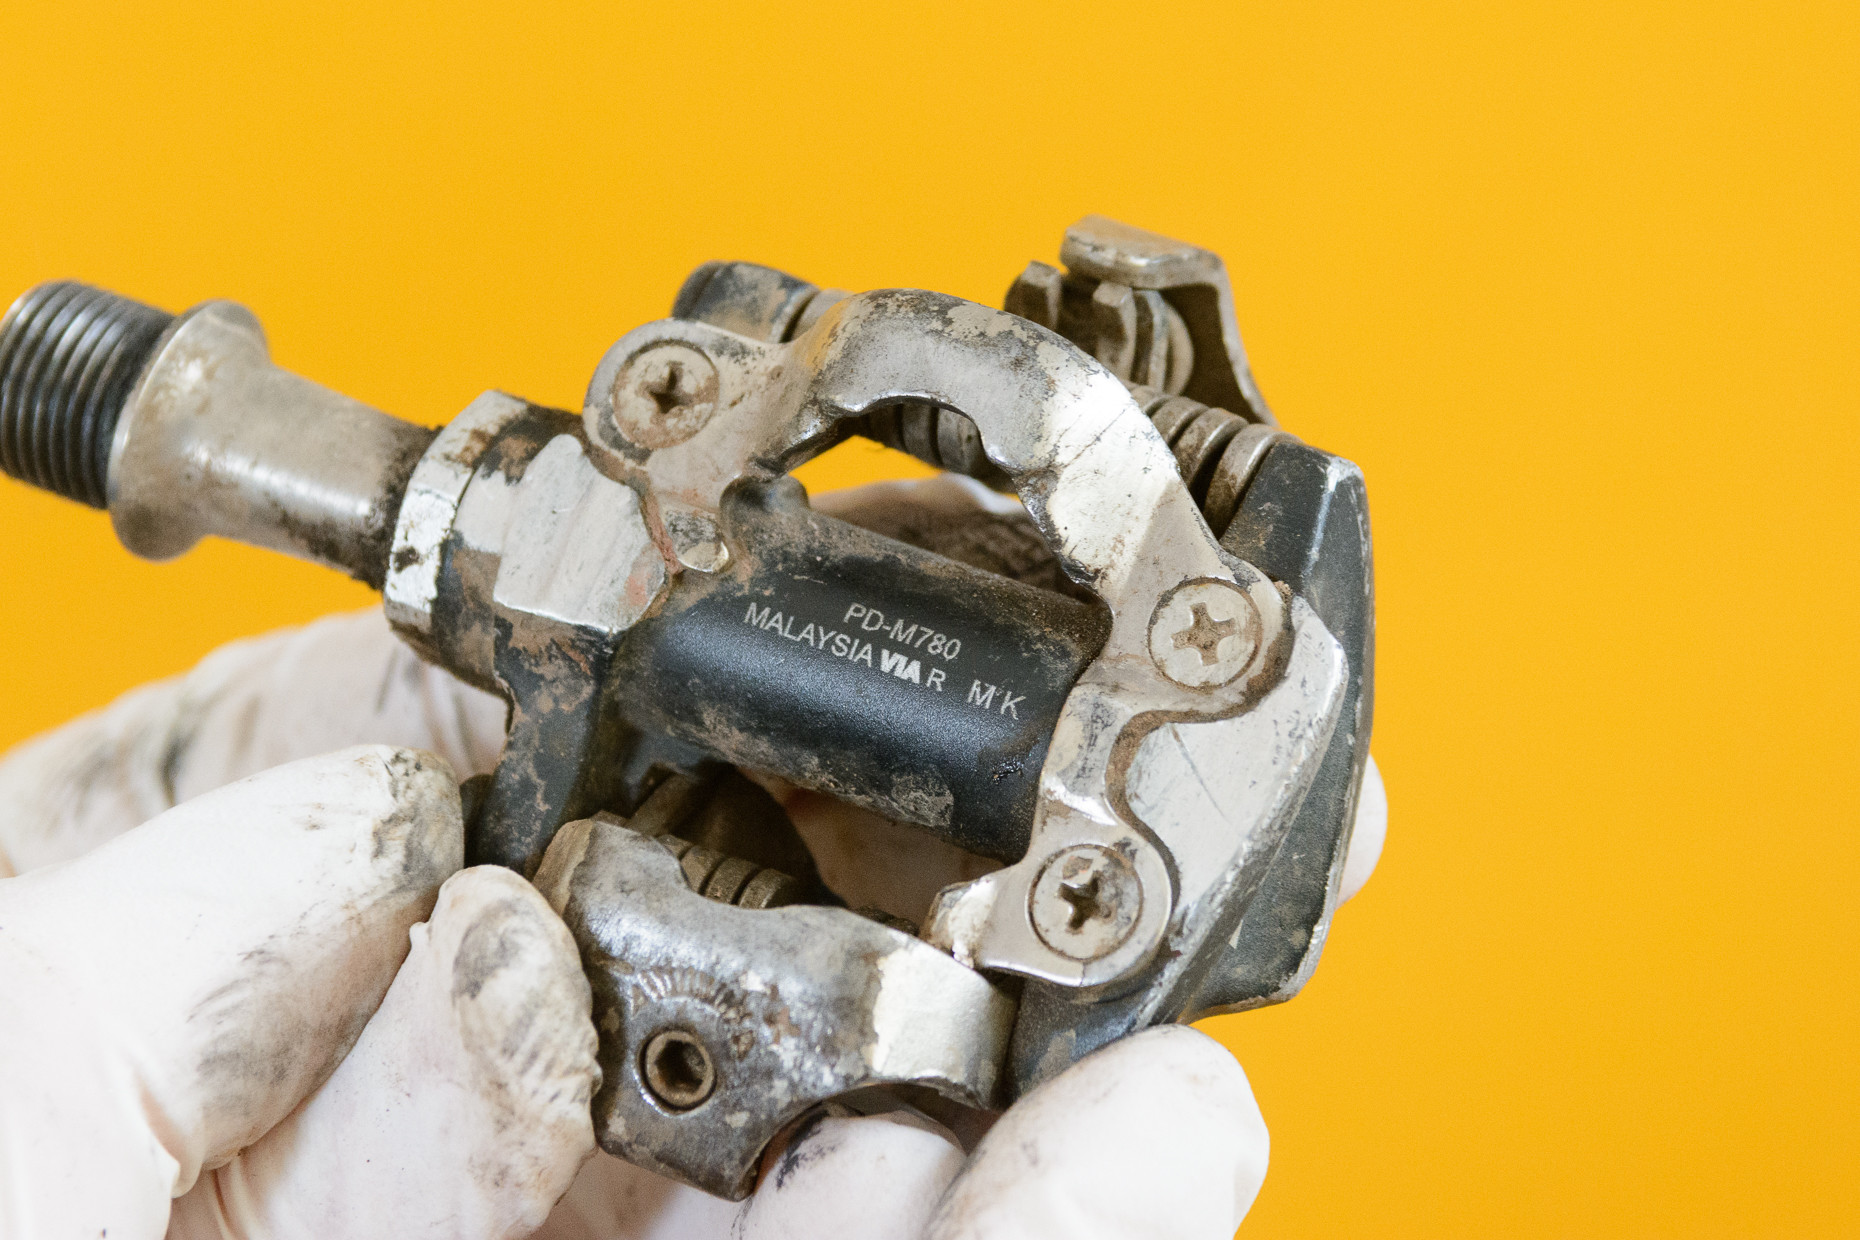 Image showing thread direction to differentiate between left and right pedals
3. How to Remove Pedals from a Bike: A Step-by-Step Guide
To remove bike pedals, position the crank arm correctly, use the appropriate tool to loosen the pedal by turning towards the rear of the bike, and then unscrew by hand.
Removing pedals from a bike can be straightforward if you follow the correct steps. Here’s a detailed guide to help you through the process:
3.1. How to Remove the Right Pedal (Driveside)?
Position the right crank arm forward, attach the tool pointing rearward, and apply downward force to loosen the pedal.
 Image showing the correct positioning and tool placement for removing the right bike pedal
- Position the Crank Arm: Rotate the crankset so that the right-hand crank arm is pointing roughly towards the front wheel (the three o’clock position when viewed from the driveside).
- Attach the Tool: If your pedals use wrench flats, place your spanner on them, pointing towards the rear of the bike. If your pedals use a hex key, insert the short end of the hex key into the back of the pedal, with the long section pointing towards the rear of the bike.
- Apply Force: Push down hard on the tool while holding the opposite crank to loosen the pedal. You can then unscrew the pedal by hand. If the pedal is difficult to loosen, use an old pipe to increase leverage or place the bike’s wheels on the floor for added stability and use your foot for extra pressure.
3.2. How to Remove the Left Pedal (Non-Driveside)?
Mirror the right pedal removal process, ensuring the tool points rearward and force is applied to loosen the reverse-threaded pedal.
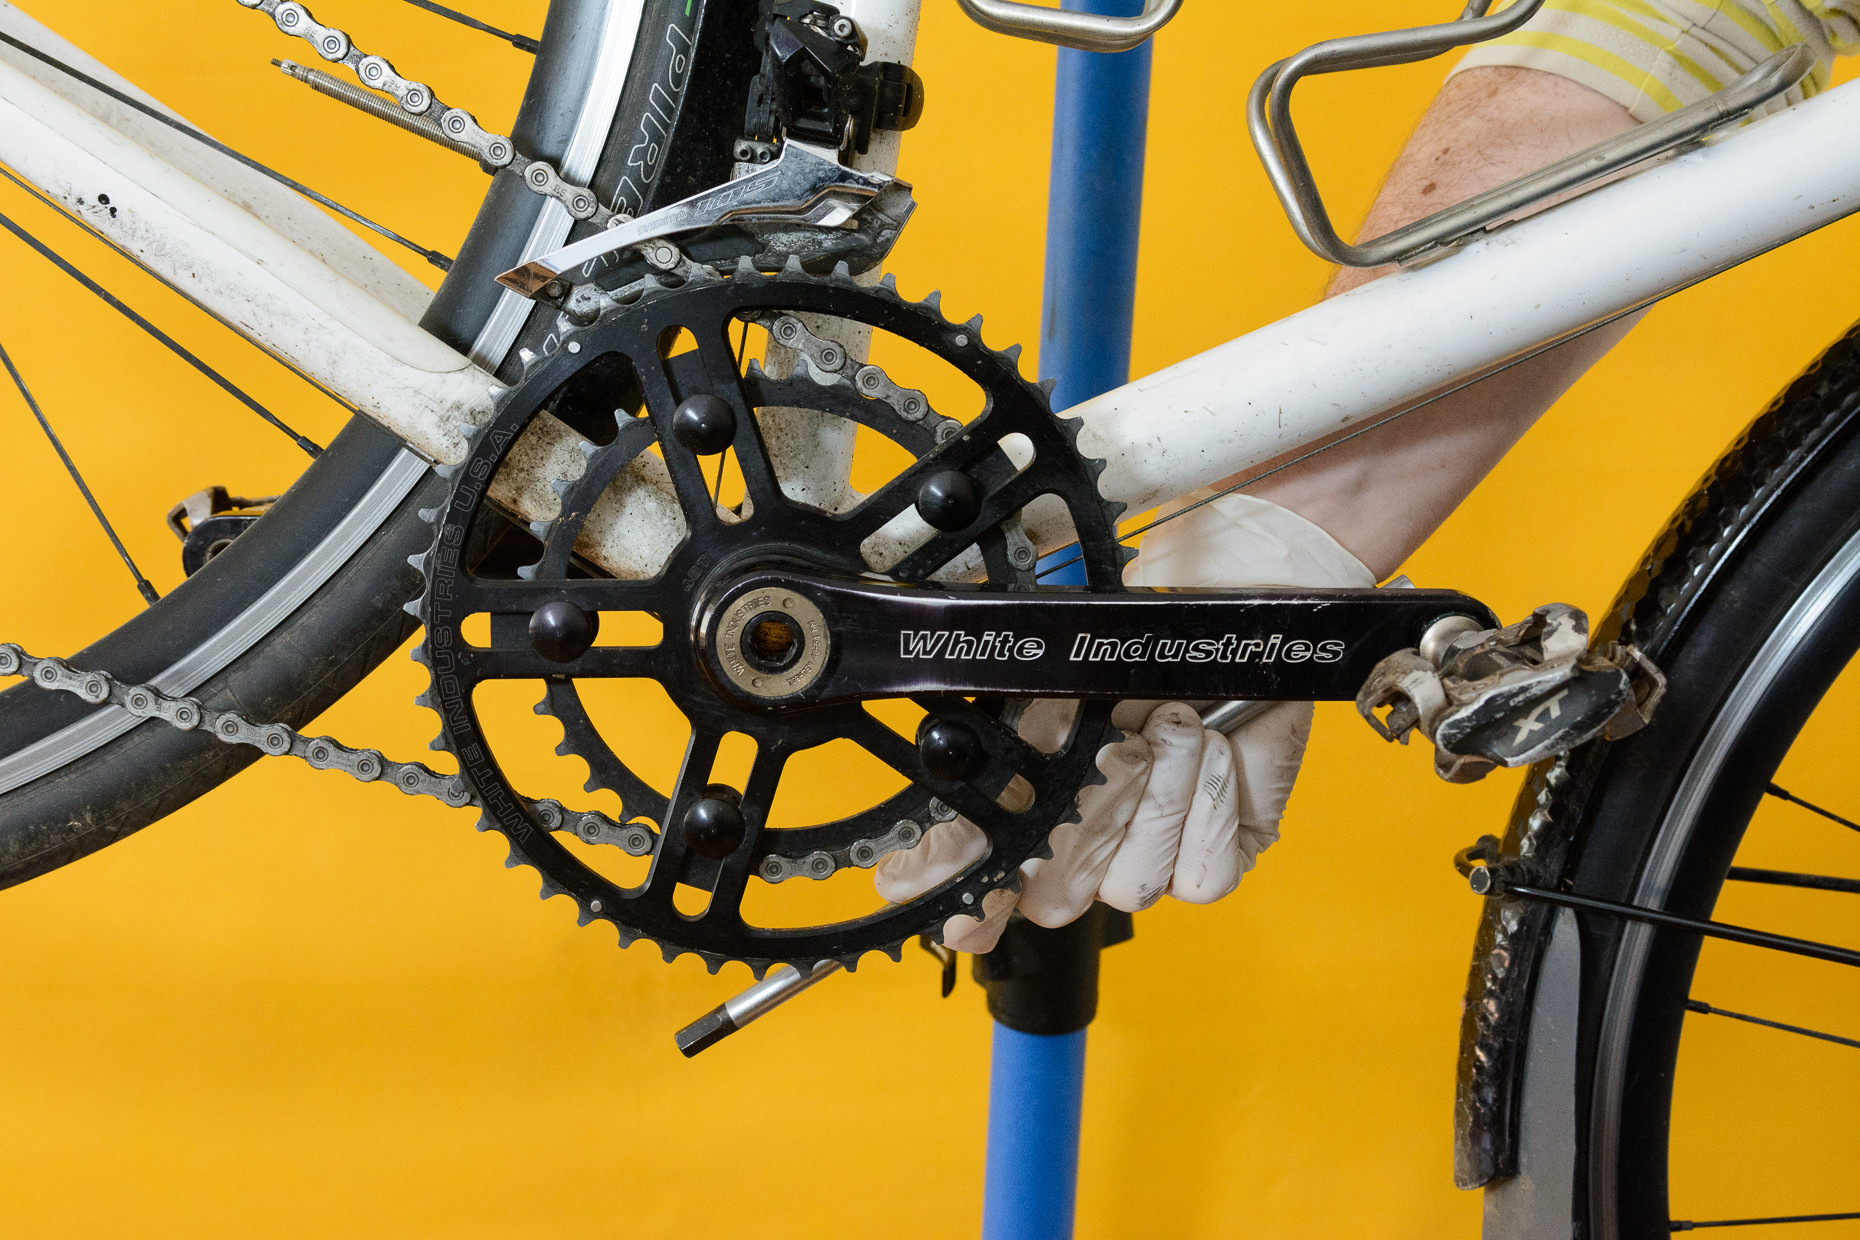
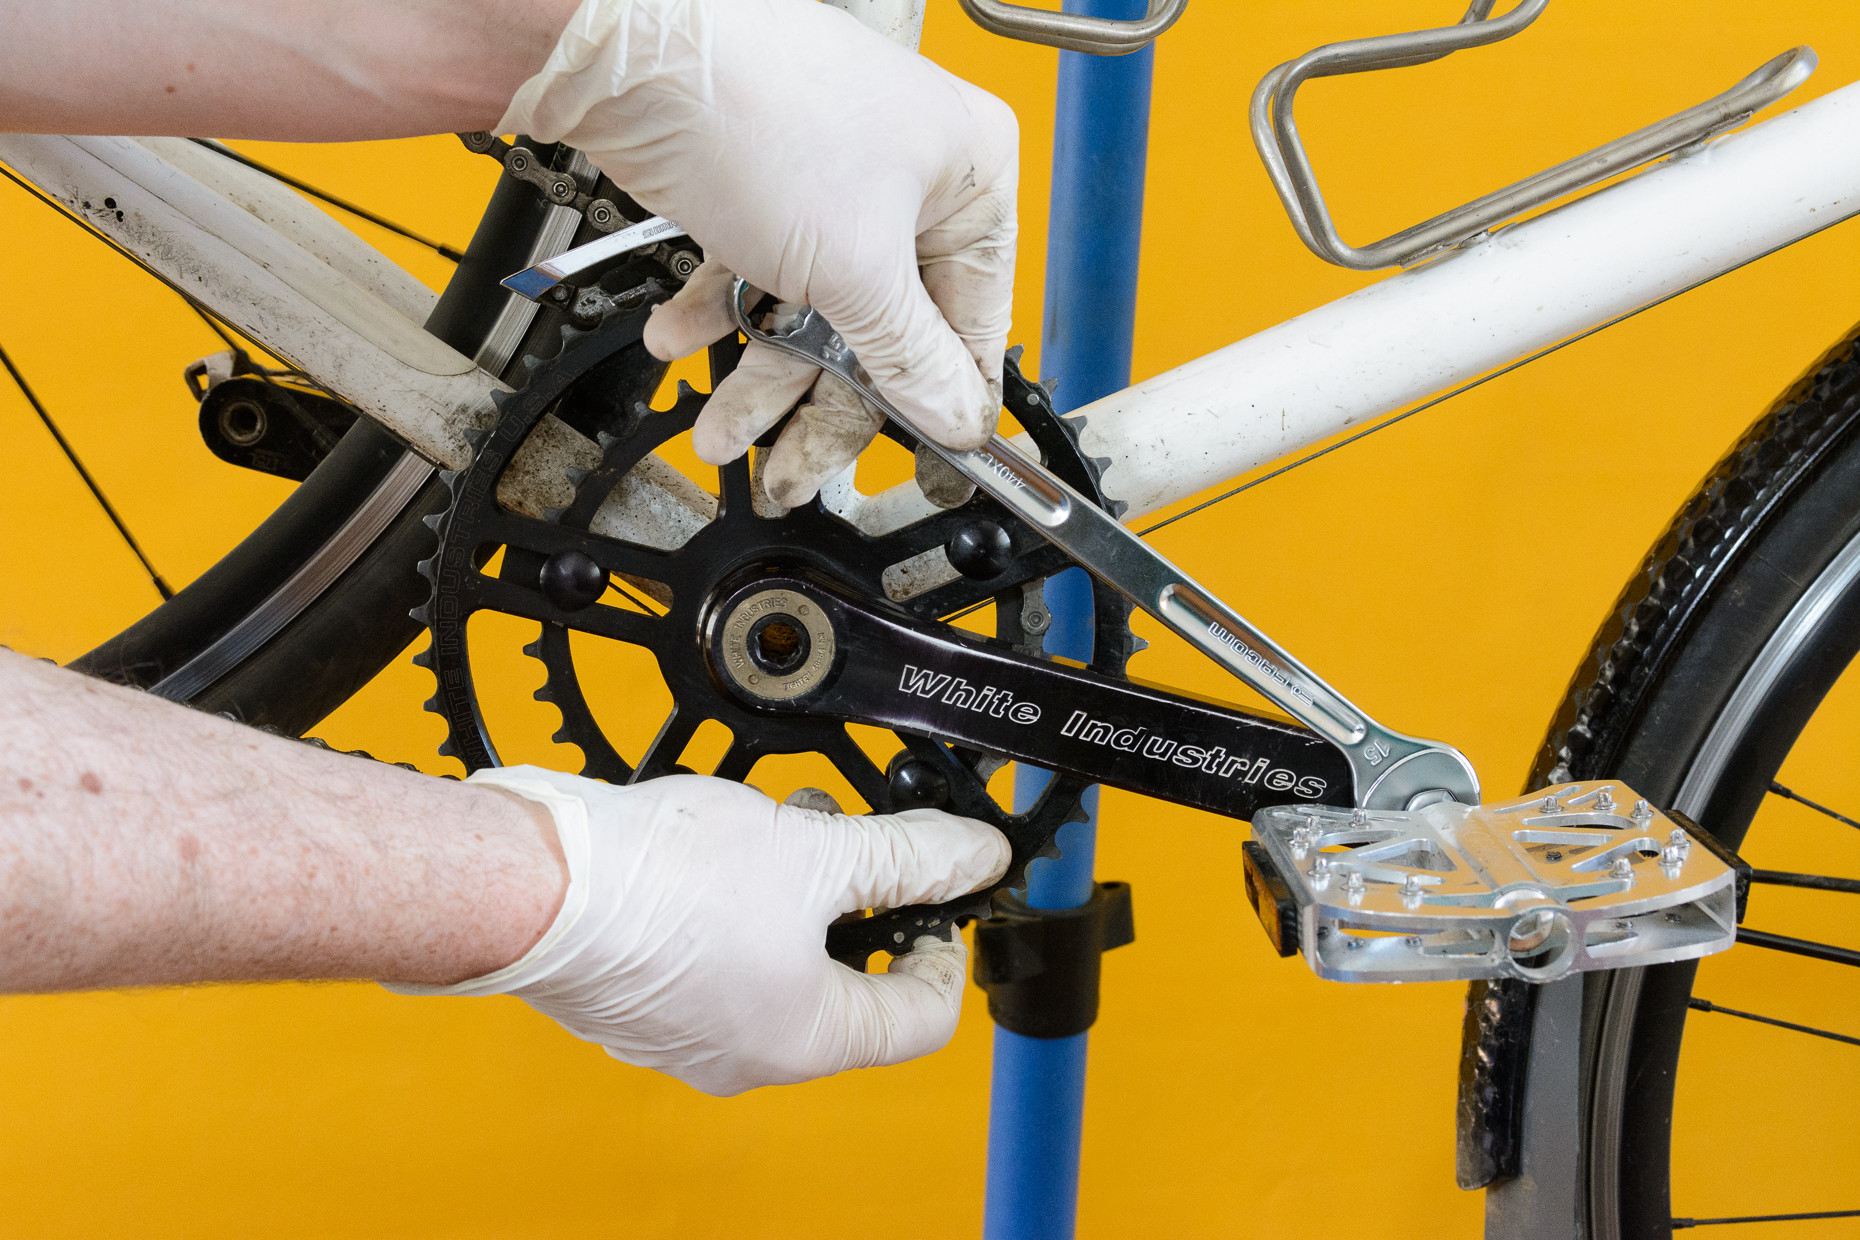 Image showing the correct positioning and tool placement for removing the left bike pedal
- Position the Crank Arm: Rotate the left-hand crank arm so that it is pointing towards the front wheel (the nine o’clock position when viewed from the non-driveside).
- Attach the Tool: Follow the same steps as for the right pedal, placing your tool so that it is pointing towards the back of the bike.
- Apply Force: As with the right pedal, push down hard on the tool to loosen the pedal. Remember that the left pedal has a reverse thread, so you will need to turn the tool clockwise to loosen it.
3.3. What if the Pedals Are Stuck?
Increase leverage with a pipe or use your foot for extra force, ensuring the tool is securely fitted and the bike is stable.
 Applying extra leverage to remove a stuck bike pedal
If the pedals are stuck due to lack of grease or prolonged use, applying additional leverage can help. Use an old pipe or similar tool to extend the handle of your spanner or hex key, providing more force. Alternatively, place the wheels of the bike on the floor, have someone hold the bike steady, and use your foot to apply extra pressure to the tool. Ensure the tool is securely fitted to prevent slippage and potential injury.
4. How to Change Bike Pedals: A Detailed Guide
To change bike pedals, clean and grease the threads, hand-thread the pedals into the crank arms, and then tighten with the appropriate tool.
Changing bike pedals involves a few key steps to ensure they are properly installed and function correctly. Here’s a detailed guide to help you through the process:
4.1. How to Fit the Right Pedal (Driveside)?
Clean and grease the threads, hand-thread clockwise, and tighten snugly with a tool.
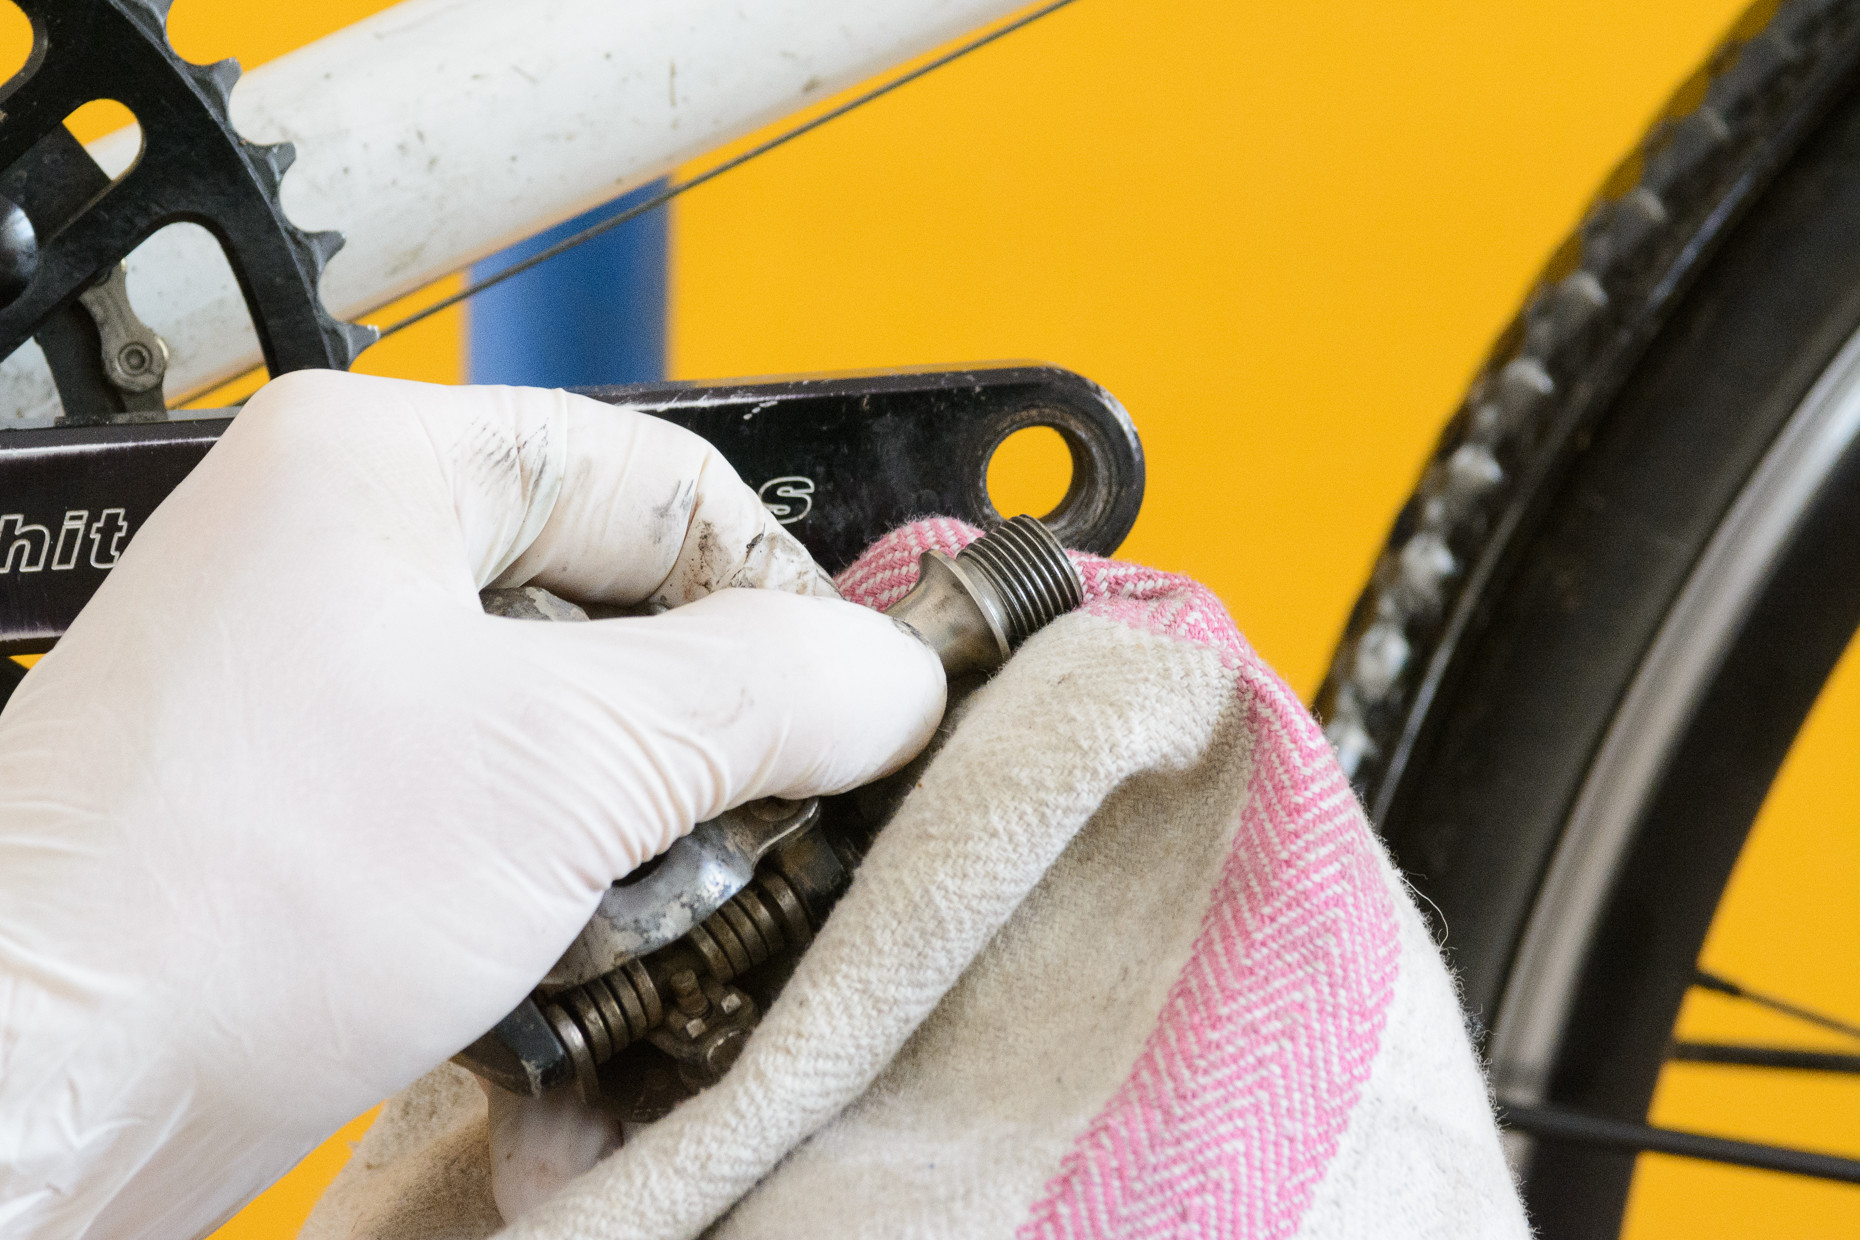 Cleaning the threads of a bike pedal before installation
- Prepare the Threads: Clean the threads on both the crank and the pedals thoroughly to remove any grit or dirt that could damage the threads over time.
- Apply Grease: Apply a thin layer of grease or anti-seize compound to the threads on the pedal axle. This step is crucial to prevent the pedals from becoming difficult to remove in the future and to avoid the pedals and cranks fusing together permanently. Avoid using chain lube or other oils, as they are not as effective in the long run.
- Hand-Thread the Pedal: Begin threading the pedal into the crank by hand. The right-hand pedal tightens clockwise. Continue threading until it bottoms out on the crank.
- Tighten with a Tool: Once the pedal is bottomed out against the crank, tighten it lightly with either your hex key or spanner. Some pedals have a specified torque they need to be tightened to, with Shimano recommending torques in the range of 35Nm to 50Nm.
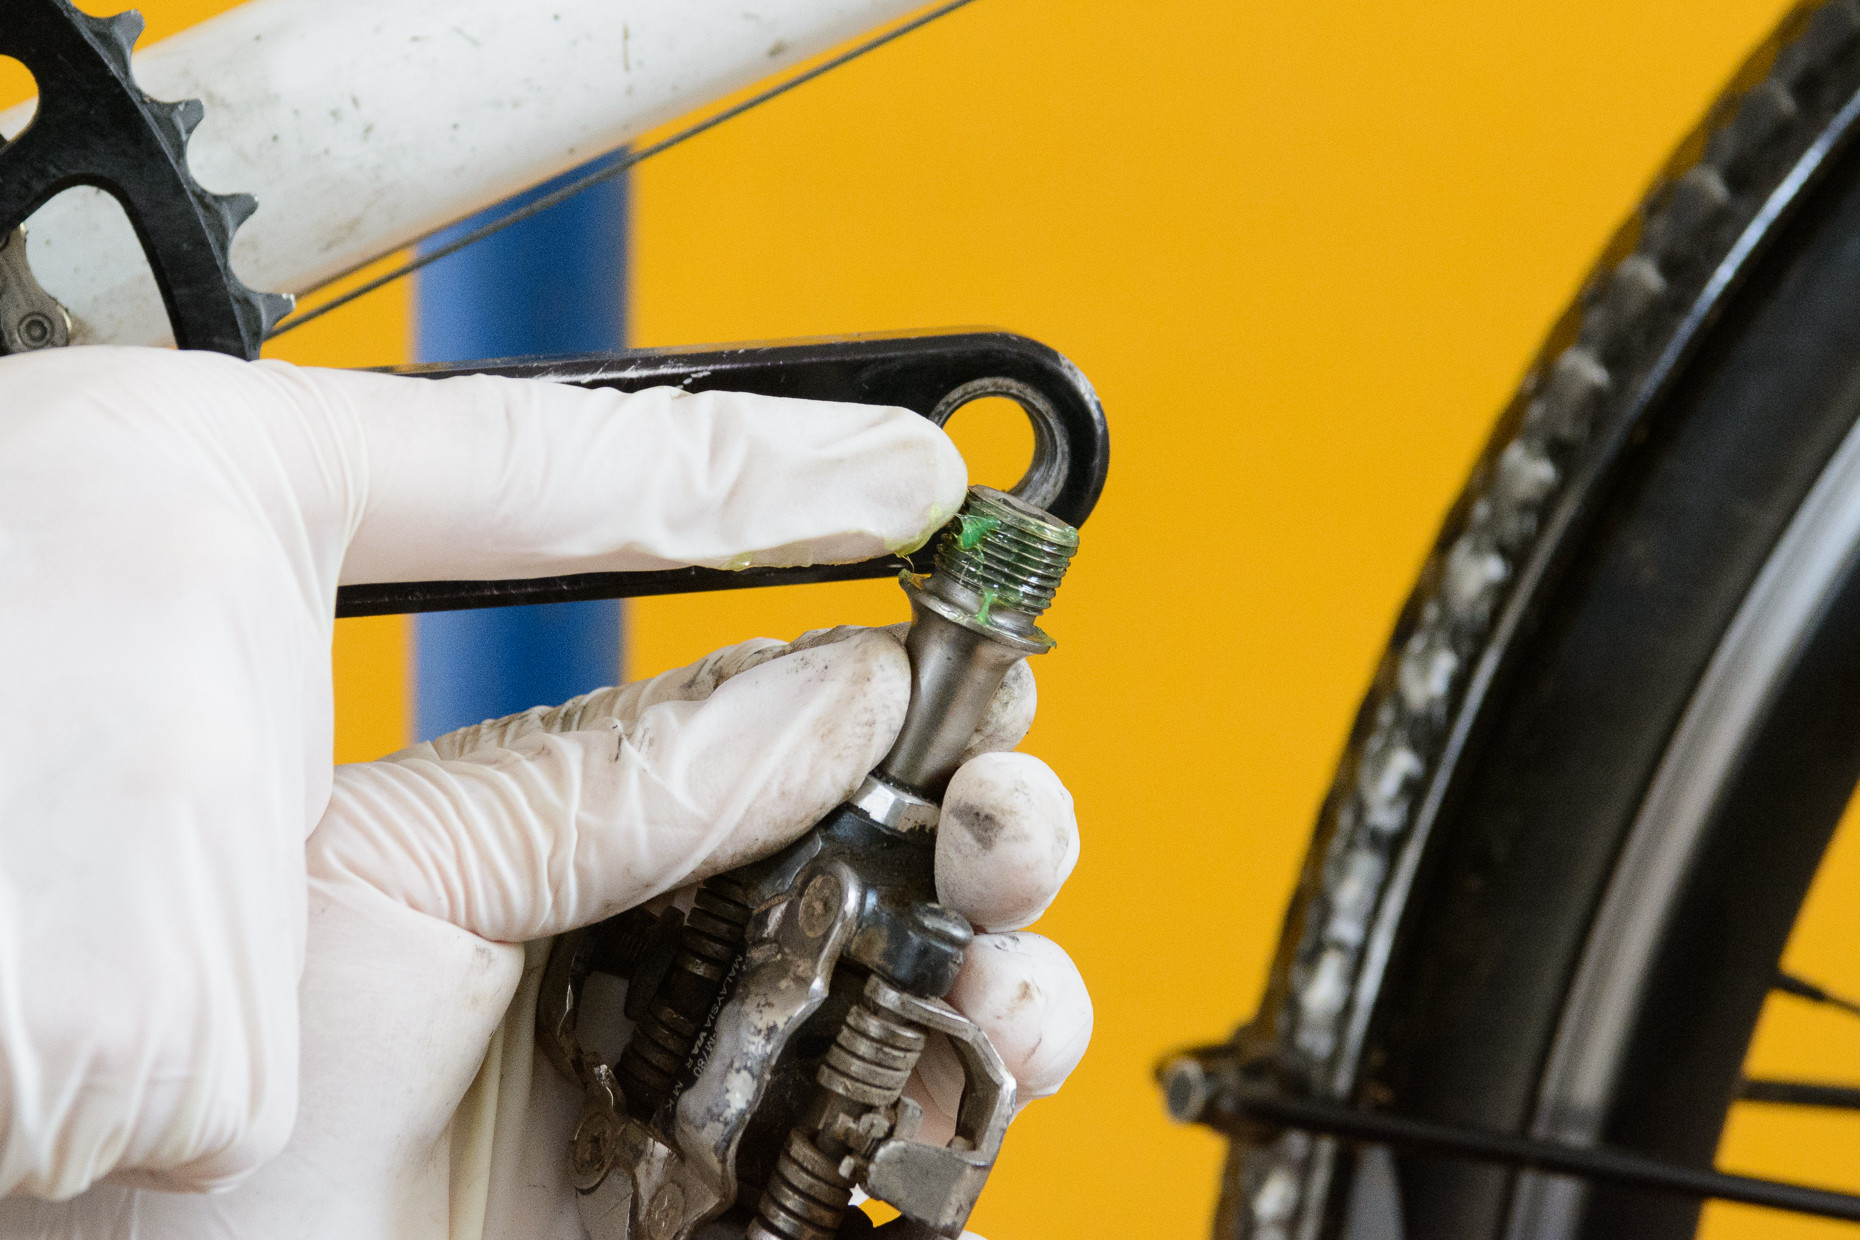 Greasing the threads of a bike pedal before installation
4.2. How to Fit the Left Pedal (Non-Driveside)?
Repeat the process for the right pedal, but thread counter-clockwise to tighten the reverse-threaded left pedal.
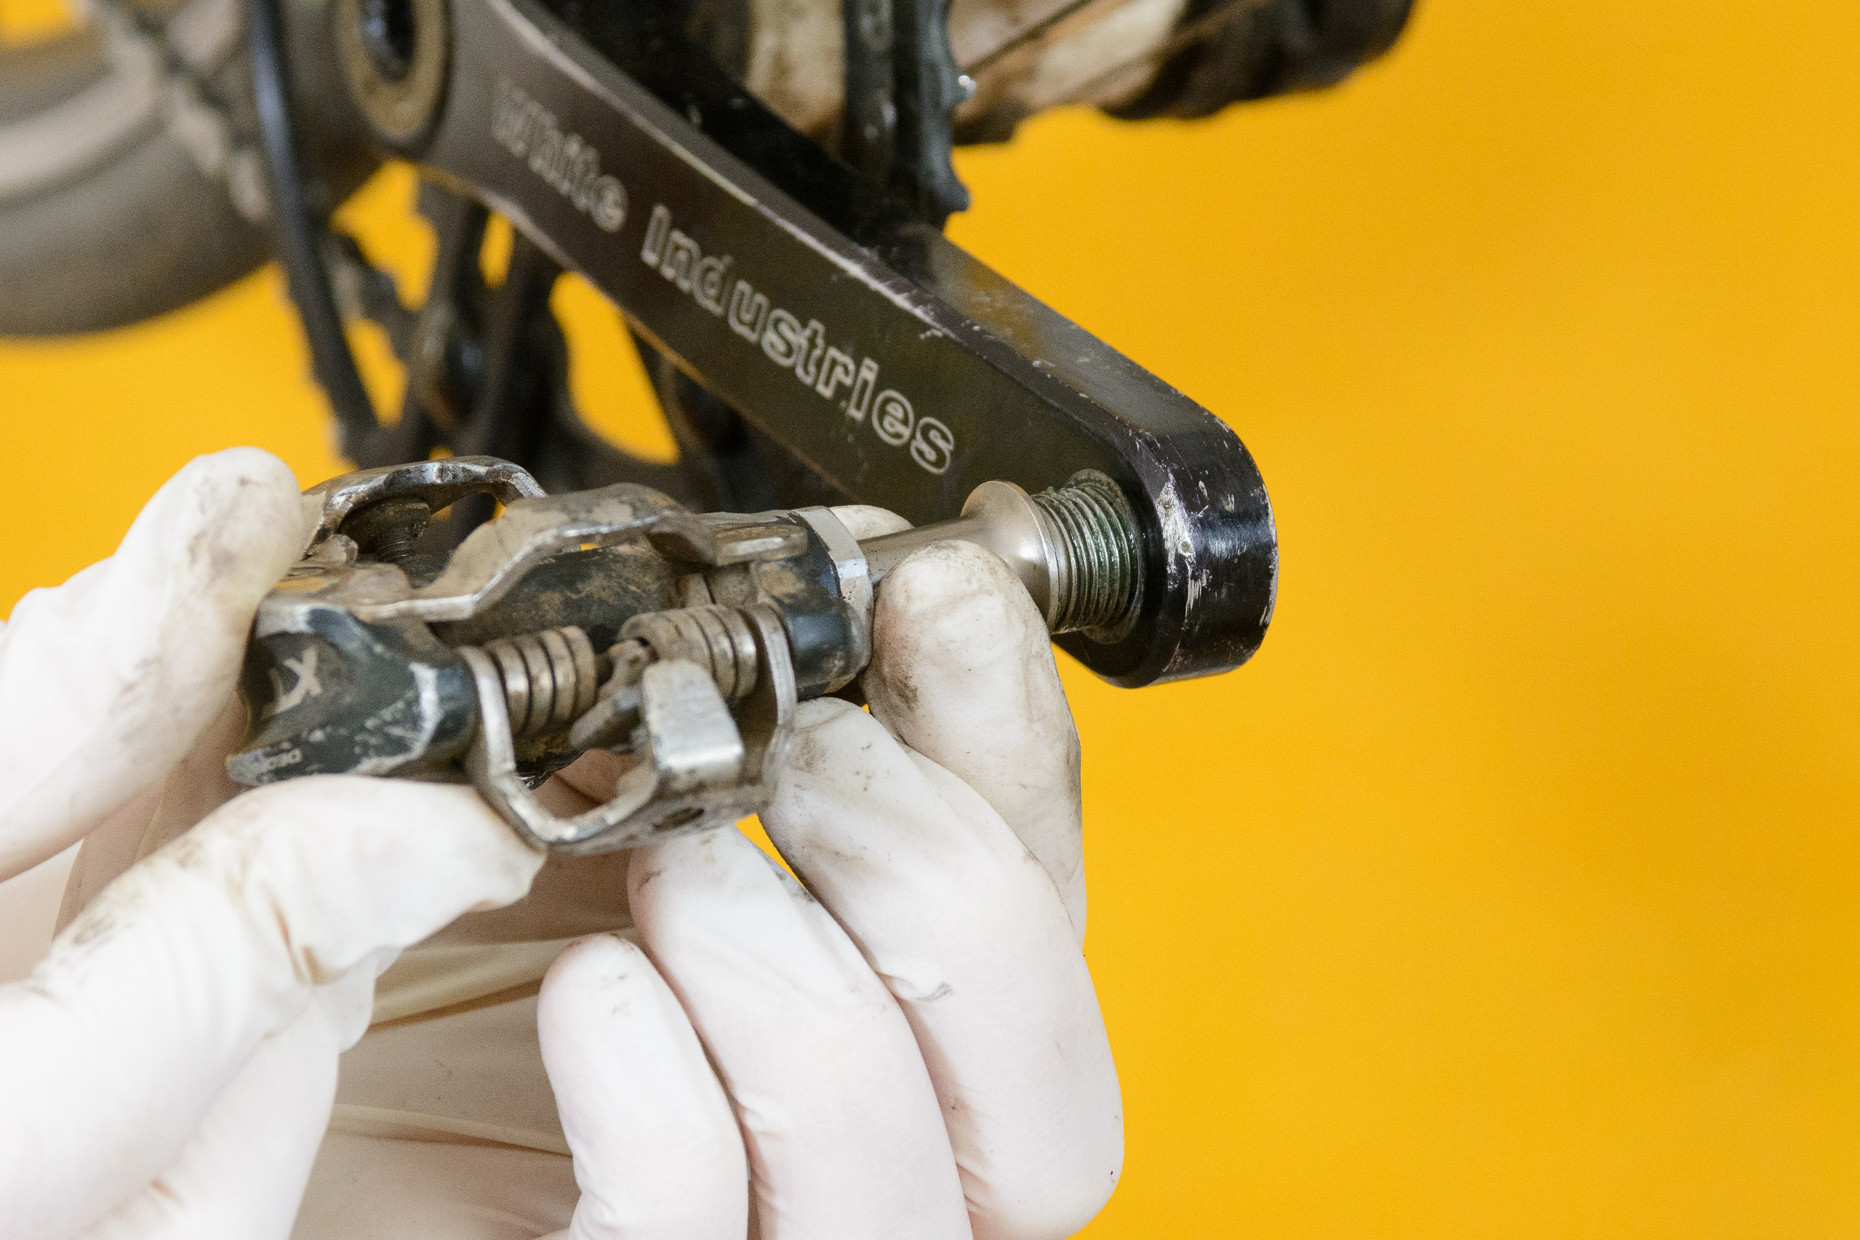 Hand-threading a bike pedal into the crank arm
- Prepare the Threads: As with the right pedal, clean and grease the threads on both the crank and the pedal.
- Hand-Thread the Pedal: Begin threading the pedal into the crank by hand. The left-hand pedal tightens counter-clockwise due to its reverse thread. Continue threading until it bottoms out on the crank.
- Tighten with a Tool: Once the pedal is bottomed out against the crank, tighten it lightly with either your hex key or spanner to the specified torque, if available.
4.3. How to Ensure Correct Pedal Installation?
Double-check the pedal’s orientation before using tools to avoid cross-threading and damage to the crank arm.
 Tightening a bike pedal snugly against the crank arm
Before using any tools, double-check that you are fitting the correct pedal. The left-hand pedal will not thread into the right-hand crank, and forcing it will cross the threads, potentially destroying the crank. If you encounter resistance when threading by hand, stop and re-verify that you have the correct pedal and orientation. Even experienced mechanics can make this mistake, so take your time and ensure you are doing it right.
5. What Are Some Recommended Bike Pedals and Cycling Cleat Advice?
For new pedals, explore options for road, mountain, and gravel bikes, and learn about using and setting up clipless pedals and cleats.
If you are looking to upgrade your bike pedals or are new to cycling, understanding the different types of pedals available and how to use them can greatly enhance your riding experience. Here are some recommendations and advice:
5.1. What Are the Best Options for Road Bike Pedals?
Road bike pedals should be lightweight and efficient for power transfer; clipless pedals are often preferred for performance.
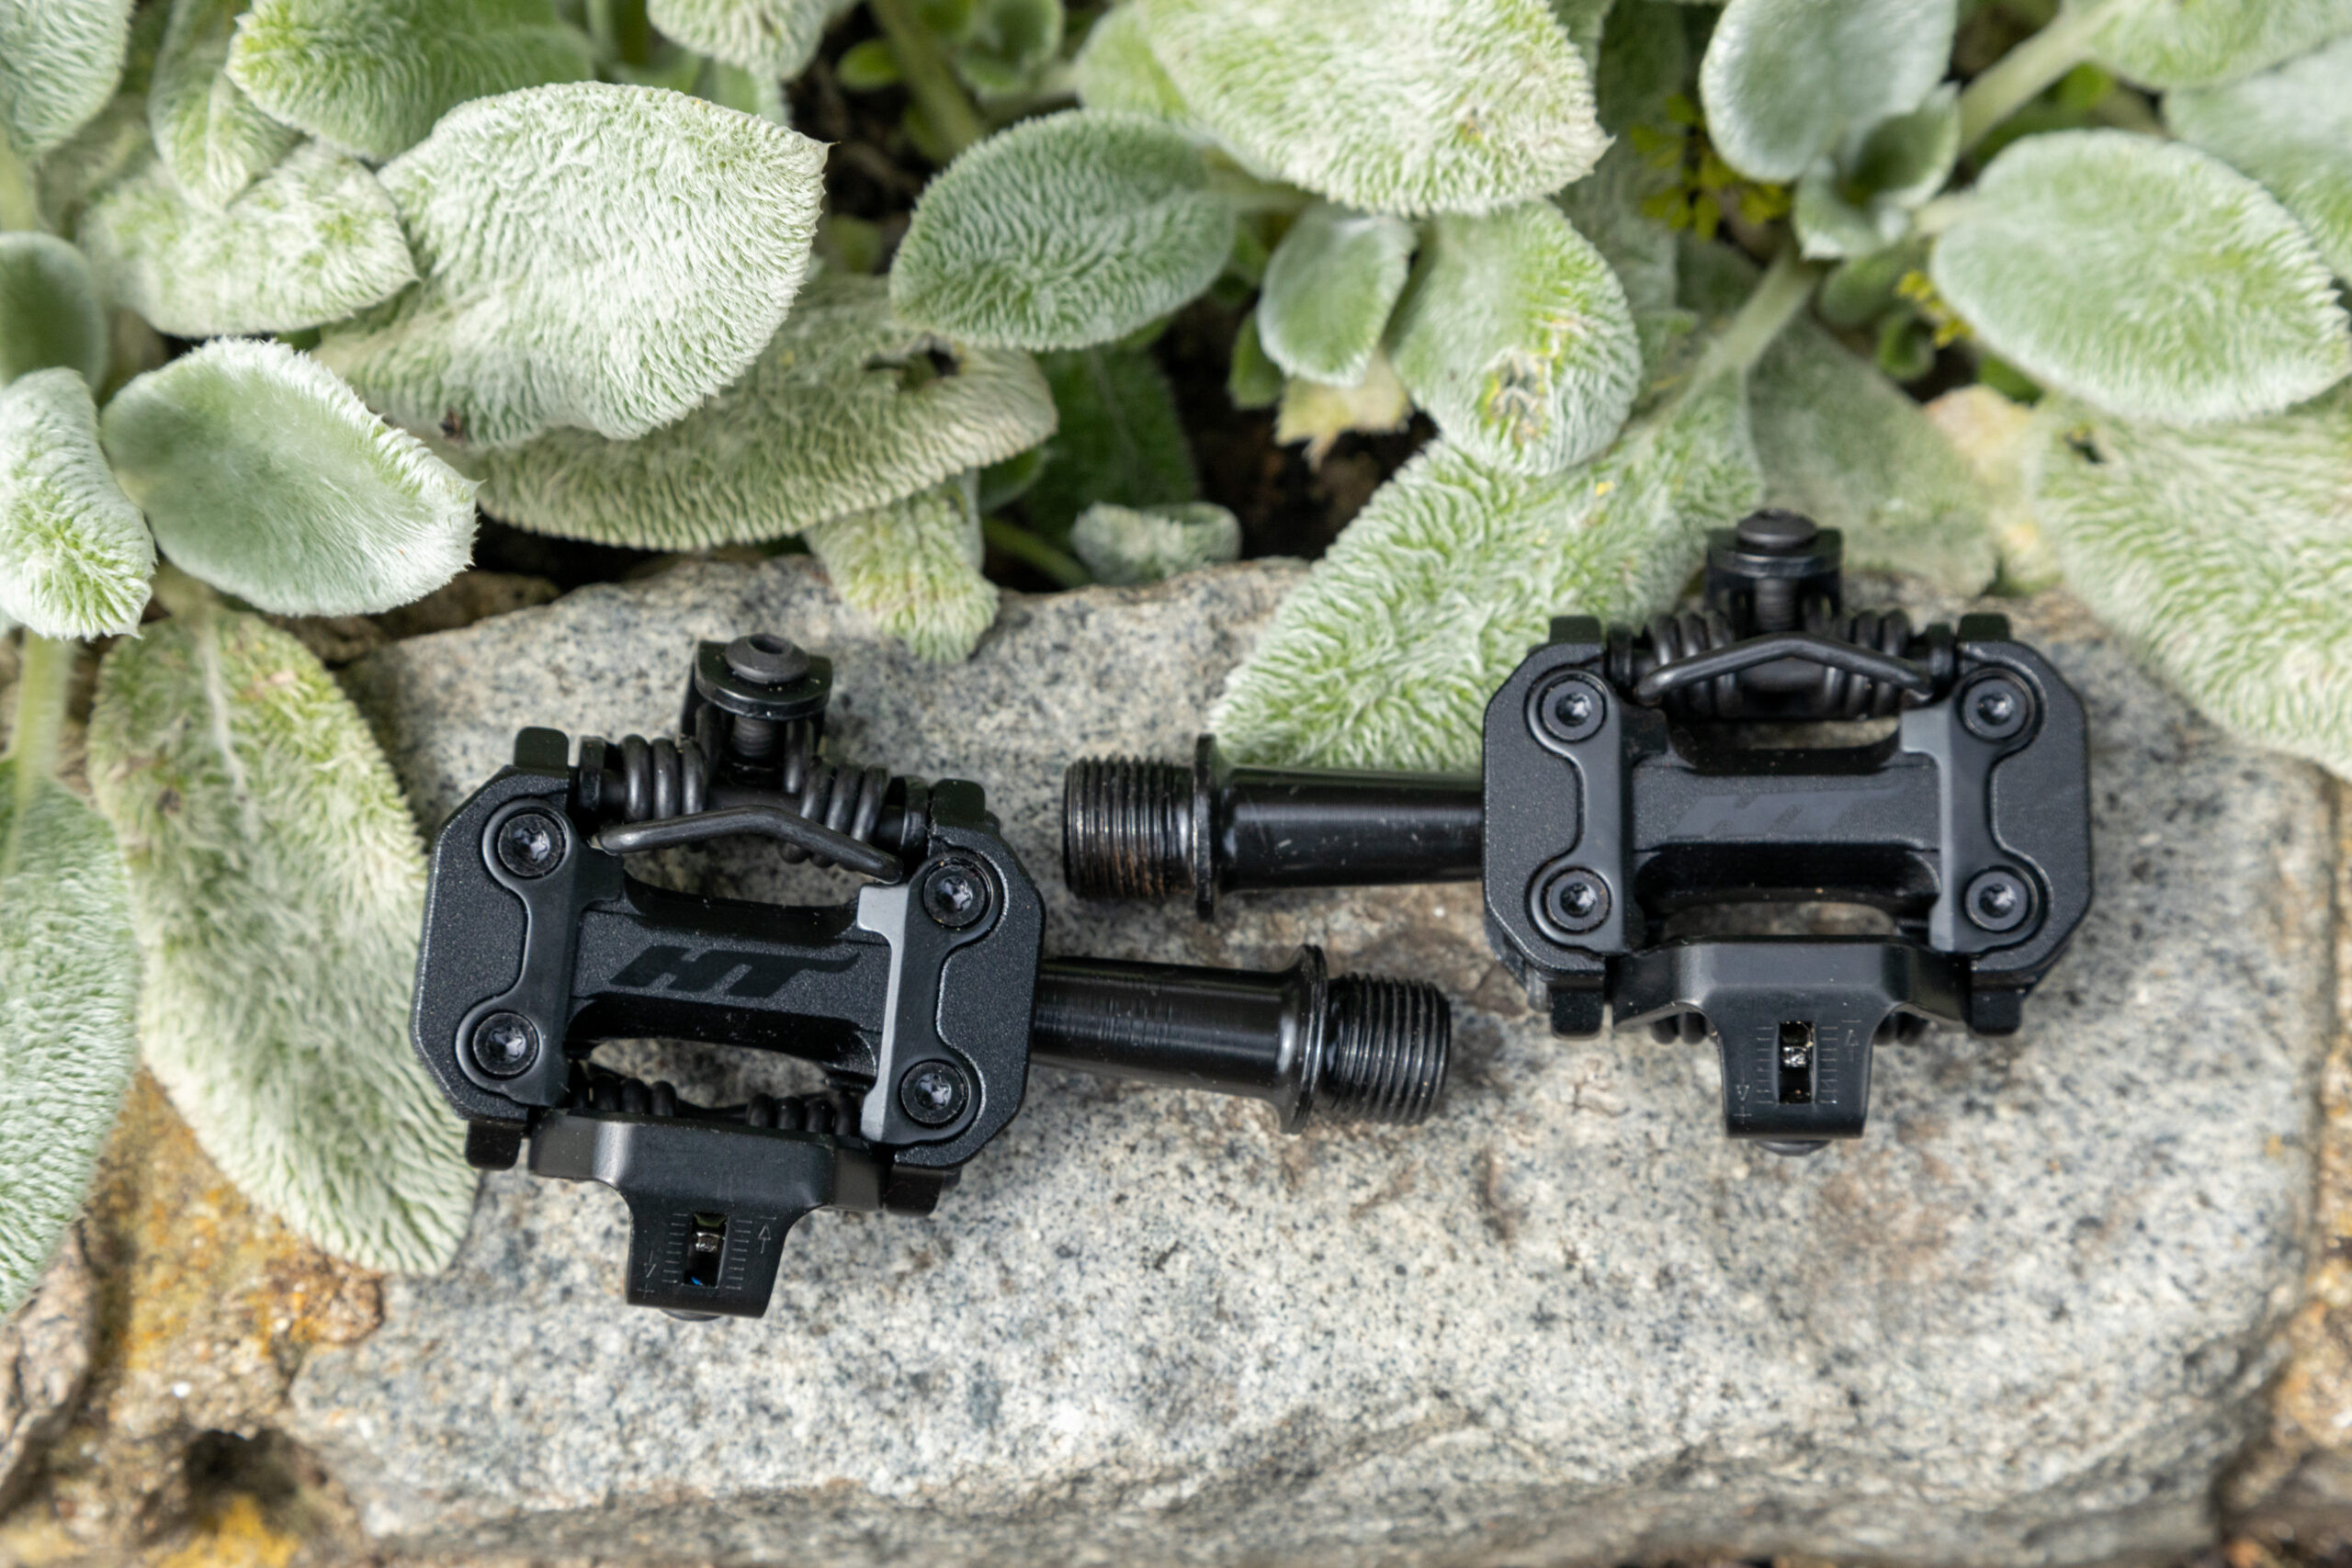 HT M2 pedal on a rock, suitable for gravel and mountain biking
Road bike pedals are designed to be lightweight and maximize power transfer. Clipless pedals, which require special shoes with cleats that clip into the pedal, are popular among road cyclists for their efficiency and control. When choosing road bike pedals, consider factors such as weight, durability, and the ease of clipping in and out.
5.2. What Are the Best Options for Mountain Bike Pedals?
Mountain bike pedals should be durable and offer good grip; clipless or flat pedals are suitable depending on riding style.
Mountain bike pedals need to be durable and provide good grip, whether you prefer clipless or flat pedals. Clipless pedals for mountain biking typically have a smaller platform and are designed to shed mud and debris. Flat pedals, on the other hand, offer more freedom of movement and are popular among riders who want the option to quickly put a foot down.
5.3. What Are the Best Options for Gravel Bike Pedals?
Gravel bike pedals should balance efficiency and comfort; clipless pedals with good mud clearance are often a good choice.
Gravel bike pedals need to strike a balance between efficiency and comfort. Clipless pedals with good mud clearance are often a good choice for gravel riding, as they provide a secure connection to the bike while still allowing you to clip in and out easily in varying conditions.
5.4. How to Use Clipless Pedals?
Clipless pedals require practice to clip in and out smoothly; start in a safe area and adjust cleat tension as needed.
Clipless pedals offer increased efficiency and control but require some practice to use effectively. Start by practicing clipping in and out in a safe area, such as a grassy field or empty parking lot. Adjust the cleat tension on the pedals to make it easier to clip in and out until you become more comfortable.
5.5. How to Set Up Cycling Cleats?
Proper cleat setup is crucial for comfort and performance; align cleats to match your natural foot position and adjust for any leg length discrepancies.
Proper cleat setup is crucial for comfort and performance. Align your cleats to match your natural foot position, and adjust them to account for any leg length discrepancies or other biomechanical issues. If you are unsure how to set up your cleats properly, consider consulting a professional bike fitter.
At usabikers.net, we are committed to providing you with the most up-to-date and comprehensive information on motorcycle maintenance, gear, and riding techniques. Our team of experienced riders and mechanics are dedicated to helping you get the most out of your motorcycle, whether you are a beginner or an experienced rider.
According to research from the Motorcycle Safety Foundation (MSF), in July 2025, proper motorcycle maintenance is a critical factor in ensuring rider safety.
6. What is the Importance of Pedal Maintenance for Bikers?
Proper pedal maintenance ensures smooth riding, prevents accidents, and enhances the overall biking experience.
Maintaining your bike’s pedals is essential for a smooth, safe, and enjoyable riding experience. Neglecting pedal maintenance can lead to various issues, including reduced efficiency, increased risk of accidents, and potential damage to other bike components. Here’s why pedal maintenance is crucial for bikers:
6.1. How Does Regular Cleaning Affect Pedal Performance?
Regular cleaning prevents dirt buildup, ensuring smooth rotation and efficient power transfer.
Regular cleaning of your bike pedals helps prevent the buildup of dirt, grime, and debris that can hinder their performance. Clean pedals rotate smoothly, allowing for efficient power transfer from your legs to the bike. This is especially important for clipless pedals, where dirt can interfere with the clipping mechanism.
6.2. Why is Lubrication Important for Pedal Longevity?
Lubrication reduces friction, preventing wear and tear on moving parts and extending pedal life.
Proper lubrication is key to reducing friction between the moving parts of your bike pedals. Lubricating the pedal axles, bearings, and clipping mechanisms (for clipless pedals) prevents wear and tear, extending the lifespan of your pedals. Use a high-quality grease or lubricant specifically designed for bike components to ensure optimal performance.
6.3. How Does Inspection Prevent Pedal-Related Accidents?
Regular inspection identifies loose or worn components, preventing potential accidents and ensuring rider safety.
Regularly inspecting your bike pedals for loose or worn components is crucial for preventing accidents. Check the pedal axles for play, and ensure that the pedal bodies are securely attached to the axles. For clipless pedals, inspect the clipping mechanisms for wear and tear, and replace any worn cleats promptly. Addressing these issues early can prevent potential accidents and ensure your safety while riding.
6.4. What Role Do Pedal Bearings Play in Smooth Riding?
Well-maintained bearings ensure smooth rotation, enhancing riding comfort and reducing energy expenditure.
The bearings in your bike pedals play a critical role in their smooth operation. Well-maintained bearings allow the pedals to rotate freely, enhancing your riding comfort and reducing the amount of energy you need to expend. If your pedals feel rough or gritty when you rotate them, it may be time to clean and re-grease the bearings, or replace them altogether.
6.5. How to Address Common Pedal Problems?
Addressing common pedal problems like squeaking or binding ensures a smoother and more enjoyable ride.
Addressing common pedal problems promptly can help ensure a smoother and more enjoyable ride. Squeaking pedals can often be resolved by lubricating the pedal axles and cleats (for clipless pedals). Binding pedals may require cleaning and re-greasing the bearings or replacing worn components. By addressing these issues early, you can prevent them from escalating into more serious problems that could compromise your safety.
7. What Are the Different Types of Bike Pedals Available?
Different types of bike pedals, including flat, clipless, and hybrid options, cater to various riding styles and preferences.
Bike pedals come in various types, each designed to cater to different riding styles, preferences, and performance needs. Understanding the different types of pedals available can help you choose the best option for your bike and riding habits. Here’s an overview of the different types of bike pedals:
7.1. What Are Flat Pedals and Their Benefits?
Flat pedals offer versatility and ease of use, suitable for recreational riding and commuting.
Flat pedals, also known as platform pedals, are the most common type of bike pedals. They feature a flat platform with pins or ridges to provide grip for your shoes. Flat pedals are versatile and easy to use, making them a great choice for recreational riding, commuting, and beginners. They allow you to easily put your feet down when needed and don’t require special shoes.
7.2. What Are Clipless Pedals and Their Advantages?
Clipless pedals enhance power transfer and control, ideal for performance-oriented cycling.
Clipless pedals, also known as clip-in pedals, require special shoes with cleats that attach to the pedal. This system provides a secure connection between your feet and the bike, enhancing power transfer and control. Clipless pedals are popular among performance-oriented cyclists, including road racers, mountain bikers, and triathletes. They allow you to pull up on the pedals as well as push down, resulting in a more efficient and powerful pedaling motion.
7.3. What Are Hybrid Pedals and Their Uses?
Hybrid pedals combine flat and clipless designs, offering versatility for different riding scenarios.
Hybrid pedals combine the features of both flat and clipless pedals. They typically have a flat platform on one side and a clipless mechanism on the other, allowing you to use either regular shoes or cycling shoes with cleats. Hybrid pedals are a great choice for riders who want the versatility of both types of pedals, such as commuters who may want to ride in regular shoes for short trips and clip in for longer rides.
7.4. How Do Touring Pedals Enhance Long-Distance Riding?
Touring pedals offer comfort and stability, suitable for long-distance and multi-day rides.
Touring pedals are designed for long-distance and multi-day rides. They typically have a larger platform than other types of pedals, providing more support and comfort for your feet. Touring pedals may also feature a clipless mechanism for added efficiency. They are a great choice for cyclists who prioritize comfort and stability over all-out performance.
7.5. What Are BMX Pedals Designed For?
BMX pedals are durable and grippy, essential for the demands of BMX riding and tricks.
BMX pedals are designed to withstand the demands of BMX riding and tricks. They are typically made from durable materials such as aluminum or magnesium and feature a wide platform with aggressive pins for maximum grip. BMX pedals are essential for riders who want to maintain control and stability while performing jumps, grinds, and other tricks.
8. How to Choose the Right Bike Pedal for Your Needs?
Choosing the right bike pedal depends on riding style, experience level, and personal preferences.
Choosing the right bike pedal for your needs can greatly enhance your riding experience. Consider your riding style, experience level, and personal preferences when selecting pedals for your bike. Here’s a guide to help you make the right choice:
8.1. How Does Riding Style Influence Pedal Choice?
Riding style, whether recreational, commuting, or competitive, dictates the type of pedal that best suits your needs.
Your riding style is one of the most important factors to consider when choosing bike pedals. If you primarily ride for recreation or commuting, flat pedals may be the best choice. They are easy to use and don’t require special shoes. If you are a performance-oriented cyclist who races or trains regularly, clipless pedals may be a better option. They provide a more efficient and powerful pedaling motion. If you want the versatility of both types of pedals, consider hybrid pedals.
8.2. How Does Experience Level Affect Pedal Selection?
Beginners may prefer flat pedals for ease of use, while experienced riders often opt for clipless pedals for enhanced performance.
Your experience level can also influence your pedal choice. If you are a beginner, flat pedals may be easier to learn on. They allow you to quickly put your feet down when needed, which can be helpful when you are first learning to ride. As you become more experienced, you may want to switch to clipless pedals for their performance benefits. However, clipless pedals can take some getting used to, so be sure to practice in a safe area before riding in traffic.
8.3. What Are the Comfort Considerations When Choosing Pedals?
Comfort is crucial; choose pedals that provide adequate support and minimize foot fatigue, especially for long rides.
Comfort is an important consideration when choosing bike pedals, especially if you plan to ride long distances. Look for pedals that provide adequate support for your feet and minimize foot fatigue. Some pedals have a larger platform or a more ergonomic design to enhance comfort. If you use clipless pedals, make sure your cleats are properly adjusted to prevent discomfort or injury.
8.4. How Does Shoe Compatibility Impact Pedal Choice?
Ensure your shoes are compatible with your chosen pedal type, especially when using clipless systems.
Your shoe compatibility is another important factor to consider when choosing bike pedals. If you use clipless pedals, you will need to purchase special shoes with cleats that are compatible with your pedal system. There are several different types of clipless pedal systems, each with its own unique cleat design. Make sure your shoes are compatible with the pedal system you choose.
8.5. What Are the Durability Considerations for Bike Pedals?
Choose pedals made from durable materials that can withstand the demands of your riding conditions.
The durability of your bike pedals is an important consideration, especially if you ride in harsh conditions. Look for pedals made from durable materials such as aluminum, steel, or carbon fiber. These materials can withstand the demands of rough terrain, inclement weather, and heavy use. If you ride frequently, you may want to invest in higher-quality pedals that are designed to last.
9. What Are Some Common Bike Pedal Problems and Solutions?
Addressing common bike pedal problems like squeaking, loosening, or binding ensures a smoother and safer ride.
Bike pedals, like any other component of your bike, can experience problems over time. Addressing these issues promptly can help ensure a smoother, safer, and more enjoyable riding experience. Here are some common bike pedal problems and their solutions:
9.1. How to Fix Squeaking Pedals?
Squeaking pedals often indicate a need for lubrication; apply grease to the axle and cleat interfaces to resolve the issue.
Squeaking pedals are a common problem that can be annoying and distracting. Often, the squeaking is caused by friction between the pedal axle and the crank arm, or between the cleat and the pedal (for clipless pedals). To fix squeaking pedals, try the following:
- Lubricate the Pedal Axle: Remove the pedals from the crank arms and apply a thin layer of grease to the pedal axles. Reinstall the pedals and tighten them securely.
- Lubricate the Cleats: If you use clipless pedals, apply a small amount of lubricant to the cleat interfaces. This can help reduce friction and eliminate squeaking.
9.2. How to Address Loose Pedals?
Loose pedals require tightening to prevent damage to the crank arms; ensure proper torque when re-tightening.
Loose pedals can be dangerous and can damage the crank arms. If you notice that your pedals are loose, it’s important to address the issue promptly. To fix loose pedals, try the following:
- Tighten the Pedals: Use a wrench or Allen key to tighten the pedals securely to the crank arms. Make sure to tighten them to the proper torque specification, which can be found in your bike’s owner’s manual or on the pedal packaging.
- Check the Threads: If the pedals continue to loosen, check the threads on the crank arms and the pedal axles for damage. If the threads are damaged, you may need to replace the crank arms or the pedals.
9.3. How to Resolve Binding Pedals?
Binding pedals indicate a need for cleaning and lubrication of the bearings; disassemble, clean, and re-grease the bearings.
Binding pedals, where the pedals don’t rotate smoothly, can be caused by dirt, grime, or corrosion in the pedal bearings. To resolve binding pedals, try the following:
- Clean the Bearings: Disassemble the pedals and clean the bearings with a solvent or degreaser.
- Lubricate the Bearings: Apply a high-quality grease to the bearings and reassemble the pedals.
- Replace the Bearings: If cleaning and lubricating the bearings doesn’t solve the problem, you may need to replace the bearings altogether.
9.4. What to Do About Worn Cleats?
Worn cleats can cause clipping issues; replace them to ensure secure and reliable engagement with clipless pedals.
Worn cleats can cause clipping issues, such as difficulty clipping in or out, or a loose connection between the shoe and the pedal. If you use clipless pedals, it’s important to replace your cleats regularly to ensure a secure and reliable connection. To address worn cleats, try the following:
- Replace the Cleats: Purchase new cleats that are compatible with your pedal system and replace the old cleats.
- Adjust the Cleat Position: After replacing the cleats, make sure to adjust the cleat position to match your natural foot position.
9.5. How to Prevent Pedal Stripping?
Prevent pedal stripping by greasing threads, avoiding overtightening, and ensuring correct installation.
Stripped pedal threads can be a costly and time-consuming problem to fix. To prevent pedal stripping, try the following:
- Grease the Threads: Apply a thin layer of grease to the pedal threads before installing them. This will help prevent corrosion and make it easier to remove the pedals in the future.
- Avoid Overtightening: Overtightening the pedals can damage the threads. Tighten the pedals to the proper torque specification, and avoid using excessive force.
- Install the Pedals Correctly: Make sure to install the pedals on the correct side of the bike (right pedal on the right side, left pedal on the left side). The pedals have different threading, and installing them on the wrong side can damage the threads.
10. What Are Some Advanced Bike Pedal Maintenance Tips?
Advanced maintenance tips include using threadlocker, upgrading bearings, and custom pedal modifications.
For experienced riders and mechanics, there are several advanced bike pedal maintenance tips that can further enhance pedal performance and longevity. These tips involve more technical procedures and may require specialized tools or knowledge. Here are some advanced bike pedal maintenance tips:
10.1. How to Use Threadlocker for Pedals?
Threadlocker prevents loosening by securing threads, suitable for aggressive riding conditions.
Threadlocker is a liquid adhesive that is applied to the threads of bolts and screws to prevent them from loosening due to vibration. Using threadlocker on your bike pedals can help prevent them from loosening, especially if you ride in aggressive conditions. To use threadlocker on your bike pedals, follow these steps:
- Clean the Threads: Clean the threads on the crank arms and the pedal axles with a solvent or degreaser.
- Apply Threadlocker: Apply a small amount of threadlocker to the threads of the pedal axles.
- Install the Pedals: Install the pedals on the crank arms and tighten them to the proper torque specification.
- Allow to Cure: Allow the threadlocker to cure for the recommended time period before riding your bike.
10.2. How to Upgrade Pedal Bearings?
Upgrading pedal bearings enhances smoothness and reduces friction, ideal for performance enthusiasts.
Upgrading the bearings in your bike pedals can improve their smoothness and reduce friction, resulting in a more efficient pedaling motion. High-quality bearings are typically made from ceramic or stainless steel and are designed to be more durable and smoother than stock bearings. To upgrade your pedal bearings, follow these steps:
- Disassemble the Pedals: Disassemble the pedals and remove the old bearings.
- Install the New Bearings: Install the new bearings in the pedals, following the manufacturer’s instructions.
- Lubricate the Bearings: Apply a high-quality grease to the bearings and reassemble the pedals.
10.3. How to Modify Pedal Pins for Enhanced Grip?
Modifying pedal pins improves grip for flat pedals, enhancing control in technical riding.
Modifying the pins on your flat pedals can improve their grip, especially if you ride in technical terrain. There are several ways to modify your pedal pins, including:
- Replacing the Pins: Replace the stock pins with longer or sharper pins for increased grip.
- Adding More Pins: Add more pins to the pedals for even greater grip.
- Adjusting the Pin Height: Adjust the height of the pins to customize the grip to your preferences.
10.4. How to Service Clipless Pedal Mechanisms?
Servicing clipless pedal mechanisms ensures reliable clipping action and extends pedal life.
Servicing the clipless mechanisms on your clipless pedals can help ensure reliable clipping action and extend the lifespan of your pedals. This involves cleaning and lubricating the mechanisms regularly. To service your clipless pedal mechanisms, follow these steps:
- Clean the Mechanisms: Clean the mechanisms with a solvent or degreaser to remove dirt and grime.
- Lubricate the Mechanisms: Apply a small amount of lubricant to the mechanisms to keep them working smoothly.
- Inspect for Wear: Inspect the mechanisms for wear and tear, and replace any worn parts as needed.
10.5. How to Use Pedal Washers Correctly?
Pedal washers prevent crank arm damage by distributing pressure, especially with alloy cranks.
Pedal washers are thin metal or plastic washers that are placed between the pedal axle and the crank arm. They help distribute pressure and prevent damage to the crank arms, especially if you have alloy cranks. To use pedal washers correctly, follow these steps:
- Install the Washers: Place the pedal washers on the pedal axles before installing the pedals on the crank arms.
- Tighten the Pedals: Tighten the pedals to the proper torque specification.
- Check for Damage: Periodically check the crank arms for damage, such as cracks or dents. If you notice any damage, replace the crank arms immediately.
Remember, always consult your bike’s owner’s manual or a professional mechanic before attempting any advanced maintenance procedures.
According to the American Motorcyclist Association (AMA), regular maintenance is key to ensuring the longevity and safety of your motorcycle. Visit usabikers.net for more tips and guides on motorcycle maintenance and safety.
FAQ: How to Remove a Bike Pedal
1. Which direction do I turn the wrench to remove a bike pedal?
Turn the wrench towards the rear of the bike to loosen the pedal. Remember, the