
Getting a flat tyre is an inevitable part of cycling. Whether you’re a seasoned road cyclist or a weekend trail rider, knowing how to change a bike tyre is a crucial skill. While the thought of fixing a flat might seem daunting, especially on the roadside, it’s a straightforward process that anyone can master with a little know-how and the right tools. This guide will walk you through each step of changing your bike tyre, ensuring you can get back on your ride quickly and confidently.
 How To Change a Bike Tyre
(Image credit: Mick Kirkmann) – Close-up of hands demonstrating how to change a bike tyre, emphasizing the practical aspect of bike maintenance.
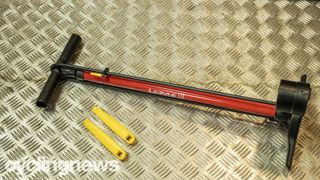
Before we dive in, remember that having the right tools is half the battle. Trying to wrestle with a stubborn tyre without proper levers can be frustrating and even damaging to your bike. Let’s gather what you’ll need to make this process smooth and efficient.
Tools You’ll Need for a Bike Tyre Change
Having the right tools not only simplifies the process but also prevents damage to your rims and tyres. Here’s a quick checklist of essential items:
- Tyre Levers: Invest in a set of good quality tyre levers. Plastic levers are preferred to avoid scratching your rims. Cheap levers can break, while metal ones can cause damage.
- Pump (Track or Hand Pump): Ensure your pump is compatible with your bike’s valve type (Presta or Schrader). Many modern pumps are dual-compatible. A track pump is faster for inflation at home, but a hand pump is essential to carry with you on rides.
- Spare Inner Tube: Always carry a spare inner tube that matches your tyre size. Check the size markings on your current tyre sidewall to ensure compatibility.
- Optional: Multi-tool or Wrench: Depending on your bike, you might need a wrench or multi-tool to remove the wheel from the frame.
With your tools ready, let’s get started on removing the old tyre.
Removing the Old Tyre: Step-by-Step
The first part of changing a tyre is removing the wheel and then the old, potentially flat, tyre. Follow these steps carefully to avoid any mishaps.
 How To Change a Bike Tyre
(Image credit: Mick Kirkmann) – Hands deflating a bike tyre with a Presta valve, illustrating the initial step of tyre removal.
Step 1: Deflate the Tyre Completely
Whether you have a puncture or are replacing a worn tyre, the first step is to ensure the tyre is fully deflated.
- For Presta Valves (thin, with a locking nut): Locate the small barrel at the valve tip and unscrew it counter-clockwise. Once loosened, press down on the valve core to release any remaining air. Remove the valve cap and the lock ring that secures the valve to the rim.
- For Schrader Valves (car-type valves): Simply remove the valve cap and depress the pin in the center of the valve to release the air.
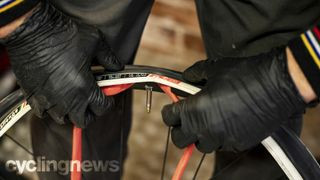
Step 2: Unseat the Tyre Bead
The tyre bead is the edge of the tyre that sits inside the rim. To remove the tyre, you need to push this bead inwards, into the rim’s center channel.
 How To Change a Bike Tyre
(Image credit: Mick Kirkmann) – Hands unseating a bike tyre from the rim, showing the technique to create slack for lever insertion.
Work your way around the entire circumference of the tyre on both sides of the wheel, squeezing the tyre inwards with your thumbs. This action pushes the tyre bead away from the rim edge and into the deeper central channel of the rim. Creating this slack is crucial for easier tyre lever insertion.
Step 3: Remove One Side of the Tyre by Hand (If Possible)
After unseating the bead, try to remove one side of the tyre from the rim using just your hands.
 How To Change a Bike Tyre
(Image credit: Mick Kirkmann) – Hands pushing a bike tyre over the rim edge without levers, highlighting the initial manual removal attempt.
Start at the valve and work your thumbs around the tyre, pushing the tyre bead over the rim edge. If the tyre is relatively loose, you might be able to remove one entire side this way. This is the safest method as it avoids pinching the inner tube.
Step 4: Using Tyre Levers to Remove the Tyre
If the tyre is too tight to remove by hand, tyre levers are your best friend.
- Insert the First Lever: Choose a point on the tyre, ideally opposite the valve, and insert the rounded end of a tyre lever under the tyre bead. Hook the other end of the lever onto a spoke for leverage.
- Use the Second Lever: Insert a second tyre lever about 2-3 inches away from the first, also under the tyre bead. Lever this second lever downwards to lift more of the tyre bead over the rim.
- Slide (or Repeat if Necessary): Some tyre levers have a hook that allows you to slide the lever around the rim, pulling the tyre bead off as you go. If your levers don’t have this feature, or if the tyre is very tight, you might need to use a third lever to continue working the tyre off the rim, repeating the levering action in small increments.
 How To Change a Bike Tyre
(Image credit: Mick Kirkmann) – A removed bike tyre and wheel, emphasizing inspection for damage after tyre removal.
Once one side of the tyre is completely off the rim, you can usually pull the inner tube out. Then, the other side of the tyre should come off relatively easily by hand.
Step 5: Inspect the Tyre and Rim
Before fitting a new tube or tyre, take a moment to inspect the inside of the old tyre for any sharp objects that caused the puncture, like glass or thorns. Carefully run your fingers along the inside of the tyre. Also, check your rim for any damage, cracks, or sharp edges that could cause future punctures.
Now that the old tyre is off, let’s move on to fitting the new tyre and inner tube.
Fitting a New Bike Tyre: Step-by-Step
Fitting a tyre correctly is just as important as removing it. Proper installation ensures a safe and comfortable ride and helps prevent pinch flats.
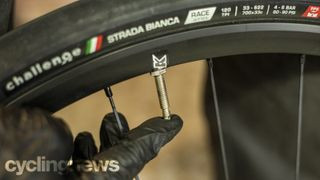
Step 1: Check Your New Inner Tube Size
Before you start, ensure your new inner tube is the correct size for your tyre. The tyre size is usually printed on the sidewall of your tyre (e.g., 700x25c, 27.5×2.2). Match these dimensions to the size range indicated on the inner tube box.
 How To Change a Bike Tyre
(Image credit: Mick Kirkmann) – Hands checking the size markings on a new inner tube, highlighting the importance of correct tube size selection.
Also, check that the valve length of the inner tube is suitable for your rim depth, especially if you have deep-section aero rims. A valve that is too short won’t protrude enough to attach a pump head properly.
Step 2: Mount One Side of the Tyre
Place one bead of the new tyre onto the rim. Start opposite the valve and work your way around, using your thumbs to push the tyre bead over the rim edge.
 How To Change a Bike Tyre
(Image credit: Mick Kirkmann) – Hands fitting one side of a new bike tyre onto the rim, demonstrating the initial tyre mounting stage.
Many cyclists align the tyre label with the valve hole for a professional look and to make it easier to locate the valve later.
Step 3: Insert the Inner Tube
Slightly inflate the new inner tube just enough to give it some shape. This prevents it from being pinched between the tyre and rim during installation.
 How To Change a Bike Tyre
(Image credit: Mick Kirkmann) – Hands slightly inflating a new inner tube before installation, emphasizing preventing pinch flats.
Insert the valve of the slightly inflated tube into the valve hole in the rim. Push the tube up into the tyre cavity, distributing it evenly around the rim. Ensure the tube is not twisted or pinched.
Step 4: Fit the Second Side of the Tyre by Hand (If Possible)
Just like with removal, try to fit the second tyre bead onto the rim using only your thumbs. Start at the valve and work your way around in both directions, pushing the bead over the rim edge.
 How To Change a Bike Tyre
(Image credit: Mick Kirkmann) – Hands fitting the second side of a bike tyre by hand, demonstrating manual tyre installation.
Again, creating slack by pushing the already mounted sections of the tyre into the rim’s center channel will give you more room to work with and make the final section easier to fit.
Step 5: Using Tyre Levers to Finish Fitting the Tyre
If the last section of the tyre is too tight to push on by hand, use tyre levers carefully.
 How To Change a Bike Tyre
(Image credit: Mick Kirkmann) – Hands using tyre levers to fit the final section of a tight bike tyre, highlighting lever technique for installation.
- Insert Levers: Insert two tyre levers under the tyre bead, on either side of the section that’s still off the rim.
- Lever Tyre On: Use the levers to gently lever the remaining section of the tyre bead over the rim edge. Work in small increments, moving the levers around the rim as needed. Be extremely careful not to pinch the inner tube between the tyre lever and the rim.
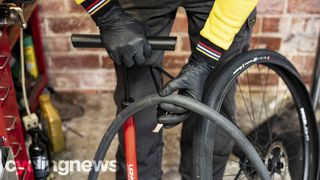
Step 6: Inflate the Tyre Carefully
Before fully inflating, check that the tyre bead is seated evenly all around the rim on both sides. Look for a consistent gap between the tyre bead and the rim edge. If you see any bulges or uneven seating, deflate the tyre slightly and use your thumbs to massage the tyre into the correct position.
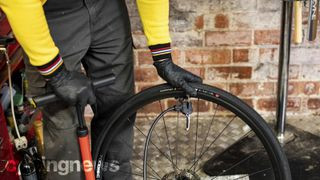 How To Change a Bike Tyre
(Image credit: Mick Kirkmann) – Hands inflating a bike tyre with a track pump, emphasizing careful inflation and tyre seating check.
Once you’re satisfied with the seating, attach your pump and inflate the tyre to the recommended pressure, which is usually printed on the tyre sidewall (PSI or BAR). Inflate gradually, checking again for proper seating as you pump. You might hear a ‘pop’ as the tyre bead seats fully into the rim – this is normal.
Finally, secure the valve lock ring (if using Presta valves) and close the valve tip. Spin the wheel to check for any wobbles or bulges, ensuring the tyre is seated correctly.
Conclusion: Ride On with Confidence
Knowing how to change a bike tyre is a fundamental skill for any cyclist. With a bit of practice and the right tools, you can confidently handle a flat tyre and get back to enjoying your ride. Remember to take your time, be patient, and always double-check your work before hitting the road or trail again. Happy cycling!
Disclaimer: Bicycle maintenance should be performed with care and attention to detail. If you are unsure about any step, it’s always best to consult a professional bike mechanic.