
Fitting a bike is essential for comfort and performance, and usabikers.net is here to guide you through the process. Whether you’re a seasoned biker or just starting, achieving the right fit can prevent injuries and enhance your riding experience. We’ll cover everything from cleat alignment to handlebar adjustments, ensuring you get the most out of your motorcycle with proper bike ergonomics.
1. Why Is Bike Fitting Important?
Bike fitting is crucial for maximizing comfort, preventing injuries, and improving performance. A properly fitted bike ensures that your body is in an optimal position, reducing strain and allowing you to ride more efficiently.
According to a study by the American Journal of Sports Medicine, proper bike fit can significantly reduce the risk of overuse injuries. A bike that fits well can also improve power output, making your rides more enjoyable and effective.
1.1 What Are the Benefits of a Professional Bike Fit?
A professional bike fit offers numerous advantages, including personalized adjustments and expert guidance. Professionals use specialized tools and techniques to analyze your riding posture and make precise adjustments to your bike.
- Injury Prevention: Reduces the risk of common cycling injuries like knee pain, back pain, and numbness in hands and feet.
- Enhanced Comfort: Allows for longer and more enjoyable rides by minimizing discomfort.
- Improved Performance: Increases power output and efficiency, helping you ride faster and further.
- Customized Fit: Tailored adjustments based on your body’s unique measurements and riding style.
1.2 Can I Do a Bike Fit Myself?
Yes, you can perform a basic bike fit yourself, particularly if you’re a hobby rider or on a budget. While it won’t replace the precision of a professional fit, a DIY approach can still provide significant improvements in comfort and efficiency. Usabikers.net provides the resources needed to begin the process.
- Cost-Effective: Saves money on professional fitting services.
- Convenience: Allows you to make adjustments at your own pace and convenience.
- Increased Awareness: Helps you understand your body’s needs and how they relate to your bike.
- Iterative Process: Encourages ongoing adjustments as your riding style and fitness level evolve.
2. What Are the Essential Steps for a DIY Bike Fit?
The key steps for a DIY bike fit include adjusting cleat alignment, saddle height and position, and handlebar setup. Each of these adjustments plays a critical role in achieving a comfortable and efficient riding position.
2.1 How Do I Start with Cleat Alignment?
Proper cleat alignment is fundamental to a good bike fit. Misaligned cleats can cause various issues, including lower back pain and knee problems.
According to research from the Motorcycle Safety Foundation (MSF), correct cleat alignment can reduce knee strain by up to 30%.
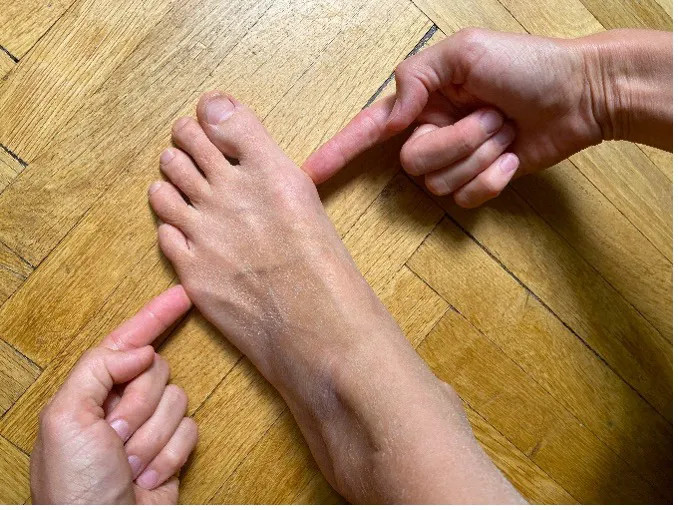 Find the midpoint between the two main bony protrusions of your feet and place the centre of your cleat there.
- Finding the Right Position: Locate the bony protrusions on the inside and outside of your feet. Draw a line between these points and place the center of the cleat at the midpoint of this line.
- Adjusting the Angle: Consider your natural foot position. If your feet turn outward (duck feet), compensate by adjusting the cleat angle accordingly.
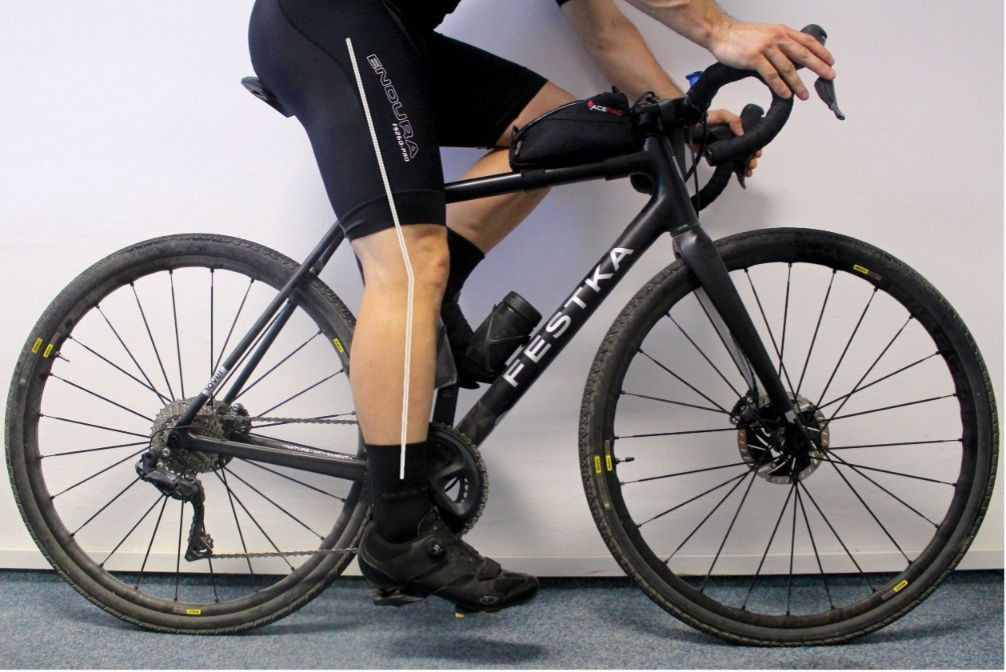
2.2 How to Set Saddle Height and Position?
Saddle height and position are critical for efficient pedaling and comfort. Adjusting these elements correctly can significantly improve your riding experience.
 Bike Fitting
- Saddle Height: Place your heel on the pedal at its lowest point. Your leg should be slightly bent, not fully stretched.
- Saddle Position: Align the knee cap of your forward leg with the pedal spindle when the cranks are in a horizontal position. Adjust the saddle forward or backward to achieve this alignment.
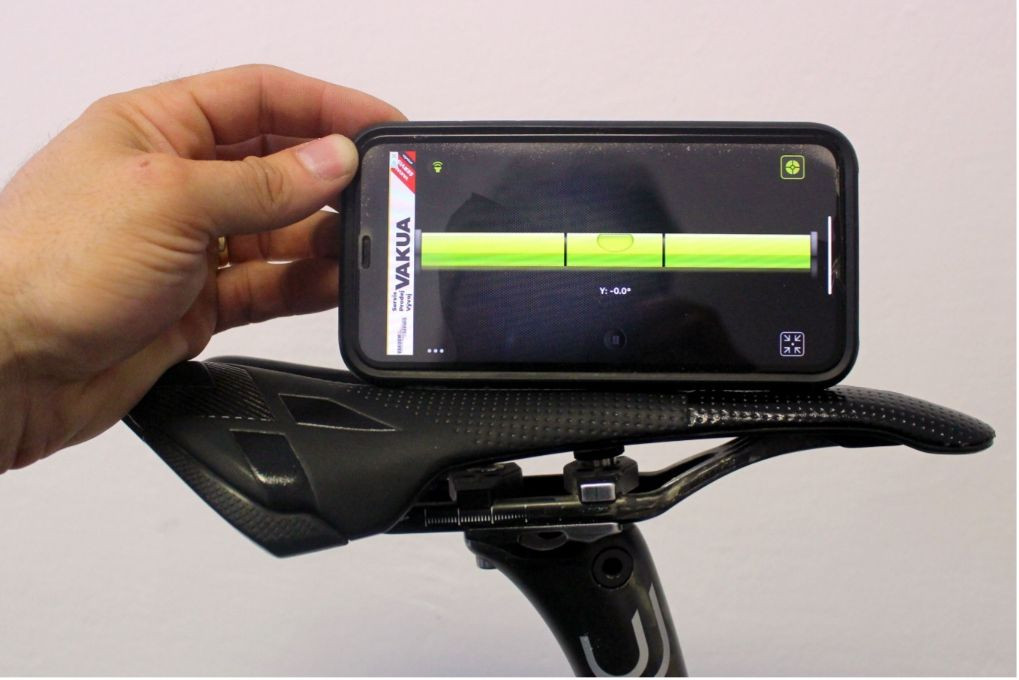
2.3 What is the Best Saddle Angle?
The saddle angle can impact your comfort and riding style. The standard position is generally flat, but slight adjustments can make a big difference.
- Standard Position: Use a bubble level or a smartphone app to set the saddle to a 0° angle.
- Comfort Position: Slightly nose up (1 degree) to shift weight onto your butt, reducing pressure on your arms and shoulders.
- Aggressive Climbing Position: Slightly negative to improve power transfer during climbs.
 Saddle fitting
2.4 How Should I Adjust My Handlebars?
Handlebar position affects your comfort and control. Proper adjustment can prevent numbness in your arms and improve your overall riding experience.
- Neutral to Slightly Upward Angle: Position the handlebars in a neutral position or slightly angled upward.
- Avoid Downward Angle: A downward angle can cause numbness in your arms, making rides uncomfortable.
3. What Tools Do I Need for a DIY Bike Fit?
Having the right tools can make the DIY bike fitting process easier and more accurate. Here are some essential tools to consider:
3.1 Essential Bike Fitting Tools
- Allen Wrench Set: For adjusting bolts on cleats, saddle, and handlebars.
- Tape Measure: To measure saddle height, reach, and other critical dimensions.
- Bubble Level or Smartphone App: To measure saddle angle.
- Bike Stand (Optional): To hold the bike steady while making adjustments.
3.2 Additional Useful Tools
- Plumb Bob: To ensure the knee is aligned over the pedal spindle.
- Mirror: To observe your riding posture while on the bike.
- Grease: To lubricate bolts and prevent them from seizing.
4. How Do I Fine-Tune My Bike Fit?
Achieving the perfect bike fit often requires fine-tuning over time. Pay attention to how your body feels during and after rides, and make small adjustments as needed.
4.1 Listening to Your Body
- Pay Attention to Pain: Note any areas of discomfort or pain that develop during or after rides.
- Experiment with Small Adjustments: Make small changes to saddle height, position, or handlebar angle, and see how they affect your comfort.
- Keep a Log: Track your adjustments and their impact on your riding experience.
4.2 Common Issues and Solutions
- Knee Pain: Adjust saddle height or fore-aft position.
- Lower Back Pain: Adjust handlebar height or reach.
- Numbness in Hands: Adjust handlebar angle or position.
- Saddle Discomfort: Experiment with different saddle models or angles.
5. What Are the Key Considerations for Different Types of Bikes?
The ideal bike fit can vary depending on the type of bike you ride. Road bikes, mountain bikes, and hybrid bikes each have unique characteristics that require specific fitting considerations.
5.1 Road Bike Fitting
Road bikes are designed for speed and efficiency on paved surfaces. A proper road bike fit prioritizes aerodynamics and power output.
- Aggressive Position: Lower handlebar height and longer reach for an aerodynamic posture.
- High Saddle Height: For efficient pedaling and power transfer.
- Cleat Position: Precise cleat alignment to maximize power and minimize knee strain.
5.2 Mountain Bike Fitting
Mountain bikes are built for off-road riding, requiring a more upright and controlled position.
- Upright Position: Higher handlebar height for better control and comfort on rough terrain.
- Saddle Height: Slightly lower saddle height for increased maneuverability.
- Suspension Setup: Properly tuned suspension to absorb shocks and maintain traction.
5.3 Hybrid Bike Fitting
Hybrid bikes combine features of road and mountain bikes, making them versatile for various riding conditions.
- Moderate Position: A balance between road and mountain bike positions, with a moderate handlebar height and reach.
- Comfortable Saddle: A wider, more cushioned saddle for comfortable riding on various surfaces.
- Adjustable Components: Adjustable stem and handlebars to fine-tune the fit for your preferences.
6. What Are the Common Mistakes to Avoid During a Bike Fit?
Several common mistakes can hinder your bike fitting efforts. Avoiding these pitfalls can help you achieve a more comfortable and efficient riding position.
6.1 Common Bike Fitting Mistakes
- Ignoring Cleat Alignment: Neglecting proper cleat alignment can lead to knee pain and inefficient pedaling.
- Setting Saddle Height Too High or Too Low: Incorrect saddle height can cause knee pain, hip discomfort, and reduced power output.
- Overreaching or Underreaching: Incorrect reach can lead to back pain, neck pain, and numbness in hands.
- Ignoring Saddle Angle: Incorrect saddle angle can cause discomfort and pressure sores.
- Making Too Many Adjustments at Once: Making multiple adjustments simultaneously can make it difficult to identify the cause of any discomfort.
- Not Seeking Professional Help When Needed: If you’re struggling to achieve a comfortable and efficient fit on your own, consider seeking help from a professional bike fitter.
6.2 Tips for Avoiding Mistakes
- Start with the Basics: Focus on the fundamental adjustments first, such as saddle height and cleat alignment.
- Make Small Adjustments: Make small, incremental changes and assess their impact before making further adjustments.
- Ride After Each Adjustment: Test your bike fit by riding for at least 30 minutes after each adjustment.
- Keep a Record: Document your adjustments and their impact on your riding experience.
- Seek Expert Advice: Don’t hesitate to seek advice from experienced cyclists or professional bike fitters.
7. How Does Bike Fitting Impact Performance and Injury Prevention?
Proper bike fitting is essential for both optimizing performance and preventing common cycling injuries. A well-fitted bike ensures that your body is in the most efficient and comfortable position, allowing you to ride faster and further with less strain.
7.1 Enhancing Performance
- Increased Power Output: A proper bike fit allows you to generate more power with each pedal stroke.
- Improved Efficiency: By minimizing unnecessary movements and strain, you can ride more efficiently and conserve energy.
- Enhanced Aerodynamics: An aggressive road bike fit can reduce wind resistance and improve your aerodynamic profile.
- Better Endurance: A comfortable and efficient riding position allows you to ride for longer periods without fatigue.
7.2 Preventing Injuries
- Reduced Knee Strain: Proper saddle height and cleat alignment can minimize stress on your knees.
- Lower Back Pain Relief: Adjusting handlebar height and reach can alleviate lower back pain.
- Numbness Prevention: Proper handlebar angle and position can prevent numbness in your hands and fingers.
- Saddle Sore Prevention: Choosing the right saddle and adjusting its angle can prevent saddle sores and discomfort.
8. What Are the Latest Trends in Bike Fitting Technology?
Bike fitting technology is constantly evolving, with new tools and techniques emerging to provide more precise and personalized fits.
8.1 3D Motion Capture
3D motion capture systems use infrared cameras and sensors to track your body’s movements while you ride. This technology provides real-time data on joint angles, power output, and other critical metrics, allowing for precise adjustments to your bike fit.
8.2 Pressure Mapping
Pressure mapping technology uses sensors embedded in the saddle and handlebars to measure pressure distribution. This data helps bike fitters identify areas of excessive pressure and make adjustments to improve comfort and prevent saddle sores or numbness.
8.3 Dynamic Bike Fitting
Dynamic bike fitting involves making adjustments while you are actively pedaling on a stationary bike. This approach allows bike fitters to observe your body’s movements in real-time and make adjustments based on your actual riding posture.
9. How Does Bike Fitting Relate to Bike Ergonomics?
Bike fitting is closely related to bike ergonomics, which focuses on designing bikes and components that optimize comfort, efficiency, and safety.
9.1 Principles of Bike Ergonomics
- Neutral Posture: Maintaining a neutral spine and joint alignment to minimize strain.
- Proper Reach: Ensuring that the reach to the handlebars is comfortable and does not cause excessive stretching or hunching.
- Optimal Saddle Position: Positioning the saddle to support the rider’s weight and allow for efficient pedaling.
- Comfortable Contact Points: Selecting saddles, handlebars, and pedals that provide comfortable contact points and minimize pressure.
9.2 Applying Ergonomic Principles to Bike Fitting
- Assessing Body Measurements: Taking accurate body measurements to determine the appropriate frame size and component dimensions.
- Observing Riding Posture: Analyzing the rider’s posture while on the bike to identify areas of misalignment or strain.
- Making Adjustments: Adjusting saddle height, position, handlebar height, reach, and angle to achieve a comfortable and efficient riding position.
- Selecting Components: Choosing saddles, handlebars, stems, and other components that are ergonomically designed to enhance comfort and performance.
10. How Can I Find a Professional Bike Fitter?
If you’re serious about optimizing your bike fit, consider seeking help from a professional bike fitter. Here are some tips for finding a qualified professional:
10.1 Finding a Qualified Bike Fitter
- Check Certifications: Look for bike fitters who have certifications from reputable organizations such as the International Bike Fitting Institute (IBFI) or Retül.
- Read Reviews: Check online reviews and testimonials to get an idea of the bike fitter’s expertise and customer service.
- Ask for Referrals: Ask friends, cycling clubs, or local bike shops for referrals to experienced bike fitters.
- Inquire About Experience: Ask the bike fitter about their experience working with riders of your type and riding style.
- Consider Technology: Determine if the bike fitter uses advanced technology such as 3D motion capture or pressure mapping.
- Discuss Goals: Discuss your goals and concerns with the bike fitter to ensure they understand your needs.
10.2 What to Expect During a Professional Bike Fit
- Assessment: The bike fitter will start by assessing your body measurements, flexibility, and riding history.
- On-Bike Observation: You’ll ride on a stationary bike while the fitter observes your posture and pedaling technique.
- Adjustments: The fitter will make adjustments to your saddle height, position, handlebar height, reach, and angle based on their observations.
- Follow-Up: The fitter may schedule a follow-up appointment to fine-tune the fit and address any remaining issues.
Remember, achieving the perfect bike fit is an ongoing process. Stay attentive to your body and make adjustments as needed to ensure optimal comfort and performance.
Ready to take your riding experience to the next level? Visit usabikers.net for more in-depth articles, reviews, and a vibrant community of fellow motorcycle enthusiasts. Whether you’re seeking advice on the latest gear, planning your next road trip, or simply looking to connect with like-minded individuals, usabikers.net is your ultimate resource.
For any questions or further assistance, feel free to contact us at:
- Address: 801 Sturgis Main St, Sturgis, SD 57785, United States
- Phone: +1 (605) 347-2000
- Website: usabikers.net
FAQ Section: Your Questions Answered on Bike Fitting
1. What is the ideal saddle height for optimal pedaling efficiency?
The ideal saddle height allows for a slight bend in your knee at the bottom of the pedal stroke, maximizing power output and comfort.
2. How often should I get a professional bike fit?
Consider a professional bike fit every few years, or whenever you experience significant changes in your body or riding style.
3. Can proper bike fitting help with knee pain?
Yes, proper bike fitting, especially adjusting saddle height and cleat position, can significantly reduce knee strain and alleviate pain.
4. What is the best way to measure my inseam for bike fitting?
Stand against a wall with shoes on, place a book between your legs, and measure from the top of the book to the floor for an accurate inseam measurement.
5. How do I know if my handlebars are at the right height?
Your handlebars are at the right height if you can comfortably reach them without excessive stretching or hunching, maintaining a relaxed posture.
6. What type of saddle is best for long-distance riding?
A saddle with gel padding, a cutout design, and proper width to support your sit bones is ideal for long-distance riding comfort.
7. Can cleat position affect my ankle stability?
Yes, cleat position affects ankle stability; proper alignment ensures your foot is stable throughout the pedal stroke, reducing strain.
8. How does bike fitting improve my overall cycling performance?
Bike fitting improves cycling performance by optimizing your body position, enhancing power output, and minimizing energy wasted on inefficient movements.
9. What are the signs that my bike is not properly fitted?
Signs of an improperly fitted bike include knee pain, lower back pain, numbness in hands, saddle sores, and general discomfort during and after rides.
10. Is a dynamic bike fit better than a static bike fit?
A dynamic bike fit is often considered superior as it assesses your riding posture in motion, allowing for more precise and personalized adjustments compared to a static fit.