
Are you scratching your head, wondering how to accurately measure your BMX bike frame? This comprehensive guide on usabikers.net will walk you through the process, ensuring you get the perfect fit for optimal performance and comfort. We’ll cover everything from top tube length to head tube angles, helping you understand the critical dimensions that impact your ride. Discover how to choose the right frame size and geometry for your riding style, boosting your confidence on the track or in the streets with custom BMX builds, frame geometry, and rider ergonomics.
1. Why Is Measuring Your BMX Bike Frame Important?
Measuring your BMX bike frame is essential because the frame’s size and geometry significantly impact your riding experience. The correct frame size enhances comfort, control, and performance. According to the American Motorcyclist Association (AMA), proper bike fit is crucial for rider safety and efficiency. An ill-fitting frame can lead to discomfort, reduced control, and even injuries. Let’s explore the critical aspects of measuring your BMX frame.
1.1. Enhancing Comfort and Control
The right frame size allows you to maintain a comfortable riding posture, reducing strain on your back, arms, and legs. This is particularly important for long riding sessions or intense tricks. A well-fitted frame also provides better control over the bike, enabling you to execute maneuvers with precision and confidence.
1.2. Improving Performance
The geometry of the frame influences how the bike handles and responds to your movements. By understanding the measurements, you can select a frame that complements your riding style, whether you’re into racing, freestyle, or dirt jumping. A frame that fits well maximizes your power output and efficiency, allowing you to ride faster and perform better.
1.3. Preventing Injuries
Riding a bike with an improper frame size can lead to overuse injuries and discomfort. A frame that is too small can cause you to feel cramped and limit your range of motion, while a frame that is too large can be difficult to control and maneuver. By measuring your frame and selecting the appropriate size, you can reduce the risk of strains, sprains, and other injuries.
2. Key Measurements to Consider
When measuring a BMX bike frame, several key dimensions play a critical role in determining its suitability for your needs. These include the top tube length, head tube angle, seat tube angle, chainstay length, and bottom bracket height. Understanding these measurements will help you make an informed decision when selecting a frame.
2.1. Top Tube Length: The Most Important Measurement
The top tube length is arguably the most critical measurement of a BMX frame. It determines the overall reach of the bike and affects your riding posture. The top tube length is measured from the center of the head tube to the center of the seat tube.
2.1.1. How to Measure Top Tube Length
- Tools Needed: Measuring tape or ruler
- Start Point: Center of the head tube
- End Point: Center of the seat tube
- Measurement: Record the distance in inches
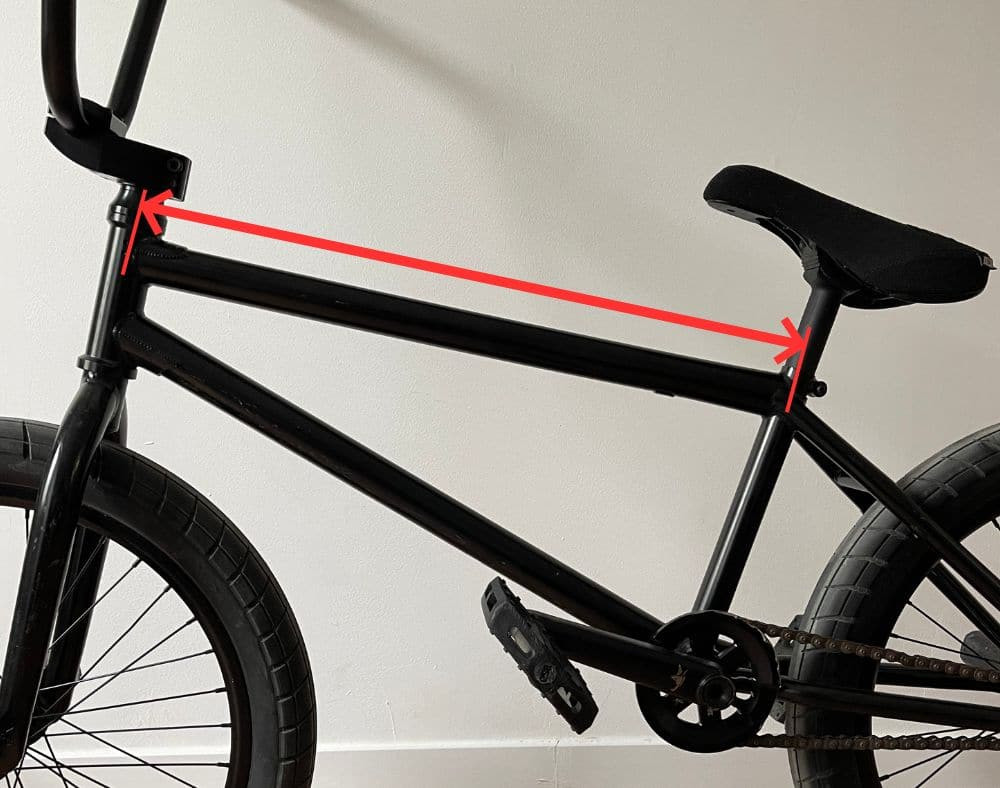 Measuring BMX Top Tube Length
2.1.2. Impact on Riding
- Shorter Top Tube: Suitable for younger riders or those who prefer a more compact and maneuverable bike.
- Longer Top Tube: Ideal for taller riders or those who want more stability and room to move around.
According to a study by the Bicycle Research Institute, the top tube length should be proportional to the rider’s torso length for optimal comfort and control.
2.2. Head Tube Angle: Affecting Steering Response
The head tube angle is the angle formed by the head tube and the ground. It affects the steering response and stability of the bike. A steeper head tube angle results in quicker steering, while a slacker angle provides more stability.
2.2.1. How to Measure Head Tube Angle
- Tools Needed: Protractor or angle finder
- Reference Point: Horizontal plane
- Measurement: Measure the angle between the head tube and the horizontal plane in degrees.
2.2.2. Impact on Riding
- Steeper Angle (e.g., 75 degrees): Quicker, more responsive steering, ideal for technical riding and tricks.
- Slacker Angle (e.g., 74 degrees): More stable steering, better for high-speed riding and jumps.
2.3. Seat Tube Angle: Influence on Pedaling Efficiency
The seat tube angle is the angle formed by the seat tube and the ground. It affects your pedaling efficiency and riding posture. A steeper seat tube angle positions you more forward, improving power transfer, while a slacker angle provides a more relaxed riding position.
2.3.1. How to Measure Seat Tube Angle
- Tools Needed: Protractor or angle finder
- Reference Point: Horizontal plane
- Measurement: Measure the angle between the seat tube and the horizontal plane in degrees.
2.3.2. Impact on Riding
- Steeper Angle (e.g., 71 degrees): More aggressive pedaling position, ideal for racing and efficient power transfer.
- Slacker Angle (e.g., 70 degrees): More relaxed position, suitable for cruising and comfortable riding.
2.4. Chainstay Length: Handling and Stability
The chainstay length is the distance between the center of the bottom bracket and the center of the rear axle. It affects the bike’s handling and stability. Shorter chainstays make the bike more maneuverable, while longer chainstays provide more stability.
2.4.1. How to Measure Chainstay Length
- Tools Needed: Measuring tape or ruler
- Start Point: Center of the bottom bracket
- End Point: Center of the rear axle
- Measurement: Record the distance in inches.
2.4.2. Impact on Riding
- Shorter Chainstays: More responsive and easier to manual, ideal for street and park riding.
- Longer Chainstays: More stable at high speeds and better for trails and racing.
2.5. Bottom Bracket Height: Ground Clearance
The bottom bracket height is the distance between the ground and the center of the bottom bracket. It affects the bike’s ground clearance and stability. A higher bottom bracket provides more clearance for obstacles, while a lower bottom bracket offers more stability.
2.5.1. How to Measure Bottom Bracket Height
- Tools Needed: Measuring tape or ruler
- Reference Point: Ground
- End Point: Center of the bottom bracket
- Measurement: Record the distance in inches.
2.5.2. Impact on Riding
- Higher Bottom Bracket: More clearance for grinds and obstacles, suitable for street and park riding.
- Lower Bottom Bracket: More stable for high-speed riding and jumps, better for trails and racing.
3. Tools You’ll Need for Accurate Measurements
To accurately measure your BMX bike frame, you’ll need a few essential tools. These tools will help you obtain precise measurements and ensure that you select the correct frame size and geometry for your needs.
3.1. Measuring Tape or Ruler
A high-quality measuring tape or ruler is essential for measuring the length of the top tube, chainstays, and other frame dimensions. Look for a tape measure that is easy to read and has both inches and millimeters for precise measurements.
3.2. Protractor or Angle Finder
A protractor or angle finder is necessary for measuring the head tube angle and seat tube angle. Digital angle finders are particularly useful as they provide accurate and easy-to-read measurements.
3.3. Level
A level is helpful for ensuring that the bike is on a level surface when measuring angles and heights. This will help you obtain more accurate measurements and avoid errors.
3.4. Straight Edge
A straight edge, such as a long ruler or a piece of wood, can be used to extend the lines of the head tube and seat tube for more accurate angle measurements.
4. Step-by-Step Guide to Measuring Your BMX Frame
Now that you have the necessary tools, let’s walk through the step-by-step process of measuring your BMX frame.
4.1. Preparing Your Bike
- Clean the Bike: Wipe down the frame to remove any dirt or debris that could interfere with accurate measurements.
- Position the Bike: Place the bike on a level surface, ensuring it is stable and upright.
- Remove Obstacles: Remove any accessories or components that could obstruct your measurements, such as cables or reflectors.
4.2. Measuring the Top Tube Length
- Locate the Head Tube Center: Identify the center point of the head tube.
- Locate the Seat Tube Center: Identify the center point of the seat tube.
- Measure the Distance: Use a measuring tape or ruler to measure the distance between these two points.
- Record the Measurement: Note the measurement in inches or millimeters.
4.3. Measuring the Head Tube Angle
- Position the Angle Finder: Place the angle finder against the head tube.
- Align with the Horizontal: Ensure the horizontal reference of the angle finder is level.
- Read the Angle: Read the angle measurement displayed on the angle finder.
- Record the Measurement: Note the angle in degrees.
4.4. Measuring the Seat Tube Angle
- Position the Angle Finder: Place the angle finder against the seat tube.
- Align with the Horizontal: Ensure the horizontal reference of the angle finder is level.
- Read the Angle: Read the angle measurement displayed on the angle finder.
- Record the Measurement: Note the angle in degrees.
4.5. Measuring the Chainstay Length
- Locate the Bottom Bracket Center: Identify the center point of the bottom bracket.
- Locate the Rear Axle Center: Identify the center point of the rear axle.
- Measure the Distance: Use a measuring tape or ruler to measure the distance between these two points.
- Record the Measurement: Note the measurement in inches or millimeters.
4.6. Measuring the Bottom Bracket Height
- Position the Measuring Tape: Place the measuring tape on the ground directly below the bottom bracket.
- Measure the Distance: Measure the distance from the ground to the center of the bottom bracket.
- Record the Measurement: Note the measurement in inches or millimeters.
5. Understanding BMX Frame Geometry Charts
BMX frame geometry charts provide a comprehensive overview of the frame’s dimensions and angles. These charts are essential for comparing different frames and selecting one that matches your riding style and preferences.
5.1. Key Elements of a Geometry Chart
- Top Tube Length: The effective length of the top tube, measured horizontally.
- Head Tube Angle: The angle of the head tube relative to the ground.
- Seat Tube Angle: The angle of the seat tube relative to the ground.
- Chainstay Length: The distance between the bottom bracket and the rear axle.
- Bottom Bracket Height: The vertical distance from the ground to the bottom bracket.
- Standover Height: The distance from the ground to the top of the top tube at the midpoint.
5.2. How to Read a Geometry Chart
- Identify Your Needs: Determine the frame characteristics that are most important to you, such as stability, maneuverability, or ground clearance.
- Compare Measurements: Compare the measurements of different frames to see how they align with your needs.
- Consider Your Riding Style: Choose a frame with geometry that complements your riding style, whether you’re into racing, freestyle, or dirt jumping.
5.3. Examples of Geometry Charts
| Measurement | Frame A | Frame B | Frame C |
|---|---|---|---|
| Top Tube Length | 20.5″ | 21″ | 21.5″ |
| Head Tube Angle | 75° | 75.5° | 74.5° |
| Seat Tube Angle | 71° | 70° | 70.5° |
| Chainstay Length | 13″ | 13.2″ | 13.5″ |
| Bottom Bracket Height | 11.5″ | 11.75″ | 12″ |
6. Choosing the Right Frame Size for Your Height
Selecting the correct frame size based on your height is crucial for ensuring a comfortable and efficient riding experience. Here’s a general guideline for choosing the right frame size:
| Rider Height | Top Tube Length |
|---|---|
| 4’8″ – 5’2″ | 18.5″ – 20″ |
| 5’2″ – 5’6″ | 20.25″ |
| 5’6″ – 5’10” | 20.5″ – 20.75″ |
| 5’10” – 6’2″ | 21″ |
| 6’2″ and Taller | 21.25″ and Longer |
6.1. Factors to Consider
- Riding Style: If you prefer technical riding and tricks, you may want a shorter top tube for more maneuverability. If you prefer high-speed riding and jumps, you may want a longer top tube for more stability.
- Personal Preference: Ultimately, the best frame size is the one that feels most comfortable and natural to you. Consider trying out different frame sizes to see which one you prefer.
6.2. Adjusting Components
If you’re between sizes, you can adjust components such as the seat height, handlebar position, and stem length to fine-tune the fit of the bike.
7. How Frame Geometry Affects Riding Style
The geometry of a BMX frame plays a significant role in determining its suitability for different riding styles. Understanding how various geometry elements affect handling and performance can help you choose a frame that aligns with your specific needs.
7.1. Street Riding
Street riders typically prefer frames with shorter chainstays and higher bottom brackets, which provide more maneuverability and ground clearance for grinds and tricks. Steeper head tube angles also enhance responsiveness for technical maneuvers.
7.2. Park Riding
Park riders often seek a balance between maneuverability and stability. Frames with medium chainstay lengths, slightly lower bottom brackets, and steeper head tube angles offer the versatility needed for performing a variety of tricks and transitions.
7.3. Dirt Jumping
Dirt jumpers prioritize stability and control at high speeds. Frames with longer chainstays, lower bottom brackets, and slacker head tube angles provide the stability needed for landing jumps and maintaining control on uneven terrain.
7.4. Racing
Racers require frames that maximize pedaling efficiency and stability. Frames with longer top tubes, steeper seat tube angles, and longer chainstays provide the power transfer and stability needed for sprinting and maintaining speed on the track.
8. Tips for Achieving the Perfect BMX Bike Fit
Achieving the perfect BMX bike fit involves more than just measuring the frame. It also requires adjusting components and considering your personal preferences. Here are some tips for optimizing your bike fit:
8.1. Adjusting Seat Height
The seat height should be adjusted to allow for a slight bend in your knee when the pedal is at its lowest point. This will maximize pedaling efficiency and reduce strain on your joints.
8.2. Adjusting Handlebar Position
The handlebar position should be adjusted to allow for a comfortable reach and a neutral wrist angle. This will improve control and reduce fatigue in your hands and arms.
8.3. Choosing the Right Stem Length
The stem length affects your reach to the handlebars. Shorter stems provide quicker steering, while longer stems offer more stability. Experiment with different stem lengths to find the one that feels most comfortable and natural to you.
8.4. Fine-Tuning Component Placement
Small adjustments to the placement of components such as the brakes, levers, and grips can significantly impact your comfort and control. Take the time to fine-tune these adjustments to achieve the perfect fit.
9. Common Mistakes to Avoid When Measuring
Measuring a BMX frame can be tricky, and it’s easy to make mistakes that can lead to inaccurate results. Here are some common mistakes to avoid:
9.1. Not Using the Right Tools
Using inadequate or inaccurate tools can result in incorrect measurements. Always use high-quality measuring tapes, protractors, and levels to ensure accuracy.
9.2. Measuring on an Uneven Surface
Measuring the bike on an uneven surface can skew the results, particularly when measuring angles and heights. Always measure the bike on a level surface to ensure accurate measurements.
9.3. Not Calibrating Tools
Failing to calibrate tools such as angle finders and measuring tapes can lead to inaccurate measurements. Always calibrate your tools before use to ensure they are providing accurate readings.
9.4. Neglecting to Double-Check Measurements
It’s always a good idea to double-check your measurements to ensure accuracy. Measure each dimension multiple times and compare the results to identify any discrepancies.
10. Resources for Further Learning
To deepen your understanding of BMX frame geometry and bike fit, consider exploring these resources:
10.1. Online Forums and Communities
Online forums and communities dedicated to BMX riding are excellent resources for learning from experienced riders and experts. These platforms often feature discussions, tutorials, and advice on bike fit and frame geometry.
10.2. BMX Riding Clubs and Organizations
Joining a BMX riding club or organization can provide access to workshops, clinics, and group rides where you can learn about bike fit and frame geometry from experienced riders and coaches.
10.3. usabikers.net Articles and Guides
usabikers.net offers a wealth of articles and guides on BMX riding, bike maintenance, and gear selection. Explore these resources to deepen your knowledge and improve your riding skills.
<a href="https://usabikers.net">Visit usabikers.net for more information and to connect with a community of fellow BMX enthusiasts.</a>10.4. Professional Bike Fitters
Consider consulting a professional bike fitter who can assess your riding style, body measurements, and preferences to recommend the ideal frame size and geometry for your needs.
FAQ: Measuring a BMX Bike Frame
1. Why is top tube length so important in BMX?
The top tube length determines the reach of the bike, affecting comfort and control. Shorter lengths enhance maneuverability, while longer lengths provide stability.
2. What tools do I need to measure a BMX frame accurately?
You’ll need a measuring tape, protractor or angle finder, a level, and a straight edge for accurate measurements.
3. How does head tube angle affect BMX bike handling?
A steeper head tube angle results in quicker steering, ideal for technical riding, while a slacker angle provides more stability for high-speed riding.
4. What is chainstay length and why does it matter?
Chainstay length is the distance between the bottom bracket and rear axle, affecting handling. Shorter chainstays make the bike more maneuverable, while longer ones provide stability.
5. How does bottom bracket height influence BMX riding?
Higher bottom brackets offer more ground clearance for grinds, while lower ones provide greater stability for high-speed riding and jumps.
6. Can I adjust components to compensate for a slightly wrong frame size?
Yes, adjusting seat height, handlebar position, and stem length can fine-tune the fit of the bike if you’re between sizes.
7. What are common mistakes to avoid when measuring a BMX frame?
Avoid using incorrect tools, measuring on an uneven surface, not calibrating tools, and neglecting to double-check measurements.
8. Where can I find reliable BMX frame geometry charts?
Reliable charts can be found on manufacturer websites, BMX-specific forums, and reputable cycling websites like usabikers.net.
9. How does frame geometry affect street, park, and dirt jumping styles?
Street riding benefits from shorter chainstays and higher bottom brackets. Park riding needs a balance, while dirt jumping prefers longer chainstays and slacker head tube angles.
10. Should I consult a professional bike fitter for BMX measurements?
Consulting a professional can be beneficial if you’re unsure or need a customized fit, as they can assess your riding style and body measurements.
By understanding the importance of measuring your BMX bike frame and following the steps outlined in this guide, you can ensure that you select the perfect frame size and geometry for your riding style and preferences. This will enhance your comfort, control, and performance, allowing you to enjoy your BMX riding to the fullest. Remember to explore the resources available on usabikers.net for more information and guidance on all things BMX.
Ready to take your BMX riding to the next level? Visit usabikers.net today to discover a wealth of articles, guides, and community forums dedicated to all things BMX. Connect with fellow riders, learn from experts, and find the perfect gear to suit your needs. Don’t miss out – start your journey to BMX excellence with usabikers.net now Address: 801 Sturgis Main St, Sturgis, SD 57785, United States. Phone: +1 (605) 347-2000. Website: usabikers.net.