If you’re considering purchasing a new bicycle, or perhaps your very first one, grasping the essential measurements that define its frame is crucial. This knowledge ensures you select a bike that not only fits you perfectly but also aligns with your intended style of riding.
Even if you’re planning to rent a bike, understanding your frame’s key dimensions is invaluable. It empowers you to confirm that your rental bike will offer a comfortable and adjustable riding experience.
It’s important to note that bike manufacturers don’t always adhere to uniform frame sizing methods. Therefore, examining a set of fundamental measurements is necessary for a fair comparison between different brands and models.
Continue reading to learn how to accurately measure your road bike or mountain bike frame. This guide will help you secure the correct bike fit and optimize your cycling performance. For a deeper dive into how these measurements influence bike handling, explore our detailed guide on mountain bike geometry. While focused on mountain bikes, the principles and significance of these measurements largely apply to road bikes as well.
We also offer specific guidance on choosing the right frame size for road bikes and mountain bikes, along with tailored advice for selecting women’s bikes.
Essential Bike Geometry Measurements
Before we delve into the methods of measuring your bike frame, let’s familiarize ourselves with the key terms and measurements that define bike geometry:
- Top Tube Length: This is the horizontal distance from the center of the head tube to the center of the seatpost.
- Seat Tube Length: Measured from the center of the bottom bracket to the top of the seat tube.
- Reach: The horizontal distance from the bottom bracket to the top of the head tube.
- Stack: The vertical distance from the bottom bracket to the top of the head tube.
- Wheelbase: The distance between the front and rear axle.
- Chainstay Length: The distance from the bottom bracket to the rear dropout.
- Front Center: The distance from the bottom bracket to the front axle.
- Seat Tube Angle: The angle of the seat tube relative to the ground.
- Head Tube Angle: The angle of the head tube relative to the ground.
- Bottom Bracket Drop: The vertical distance between the wheel axles and the bottom bracket.
- Bottom Bracket Height: The vertical distance from the ground to the bottom bracket.
Tools Needed for Bike Frame Measurement
To accurately measure your bike frame, gather these tools:
- Tape Measure: For linear measurements.
- Clinometer: To measure angles. Smartphone apps are readily available for this purpose.
- Long Spirit Level: Or, utilize a straight piece of wood in conjunction with a clinometer app.
- Plumb Line: Alternatively, you can create one using string and a weight like Blu Tack.
While most modern bikes, whether road or mountain, use metric units (centimeters and millimeters), some manufacturers, particularly for mountain bikes, might still use inches. For consistency and ease of comparison, we recommend using metric units. If you need to convert centimeters to inches, divide by 2.54.
Geometry charts for current bike models are usually available on the manufacturer’s website. If your bike is a recent model, consulting the official geometry chart is advisable for more accurate measurements. These charts serve as a valuable reference point.
Measuring Top Tube Length Accurately
 Demonstration of top tube measurement on a bicycle frame
Historically, bicycles were designed with horizontal top tubes. Today, many bikes feature sloping top tubes. While geometry charts often list the “real” top tube length, a more consistent measurement, regardless of the top tube angle, is the horizontal top tube length, often termed “effective top tube length” or “virtual top tube.”
This measurement represents the horizontal distance between the centerline of the head tube and the centerline of the seatpost. To measure it correctly, utilize your spirit level or clinometer app to ensure your measurement is perfectly horizontal.
Many manufacturers size road bikes based on top tube length. However, mountain bikes are typically sized using S, M, L, etc., designations. Some road bike brands, like Merida, also use this system, offering sizes like S, S/M, M/L, and L.
It’s crucial to recognize that size interpretations can vary significantly between brands. For example, a size-S frame from Ridley might have a top tube length around 54cm, which is equivalent to a size-medium frame in many other brands.
Furthermore, the method of measuring virtual top tube length can also differ among manufacturers. Colnago, for instance, measures the horizontal distance from the head tube to a vertical line projected from the top of the seat tube. This method doesn’t account for the seatpost’s backward projection, resulting in smaller numbers compared to other manufacturers. A 50s Colnago frame is comparable to a 54cm top tube frame from another brand.
Step-by-Step Guide to Measuring Seat Tube Length
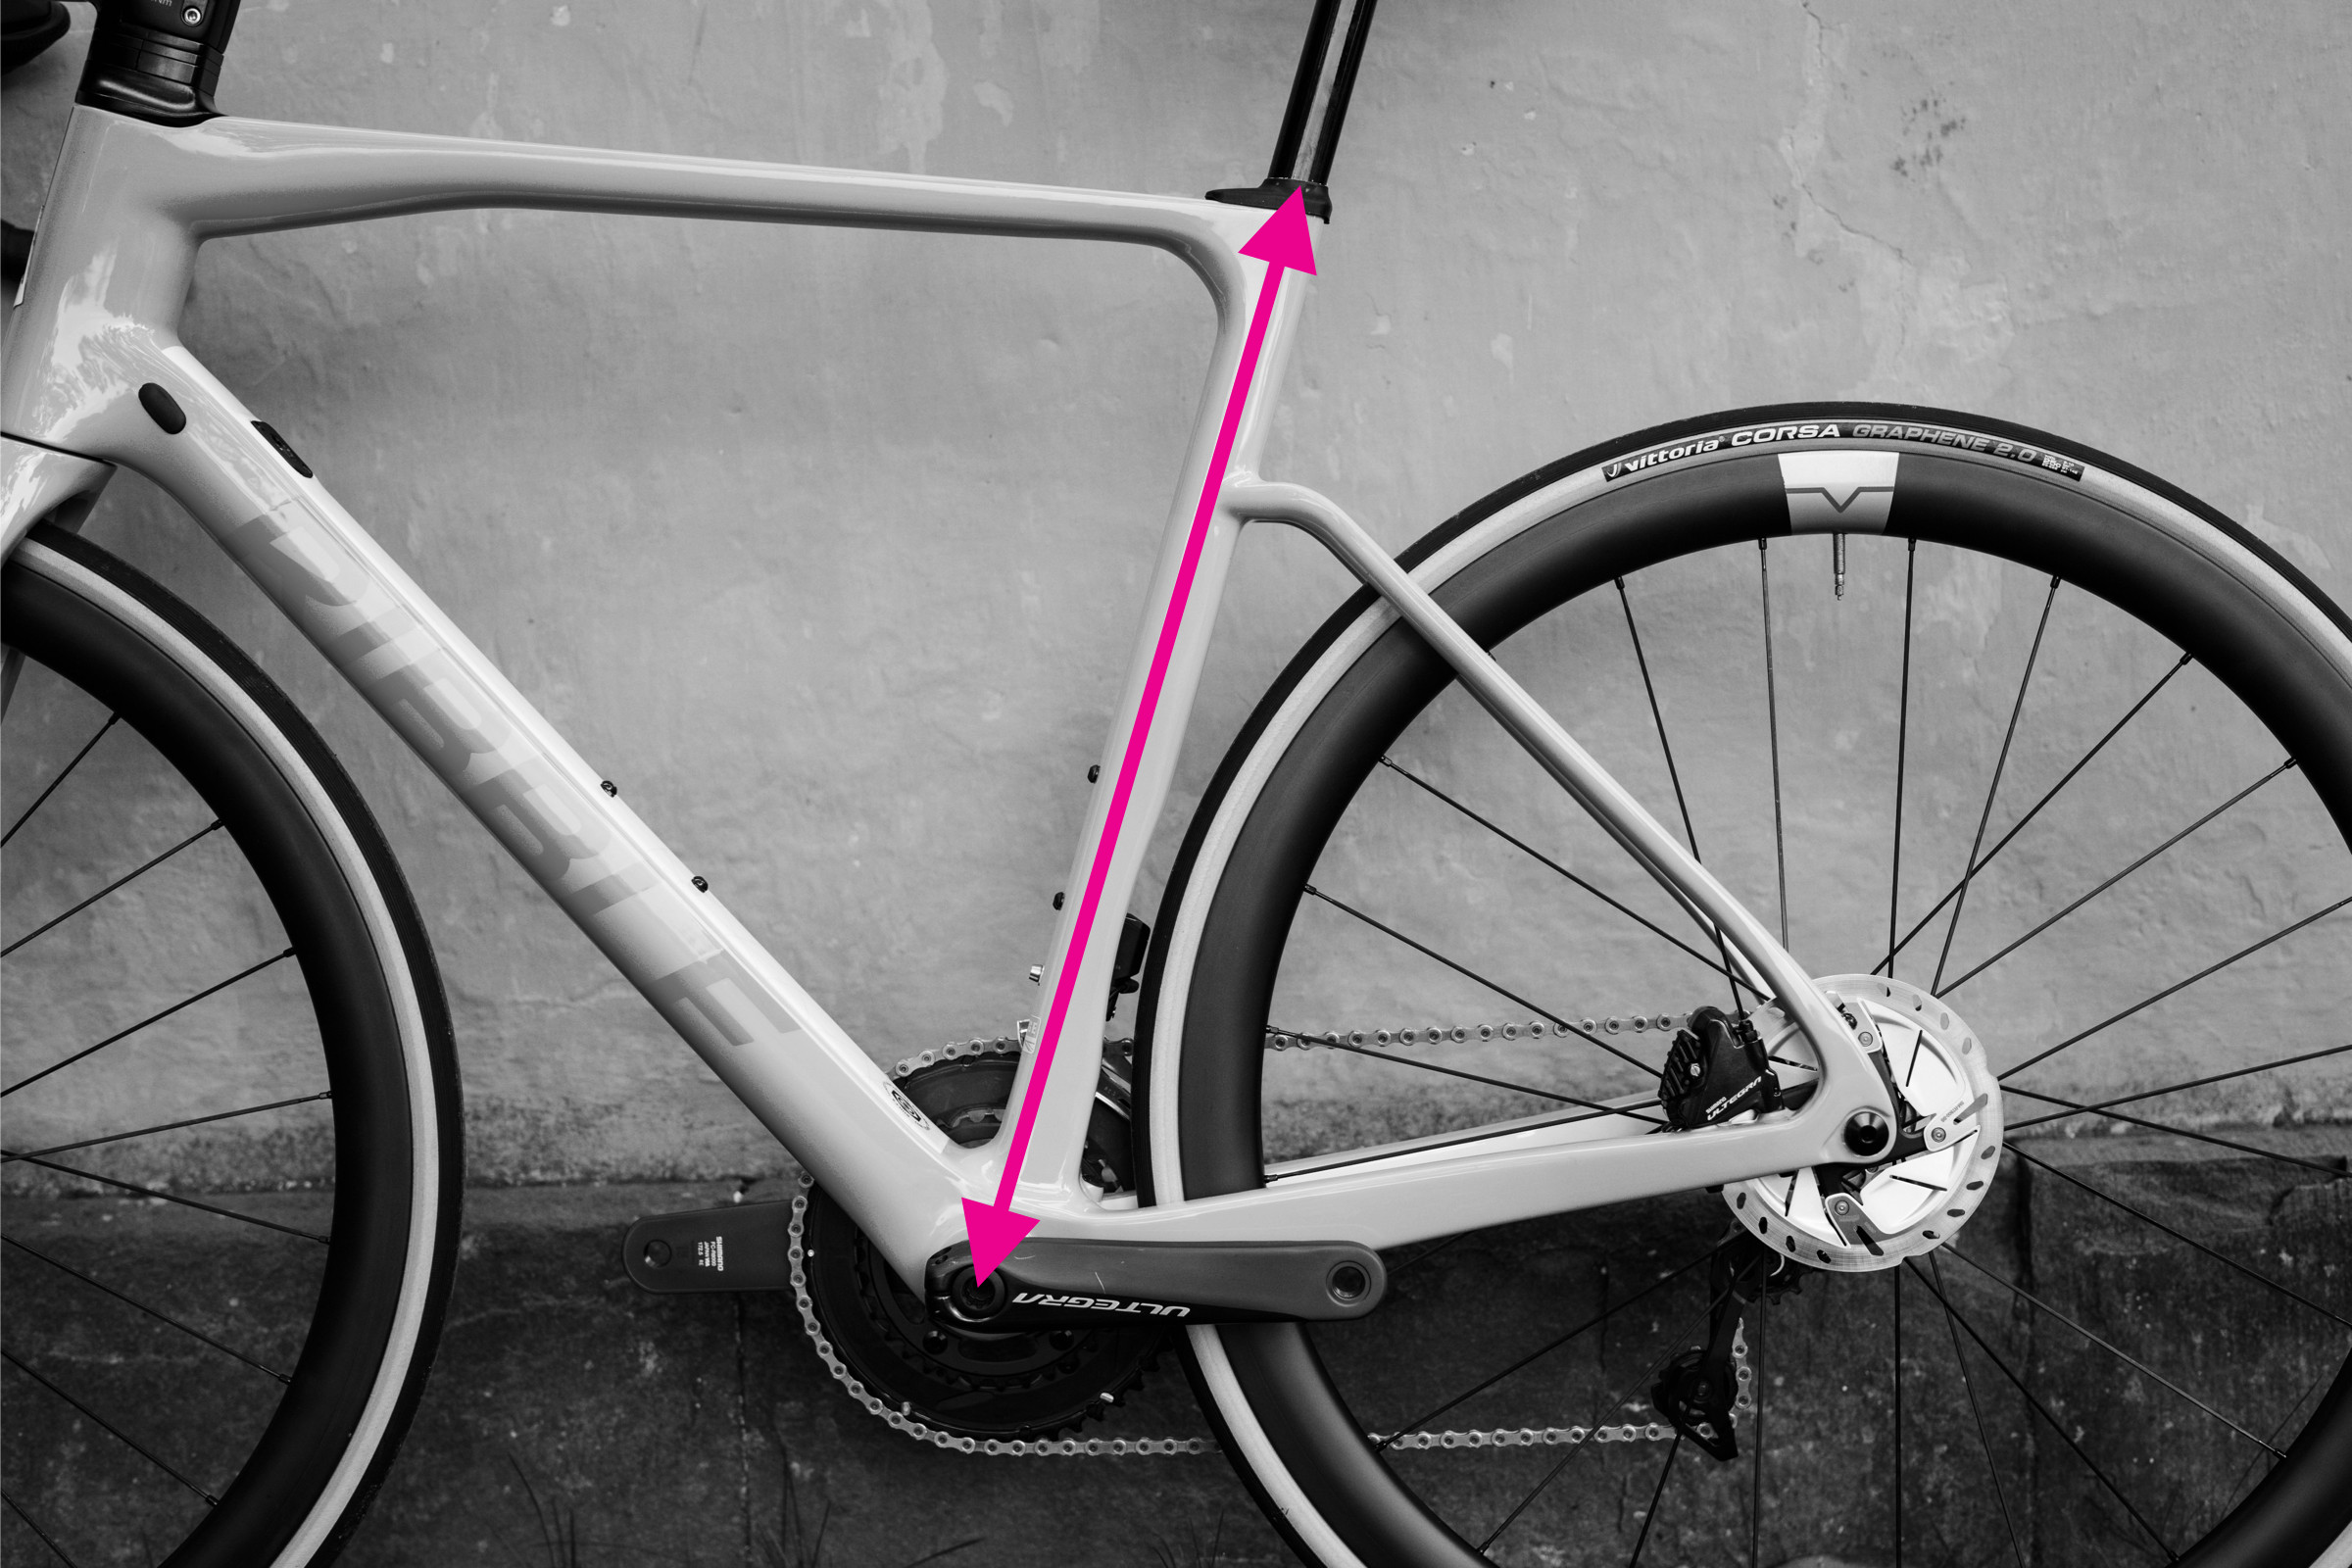 Visual guide to measuring the seat tube length on a bicycle frame
Seat tube length is measured as the straight-line distance from the center of the bottom bracket to the top of the seat tube. However, this measurement can be more complex than it appears. Some bikes, like the Trek Madone, have a seat tube that extends significantly above the top tube junction. Others employ a seatmast design, making direct comparisons challenging.
Moreover, mountain bikes often have a kink in the seat tube. Avoid following the tube’s contour, as this will result in an inaccurate, longer measurement.
To ensure accuracy, align your straight edge from the bottom bracket center to the top of the seat tube and measure along this line if you’re uncertain about the correct path.
Understanding and Measuring Reach and Stack
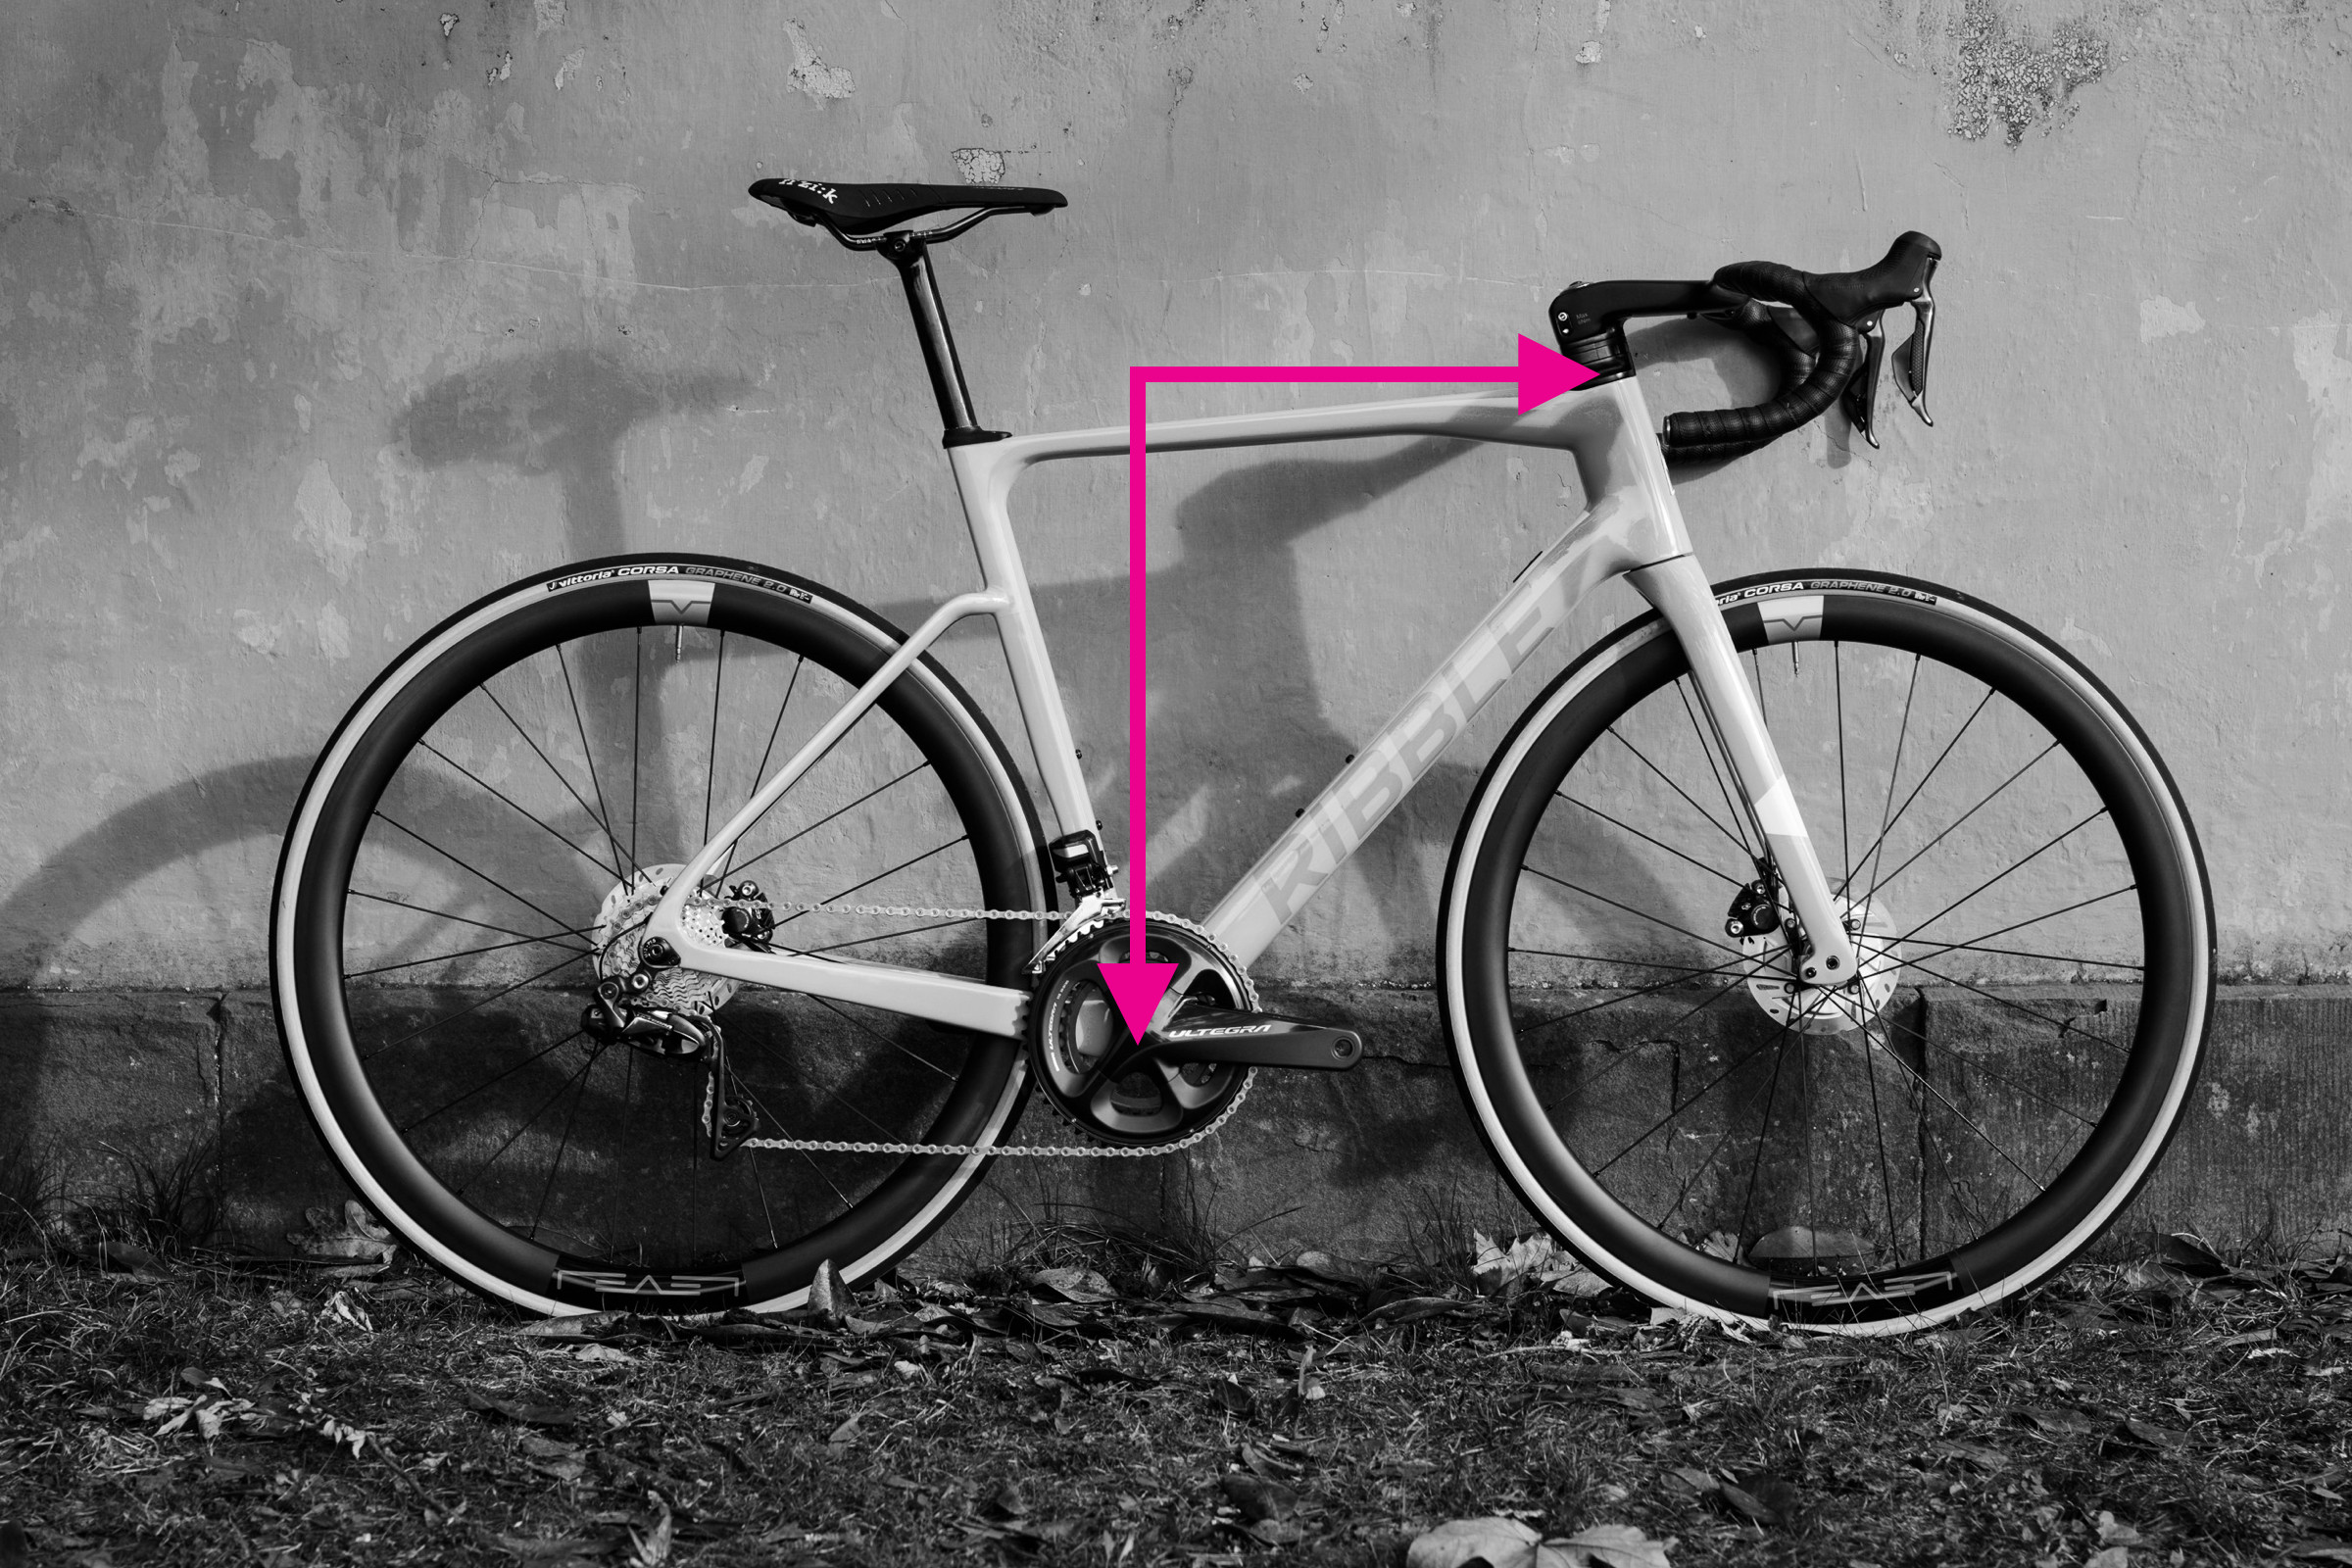 Illustration of stack and reach measurements on a bicycle frame
As we’ve seen, comparing frames based solely on top tube and seat tube lengths can be misleading. For greater consistency, most manufacturers now provide reach and stack values. These measurements are frame design-independent and represent the perpendicular distances between two crucial contact points: the bottom bracket and the top of the head tube.
For a more in-depth explanation of the importance of reach and stack, refer to our article here. In short, reach is the horizontal distance, while stack is the vertical distance between these points.
To measure reach, you’ll need your spirit level and plumb line. Attach the plumb line to the end of the level. If using Blu Tack, ensure it’s symmetrically shaped for an accurate vertical line. Align the top edge of the level with the centerline of the top of the head tube. Adjust the level until the plumb line intersects with the center of the bottom bracket spindle. Measure the horizontal distance from the plumb line’s top to the head tube to obtain your reach.
Alternatively, you can position your bike against a wall, measure the horizontal distance from the wall to the top of the head tube and then to the bottom bracket, and subtract the latter from the former. Ensure your measurements are horizontal.
Once set up to measure reach, you can also measure stack. Stack is the vertical distance between the bottom bracket and the top of the head tube, measured along the plumb line. Another method is to measure the vertical distance from the ground to the top of your head tube and subtract the height of your bottom bracket from the ground.
Measuring reach and stack can be tricky and might require a second person to assist with the plumb line method. Repeating the measurements is advisable to ensure consistency and accuracy.
Measuring Wheelbase for Bike Stability
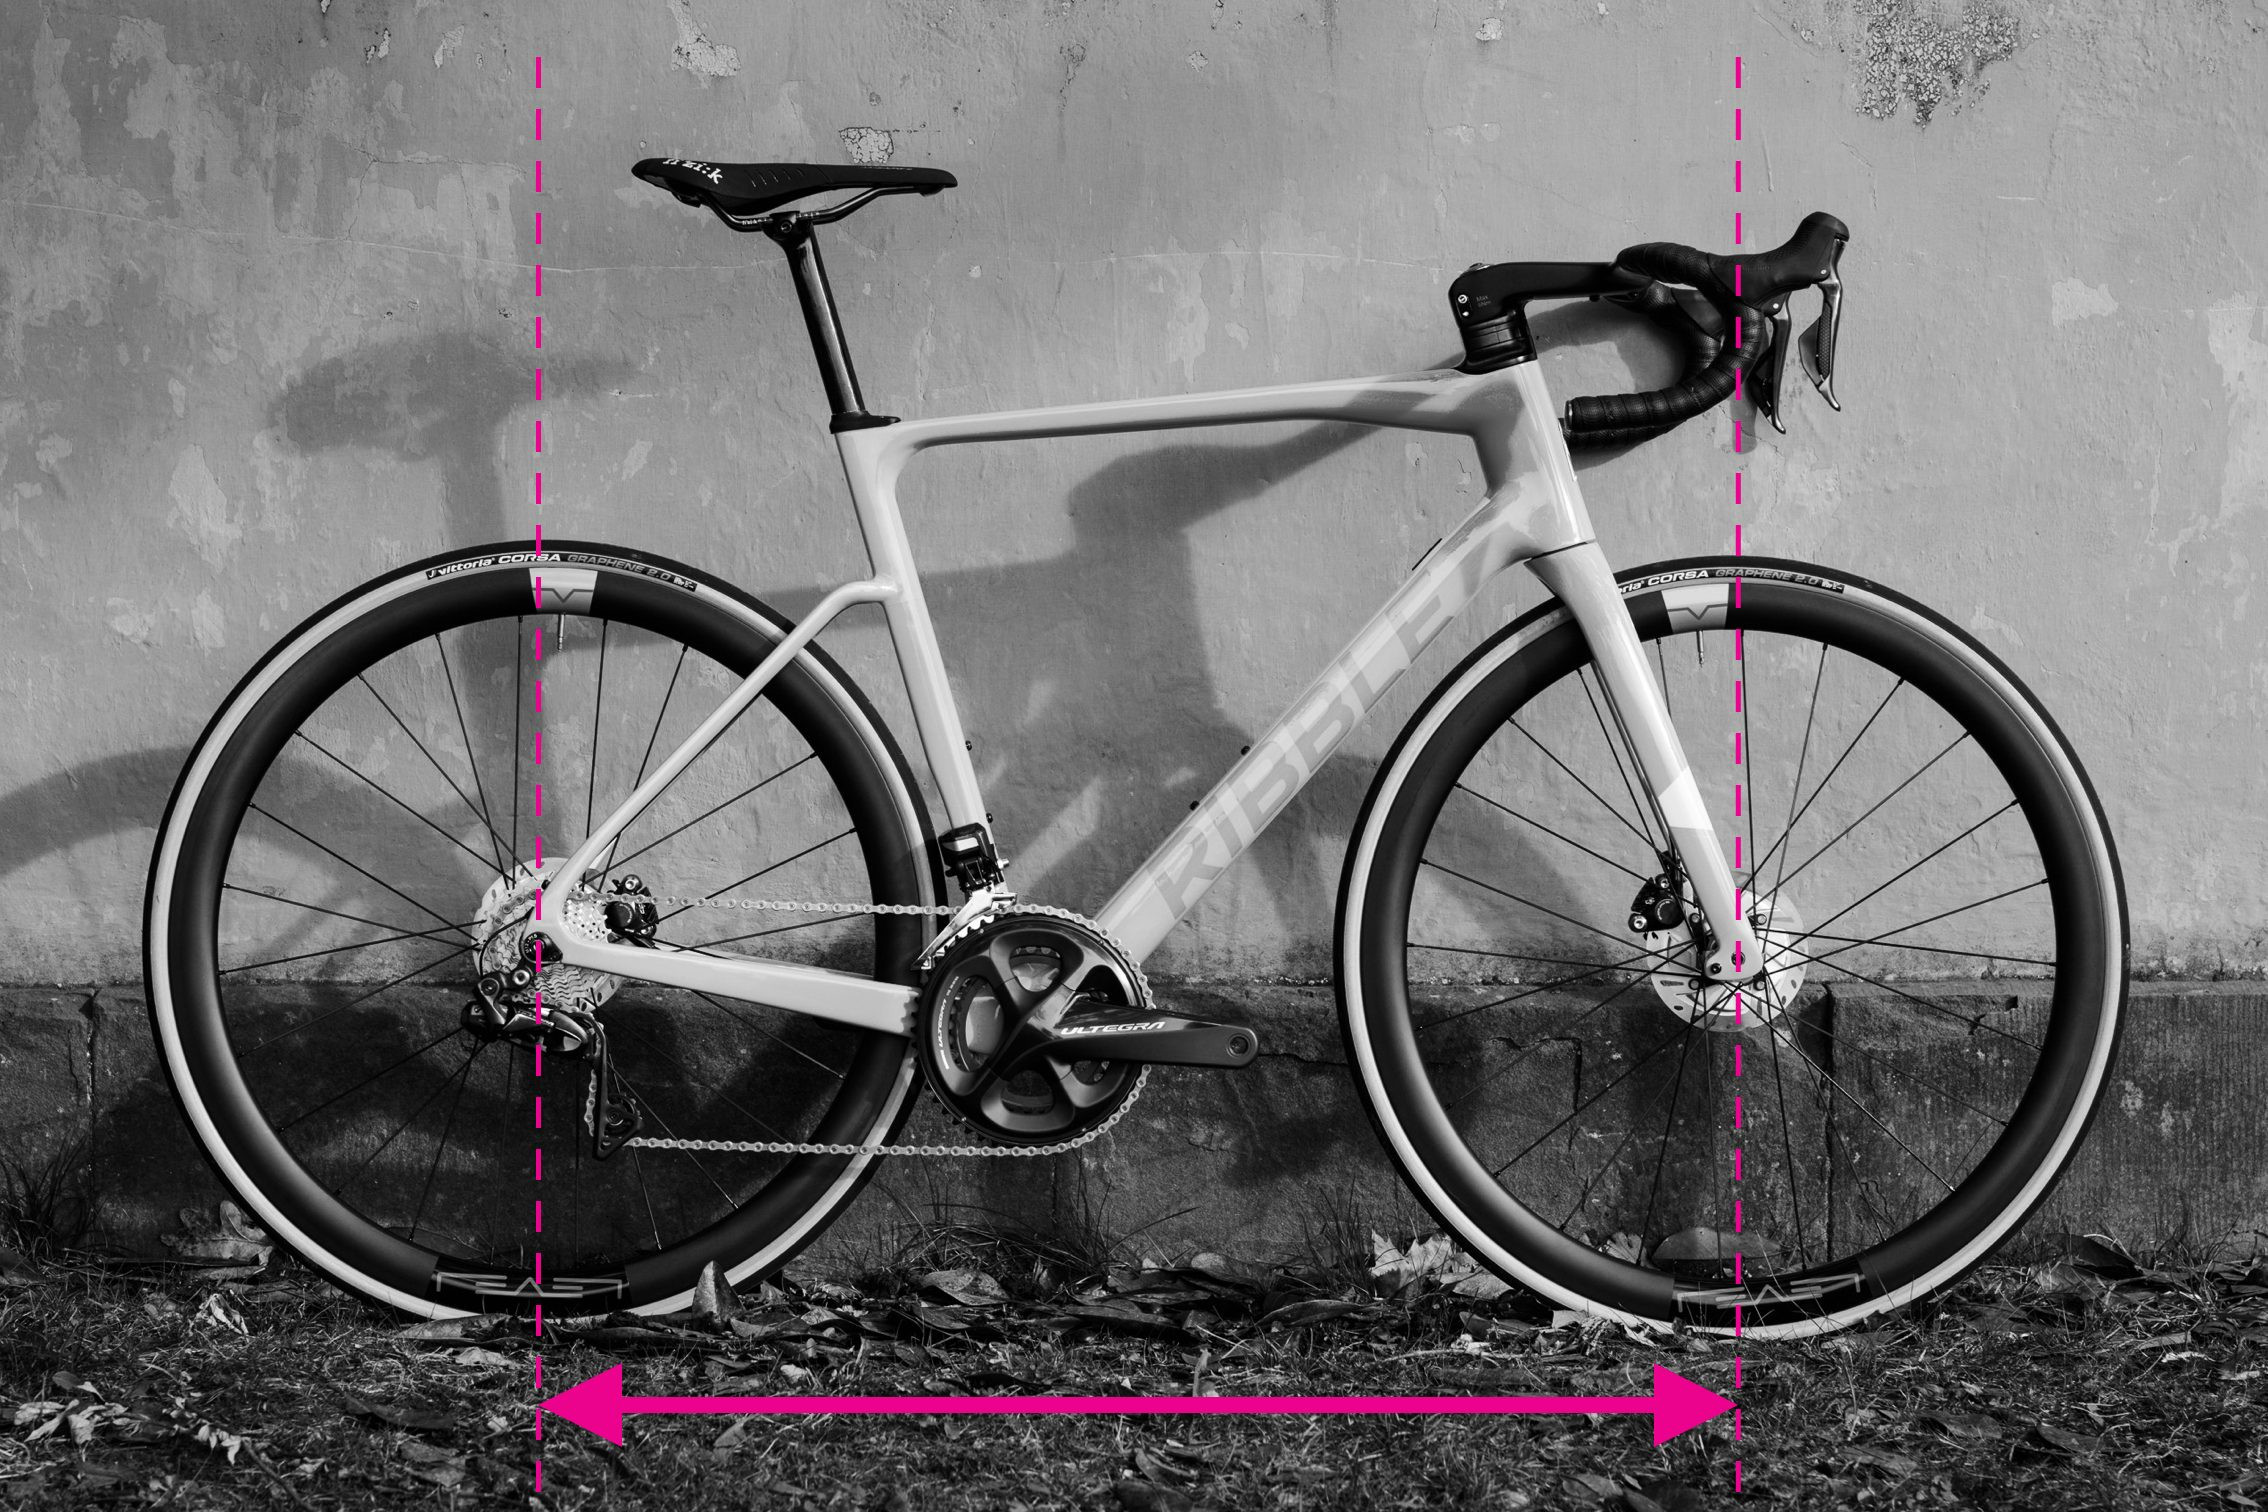 Diagram illustrating wheelbase measurement on a bicycle frame
The wheelbase is the distance between the front and rear axles of your bike. It significantly influences a frame’s ride quality and varies with frame size. A longer wheelbase generally provides more stability, while a shorter wheelbase can offer more agility.
Measuring wheelbase is relatively straightforward. However, it’s crucial to ensure the fork is pointing straight ahead; otherwise, your measurement will be inaccurate. Like reach and stack, taking multiple measurements and averaging them can improve accuracy, particularly if the fork isn’t perfectly aligned. Measuring both sides of the bike and averaging the results can also compensate for slight fork misalignments.
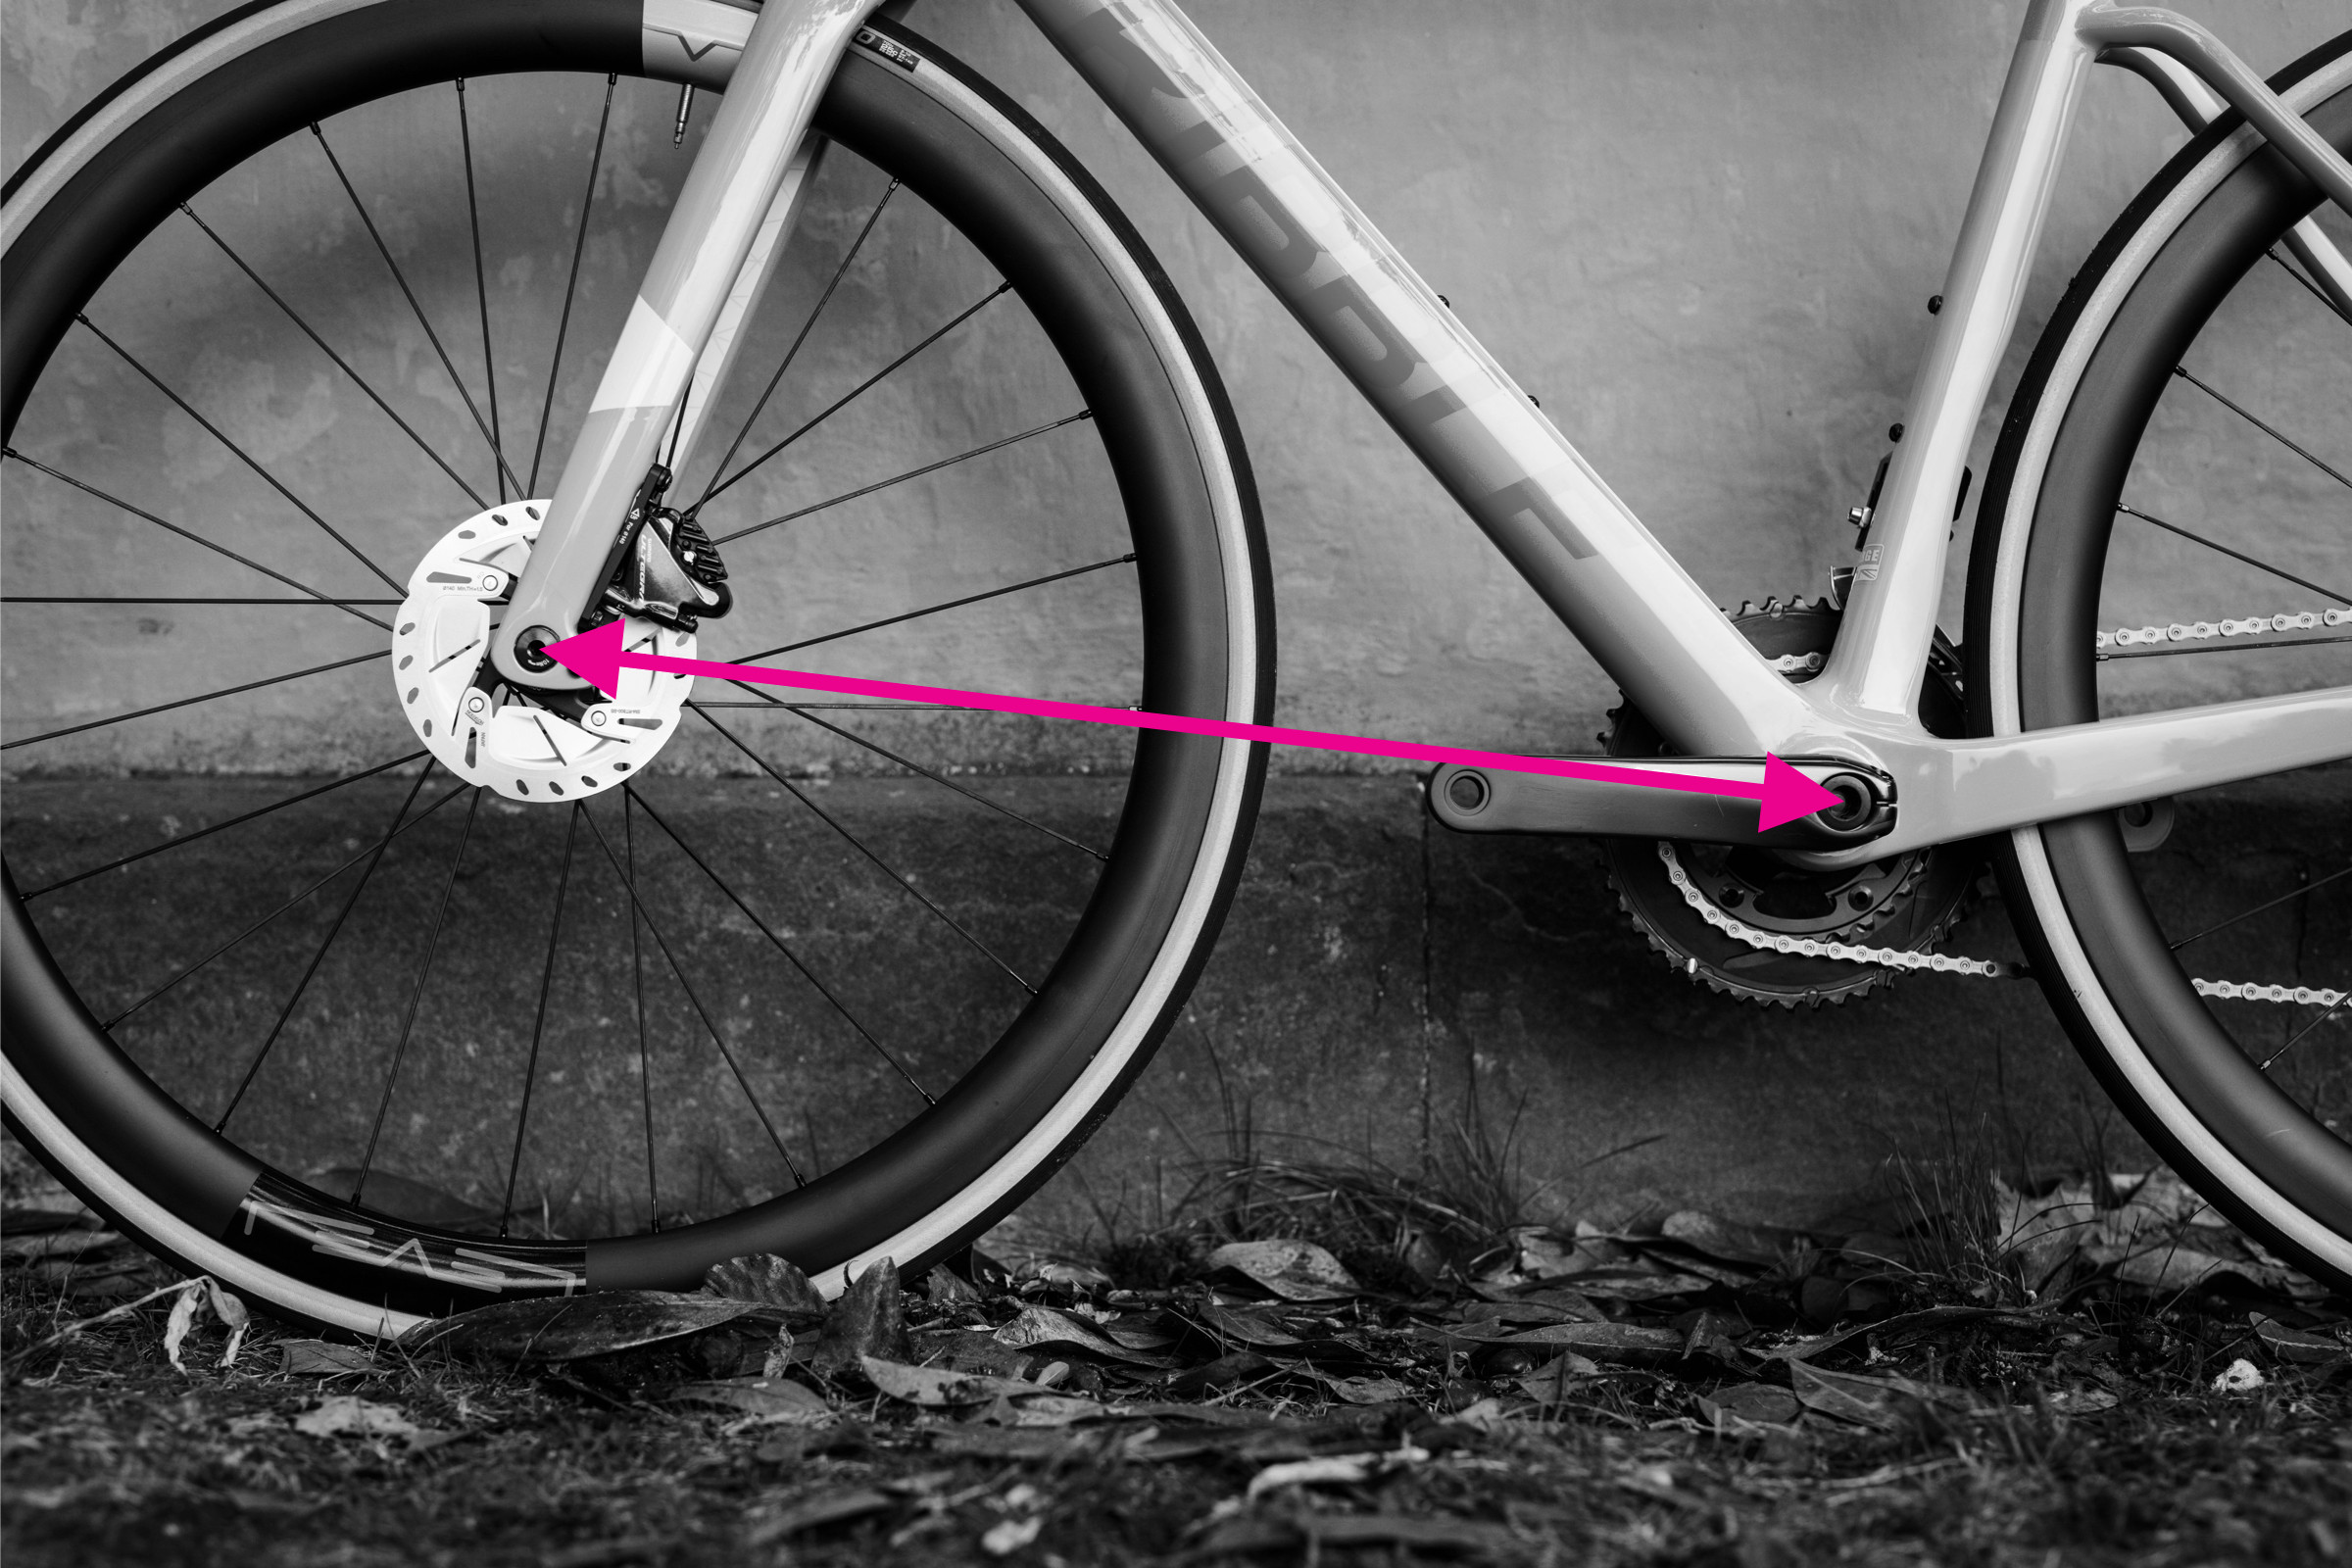
Determining Chainstay Length for Bike Handling
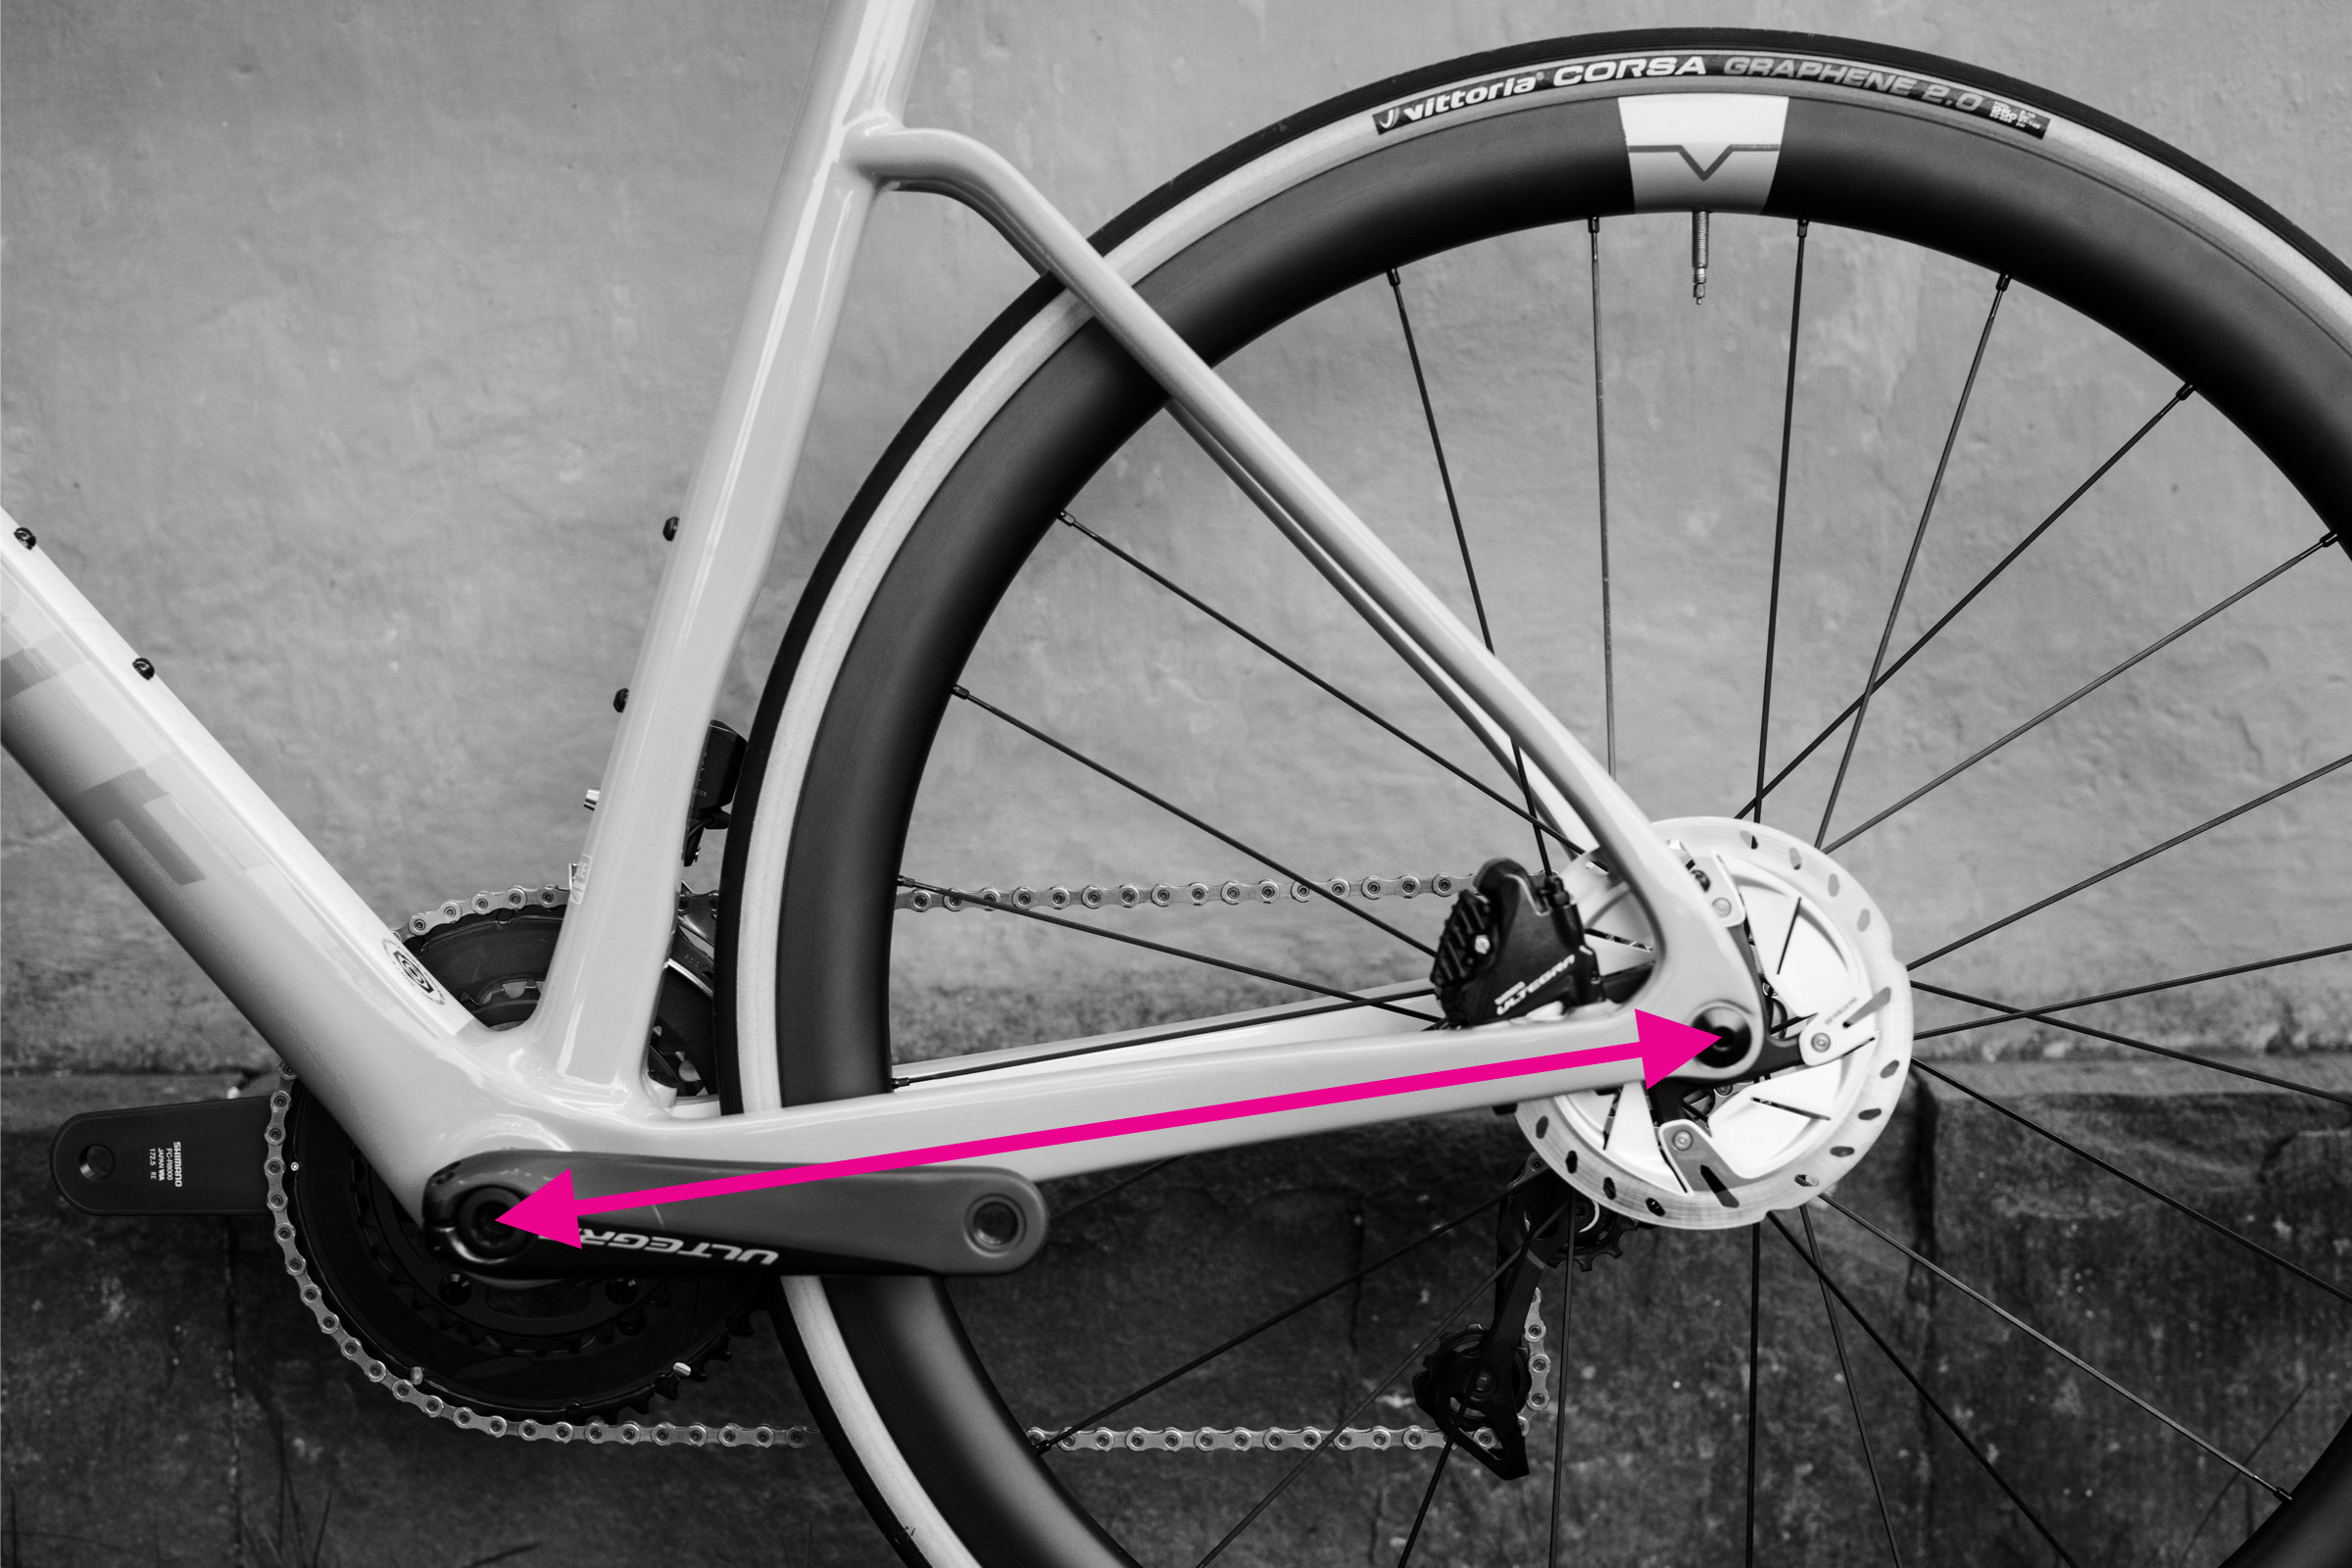 Visual guide to measuring chainstay length on a bicycle frame
Chainstay length is one of the two components that constitute the wheelbase and plays a vital role in a frame’s handling characteristics. Shorter chainstays typically result in a more responsive and lively feel, while longer chainstays can enhance stability, especially at higher speeds.
Chainstay length is the straight-line distance from the center of the bottom bracket axle to the center of the rear dropout. It’s easily measured with a ruler or tape measure.
Measuring Front Center for Balance and Toe Clearance
 Front center measurement explained on a bicycle frame diagram
Front center is the other component of the wheelbase, analogous to chainstay length but measured from the bottom bracket axle to the front dropout. Front center affects handling and influences toe overlap—the possibility of your foot hitting the front wheel during tight turns. While not always specified by bike manufacturers, brands like BMC include it in their geometry charts.
Note that the wheelbase is not simply the sum of chainstay length and front center, as these measurements are not taken horizontally.
Measuring Seat Tube and Head Tube Angles for Handling Dynamics
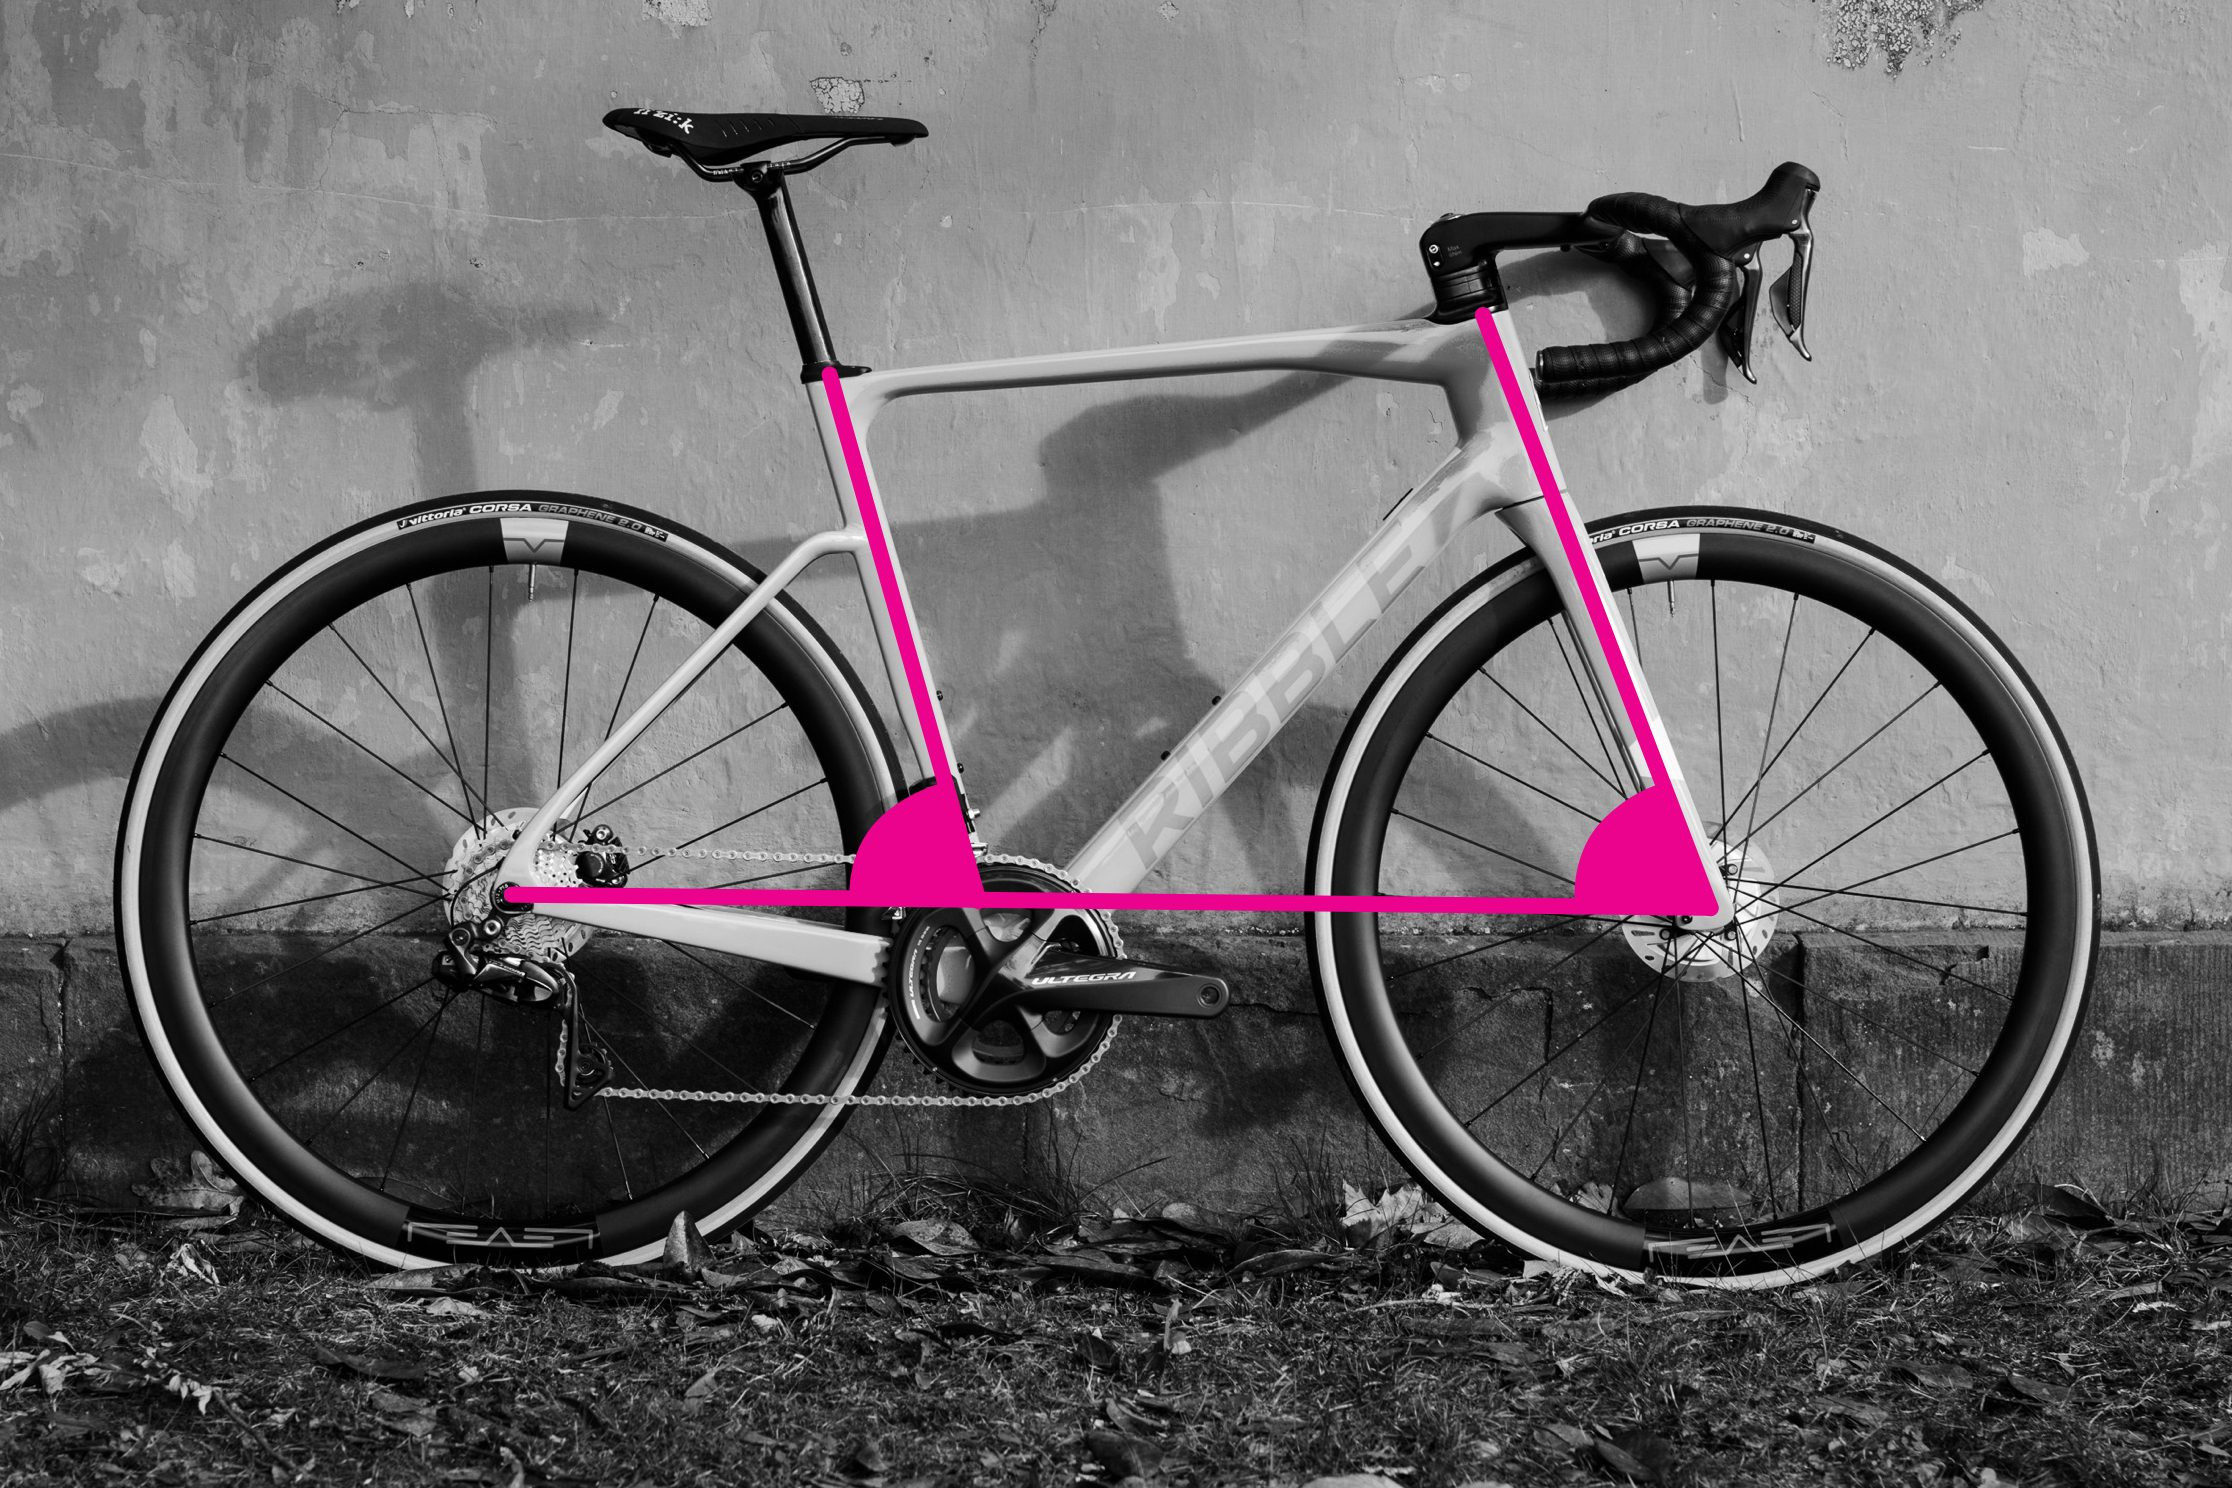 Diagram showing seat tube and head tube angle measurements on a bike frame
Seat tube and head tube angles are critical determinants of a bike’s handling. Steeper angles generally lead to quicker, more nimble handling, while slacker angles provide more stability, particularly at higher speeds and on uneven terrain. Your clinometer app is essential for measuring these angles.
For straight seat tubes, simply align your smartphone with the tube and read the angle from the clinometer app. Ensure the bike is vertical and on a level surface for an accurate reading. If the seat tube has a kink, use a straight edge to create a straight line from the bottom bracket shell to the top of the seat tube and measure the angle against this straight edge.
Most modern bikes feature tapered head tubes, meaning the angle of the front face of the head tube will differ slightly from the angle of its centerline. To approximate the centerline angle, align your phone with the centerline or use a straight edge to connect the centers of the top and bottom of the head tube.
If your bike has straight fork legs without a curved crown, the fork leg angle will mirror the head tube angle, offering an alternative measurement point. Again, ensure the bike is perfectly vertical. You can also measure the head tube angle by aligning the clinometer with the steerer tube extension above the head tube.
Measuring Bottom Bracket Drop for Stability and Cornering
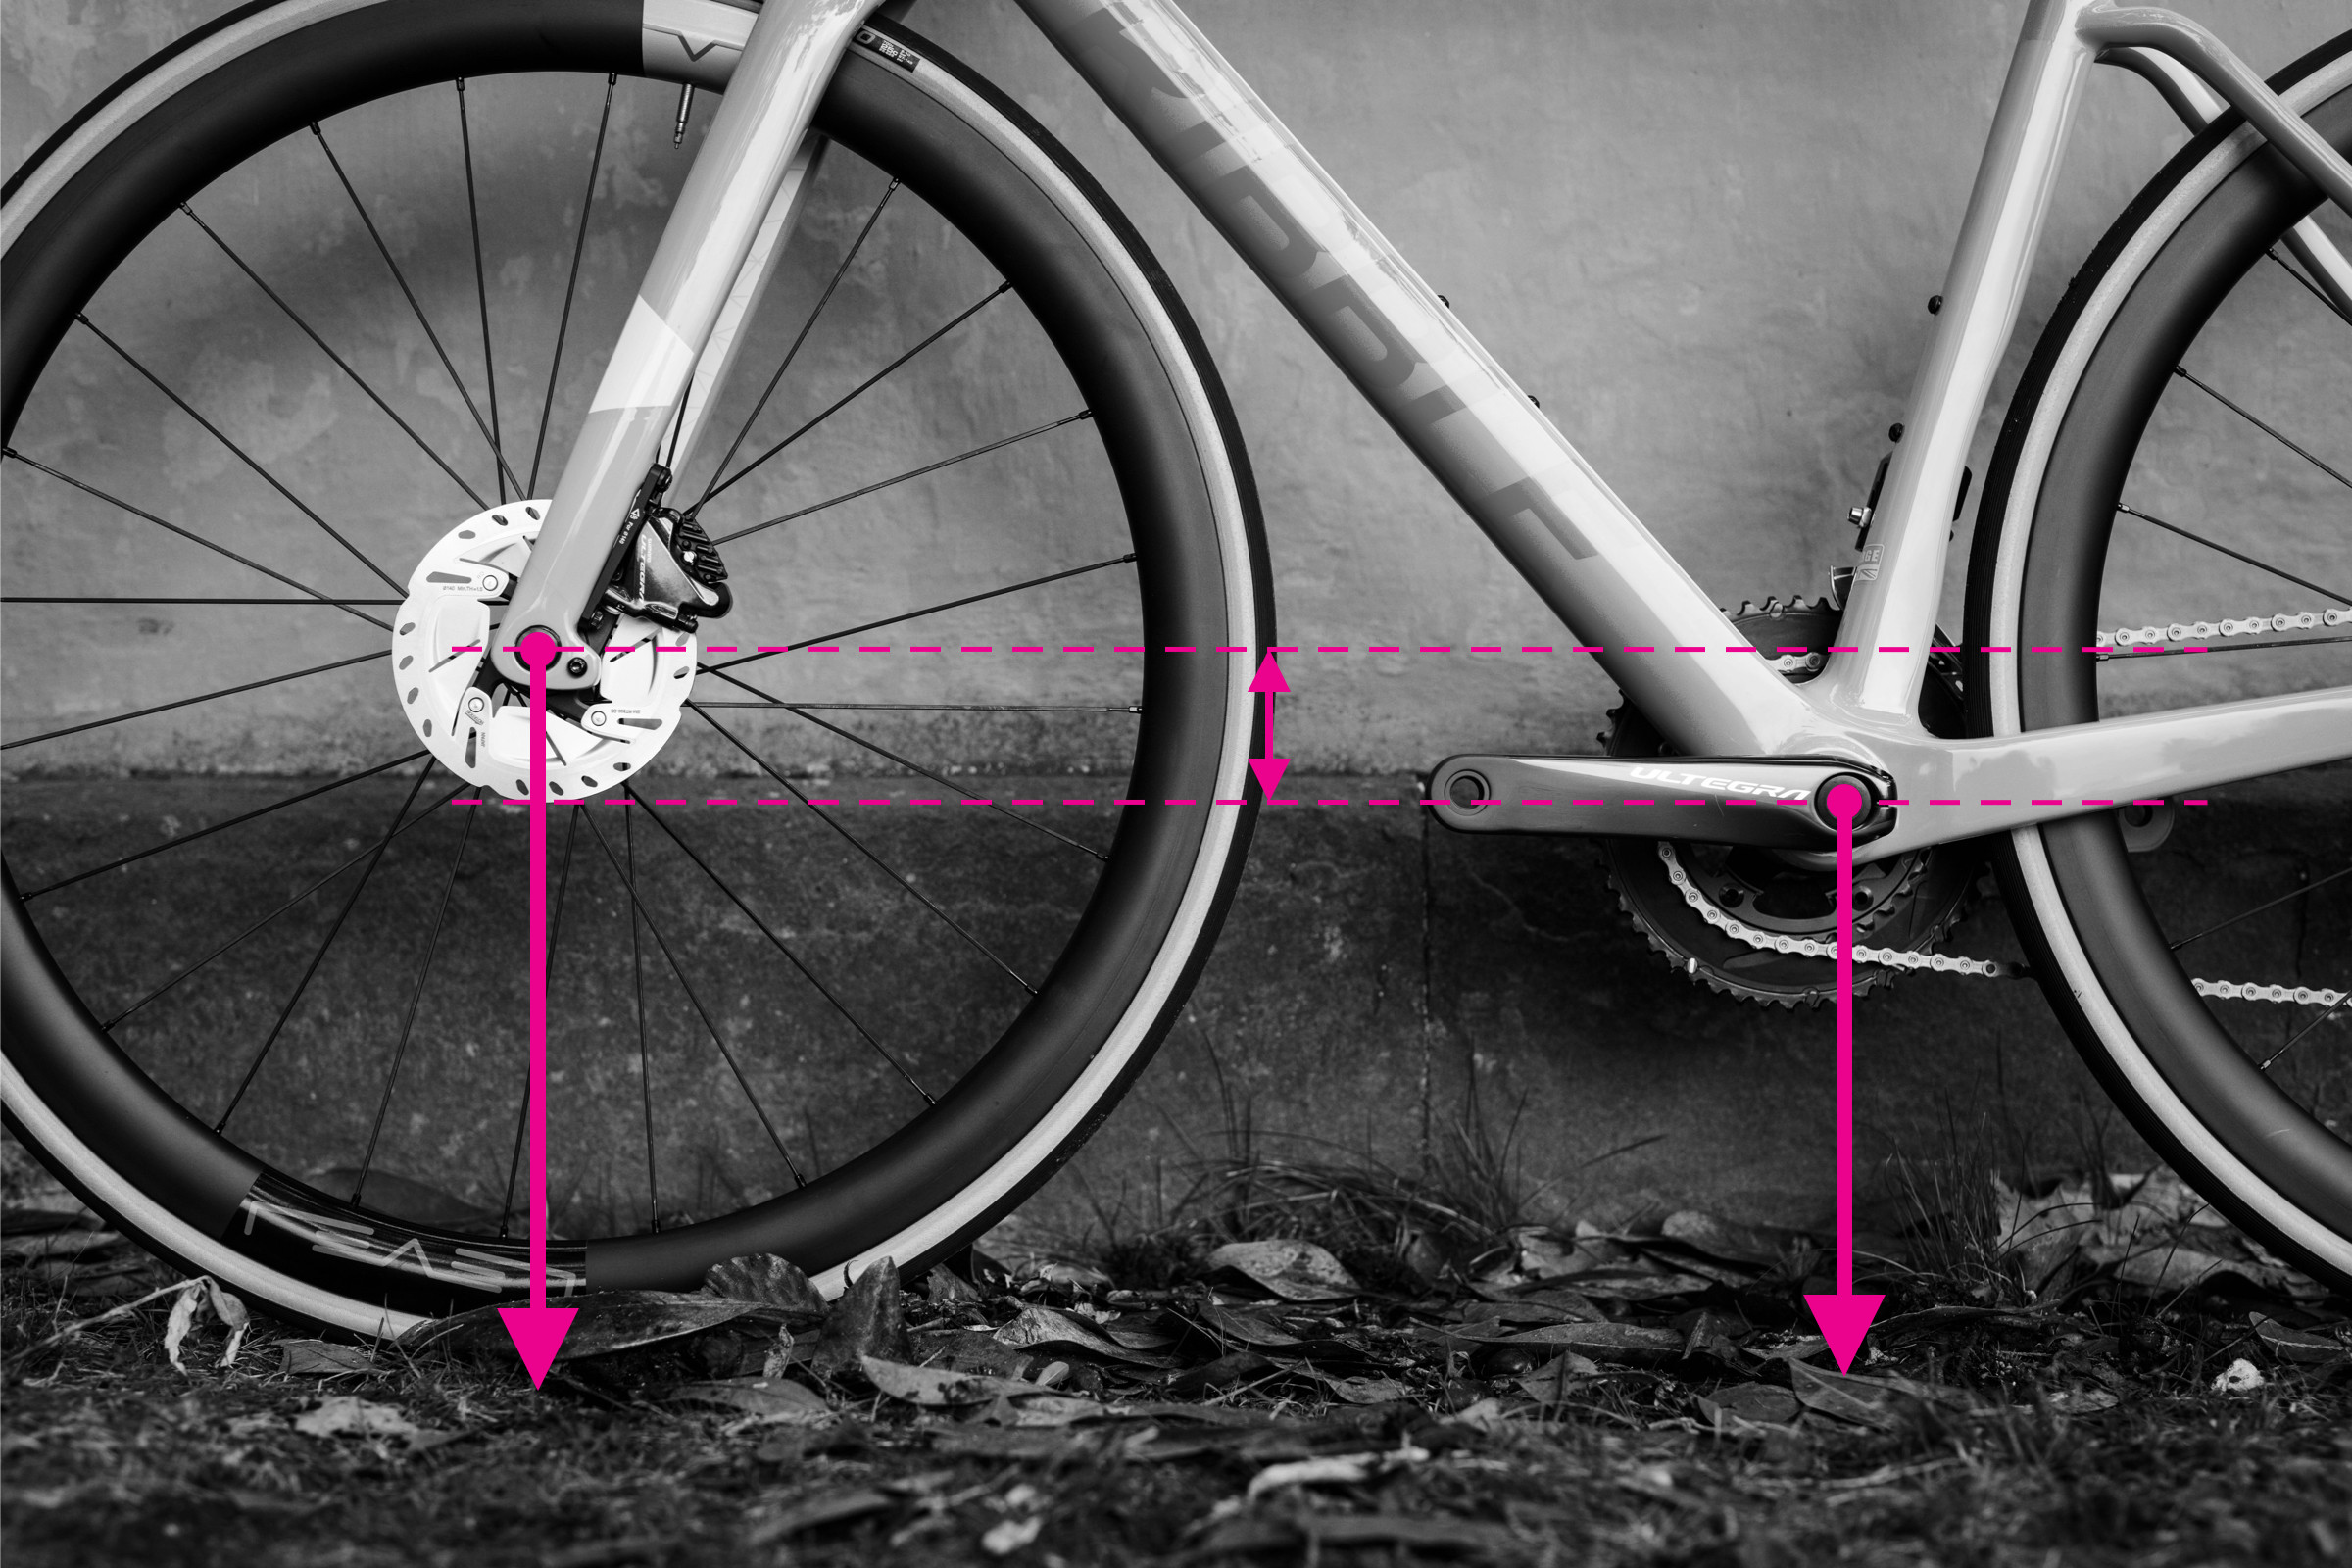 Illustration of bottom bracket drop measurement on a bicycle frame
Bottom bracket (BB) drop is the vertical distance between the wheel axles and the centerline of the crank axle. It’s measured by finding the height of the rear axle and the height of the bottom bracket and subtracting the former from the latter. BB drop is a key measurement often included in bike geometry charts. A larger BB drop lowers the center of gravity, enhancing stability and cornering ability.
Measuring Bottom Bracket Height for Pedal Clearance
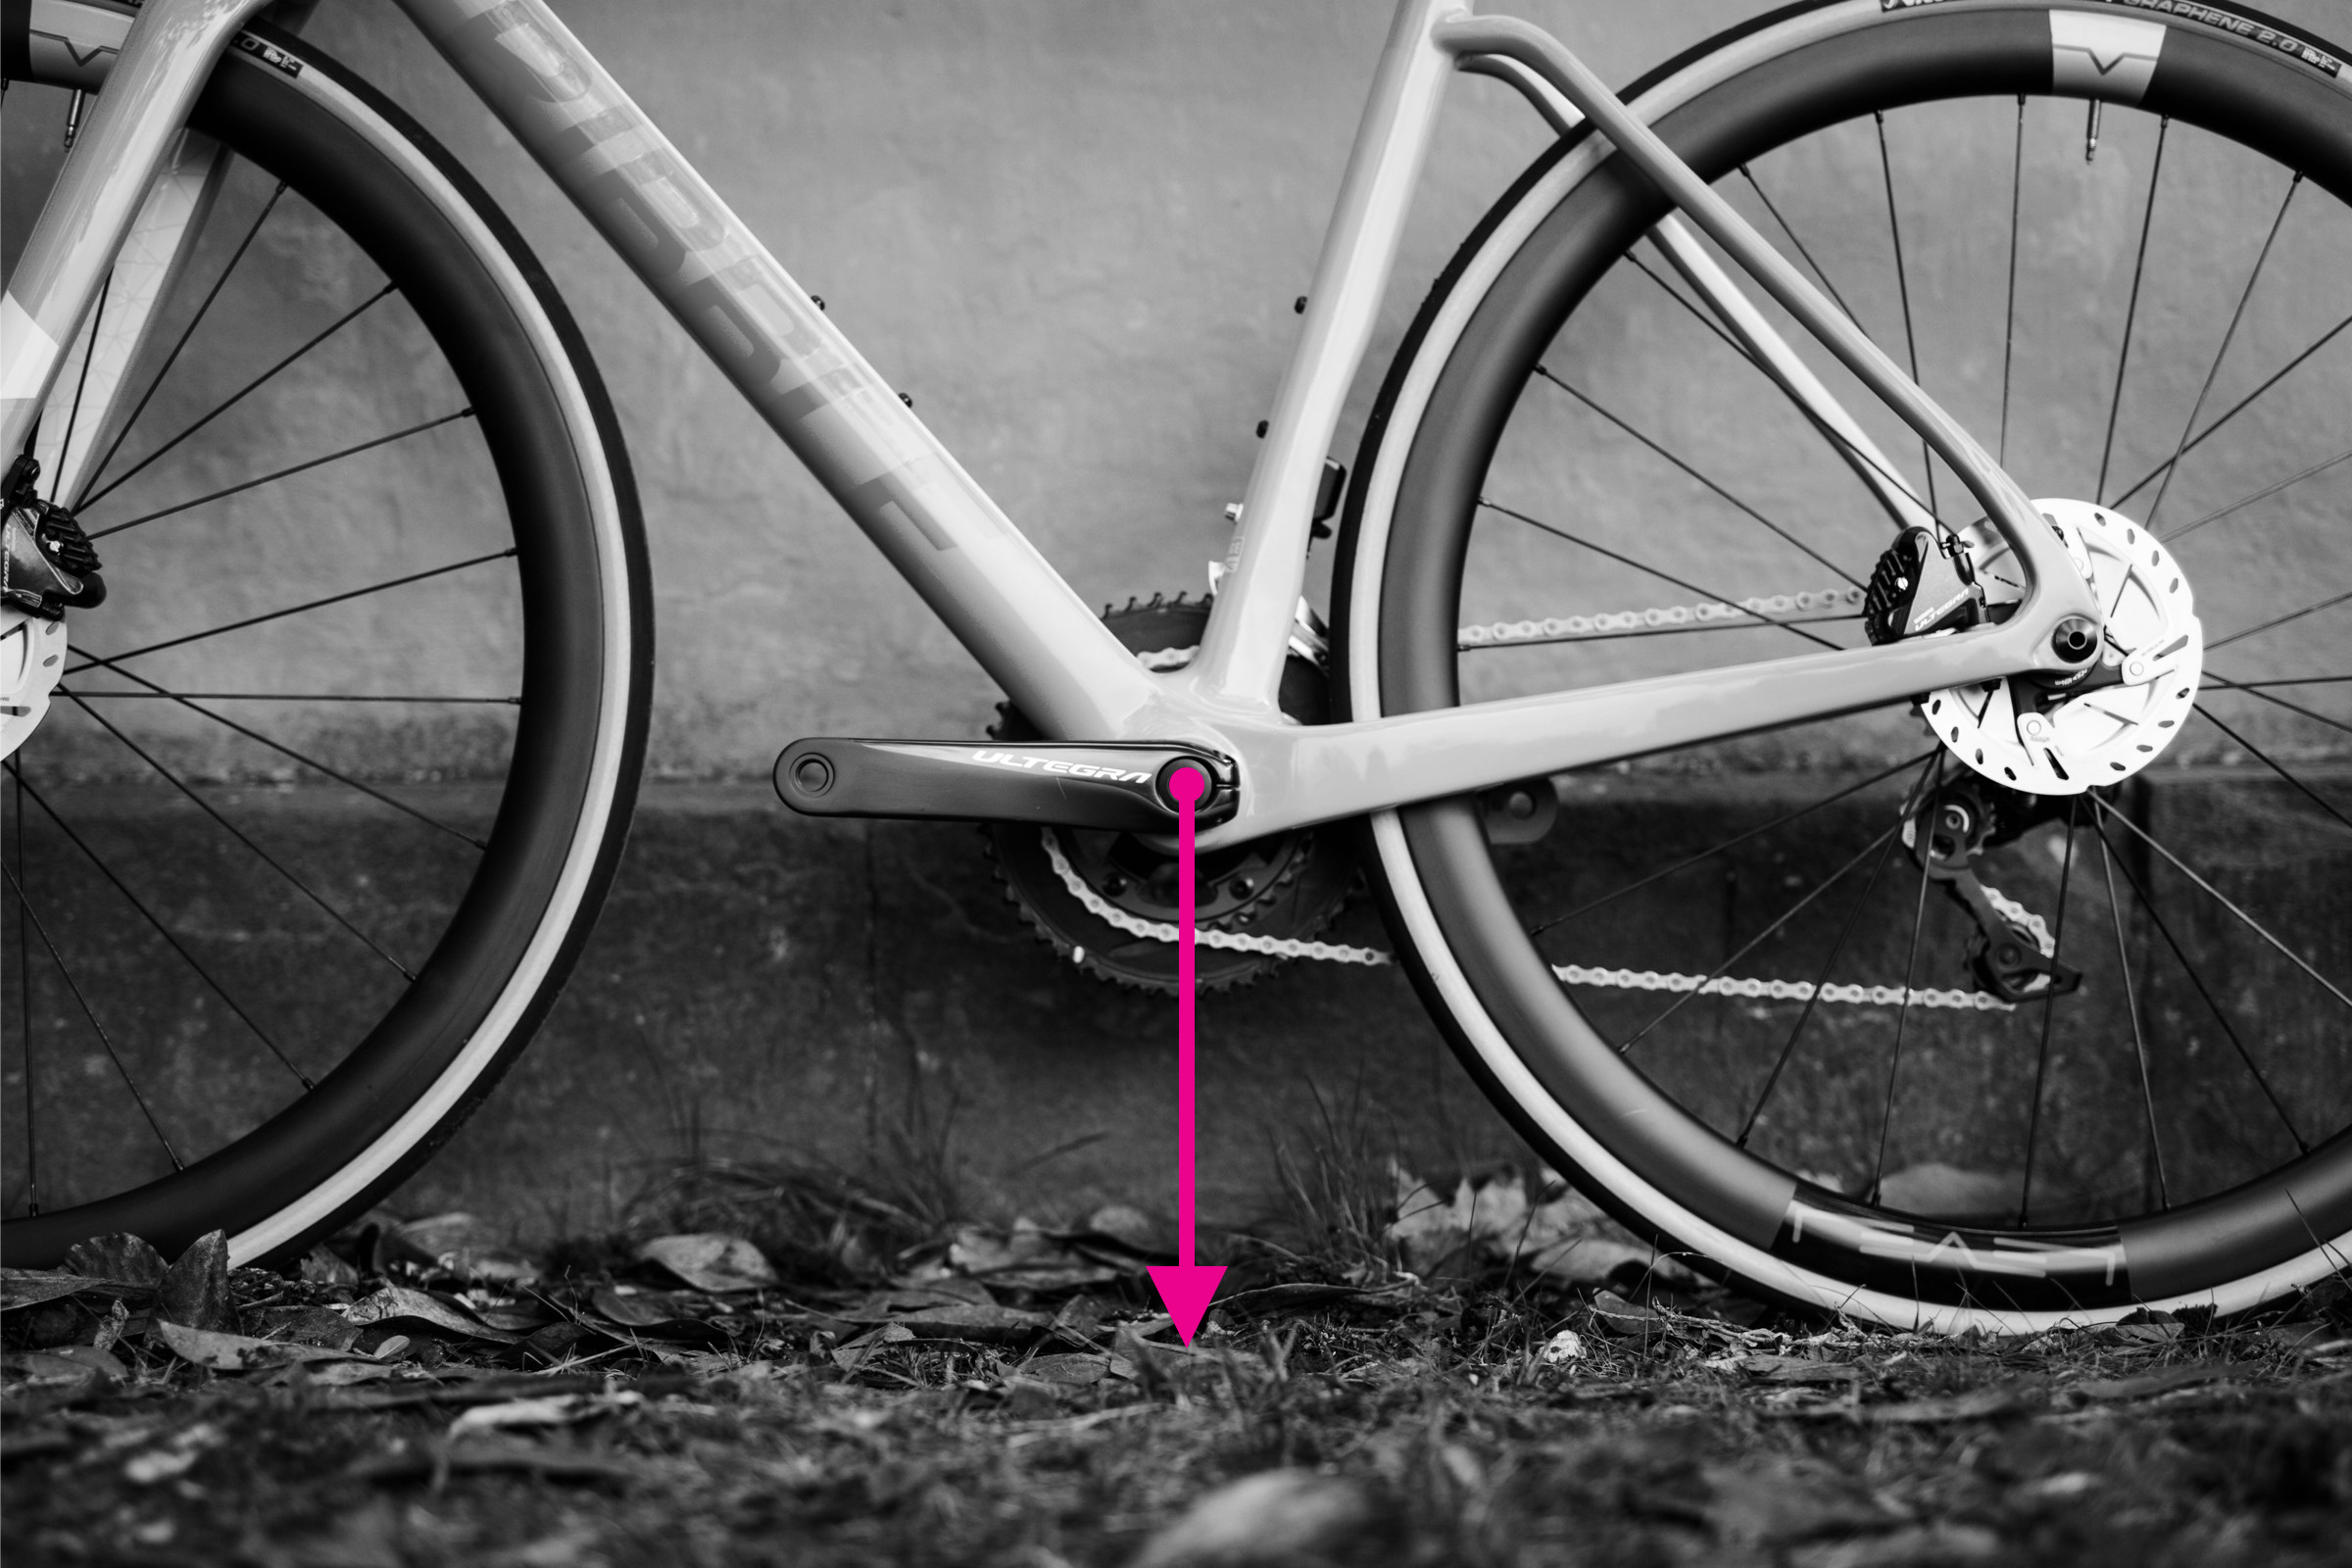 Bottom bracket height measurement demonstration on a bike frame
Finally, bottom bracket height is the vertical distance from the ground to the center of the bottom bracket shell. This measurement is relatively straightforward to obtain. Ensure your bike is upright on a level surface for an accurate reading.
Unlike bottom bracket drop, bottom bracket height is slightly influenced by your tires. Therefore, inflate your tires to your typical riding pressure before measuring for the most accurate result.
With these comprehensive measurements, you are now equipped to effectively size up any bike frame. This knowledge is invaluable for making informed purchasing decisions in the future, whether you’re looking at a new or second-hand road bike, a practical commuting bike, or an adventurous gravel bike. Keep your recorded measurements in a safe place for future reference, saving you from repeating the process.