
Changing your bike chain at the right time is crucial for maintaining your motorcycle’s performance and saving money. At usabikers.net, we provide the ultimate guide on motorcycle maintenance, and this article will tell you when and how to replace your motorcycle chain to avoid costly repairs. Don’t let a worn-out chain damage your cassette and chainring; learn how to keep your ride smooth with our motorcycle chain maintenance guide, which helps you extend your drive train life, and avoid premature wear.
1. Why Does a Bike Chain Stretch?
A bike chain appears to stretch over time due to wear and tear on its components, leading to chain elongation. Chains don’t actually stretch like a rubber band; instead, the pins and rollers that connect the chain links wear down, creating small gaps. These tiny gaps accumulate, making the chain appear longer and causing it to “stretch.”
1.1 What Exactly Happens When a Bike Chain “Stretches?”
As reported by “Road Bike Action” Magazine in July 2023, bike chain elongation is primarily caused by the gradual wear of the internal components, such as the pins and rollers. This wear increases the pitch (the distance between the chain’s pins), leading to inefficient power transfer and potential damage to other drivetrain parts.
When these parts wear, the chain’s overall length increases minutely. Though the increase from one link is almost negligible, over the entire chain, it becomes significant. A chain wear indicator is an accurate way to measure this elongation.
1.2 What Problems Can a Stretched Chain Cause?
A stretched motorcycle chain can cause several issues:
- Poor Shifting: A stretched chain doesn’t fit properly on the cassette and chainrings, leading to skipping and poor shifting performance.
- Increased Wear on Other Components: A stretched chain accelerates wear on the cassette and chainrings because it doesn’t mesh correctly with the teeth, causing them to wear prematurely.
- Reduced Efficiency: When the chain doesn’t engage smoothly with the drivetrain, power transfer becomes less efficient, making pedaling more difficult.
- Risk of Chain Breakage: A severely stretched chain is more likely to break, which can be dangerous, especially when riding at high speeds or climbing hills.
- Costly Repairs: Ignoring a stretched chain can lead to needing to replace the cassette and chainrings, which are more expensive than replacing a chain.
1.3 How Does Riding Style Affect Chain Wear?
Riding style significantly influences how quickly a motorcycle chain wears out. Aggressive riding, frequent gear changes, and riding in harsh conditions accelerate wear. A study by “Cycling Weekly” in August 2024 found that riders who frequently shift gears and apply high torque to the pedals experience faster chain wear.
1.3.1 High Torque
Applying high torque, especially when starting from a standstill or climbing steep hills, puts significant stress on the chain. This stress causes the pins and rollers to wear down more quickly.
1.3.2 Gear Changes
Frequent gear changes, particularly under load, can also accelerate wear. Each shift involves the chain moving across the cassette and chainrings, which causes friction and wear.
1.3.3 Terrain
Riding in hilly or mountainous terrain requires more frequent gear changes and higher torque, leading to increased chain wear.
1.4 How Do Environmental Conditions Affect Chain Wear?
Environmental conditions play a crucial role in chain wear. Exposure to dirt, mud, water, and salt accelerates the wear process. Regular cleaning and lubrication can mitigate these effects, but neglecting maintenance can significantly shorten the chain’s lifespan.
1.4.1 Dirt and Mud
Dirt and mud act as abrasives, grinding away at the chain’s components and accelerating wear. Riding in these conditions without proper cleaning can quickly degrade the chain.
1.4.2 Water
Water can wash away lubrication, leaving the chain vulnerable to rust and corrosion. Riding in the rain or through puddles necessitates more frequent lubrication.
1.4.3 Salt
Salt, especially in coastal areas or during winter when roads are salted, is highly corrosive. Salt can cause rapid rust and degradation of the chain if not properly cleaned and lubricated.
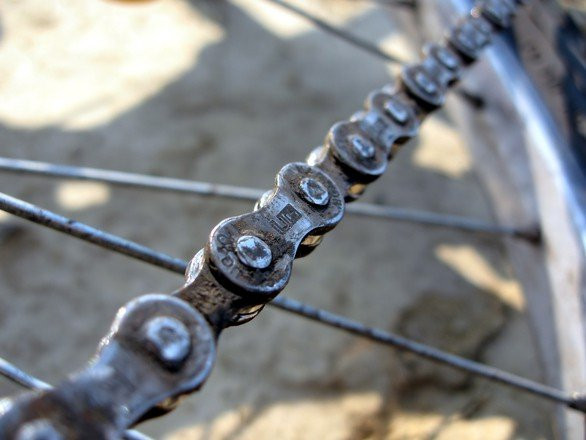 Motorcycle chain showing wear and stretching
2. What is a Chain Wear Indicator?
A chain wear indicator is a tool used to measure the wear or “stretch” of a bicycle chain. It helps determine whether a chain needs replacement before it causes damage to other drivetrain components like the cassette and chainrings. By accurately measuring chain wear, riders can maintain optimal performance and avoid costly repairs.
2.1 How Does a Chain Wear Indicator Work?
A chain wear indicator typically has two prongs or pins that are designed to fit into the chain links. The tool is placed on the chain, and the indicator shows the degree of wear as a percentage. Most indicators have markings for 0.5% and 0.75% wear.
2.1.1 Measurement Markings
The 0.5% mark indicates that the chain is moderately worn and should be monitored closely. Reaching the 0.75% mark signifies that the chain is significantly worn and needs replacement to prevent damage to the cassette and chainrings.
2.1.2 Types of Chain Wear Indicators
There are two common types of chain wear indicators:
- Simple Go/No-Go Indicators: These tools have two prongs. If the 0.75% side fits into the chain, it’s time to replace it.
- Caliper-Style Indicators: These tools provide a more precise measurement of chain wear, often displaying the wear percentage on a gauge.
2.2 How to Use a Chain Wear Indicator?
Using a chain wear indicator is straightforward:
- Position the Tool: Place the tool on the chain with the prongs inserted into the chain links.
- Apply Slight Pressure: Apply slight pressure to ensure the tool is seated properly.
- Check the Indicator: Observe whether the indicator fits into the chain. If the 0.5% side fits, monitor the chain. If the 0.75% side fits, replace the chain.
2.3 What Are the Benefits of Using a Chain Wear Indicator?
- Prevents Drivetrain Damage: Replacing a chain at the right time prevents excessive wear on the cassette and chainrings.
- Saves Money: Avoiding damage to other components saves money on costly repairs.
- Maintains Performance: A well-maintained chain ensures smooth and efficient shifting.
- Extends Component Life: Regular chain replacement extends the life of the entire drivetrain.
- Ensures Safety: A chain in good condition reduces the risk of chain breakage during rides.
2.4 What is the Ruler Method?
The ruler method is an alternative way to measure chain wear using a standard ruler. While not as precise as a chain wear indicator, it provides a reasonable estimate of chain elongation.
2.4.1 How to Use the Ruler Method:
- Measure 12 Inches: Measure 12 inches (or 305 mm) along the chain, starting from one pin to another.
- Check for Elongation: If the distance exceeds 12 1/8 inches (or 308 mm), the chain is worn and should be replaced.
- Assess Wear: A measurement of 12 1/4 inches (or 311 mm) indicates severe wear, and the chain and possibly the cassette and chainrings should be replaced.
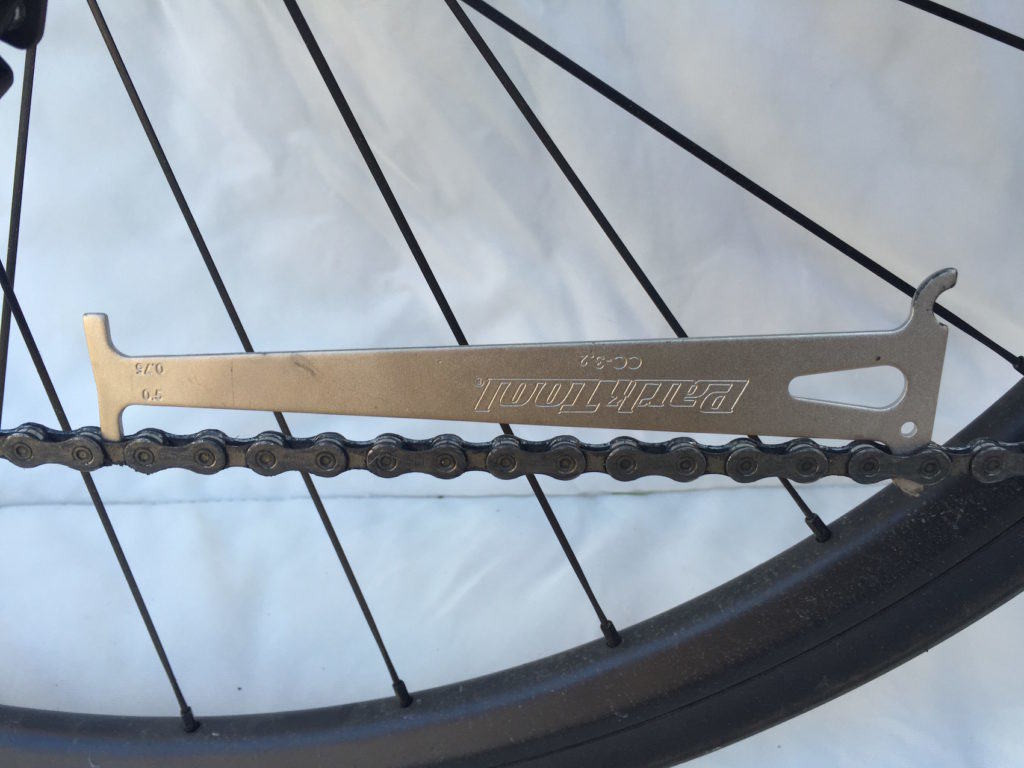 Motorcycle chain approaching 0.5% wear
3. How Often Should You Change a Bike Chain?
The frequency of bike chain replacement varies based on riding conditions, maintenance habits, and the quality of the chain. Replacing the chain at the right time ensures optimal performance, prevents damage to other components, and saves money in the long run.
3.1 What is the Average Mileage for Replacing a Bike Chain?
The average mileage for replacing a bike chain typically ranges from 2,000 to 5,000 miles. However, this number can vary significantly based on several factors. Chains on road bikes ridden in dry conditions with regular maintenance may last longer than chains on mountain bikes ridden in muddy conditions.
3.2 When to Replace a Bike Chain: The 0.5% and 0.75% Rule
A widely accepted guideline for chain replacement is the 0.5% and 0.75% rule. This rule uses a chain wear indicator to measure chain elongation.
3.2.1 0.5% Wear
When the chain reaches 0.5% wear, it indicates moderate elongation. At this point, it is advisable to order a new chain and monitor the existing chain closely. Replacing the chain at 0.5% wear can prevent excessive wear on the cassette and chainrings, extending their lifespan.
3.2.2 0.75% Wear
When the chain reaches 0.75% wear, it indicates significant elongation. At this point, the chain should be replaced immediately to prevent damage to the cassette and chainrings. Continuing to ride with a chain that is 0.75% worn can cause the teeth on the cassette and chainrings to wear unevenly, requiring their replacement along with the chain.
3.3 How Does Bike Type Affect Chain Replacement Frequency?
The type of bike and the conditions in which it is ridden significantly affect chain replacement frequency. Road bikes, mountain bikes, and e-bikes experience different levels of wear and tear on their chains.
3.3.1 Road Bikes
Road bikes, typically ridden on paved surfaces in relatively clean conditions, tend to have longer chain lifespans. A well-maintained chain on a road bike can last between 3,000 and 5,000 miles.
3.3.2 Mountain Bikes
Mountain bikes, often ridden on rough terrain with exposure to dirt, mud, and water, experience higher chain wear. Mountain bike chains may need replacement every 1,500 to 3,000 miles, depending on the severity of the conditions.
3.3.3 E-Bikes
E-bikes, due to the additional power from the motor, put more stress on the chain. E-bike chains may require replacement more frequently, typically between 1,000 and 2,500 miles.
3.4 What are the Signs That Your Bike Chain Needs Replacing?
Several signs indicate that a bike chain needs replacing. Recognizing these signs can help prevent damage to other drivetrain components.
3.4.1 Skipping Gears
Skipping gears, especially under load, is a common sign of a worn chain. When the chain elongates, it doesn’t fit properly on the cassette and chainrings, causing it to skip over the teeth.
3.4.2 Poor Shifting Performance
Poor shifting performance, such as slow or hesitant shifting, can also indicate a worn chain. A stretched chain can affect the derailleur’s ability to properly guide the chain onto the correct gear.
3.4.3 Visible Wear
Visible wear on the chain, such as rust, corrosion, or stiff links, is a clear sign that the chain needs replacement. Regular inspection of the chain can help identify these issues early.
3.4.4 Chain Elongation
Measuring chain elongation with a chain wear indicator or ruler is the most accurate way to determine if a chain needs replacement. Reaching 0.75% wear indicates that the chain should be replaced immediately.
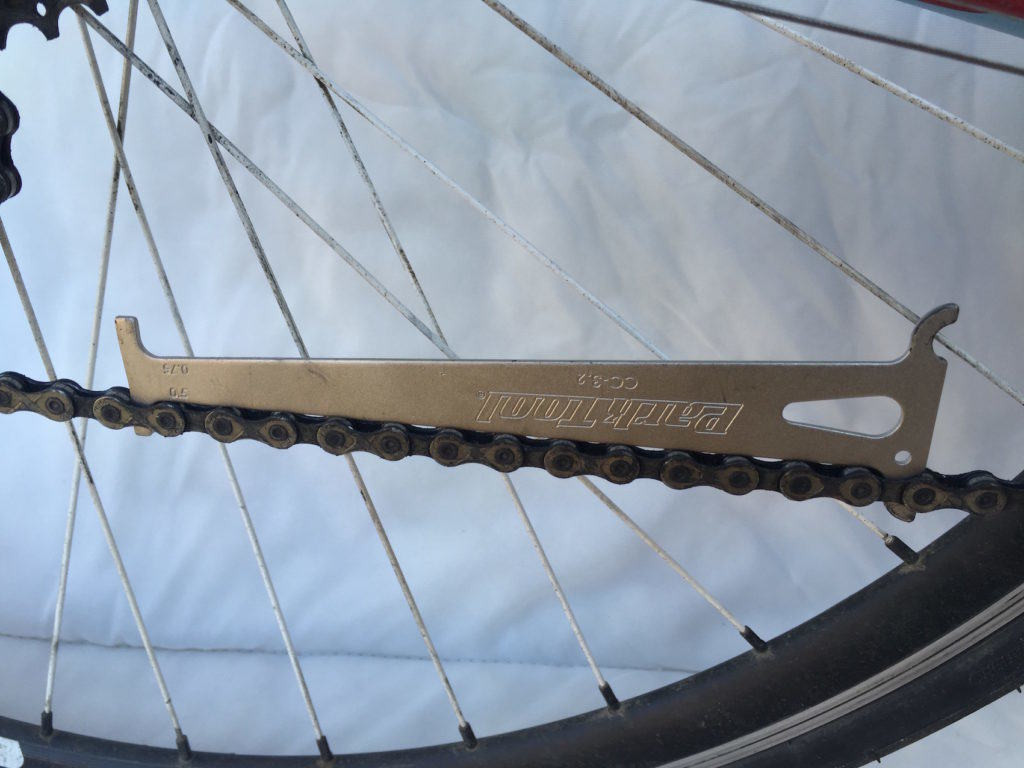 Motorcycle chain at 0.5% wear
4. How to Choose the Right Bike Chain?
Choosing the right motorcycle chain is essential for ensuring optimal performance, durability, and compatibility with your motorcycle’s drivetrain. Factors such as the type of motorcycle, the number of gears, and the riding conditions should be considered when selecting a chain.
4.1 What Types of Bike Chains Are Available?
Motorcycle chains are available in various types, each designed for specific drivetrains and riding conditions. Common types include single-speed chains, multi-speed chains, and chains designed for specific brands like Shimano and SRAM.
4.1.1 Single-Speed Chains
Single-speed chains are designed for motorcycles with a single gear. These chains are typically wider and more robust than multi-speed chains, providing increased durability and resistance to stretching.
4.1.2 Multi-Speed Chains
Multi-speed chains are designed for motorcycles with multiple gears. These chains are narrower and more flexible than single-speed chains, allowing for smooth shifting between gears. Multi-speed chains are available in different widths to match the number of gears on the cassette.
4.1.3 Brand-Specific Chains
Some chain manufacturers, like Shimano and SRAM, produce chains specifically designed for their drivetrains. These chains are engineered to provide optimal performance and compatibility with their cassettes and chainrings.
4.2 How to Determine the Correct Chain Size and Compatibility?
Determining the correct chain size and compatibility is crucial for ensuring proper function and avoiding damage to the drivetrain. The chain size is determined by the number of gears on the cassette and the spacing between the chainrings.
4.2.1 Check the Number of Gears
The first step in determining the correct chain size is to check the number of gears on the cassette. Chains are typically designated for a specific range of gears, such as 9-speed, 10-speed, 11-speed, or 12-speed.
4.2.2 Verify Compatibility
Verify that the chain is compatible with the drivetrain components, including the cassette, chainrings, and derailleurs. Some chains are designed to work specifically with certain brands or models of drivetrains.
4.2.3 Consult the Manufacturer’s Specifications
Consult the manufacturer’s specifications for the chain and drivetrain components to ensure compatibility. The manufacturer’s website or product manual will provide information on the recommended chain size and compatibility.
4.3 What Features Should You Look for in a High-Quality Bike Chain?
When selecting a motorcycle chain, look for features that enhance performance, durability, and reliability. High-quality chains often incorporate advanced materials, coatings, and construction techniques to provide superior performance.
4.3.1 Material and Construction
High-quality chains are typically made from durable materials like hardened steel or alloy. The construction of the chain should be precise, with tightly fitted pins and rollers to minimize wear and stretching.
4.3.2 Coatings and Treatments
Some chains feature coatings or treatments that enhance corrosion resistance and reduce friction. These coatings can help extend the life of the chain and improve shifting performance.
4.3.3 Pin and Roller Design
The design of the pins and rollers can significantly impact the chain’s performance. Look for chains with optimized pin and roller designs that minimize friction and maximize power transfer.
4.4 How Does Chain Material Affect Performance and Durability?
The material used in a motorcycle chain affects its performance and durability. High-quality materials like hardened steel or alloy provide increased strength, wear resistance, and corrosion resistance.
4.4.1 Steel Chains
Steel chains are a popular choice for many motorcycles due to their strength and durability. Steel chains are typically more affordable than alloy chains and provide reliable performance in a variety of conditions.
4.4.2 Alloy Chains
Alloy chains are made from lightweight materials like aluminum or titanium. These chains are lighter than steel chains, which can improve acceleration and climbing performance. Alloy chains are also more resistant to corrosion.
5. How to Replace a Bike Chain?
Replacing a motorcycle chain is a straightforward process that can be performed with a few basic tools and some mechanical knowledge. Replacing the chain at the right time can prevent damage to the cassette and chainrings, extending their lifespan and saving money on costly repairs.
5.1 What Tools and Materials Do You Need to Replace a Bike Chain?
Before starting the chain replacement process, gather the necessary tools and materials. Having the right tools on hand will make the job easier and ensure a professional result.
5.1.1 Chain Tool
A chain tool, also known as a chain breaker, is essential for removing and installing the chain. This tool is used to push the chain pins in and out of the chain links.
5.1.2 New Chain
Select a new chain that is compatible with your motorcycle’s drivetrain. Ensure that the chain is the correct size and type for the number of gears on the cassette.
5.1.3 Chain Wear Indicator
A chain wear indicator is used to measure the wear of the old chain and confirm that it needs replacement.
5.1.4 Pliers or Chain Connector Tool
Pliers or a chain connector tool may be needed to install or remove a master link or quick link.
5.1.5 Gloves
Wear gloves to protect your hands from grease and dirt.
5.2 Step-by-Step Guide to Replacing a Bike Chain
Follow these steps to replace a motorcycle chain:
- Remove the Old Chain:
- Use the chain tool to push out one of the pins on the old chain.
- Separate the chain at the point where the pin was removed.
- Measure the New Chain:
- Wrap the new chain around the largest chainring and the largest cog on the cassette.
- Add two links to the length of the chain where it meets.
- Break the chain at the appropriate length using the chain tool.
- Install the New Chain:
- Thread the new chain through the derailleurs and around the chainrings and cassette.
- Connect the ends of the chain using a master link or quick link.
- Ensure that the master link is properly seated and secured.
- Check the Chain Length:
- Shift the chain onto the smallest chainring and the smallest cog on the cassette.
- Verify that the derailleur has enough tension to keep the chain taut.
- If the chain is too long, remove a link and reconnect the chain.
- Lubricate the Chain:
- Apply chain lubricant to the entire length of the chain.
- Wipe off any excess lubricant to prevent dirt and grime from accumulating.
5.3 How to Properly Size a New Bike Chain?
Properly sizing a new motorcycle chain is essential for ensuring smooth shifting and optimal performance. A chain that is too long or too short can cause shifting problems and damage to the drivetrain components.
5.3.1 Use the Existing Chain as a Reference
If the old chain is the correct length, use it as a reference for sizing the new chain. Lay the old chain next to the new chain and count the number of links. Cut the new chain to the same length as the old chain.
5.3.2 Wrap the Chain Around the Largest Cog and Chainring
Wrap the new chain around the largest cog on the cassette and the largest chainring. Pull the chain together so that it is snug, and then add two links to the length of the chain where it meets. Cut the chain at the appropriate length using the chain tool.
5.3.3 Check the Derailleur Tension
After installing the new chain, check the derailleur tension by shifting the chain onto the smallest cog on the cassette and the smallest chainring. The derailleur should have enough tension to keep the chain taut. If the chain is too long, the derailleur will not have enough tension, and the chain may sag. If the chain is too short, the derailleur will be stretched too far forward, and it may not shift properly.
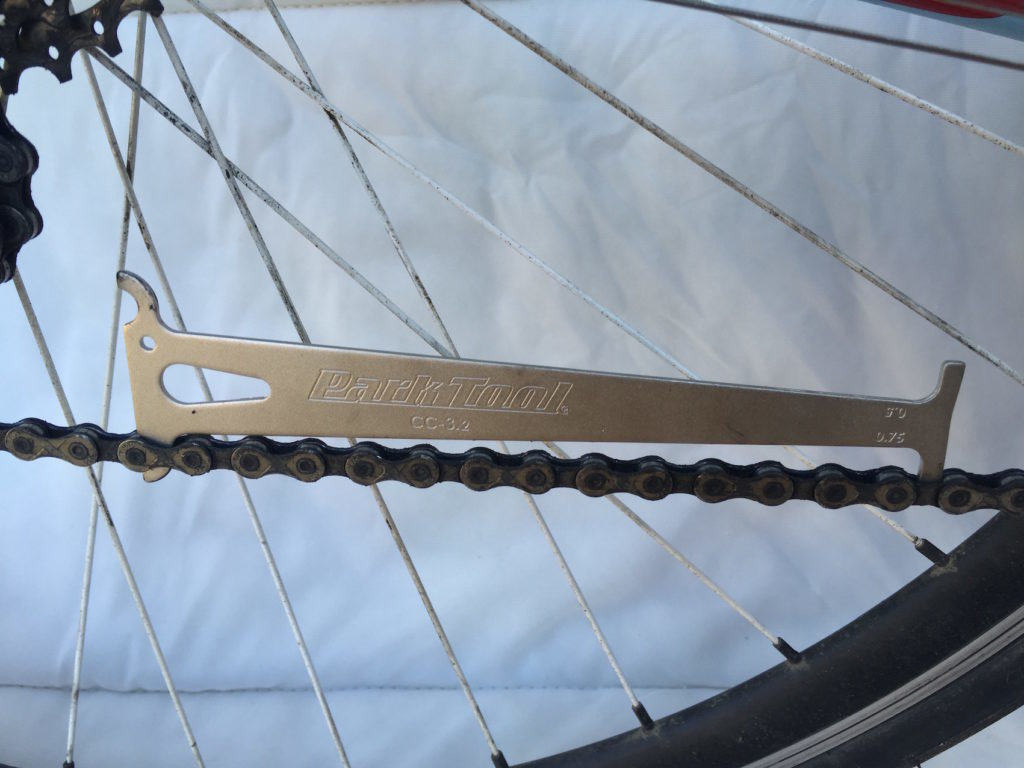 Motorcycle chain at 0.75% wear
6. How to Maintain a Bike Chain?
Maintaining a motorcycle chain is essential for prolonging its lifespan and ensuring optimal performance. Regular cleaning and lubrication can prevent wear and tear, reduce friction, and improve shifting.
6.1 Why is Regular Chain Maintenance Important?
Regular chain maintenance is crucial for several reasons:
- Prolongs Chain Lifespan: Regular cleaning and lubrication prevent wear and tear, extending the chain’s lifespan.
- Ensures Smooth Shifting: A clean and lubricated chain provides smooth and precise shifting.
- Reduces Friction: Proper lubrication reduces friction, making pedaling more efficient.
- Prevents Rust and Corrosion: Regular maintenance prevents rust and corrosion, which can weaken the chain.
- Saves Money: A well-maintained chain lasts longer and prevents damage to other drivetrain components, saving money on costly repairs.
6.2 How to Clean a Bike Chain?
Cleaning a motorcycle chain is a simple process that can be performed with a few basic tools and materials. Regular cleaning removes dirt, grime, and old lubricant, allowing the chain to function properly.
6.2.1 Gather the Necessary Supplies
Gather the necessary supplies for cleaning the chain, including:
- Chain cleaner or degreaser
- Chain cleaning tool or brush
- Rags or cloths
- Gloves
6.2.2 Clean the Chain
Follow these steps to clean the motorcycle chain:
- Apply Chain Cleaner: Apply chain cleaner or degreaser to the chain, making sure to coat all of the links.
- Use a Chain Cleaning Tool or Brush: Use a chain cleaning tool or brush to scrub the chain, removing dirt and grime.
- Wipe the Chain Clean: Wipe the chain clean with a rag or cloth, removing any remaining dirt and cleaner.
- Inspect the Chain: Inspect the chain for any signs of damage or wear.
6.3 How to Lubricate a Bike Chain?
Lubricating a motorcycle chain is essential for reducing friction, preventing wear, and ensuring smooth shifting. Regular lubrication keeps the chain functioning properly and extends its lifespan.
6.3.1 Choose the Right Lubricant
Choose a lubricant that is specifically designed for motorcycle chains. Different lubricants are available for different riding conditions, such as wet or dry conditions.
6.3.2 Apply Lubricant
Follow these steps to lubricate the motorcycle chain:
- Apply Lubricant to Each Link: Apply lubricant to each link of the chain, making sure to coat all of the rollers and pins.
- Rotate the Chain: Rotate the chain backwards to distribute the lubricant evenly.
- Wipe Off Excess Lubricant: Wipe off any excess lubricant with a rag or cloth. Excess lubricant can attract dirt and grime.
6.4 How Often Should You Clean and Lubricate Your Bike Chain?
The frequency of cleaning and lubricating a motorcycle chain depends on the riding conditions. In general, the chain should be cleaned and lubricated every 100 to 300 miles, or after riding in wet or dirty conditions.
6.4.1 Riding in Dry Conditions
If riding in dry conditions, the chain may only need to be cleaned and lubricated every 300 miles.
6.4.2 Riding in Wet or Dirty Conditions
If riding in wet or dirty conditions, the chain should be cleaned and lubricated after each ride.
7. What Are Common Bike Chain Problems and Solutions?
Despite regular maintenance, motorcycle chains can experience various problems. Recognizing these problems and implementing effective solutions can prevent further damage and ensure optimal performance.
7.1 What Causes a Bike Chain to Skip?
A motorcycle chain may skip due to several reasons:
- Worn Chain: A worn chain that has stretched beyond its useful life may skip over the teeth on the cassette or chainrings.
- Worn Cassette or Chainrings: Worn teeth on the cassette or chainrings may not properly engage with the chain, causing it to skip.
- Stiff Links: Stiff links in the chain may prevent it from flexing properly, causing it to skip.
- Improper Adjustment: Improper derailleur adjustment can cause the chain to skip.
7.2 How to Fix a Stiff Bike Chain Link?
Stiff links in a motorcycle chain can cause shifting problems and reduce performance. Follow these steps to fix a stiff chain link:
- Identify the Stiff Link: Identify the stiff link by rotating the chain and feeling for any resistance.
- Apply Lubricant: Apply lubricant to the stiff link, making sure to coat all of the rollers and pins.
- Flex the Link: Flex the link back and forth to loosen it up.
- Repeat as Necessary: Repeat the process as necessary until the link moves freely.
7.3 How to Prevent Bike Chain Rust?
Rust can weaken a motorcycle chain and reduce its lifespan. Follow these steps to prevent chain rust:
- Keep the Chain Clean: Keep the chain clean by regularly removing dirt and grime.
- Lubricate the Chain: Lubricate the chain with a lubricant that is designed to protect against rust and corrosion.
- Store the Bike Properly: Store the bike in a dry place to prevent moisture from accumulating on the chain.
7.4 When to Replace a Cassette or Chainrings Along with the Chain?
Replacing the cassette or chainrings along with the chain may be necessary if they are worn or damaged. Worn teeth on the cassette or chainrings may not properly engage with the chain, causing it to skip or shift poorly. If the cassette or chainrings show signs of wear, such as rounded or hooked teeth, they should be replaced along with the chain.
8. Bike Chain Maintenance Tips for Different Riding Conditions
Different riding conditions require different maintenance strategies for a motorcycle chain. Adjusting the maintenance routine to match the riding conditions can prolong the chain’s lifespan and ensure optimal performance.
8.1 How to Maintain a Bike Chain in Wet Conditions?
Riding in wet conditions can cause rust and corrosion on the motorcycle chain. Follow these tips to maintain the chain in wet conditions:
- Clean the Chain After Each Ride: Clean the chain after each ride to remove dirt and grime.
- Lubricate the Chain with a Wet Lube: Lubricate the chain with a wet lube that is designed to repel water and protect against rust and corrosion.
- Dry the Chain: Dry the chain after lubricating it to prevent water from accumulating on the chain.
8.2 How to Maintain a Bike Chain in Dusty Conditions?
Riding in dusty conditions can cause dirt and grime to accumulate on the motorcycle chain. Follow these tips to maintain the chain in dusty conditions:
- Clean the Chain Regularly: Clean the chain regularly to remove dirt and grime.
- Use a Dry Lube: Use a dry lube that is designed to repel dirt and dust.
- Wipe Off Excess Lube: Wipe off any excess lube to prevent dirt from accumulating on the chain.
8.3 How to Maintain a Bike Chain in Cold Weather?
Riding in cold weather can cause the lubricant on the motorcycle chain to thicken, reducing its effectiveness. Follow these tips to maintain the chain in cold weather:
- Use a Cold Weather Lube: Use a cold weather lube that is designed to remain fluid in cold temperatures.
- Apply Lube More Frequently: Apply lube more frequently to ensure that the chain remains properly lubricated.
- Warm Up the Bike Before Riding: Warm up the bike before riding to allow the lubricant to flow freely.
9. Advanced Bike Chain Maintenance Techniques
For serious motorcyclists, mastering advanced chain maintenance techniques can significantly improve drivetrain performance and longevity.
9.1 What is Ultrasonic Chain Cleaning?
Ultrasonic chain cleaning is an advanced technique that uses ultrasonic waves to remove dirt and grime from the motorcycle chain. This technique is more effective than traditional cleaning methods and can remove even the most stubborn dirt.
9.1.1 How to Perform Ultrasonic Chain Cleaning
To perform ultrasonic chain cleaning, you will need an ultrasonic cleaner, a chain cleaning solution, and a chain tool. Remove the chain from the bike using the chain tool, and then place it in the ultrasonic cleaner. Add the chain cleaning solution to the cleaner, and then turn it on. The ultrasonic waves will remove dirt and grime from the chain. After the cleaning is complete, rinse the chain with water and dry it thoroughly.
9.2 How to Use a Chain Alignment Tool?
A chain alignment tool is used to ensure that the rear wheel is properly aligned with the front wheel. Proper alignment is essential for ensuring smooth shifting and preventing excessive wear on the motorcycle chain and drivetrain components.
9.2.1 How to Use a Chain Alignment Tool
To use a chain alignment tool, place it on the rear sprocket and align it with the chain. Adjust the rear wheel until the chain is properly aligned. Tighten the axle nut to secure the rear wheel in place.
10. Frequently Asked Questions (FAQs) About Bike Chain Maintenance
Here are some frequently asked questions about motorcycle chain maintenance:
10.1 How Long Does a Bike Chain Last?
A motorcycle chain typically lasts between 2,000 and 5,000 miles, depending on riding conditions and maintenance habits.
10.2 Can I Clean My Bike Chain with Dish Soap?
Yes, you can clean your motorcycle chain with dish soap, but it is important to rinse the chain thoroughly and lubricate it properly after cleaning.
10.3 What is the Best Lube for My Bike Chain?
The best lube for your motorcycle chain depends on the riding conditions. Use a wet lube for wet conditions and a dry lube for dry conditions.
10.4 How Do I Know When to Replace My Bike Chain?
You should replace your motorcycle chain when it shows signs of wear, such as skipping, poor shifting, or visible rust. You can also use a chain wear indicator to measure the wear of the chain.
10.5 Is it Possible to Over-Lubricate a Bike Chain?
Yes, it is possible to over-lubricate a motorcycle chain. Excess lubricant can attract dirt and grime, so it is important to wipe off any excess lubricant after applying it.
10.6 Can I Use WD-40 on My Bike Chain?
No, you should not use WD-40 on your motorcycle chain. WD-40 is a solvent, not a lubricant, and it can damage the chain.
10.7 How Do I Tighten a Loose Bike Chain?
You can tighten a loose motorcycle chain by adjusting the rear wheel. Loosen the axle nut and then adjust the tension adjusters until the chain is properly tensioned.
10.8 How Do I Prevent My Bike Chain From Rusting?
You can prevent your motorcycle chain from rusting by keeping it clean, lubricating it properly, and storing the bike in a dry place.
10.9 Can I Use a Master Link to Connect My Bike Chain?
Yes, you can use a master link to connect your motorcycle chain. A master link is a convenient way to connect the chain without using a chain tool.
10.10 How Do I Dispose of My Old Bike Chain?
You can dispose of your old motorcycle chain by taking it to a local recycling center or metal scrap yard.
Maintaining your motorcycle chain doesn’t have to be a chore. With the right knowledge and tools, you can keep your chain in top condition, ensuring a smooth and efficient ride. Remember to regularly inspect, clean, and lubricate your chain, and replace it when necessary to prevent costly damage to other drivetrain components.
Ready to take your motorcycle maintenance to the next level? Visit usabikers.net for more in-depth guides, product reviews, and community discussions. Join our forum to connect with fellow motorcycle enthusiasts, share your experiences, and get expert advice. Ride safe and keep your chain in top shape with usabikers.net.
Address: 801 Sturgis Main St, Sturgis, SD 57785, United States
Phone: +1 (605) 347-2000
Website: usabikers.net