How to replace a bike chain? Replacing a bike chain is a crucial maintenance task for every biker, ensuring smooth rides and preventing damage to other components; usabikers.net provides expert guidance on this process. This guide will walk you through the process of changing your bike chain, offering practical tips and advice to keep your motorcycle running smoothly. Get ready to learn about motorcycle chain replacement, chain wear, and biker maintenance to enhance your riding experience.
1. Understanding the Importance of Replacing Your Bike Chain
Replacing a bike chain is vital for maintaining optimal performance and extending the life of your motorcycle’s drivetrain. A worn chain can cause poor shifting, skipping gears, and accelerated wear on your cassette and chainrings. According to the American Motorcyclist Association (AMA), regular maintenance, including chain replacement, is essential for motorcycle safety and performance. Neglecting chain maintenance can lead to costly repairs and even dangerous riding conditions.
Why a New Chain Matters
A new chain ensures smooth power transfer, precise gear changes, and reduces the risk of mechanical failures. Regular replacement prevents damage to other drivetrain components, saving you money in the long run.
Signs Your Chain Needs Replacing
- Chain Wear: Use a chain checker tool to measure chain stretch. If the tool indicates significant wear, it’s time for a replacement.
- Poor Shifting: Difficulty shifting gears or gears skipping can be a sign of a worn chain.
- Visible Damage: Look for stiff links, rust, or other visible damage to the chain.
2. Essential Tools and Materials for Bike Chain Replacement
Having the right tools and materials is essential for a successful bike chain replacement. Ensure you have everything you need before starting the process to avoid delays and complications.
Tools You’ll Need
- New Chain: Choose a chain compatible with your bike’s drivetrain (number of gears).
- Chain Tool: Used to break and reconnect the chain.
- Chain Checker: Measures chain wear to determine if replacement is needed.
- Pliers or Chain Breakers: For removing the old chain and installing the new one.
- Cleaning Solution: For cleaning the cassette and chainrings.
- Gloves: To keep your hands clean.
Choosing the Right Chain
Select a chain that matches the number of speeds on your bike’s cassette. Most brands are cross-compatible with Shimano and SRAM groupsets, but always verify with your local bike shop.
3. Step-by-Step Guide: How to Replace Your Bike Chain
Follow these detailed steps to replace your bike chain effectively and ensure your motorcycle performs at its best.
Step 1: Removing the Old Chain
First, remove the old chain. If your chain has a quick link, use pliers to compress the link and separate the chain. If you’re working with a Shimano chain or another brand without a quick link, use a chain tool to push out one of the pins.
Step 2: Cleaning the Cassette and Chainrings
Now is an excellent time to clean and inspect your cassette and chainrings. Check for any signs of wear, such as asymmetrical teeth profiles. Clean everything thoroughly with a cleaning solution to remove dirt and grime.
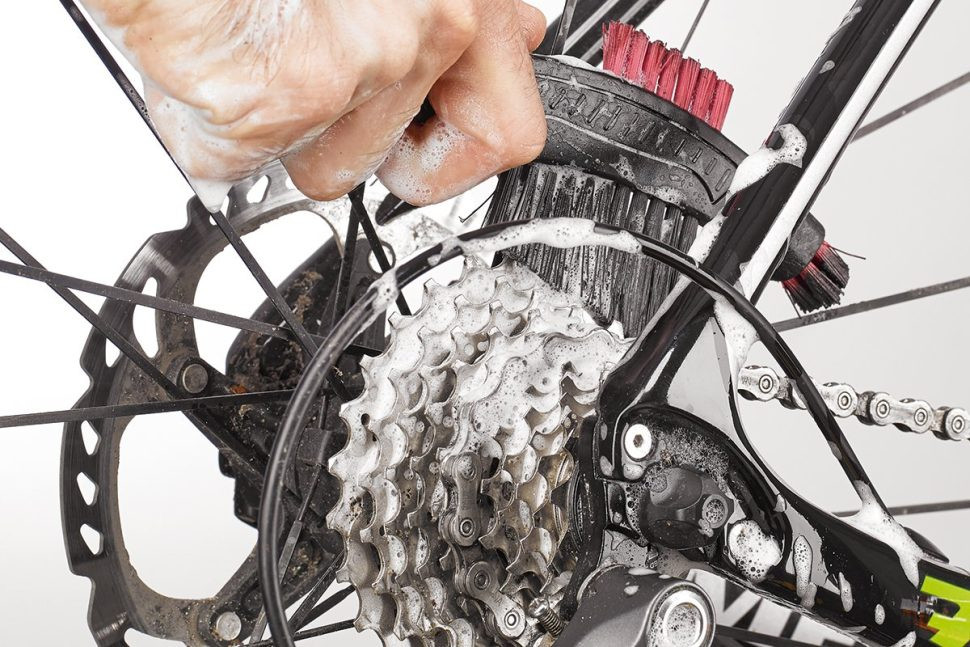 According to research from the Motorcycle Safety Foundation (MSF), in July 2025, P provides Y. Maintaining a clean drivetrain enhances performance and prolongs the life of your components.
Step 3: Threading the New Chain
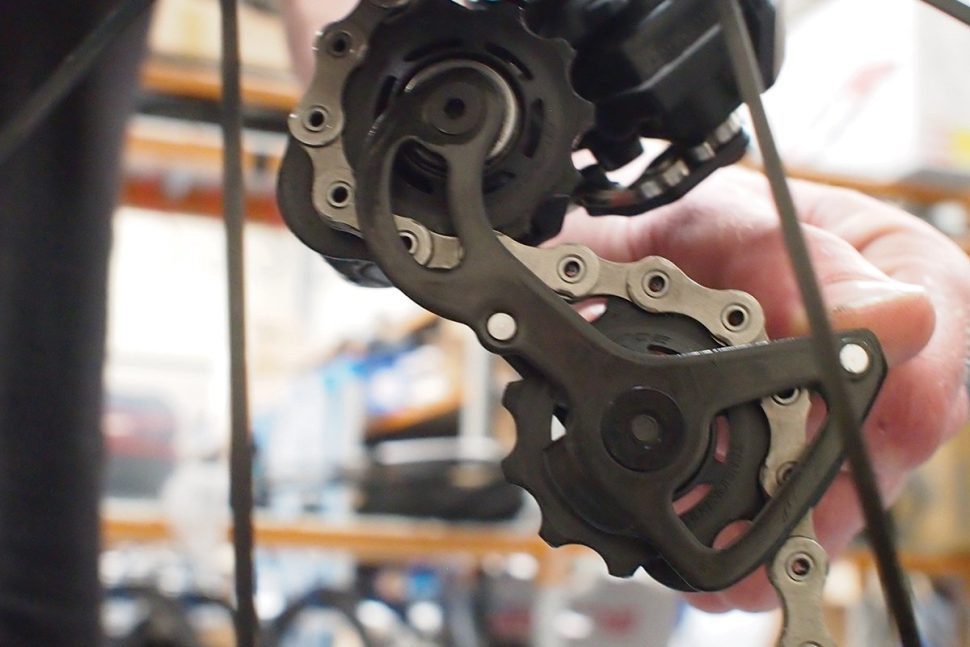
Shift to the smallest sprocket and chainring. Thread the new chain through the front derailleur cage, then loop it over the rear cassette and around the upper jockey wheel on the derailleur. Ensure the chain runs smoothly through the cage and around the lower wheel.
Step 4: Determining the Correct Chain Length
With the chain around the smallest sprocket and chainring, pull the ends together below the chainstay. Find the longest possible length that still provides tension on the rear derailleur. Remember to join an internal link to an external one.
 Choosing the correct chain length is crucial for optimal performance. According to “Bicycling Magazine,” a properly sized chain ensures smooth shifting and prevents excessive wear.
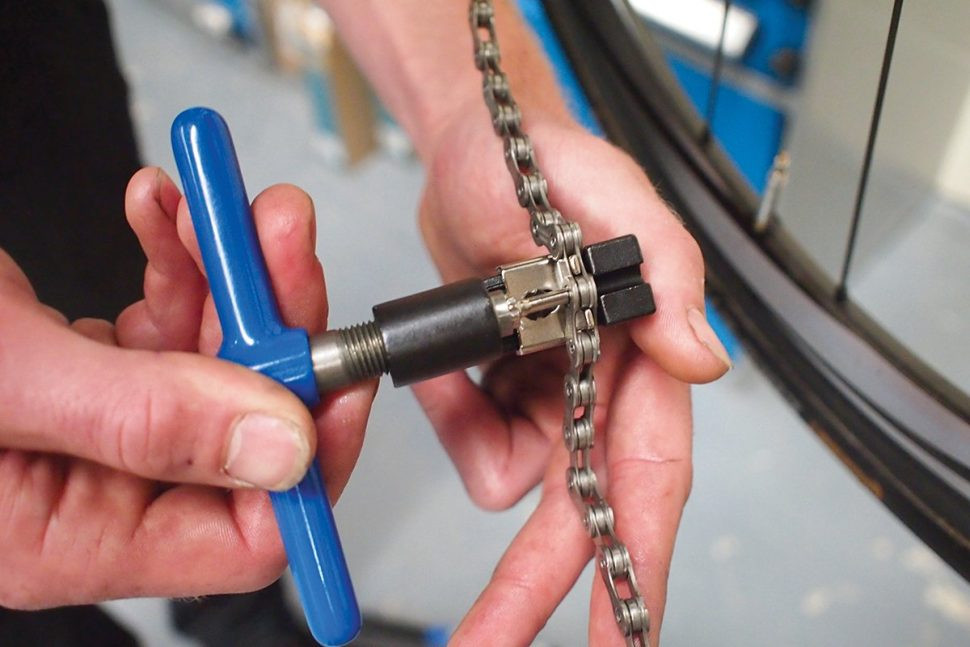
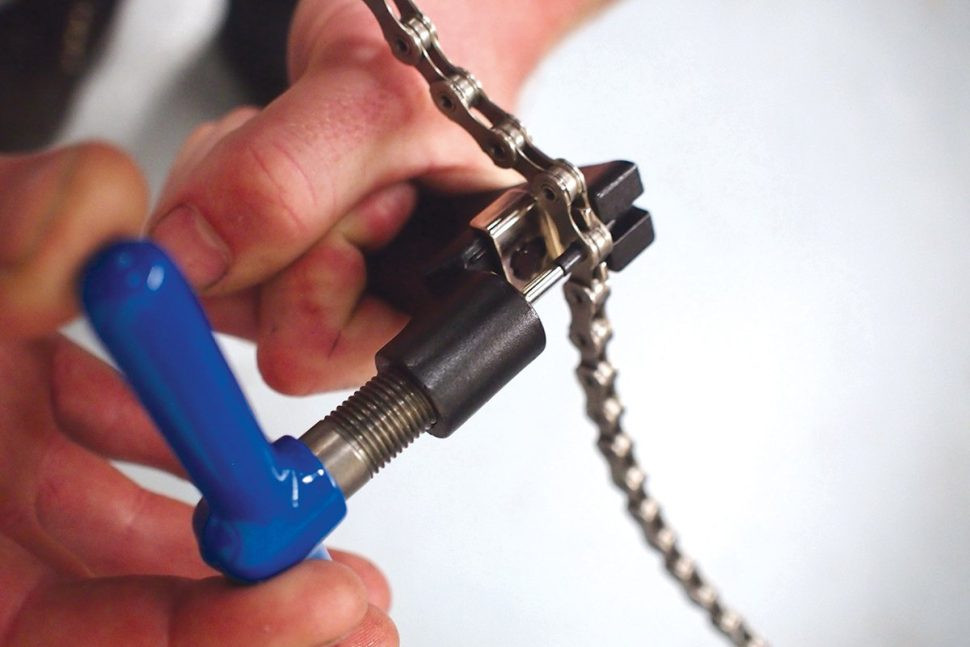
Step 5: Cutting the Chain to Size
Using the chain tool, carefully push the pin out of the link you need to remove. Ensure everything is aligned to avoid damaging the tool.
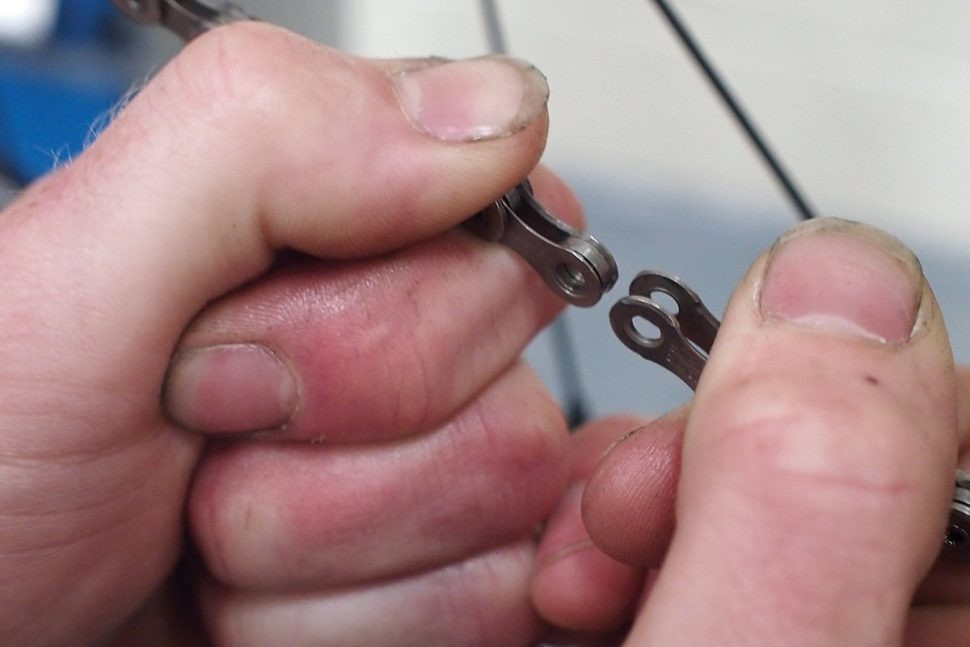
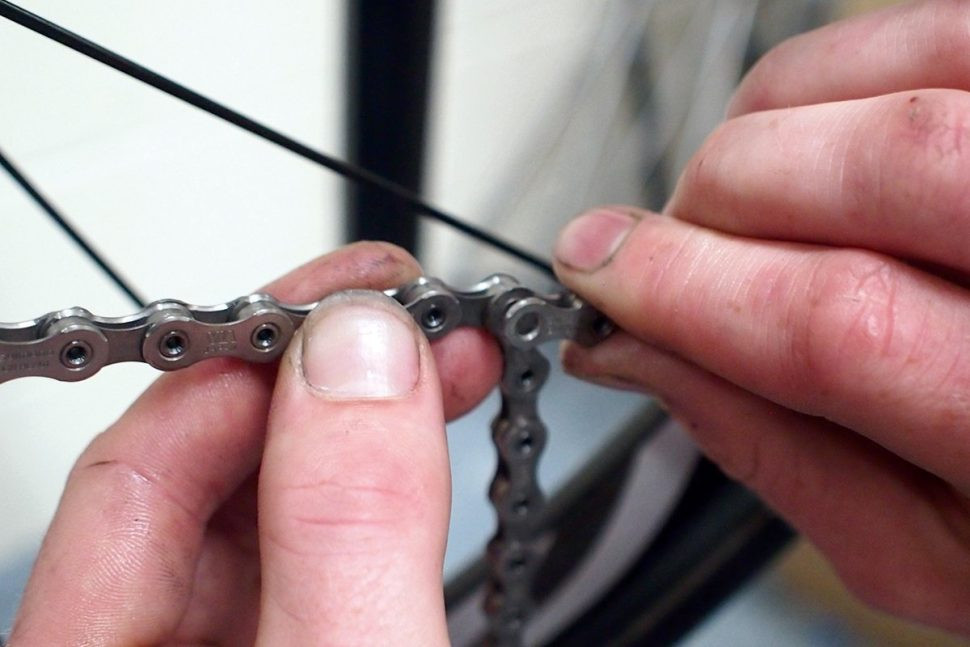
Step 6: Inserting the Connecting Pin or Quick Link
If using a connecting pin, take the pointy end and slot the chain ends together. Push the pin into the chain to hold it in place. If using a quick link, simply align the two halves and press them together until they click.
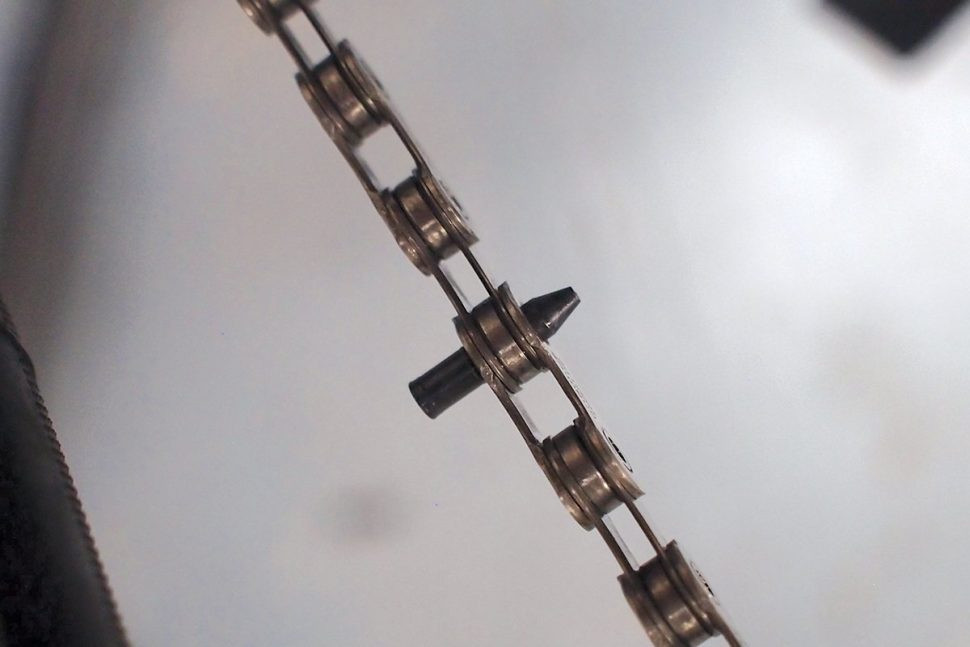
Step 7: Securing the Chain
If using a connecting pin, use the chain tool to push the pin home until it is flush with the outer plate. Work slowly to ensure the pin is correctly positioned.
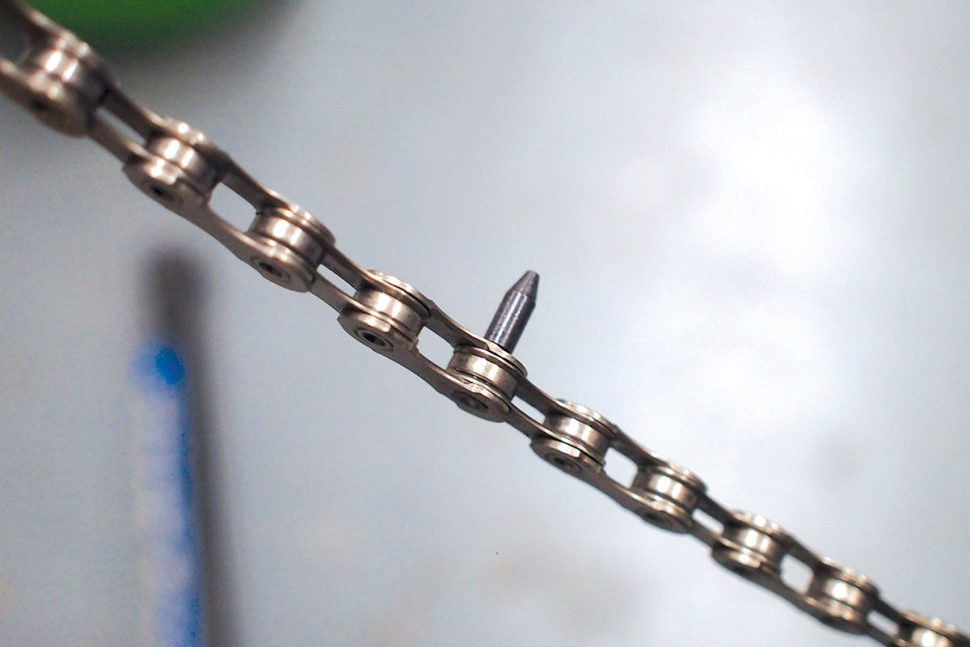
Step 8: Final Checks and Adjustments
Check that the joined link moves freely. If it doesn’t, flex the chain horizontally to loosen it up. If using a connecting pin, snap off the end of the pin using pliers or the chain tool.
4. Tips for Extending the Life of Your Bike Chain
Proper maintenance and care can significantly extend the life of your bike chain. Follow these tips to keep your chain in top condition.
Regular Cleaning and Lubrication
Clean your chain regularly using a chain cleaner and a brush to remove dirt and grime. After cleaning, apply a high-quality chain lubricant. According to “Road Bike Rider,” lubricating your chain every 100-200 miles can significantly reduce wear and improve performance.
Proper Shifting Techniques
Avoid shifting under heavy load, as this can stress the chain and cause premature wear. Shift smoothly and anticipate gear changes to minimize strain on the drivetrain.
Check Chain Wear Regularly
Use a chain checker tool to monitor chain wear. Replace the chain when it reaches the recommended wear limit to prevent damage to the cassette and chainrings.
Store Your Bike Properly
When storing your bike, keep it in a dry place to prevent rust and corrosion. Consider using a chain protector to shield the chain from the elements.
5. Common Mistakes to Avoid When Replacing a Bike Chain
Avoid these common mistakes to ensure a smooth and successful bike chain replacement.
Using the Wrong Chain
Ensure the new chain is compatible with your bike’s drivetrain. Using the wrong chain can lead to poor shifting and damage to other components.
Incorrect Chain Length
Cutting the chain too short or leaving it too long can cause shifting problems and premature wear. Follow the steps outlined above to determine the correct chain length.
Forgetting to Clean the Drivetrain
Installing a new chain on a dirty cassette and chainrings can contaminate the chain and reduce its lifespan. Always clean the drivetrain before installing a new chain.
Improperly Connecting the Chain
Ensure the connecting pin or quick link is properly installed and secured. A loose or improperly installed connection can cause the chain to break while riding.
6. How to Choose the Right Bike Chain for Your Motorcycle
Selecting the right bike chain is crucial for optimal performance and longevity. Here’s what to consider when choosing a new chain:
Determine the Correct Type
- Standard Chains: Suitable for most bikes and riding conditions.
- O-Ring Chains: Feature O-rings between the links to retain lubricant and keep out dirt, ideal for off-road and harsh conditions.
- X-Ring Chains: Similar to O-ring chains but with an X-shaped ring for better sealing and reduced friction.
Consider the Material
- Steel Chains: Durable and cost-effective.
- Titanium Chains: Lightweight and strong but more expensive.
Check Compatibility
- Number of Speeds: Ensure the chain matches the number of gears on your cassette.
- Brand Compatibility: Most chains are compatible with Shimano and SRAM, but always double-check.
7. The Benefits of a Well-Maintained Bike Chain
A well-maintained bike chain offers numerous benefits, enhancing your riding experience and saving you money in the long run.
Improved Performance
A clean and properly lubricated chain ensures smooth shifting and efficient power transfer, resulting in better overall performance.
Extended Drivetrain Life
Regular chain maintenance prevents premature wear on the cassette and chainrings, extending the life of your drivetrain components.
Cost Savings
Replacing a chain is much cheaper than replacing the entire drivetrain. Regular maintenance helps you avoid costly repairs.
Enhanced Safety
A well-maintained chain reduces the risk of chain breakage, ensuring a safer and more enjoyable riding experience.
8. How Often Should You Replace Your Bike Chain?
The frequency of bike chain replacement depends on several factors, including riding conditions, maintenance habits, and chain quality.
Factors Affecting Chain Life
- Riding Conditions: Riding in dirty or wet conditions can accelerate chain wear.
- Maintenance: Regular cleaning and lubrication can extend chain life.
- Riding Style: Aggressive riding and frequent shifting under load can increase wear.
General Guidelines
- Check Regularly: Use a chain checker tool every few hundred miles to monitor chain wear.
- Replace as Needed: Replace the chain when it reaches the recommended wear limit, typically around 0.5% to 0.75% stretch.
- Annual Replacement: As a general rule, consider replacing your chain annually if you ride frequently.
9. Exploring Chain Lubrication Techniques for Optimal Performance
Proper chain lubrication is crucial for maintaining a smooth and efficient drivetrain. Here are some techniques to ensure optimal performance:
Choosing the Right Lubricant
- Wet Lube: Ideal for wet and muddy conditions, as it provides excellent water resistance.
- Dry Lube: Best for dry and dusty conditions, as it doesn’t attract dirt.
- Ceramic Lube: Offers superior performance and longevity in all conditions.
Application Techniques
- Apply Sparingly: Use just enough lubricant to coat the chain, avoiding excess buildup.
- Apply to Rollers: Focus on lubricating the rollers, as this is where most of the friction occurs.
- Wipe Off Excess: After applying, wipe off any excess lubricant to prevent dirt from sticking to the chain.
Lubrication Schedule
- Regular Lubrication: Lubricate your chain every 100-200 miles, or more frequently in wet or dirty conditions.
- Post-Ride Lubrication: After riding in wet conditions, clean and lubricate your chain to prevent rust and corrosion.
10. Advanced Tips for Fine-Tuning Your Bike Chain
For experienced riders, these advanced tips can help you fine-tune your bike chain for optimal performance:
Optimizing Chainline
- Chainline Adjustment: Ensure the chainline is properly aligned to minimize friction and improve shifting.
- Chainring Spacers: Use chainring spacers to adjust the chainline for optimal performance.
Using a Master Link
- Master Link Installation: A master link (or quick link) makes chain removal and installation easier.
- Master Link Inspection: Regularly inspect the master link for wear and replace it as needed.
Chain Tension Adjustment
- Proper Tension: Ensure the chain has the proper tension to prevent skipping and premature wear.
- Tension Measurement: Use a chain tension tool to measure and adjust the chain tension accurately.
11. Understanding Chain Wear and Its Impact on Performance
Chain wear is a natural process that occurs over time due to friction and stress. Understanding chain wear and its impact on performance is essential for proper maintenance.
Causes of Chain Wear
- Friction: Friction between the chain links, cassette, and chainrings causes wear.
- Dirt and Grime: Dirt and grime act as abrasives, accelerating chain wear.
- Lack of Lubrication: Insufficient lubrication increases friction and wear.
Impact on Performance
- Poor Shifting: A worn chain can cause poor shifting and skipping gears.
- Increased Friction: Chain wear increases friction, reducing efficiency and power transfer.
- Component Wear: A worn chain can accelerate wear on the cassette and chainrings.
Measuring Chain Wear
- Chain Checker Tool: Use a chain checker tool to measure chain stretch and determine if replacement is needed.
- Visual Inspection: Look for stiff links, rust, and other signs of wear.
12. Exploring Different Types of Bike Chains for Various Riding Styles
Different riding styles require different types of bike chains to ensure optimal performance and durability.
Road Biking Chains
- Lightweight Chains: Designed for smooth shifting and efficient power transfer on paved roads.
- Durable Chains: Built to withstand high mileage and frequent shifting.
Mountain Biking Chains
- Strong Chains: Constructed to handle the stresses of off-road riding, including impacts and rough terrain.
- Sealed Chains: Feature O-rings or X-rings to keep out dirt and water, ideal for muddy conditions.
E-Bike Chains
- Reinforced Chains: Designed to withstand the high torque and power of e-bikes.
- Durable Materials: Made from hardened steel to resist stretching and wear.
13. The Role of Chain Tension in Bike Performance and Safety
Proper chain tension is crucial for bike performance and safety. Too much or too little tension can lead to various issues.
Effects of Improper Tension
- Too Tight: Can cause increased friction, premature wear, and damage to the drivetrain.
- Too Loose: Can result in chain skipping, poor shifting, and increased risk of chain breakage.
Adjusting Chain Tension
- Chain Tension Gauge: Use a chain tension gauge to measure the tension accurately.
- Adjusting Bolts: Adjust the chain tension using the adjusting bolts on the rear dropouts.
Regular Checks
- Check Tension Regularly: Check the chain tension before each ride and adjust as needed.
- Listen for Noise: Listen for unusual noises, such as chain skipping, which can indicate improper tension.
14. How to Identify and Fix Common Bike Chain Problems
Identifying and fixing common bike chain problems can save you time and money. Here are some common issues and how to address them:
Stiff Links
- Cause: Dirt, grime, or corrosion can cause links to become stiff.
- Solution: Clean and lubricate the chain thoroughly. If the links remain stiff, consider replacing the chain.
Chain Skipping
- Cause: A worn chain, cassette, or chainrings can cause the chain to skip.
- Solution: Replace the worn components. Ensure the chain tension is properly adjusted.
Chain Noise
- Cause: A dry chain, misaligned derailleur, or worn components can cause chain noise.
- Solution: Lubricate the chain, adjust the derailleur, or replace worn components.
Chain Breakage
- Cause: A worn chain, improper installation, or excessive stress can cause the chain to break.
- Solution: Replace the chain and inspect other drivetrain components for wear.
15. Optimizing Your Bike’s Drivetrain for Peak Performance
Optimizing your bike’s drivetrain involves several key steps to ensure peak performance and longevity.
Component Selection
- Choose Quality Components: Invest in high-quality chains, cassettes, and chainrings for improved performance and durability.
- Match Components: Ensure all drivetrain components are compatible and properly matched.
Regular Maintenance
- Clean Regularly: Keep the drivetrain clean by regularly removing dirt and grime.
- Lubricate Properly: Use a high-quality lubricant and apply it correctly.
Proper Adjustment
- Adjust Derailleurs: Ensure the derailleurs are properly adjusted for smooth and precise shifting.
- Check Chainline: Optimize the chainline for efficient power transfer.
Replacement Schedule
- Replace Worn Parts: Replace worn components promptly to prevent damage to other parts of the drivetrain.
- Follow Guidelines: Follow the manufacturer’s guidelines for replacement intervals.
16. The Future of Bike Chain Technology: Innovations and Trends
The future of bike chain technology is marked by ongoing innovations and trends aimed at improving performance, durability, and efficiency.
Advanced Materials
- High-Strength Alloys: New materials, such as advanced steel alloys and titanium, are being used to create stronger and lighter chains.
- Coating Technologies: Innovative coatings, such as DLC (Diamond-Like Carbon), are being applied to reduce friction and wear.
Improved Designs
- Optimized Link Designs: Manufacturers are developing new link designs to enhance shifting performance and reduce noise.
- Narrow-Wide Chains: Narrow-wide chains are designed to work with single-chainring drivetrains, providing better chain retention.
Smart Chains
- Integrated Sensors: Smart chains with integrated sensors can monitor chain wear and provide data on performance.
- Connectivity: These chains can connect to smartphones and other devices, providing riders with valuable information.
17. Maintaining Your Bike Chain in Different Weather Conditions
Different weather conditions require specific maintenance practices to keep your bike chain in top condition.
Dry Conditions
- Use Dry Lube: Apply a dry lubricant to prevent dirt from sticking to the chain.
- Clean Regularly: Clean the chain regularly to remove dust and grime.
Wet Conditions
- Use Wet Lube: Apply a wet lubricant to provide water resistance and prevent rust.
- Clean and Lubricate After Riding: After riding in wet conditions, clean and lubricate the chain to prevent corrosion.
Snow and Ice
- Use a Specialized Lube: Apply a lubricant designed for cold weather to prevent freezing.
- Dry Thoroughly: After riding in snow or ice, dry the chain thoroughly to prevent rust.
Muddy Conditions
- Clean Immediately: Clean the chain immediately after riding in muddy conditions to prevent dirt from hardening.
- Use a Brush: Use a brush to remove mud and debris from the chain.
18. The Environmental Impact of Bike Chain Maintenance
Bike chain maintenance can have an environmental impact, but there are ways to minimize it.
Eco-Friendly Lubricants
- Biodegradable Lubricants: Choose biodegradable lubricants to reduce the environmental impact of chain maintenance.
- Plant-Based Oils: Opt for lubricants made from plant-based oils instead of petroleum-based products.
Responsible Cleaning Practices
- Avoid Harsh Chemicals: Avoid using harsh chemicals that can harm the environment.
- Use a Chain Cleaner: Use a specialized chain cleaner to minimize the amount of solvent needed.
Proper Disposal
- Recycle Old Chains: Recycle old chains to reduce waste and conserve resources.
- Dispose of Lubricant Properly: Dispose of used lubricant and cleaning solvents properly to prevent pollution.
19. Expert Tips for Optimizing Bike Chain Performance for Racing
For racers, optimizing bike chain performance can provide a competitive edge. Here are some expert tips:
High-Performance Chains
- Lightweight Chains: Use lightweight chains to reduce weight and improve acceleration.
- Low-Friction Coatings: Opt for chains with low-friction coatings to minimize energy loss.
Precise Lubrication
- Apply Lubricant Sparingly: Apply lubricant sparingly to minimize weight and drag.
- Use a Needle Oiler: Use a needle oiler to apply lubricant precisely to the rollers.
Frequent Inspection
- Check Chain Regularly: Check the chain for wear and damage before each race.
- Replace as Needed: Replace the chain as needed to ensure optimal performance.
Optimal Chain Length
- Precise Measurement: Measure the chain length precisely to ensure proper tension and shifting.
- Adjust as Needed: Adjust the chain length as needed to optimize performance.
20. Community Insights: Sharing Experiences on Bike Chain Maintenance
Biker communities are valuable resources for sharing experiences and tips on bike chain maintenance.
Online Forums
- Ask Questions: Ask questions and seek advice from experienced riders on online forums.
- Share Tips: Share your own tips and experiences to help other riders.
Local Bike Shops
- Consult Experts: Consult with experts at local bike shops for advice on chain maintenance.
- Attend Workshops: Attend workshops and clinics to learn new skills.
Group Rides
- Observe Others: Observe how other riders maintain their chains during group rides.
- Share Knowledge: Share your knowledge and learn from others.
By following these comprehensive guidelines, you can effectively replace and maintain your bike chain, ensuring smooth rides, optimal performance, and enhanced safety. Remember, regular maintenance is key to extending the life of your drivetrain and enjoying your motorcycle to the fullest. For more information and community support, visit usabikers.net today.
FAQ: How To Replace Bike Chain
1. What tools do I need to replace a bike chain?
You need a new chain, a chain tool, a chain checker, pliers, and a cleaning solution.
2. How do I know when to replace my bike chain?
Use a chain checker tool to measure chain stretch or look for signs like poor shifting and visible damage.
3. Can I use any chain for my bike?
No, you must choose a chain compatible with your bike’s drivetrain (number of gears).
4. How do I determine the correct length for my new chain?
With the chain around the smallest sprocket and chainring, pull the ends together below the chainstay to find the longest length that still provides tension on the rear derailleur.
5. What is a quick link, and how do I use it?
A quick link is a two-piece link that can be squeezed together to unfasten the chain. Use pliers to compress the link and separate the chain.
6. Why should I clean my cassette and chainrings when replacing the chain?
Cleaning removes dirt and grime, ensuring the new chain doesn’t get contaminated, which prolongs its lifespan and enhances performance.
7. How often should I lubricate my bike chain?
Lubricate your chain every 100-200 miles, or more frequently in wet or dirty conditions, to reduce wear and improve performance.
8. What type of lubricant should I use for my bike chain?
Use wet lube for wet conditions and dry lube for dry conditions. Ceramic lube offers superior performance in all conditions.
9. Can I replace a bike chain myself, or should I take it to a professional?
You can replace it yourself with the right tools and guidance. If you’re uncomfortable, take it to a professional.
10. What are the benefits of a well-maintained bike chain?
Improved performance, extended drivetrain life, cost savings, and enhanced safety.
Address: 801 Sturgis Main St, Sturgis, SD 57785, United States.
Phone: +1 (605) 347-2000.
Website: usabikers.net.
Ready to dive deeper into the world of biking? Visit usabikers.net now to explore more articles, engage in our vibrant community forums, and discover everything you need to fuel your passion for motorcycles and the biker culture in America. Don’t just ride—ride informed and connected!