
Adjusting your bike’s front derailleur is crucial for achieving smooth and reliable shifting, especially for avid bikers who demand peak performance. At usabikers.net, we provide expert guidance on front derailleur adjustment, ensuring your motorcycle shifts seamlessly between chainrings, enhancing your riding experience. Master the art of derailleur tuning, avoid frustrating chain drops, and keep your motorcycle running like a dream with our comprehensive guide, complete with tips for optimal chain alignment and cable tension.
1. Essential Tools for Front Derailleur Adjustment
What tools are indispensable for fine-tuning your front derailleur?
To properly adjust your front derailleur, you’ll need a few essential tools:
- Repair Stand: A repair stand securely holds your bike, making it easier to work on the derailleur.
- Hex Wrenches: These are necessary for loosening and tightening various bolts on the derailleur.
- Screwdriver: A Phillips or flathead screwdriver is needed for adjusting the limit screws.
- Light Lubricant: Apply lubricant to the derailleur’s pivot points and cable for smooth operation.
- Derailleur Cable and Housing: Replace worn or damaged cables and housings to ensure precise shifting.
- Caliper or Metric Ruler: Use this to measure the derailleur’s height and alignment accurately.
- Cable End Caps and Housing End Caps: These prevent fraying and maintain cable integrity.
- Rags: Keep rags handy to wipe away excess lubricant and keep your workspace clean.
Having these tools readily available will make the adjustment process smoother and more efficient, ensuring your motorcycle performs optimally.
2. Understanding Front Derailleur Function
What is the primary function of the front derailleur on a motorcycle?
The front derailleur’s main job is to move the chain between the front chainrings, allowing you to change gears efficiently. It works by using a cage that is pulled by an inner wire in one direction. When the wire is released, a spring returns the cage to its original position. A well-adjusted front derailleur will shift the chain smoothly without causing it to fall off the rings. The key adjustments are height, rotation, limit screws, and cable tension, all working together to ensure seamless gear changes.
 Front Derailleur
3. Pre-Adjustment Lubrication Tips
How important is lubrication when adjusting a front derailleur?
Lubrication is key to ensuring smooth operation of your front derailleur. Applying a light lubricant to the pivot points helps the derailleur move freely. Additionally, lubricating the inner cable wires reduces friction and improves shifting accuracy. If you’ve loosened the inner wire pinch bolt, be sure to lubricate the threads before tightening it to approximately 30-40 inch-pounds. Proper lubrication minimizes wear and tear, extending the life of your derailleur and enhancing your riding experience.
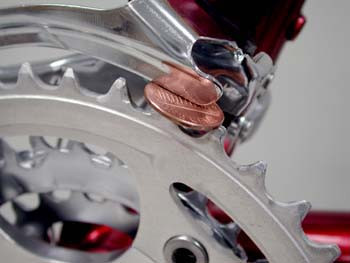
4. Setting the Correct Front Derailleur Height
How should I determine the proper height for my front derailleur?
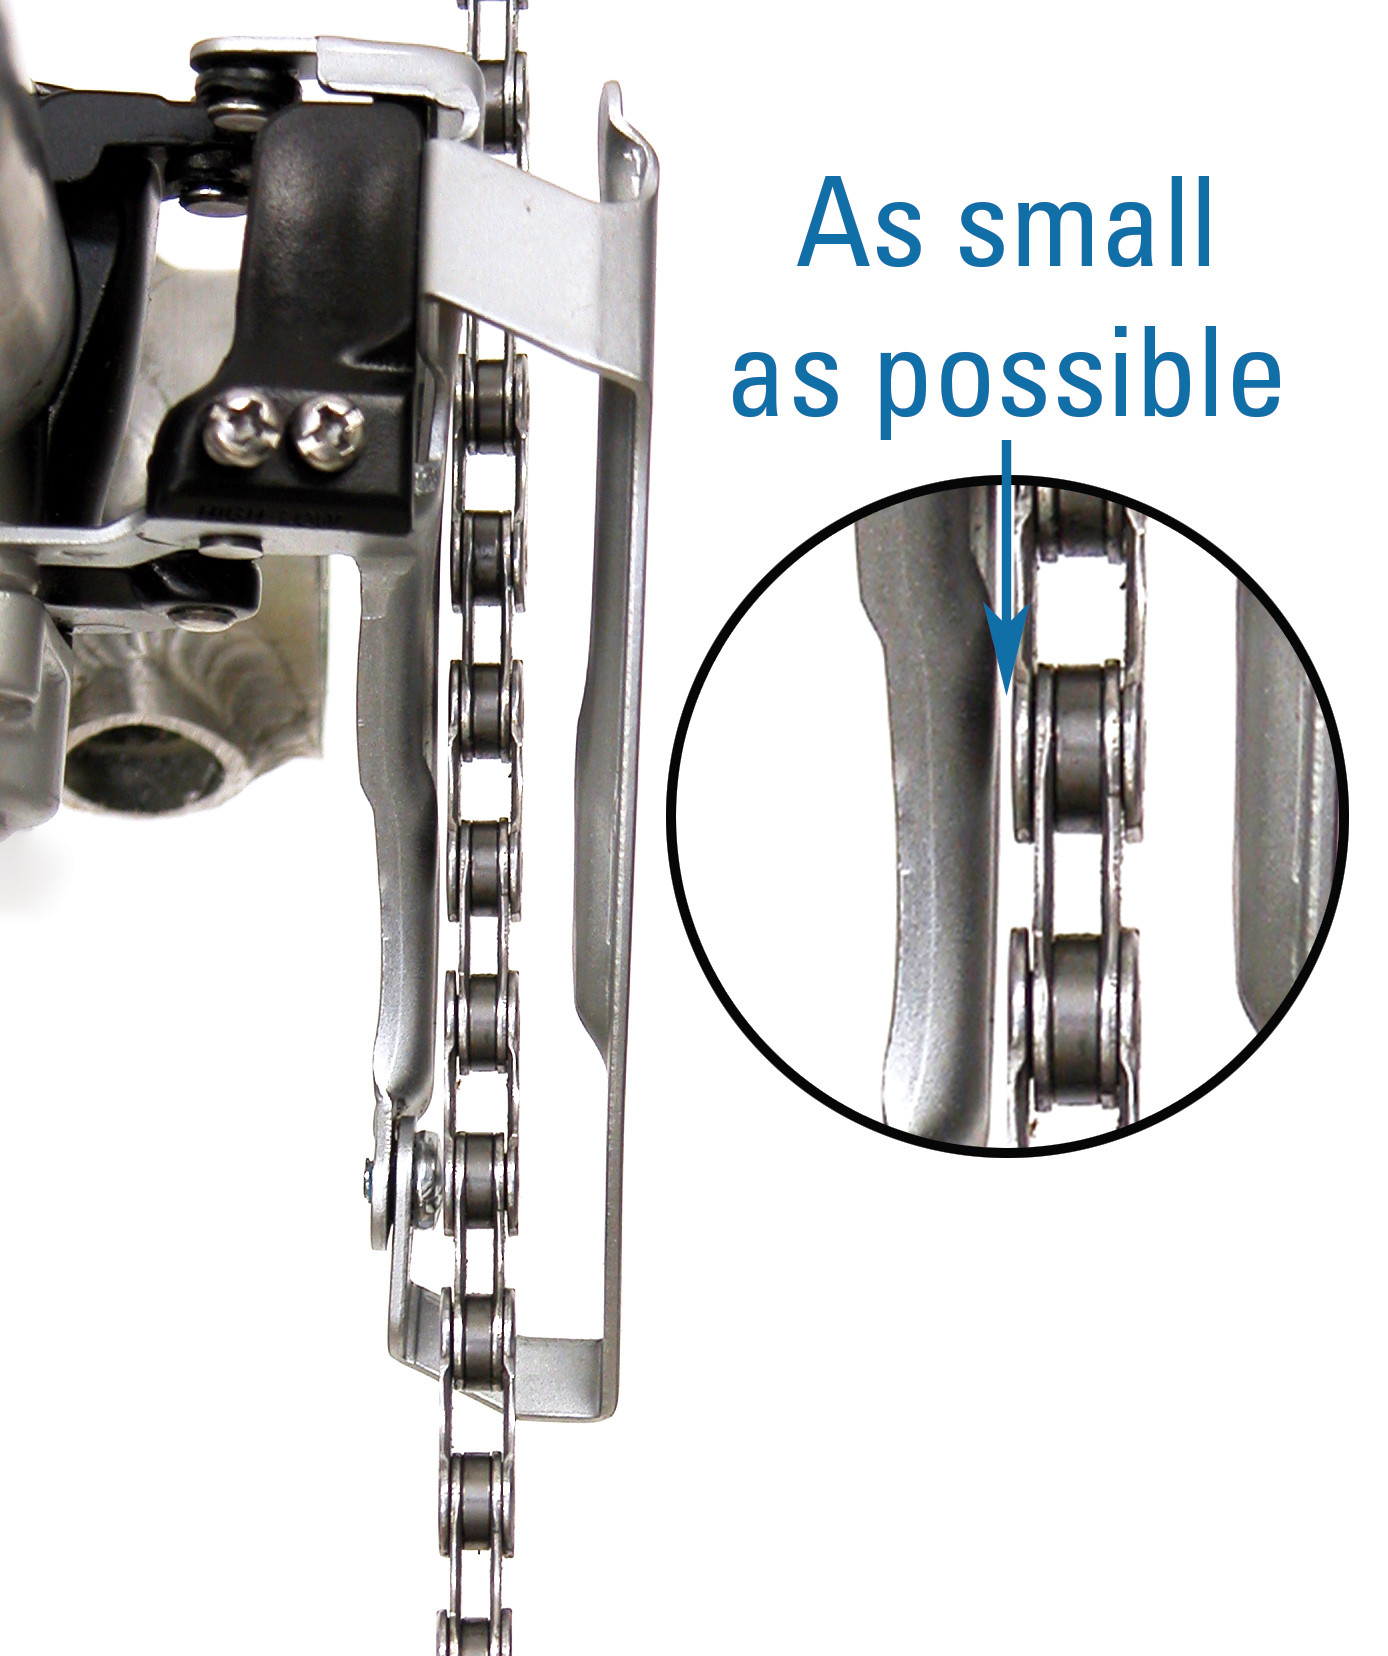
Setting the correct height for your front derailleur is crucial for optimal shifting performance. First, ensure the outer cage plate is positioned directly over the largest chainring. The gap between the teeth of the outer chainring and the lower edge of the outer cage plate should be about 1-2mm, roughly the thickness of a penny. Using a penny or a dime as a feeler gauge can help you achieve this precise measurement. If the derailleur is too high, it may shift poorly; if it’s too low, it could scrape against the chainrings or jam the chain.
5. Adjusting Derailleur Height – A Step-by-Step Guide
What is the procedure for adjusting the height of the front derailleur cage?
To adjust the height of the front derailleur cage:
- Begin by releasing the inner wire tension completely by shifting to the innermost chainring.
- Note the angle of the outer cage plate relative to the chainring.
- Loosen the derailleur clamp bolt. Front derailleur clamps typically leave a mark on the frame, which can serve as a useful reference.
- Adjust the derailleur height, ensuring the cage maintains the same rotation relative to the chainring.
- Tighten the clamp bolt.
- Move the outer cage plate over the outer chainring and double-check the height.
- Repeat this process until the cage plate height is 1-2mm above the outer chainring.
This careful adjustment ensures smooth and reliable shifting, preventing chain drops and optimizing your riding experience.
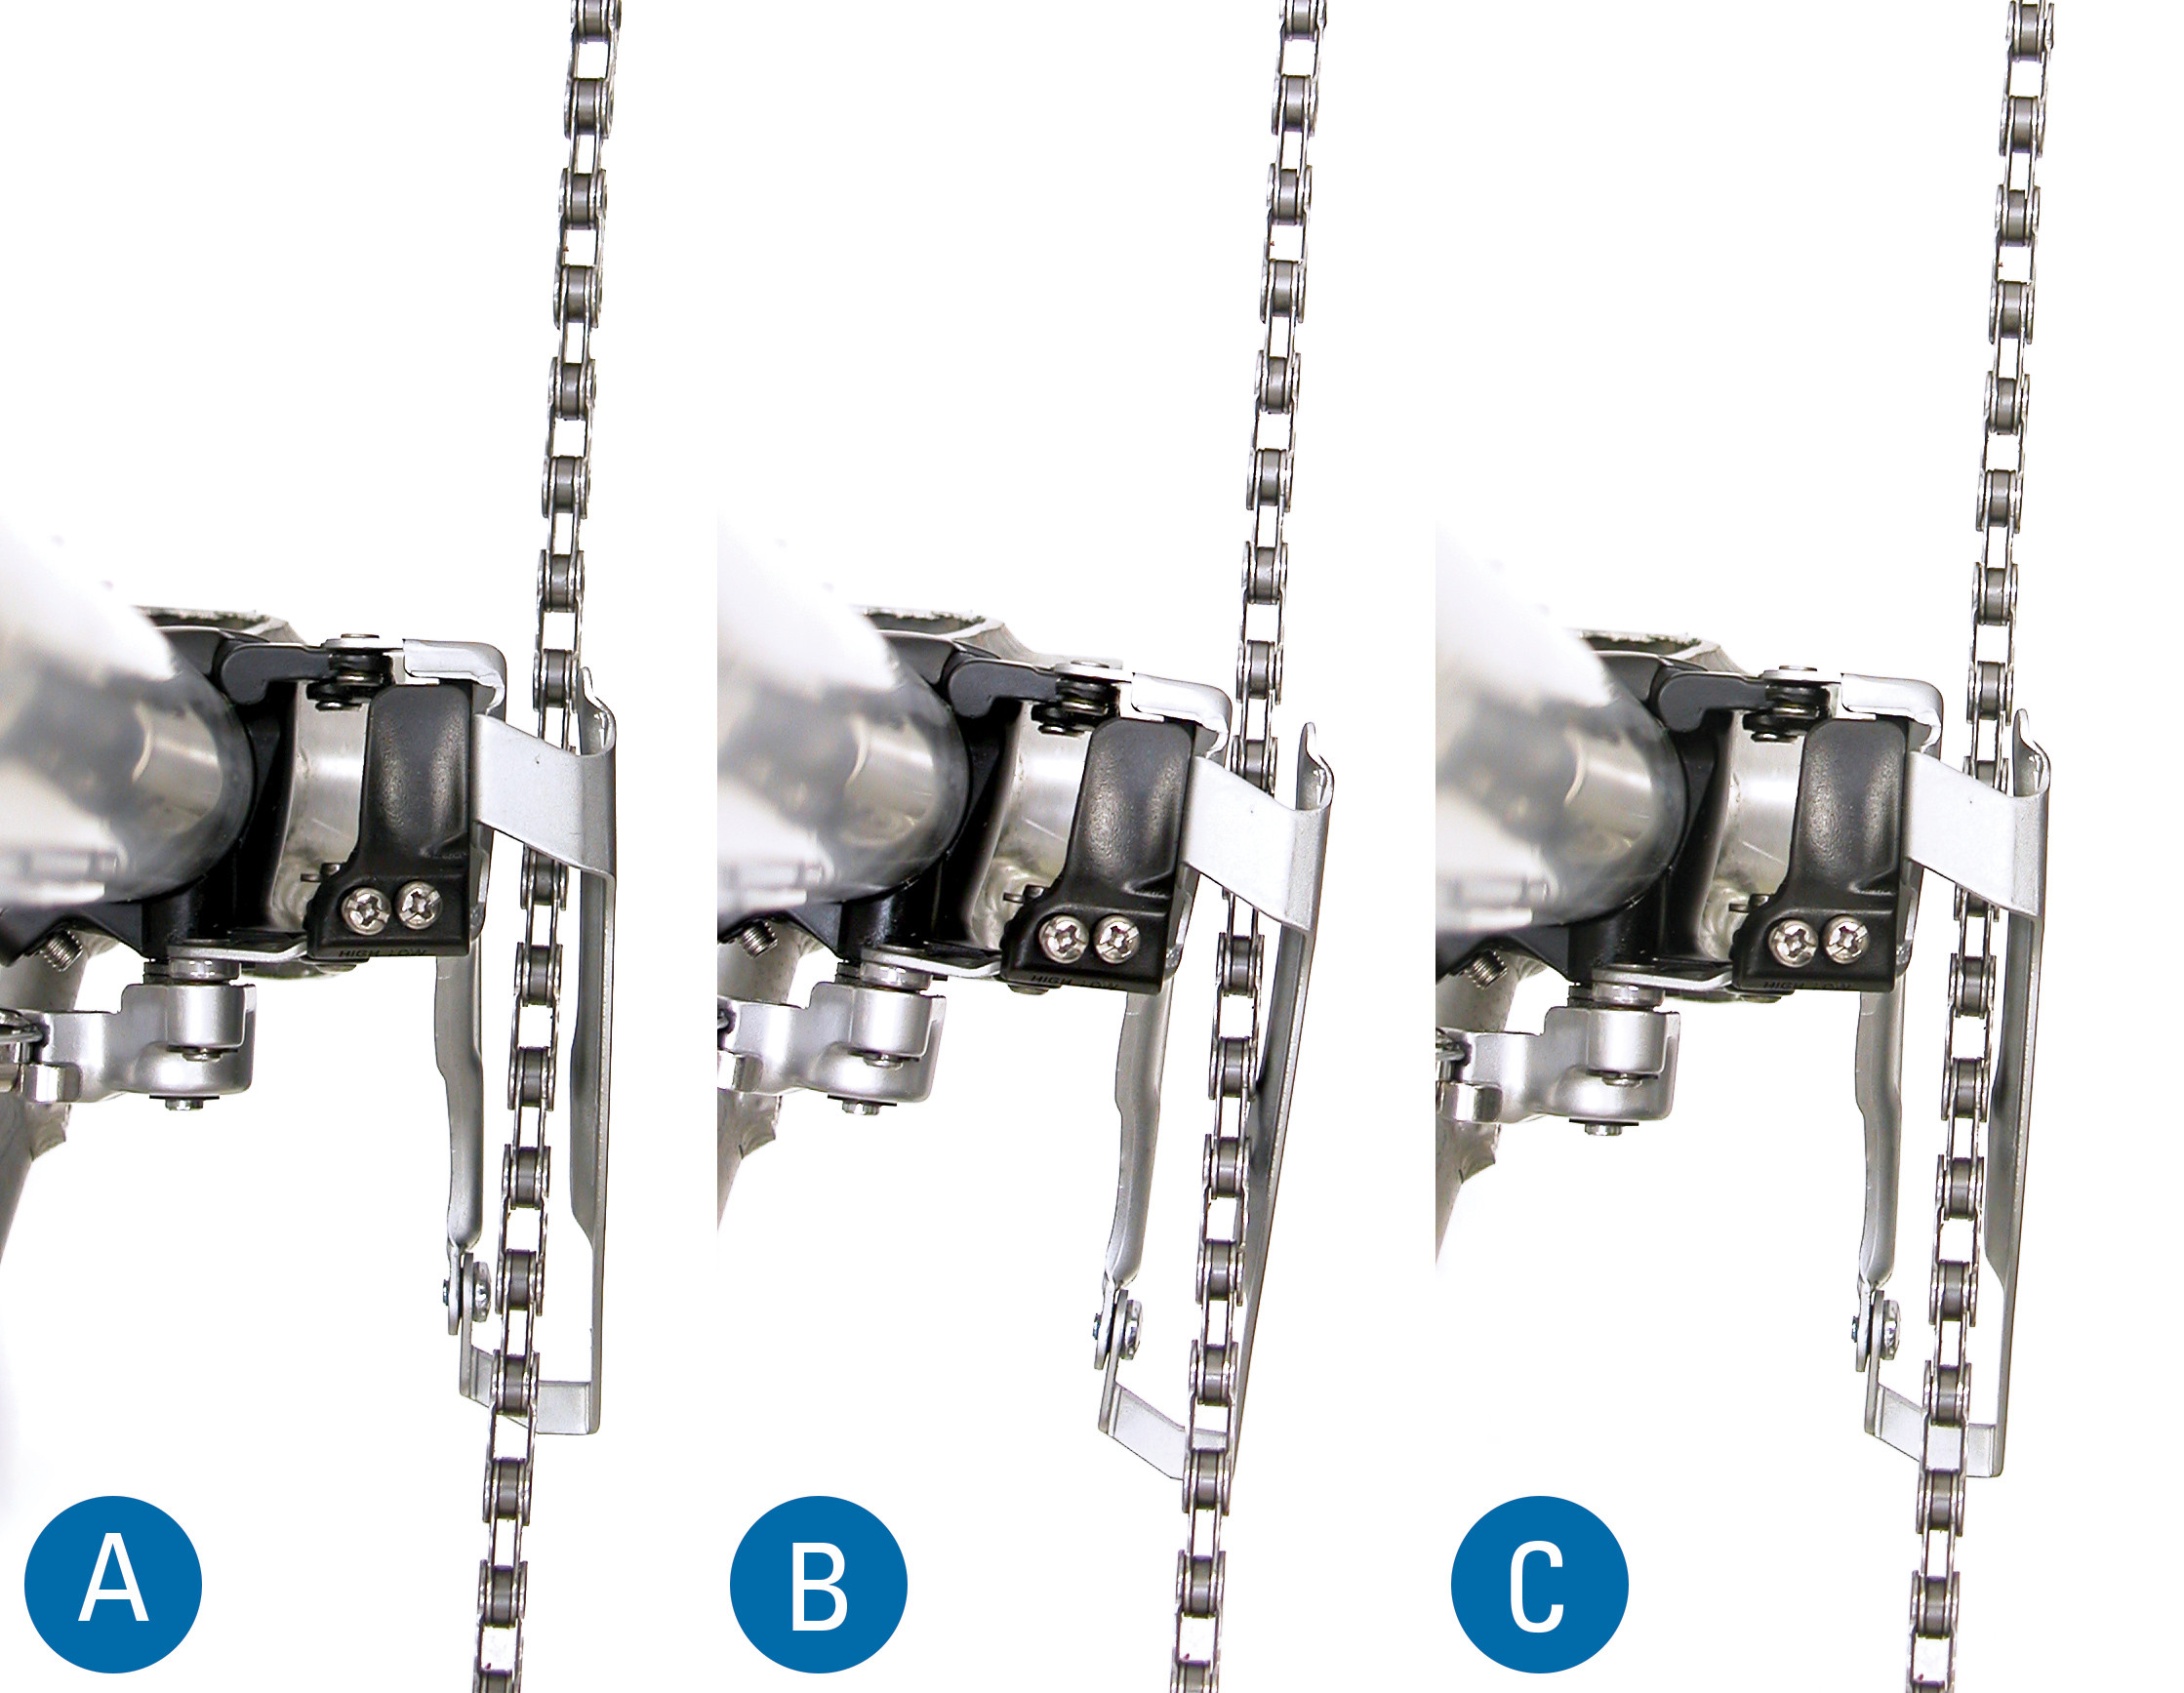
6. Fine-Tuning Rotational Angle for Optimal Performance
Why is the rotational angle of the front derailleur so important?
The rotational angle of the front derailleur is crucial because it directly impacts shifting performance. The derailleur cage should be approximately parallel to the chain to minimize the risk of the chain jumping off the outermost ring. If the cage is not parallel, there will be a relatively large gap at either the back or the front end of the cage, potentially causing the chain to overshift. Proper alignment ensures smooth transitions between chainrings and prevents frustrating chain drops.
7. Step-by-Step Instructions for Adjusting Rotational Angle
How do I correctly adjust the rotational angle of my front derailleur?
To adjust the rotational angle of your front derailleur, follow these steps:
- Shift the chain to the outermost chainring and outermost rear sprocket.
- Sight the chain from directly above the chainrings, visualizing it as a straight line.
- Compare this line to the outer derailleur cage plate, ensuring they are parallel.
- If the cage needs rotation, release the inner wire tension by shifting to the innermost chainring.
- Loosen the clamp bolt and slightly rotate the cage in the correct direction, taking care not to change the height.
- Tighten the derailleur clamp bolt.
- Shift to the outer chainring and observe the rotation alignment.
- Repeat the adjustment as necessary until the cage and chain are parallel.
 Front Derailleur Alignment
8. Understanding Limit Screws: Your Guide to “L” and “H”
What is the role of the “L” and “H” limit screws on a front derailleur?
Limit screws, marked “L” and “H,” control the range of the front derailleur’s movement. The “L” screw stops the derailleur from moving too far inward toward the smallest chainring, preventing the chain from falling off. The “H” screw, on the other hand, stops the derailleur from moving too far outward toward the largest chainring, preventing the chain from overshooting. Proper adjustment of these screws ensures the chain shifts correctly without derailing.
9. Identifying Limit Screws When Markings Are Absent
What should I do if my derailleur’s limit screws aren’t clearly marked?
If the limit screws on your derailleur lack markings, you can identify them through testing. Start with the chain on the smallest cog and completely relax the cable tension using the cable barrel adjuster. Place a hand on the derailleur body to feel for lateral motion. Turn one screw a full turn clockwise and then counter-clockwise. If you feel motion in the derailleur, that’s the “L” screw. If not, the other screw is the “L” screw. Mark the “L” screw permanently to avoid future confusion. The remaining screw is then, by default, the “H” screw.
10. The Importance of Inner Wire Tension in Limit Screw Settings
How does inner wire tension affect the limit screw settings on a front derailleur?
Inner wire tension plays a critical role in the effectiveness of limit screw settings. While limit screws physically stop the derailleur’s movement, it’s the inner wire and derailleur spring that facilitate the actual shifting. If the inner wire has too much tension, the derailleur won’t rest correctly against the L-screw stop, which can alter the inner limit and potentially cause the chain to fall off the rings. Maintaining the correct tension ensures the derailleur responds accurately to the limit screw settings, promoting smooth and reliable shifting.
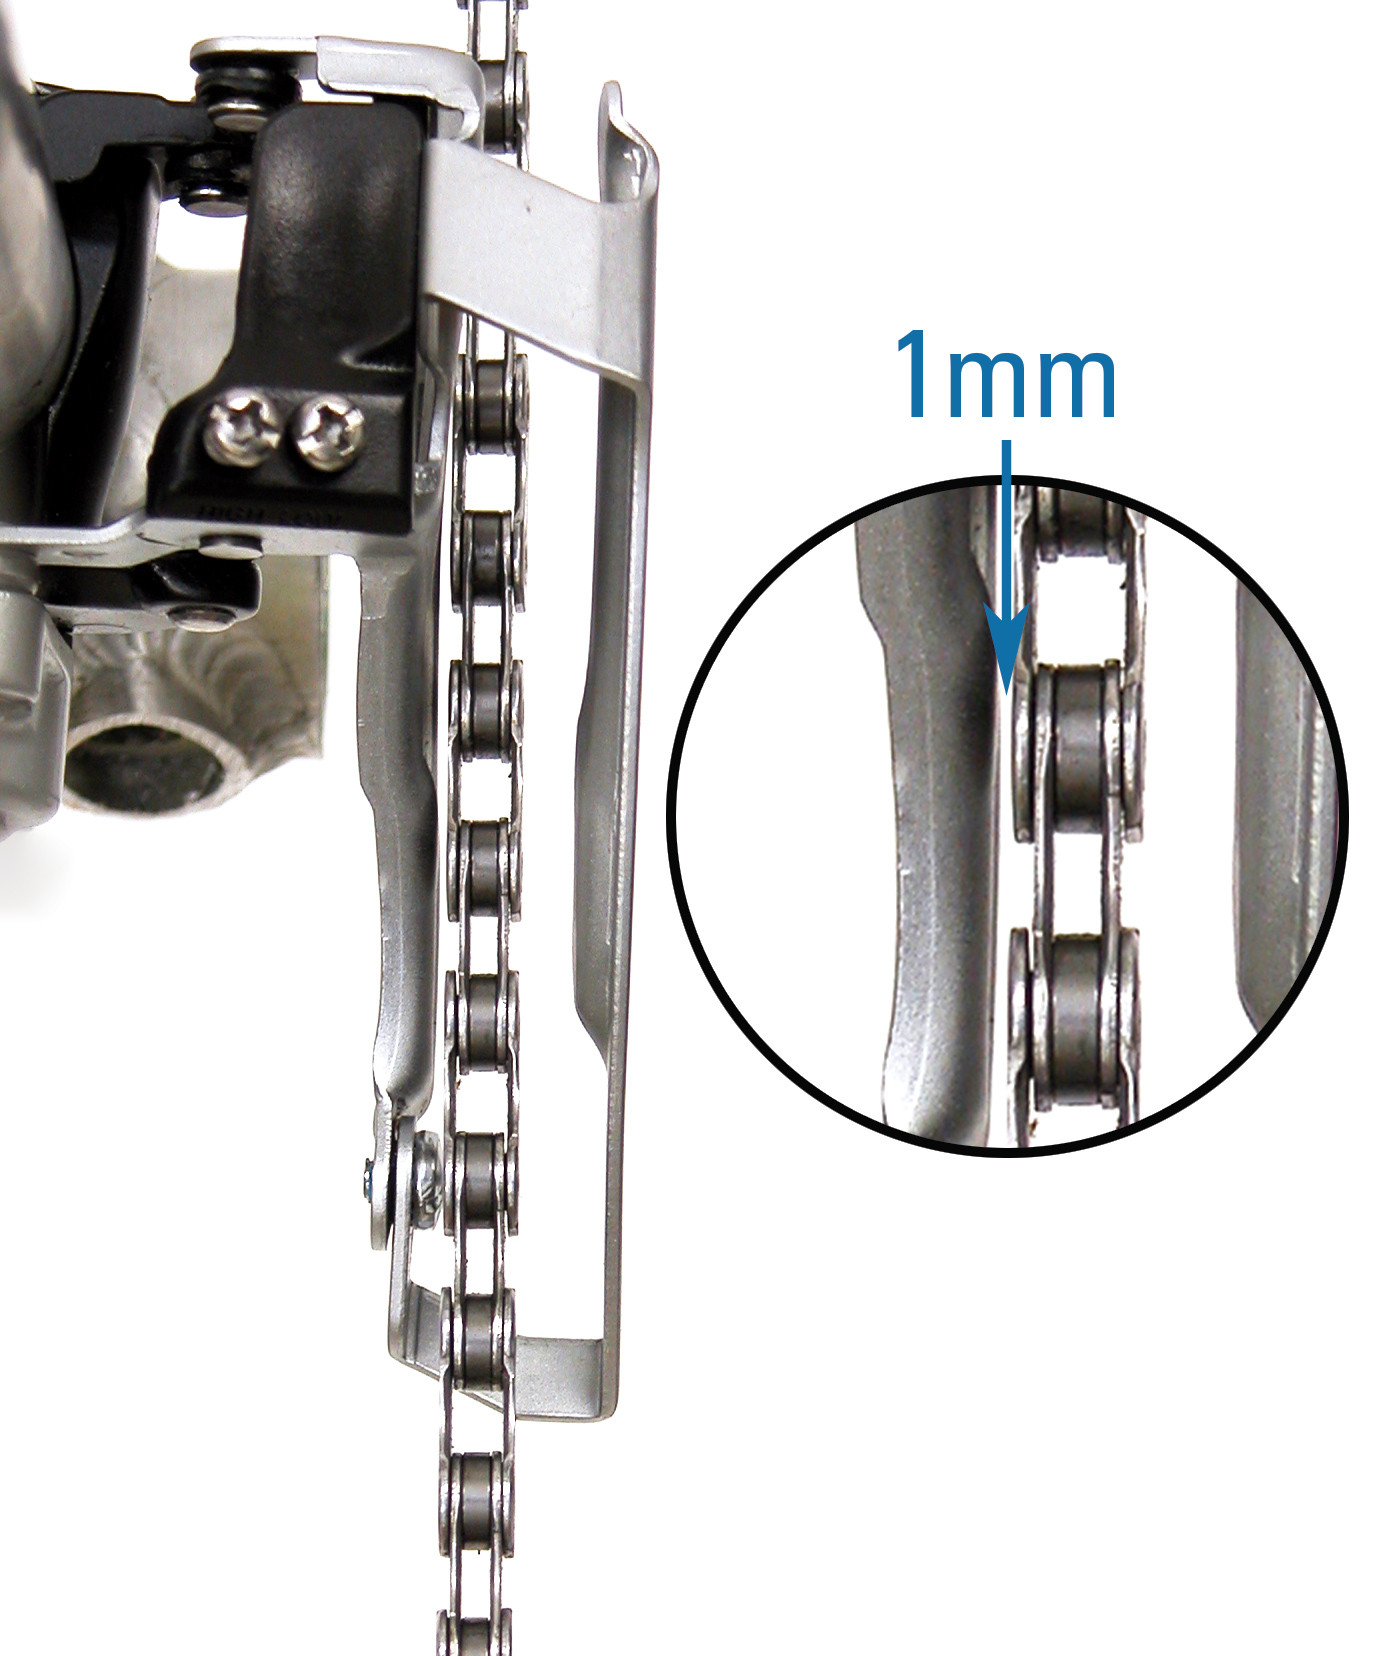
11. L-Screw Adjustment: A Detailed Guide
What is the correct procedure for adjusting the L-screw on a front derailleur?
To properly adjust the L-screw:
- Shift the chain to the innermost rear sprocket and innermost front chainring.
- Inspect the derailleur for a marking indicating the “L” screw.
- Check the inner wire tension, which should be fairly loose at this point. If it’s taut, turn the barrel adjuster clockwise into the housing.
- Sight the gap between the inner chain plate and inner cage plate; a small gap of about 1/16″ or 1mm (the thickness of a dime) should be visible.
- Pedal the bike slowly and continue to sight the gap, setting the clearance at the tightest point in the chainring rotation.
- Adjust the L-screw until there’s a small gap between the inner cage and inner chain plate.
- Pedal the bike and ensure the chain isn’t rubbing against the cage as the chainrings turn.
 L-Screw Adjustment
12. Troubleshooting L-Screw Issues
What should I do if the chain rubs or shifts poorly after adjusting the L-screw?
If the chain rubs against the cage after adjusting the L-screw, loosen the L-limit screw 1/8 turn counter-clockwise. Inspect for the gap again and repeat until a slight gap appears. If the gap appears larger than 1mm, tighten the L-screw in small increments until the gap closes.
Test the shift by manually pulling on the inner wire to simulate shifting to the next chainring and then back to the innermost ring. If shifting seems slow, turn the L-limit counter-clockwise 1/8 turn and repeat the test until shifting is adequate. If the chain shifts beyond the inner ring and falls off, the gap may be too large or the cage alignment may be off. Tighten the L-screw 1/8 turn and check the shift again. If the chain still drops off but rubs the inner cage, other issues such as chain line or derailleur rotation may be at fault.
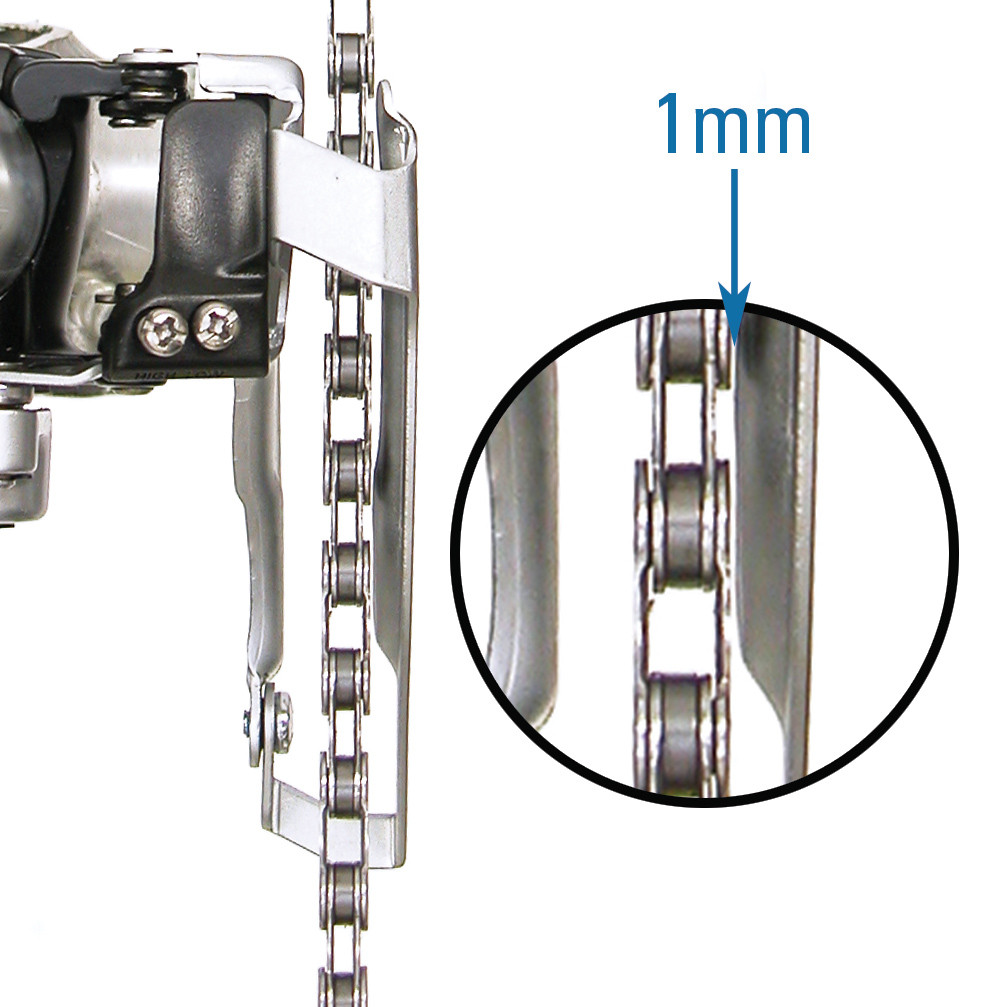
13. Mastering H-Screw Adjustment for Smooth Shifting
How should I adjust the H-screw to ensure smooth shifting to the largest chainring?
To adjust the H-screw effectively, follow these steps:
- Shift to the outermost sprocket in the rear and the outermost front chainring.
- Locate the H-screw on the derailleur.
- Pull the inner wire with your hand to increase tension, ensuring the derailleur is pressed against the H-screw.
- Maintain full pressure on the inner wire and check the gap between the chain and outer cage plate. A small gap of about 1/16″ or 1mm should be visible.
- Pedal the bike slowly and continue to sight the gap, setting the clearance at the tightest point in the chainring rotation. If the chain rubs the cage, loosen the H-screw 1/8 turn and pull fully on the inner wire. Check the gap again. If the chain isn’t rubbing, tighten the H-screw repeatedly until the chain is 1mm away from the outer cage plate.
 H-Screw Adjustment
14. Testing and Fine-Tuning H-Screw Adjustments
What is the best way to test and fine-tune the H-screw adjustment on my front derailleur?
To test and fine-tune the H-screw adjustment, shift the derailleur from the next-to-largest to the largest ring using hand pressure on the inner wire rather than the shift lever. If shifting is slow, loosen the H-limit screw slightly and repeat the test. If the chain shifts off the outside of the large chainring, the outer-limit is set too loose. Tighten the H-screw limit and test the shift again.
15. Understanding Index Adjustment on Three Chainring Bikes
What is index adjustment and how does it apply to bikes with three chainrings?
Index adjustment is a feature in some front derailleur systems where the shift lever has distinct stops or clicks for each gear. If your shift lever has three such stops, it’s an index shifter. Indexing ensures that each click on the shifter corresponds to a specific gear position, providing precise and consistent shifting. Setting the indexing should only be done after completing all the basic adjustments, such as height, rotation, and limit screw settings.
16. Step-by-Step Guide to Index Adjustment for Three Chainring Systems
How can I properly adjust the index settings on a front derailleur with three chainrings?
To properly adjust the index settings on a front derailleur with three chainrings:
- Shift the chain to the middle chainring in the front and the innermost rear sprocket.
- View the gap between the inner cage plate and the chain. The gap should be as small as possible without the chain rubbing.
- To reduce the gap, increase inner wire tension by turning the barrel adjuster counter-clockwise. This adjuster may be located on the frame or the shift lever.
- Check the gap again.
- If the chain is rubbing the cage, turn the barrel adjuster clockwise, or inward toward the shifter body.
- If the barrel adjuster is all the way in or out, there will be no adjustment possible. In these cases, reset the barrel by shifting to the innermost chainring and loosening the inner wire pinch bolt. Turn the barrel fully clockwise and back out about 2 full turns. Pull the wire gently with a fourth-hand tool and tighten the pinch bolt. Begin the adjustment of inner wire tension as described above.
- Test the shift of the front derailleur to all three front chainrings. If the derailleur rubs in the largest front chainring, double-check the H-limit screw and inner wire tension, which may be too loose. If the chain is slow to shift to the smallest chainring, double-check the L-limit screw and inner wire tension, which may be too tight.
 Index Adjustment
17. Index Adjustment: A Simple Approach for Two Chainring Bikes
How does index adjustment differ for bikes with only two chainrings?
For bikes with two chainrings, index adjustment is simpler. The shift lever will have two distinct stops or clicks. Some bikes use an in-line barrel adjuster to change housing length and set the indexing. Ensure that all basic adjustments are completed before setting the indexing.
18. Detailed Steps for Index Adjustment on Two Chainring Bikes
What are the specific steps for adjusting the index settings on a two chainring front derailleur?
To adjust the index settings on a two chainring front derailleur, follow these steps:
- Shift the chain to the outer chainring in the front and the outermost rear cog.
- View the gap between the outer cage plate and the chain.
- If the outer cage plate clears the chain, the index setting is adequate.
- If the plate is rubbing the chain, increase inner wire tension by turning the adjusting barrel counter-clockwise and check again.
- If the barrel adjuster is all the way in or out, there will be no adjustment possible. In these cases, reset the barrel by shifting to the innermost chainring and loosening the inner wire pinch bolt. Turn the barrel fully clockwise and back out about 2 full turns. Pull the wire gently with a fourth-hand tool and tighten the pinch bolt. Begin the adjustment of inner wire tension as described above.
- Test the shift of the front derailleur to both front chainrings.
19. Optimizing Front Derailleur Performance: Tips and Tricks
How can I optimize the performance of my front derailleur for the best possible shifting experience?
To optimize the performance of your front derailleur, it should shift the chain between chainrings without throwing the chain off the extreme outer and inner rings. Even on properly adjusted bikes, slight rubbing may occur, especially when riding in the largest sprocket in the front and the smallest cog in the back. This can be due to frame flex under force, which moves the chainrings side to side. While loosening the H-limit might stop the rubbing, it could also cause the chain to shift over the largest ring and come off. If all adjustments are correct and the rubbing persists, the rider may be exceeding the engineering and design capabilities of the motorcycle.
20. Addressing Common Front Derailleur Performance Issues
What are some common issues that can affect front derailleur performance and how can they be resolved?
Common issues affecting front derailleur performance include:
- Chain Rubbing: Ensure proper alignment and adjust the H-limit screw.
- Slow Shifting: Check inner wire tension and adjust limit screws.
- Chain Dropping: Verify L-limit screw setting and cage alignment.
- Poor Indexing: Fine-tune barrel adjuster and reset cable tension if needed.
Regular maintenance and precise adjustments are key to resolving these issues and maintaining optimal front derailleur performance.
21. Advanced Troubleshooting: Bent Derailleur Cage
How do I diagnose and fix a bent derailleur cage that’s causing shifting problems?
A bent derailleur cage can cause significant shifting problems. To diagnose, visually inspect the cage for any obvious bends or misalignments. Compare it to images of a properly aligned derailleur cage. If bent, carefully try to straighten it using pliers, being gentle to avoid further damage. If the damage is severe, consider replacing the derailleur. Ensure the cage is parallel to the chainrings after any adjustments.
22. Upgrading Your Front Derailleur: What to Consider
What should I consider when upgrading my front derailleur for improved performance?
When upgrading your front derailleur, consider the following:
- Compatibility: Ensure the new derailleur is compatible with your bike’s frame, crankset, and shifters.
- Type: Choose between braze-on, clamp-on, or direct mount based on your frame.
- Capacity: Select a derailleur with the appropriate capacity for your chainring sizes.
- Performance: Look for features like smooth shifting, durable construction, and precise adjustability.
- Brand Reputation: Opt for reputable brands known for quality and reliability.
23. Understanding Different Types of Front Derailleurs
What are the main types of front derailleurs and how do they differ?
The main types of front derailleurs include:
- Braze-On: Mount directly to a braze-on tab on the frame.
- Clamp-On: Attach to the frame using a clamp.
- Direct Mount: Bolt directly to specific frame mounts.
- E-Type: Mount to the bottom bracket shell.
Each type offers different mounting options and may be better suited for specific frame designs.
24. Common Mistakes to Avoid When Adjusting Front Derailleurs
What are the common mistakes people make when adjusting front derailleurs, and how can I avoid them?
Common mistakes to avoid include:
- Ignoring Cable Tension: Properly tension the cable before adjusting limit screws.
- Over-Tightening Screws: Avoid stripping screw heads by using the correct torque.
- Misaligning the Cage: Ensure the cage is parallel to the chainrings.
- Skipping Lubrication: Lubricate pivot points for smooth operation.
- Neglecting Compatibility: Verify the derailleur is compatible with your system.
25. Maintaining Your Front Derailleur for Longevity
What maintenance practices will help prolong the life of my front derailleur?
To maintain your front derailleur:
- Regular Cleaning: Keep it free from dirt and debris.
- Proper Lubrication: Lubricate pivot points and cables.
- Cable Inspection: Check for wear and fraying.
- Alignment Checks: Ensure the cage is properly aligned.
- Hardware Checks: Tighten loose bolts and screws.
Regular maintenance ensures optimal performance and extends the life of your derailleur.
26. When to Seek Professional Help for Derailleur Issues
When should I consider taking my bike to a professional mechanic for front derailleur issues?
Consider professional help if you encounter:
- Persistent Shifting Problems: Despite adjustments, shifting remains poor.
- Bent or Damaged Derailleur: The derailleur is visibly damaged.
- Stripped Screws: You can’t adjust screws due to stripping.
- Unfamiliar Issues: You’re unsure how to diagnose or fix the problem.
A professional mechanic can accurately diagnose and resolve complex issues, ensuring your bike performs optimally.
27. The Impact of Chainline on Front Derailleur Performance
How does chainline affect the performance of the front derailleur, and what can I do about it?
Chainline is the distance between the centerline of your frame and the chainrings. An improper chainline can cause poor shifting, chain rub, and increased wear. Ensure your crankset and bottom bracket are compatible and properly installed to maintain the correct chainline. Adjustments to the bottom bracket or crankset spacers may be necessary to correct the chainline.
28. Using a Cable Tensioning Tool for Precise Adjustments
What are the benefits of using a cable tensioning tool when adjusting a front derailleur?
A cable tensioning tool helps you precisely adjust cable tension, resulting in smoother and more reliable shifting. It eliminates guesswork and ensures consistent tension, improving overall performance. Using a cable tensioning tool is particularly useful for indexed shifting systems where precise cable tension is crucial.
29. Seasonal Adjustments: Adapting to Changing Conditions
Should I adjust my front derailleur differently for different seasons or riding conditions?
Yes, seasonal adjustments can improve performance. In wet or muddy conditions, ensure your derailleur is clean and well-lubricated to prevent debris from affecting shifting. In colder temperatures, use a lighter lubricant to prevent stiffness. Regularly inspect and adjust cable tension as cables can stretch or contract with temperature changes.
30. The Relationship Between Front and Rear Derailleur Adjustments
How do the adjustments of the front and rear derailleurs affect each other?
The adjustments of the front and rear derailleurs are interconnected. A misadjusted rear derailleur can affect the chainline, leading to poor front derailleur performance. Similarly, a poorly adjusted front derailleur can cause chain rub or difficulty shifting in certain rear gear combinations. Ensure both derailleurs are properly adjusted to work harmoniously for optimal shifting performance.
31. Understanding Derailleur Compatibility with Different Bike Types
How does the type of bike (road, mountain, hybrid) influence the front derailleur selection and adjustment?
Different bike types require different front derailleurs due to varying chainring sizes and frame geometries. Road bikes typically have smaller chainring gaps and require derailleurs with tighter tolerances. Mountain bikes need derailleurs with wider ranges to accommodate larger chainring differences and suspension travel. Hybrid bikes often use a combination of features. Selecting the correct derailleur type and adjusting it according to the bike’s specifications ensures optimal performance.
32. Using a Third-Hand Tool for Easier Cable Adjustments
What is a third-hand tool, and how can it simplify front derailleur adjustments?
A third-hand tool, also known as a cable puller, is a device that holds the derailleur cable taut while you tighten the pinch bolt. This simplifies the adjustment process by freeing up both of your hands, allowing for more precise and easier cable tensioning. It’s particularly useful when working alone and ensures the cable doesn’t slip during tightening.
33. Checking and Correcting Hanger Alignment
Why is it important to check and correct the derailleur hanger alignment, and how is it done?
Derailleur hanger alignment is crucial because a bent hanger can cause significant shifting problems. To check the alignment, use a derailleur alignment gauge, which screws into the hanger and allows you to measure its straightness relative to the wheel. If the hanger is bent, the tool can also be used to carefully bend it back into alignment. Proper hanger alignment ensures the derailleur is parallel to the cogs, resulting in smooth and accurate shifting.
34. Adapting Derailleur Adjustments for E-Bikes
How do the front derailleur adjustments differ for e-bikes compared to traditional bikes?
E-bikes often have higher torque and different gear ranges, which can affect front derailleur performance. Ensure the derailleur is compatible with the e-bike’s motor and battery system. Check and adjust the cable tension more frequently, as the increased power can cause cables to stretch faster. Proper lubrication is also essential to handle the additional stress on the derailleur.
35. Utilizing Online Resources and Communities for Derailleur Assistance
What online resources and communities can provide additional help with front derailleur adjustments?
Online resources and communities can offer valuable assistance with front derailleur adjustments. Websites like usabikers.net provide detailed guides and tutorials. Online forums and communities allow you to ask questions and get advice from experienced cyclists and mechanics. YouTube channels often feature step-by-step video guides for visual learners.
36. Understanding the Role of the B-Tension Screw in Shifting Performance
What is the B-tension screw and how does it affect the shifting performance of my derailleur?
The B-tension screw adjusts the distance between the guide pulley of the rear derailleur and the cassette cogs. Proper adjustment ensures smooth shifting, especially in the larger cogs. Turning the B-tension screw adjusts this distance, preventing the pulley from rubbing against the cassette and optimizing shifting performance.
37. How to Choose the Right Lubricant for Your Derailleur System
What types of lubricants are best suited for derailleur systems, and why?
The best lubricants for derailleur systems are those that reduce friction, protect against corrosion, and don’t attract excessive dirt. Dry lubricants, like Teflon-based sprays, are ideal for dry conditions as they minimize dirt buildup. Wet lubricants are better for wet conditions as they provide greater water resistance. Chain-specific lubricants are also a good choice, as they are designed to penetrate the chain links and provide long-lasting protection.
38. The Importance of Regular Cable Replacement for Optimal Shifting
Why is it essential to replace derailleur cables regularly, and how does it affect shifting performance?
Regular cable replacement is essential because cables can stretch, fray, and become contaminated over time, leading to poor shifting performance. Replacing cables ensures consistent and precise shifting, as new cables provide the correct tension and smooth movement within the housing. It’s recommended to replace cables annually or more frequently if you ride in harsh conditions.
39. DIY vs. Professional Adjustments: Knowing Your Limits
When is it appropriate to perform DIY derailleur adjustments, and when should you seek professional help?
DIY derailleur adjustments are appropriate for minor issues like cable tensioning and limit screw adjustments when you have the necessary tools and a basic understanding of the system. Seek professional help for more complex issues like bent hangers, damaged derailleurs, or persistent shifting problems that you can’t resolve with basic adjustments.
40. Tips for Preventing Common Derailleur Problems While Riding
What practical steps can I take while riding to prevent common derailleur problems and maintain smooth shifting?
To prevent derailleur problems while riding:
- Avoid Shifting Under Heavy Load: Ease up on the pedals when shifting.
- Maintain Proper Chainline: Avoid extreme cross-chaining.
- Inspect Cables Regularly: Look for signs of wear or damage.
- Keep the Drivetrain Clean: Prevent dirt buildup that can affect shifting.
- Shift Smoothly: Avoid abrupt or forceful shifts.
Following these tips will help maintain smooth shifting and prevent common derailleur problems.
Visit usabikers.net for more in-depth guides, community forums, and the latest information on motorcycle maintenance and culture. Join our community today and take your riding experience to the next level. Address: 801 Sturgis Main St, Sturgis, SD 57785, United States. Phone: +1 (605) 347-2000. Website: usabikers.net.
FAQ: Your Front Derailleur Questions Answered
-
How often should I adjust my front derailleur?
You should adjust your front derailleur whenever you notice shifting problems, such as slow or inaccurate gear changes, chain rub, or chain drops. A general check-up every few months is a good practice.
-
What does the “H” screw on the front derailleur control?
The “H” screw controls the outer limit of the front derailleur, preventing the chain from shifting past the largest chainring.
-
What does the “L” screw on the front derailleur control?
The “L” screw controls the inner limit of the front derailleur, preventing the chain from shifting past the smallest chainring.
-
Why is my chain rubbing on the front derailleur cage?
Chain rub can be caused by improper cage alignment, incorrect limit screw settings, or insufficient cable tension. Check and adjust these factors to eliminate rubbing.
-
How do I know if my front derailleur cable is stretched?
If you find yourself needing to constantly adjust the barrel adjuster to maintain proper shifting, it’s likely that your cable is stretched and needs to be replaced.
-
Can I use any lubricant on my front derailleur?
No, it’s best to use a lubricant specifically designed for bicycle components. These lubricants are formulated to reduce friction and protect against corrosion without attracting excessive dirt.
-
What is the purpose of the barrel adjuster on my front derailleur?
The barrel adjuster fine-tunes the cable tension, allowing you to make small adjustments to improve shifting performance without having to loosen the cable bolt.
-
How do I reset my front derailleur cable tension?
To reset cable tension, shift to the smallest chainring, loosen the cable bolt, pull the cable taut, and retighten the bolt. Then, use the barrel adjuster to fine-tune the tension.
-
Is it possible to upgrade my front derailleur for better shifting?
Yes, upgrading to a higher-quality front derailleur can improve shifting performance, especially if your current derailleur is old or worn out.
-
What should I do if my front derailleur shifts too slowly?
If your front derailleur shifts too slowly, first check the cable tension and limit screw settings. Ensure the cable is properly tensioned and the limit screws are adjusted to allow the derailleur to move freely.