Adjusting your dirt bike suspension clickers is key to unlocking optimal performance on the trails, and at usabikers.net, we are dedicated to providing you with the knowledge and tools to master this essential skill. With the right adjustments, you can fine-tune your bike’s suspension to match your riding style and the terrain, resulting in a smoother, more controlled ride. Optimize your off-road experience and gain the confidence to conquer any trail and explore the world of rebound damping and compression damping.
1. What Is The Significance Of Sag Measurement In Suspension Tuning?
Sag measurement is crucial because it determines the initial position of your suspension, affecting how it responds to bumps and jumps. Correct sag ensures optimal suspension travel for both absorbing impacts and maintaining traction. Sag is the amount your suspension compresses under static (bike only) and dynamic (rider on bike) loads.
Understanding Sag Terms
- SAG: Originally stood for “Support And Gear,” now commonly refers to the amount of suspension compression.
- Extended SAG: Measurement of suspension at full extension (wheel off the ground).
- Static SAG: The amount the bike settles under its weight alone, without the rider. It is typically about 6-10% of total suspension travel.
- Race SAG: The amount the bike settles with the rider on board. Ideally, rear suspension SAG should be approximately 30-33%, and front SAG around 25-30% of the total suspension travel.
General Sag Percentage Guidelines:
- Front Suspension Static Sag: 14% of available travel (Travel in mm x 0.14 = Static Sag in mm)
- Front Suspension Rider Sag: 25% of available travel (Travel in mm x 0.25 = Rider Sag in mm)
- Rear Suspension Static Sag: 11% of available travel (Travel in mm x 0.11 = Static Sag in mm)
- Rear Suspension Rider Sag: 34% of available travel (Travel in mm x 0.34 = Rider Sag in mm)
Sag Measurement Tips
- Measure Accurately: Use a tape measure and have a friend help you. Measure from a fixed point on the frame to the axle.
- Consistent Technique: Ensure the bike is on level ground and the rider is in their normal riding position.
- Record Measurements: Keep a log of your measurements for future reference.
2. What Should I Check Before Adjusting Suspension Clickers?
Before tweaking your suspension clickers, verify baseline settings, tire pressure, spring rate, and proper installation to ensure you are making adjustments on a solid foundation. According to the Motorcycle Safety Foundation (MSF), in July 2025, verifying these settings provides a stable starting point for fine-tuning your suspension.
Pre-Adjustment Checklist:
- Record Current Settings: Note the current clicker positions in a notebook to track your adjustments.
- Tire Pressure: Adjust tire pressure based on the riding terrain, ensuring optimal grip and handling.
- Spring Rate: Confirm you have the correct spring rate for your weight and riding style.
- Sag Setting: Set the correct sag before making any clicker adjustments.
- Front Wheel Installation: Ensure the front wheel is installed correctly. Torque your triple clamps to the factory-suggested specification (typically 12Nm (106 inch/lb) for lower bolts and 17Nm (150 inch/lb) for the upper bolts). Over-tightening can bind the inner fork tubes.
- Air Bleed: Release air from the forks after each ride using the air bleed screw or aftermarket air release buttons, even on WP AER suspension forks. Check air spring pressure frequently.
- Maintenance: Regularly maintain your suspension by following the service intervals in your owner’s manual.
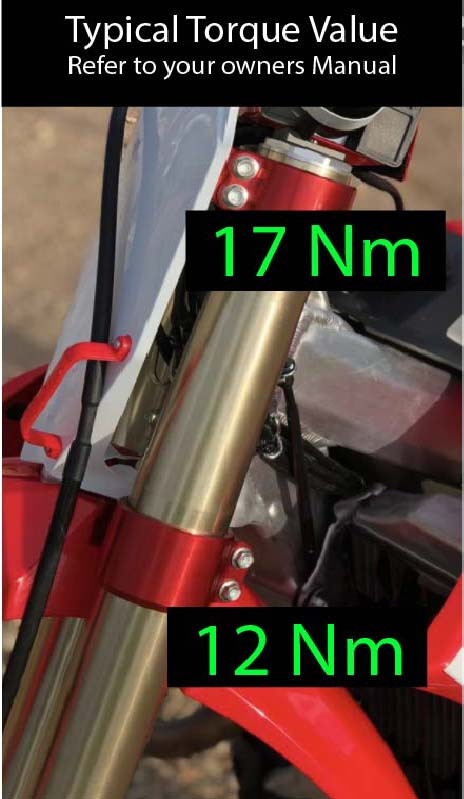 Torque T Clamps
3. How Do I Adjust Suspension Clickers Properly?
To adjust suspension clickers properly, start with the factory settings, then adjust rebound and compression damping to suit your riding needs and terrain. Begin with compression damping, testing full firm and full soft to understand the adjustment range.
Step-by-Step Adjustment Guide:
- Consult Your Manual: Refer to your owner’s manual for suggested settings and specific instructions on adjusting rebound and compression for your fork and shock.
- Baseline Setting: Start with the clickers in the standard position recommended by the manufacturer.
- Compression Damping: Begin by adjusting the compression damping. Ride the bike with the compression adjuster set to full firm, then to full soft. This will give you a sense of the impact compression damping has on your ride.
- Rebound Damping: Repeat the same process with the rebound adjuster to understand its effects.
- Individual Adjustment: Adjust suspension damping for your weight, comfort, and the terrain.
- Track Your Changes: Keep a detailed notebook of all adjustments and their effects on handling.
Clicker Adjustment Tips:
- Small Increments: Make small adjustments (one or two clicks at a time) to avoid drastic changes.
- Test and Evaluate: After each adjustment, ride the bike to evaluate the changes.
- One Change at a Time: Adjust only one setting at a time to clearly understand its impact.
4. What Is The Role Of Rebound And Compression Damping In Suspension?
Rebound damping controls the speed at which the suspension returns after compression, while compression damping manages the resistance to compression. Balancing these adjustments is critical for optimal handling and comfort. Compression damping controls the force needed to compress the suspension, and rebound damping controls the rate at which the suspension returns to its original position after being compressed.
Detailed Explanation:
- Compression Damping: Manages the force required to compress the suspension, affecting how the bike handles bumps and landings.
- Rebound Damping: Controls the rate at which the suspension returns to its original position after compression, influencing traction and stability.
Low-Speed vs. High-Speed Compression Adjusters:
- Low-Speed Compression: Affects damping during slow shock velocities, such as rolling bumps and jump faces.
- High-Speed Compression: Controls damping during rapid shock movements, like square-edged bumps.
5. How Do I Adjust Suspension For Different Terrain Conditions?
Adjusting your suspension for different terrain conditions involves modifying compression and rebound damping to optimize traction and control. Soft terrain requires more compression damping, while hard-packed dirt benefits from softer settings.
Terrain-Specific Adjustments:
- Soft Terrain: Increase compression damping to handle larger, spaced-out bumps and increase rebound damping to minimize kick.
- Hard-Packed Dirt: Use softer settings for comfort and traction, as bumps are closer together and often have square edges.
- Muddy Conditions: Increase spring rates and compression damping to manage the extra weight.
Adjusting for Various Terrains
| Terrain Type | Compression Damping | Rebound Damping |
|---|---|---|
| Soft/Loamy | Firmer | Firmer |
| Hard Pack | Softer | Neutral |
| Sandy | Firmer | Firmer |
| Rocks/Roots | Softer | Faster |
| Muddy | Firmer | Neutral |
| Mixed Conditions | Blended Settings | Blended Settings |
6. What Are The Common Suspension Symptoms And How Can I Correct Them?
Common suspension symptoms include head shake, oversteer, understeer, and fork dive. Diagnosing and addressing these issues through targeted adjustments can significantly improve your bike’s handling.
Troubleshooting Common Suspension Issues:
- Head Shake:
- Cause: Handlebars violently swapping back and forth.
- Solutions:
- Check steering bearings for tightness.
- Balance suspension setup.
- Adjust fork stiffness and rebound.
- Raise the rear of the bike by adjusting race sag.
- Oversteer:
- Cause: Bike turns more than rider input.
- Solutions:
- Increase compression.
- Increase rear end sag.
- Use stiffer fork springs or increase preload.
- Understeer:
- Cause: Bike steers less than rider input.
- Solutions:
- Reduce compression on fork setting.
- Reduce preload on fork springs.
- Reduce rear end sag.
- Fork Dive:
- Cause: Fork dives excessively under braking.
- Solutions:
- Increase compression.
- Increase fork spring preload.
- Use stiffer fork springs.
- Lower the back end sag.
- Raise fork legs in triple clamps (but be cautious as this can cause understeer).
7. How Does Rear Shock Kicking Affect Handling And How Can I Fix It?
Rear shock kicking, especially under braking, negatively impacts confidence and control. Adjusting sag, fork settings, and rebound damping can help stabilize the rear end.
Addressing Rear Shock Kicking:
- Check Rider Sag:
- Too tall sag can put extra weight on the front end, causing forks to dive.
- Solution: Reduce preload on the shock spring to lower the rear of the bike.
- Evaluate Fork Settings:
- If forks are diving too much, the rear end is likely to kick.
- Solutions:
- Increase compression on the forks.
- Soften rebound on the forks to help them recover better.
- Adjust Shock Rebound:
- Be cautious, as too slow rebound can cause the shock to pack.
- Determine when the kick happens to better diagnose the issue.
- High-Speed Compression Damping:
- Soften high-speed compression to help the shock absorb bumps better.
- Try 1/8 to 1/4 turns at a time.
- Low-Speed Compression Damping:
- Soften low-speed compression to improve shock movement over rolling terrain.
- Adjust one or two clicks at a time.
- Rider Input:
- Ensure you are shifting your weight (butt) over the rear of the bike when braking.
8. What Are The Best Suspension Settings For Hard Pack And Square Edge Bumps?
For hard pack and square edge bumps, use the softest compression damping possible while maintaining control and preventing bottoming out.
Optimizing for Hard Pack:
- Softer Compression:
- Adjust compression damping to be as soft as possible to absorb square edges.
- Balance Control:
- Ensure you still have enough control to prevent bottoming out on jump faces and during G-outs.
9. How Does Fork Oil Height Affect Suspension Performance?
Adjusting fork oil height alters the air spring effect in your forks, making them more progressive and resistant to bottoming out.
Understanding Fork Oil Height Adjustments:
- Increasing Oil Height:
- Reduces the airspace in the fork’s spring chamber.
- Makes the forks feel more progressive and stiffer from mid-stroke onwards.
- Decreasing Oil Height:
- Increases the airspace, making the forks feel softer.
- Can be done by removing 10cc of oil at a time until bottoming out becomes an issue.
Benefits of Understanding Air Spring Function:
- Progressive Feel: Allows you to fine-tune the fork’s progression for better control.
- Bottoming Resistance: Provides increased resistance to bottoming out without sacrificing initial plushness.
10. What Are The Key Suspension Terms I Need To Know?
Understanding key suspension terms like spring rate, preload, damping, and stiction is essential for effective tuning and communication with suspension professionals.
Essential Suspension Terminology:
- Spring Rate:
- Determines how much force is required to compress the spring.
- Spring Preload:
- The amount of tension applied to the spring before installation.
- Coil Spring:
- A metal wire formed into a coil that stores energy when compressed.
- Air Spring:
- Compressed air in a sealed system that stores energy.
- Damping:
- Controls unwanted spring motion by converting kinetic energy into heat.
- Compression Damping:
- Controls the shock or fork when it is being compressed.
- Rebound Damping:
- Controls the shock or fork when it is extending back.
- Damper:
- A fluid chamber that regulates oil flow to control piston speed.
- Damper Speed:
- The speed at which the damper compresses or rebounds.
- Damping Circuits:
- Low and high-speed circuits for compression and rebound.
- High-Speed Compression (HSC):
- Controls suspension travel at high damper speeds.
- Low-Speed Compression (LSC):
- Controls suspension travel at low damper speeds.
- Suspension Packing:
- Occurs when rebound is too slow, causing the suspension to stay compressed.
- Preload:
- Adjusted to bring the bike to the proper SAG dimension.
- Valve Shim:
- A thin washer used to exert resistance on oil flow.
- Stiction:
- The tension exerted on moving parts by stationary parts like bushings and seals.
By mastering these adjustments, you can significantly enhance your riding experience, improving handling, comfort, and confidence on any terrain.
11. What Is The Difference Between Sprung And Unsprung Weight?
Sprung weight refers to the mass of the motorcycle supported by the suspension, while unsprung weight includes components like wheels, tires, and brake assemblies. Reducing unsprung weight improves suspension responsiveness and handling.
Understanding Sprung vs. Unsprung Weight:
- Sprung Weight: The mass of the motorcycle supported by the suspension, including the frame, engine, and rider.
- Unsprung Weight: The mass of the components not supported by the suspension, such as wheels, tires, brake assemblies, and lower fork sliders.
Why It Matters:
- Suspension Responsiveness: Lower unsprung weight allows the suspension to react more quickly to bumps, improving traction and control.
- Handling: A higher ratio of sprung to unsprung weight is desirable for better handling, especially at high speeds.
Examples of Unsprung Weight:
- Tires
- Wheels
- Wheel bearings and hubs
- Brake assemblies
- Swing arm and lower fork inner tube “sliders”
Semi-Sprung Parts:
- Springs themselves
- Shock absorbers and forks
12. What Role Does Re-Valving Suspension Play, And When Is It Necessary?
Re-valving suspension involves modifying the internal components to better suit specific riding styles, terrain, or rider weights. It becomes necessary when clicker adjustments alone cannot achieve the desired performance.
When to Consider Re-Valving:
- Change in Riding Style: Moving from casual riding to aggressive racing may require re-valving.
- Bike Setup Changes: Modifications like changing springs or lowering the bike may necessitate re-valving to maintain balance.
- Terrain Changes: Frequent riding on different terrain types (e.g., soft dirt to rocky trails) may require custom valving.
- Weight Changes: Significant changes in rider weight can affect suspension performance.
- Rider Feedback: Experiencing bottoming out, excessive stiffness, or poor traction indicates potential need for re-valving.
- Age and Condition: Over time, suspension components degrade, and re-valving can restore performance.
Benefits of Re-Valving:
- Customized Performance: Tailored suspension response for specific needs.
- Improved Handling: Enhanced control and stability on various terrains.
- Increased Comfort: Smoother ride with better absorption of impacts.
FAQ Section: Adjusting Dirt Bike Suspension Clickers
1. How do I find the stock suspension settings for my dirt bike?
Consult your owner’s manual for the factory settings, which provide a baseline for adjustments. The owner’s manual will provide suggested settings, and it will inform you on how to click adjust rebound and compression for your fork and shock.
2. What tools do I need to adjust my dirt bike’s suspension clickers?
Typically, you’ll need a flat-head screwdriver and possibly a small wrench, depending on your bike’s specific clicker design.
3. Which clicker should I adjust first, compression or rebound?
Start with compression, as it affects how the bike absorbs bumps. Then, adjust rebound to control how quickly the suspension returns.
4. How many clicks should I adjust at a time?
Make small adjustments, one to two clicks at a time, to avoid drastic changes and accurately assess the impact.
5. What does “packing” mean in suspension terms, and how do I fix it?
Packing occurs when the suspension compresses over successive bumps without fully rebounding. To fix it, speed up the rebound damping.
6. How do I know if my spring rate is correct for my weight?
If you can’t achieve the correct sag with preload adjustments, your spring rate is likely incorrect.
7. Can I adjust my suspension for both motocross and trail riding?
Yes, but you’ll likely need different settings. Motocross usually requires stiffer settings, while trail riding benefits from softer, more compliant suspension.
8. What is the difference between low-speed and high-speed compression adjustment?
Low-speed compression affects damping during slow suspension movements, like rolling bumps, while high-speed compression affects damping during rapid impacts, like square-edged bumps.
9. Should I adjust my suspension differently for sand riding?
Yes, sandy conditions often require firmer compression and increased rebound to keep the bike riding on top of the terrain.
10. How often should I service my dirt bike’s suspension?
Follow the service intervals in your owner’s manual, typically every 20-40 hours of riding, depending on conditions.
Adjusting your dirt bike suspension clickers is a crucial skill for any serious rider, and at usabikers.net, we’re here to guide you every step of the way. With the right knowledge and techniques, you can fine-tune your bike to match your riding style and the terrain, unlocking optimal performance and control.
Ready to take your riding to the next level? Visit usabikers.net today to explore our comprehensive articles, join our vibrant community forum, and discover everything you need to know about dirt bikes and the biker culture in America!
Address: 801 Sturgis Main St, Sturgis, SD 57785, United States
Phone: +1 (605) 347-2000
Website: usabikers.net