Are you having trouble shifting gears smoothly on your bike? Adjusting your front gears, or front derailleur, is crucial for a seamless riding experience. At usabikers.net, we provide easy-to-follow instructions for motorcycle and bike enthusiasts to keep their rides in top condition. Learning how to adjust your bike’s front gears can significantly improve your cycling performance.
This detailed guide is designed to help you understand the importance of proper derailleur adjustment, offering expert tips and tricks to ensure your rides are smooth and enjoyable. Dive in to learn about maintaining your drivetrain, improving shifting efficiency, and enjoying the open road or trail with confidence.
1. Essential Tools for Front Gear Adjustment
What tools are needed to adjust front gears on a bike? To effectively adjust your front gears, you’ll need a few essential tools, ensuring the process is smooth and accurate.
- Hex wrenches: For loosening and tightening bolts.
- Screwdriver: (#2 Phillips or straight blade) For adjusting limit screws.
- Light lubricant: To keep moving parts working smoothly.
- Derailleur cable: Inner wire and housing, if replacement is needed.
- Caliper or metric ruler: For precise measurements.
- Cable end caps: And housing end caps as needed.
- Rags: To keep your workspace clean.
Having these tools on hand will make the adjustment process easier and more efficient. Regular maintenance ensures your bike performs optimally, as emphasized by the American Motorcyclist Association (AMA) in their safety guidelines.
2. Understanding the Front Derailleur
What is the function of the front derailleur? The front derailleur’s primary function is to move the chain between the chainrings, allowing you to shift gears smoothly. It’s crucial to ensure that your front derailleur is properly adjusted to avoid issues like chain drops or poor shifting performance.
The front derailleur is responsible for shifting the chain across the different chainrings. This mechanism is controlled by the inner wire, which, when pulled, moves the derailleur cage. When the inner wire is released, a spring returns the cage to its original position. The basic adjustments include height, rotation, limit screws, and inner wire tension. Proper lubrication of the pivot points and cable inner wires is essential for smooth operation. According to the Motorcycle Safety Foundation (MSF), maintaining these components ensures reliable shifting and enhances rider safety.
3. Step-by-Step Guide: How to Adjust Front Gears on Bike
How do you adjust front gears on a bike effectively? Follow these steps for an effective front gear adjustment:
- Check the Height: Position the outer cage plate above the largest chainring.
- Assess Rotational Angle: Ensure the cage is parallel to the chain.
- Adjust Limit Screws: Use the “L” and “H” screws to control derailleur movement.
- Set Inner Wire Tension: Fine-tune the cable tension for precise shifting.
- Test Shifting: Confirm smooth transitions between chainrings.
3.1. Front Derailleur Height Adjustment
How do you adjust the height of the front derailleur? The height of the front derailleur is essential for optimal shifting. Properly aligning the derailleur ensures the chain moves smoothly between the chainrings without any interference.
- Inspect Alignment: Make sure the outer cage plate is positioned correctly over the largest chainring.
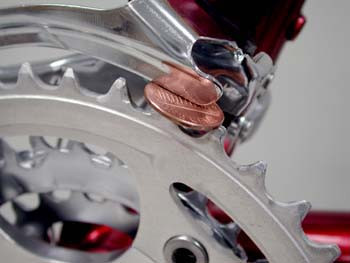
- Measure the Gap: The gap between the outer chainring teeth and the lower edge of the outer cage plate should be 1-2mm, approximately the thickness of a penny.
- Loosen and Adjust: Release the inner wire tension by shifting to the innermost chainring. Loosen the derailleur clamp bolt, adjust the height, and return the cage to the same rotation relative to the chainring. Tighten the clamp bolt.
Adjusting the height correctly prevents the chain from scraping against the chainrings or jamming during shifts.
 Front Derailleur Height Adjustment
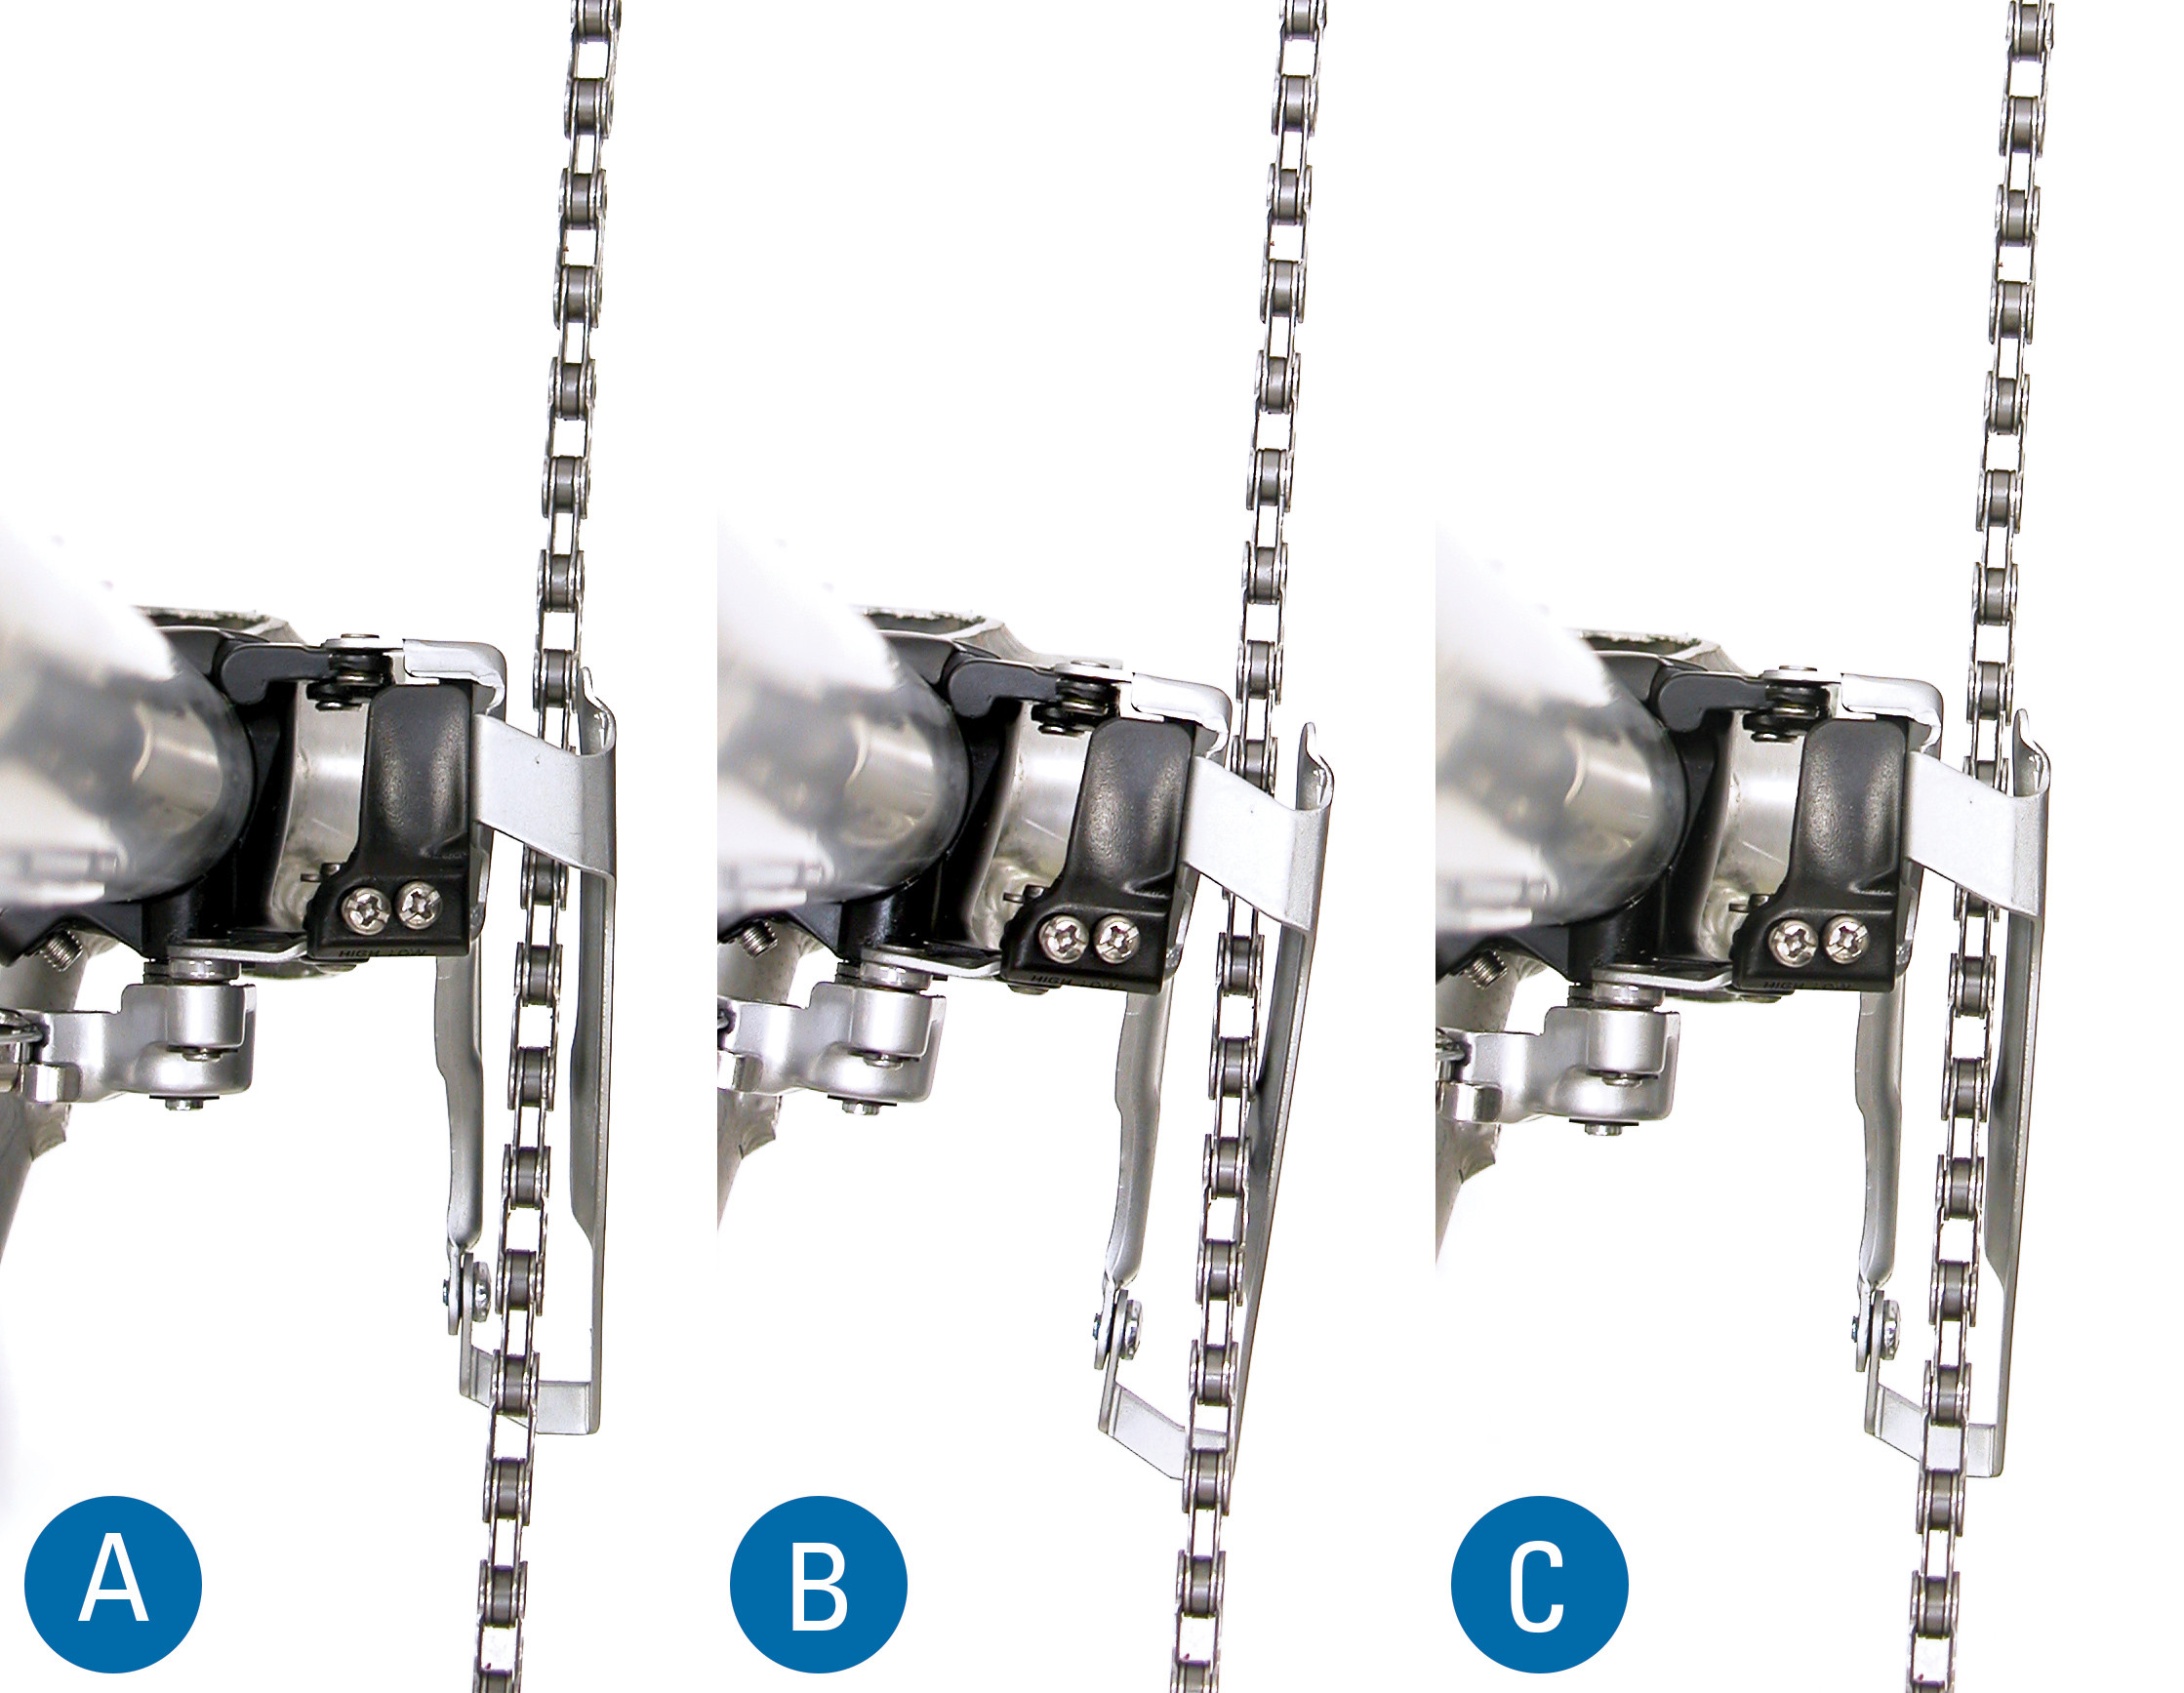
3.2. Front Derailleur Rotational Angle Adjustment
How do you adjust the rotational angle of the front derailleur? Adjusting the rotational angle ensures that the derailleur cage is parallel to the chain, optimizing shifting performance and minimizing the risk of chain drops.
- Shift Chain: Move the chain to the outermost chainring and outermost rear sprocket.
- Sight the Chain: View the chain from directly above the chainrings. The chain should appear as a straight line, parallel to the outer derailleur cage plate.
- Rotate if Necessary: If the cage isn’t parallel, note the direction of the needed rotation. Release inner wire tension and loosen the clamp bolt. Rotate the derailleur slightly in the correct direction, being careful not to change the height. Tighten the clamp bolt.
- Recheck Alignment: Shift to the outer chainring and observe the rotational alignment. Repeat the adjustment if needed.
Proper alignment minimizes the risk of the chain jumping off the outermost ring and ensures smooth transitions.
 Front Derailleur Rotational Angle Adjustment
3.3. Limit Screw Settings: H and L Screws
What are the limit screws on a front derailleur and how do you adjust them? Limit screws, marked “L” and “H,” control the inward and outward travel of the front derailleur cage, preventing the chain from falling off the chainrings.
The L-screw stops the derailleur’s motion toward the smallest chainring, while the H-screw stops the motion toward the largest chainring. If the screws aren’t marked, you can identify them by testing: relax the cable tension and turn each screw while feeling for lateral motion in the derailleur body. The screw that causes motion is the “L” screw. Proper adjustment of these screws ensures the chain stays on the chainrings and shifts smoothly.
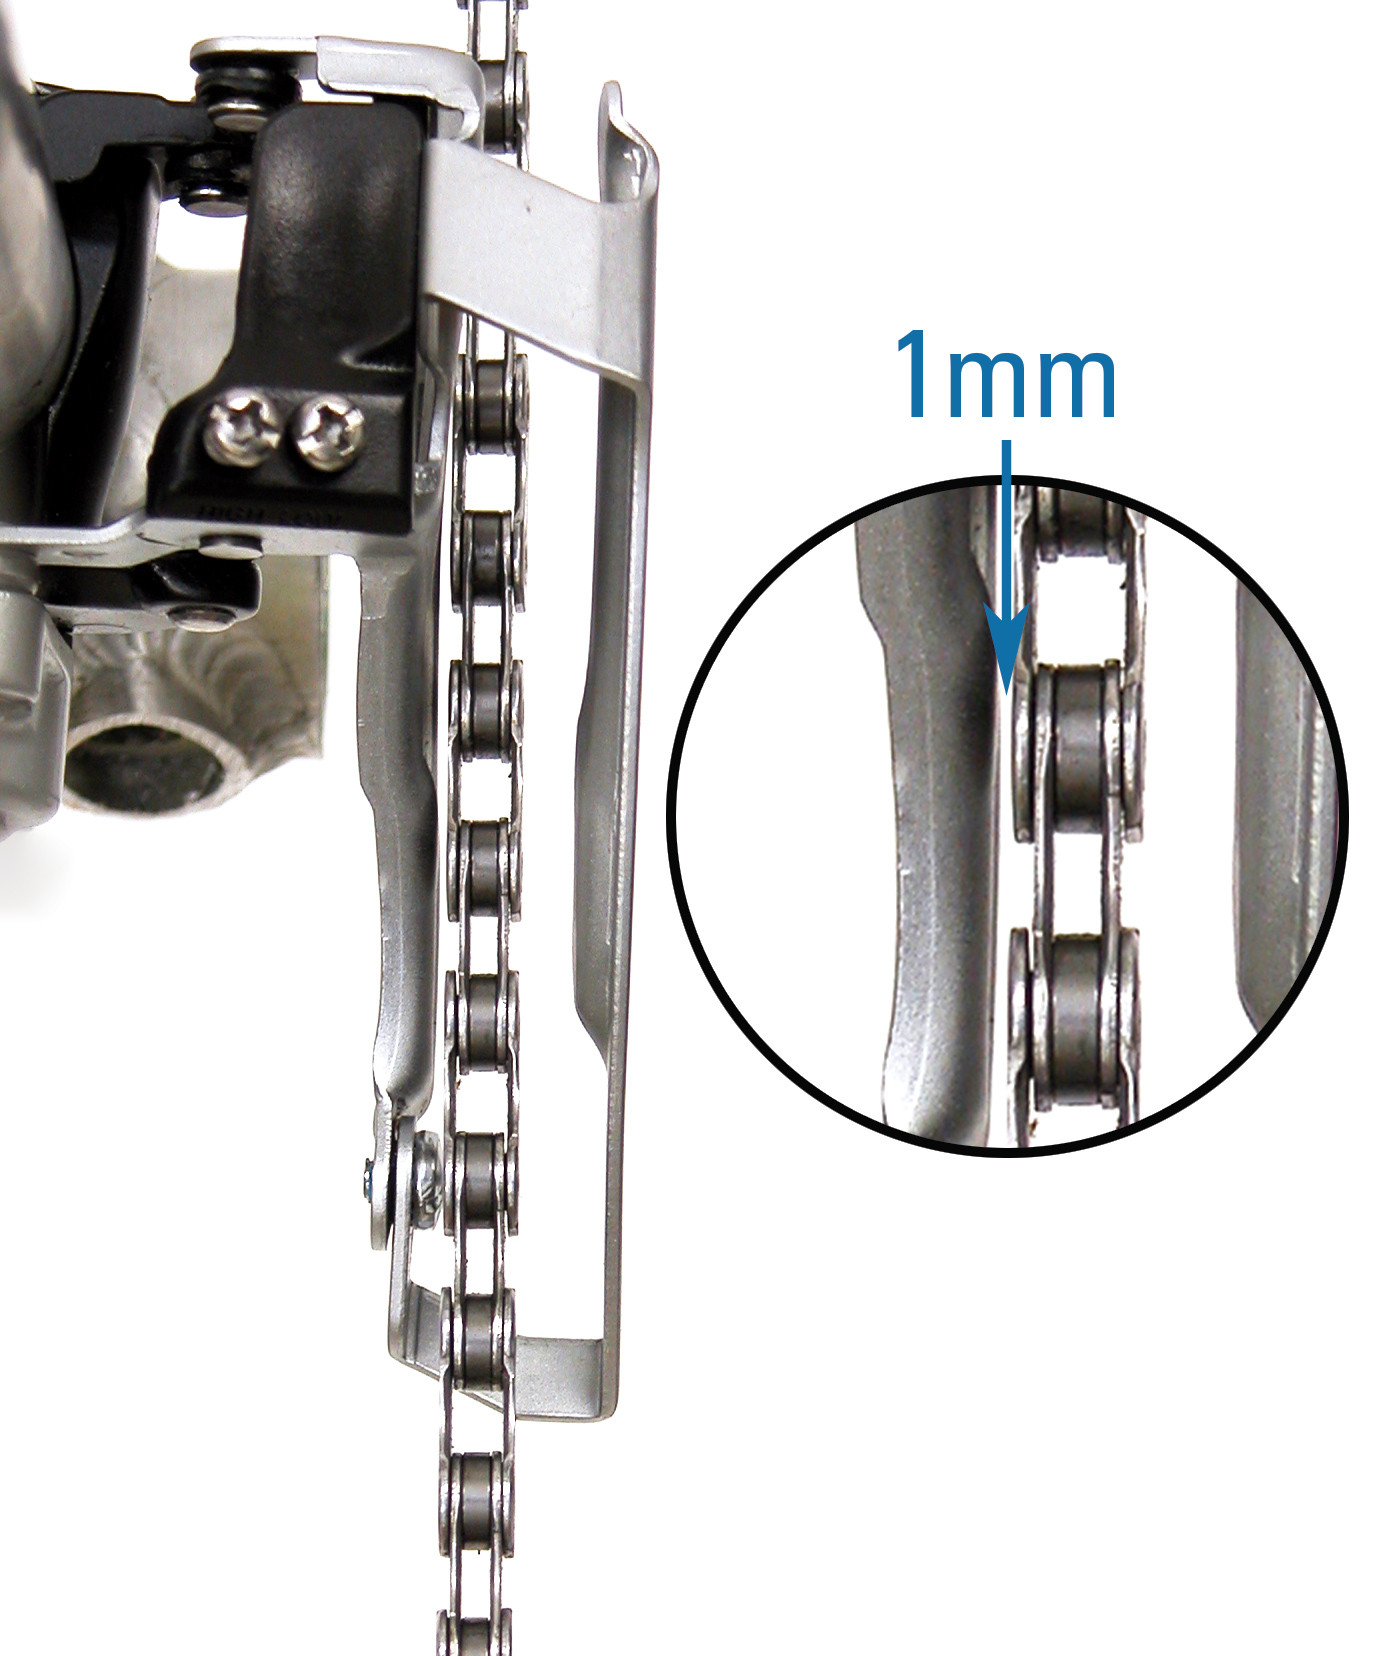
3.4. L-Screw Adjustment: Fine-Tuning the Low Limit
How do you adjust the L-screw on a front derailleur? Adjusting the L-screw controls the innermost travel of the front derailleur, ensuring the chain shifts to the smallest ring without falling off.
- Shift Chain: Move the chain to the innermost rear sprocket and innermost front chainring.
- Check Wire Tension: Ensure the inner wire tension is loose. If it’s taut, turn the barrel adjuster clockwise into the housing.
- Sight the Gap: There should be a small gap between the inner chain plate and the inner cage plate, about 1/16″ or 1mm.
- Adjust L-Screw: Pedal the bike slowly and adjust the L-screw so there is a small gap between the inner cage and inner chain plate. Ensure the chain isn’t rubbing the cage as the chainrings turn.
 L-Screw Adjustment
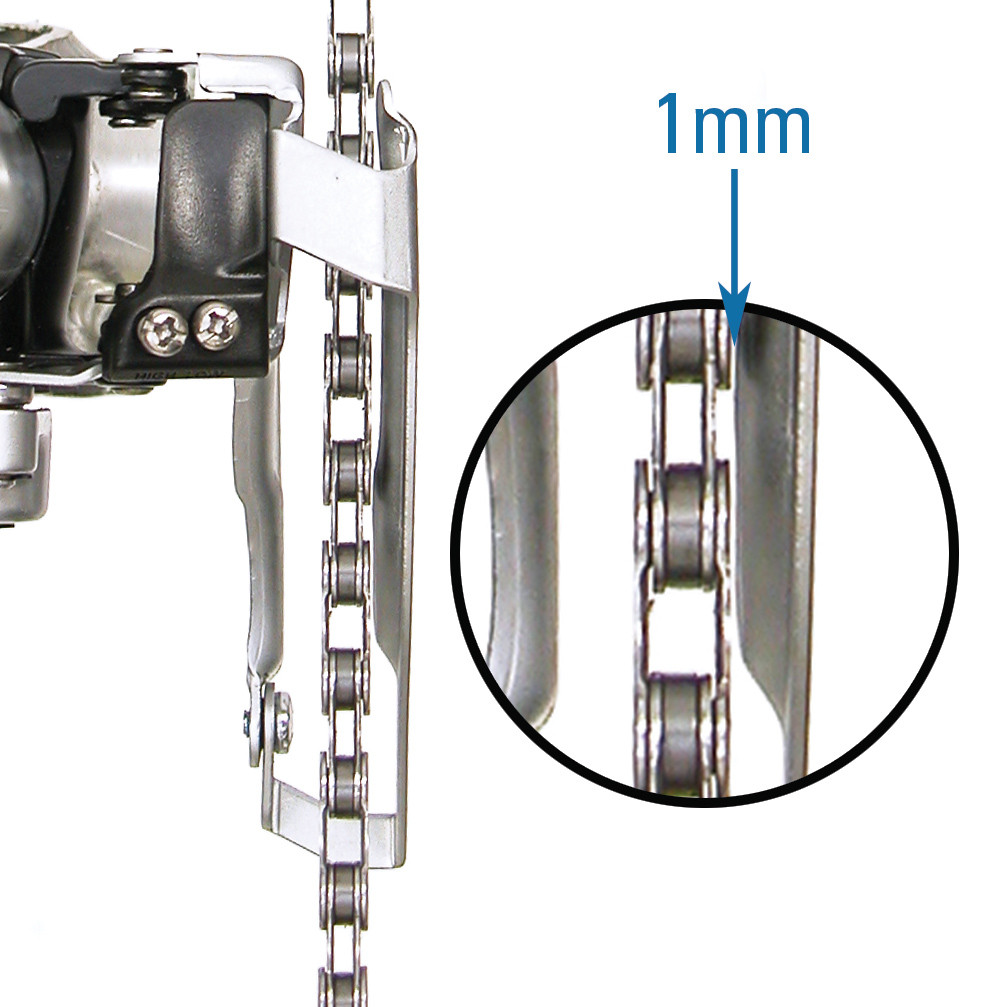
3.5. H-Screw Adjustment: Setting the High Limit
How do you adjust the H-screw on a front derailleur? The H-screw stops the outward travel of the front derailleur, ensuring the chain shifts to the largest chainring without falling off.
- Shift Chain: Shift to the outermost sprocket in the rear and the outermost front chainring.
- Increase Wire Tension: Pull the inner wire by hand to increase tension, ensuring the derailleur is against the H-screw.
- Check the Gap: Maintain full pressure on the inner wire and check the gap between the chain and outer cage plate. It should be about 1/16″ or 1mm.
- Adjust H-Screw: Pedal the bike slowly and adjust the H-screw until the chain is 1mm from the outer cage.
 H-Screw Adjustment
4. Index Adjustment: Fine-Tuning Shifting Precision
What is index adjustment and how do you perform it? Index adjustment fine-tunes the shifting precision on bikes with indexed shifters, ensuring smooth and accurate transitions between gears.
4.1. Index Adjustment on Three Chainring Bikes
How do you adjust the index on a three chainring bike? Adjusting the index on a three chainring bike ensures smooth and precise shifting between all three chainrings.
- Shift Chain: Move the chain to the middle chainring in the front and the innermost rear sprocket.
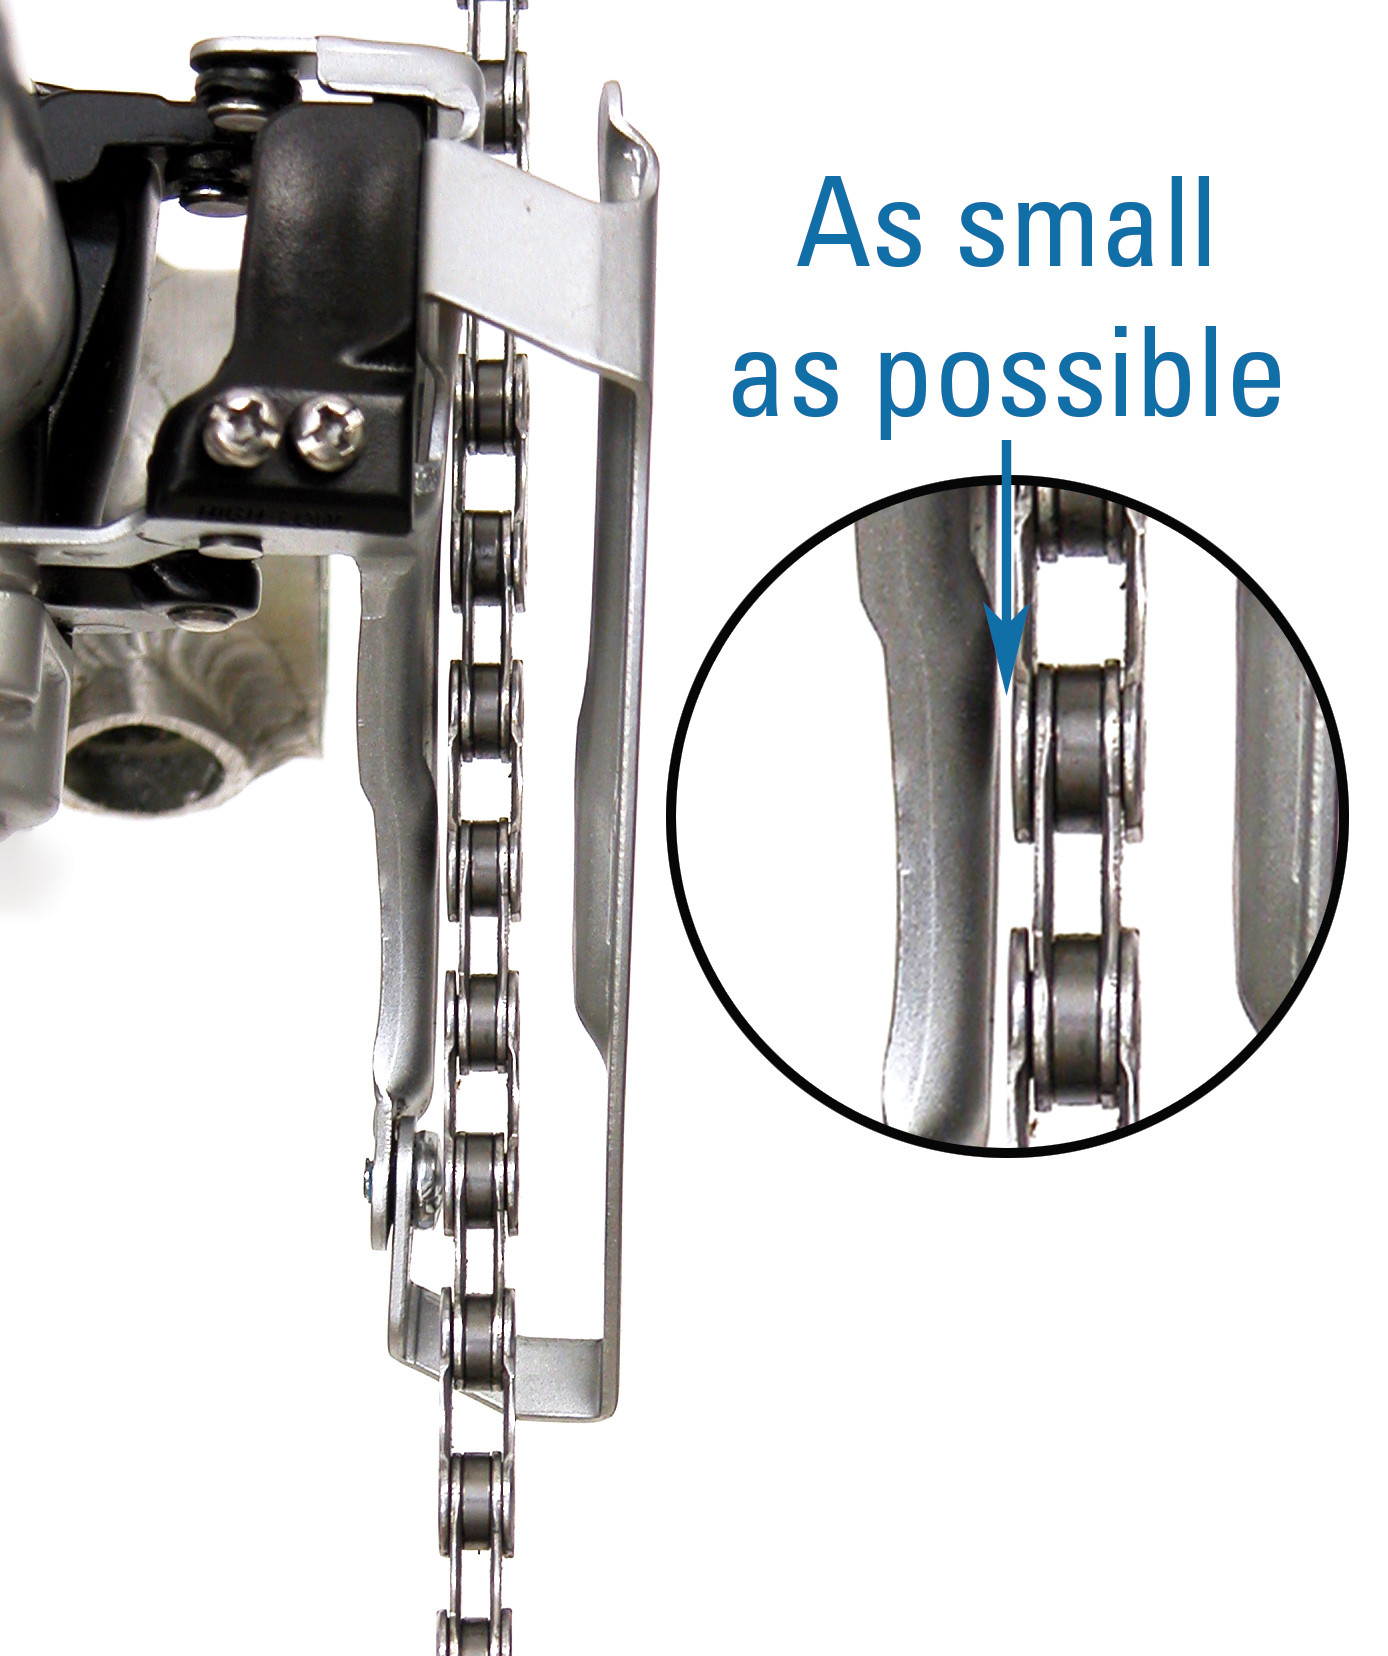
- View the Gap: Check the gap between the inner cage plate and the chain. The gap should be as small as possible without the chain rubbing.
- Adjust Wire Tension: Increase inner wire tension by turning the barrel adjuster counter-clockwise. Check the gap again.
- Correct Rubbing: If the chain is rubbing the cage, turn the barrel adjuster clockwise.
- Test Shifting: Shift the front derailleur to all three front chainrings. If the derailleur rubs in the largest front chainring, double-check the H-limit screw and inner wire tension.
 Index Adjustment on Three Chainring Bikes
4.2. Index Adjustment on Two Chainring Bikes
How do you adjust the index on a two chainring bike? Adjusting the index on a two chainring bike ensures smooth and precise shifting between the two chainrings.
- Shift Chain: Move the chain to the outer chainring in the front and the outermost rear cog.
- View the Gap: Check the gap between the outer cage plate and the chain.
- Assess Clearance: If the outer cage plate clears the chain, the index setting is adequate.
- Adjust Tension: If the plate is rubbing the chain, increase inner wire tension by turning the adjusting barrel counter-clockwise and check again.
- Test Shifting: Shift the front derailleur to both front chainrings.
5. Troubleshooting Common Front Derailleur Issues
What are common front derailleur problems and how can you fix them? Common front derailleur issues include slow shifting, chain rub, and the chain falling off. Proper adjustment and maintenance can resolve these problems.
- Slow Shifting: Adjust the limit screws or increase cable tension.
- Chain Rub: Fine-tune the index setting or realign the derailleur cage.
- Chain Falling Off: Adjust the limit screws to prevent over-shifting.
Regularly inspecting and maintaining your front derailleur ensures smooth and reliable shifting.
6. Maintaining Optimal Front Derailleur Performance
How do you maintain optimal performance of the front derailleur? Proper maintenance ensures the front derailleur continues to function efficiently and reliably.
- Lubricate Regularly: Keep the pivot points and cable wires lubricated.
- Inspect Cables: Check for fraying or damage and replace as needed.
- Clean Regularly: Remove dirt and debris from the derailleur and chainrings.
- Check Alignment: Ensure the derailleur cage is properly aligned.
Regular maintenance extends the life of your components and ensures a smooth riding experience.
7. Advanced Tips for Front Gear Adjustment
What are some advanced tips for adjusting front gears on a bike? For those looking to take their adjustment skills to the next level, these advanced tips can help:
- Use a Cable Tension Tool: Ensures consistent and accurate cable tension.
- Check Chain Line: Make sure the chain line is straight for optimal shifting.
- Consider Derailleur Compatibility: Ensure the derailleur is compatible with your bike’s drivetrain.
- Fine-Tune Adjustments: Make small, incremental adjustments for best results.
By employing these advanced tips, you can achieve even smoother and more reliable shifting performance.
8. The Importance of Professional Bike Maintenance
When should you seek professional bike maintenance? While many adjustments can be done at home, professional maintenance is crucial for complex issues or if you lack experience.
A professional mechanic can:
- Diagnose Complex Problems: Identify issues that aren’t immediately apparent.
- Ensure Proper Installation: Guarantee components are installed correctly.
- Provide Expert Adjustments: Fine-tune settings for optimal performance.
- Offer Preventative Maintenance: Keep your bike in top condition.
Regular professional check-ups can extend the life of your bike and ensure a safe and enjoyable riding experience.
9. Front Derailleur Performance: Understanding Limitations
What are the limitations of front derailleur performance? The front derailleur should shift the chain between chainrings without throwing it off, but limitations exist.
Slight chain rub can occur, especially in extreme gear combinations. Frame flex under heavy pedaling can also cause intermittent rubbing noises. Loosening the H-limit might stop the rubbing but could cause the chain to shift off the largest ring. If all adjustments are correct, the rider might be exceeding the bike’s design capabilities.
10. Join the Community at usabikers.net
Looking for more tips, tricks, and community support for your biking adventures? At usabikers.net, we offer a wealth of resources for motorcycle and bike enthusiasts.
10.1. Explore Informative Articles
Access our extensive library of articles covering everything from basic maintenance to advanced riding techniques. Stay informed and improve your skills with our expert advice.
10.2. Connect with Fellow Bikers
Join our vibrant community of bikers to share experiences, ask questions, and connect with like-minded individuals. Our forums are a great place to find support and inspiration.
10.3. Discover Events and Rallies
Stay up-to-date with the latest biker events and rallies across the USA. Find local meetups, plan road trips, and experience the thrill of the open road with fellow enthusiasts.
10.4. Get Personalized Recommendations
Receive personalized recommendations for gear, accessories, and services based on your riding preferences. Our experts are here to help you find the perfect fit for your needs.
Ready to take your biking experience to the next level? Visit usabikers.net today and discover a world of information, community, and adventure. Connect with us and explore the open road with confidence!
FAQ: Frequently Asked Questions About Front Gear Adjustment
Q1: Why is my front derailleur not shifting properly?
Your front derailleur may not be shifting properly due to incorrect height, rotational angle, limit screw settings, or inner wire tension. Start by checking these basic adjustments and fine-tuning as necessary.
Q2: How often should I adjust my front derailleur?
You should adjust your front derailleur whenever you notice poor shifting performance, such as slow shifting, chain rub, or the chain falling off. A general check-up every few months is a good practice.
Q3: What does the “L” screw do on the front derailleur?
The “L” screw controls the innermost travel of the front derailleur, preventing the chain from falling off the smallest chainring. Adjust it to ensure the chain shifts smoothly to the smallest ring without overshooting.
Q4: What does the “H” screw do on the front derailleur?
The “H” screw stops the outward travel of the front derailleur, ensuring the chain shifts to the largest chainring without falling off. Adjust it to maintain a small gap between the chain and outer cage plate.
Q5: How do I know if my front derailleur cable is too tight?
If your front derailleur cable is too tight, the derailleur will not rest on the L-screw stop, and the inner limit will change, possibly causing the chain to fall off the rings. The cable should have some slack when in the innermost chainring.
Q6: Can I use any lubricant on my front derailleur?
It is best to use a light lubricant specifically designed for bicycle components. Avoid using heavy grease, which can attract dirt and debris.
Q7: How do I adjust the front derailleur on a bike with electronic shifting?
Electronic shifting systems typically have a different adjustment process than mechanical systems. Consult the manufacturer’s instructions for specific guidance on adjusting your electronic front derailleur.
Q8: What is the ideal gap between the front derailleur cage and the chainrings?
The ideal gap between the outer chainring teeth and the lower edge of the outer cage plate should be 1-2mm, about the thickness of a penny. This ensures smooth shifting without chain rub.
Q9: How do I prevent chain rub on my front derailleur?
To prevent chain rub, ensure the derailleur cage is properly aligned, the limit screws are correctly adjusted, and the inner wire tension is optimized. Small adjustments can make a big difference.
Q10: What should I do if my front derailleur is bent?
If your front derailleur is bent, it may be difficult or impossible to adjust properly. In this case, it is best to replace the derailleur with a new one to ensure reliable shifting performance.