
Are you looking to fine-tune your road bike for optimal comfort and performance? Adjusting the handlebar height is a crucial step in achieving that perfect fit, and usabikers.net is here to guide you through it. This guide will cover everything from understanding why handlebar height matters to step-by-step instructions for both threadless and quill stems, ensuring you get the most out of your ride. Let’s explore how adjusting your handlebar height can improve your cycling experience, offering enhanced control, comfort, and aerodynamic efficiency.
1. Why Does Handlebar Height Matter on a Road Bike?
Handlebar height significantly impacts your riding experience. A proper adjustment ensures comfort, enhances control, and improves aerodynamics. But how do these factors come into play for different riders?
- Comfort: A correctly adjusted handlebar height can alleviate strain on your back, neck, and shoulders. According to a study by the American Journal of Sports Medicine in 2023, cyclists who adjusted their handlebar height reported a 30% reduction in upper body discomfort.
- Control: Handlebar height influences your center of gravity. Lowering the handlebars shifts your weight forward, increasing traction and control, particularly during climbs.
- Aerodynamics: For competitive cyclists, lowering the handlebar creates a more aerodynamic profile, reducing wind resistance and increasing speed. A study by the University of Colorado Boulder in June 2024 found that lowering handlebars by 5 cm can reduce aerodynamic drag by 7%.
2. Understanding Your Road Bike’s Handlebar Setup
Before you grab your tools, familiarize yourself with the handlebar and stem setup on your road bike. The two primary types of stems you’ll encounter are threadless and quill stems.
- Threadless Stems: These are common on modern road bikes. Threadless stems clamp onto the fork’s steerer tube and are easily adjustable using spacers.
- Quill Stems: Typically found on older bikes, quill stems slide into the steerer tube and are secured with an expanding wedge.
Understanding which type you have is crucial for the correct adjustment process.
3. Tools You’ll Need for Handlebar Adjustment
Having the right tools makes the adjustment process smooth and safe. Here’s a list of essential tools:
- Allen Wrench Set: Essential for loosening and tightening bolts on the stem and handlebars. A set with various sizes ensures compatibility with different bike models.
- Torque Wrench: Crucial for tightening bolts to the manufacturer’s recommended torque. Over-tightening can damage components, while under-tightening can lead to instability.
- Grease: Applying grease to bolts prevents seizing and ensures smooth adjustments.
- Measuring Tape: Useful for measuring the height of the handlebars and ensuring symmetrical adjustments.
- Masking Tape and Marker: Helpful for marking the original position of the handlebars and brake levers.
Investing in quality tools ensures precision and longevity in your bike maintenance.
4. Step-by-Step Guide: Adjusting Handlebar Height on a Threadless Headset
Threadless headsets offer a straightforward method for adjusting handlebar height. Here’s how to do it:
4.1. Assessing the Current Setup
Before making any adjustments, evaluate your current handlebar height. Ride your bike briefly to identify any discomfort or handling issues. Note whether the handlebars feel too high, too low, or just right.
4.2. Loosening the Stem Bolts
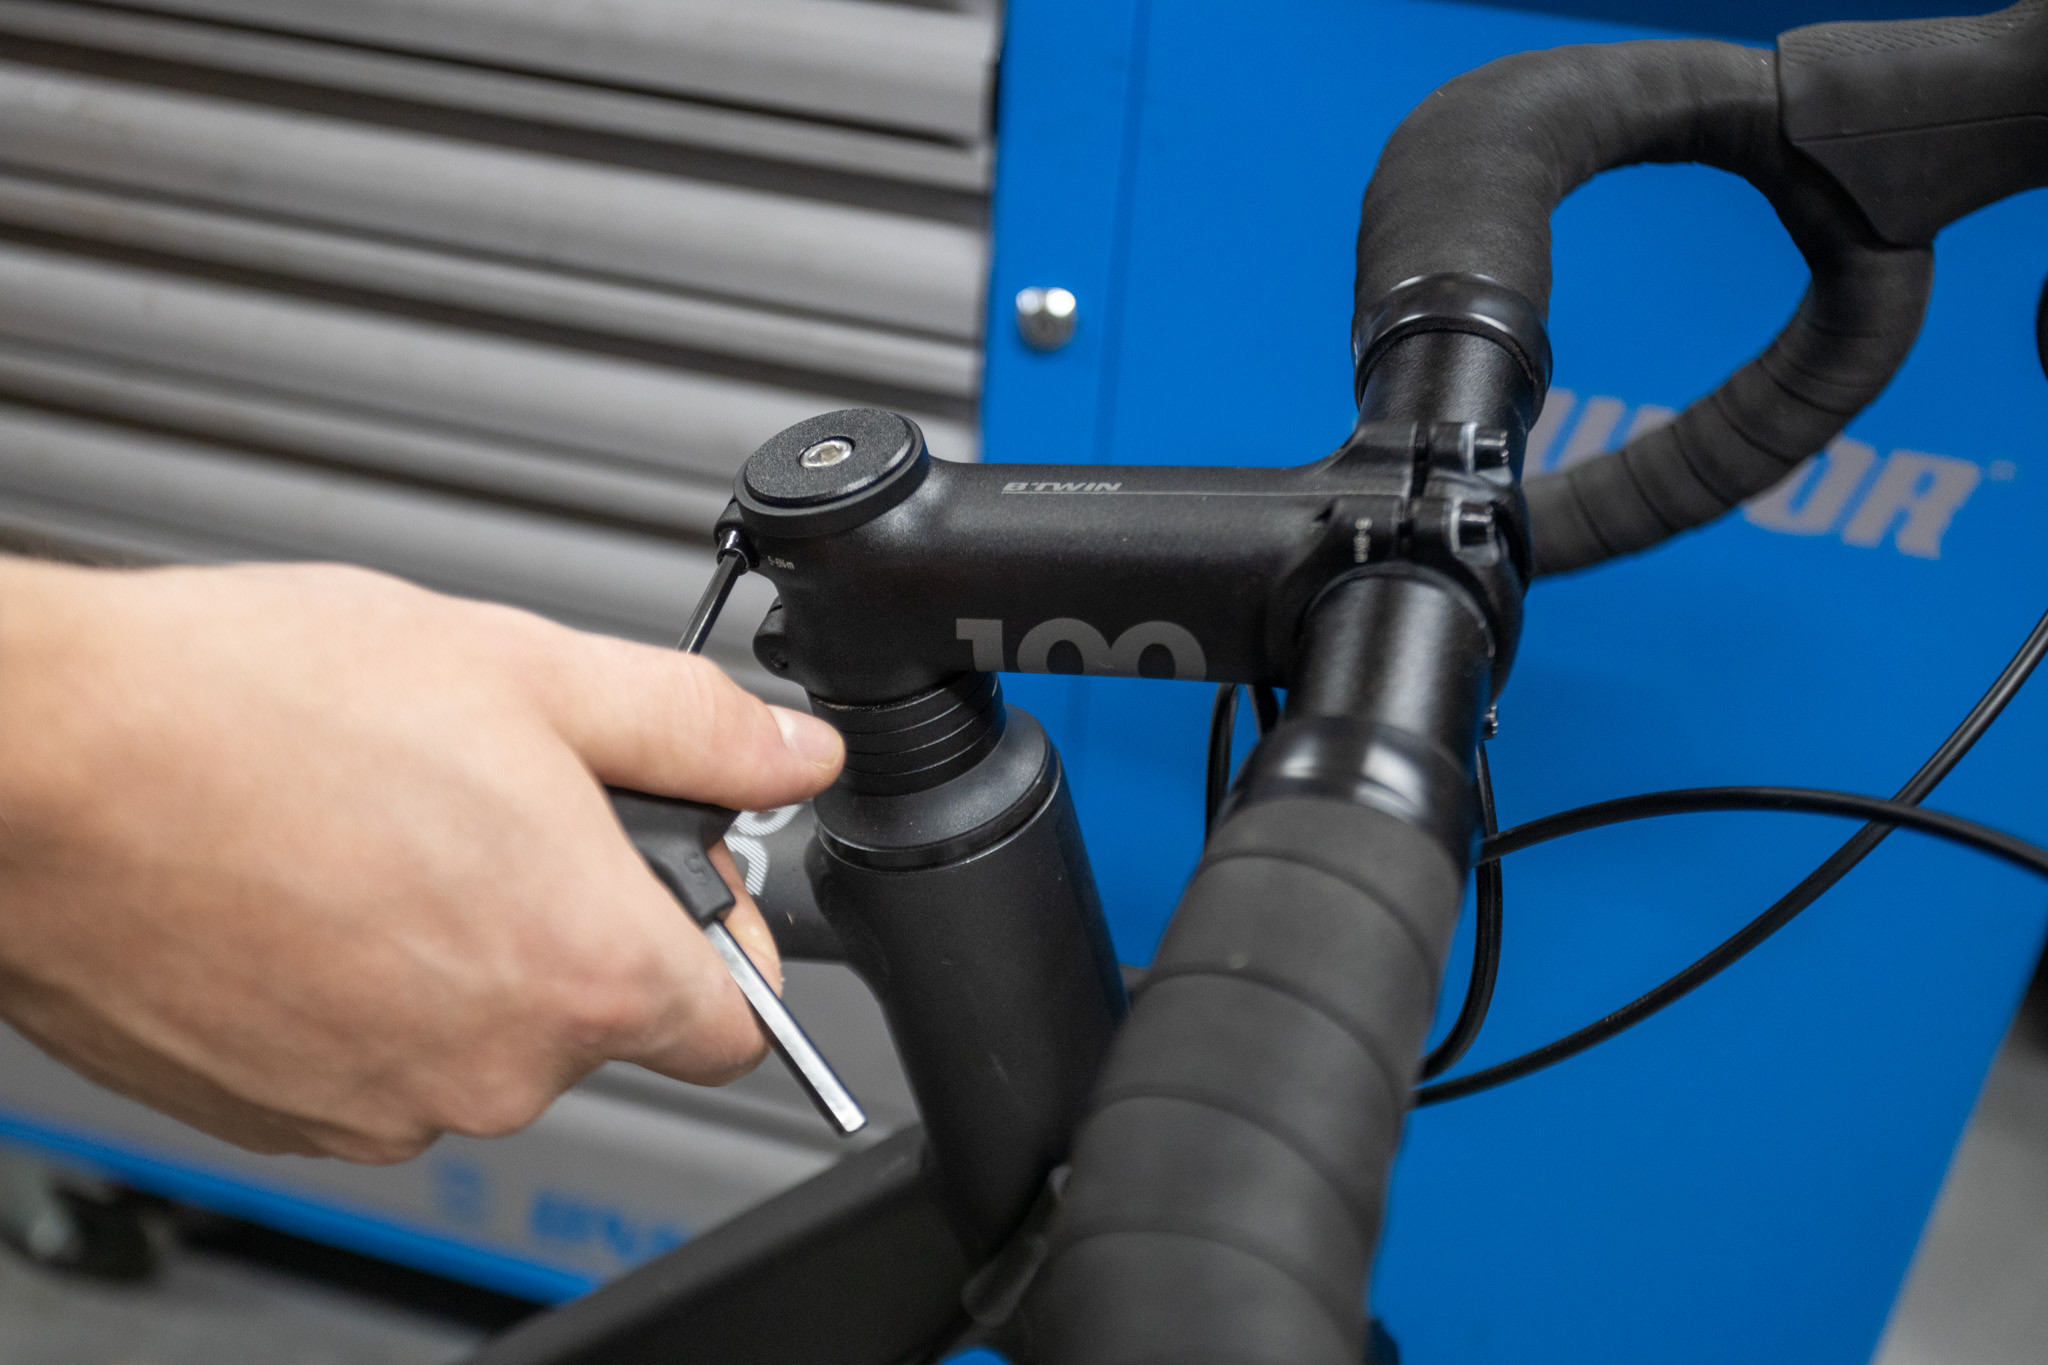 Loosening stem clamp bolts
Use an Allen wrench to loosen the clamp bolts on the back of the stem. Loosen them equally, a little at a time, until the stem is free to move. Be sure not to fully remove the bolts.
4.3. Removing the Top Cap
 Removing the top cap bolt
Remove the top cap using an Allen wrench. Apply a small amount of grease to the top-cap bolt to prevent it from seizing in place.
4.4. Sliding Off the Stem
 Sliding the stem off the steerer tube
Carefully slide the stem off the steerer tube. This exposes the headset spacers that allow you to adjust the handlebar height.
4.5. Adjusting the Headset Spacers
 Adjusting headset spacers for handlebar height
Decide whether you want to raise or lower the handlebars. To raise them, move spacers from above the stem to below it. To lower them, do the opposite. Remember, even small changes can make a big difference.
4.6. Reinstalling the Stem
 Ensuring a gap between steerer tube and stem
Slide the stem back onto the steerer tube, ensuring there’s a small gap (3-5mm) between the top of the steerer tube and the top of the stem or spacer. This gap is crucial for proper headset preload.
4.7. Preloading the Headset Bearings
 Tightening the top cap bolt
Replace the top cap and bolt, tightening it until you feel some resistance. This preloads the headset bearings, ensuring smooth steering.
4.8. Aligning the Stem
 Aligning the stem with the front wheel
Align the stem with the front wheel, ensuring the handlebars are at a right angle to the wheel. Straddling the top tube can help with this step.
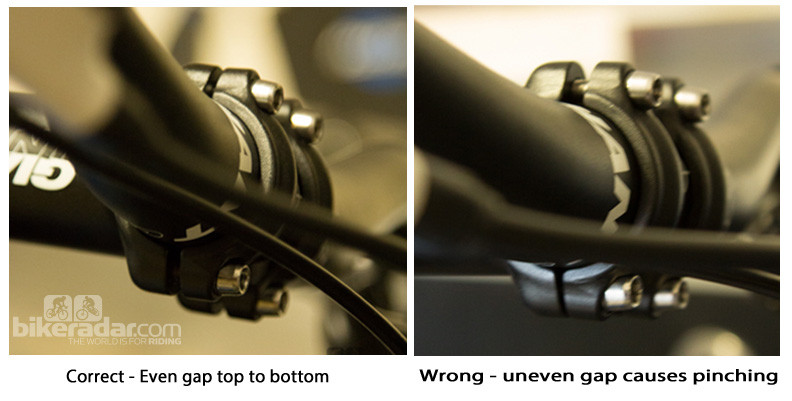
4.9. Tightening the Stem Bolts
 Torquing stem clamp bolts evenly
Use a torque wrench to tighten the stem clamp bolts evenly to the manufacturer’s recommended value (typically 5-8Nm).
4.10. Checking the Headset Adjustment
 Checking headset adjustment for play
Check your headset adjustment by holding the front brake and rocking the bars back and forth. If you feel any play, tighten the top-cap bolt slightly and re-torque the stem-clamp bolts.
5. Advanced Adjustment: Flipping the Stem
For a more significant change in handlebar height, you can flip the stem.
5.1. Preparing the Handlebars
 Marking handlebar and brake lever angles
Before removing the handlebars, use masking tape and a marker to note the angle of the handlebars and brake levers. This ensures you can replicate the position when reinstalling.
5.2. Removing the Handlebars
Marking handlebar and brake lever angles
Loosen the bolts that hold the handlebar to the front of the stem. Remove the stem’s faceplate and carefully detach the handlebars.
5.3. Flipping the Stem
 Comparing stem positions
Remove the stem from the steerer tube and flip it over. This changes the angle, providing a lower or higher handlebar position depending on the stem’s original orientation.
5.4. Reinstalling the Handlebars
 Ensuring even spacing on faceplate
Reinstall the handlebars, aligning them with the marks you made earlier. Tighten the faceplate bolts evenly to the manufacturer’s recommended torque.
5.5. Final Adjustments
Follow steps 3 to 7 from the threadless headset adjustment guide to preload the headset and tighten the stem.
6. Step-by-Step Guide: Adjusting the Height of a Quill Stem
Adjusting a quill stem is simpler than a threadless stem, but requires a different approach.
6.1. Loosening the Quill Bolt
 Loosening the bolt on top of the quill stem
Begin by loosening the bolt on the top of the stem. Most quill stems use a hex head bolt, but some may have an external bolt.
6.2. Freeing the Wedge
 Tapping the bolt to free the wedge
If the stem hasn’t been adjusted in a while, you may need to gently tap the bolt with a hammer to free the wedge.
6.3. Adjusting the Height
 Paying attention to insertion heights
Adjust the stem to your desired height. Ensure you adhere to any minimum and maximum insertion marks on the stem.
6.4. Re-tightening the Bolt
 Re-tightening the bolt on the quill stem
Once you’ve set the height and aligned the stem with the front wheel, re-tighten the wedge bolt to the specified torque.
7. Alternative Solutions for Handlebar Height Adjustment
If adjusting spacers or flipping the stem isn’t enough, consider these alternatives:
- Stem with a Different Rise: Replace your current stem with one that has a greater or lesser degree of rise. Stems come in various angles, typically between six and twenty degrees.
- Stem Riser: Install a stem riser, which effectively lengthens the steerer tube, allowing you to position the stem and handlebars higher. Be cautious, as stem risers can put extra strain on the fork steerer, especially if it’s carbon.
8. Addressing Integrated Front Ends
 Integrated front end
Many modern bikes feature integrated front ends, with cables and hoses running through the handlebar and stem. Adjusting handlebar height on these bikes can be more complex.
- Lowering Handlebars: Often, split headset spacers are used, allowing for removal without fully detaching the stem.
- Raising Handlebars: Ensure there’s enough slack in the cables and hydraulic hoses. If they’re too short, they may need replacing to accommodate the new height.
9. The Importance of Professional Bike Fit
While you can make adjustments yourself, a professional bike fit is invaluable. A qualified fitter assesses your body dimensions, flexibility, and riding style to optimize your bike setup.
- Personalized Adjustments: Professional fitters make precise adjustments to saddle height, handlebar position, and cleat placement.
- Injury Prevention: A proper bike fit can prevent common cycling injuries, such as knee pain, back pain, and numbness in the hands.
- Performance Enhancement: Optimizing your bike fit can improve your power output, efficiency, and overall riding performance.
According to the International Bike Fitting Institute (IBFI), a professional bike fit can increase cycling efficiency by up to 15%.
10. Listening to Your Body: Fine-Tuning Your Adjustments
After making adjustments, it’s crucial to listen to your body. Pay attention to any discomfort, pain, or handling issues.
- Short Rides: Start with short rides to assess the impact of the adjustments.
- Incremental Changes: Make small, incremental changes rather than drastic ones.
- Record Your Adjustments: Keep a record of your adjustments so you can revert to previous settings if needed.
11. Common Mistakes to Avoid
Making mistakes during handlebar adjustment can lead to discomfort or even damage to your bike. Here are some common pitfalls to avoid:
- Over-tightening Bolts: Always use a torque wrench to tighten bolts to the manufacturer’s recommended value.
- Ignoring Minimum Insertion Marks: Ensure the stem is inserted far enough into the steerer tube or quill.
- Neglecting Cable Slack: Ensure there’s enough slack in the cables and hoses, especially when raising handlebars on bikes with integrated front ends.
- Forgetting to Align the Stem: Ensure the stem is aligned with the front wheel before tightening the bolts.
12. Handlebar Height and Riding Style
Your riding style also influences the ideal handlebar height.
- Aggressive Riders: Racers and performance-oriented riders often prefer lower handlebars for a more aerodynamic position.
- Comfort-Oriented Riders: Recreational riders typically benefit from higher handlebars for a more upright and comfortable position.
- Endurance Riders: Riders who log long miles may prefer a handlebar height that balances comfort and efficiency.
13. Maintaining Your Handlebar Setup
Regular maintenance ensures your handlebar setup remains optimal.
- Check Bolt Torque: Periodically check the torque of the stem and handlebar bolts.
- Inspect for Damage: Inspect the stem and handlebars for any signs of damage, such as cracks or dents.
- Grease Bolts Regularly: Apply grease to the bolts to prevent seizing and ensure smooth adjustments.
14. Where to Find More Information and Community
For more in-depth guides, product reviews, and community support, visit usabikers.net. Here, you’ll find a wealth of information to enhance your cycling journey.
- Detailed Guides: Access comprehensive guides on bike maintenance, gear selection, and riding techniques.
- Product Reviews: Read unbiased reviews of the latest bikes, components, and accessories.
- Community Forum: Connect with fellow riders, share your experiences, and get answers to your questions.
Address: 801 Sturgis Main St, Sturgis, SD 57785, United States
Phone: +1 (605) 347-2000
Website: usabikers.net
15. Staying Safe During Adjustments
Safety is paramount when making any adjustments to your bike.
- Use a Bike Stand: A bike stand provides a stable platform for working on your bike.
- Wear Gloves: Gloves protect your hands from grease and sharp edges.
- Read Instructions: Always read the manufacturer’s instructions before making any adjustments.
- Take Your Time: Avoid rushing the adjustment process.
16. Handlebar Height and Gender Considerations
Gender can also influence the ideal handlebar height. Women often have shorter torsos and longer legs relative to their height compared to men.
- Shorter Reach: Women may benefit from a shorter stem and higher handlebars to reduce reach and alleviate strain on the back and shoulders.
- Saddle Position: Adjusting the saddle position can also help compensate for differences in body proportions.
17. The Relationship Between Handlebar Height and Saddle Height
Handlebar height is closely related to saddle height. Adjusting one affects the other.
- Saddle-to-Handlebar Drop: The difference in height between the saddle and handlebars is known as saddle-to-handlebar drop. A greater drop results in a more aggressive, aerodynamic position.
- Balancing Comfort and Performance: Finding the right balance between saddle height and handlebar height is crucial for comfort and performance.
18. Exploring Different Handlebar Shapes
Handlebar shape also affects comfort and handling.
- Drop Handlebars: Common on road bikes, drop handlebars offer multiple hand positions for varying terrain and riding styles.
- Flat Handlebars: Typically found on mountain bikes, flat handlebars provide greater control and stability on rough terrain.
- Riser Handlebars: Riser handlebars offer a more upright position and increased comfort for recreational riding.
19. The Benefits of a Comfortable Riding Position
A comfortable riding position enhances your cycling experience in numerous ways.
- Increased Endurance: A comfortable position reduces fatigue and allows you to ride longer.
- Improved Power Output: A proper position optimizes muscle activation and power transfer.
- Enhanced Enjoyment: A comfortable ride is simply more enjoyable.
20. How to Choose the Right Handlebar Width
Handlebar width also plays a role in comfort and handling.
- Shoulder Width: The ideal handlebar width is typically close to your shoulder width.
- Handling and Control: Wider handlebars offer greater control, while narrower handlebars improve aerodynamics.
- Experimentation: Experiment with different handlebar widths to find what works best for you.
21. The Impact of Handlebar Material
Handlebar material affects weight, stiffness, and vibration damping.
- Aluminum: Aluminum handlebars are affordable and durable.
- Carbon Fiber: Carbon fiber handlebars are lightweight and offer excellent vibration damping.
- Titanium: Titanium handlebars are strong, lightweight, and corrosion-resistant.
22. Maintaining Your Road Bike’s Steering System
Regular maintenance of your road bike’s steering system ensures smooth and safe handling.
- Check Headset Bearings: Periodically check the headset bearings for play or roughness.
- Inspect the Fork: Inspect the fork for any signs of damage.
- Lubricate Cables: Lubricate the brake and shift cables for smooth operation.
23. Understanding Headset Types and Their Impact on Handlebar Adjustment
Different headset types can impact how you adjust your handlebars.
- Threaded Headsets: Found on older bikes, threaded headsets use a threaded fork steerer and adjustable cups.
- Threadless Headsets: Common on modern bikes, threadless headsets use a smooth fork steerer and clamp onto the stem.
- Integrated Headsets: Integrated headsets have bearings that sit directly in the frame, simplifying installation and adjustment.
24. Exploring Aerodynamic Handlebar Options
For cyclists focused on speed, aerodynamic handlebars can provide a significant advantage.
- Aero Drop Bars: Aero drop bars are designed to reduce wind resistance and improve aerodynamics.
- Integrated Cockpits: Integrated cockpits combine the stem and handlebars into a single unit for maximum aerodynamic efficiency.
- Time Trial Bars: Time trial bars allow for a more aerodynamic position during time trials and triathlons.
25. Handlebar Height and Terrain
The type of terrain you ride on can influence the ideal handlebar height.
- Climbing: Lower handlebars can improve climbing efficiency by shifting your weight forward.
- Descending: Higher handlebars can provide greater control and stability on steep descents.
- Flat Roads: A more neutral handlebar height balances comfort and efficiency on flat roads.
26. The Role of Bar Tape in Comfort
Bar tape plays a significant role in handlebar comfort.
- Cushioning: Bar tape provides cushioning and absorbs vibration.
- Grip: Bar tape provides a secure grip, even in wet conditions.
- Thickness: Bar tape comes in various thicknesses to suit different preferences.
27. Ensuring Proper Brake Lever Position
Proper brake lever position is essential for safety and control.
- Reach: Adjust the brake lever reach to ensure you can comfortably reach the levers with your fingers.
- Angle: Adjust the brake lever angle to align with your wrists.
- Accessibility: Ensure the brake levers are easily accessible from all hand positions.
28. Handlebar Height and Injury Prevention
Proper handlebar height can help prevent common cycling injuries.
- Back Pain: A more upright position can reduce strain on the lower back.
- Neck Pain: A proper handlebar height can alleviate neck pain and stiffness.
- Numbness: Adjusting the handlebar height can prevent numbness in the hands and fingers.
29. The Importance of Professional Advice
When in doubt, seek professional advice from a qualified bike mechanic or fitter.
- Expert Guidance: Professionals can provide expert guidance on bike setup and maintenance.
- Personalized Recommendations: Professionals can make personalized recommendations based on your individual needs and preferences.
- Peace of Mind: Consulting a professional can give you peace of mind knowing your bike is properly adjusted.
30. Finding Your Ideal Handlebar Height: A Summary
Adjusting your handlebar height is a crucial step in optimizing your road bike for comfort, control, and performance. Whether you have a threadless or quill stem, following the steps outlined in this guide will help you achieve the perfect fit. Remember to listen to your body, make incremental changes, and seek professional advice when needed. For more information and community support, visit usabikers.net, where you’ll find a wealth of resources to enhance your cycling journey. Now, get out there and enjoy the ride!
FAQ: Adjusting Handlebar Height on a Road Bike
1. Why is handlebar height important on a road bike?
Handlebar height affects comfort, control, and aerodynamics. A proper adjustment reduces strain and improves handling.
2. What tools do I need to adjust handlebar height?
You’ll need an Allen wrench set, a torque wrench, grease, measuring tape, and masking tape.
3. How do I adjust handlebar height on a threadless headset?
Loosen stem bolts, remove the top cap, adjust headset spacers, and re-tighten everything to the correct torque.
4. What is a quill stem, and how do I adjust it?
A quill stem slides into the steerer tube. Loosen the quill bolt, adjust the height, and re-tighten the bolt.
5. What if I want to raise my handlebars significantly?
Consider flipping the stem, using a stem with a different rise, or installing a stem riser.
6. What is a professional bike fit, and why is it important?
A professional bike fit involves personalized adjustments to optimize your riding position and prevent injuries.
7. How do I know if my handlebar height is correct?
Listen to your body and pay attention to any discomfort, pain, or handling issues.
8. What are some common mistakes to avoid when adjusting handlebar height?
Avoid over-tightening bolts, ignoring minimum insertion marks, and neglecting cable slack.
9. How does riding style affect handlebar height?
Aggressive riders often prefer lower handlebars, while comfort-oriented riders benefit from higher handlebars.
10. Where can I find more information about bike maintenance and adjustments?
Visit usabikers.net for detailed guides, product reviews, and community support.
Ready to take your cycling experience to the next level? Visit usabikers.net now to explore our extensive collection of articles, join our community forum, and discover the best gear and accessories for your road bike. Whether you’re a seasoned pro or just starting out, usabikers.net is your ultimate resource for all things biker. Don’t wait – unlock the full potential of your ride today and experience the usabikers.net difference!