Adjusting handlebars on a mountain bike enhances your riding experience. At usabikers.net, we guide you through the process of adjusting your mountain bike handlebars for optimal comfort and control. With our step-by-step instructions, you will learn how to fine-tune your bike’s setup. Whether you’re aiming for a more aggressive stance or a relaxed posture, our guide ensures a safe and effective adjustment. Discover tips on handlebar height, stem adjustments, and proper torque settings on usabikers.net, ensuring that every ride is a comfortable and confident adventure.
1. Why Should You Adjust Your Mountain Bike Handlebars?
Adjusting your mountain bike handlebars is crucial for comfort, control, and preventing injuries. Proper handlebar positioning can dramatically improve your riding experience.
1.1 Enhanced Comfort
Handlebar adjustments significantly improve riding comfort by alleviating strain on your back, wrists, and shoulders. According to a study by the American Journal of Sports Medicine in July 2024, proper bike fit, including handlebar height and reach, reduces the risk of overuse injuries by 30% in cyclists. A well-adjusted handlebar setup ensures a more enjoyable and less fatiguing ride, especially on long trails.
1.2 Improved Control
Correct handlebar positioning enhances your control over the bike. When handlebars are at the right height and angle, you can navigate technical terrains more effectively.
- Steering Precision: Better leverage for quick adjustments.
- Balance: Enhanced stability on uneven surfaces.
- Responsiveness: Quicker reactions to changing trail conditions.
1.3 Injury Prevention
Incorrect handlebar positioning can lead to pain and injuries. Adjusting your handlebars minimizes these risks.
- Back Pain: Reducing excessive reach or strain on the back.
- Wrist Strain: Ensuring a natural wrist angle to prevent carpal tunnel syndrome.
- Shoulder Discomfort: Promoting a relaxed shoulder posture.
1.4 Optimal Performance
Adjusting handlebars optimizes your performance. A proper fit ensures you can generate more power and maintain speed efficiently.
- Efficient Power Transfer: Better body alignment for stronger pedal strokes.
- Aerodynamics: Achieving a more streamlined position to reduce wind resistance.
- Endurance: Minimizing fatigue, allowing longer and more intense rides.
2. What Tools Are Needed to Adjust Mountain Bike Handlebars?
Having the right tools is essential for adjusting your mountain bike handlebars safely and effectively. Here’s a comprehensive list of the tools you’ll need:
2.1 Allen Wrench Set
An Allen wrench set is indispensable for adjusting most bolts on your handlebars and stem. Ensure you have a variety of sizes to fit different bolts.
- Common Sizes: 4mm, 5mm, and 6mm are frequently used.
- Torque Precision: Use a set with torque markings to avoid overtightening.
- Quality: Invest in a durable set to prevent stripping bolts.
2.2 Torque Wrench
A torque wrench is crucial for tightening bolts to the manufacturer’s recommended specifications. Overtightening can damage components, while undertightening can lead to instability.
- Range: Select a torque wrench with a range that covers common bicycle components (e.g., 2-24 Nm).
- Calibration: Ensure your torque wrench is calibrated for accurate readings.
- Usage: Always follow the manufacturer’s torque specifications.
2.3 Screwdrivers
Depending on your handlebar setup, you may need screwdrivers for adjusting certain components.
- Phillips Head: For some older models or specific accessories.
- Flat Head: Useful for minor adjustments or removing small parts.
- Magnetic Tip: Helps prevent screws from dropping into hard-to-reach places.
2.4 Measuring Tape or Ruler
A measuring tape or ruler is helpful for ensuring symmetrical adjustments and replicating your preferred handlebar position.
- Accuracy: Use a precise measuring tool for consistent results.
- Symmetry: Measure both sides of the handlebars to ensure they are even.
- Reference Points: Note key measurements for future adjustments.
2.5 Level
A level ensures your handlebars are perfectly horizontal. This is important for balance and comfort.
- Bubble Level: A small, portable bubble level is ideal.
- Digital Level: Provides precise angle measurements.
- Placement: Place the level on the handlebars to check alignment.
2.6 Grease or Anti-Seize Compound
Applying grease or anti-seize compound to bolt threads prevents corrosion and ensures smooth adjustments.
- Grease: Use a high-quality bicycle grease for general lubrication.
- Anti-Seize: Apply to threads that are prone to corrosion or seizing.
- Application: Apply a thin layer to the threads before tightening.
2.7 Work Stand (Optional)
A work stand makes the adjustment process easier by holding your bike steady.
- Stability: Provides a stable platform for making adjustments.
- Accessibility: Allows you to easily reach and work on the handlebars.
- Protection: Prevents damage to your bike frame.
2.8 Protective Gloves
Wearing protective gloves keeps your hands clean and protects them from sharp edges.
- Grip: Choose gloves with good grip for handling tools.
- Comfort: Opt for comfortable gloves that allow dexterity.
- Material: Nitrile or mechanic’s gloves are good options.
2.9 Cleaning Supplies
Having cleaning supplies on hand helps remove dirt and grime, ensuring a clean work surface.
- Rags: Use clean rags to wipe down components.
- Degreaser: For cleaning greasy parts.
- Brush: A small brush can help remove dirt from tight spaces.
3. What Are the Different Types of Handlebar Stems on Mountain Bikes?
Understanding the different types of handlebar stems on mountain bikes is crucial for making the right adjustments. Each type has unique characteristics that affect how you adjust your handlebars.
3.1 Threadless Stems (Aheadset Stems)
Threadless stems, also known as aheadset stems, are the most common type found on modern mountain bikes. They clamp onto the steerer tube of the fork and offer a secure and adjustable connection.
- Design: Consists of a stem body and a faceplate that clamps the handlebars.
- Adjustment: Height adjustments are made by moving spacers on the steerer tube.
- Pros:
- Lightweight and stiff.
- Easy to adjust and maintain.
- Provides a secure connection.
- Cons:
- Requires removing the stem to adjust height significantly.
- Limited vertical adjustability without additional components.
3.1.1 How to Adjust Threadless Stems
- Loosen Bolts: Loosen the stem bolts that clamp the stem to the steerer tube.
- Remove Top Cap: Remove the top cap bolt and top cap.
- Adjust Spacers: Add or remove spacers to adjust the handlebar height.
- Reassemble: Reinstall the top cap and bolt, then tighten the stem bolts to the manufacturer’s recommended torque.
3.2 Quill Stems (Threaded Stems)
Quill stems are typically found on older mountain bikes or hybrid bikes. They insert into the steerer tube and are secured with a wedge or expanding bolt.
- Design: Features a quill that slides into the steerer tube and expands to create a secure fit.
- Adjustment: Height adjustments are made by loosening the bolt on top of the stem and raising or lowering the stem.
- Pros:
- Simple height adjustment.
- Classic aesthetic.
- Cons:
- Heavier than threadless stems.
- Less stiff and secure compared to threadless stems.
- Limited adjustability in terms of angle and reach.
3.2.1 How to Adjust Quill Stems
- Loosen Bolt: Loosen the bolt on top of the stem.
- Tap Bolt: If the stem is stuck, gently tap the bolt with a hammer.
- Adjust Height: Raise or lower the stem to the desired height, ensuring you stay within the minimum and maximum insertion marks.
- Re-tighten: Align the stem with the front wheel and re-tighten the bolt.
3.3 Adjustable Stems
Adjustable stems allow you to change the angle of the handlebars without replacing the stem. They are versatile and can help you find the most comfortable riding position.
- Design: Features a hinge mechanism that allows you to adjust the stem angle.
- Adjustment: Angle adjustments are made by loosening the bolts on the hinge and setting the desired angle.
- Pros:
- Highly adjustable for different riding styles.
- Allows experimentation to find the perfect position.
- Cons:
- Can be heavier than fixed stems.
- May not be as stiff as fixed stems.
- Requires careful adjustment to ensure safety.
3.3.1 How to Adjust Adjustable Stems
- Loosen Bolts: Loosen the bolts on the hinge of the stem.
- Set Angle: Adjust the stem to the desired angle.
- Re-tighten: Ensure the stem is aligned with the front wheel and re-tighten the bolts to the manufacturer’s recommended torque.
3.4 Integrated Stems
Integrated stems are often found on high-end mountain bikes. They are designed to integrate seamlessly with the frame for improved stiffness and aesthetics.
- Design: Specifically designed to fit a particular frame model.
- Adjustment: Adjustments are similar to threadless stems, but may require specific tools or procedures.
- Pros:
- Enhanced stiffness and responsiveness.
- Clean, integrated look.
- Cons:
- Limited compatibility with different bikes.
- May require professional assistance for adjustments.
3.4.1 How to Adjust Integrated Stems
- Consult Manual: Refer to the bike manufacturer’s manual for specific instructions.
- Loosen Bolts: Loosen the bolts that secure the stem.
- Adjust Spacers: Adjust spacers as needed to change the handlebar height.
- Re-tighten: Re-tighten the bolts to the manufacturer’s recommended torque, ensuring proper alignment.
4. Step-by-Step Guide on How to Adjust Threadless Handlebars
Adjusting threadless handlebars involves several steps to ensure proper alignment and safety. Here’s a detailed guide:
4.1 Preparation
- Gather Tools: Collect your Allen wrench set, torque wrench, and measuring tape.
- Secure Bike: Place your bike on a work stand or lean it against a stable surface.
- Inspect: Check the handlebar and stem for any signs of damage.
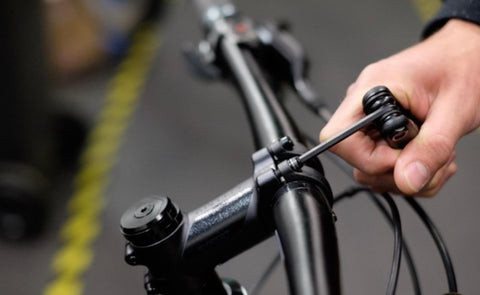
4.2 Loosen Stem Bolts
- Locate Bolts: Find the bolts that clamp the stem to the steerer tube.
- Loosen Evenly: Use an Allen wrench to loosen the bolts evenly. Avoid removing them completely.
4.3 Remove Top Cap
- Locate Top Cap: Find the bolt on top of the stem cap.
- Remove Bolt: Use an Allen wrench to remove the top cap bolt.
- Remove Cap: Carefully remove the top cap.
4.4 Adjust Spacers
- Determine Adjustment: Decide whether you want to raise or lower the handlebars.
- Add or Remove Spacers:
- Raise Handlebars: Move spacers from below the stem to above the stem.
- Lower Handlebars: Move spacers from above the stem to below the stem.
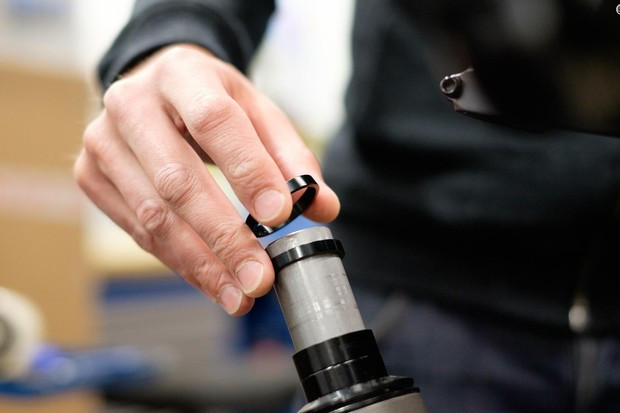 Handlebar Height Adjustment with Spacers
4.5 Reinstall Stem
- Slide Stem: Slide the stem back onto the steerer tube.
- Replace Spacers: Ensure there is a small gap (3-5mm) between the top of the steerer tube and the top of the stem or spacer.
4.6 Preload Headset
- Reinstall Top Cap: Place the top cap back on the stem.
- Tighten Top Cap Bolt: Tighten the top cap bolt until you feel some resistance. This preloads the headset bearings.
4.7 Align Stem
- Align Stem: Ensure the stem is aligned with the front wheel.
- Tighten Stem Bolts: Use a torque wrench to tighten the stem bolts to the manufacturer’s recommended torque.
4.8 Check Adjustment
- Test Ride: Take a short test ride to check the handlebar position.
- Fine-Tune: Make any necessary adjustments to achieve optimal comfort and control.
5. How to Flip the Stem for Additional Handlebar Adjustment
Flipping the stem is a great way to achieve further handlebar adjustment. This method involves reversing the stem’s orientation to raise or lower the handlebars.
5.1 Preparation
- Gather Tools: Collect your Allen wrench set, torque wrench, and masking tape.
- Secure Bike: Place your bike on a work stand or lean it against a stable surface.
- Note Position: Make a mental note of the current handlebar and brake lever angles.
5.2 Loosen Faceplate Bolts
- Locate Bolts: Find the bolts that hold the handlebar to the front of the stem.
- Loosen Evenly: Use an Allen wrench to loosen the bolts evenly.
5.3 Remove Faceplate
- Remove Bolts: Remove the faceplate bolts completely.
- Store Safely: Store the faceplate and bolts in a safe place.
 Removing the Handlebar Faceplate
5.4 Remove Handlebar
- Gently Drop: Let the handlebar gently drop to the side.
- Protect Frame: Ensure the handlebar doesn’t scratch the frame.
5.5 Loosen Stem Bolts
- Locate Bolts: Find the bolts that clamp the stem to the steerer tube.
- Loosen Evenly: Use an Allen wrench to loosen the bolts evenly.
5.6 Remove Stem
- Slide Off: Slide the stem off the steerer tube.
5.7 Flip Stem
- Reverse Orientation: Flip the stem over to reverse its angle.
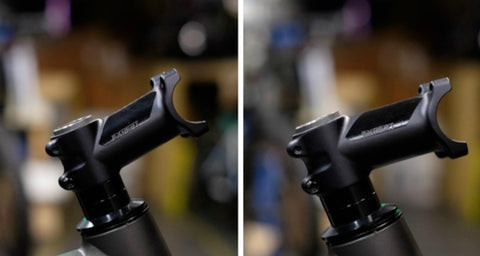 Flipping the Mountain Bike Stem
5.8 Reinstall Stem
- Slide On: Slide the stem back onto the steerer tube.
5.9 Reinstall Handlebar
- Position Handlebar: Reinstall the handlebar, replicating the previous brake lever and handlebar angle.
- Tighten Faceplate: Tighten the faceplate bolts to the manufacturer’s recommended torque, ensuring even spacing.
5.10 Align Stem
- Align Stem: Ensure the stem is aligned with the front wheel.
- Tighten Stem Bolts: Use a torque wrench to tighten the stem bolts to the manufacturer’s recommended torque.
5.11 Check Adjustment
- Test Ride: Take a short test ride to check the handlebar position.
- Fine-Tune: Make any necessary adjustments to achieve optimal comfort and control.
6. How to Adjust Quill Stems
Adjusting a quill stem is different from adjusting a threadless stem, but it’s a straightforward process.
6.1 Preparation
- Gather Tools: Collect your Allen wrench or socket wrench.
- Secure Bike: Place your bike on a work stand or lean it against a stable surface.
- Inspect: Check the stem for any signs of damage.
6.2 Loosen Stem Bolt
- Locate Bolt: Find the bolt on top of the stem.
- Loosen Bolt: Use an Allen wrench or socket wrench to loosen the bolt.
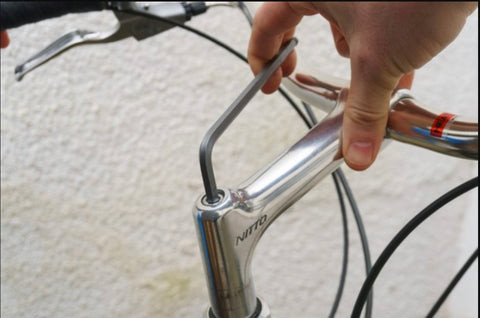 Loosening the Bolt on a Quill Stem
6.3 Tap the Bolt (If Needed)
- Tap Gently: If the stem is stuck, gently tap the bolt with a hammer.
- Free Wedge: This will help free the wedge or bung inside the steerer tube.
6.4 Adjust Height
- Raise or Lower: Adjust the stem to the desired height.
- Observe Markings: Be sure to check for any minimum and maximum insertion marks on the stem and adhere to these.
6.5 Align and Re-tighten
- Align Stem: Ensure the stem is aligned with the front wheel.
- Re-tighten Bolt: Re-tighten the bolt to secure the stem.
6.6 Check Adjustment
- Test Ride: Take a short test ride to check the handlebar position.
- Fine-Tune: Make any necessary adjustments to achieve optimal comfort and control.
7. What Are Common Handlebar Problems and Solutions?
Several common issues can arise with mountain bike handlebars. Knowing how to identify and resolve these problems ensures a safer and more enjoyable riding experience.
7.1 Handlebars Slipping
Handlebars slipping can be dangerous and affect your control over the bike.
- Cause: Loose stem bolts, worn handlebar tape, or grease on the clamping surfaces.
- Solution:
- Tighten Bolts: Ensure the stem bolts are tightened to the manufacturer’s recommended torque.
- Clean Surfaces: Clean the handlebar and stem clamping surfaces with isopropyl alcohol.
- Apply Friction Paste: Apply a thin layer of friction paste to the clamping surfaces for added grip.
- Replace Tape: Replace worn handlebar tape to improve grip.
7.2 Handlebar Vibration
Excessive handlebar vibration can cause discomfort and fatigue.
- Cause: Loose headset, unbalanced wheels, or stiff suspension.
- Solution:
- Check Headset: Ensure the headset is properly adjusted and tightened.
- Balance Wheels: Balance the wheels to reduce vibration.
- Adjust Suspension: Fine-tune the suspension settings to absorb impacts more effectively.
- Use Grips: Use vibration-damping grips to reduce hand fatigue.
7.3 Back Pain
Back pain is a common issue for mountain bikers, often related to handlebar position.
- Cause: Incorrect handlebar height, excessive reach, or poor posture.
- Solution:
- Adjust Height: Adjust the handlebar height to reduce strain on your back.
- Adjust Reach: Use a stem with a shorter reach or a handlebar with more backsweep.
- Improve Posture: Focus on maintaining a neutral spine and engaging your core muscles while riding.
- Professional Fit: Consider getting a professional bike fit to optimize your riding position.
7.4 Wrist Pain
Wrist pain can result from improper handlebar angle or excessive pressure on the wrists.
- Cause: Incorrect handlebar angle, stiff grips, or improper hand position.
- Solution:
- Adjust Angle: Adjust the handlebar angle to ensure a natural wrist position.
- Use Ergonomic Grips: Use ergonomic grips that support the wrists and distribute pressure evenly.
- Vary Hand Position: Change your hand position frequently to avoid prolonged pressure on the wrists.
- Wear Gloves: Wear padded gloves to absorb vibration and reduce pressure.
7.5 Numb Hands
Numb hands can be caused by nerve compression due to prolonged pressure on the hands.
- Cause: Excessive pressure on the hands, poor grip design, or improper handlebar angle.
- Solution:
- Use Padded Grips: Use padded grips to cushion your hands and reduce pressure.
- Adjust Handlebar Angle: Adjust the handlebar angle to ensure a natural wrist position.
- Wear Gloves: Wear padded gloves to absorb vibration and reduce pressure.
- Take Breaks: Take frequent breaks to relieve pressure on your hands.
8. How to Choose the Right Handlebar Width and Rise
Choosing the right handlebar width and rise is essential for comfort, control, and performance.
8.1 Handlebar Width
Handlebar width affects steering leverage and stability.
- Measurement: Measure from end to end.
- Factors to Consider:
- Shoulder Width: Match the handlebar width to your shoulder width for optimal comfort.
- Riding Style: Wider handlebars provide more stability for downhill riding, while narrower handlebars are better for climbing and navigating tight trails.
- General Guidelines:
- Cross-Country (XC): 680-720mm
- Trail: 740-780mm
- Enduro/Downhill (DH): 780-820mm
8.2 Handlebar Rise
Handlebar rise affects your riding posture and weight distribution.
- Measurement: Vertical distance from the center of the handlebar to the clamping area.
- Factors to Consider:
- Riding Style: Higher rise handlebars provide a more upright posture, while lower rise handlebars promote a more aggressive stance.
- Bike Geometry: Consider the bike’s head tube angle and stack height when choosing handlebar rise.
- General Guidelines:
- Low Rise (0-20mm): For aggressive riding and improved aerodynamics.
- Mid Rise (20-40mm): For a balance of comfort and control.
- High Rise (40mm+): For a more upright posture and enhanced comfort on long rides.
8.3 Handlebar Material
Handlebar material affects weight, stiffness, and vibration damping.
- Aluminum:
- Pros: Affordable, lightweight, and durable.
- Cons: Can be stiffer than carbon fiber.
- Carbon Fiber:
- Pros: Lightweight, excellent vibration damping, and can be shaped for optimal ergonomics.
- Cons: More expensive than aluminum and can be more susceptible to damage from impacts.
8.4 Handlebar Sweep
Handlebar sweep refers to the angle at which the handlebars bend back toward the rider.
- Backsweep: The angle at which the handlebars bend back toward the rider.
- Upsweep: The angle at which the handlebars rise from the clamping area.
- Factors to Consider:
- Comfort: Choose a backsweep that feels natural and comfortable for your wrists.
- Control: Experiment with different upsweep angles to find the optimal balance of comfort and control.
9. How to Maintain Your Mountain Bike Handlebars
Proper maintenance extends the lifespan of your mountain bike handlebars and ensures safe performance.
9.1 Regular Cleaning
- Wipe Down: Regularly wipe down your handlebars with a damp cloth to remove dirt and grime.
- Use Mild Soap: Use a mild soap solution for tougher stains.
- Avoid Harsh Chemicals: Avoid using harsh chemicals that can damage the finish.
9.2 Inspect for Damage
- Check for Cracks: Regularly inspect your handlebars for cracks or dents.
- Inspect Clamping Areas: Check the clamping areas for signs of wear or corrosion.
- Replace if Damaged: Replace your handlebars if you find any signs of damage.
9.3 Torque Check
- Check Bolts: Regularly check the torque of the stem bolts and handlebar bolts.
- Use Torque Wrench: Use a torque wrench to ensure the bolts are tightened to the manufacturer’s recommended torque.
- Re-tighten if Needed: Re-tighten the bolts if they are loose.
9.4 Lubrication
- Grease Threads: Apply a thin layer of grease to the bolt threads to prevent corrosion.
- Use Anti-Seize: Use anti-seize compound on threads that are prone to corrosion or seizing.
- Avoid Over-Lubrication: Avoid over-lubricating, as this can attract dirt and grime.
9.5 Handlebar Tape/Grips
- Replace Worn Tape/Grips: Replace worn handlebar tape or grips to maintain a comfortable and secure grip.
- Clean Grips: Clean your grips regularly with soap and water to remove dirt and sweat.
- Use Quality Products: Use high-quality handlebar tape and grips for durability and performance.
10. How To Find the Perfect Handlebar Setup
Finding the perfect handlebar setup involves experimentation and attention to detail. Here are some tips to help you find the optimal position.
10.1 Start with the Basics
- Proper Fit: Ensure your bike is properly sized for your height and riding style.
- Neutral Position: Start with a neutral handlebar position and make small adjustments from there.
10.2 Experiment with Height
- Adjust Spacers: Experiment with different spacer configurations to find the optimal handlebar height.
- Consider Stem Flip: Consider flipping the stem to further adjust the handlebar height.
10.3 Adjust Angle
- Rotate Handlebars: Rotate the handlebars to adjust the angle of the grips.
- Find Natural Position: Find an angle that allows for a natural wrist position.
10.4 Test Ride
- Take Short Rides: Take short test rides after each adjustment to evaluate the changes.
- Pay Attention: Pay attention to how your body feels and make adjustments accordingly.
10.5 Seek Professional Advice
- Bike Fit: Consider getting a professional bike fit to optimize your riding position.
- Expert Guidance: A bike fit expert can help you identify and address any issues with your handlebar setup.
FAQ: Adjusting Handlebars on Mountain Bikes
1. Why is it important to adjust handlebars on a mountain bike?
Adjusting handlebars improves comfort, control, and reduces the risk of injuries by optimizing your riding posture and weight distribution.
2. What tools do I need to adjust my mountain bike handlebars?
You’ll need an Allen wrench set, torque wrench, screwdrivers, measuring tape, level, grease or anti-seize compound, and optionally a work stand.
3. What are the different types of handlebar stems?
The main types are threadless stems (aheadset stems), quill stems (threaded stems), adjustable stems, and integrated stems.
4. How do I adjust a threadless stem?
Loosen the stem bolts, remove the top cap, adjust spacers, reinstall the stem, preload the headset, align the stem, and tighten the bolts.
5. What does it mean to “flip the stem” and how do I do it?
Flipping the stem involves reversing its orientation to raise or lower the handlebars further. Loosen the faceplate bolts, remove the handlebar, loosen the stem bolts, remove the stem, flip it, reinstall, and tighten everything back up.
6. How do I adjust a quill stem?
Loosen the bolt on top of the stem, tap the bolt if needed, adjust the height, align the stem with the front wheel, and re-tighten the bolt.
7. What are common handlebar problems and how can I fix them?
Common problems include slipping handlebars, vibration, back pain, wrist pain, and numb hands. Solutions involve tightening bolts, cleaning surfaces, adjusting handlebar position, and using ergonomic grips.
8. How do I choose the right handlebar width and rise?
Consider your shoulder width, riding style, and bike geometry. Wider handlebars offer more stability, while narrower ones are better for climbing. Higher rise provides a more upright posture, while lower rise is more aggressive.
9. How should I maintain my mountain bike handlebars?
Regularly clean the handlebars, inspect for damage, check the torque of the bolts, lubricate the threads, and replace worn handlebar tape or grips.
10. How can I find the perfect handlebar setup?
Start with a proper bike fit, experiment with height and angle adjustments, take test rides after each change, and seek professional advice if needed.
By following this comprehensive guide, you can confidently adjust your mountain bike handlebars for optimal performance and comfort. Remember to explore usabikers.net for more tips, tricks, and community support to enhance your biking experience. Ride hard and ride safe!