
Adjusting your bike to fit you is crucial for comfort and performance, whether you’re on the road or trail, and usabikers.net is here to guide you through the process. By fine-tuning your bicycle, you’ll enhance your riding experience and prevent potential injuries. Let’s dive into how to optimize your bike for a seamless ride, covering everything from seat adjustments to handlebar tweaks, ensuring maximum comfort and efficiency with expert tips and tricks.
1. Why Is Bike Fit Important?
A properly fitted bike enhances comfort, efficiency, and reduces the risk of injuries; therefore, optimizing your bike fit is essential for an enjoyable and safe riding experience. Ensuring your bike fits well is critical for several reasons. According to research from the Motorcycle Safety Foundation (MSF), proper bike fit is associated with reduced strain, improved handling, and enhanced performance.
What are the benefits of a good bike fit?
A good bike fit provides benefits such as increased comfort, reduced risk of injury, and improved power transfer, which collectively make cycling more enjoyable and efficient. Here’s a breakdown:
- Comfort: A bike that fits well eliminates unnecessary strain on your body, making longer rides more enjoyable.
- Injury Prevention: Correct alignment reduces the risk of common cycling injuries, such as knee pain, back pain, and wrist discomfort.
- Efficiency: Proper fit ensures optimal muscle engagement, allowing you to transfer power more effectively with each pedal stroke.
- Performance: With improved comfort and efficiency, you’ll be able to ride faster and longer, enhancing your overall cycling performance.
- Enhanced Control: A well-fitted bike provides better control and stability, which is especially important in challenging terrains or during high-speed riding.
How does bike fit affect performance and injury prevention?
Bike fit affects performance by optimizing power output and preventing energy loss due to poor posture or inefficient movement, while it prevents injuries by ensuring proper joint alignment and reducing stress on muscles and tendons. A study published in the “Journal of Science and Medicine in Sport” highlights that cyclists with professional bike fits experience a noticeable improvement in power output compared to those without. This is because a tailored bike fit aligns your body in a way that maximizes the efficiency of each pedal stroke, allowing you to generate more power with less effort.
Additionally, a well-adjusted bike reduces the risk of common cycling injuries such as knee pain, lower back pain, and neck strain. For instance, a saddle that is too high can lead to overextension of the knee, while handlebars that are too low can cause excessive strain on the lower back and neck. By ensuring proper joint alignment and reducing stress on muscles and tendons, a professional bike fit can keep you riding comfortably and injury-free for longer periods.
Who should consider getting a bike fit?
Anyone from casual riders to professional racers can benefit from a bike fit, as it tailors the bike to individual body mechanics and riding styles, enhancing overall comfort and performance. Whether you’re just starting out or are an experienced cyclist, a bike fit can make a significant difference.
- Beginners: A proper fit helps new riders develop good habits and avoid common discomforts and injuries.
- Experienced Riders: Fine-tuning your bike can help you optimize your performance and prevent overuse injuries.
- Riders with Discomfort: If you experience pain or discomfort while riding, a bike fit can identify and address the underlying issues.
- Triathletes: Optimizing your bike for both power and aerodynamics can give you a competitive edge.
- Long-Distance Cyclists: Ensuring a comfortable and efficient position is crucial for endurance rides.
2. Key Aspects of Bike Fit
Bike fit involves several key aspects, including seat height and position, handlebar reach and height, and cleat placement, each contributing to overall comfort and efficiency.
What are the primary contact points on a bike?
The primary contact points on a bike are the saddle, handlebars, and pedals, each playing a critical role in supporting your body and transferring power efficiently; therefore, paying close attention to these areas is vital for a comfortable and effective bike fit. Ensuring these contact points are properly adjusted can significantly enhance your riding experience.
- Saddle: Supports your weight and affects your pedaling efficiency.
- Handlebars: Influence your posture, comfort, and control.
- Pedals: Where you transfer power from your legs to the bike.
How do seat height and fore/aft position affect pedaling?
Seat height and fore/aft position significantly affect pedaling efficiency by influencing leg extension and knee alignment, which are critical for maximizing power output and minimizing strain.
- Seat Height:
- Too High: Can cause rocking hips and overextension of the knee, leading to discomfort and potential injury.
- Too Low: Reduces power output and can cause knee pain due to excessive flexion.
- Fore/Aft Position:
- Too Far Forward: Can increase pressure on the knees.
- Too Far Back: Reduces power and can cause hamstring issues.
Adjusting these elements correctly ensures that your legs can move through a full and efficient range of motion, optimizing your pedaling technique.
Why is handlebar reach and height important for comfort?
Handlebar reach and height are crucial for comfort because they determine your upper body posture, influencing back strain, neck discomfort, and hand fatigue. A properly adjusted handlebar position allows you to maintain a relaxed posture, reducing strain on your back, neck, and shoulders.
- Handlebar Reach:
- Too Long: Can cause you to overreach, leading to neck and shoulder pain.
- Too Short: Can feel cramped and reduce your ability to breathe efficiently.
- Handlebar Height:
- Too High: Can reduce your aerodynamic efficiency and power output.
- Too Low: Can cause excessive strain on your lower back and neck.
Finding the right balance ensures that you can ride comfortably for extended periods without experiencing unnecessary pain or fatigue.
3. Step-by-Step Guide to Adjusting Your Bike
Adjusting your bike involves several steps, starting with leveling the seat, adjusting seat height, positioning the cleats, setting the fore/aft seat position, and checking handlebar height and reach, each contributing to a personalized fit.
How do I level and center the seat?
To level and center the seat, place your bike on a flat surface and use a level to ensure the seat is horizontal, then adjust the seat so it is centered over the seatpost to evenly distribute your weight; thus, achieving this balance is key for comfort and efficiency.
- Place the Bike on a Level Surface: Ensure your bike is on a flat surface to get an accurate reading.
- Check the Seat Level: Use a carpenter’s level or a smartphone app to check if the seat is horizontal.
- Adjust the Seat: Loosen the seatpost clamp and adjust the seat until it is level.
- Center the Seat: Ensure the seat is centered on its rails over the seatpost.
- Tighten the Clamp: Once the seat is level and centered, tighten the seatpost clamp to secure it in place.
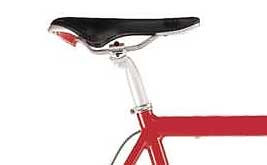 Step 1 – Level the seat
What is the correct way to adjust seat height?
The correct way to adjust seat height involves sitting on the bike with your heel on the pedal at the bottom of the stroke, ensuring your leg is fully extended without rocking your hips, providing an optimal balance of power and comfort.
- Wear Cycling Gear: Put on your cycling shorts and shoes to simulate your riding posture.
- Mount the Bike: Place your bike on a trainer or lean it against a wall for stability.
- Heel on Pedal: Place your heel on the pedal at the bottom of the stroke.
- Adjust Height: Adjust the seat height until your leg is fully extended.
- Check for Rocking: Have a friend watch from behind to ensure your hips don’t rock.
- Fine-Tune: When pedaling with the balls of your feet, you should have a slight bend in your knees.
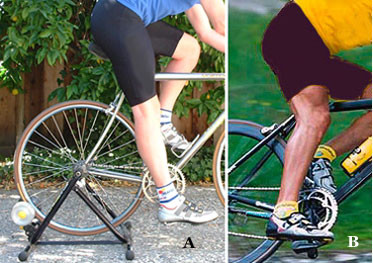 Step 2: Adjust seat height
How should I adjust shoe cleats for optimal comfort?
Adjusting shoe cleats for optimal comfort involves positioning them so the ball of your foot is over the pedal axle and aligning them to allow your feet to rest in a natural position, preventing knee strain and enhancing pedaling efficiency.
- Fore/Aft Position:
- Locate Ball of Foot: Find the ball of your foot (the widest part).
- Align Cleat: Position the cleat so the ball of your foot is over the pedal axle.
- Angular Position:
- Neutral Position: Start with the cleat aligned with an imaginary line bisecting the sole.
- Adjust Angle: Make small adjustments to eliminate any knee stress or strain.
- Test Ride:
- Easy Ride: Go for a short, easy ride to test the cleat position.
- Listen to Your Body: Pay attention to any discomfort and adjust accordingly.
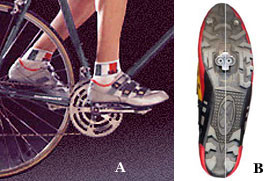 Step 3 – Adjust the shoe cleats
How do I find the correct fore/aft seat position?
Finding the correct fore/aft seat position involves positioning your knee over the pedal axle when the crank arm is horizontal, ensuring efficient power transfer and reducing stress on your knees; therefore, achieving this alignment is essential for a comfortable and effective ride.
- Set Up Bike: Place your bike on a level surface or trainer.
- Crankarm Position: Rotate the crankarm until it is horizontal.
- Plumb Line: Hang a plumb line from your kneecap.
- Check Alignment: The plumb line should intersect the pedal axle.
- Adjust Seat: Move the seat forward or backward to achieve this alignment.
What is the best way to check handlebar height and reach?
The best way to check handlebar height and reach is to assess your comfort level, ensuring your back is at a comfortable angle and your arms are relaxed, while adjusting the stem length and height to achieve the ideal position.
- Handlebar Height:
- Comfort Check: Ride and assess your comfort, especially in your lower back and neck.
- Visual Check: Compare the height of the seat to the height of the bars.
- Adjustment: Raise or lower the handlebars as needed.
- Handlebar Reach:
- Relaxed Posture: Ensure your upper body is relaxed while riding.
- Plumb Line Test: Have a helper check if a plumb line from your nose falls about an inch behind the center of the handlebar.
- Stem Adjustment: Replace the stem with a shorter or longer one as needed.
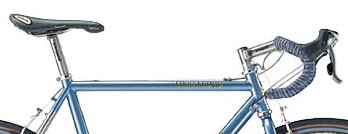 Step 5 – Check handlebar height
4. Fine-Tuning Your Handlebars
Fine-tuning your handlebars involves checking the width and shape to optimize control and comfort, ensuring the bars suit your body size and riding style; hence, making these adjustments enhances your overall cycling experience.
How do I determine the correct handlebar width?
To determine the correct handlebar width, measure the distance between the bony protrusions on top of your shoulder blades, matching the handlebar width to this measurement for optimal control and comfort; therefore, accurate sizing is crucial for an efficient ride.
- Measure Shoulder Width: Find the bony protrusions on top of your shoulder blades.
- Measure Distance: Measure the distance between these points.
- Match Handlebar Width: Choose a handlebar width that matches this measurement.
What are the different handlebar shapes and their benefits?
Different handlebar shapes offer unique benefits, such as ergonomic grips and varied hand positions, catering to different riding styles and preferences, ultimately enhancing comfort and control.
- Flat Bars:
- Benefits: Provide a more upright position, suitable for mountain biking and recreational riding.
- Features: Can include different bends and rise to adjust your posture.
- Drop Bars:
- Benefits: Offer multiple hand positions for varied terrain and long rides.
- Features: Anatomic bends in the hooks for comfort and different shapes on the tops to accommodate your wrists.
- Riser Bars:
- Benefits: Raise the handlebar height, providing a more comfortable and upright position.
- Features: Commonly used in mountain biking for better control and handling.
 Step 7 – Check handlebar size
Can I adjust handlebar angle and rotation?
Yes, you can adjust handlebar angle and rotation to fine-tune your wrist and arm position, enhancing comfort and control, ensuring a more personalized riding experience.
- Loosen Bolts: Loosen the bolts on the stem that secure the handlebars.
- Adjust Angle: Rotate the handlebars to your desired angle.
- Tighten Bolts: Tighten the bolts to secure the handlebars in the new position.
- Test Ride: Go for a short ride to ensure the new angle is comfortable.
5. Common Issues and Solutions
Addressing common issues such as knee pain, back pain, and hand numbness is essential for a comfortable ride, and adjusting your bike fit can often provide effective solutions; therefore, identifying and resolving these problems can significantly enhance your cycling experience.
Why am I experiencing knee pain?
Knee pain can result from improper seat height, cleat position, or fore/aft seat placement, requiring adjustments to alleviate strain and ensure proper alignment, making your ride more comfortable and pain-free.
- Seat Height:
- Too Low: Raise the seat to reduce knee flexion.
- Too High: Lower the seat to prevent overextension.
- Cleat Position:
- Misaligned Cleats: Adjust the cleat position to allow your feet to rest naturally.
- Fore/Aft Position:
- Incorrect Placement: Adjust the seat fore/aft position to align your knee over the pedal axle.
What causes back pain while cycling?
Back pain during cycling often stems from incorrect handlebar height or reach, leading to poor posture and strain, which can be resolved by adjusting your bike fit for a more comfortable ride; hence, addressing these issues can significantly reduce discomfort.
- Handlebar Height:
- Too Low: Raise the handlebars to reduce strain on your lower back.
- Handlebar Reach:
- Too Long: Shorten the reach by using a shorter stem.
- Too Short: Lengthen the reach by using a longer stem.
- Core Strength:
- Weak Core: Strengthen your core muscles to improve posture and stability.
How can I prevent hand numbness?
Hand numbness can be caused by excessive pressure on the nerves in your hands, often due to incorrect handlebar position or lack of variation in hand placement, which can be mitigated through proper adjustments and techniques.
- Handlebar Position:
- Incorrect Angle: Adjust the handlebar angle to distribute pressure evenly.
- Glove Use:
- Lack of Padding: Use padded cycling gloves to cushion your hands.
- Hand Placement:
- Static Position: Vary your hand position frequently to avoid prolonged pressure on specific areas.
6. The Role of Professional Bike Fitters
Professional bike fitters offer personalized assessments and adjustments, utilizing their expertise to optimize your riding experience and prevent injuries, providing valuable insights and solutions.
What are the benefits of a professional bike fit?
A professional bike fit offers numerous benefits, including personalized adjustments, injury prevention, and performance optimization, ensuring a comfortable and efficient riding experience tailored to your unique needs.
- Personalized Adjustments: Tailored to your body’s specific measurements and flexibility.
- Injury Prevention: Reduces the risk of common cycling injuries through proper alignment.
- Performance Optimization: Maximizes power output and efficiency.
- Expert Advice: Guidance from trained professionals with in-depth knowledge of biomechanics.
- Advanced Tools: Use of specialized equipment to assess and fine-tune your position.
When should I consider seeing a professional?
Consider seeing a professional bike fitter if you experience persistent pain, discomfort, or performance issues, or if you are investing in a new bike, ensuring optimal setup and preventing potential problems.
- Persistent Pain: If you have recurring pain or discomfort while riding.
- New Bike: When purchasing a new bike to ensure it is properly set up from the start.
- Performance Goals: If you are serious about improving your cycling performance.
- Complex Issues: When you have complex biomechanical issues that are difficult to address on your own.
- Long-Distance Riding: If you plan to participate in long-distance rides or races.
What can I expect during a bike fit session?
During a bike fit session, expect a comprehensive assessment of your riding posture, flexibility, and body measurements, followed by detailed adjustments to your bike to optimize comfort and performance.
- Interview:
- Riding History: Discussion of your cycling experience, goals, and any issues you’re experiencing.
- Physical Assessment:
- Flexibility: Evaluation of your flexibility and range of motion.
- Measurements: Taking key body measurements to inform the fit process.
- On-Bike Adjustments:
- Dynamic Analysis: Observing you while you ride on a stationary bike or trainer.
- Component Adjustments: Making adjustments to seat height, handlebar position, and cleat placement.
- Follow-Up:
- Post-Fit Ride: Testing the new position and making any necessary fine-tuning adjustments.
- Recommendations: Providing recommendations for exercises or further adjustments.
7. Maintenance and Long-Term Considerations
Regular maintenance and periodic re-evaluation of your bike fit are crucial for sustained comfort and performance, ensuring your bike remains optimally adjusted over time.
How often should I check my bike fit?
You should check your bike fit at least once a year or whenever you experience significant changes in your body or riding habits, ensuring continued comfort and efficiency.
- Annual Check:
- Regular Assessment: Perform a thorough check of all key fit parameters annually.
- Significant Changes:
- Body Changes: Re-evaluate your fit if you gain or lose weight, experience changes in flexibility, or have any injuries.
- Riding Habits: Adjust your fit if you change your riding style, increase your mileage, or switch to different types of riding.
What maintenance tasks are important for bike fit?
Important maintenance tasks for bike fit include checking and tightening bolts, inspecting wear on components, and ensuring proper lubrication, all crucial for maintaining the integrity of your adjustments.
- Bolt Checks:
- Regular Inspection: Check all bolts on the seatpost, stem, and handlebars to ensure they are properly tightened.
- Component Wear:
- Inspect Regularly: Check for wear and tear on the saddle, handlebars, and cleats.
- Replace Worn Parts: Replace any worn components to maintain proper fit and function.
- Lubrication:
- Grease Threads: Apply grease to the threads of bolts to prevent corrosion and ensure easy adjustment.
How do seasonal changes affect bike fit?
Seasonal changes can affect bike fit due to variations in clothing and flexibility, necessitating adjustments to maintain optimal comfort and performance throughout the year.
- Clothing:
- Layering: Adjust your fit to accommodate thicker or thinner clothing layers.
- Flexibility:
- Cold Weather: Warm up thoroughly and adjust your fit to account for decreased flexibility in cold weather.
- Riding Conditions:
- Wet/Icy Conditions: Consider adjustments to improve stability and control in challenging conditions.
8. Bike Fit for Different Riding Styles
Bike fit varies for different riding styles, such as road cycling, mountain biking, and recreational riding, requiring specific adjustments to optimize comfort and performance for each discipline.
How does bike fit differ for road cycling vs. mountain biking?
Bike fit differs between road cycling and mountain biking, with road cycling emphasizing aerodynamics and efficiency, while mountain biking prioritizes control and comfort on varied terrain.
- Road Cycling:
- Aerodynamics: Lower handlebar position to reduce wind resistance.
- Efficiency: Precise seat height and fore/aft position for optimal power transfer.
- Mountain Biking:
- Control: More upright handlebar position for better handling.
- Comfort: Suspension adjustments and wider tires for absorbing shocks.
What are the key considerations for touring bike fit?
Key considerations for touring bike fit include comfort, stability, and durability, ensuring a relaxed posture, stable handling, and reliable performance over long distances.
- Comfort:
- Upright Position: Higher handlebar position to reduce strain on your back and neck.
- Saddle Comfort: Choose a comfortable saddle suitable for long hours of riding.
- Stability:
- Weight Distribution: Ensure even weight distribution to maintain stable handling.
- Durability:
- Reliable Components: Use durable components that can withstand the demands of touring.
How should I adjust my bike for recreational riding?
Adjust your bike for recreational riding by prioritizing comfort and ease of use, ensuring a relaxed posture and straightforward adjustments for an enjoyable riding experience.
- Comfort:
- Upright Position: Set the handlebars at a comfortable height to reduce strain on your back and neck.
- Comfortable Saddle: Choose a saddle that provides adequate support and cushioning.
- Ease of Use:
- Simple Adjustments: Ensure that adjustments are easy to make without specialized tools.
9. Ergonomics and Preventing Injuries
Applying ergonomic principles to your bike fit helps prevent injuries by ensuring proper posture and reducing strain on joints, muscles, and nerves.
What are the basic principles of cycling ergonomics?
The basic principles of cycling ergonomics involve maintaining a neutral spine, relaxed shoulders, and comfortable wrist position to minimize strain and prevent injuries.
- Neutral Spine:
- Posture: Maintain a natural curve in your spine to reduce back pain.
- Relaxed Shoulders:
- Position: Avoid shrugging or hunching your shoulders.
- Comfortable Wrists:
- Angle: Keep your wrists in a neutral position to prevent numbness and pain.
How can I improve my posture on a bike?
Improve your posture on a bike by adjusting handlebar height and reach, strengthening your core muscles, and consciously maintaining a neutral spine, ensuring a more comfortable and efficient ride.
- Handlebar Adjustment:
- Height and Reach: Adjust the handlebars to achieve a comfortable and sustainable posture.
- Core Strengthening:
- Exercises: Perform exercises to strengthen your core muscles, providing better support for your spine.
- Conscious Awareness:
- Neutral Spine: Focus on maintaining a neutral spine throughout your ride.
What exercises can help prevent cycling injuries?
Exercises such as core strengthening, stretching, and flexibility training can help prevent cycling injuries by improving stability, range of motion, and overall fitness.
- Core Strengthening:
- Planks: Strengthen your abdominal and back muscles.
- Crunches: Improve core stability and support.
- Stretching:
- Hamstring Stretches: Increase flexibility in your hamstrings to prevent lower back pain.
- Quad Stretches: Stretch your quadriceps to prevent knee pain.
- Flexibility Training:
- Yoga: Improve overall flexibility and body awareness.
10. Advanced Bike Fit Techniques
Advanced bike fit techniques involve using technology and detailed assessments to fine-tune your position, catering to specific performance goals and biomechanical needs.
What is motion capture analysis in bike fitting?
Motion capture analysis in bike fitting involves using cameras and sensors to track your movements while cycling, providing precise data to optimize your position and enhance performance.
- Technology:
- Cameras and Sensors: Use of high-speed cameras and sensors to record your movements.
- Data Analysis:
- Precise Measurements: Detailed analysis of your joint angles, power output, and pedaling efficiency.
- Optimization:
- Fine-Tuning: Adjustments based on data to maximize performance and prevent injuries.
How can pressure mapping improve saddle comfort?
Pressure mapping improves saddle comfort by identifying areas of high pressure and allowing for targeted adjustments to the saddle position or choice of saddle, ensuring better weight distribution and reduced discomfort.
- Technology:
- Pressure Sensors: Use of a thin sensor placed on the saddle to measure pressure distribution.
- Data Analysis:
- Pressure Hotspots: Identification of areas with excessive pressure.
- Optimization:
- Saddle Selection: Choosing a saddle that better distributes pressure.
- Position Adjustments: Adjusting the saddle angle and fore/aft position to reduce pressure.
What are the benefits of using custom orthotics in cycling shoes?
Custom orthotics in cycling shoes provide improved foot support, alignment, and power transfer, reducing the risk of foot and knee pain while enhancing overall cycling efficiency.
- Support:
- Arch Support: Providing customized support for your arches.
- Alignment:
- Foot Alignment: Ensuring proper alignment of your feet and ankles.
- Power Transfer:
- Efficient Pedaling: Improving power transfer by stabilizing your feet.
FAQ: Adjusting Your Bike
Here are some frequently asked questions about adjusting your bike, providing quick answers and helpful tips.
1. How do I know if my seat is at the right height?
Your seat is at the right height if your leg is almost fully extended at the bottom of the pedal stroke without rocking your hips; therefore, this position ensures efficient pedaling and reduces strain.
2. What should I do if my knees hurt while cycling?
If your knees hurt while cycling, adjust your seat height and fore/aft position, and ensure your cleats are properly aligned, as knee pain is often caused by improper bike fit.
3. How do I prevent numbness in my hands while riding?
Prevent numbness in your hands by wearing padded gloves, adjusting your handlebar angle, and varying your hand position frequently; therefore, these adjustments can alleviate pressure on the nerves in your hands.
4. What tools do I need to adjust my bike?
You need a set of Allen wrenches, a torque wrench, a level, and a tape measure to adjust your bike effectively; therefore, having these tools ensures you can make accurate and safe adjustments.
5. How often should I get a professional bike fit?
Get a professional bike fit when you buy a new bike, experience persistent pain, or significantly change your riding habits; therefore, a professional fit ensures optimal comfort and performance.
6. Can I adjust my bike fit myself?
Yes, you can adjust your bike fit yourself, but it’s essential to follow guidelines and be cautious, as incorrect adjustments can lead to discomfort or injury.
7. How do I choose the right handlebar width?
Choose the right handlebar width by measuring the distance between the bony protrusions on top of your shoulder blades; therefore, matching the handlebar width to this measurement ensures optimal control.
8. What is the ideal back angle for cycling?
The ideal back angle for cycling varies depending on your riding style, but generally, a 45-degree angle is comfortable for road cycling, while a more upright position is better for mountain biking.
9. How do I adjust my cleats for optimal performance?
Adjust your cleats by positioning them so the ball of your foot is over the pedal axle and aligning them to allow your feet to rest naturally; therefore, this alignment prevents knee strain and enhances pedaling efficiency.
10. What should I consider when adjusting my bike for long-distance riding?
Consider comfort, stability, and durability when adjusting your bike for long-distance riding, ensuring a relaxed posture and reliable performance over extended periods.
Adjusting your bike to fit you is an ongoing process that enhances your cycling experience. By following these guidelines and paying attention to your body, you can achieve a comfortable and efficient ride. For more information, detailed guides, and community support, visit usabikers.net, your ultimate resource for all things biking in the USA. Explore our articles, join our forums, and connect with fellow enthusiasts to share your experiences and gain valuable insights. Let usabikers.net be your trusted companion on your cycling journey, providing the knowledge and support you need to make every ride enjoyable.
Address: 801 Sturgis Main St, Sturgis, SD 57785, United States.
Phone: +1 (605) 347-2000.
Website: usabikers.net.