Attaching your bike to a CycleOps trainer allows you to enjoy indoor cycling workouts, regardless of the weather outside, and usabikers.net is here to guide you through the process. This guide provides simple steps for securely mounting your bike to a CycleOps trainer, so you can start pedaling toward your fitness goals. You’ll discover the right methods, necessary equipment, and the advantages of using a bike trainer. Get ready to transform your regular bike into an indoor cycling machine with a simple setup process, trainer compatibility, and essential tips for a secure and stable ride.
1. What Is A CycleOps Bike Trainer And Why Use One?
A CycleOps bike trainer transforms your regular bicycle into a stationary bike for indoor workouts, which is a game-changer for year-round fitness. It’s the ideal solution for maintaining your cycling routine when outdoor conditions are unfavorable.
- Indoor Convenience: CycleOps trainers let you ride anytime, regardless of weather conditions, right in the comfort of your home.
- Consistent Training: They enable structured workouts, helping you maintain or improve your fitness level throughout the year. According to research from the Motorcycle Safety Foundation (MSF), consistent training helps riders maintain skills and reaction times, regardless of weather, in July 2025.
- Performance Measurement: Many CycleOps trainers provide data on power output, speed, and cadence, helping you track your progress over time.
- Versatility: CycleOps offers a range of trainers, from basic models to smart trainers compatible with virtual cycling apps like Zwift.
- Space Saving: Bike trainers take up less space than a dedicated stationary bike, making them ideal for smaller living spaces.
2. What Are The Different Types Of CycleOps Trainers?
CycleOps offers a variety of trainers to suit different needs and budgets. Understanding these types will help you choose the best one for your cycling goals.
- Fluid Trainers: These trainers use fluid resistance, providing a smooth, realistic ride feel that simulates outdoor cycling. Fluid resistance increases with wheel speed, offering a progressive challenge.
- Magnetic Trainers: Magnetic trainers use magnets to create resistance, which can be adjusted manually using a lever. They are typically more affordable than fluid trainers but offer less realistic road feel.
- Wheel-On Trainers: In this setup, the rear wheel of your bike stays on. It’s a common and simple design, suitable for riders who prioritize ease of use and setup.
- Direct Drive Trainers: These trainers require you to remove your rear wheel and mount your bike directly to the trainer. They offer the most realistic road feel and are often quieter than other types.
- Smart Trainers: Smart trainers can connect to virtual cycling apps via Bluetooth or ANT+. They automatically adjust resistance to simulate terrain changes in the app, providing an immersive training experience.
3. What Tools And Equipment Are Needed To Attach A Bike To A CycleOps Trainer?
Before you begin, ensure you have all the necessary tools and equipment. Proper preparation ensures a smooth and safe setup.
- CycleOps Trainer: Choose the appropriate CycleOps trainer model for your needs.
- Bike: Use a compatible road or mountain bike.
- Trainer Skewer: Replace your bike’s rear skewer with the one provided by CycleOps for secure mounting.
- Wrench: Use a wrench to tighten the trainer skewer.
- Riser Block: Place under the front wheel to level the bike (optional but recommended).
- Indoor Cycling App: Consider using apps like Zwift or ROUVY for interactive training.
- ANT+ or Bluetooth Dongle: For connecting to virtual cycling apps (if using a basic trainer).
- Speed and Cadence Sensors: To track your performance metrics (if not built into the trainer).
- Fan: To keep you cool during indoor workouts.
- Towel: To protect your bike from sweat.
- Tablet or Laptop: To run your indoor cycling app.
4. How To Choose The Right CycleOps Trainer For Your Bike?
Selecting the right CycleOps trainer depends on your bike type, budget, and training goals. Consider these factors to make an informed decision.
- Bike Compatibility: Ensure the trainer is compatible with your bike’s wheel size and axle type. Check the manufacturer’s specifications for compatibility.
- Resistance Type: Decide whether you prefer fluid, magnetic, or direct drive resistance based on your desired ride feel and budget.
- Smart Features: If you want to use virtual cycling apps, choose a smart trainer with ANT+ or Bluetooth connectivity.
- Noise Level: Consider the noise level of the trainer, especially if you live in an apartment or shared space. Fluid trainers are generally quieter than magnetic trainers.
- Stability: Look for a trainer with a wide base and sturdy construction for stability during intense workouts.
- Portability: If you need to store or transport the trainer, consider its weight and folding mechanism.
- Budget: CycleOps trainers range in price from basic models to high-end smart trainers, so set a budget before you start shopping.
5. What Are The Step-By-Step Instructions For Attaching A Bike To A CycleOps Trainer?
Follow these detailed steps to securely attach your bike to a CycleOps trainer.
5.1. Preparing Your Bike
Before mounting your bike, there are a couple of preparation steps to go through.
5.1.1. Remove or Adjust the Rear Wheel
If you’re using a direct drive trainer, remove your bike’s rear wheel. For wheel-on trainers, ensure the rear tire is properly inflated. According to the American Motorcyclist Association (AMA), proper tire inflation is crucial for safe and efficient riding, in July 2025.
5.1.2. Replace the Skewer
Swap your bike’s existing rear skewer with the trainer skewer provided by CycleOps. This skewer is designed to fit securely into the trainer’s clamping mechanism.
5.2. Mounting Your Bike
Let’s talk about the process for mounting the bike to the trainer.
5.2.1. Position the Trainer
Place the CycleOps trainer on a level surface. Ensure it is stable and won’t rock during your workout.
5.2.2. Attach the Bike
Carefully lift your bike and align the rear dropouts with the trainer’s clamping mechanism. Ensure the trainer skewer is seated properly in the clamps.
5.2.3. Secure the Clamps
Tighten the trainer’s clamps until the bike is securely held in place. The bike should not move or wobble when properly mounted.
5.3. Connecting To Virtual Training Apps
Connecting to the virtual training app is a great feature for training.
5.3.1. Install Speed and Cadence Sensors (if applicable)
Attach speed and cadence sensors to your bike according to the manufacturer’s instructions.
5.3.2. Pair Devices
Open your chosen virtual cycling app (e.g., Zwift, ROUVY) on your tablet or laptop. Pair the app with your trainer and sensors via Bluetooth or ANT+.
5.3.3. Calibrate Your Trainer
Follow the app’s instructions to calibrate your trainer for accurate power and speed readings.
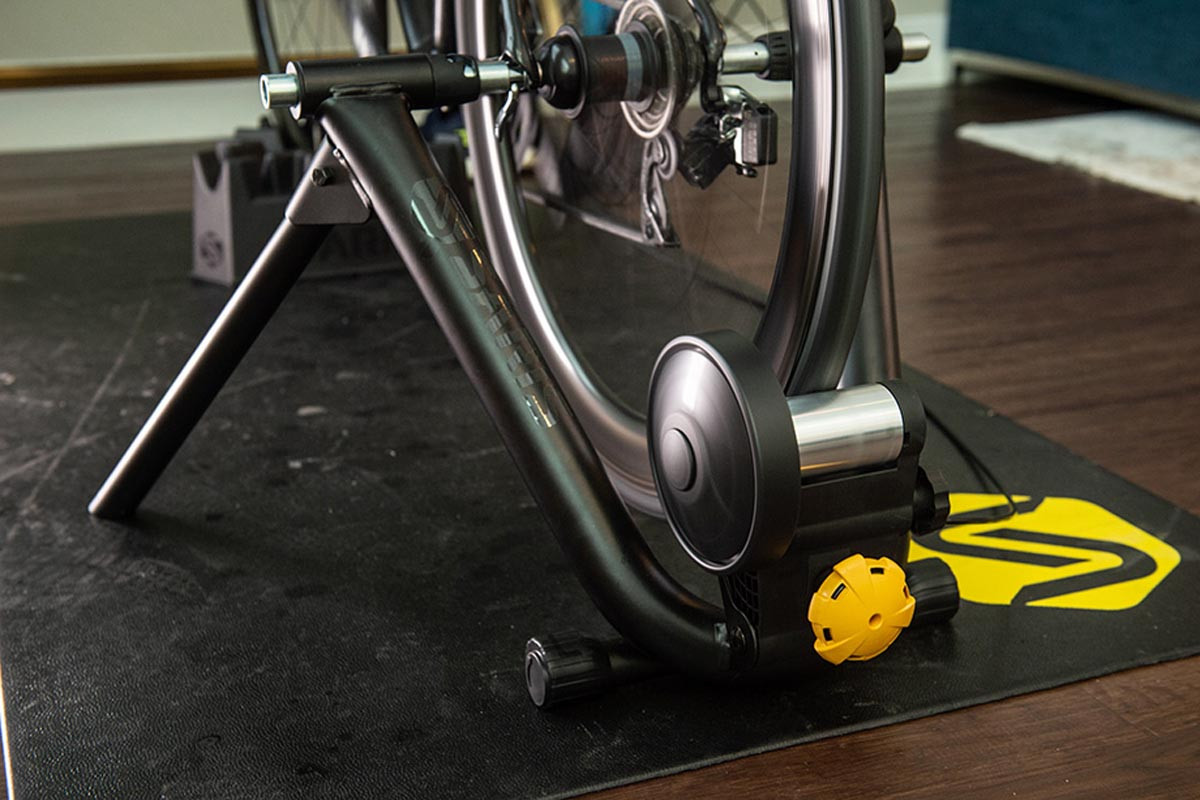
 Install bike on trainer
5.4. Ensuring a Secure Setup
It’s crucial that you ensure you set up your bike securely.
5.4.1. Check Stability
Before starting your workout, double-check that the bike is securely mounted and the trainer is stable.
5.4.2. Tighten Connections
Periodically check and tighten all connections, including the trainer clamps and sensor mounts.
5.4.3. Use a Riser Block
Place a riser block under the front wheel to level the bike and provide a more natural riding position.
6. What Are The Benefits Of Using A Trainer Skewer?
Using a trainer skewer is crucial for securely attaching your bike to the trainer, offering several advantages over a standard skewer.
- Enhanced Compatibility: Trainer skewers are specifically designed to fit the clamping mechanisms of most bike trainers, ensuring a snug and secure fit.
- Increased Durability: Made from hardened steel, trainer skewers withstand the forces exerted during intense workouts, preventing slippage and potential damage to your bike or trainer.
- Improved Safety: A trainer skewer provides a more reliable connection, reducing the risk of the bike dismounting from the trainer during use.
- Consistent Performance: By providing a stable connection, trainer skewers help ensure accurate power and speed readings, which is essential for effective training.
- Ease of Use: Trainer skewers are easy to install and remove, making it simple to switch between indoor and outdoor riding.
7. How To Calibrate Your CycleOps Trainer For Accurate Readings?
Calibrating your CycleOps trainer is essential for accurate power and speed readings, ensuring you get the most out of your indoor workouts.
- Warm-Up: Before calibrating, ride your bike on the trainer for 10-15 minutes to warm up the resistance unit.
- Use the App: Most virtual cycling apps, like Zwift and ROUVY, have built-in calibration tools. Follow the app’s instructions to start the calibration process.
- Spin Down: The app will typically instruct you to pedal at a certain speed and then stop pedaling to allow the wheel to spin down. The trainer’s internal sensors will measure the deceleration to calibrate the resistance.
- Follow Instructions: Carefully follow the on-screen instructions provided by the app.
- Repeat if Necessary: If the calibration fails or the readings seem inaccurate, repeat the process.
- Regular Calibration: Calibrate your trainer regularly, especially if you notice inconsistencies in your power or speed readings.
8. What Are The Safety Precautions To Take When Using A CycleOps Trainer?
Safety should always be a top priority when using a CycleOps trainer. Follow these precautions to prevent accidents and injuries.
- Stable Surface: Place the trainer on a level, stable surface to prevent tipping.
- Secure Mounting: Ensure your bike is securely mounted to the trainer before each ride.
- Proper Attire: Wear appropriate cycling clothing and shoes.
- Hydration: Keep water nearby and stay hydrated during your workout.
- Ventilation: Ride in a well-ventilated area to prevent overheating.
- Clear Area: Keep children and pets away from the trainer while in use.
- Emergency Stop: Familiarize yourself with the emergency stop mechanism on your trainer.
- Listen to Your Body: Stop if you feel pain, dizziness, or discomfort.
- Inspect Equipment: Regularly inspect your trainer and bike for wear and tear.
- Read the Manual: Always refer to the manufacturer’s instructions for specific safety guidelines. According to the Motorcycle Safety Foundation (MSF), reading and understanding the equipment manual is essential for safe operation, in July 2025.
9. How To Troubleshoot Common Issues When Attaching A Bike To A CycleOps Trainer?
Even with careful setup, you may encounter some common issues. Here’s how to troubleshoot them.
- Bike Won’t Mount: Ensure the trainer skewer is properly aligned and the trainer clamps are fully open. Check that your bike’s rear dropouts are compatible with the trainer.
- Trainer is Unstable: Make sure the trainer is on a level surface. Adjust the trainer’s feet to stabilize it.
- Connection Problems: Verify that your speed and cadence sensors are properly installed and paired with your virtual cycling app. Ensure Bluetooth or ANT+ is enabled on your device.
- Inaccurate Readings: Calibrate your trainer according to the manufacturer’s instructions. Check the batteries in your sensors.
- Noise: Ensure your tire is properly inflated. Tighten all bolts and connections on the trainer. Use a trainer-specific tire to reduce noise and wear.
10. How Can Indoor Cycling Apps Enhance Your Training Experience?
Indoor cycling apps like Zwift and ROUVY can transform your training experience, making it more engaging and effective.
- Interactive Workouts: These apps offer structured workouts, virtual races, and group rides, providing motivation and variety.
- Realistic Simulations: Smart trainers automatically adjust resistance to simulate terrain changes in the app, providing a realistic road feel.
- Performance Tracking: Track your power output, speed, cadence, and heart rate to monitor your progress and identify areas for improvement.
- Social Interaction: Connect with other cyclists from around the world, join clubs, and participate in group events.
- Gamification: Earn points, unlock achievements, and customize your avatar to make training fun and rewarding.
- Data Analysis: Analyze your workout data to gain insights into your performance and optimize your training plan.
 Riding a bike in Zwift
11. What Are The Best Practices For Maintaining Your CycleOps Trainer?
Proper maintenance extends the life of your CycleOps trainer and ensures optimal performance.
- Regular Cleaning: Wipe down the trainer after each use to remove sweat and dirt. Use a mild detergent if necessary.
- Lubrication: Lubricate moving parts, such as the resistance unit and skewer mechanism, with a silicone-based lubricant.
- Inspect for Wear: Regularly inspect the trainer for signs of wear and tear, such as cracks, loose bolts, or damaged resistance units.
- Proper Storage: Store the trainer in a dry, clean place when not in use.
- Check Tire Pressure: Ensure your tire is properly inflated before each ride to reduce wear on the trainer’s roller.
- Use a Trainer Tire: Consider using a trainer-specific tire to minimize noise and wear on your regular tires.
- Tighten Bolts: Periodically check and tighten all bolts and connections to ensure the trainer remains stable and secure.
12. How To Optimize Your Indoor Cycling Setup For Comfort?
Creating a comfortable indoor cycling setup is key to enjoying your workouts and staying motivated.
- Bike Fit: Ensure your bike is properly fitted to your body. Adjust the seat height, handlebar position, and cleat placement for optimal comfort and efficiency.
- Saddle Comfort: Use a comfortable saddle or consider investing in a gel seat cover.
- Handlebar Grips: Choose comfortable handlebar grips or wrap your handlebars with padded tape.
- Ventilation: Use fans to keep cool and prevent overheating.
- Entertainment: Set up a tablet or laptop to watch movies, listen to music, or use virtual cycling apps.
- Hydration: Keep a water bottle within easy reach and stay hydrated during your workout.
- Towel: Place a towel over your handlebars to absorb sweat and protect your bike.
- Riser Block: Use a riser block under the front wheel to level the bike and provide a more natural riding position.
13. What Are The Alternative Indoor Training Options Besides CycleOps Trainers?
While CycleOps trainers are a great option, there are alternative indoor training methods to consider.
- Smart Bikes: These stationary bikes have built-in resistance and connectivity features, providing a seamless virtual cycling experience.
- Rollers: Rollers challenge your balance and bike handling skills, offering a more engaging and realistic ride feel.
- Spin Bikes: These stationary bikes are designed for high-intensity workouts and typically feature adjustable resistance and performance tracking.
- Indoor Cycling Classes: Join a local indoor cycling class for structured workouts and group motivation.
- Virtual Reality Cycling: Explore immersive virtual reality cycling experiences with specialized headsets and equipment.
14. How To Integrate Indoor Cycling With Your Outdoor Riding?
Indoor cycling can be a valuable complement to your outdoor riding, helping you maintain fitness and improve performance.
- Off-Season Training: Use indoor cycling to maintain your fitness level during the off-season when outdoor riding is limited.
- Structured Workouts: Incorporate structured workouts into your indoor cycling routine to target specific fitness goals, such as endurance, power, or speed.
- Recovery Rides: Use indoor cycling for low-intensity recovery rides to flush out lactic acid and promote muscle recovery.
- Cross-Training: Combine indoor cycling with other forms of cross-training, such as running, swimming, or strength training, to improve overall fitness.
- Race Preparation: Use indoor cycling to simulate race conditions and prepare for upcoming events.
- Weather Contingency: Use indoor cycling as a backup plan when outdoor riding is not possible due to weather conditions.
- Performance Tracking: Track your indoor and outdoor cycling data to monitor your progress and identify areas for improvement.
15. What Are The Key Differences Between Basic And Smart Bike Trainers?
Understanding the differences between basic and smart bike trainers will help you choose the right option for your training needs.
- Connectivity: Smart trainers connect to virtual cycling apps via Bluetooth or ANT+, while basic trainers typically do not have this capability.
- Resistance Control: Smart trainers automatically adjust resistance to simulate terrain changes in the app, while basic trainers require manual resistance adjustments.
- Data Accuracy: Smart trainers provide more accurate power and speed readings than basic trainers, which rely on estimated data.
- Interactive Experience: Smart trainers offer a more immersive and interactive training experience, while basic trainers provide a more straightforward workout.
- Price: Smart trainers are typically more expensive than basic trainers.
15.1. In-Game Resistance
Since basic trainers do not have built-in sensors nor controlled resistance units, your resistance will not exactly mirror the terrain in Zwift. Instead you will notice a drop in your in-game speed when climbing, forcing you to work harder to get up the hills.
15.2. Power Readings
Based on your speed, Zwift will use its formula to assign you an estimated power output versus pulling power data from a smart trainer.
16. What Are Some Common Mistakes To Avoid When Setting Up Your Bike On A CycleOps Trainer?
Avoiding common mistakes can save you time and frustration when setting up your bike on a CycleOps trainer.
- Not Using a Trainer Skewer: Always use the trainer skewer provided by CycleOps for a secure and stable connection.
- Incorrect Tire Pressure: Ensure your tire is properly inflated before each ride.
- Ignoring the Riser Block: Use a riser block under the front wheel to level the bike and provide a more natural riding position.
- Forgetting to Calibrate: Calibrate your trainer regularly to ensure accurate power and speed readings.
- Overlooking Stability: Make sure the trainer is on a level surface and properly stabilized.
- Neglecting Ventilation: Ride in a well-ventilated area to prevent overheating.
- Skipping Safety Checks: Always double-check that your bike is securely mounted and the trainer is stable before starting your workout.
 inflate your tire
17. How To Create An Engaging Indoor Cycling Workout Routine?
Creating an engaging indoor cycling workout routine is key to staying motivated and achieving your fitness goals.
- Set Goals: Define your fitness goals, such as improving endurance, increasing power, or losing weight.
- Variety: Vary your workouts to keep things interesting. Incorporate intervals, hill climbs, and tempo rides.
- Structured Workouts: Follow structured workout plans from virtual cycling apps or coaching services.
- Music: Create a playlist of your favorite upbeat music to boost your energy.
- Virtual Rides: Explore virtual worlds and routes with apps like Zwift and ROUVY.
- Group Rides: Join virtual group rides to connect with other cyclists and stay motivated.
- Challenges: Participate in virtual challenges to push yourself and earn rewards.
- Reward System: Set up a reward system to celebrate your achievements and stay on track.
18. What Are The Benefits Of Joining A Virtual Cycling Community?
Joining a virtual cycling community can enhance your indoor training experience and provide support and motivation.
- Social Connection: Connect with other cyclists from around the world.
- Motivation: Stay motivated by sharing your progress and receiving encouragement from others.
- Group Rides: Participate in virtual group rides and races.
- Expert Advice: Access expert advice and tips from experienced cyclists and coaches.
- Accountability: Stay accountable to your training goals by sharing your progress with the community.
- Inspiration: Find inspiration from other cyclists’ success stories.
- New Routes: Discover new virtual routes and workouts.
- Friendship: Build friendships with like-minded individuals who share your passion for cycling.
19. What Are The Latest Trends In Indoor Cycling Technology?
Staying up-to-date with the latest trends in indoor cycling technology can help you optimize your training and enhance your experience.
- Smart Bikes: These stationary bikes have built-in resistance and connectivity features, providing a seamless virtual cycling experience.
- Virtual Reality: Explore immersive virtual reality cycling experiences with specialized headsets and equipment.
- AI Coaching: Use AI-powered coaching platforms to create personalized training plans and receive real-time feedback.
- Advanced Data Analytics: Track and analyze your cycling data with advanced metrics and visualizations.
- Interactive Resistance: Experience realistic road feel with trainers that simulate different surfaces and gradients.
- Improved Connectivity: Enjoy seamless connectivity with virtual cycling apps and devices via Bluetooth and ANT+.
- Quieter Trainers: Benefit from quieter trainer designs that minimize noise and vibration.
- More Realistic Simulations: Experience more realistic virtual environments with improved graphics and physics.
20. How To Get The Most Out Of Your Indoor Cycling Workouts?
To get the most out of your indoor cycling workouts, focus on proper setup, consistent training, and smart recovery.
- Proper Setup: Ensure your bike is securely mounted, the trainer is stable, and your equipment is calibrated.
- Consistent Training: Stick to a regular training schedule and gradually increase the intensity and duration of your workouts.
- Structured Workouts: Incorporate structured workouts into your routine to target specific fitness goals.
- Warm-Up and Cool-Down: Always warm up before your workouts and cool down afterward.
- Hydration and Nutrition: Stay hydrated and fueled during your workouts.
- Listen to Your Body: Pay attention to your body and take rest days when needed.
- Track Your Progress: Monitor your performance data to track your progress and identify areas for improvement.
- Smart Recovery: Prioritize sleep, nutrition, and active recovery to optimize your body’s ability to adapt and improve.
- Engage in virtual cycling on usabikers.net: Find virtual training partners and stay motivated on our site!
By following these steps and tips, you can transform your regular bike into an indoor cycling machine and enjoy effective, engaging workouts year-round. Remember to visit usabikers.net for more information, community support, and the latest updates on bike trainers and indoor cycling.
FAQ: How To Attach Bike To CycleOps Trainer?
21.1. What is a CycleOps trainer?
A CycleOps trainer is a device that turns your regular bike into a stationary bike for indoor workouts, allowing you to cycle regardless of the weather.
21.2. What tools do I need to attach my bike to a CycleOps trainer?
You typically need a CycleOps trainer, your bike, a trainer skewer (usually provided with the trainer), a wrench, and optionally a riser block for the front wheel.
21.3. How do I choose the right CycleOps trainer for my bike?
Consider your bike’s wheel size, axle type, the type of resistance you prefer (fluid, magnetic, or direct drive), smart features, noise level, stability, and your budget.
21.4. How do I prepare my bike before attaching it to the trainer?
Remove or adjust the rear wheel if using a direct drive trainer, and replace your bike’s rear skewer with the trainer skewer provided by CycleOps.
21.5. What are the steps for mounting my bike to the CycleOps trainer?
Position the trainer on a level surface, align the rear dropouts of your bike with the trainer’s clamping mechanism, and securely tighten the clamps.
21.6. How do I connect to virtual training apps like Zwift?
Install speed and cadence sensors on your bike, pair your devices via Bluetooth or ANT+, and calibrate your trainer through the app for accurate readings.
21.7. What safety precautions should I take when using a CycleOps trainer?
Ensure the trainer is on a stable surface, your bike is securely mounted, wear proper attire, stay hydrated, ventilate the area, and keep children and pets away.
21.8. How do I troubleshoot common issues when attaching my bike to a CycleOps trainer?
Check for bike mounting problems, trainer instability, connection issues with sensors, inaccurate readings, and unusual noise, adjusting as needed.
21.9. How do indoor cycling apps enhance my training experience?
Indoor cycling apps offer interactive workouts, realistic simulations, performance tracking, social interaction, gamification, and data analysis.
21.10. What are the best practices for maintaining my CycleOps trainer?
Regularly clean the trainer, lubricate moving parts, inspect for wear, store properly, check tire pressure, use a trainer tire, and tighten bolts.
Ready to elevate your indoor cycling experience? Visit usabikers.net now to discover in-depth articles, connect with fellow bikers, and find the perfect gear for your next ride! Connect with us at 801 Sturgis Main St, Sturgis, SD 57785, United States or call us at +1 (605) 347-2000. Check out usabikers.net today!