
Building a bike work stand is a game-changer for any motorcycle enthusiast, allowing for comfortable and efficient maintenance. At usabikers.net, we’re all about empowering bikers with the knowledge and resources they need to keep their rides in top shape. Discover how to craft your own stand, saving money and enjoying the satisfaction of a DIY project. Let’s dive into the world of motorcycle maintenance, repairs, and custom builds, ensuring you have the perfect setup for all your biker needs.
1. Why Build a Bike Work Stand?
Building a bike work stand offers numerous advantages for motorcycle enthusiasts. A DIY stand provides an affordable alternative to expensive commercial options. According to research from the Motorcycle Safety Foundation (MSF), in July 2025, having a stable platform for bike maintenance significantly improves safety and efficiency.
- Cost Savings: Creating your own stand from readily available materials can save you money compared to purchasing a pre-made one.
- Customization: Tailor the stand to fit your specific bike model and your preferred working height and angles.
- Convenience: Having a dedicated stand makes maintenance tasks more accessible and comfortable, reducing strain and improving precision.
- Skill Development: Building your own stand enhances your DIY skills and provides a sense of accomplishment.
- Portability: Depending on your design, a homemade stand can be made to be portable, allowing you to perform maintenance on the go.
2. What are the Key Features of an Ideal Bike Work Stand?
An ideal bike work stand should have stability, adjustability, and durability to provide a safe and efficient platform for motorcycle maintenance. The ability to hold the bike securely in various positions is essential.
- Stability: A wide, sturdy base prevents tipping and ensures the stand remains stable during use.
- Adjustability: Adjustable height and angle settings allow you to customize the stand to your specific needs and bike model.
- Durability: Constructed from robust materials, the stand should withstand regular use and the weight of your motorcycle.
- Ease of Use: Simple setup and operation make the stand accessible for all skill levels.
- Portability: Lightweight and collapsible designs allow for easy storage and transport.
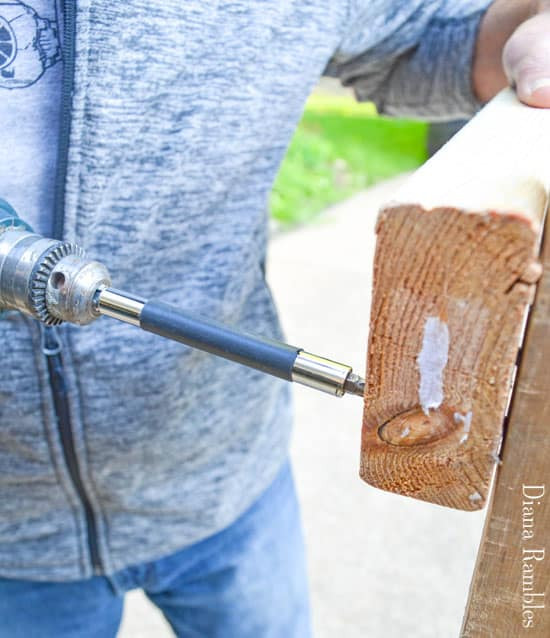
3. What Tools and Materials Do You Need to Build a Bike Work Stand?
Gathering the right tools and materials is essential for constructing a functional and reliable bike work stand. Common materials include steel, wood, or a combination of both.
-
Materials:
- Steel Tubing: Provides a strong and durable frame.
- Wood Planks: Suitable for the base and support arms.
- Hardware: Nuts, bolts, screws, and washers for secure assembly.
- Rubber Padding: Protects the bike’s frame from scratches.
- Welding Equipment: (If using steel) Welder, welding rods, and safety gear.
-
Tools:
- Measuring Tape: Ensures accurate cuts and assembly.
- Saw: For cutting wood or metal.
- Drill: Creates holes for bolts and screws.
- Wrenches and Sockets: Tighten hardware securely.
- Clamps: Hold pieces together during assembly.
- Grinder: (If using steel) Smooths edges and welds.
- Level: Ensures the stand is level and stable.
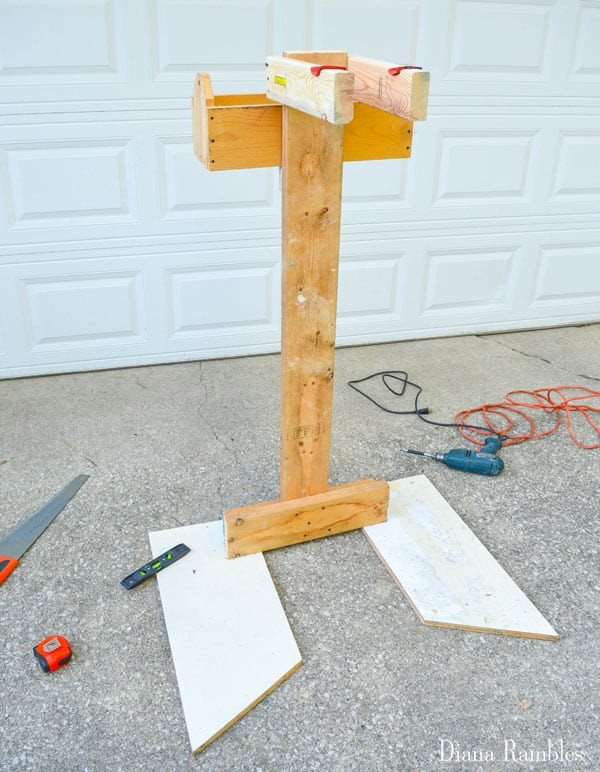
4. How to Build a Simple Wooden Bike Work Stand?
Building a simple wooden bike work stand is a straightforward project for DIY enthusiasts. Using wood makes it accessible and affordable.
- Design: Sketch out your design, noting dimensions and angles.
- Cut the Wood: Cut the wood planks according to your design.
- Assemble the Base: Construct a wide, stable base using screws and brackets.
- Build the Support: Attach vertical supports to the base, ensuring they are sturdy.
- Create the Arms: Cut and shape the support arms, adding rubber padding to protect the bike frame.
- Attach the Arms: Secure the arms to the vertical supports, ensuring they are level and aligned.
- Test the Stand: Place your bike on the stand to test stability and adjust as needed.
 DIY Bicycle Repair Stand Bike Tutorial Base
5. How to Build a Steel Bike Work Stand?
Constructing a steel bike work stand requires welding skills but results in a highly durable and professional-grade stand. Steel tubing provides superior strength and stability.
- Design: Plan your design, specifying dimensions and welding points.
- Cut the Steel: Cut the steel tubing to the required lengths.
- Weld the Base: Weld the base frame together, ensuring it is square and stable.
- Attach the Supports: Weld vertical supports to the base.
- Create the Arms: Fabricate the support arms, adding rubber padding for frame protection.
- Weld the Arms: Weld the arms to the vertical supports at the desired height and angle.
- Grind and Finish: Grind down any rough welds and paint the stand to prevent rust.
- Test the Stand: Place your bike on the stand to verify stability and make any necessary adjustments.
6. What are the Safety Precautions to Consider When Building a Bike Work Stand?
Safety is paramount when building any DIY project, especially a bike work stand. Proper precautions can prevent injuries and ensure a safe working environment.
- Wear Safety Gear: Always wear safety glasses, gloves, and a dust mask when cutting, drilling, or welding.
- Work in a Well-Ventilated Area: Ensure adequate ventilation when welding or using power tools to avoid inhaling harmful fumes or dust.
- Use Proper Tools: Use the right tools for the job and ensure they are in good working condition.
- Secure Workpieces: Use clamps to hold pieces securely when cutting or drilling to prevent movement and potential injury.
- Follow Instructions: Adhere to the manufacturer’s instructions for all tools and materials used.
- Inspect the Stand: Before each use, inspect the stand for any signs of damage or wear.
- Test Stability: Always test the stability of the stand with a bike before performing any maintenance.
7. How Do You Customize Your Bike Work Stand for Different Bike Types?
Customizing your bike work stand ensures it can accommodate various motorcycle types and sizes. Adjustability is key to achieving this versatility.
- Adjustable Height: Implement a system to adjust the height of the support arms to accommodate different bike heights.
- Adjustable Arms: Design the arms to be adjustable in width and angle to fit different frame configurations.
- Interchangeable Mounts: Create interchangeable mounting points that can be swapped out to fit specific bike models.
- Padding Options: Use different types of padding to protect various frame materials and finishes.
- Weight Capacity: Ensure the stand is rated for the weight of the heaviest bike you plan to work on.
8. What are the Benefits of Using a Bike Work Stand for Motorcycle Maintenance?
Using a bike work stand significantly enhances the efficiency and safety of motorcycle maintenance. It provides a stable and accessible platform for various tasks.
- Improved Ergonomics: Reduces strain on your back, neck, and knees by bringing the bike to a comfortable working height.
- Increased Stability: Provides a secure platform, preventing the bike from tipping or moving during maintenance.
- Better Access: Allows for easier access to all parts of the bike, making tasks like oil changes, tire replacements, and adjustments more straightforward.
- Enhanced Safety: Reduces the risk of accidents or injuries by keeping the bike stable and secure.
- Professional Results: Enables more precise and thorough maintenance, leading to better performance and longevity of your bike.
9. How Does a Bike Work Stand Improve Motorcycle Repair Efficiency?
A bike work stand streamlines the repair process, saving time and effort. By providing a stable and accessible platform, it simplifies various maintenance tasks.
- Easier Inspections: Makes it easier to inspect all parts of the bike, identifying potential issues early.
- Faster Repairs: Speeds up repair work by providing easy access to components and reducing physical strain.
- Precise Adjustments: Allows for more precise adjustments, ensuring optimal performance.
- Organized Workspace: Helps keep your workspace organized by providing a dedicated area for maintenance.
- Professional Appearance: Gives your workspace a professional look, enhancing your confidence and efficiency.
10. How to Maintain and Store Your Bike Work Stand?
Proper maintenance and storage ensure your bike work stand remains in good condition and provides reliable service for years to come. Regular care prevents wear and tear.
- Cleaning: Clean the stand regularly to remove dirt, grease, and debris.
- Inspection: Inspect the stand for any signs of damage, such as cracks, bends, or loose hardware.
- Tightening: Tighten any loose bolts or screws to maintain stability.
- Lubrication: Lubricate moving parts, such as hinges or adjustable mechanisms, to ensure smooth operation.
- Rust Prevention: Apply rust-preventative coating to steel stands to protect against corrosion.
- Storage: Store the stand in a dry, protected area to prevent damage from the elements.
- Padding Replacement: Replace worn or damaged padding to protect your bike’s frame.
11. What are the Common Mistakes to Avoid When Building a Bike Work Stand?
Avoiding common mistakes can save you time, money, and frustration when building a bike work stand. Proper planning and attention to detail are essential.
- Inadequate Design: Failing to create a detailed design before starting construction can lead to structural weaknesses or functional limitations.
- Using Poor Quality Materials: Using substandard materials can compromise the stand’s strength and durability.
- Insufficient Stability: Neglecting to create a wide, stable base can result in a stand that is prone to tipping.
- Incorrect Measurements: Inaccurate measurements can lead to misaligned components and a poorly functioning stand.
- Skipping Safety Precautions: Ignoring safety measures, such as wearing protective gear, can result in injuries.
- Poor Welding: (For steel stands) Inadequate welding can create weak points in the structure.
- Neglecting Frame Protection: Failing to add padding to the support arms can scratch or damage the bike’s frame.
12. How to Choose the Right Height for Your Bike Work Stand?
Choosing the right height for your bike work stand is crucial for comfort and efficiency. The ideal height minimizes strain and provides easy access to all parts of the bike.
- Measure Your Bike: Measure the height of your bike’s frame at the point where it will rest on the stand.
- Consider Your Height: Take into account your height and arm length.
- Ergonomic Considerations: Aim for a height that allows you to work comfortably without bending or reaching excessively.
- Adjustable Height: If possible, build an adjustable stand that can be customized to different bikes and users.
- Test the Height: Before finalizing the design, test the height with your bike to ensure it is comfortable and accessible.
13. How to Ensure Your Bike Work Stand is Stable and Safe?
Ensuring your bike work stand is stable and safe is paramount for preventing accidents and injuries. A well-built stand provides a secure platform for maintenance.
- Wide Base: A wide, sturdy base provides a stable foundation.
- Strong Materials: Use high-quality materials that can support the weight of your bike.
- Reinforced Joints: Reinforce all joints and connections to prevent movement or collapse.
- Level Surface: Always use the stand on a level surface.
- Weight Distribution: Distribute the weight of the bike evenly across the stand.
- Locking Mechanisms: Implement locking mechanisms to prevent accidental movement or adjustments.
- Regular Inspections: Regularly inspect the stand for any signs of damage or wear.
14. What Types of Wood are Best for Building a Bike Work Stand?
Choosing the right type of wood is essential for building a durable and reliable bike work stand. Hardwoods provide superior strength and stability.
-
Hardwoods:
- Oak: Strong, durable, and resistant to wear.
- Maple: Dense and durable, with a smooth finish.
- Beech: Hard, strong, and resistant to splitting.
-
Softwoods:
- Pine: Affordable and easy to work with, but less durable than hardwoods.
- Fir: Lightweight and dimensionally stable, but not as strong as hardwoods.
-
Plywood:
- Marine-Grade Plywood: Water-resistant and strong, suitable for outdoor use.
- Construction-Grade Plywood: Affordable and versatile, but less durable than marine-grade plywood.
15. How to Protect Your Bike’s Frame While Using a Work Stand?
Protecting your bike’s frame is essential to prevent scratches and damage while using a work stand. Proper padding and care can keep your bike looking its best.
- Rubber Padding: Use thick rubber padding on the support arms to cushion the frame.
- Foam Padding: Add foam padding for extra protection and comfort.
- Cloth Covering: Cover the padding with a soft cloth to prevent scratches.
- Inspect Regularly: Regularly inspect the padding for wear and tear, replacing it as needed.
- Avoid Sharp Edges: Ensure there are no sharp edges or rough surfaces on the stand that could damage the frame.
- Secure Fit: Ensure the bike fits securely on the stand, minimizing movement and potential for scratches.
 DIY Bicycle Repair Stand Bike Tutorial Arms
16. What are the Different Designs for a DIY Bike Work Stand?
There are several designs for DIY bike work stands, each offering unique advantages. Choosing the right design depends on your needs and skill level.
- A-Frame Stand: Simple and stable, with an A-shaped frame supporting the bike.
- Trestle Stand: Uses two trestles to support the bike, providing a wide and stable base.
- Vertical Lift Stand: Lifts the bike vertically, providing easy access to all parts.
- Clamp Stand: Clamps onto the bike’s frame, holding it securely in place.
- Headstock Stand: Supports the bike by the headstock, allowing the front wheel to be removed.
- Swingarm Stand: Supports the bike by the swingarm, allowing the rear wheel to be removed.
17. How to Add a Tool Tray to Your Bike Work Stand?
Adding a tool tray to your bike work stand enhances convenience and organization. A tool tray keeps essential tools within easy reach.
- Design the Tray: Design a tray that is the appropriate size and shape for your tools.
- Choose Materials: Use wood, metal, or plastic to construct the tray.
- Attach Brackets: Attach brackets to the stand to support the tray.
- Secure the Tray: Secure the tray to the brackets using screws, bolts, or welds.
- Add Dividers: Add dividers to the tray to keep tools organized.
- Consider Drainage: If using the stand outdoors, consider adding drainage holes to the tray.
18. What are the Alternatives to Building a Bike Work Stand?
If building a bike work stand is not feasible, several alternatives can provide similar benefits. These alternatives offer convenience and accessibility.
- Commercial Bike Stands: Purchase a pre-made bike stand from a retailer.
- Motorcycle Lifts: Use a motorcycle lift for heavy-duty maintenance.
- Crate or Blocks: Use a sturdy crate or blocks to support the bike.
- Wall Mounts: Install wall mounts to hold the bike securely.
- Friends Assistance: Enlist a friend to help hold the bike during maintenance.
19. How to Transport Your DIY Bike Work Stand?
Transporting your DIY bike work stand requires careful planning to ensure it arrives safely and without damage. Consider the design and materials when planning transportation.
- Collapsible Design: Design the stand to be collapsible for easy transport.
- Lightweight Materials: Use lightweight materials to reduce the weight of the stand.
- Secure Fasteners: Use secure fasteners to hold the stand together during transport.
- Protective Covering: Cover the stand with a protective covering to prevent scratches and damage.
- Tie-Down Straps: Use tie-down straps to secure the stand in your vehicle.
- Handle or Wheels: Add a handle or wheels to make it easier to move the stand.
20. What is the Cost of Building a DIY Bike Work Stand?
The cost of building a DIY bike work stand varies depending on the materials used and the complexity of the design. However, it is generally more affordable than purchasing a commercial stand.
- Materials: The cost of wood, steel, hardware, and padding.
- Tools: The cost of any tools you need to purchase.
- Consumables: The cost of welding rods, paint, and other consumables.
- Labor: The value of your time and effort.
- Total Cost: Calculate the total cost of all materials, tools, and consumables.
21. How Can Usabikers.net Help You with Your Bike Work Stand Project?
Usabikers.net offers a wealth of resources and information to assist you with your bike work stand project. From design ideas to material recommendations, we’ve got you covered.
- Detailed Guides: Access our comprehensive guides on building bike work stands.
- Community Forum: Connect with other bikers and share tips and advice.
- Product Reviews: Read reviews of tools and materials to make informed decisions.
- Expert Advice: Get expert advice from experienced motorcycle mechanics.
- Project Showcase: Showcase your finished bike work stand project and inspire others.
At usabikers.net, we understand the passion and dedication that goes into motorcycle maintenance and customization. Whether you’re a seasoned biker or just starting out, our platform provides the resources and community support you need to tackle any project with confidence.
 DIY Bicycle Repair Stand Tutorial for Bikes
22. How to Find Free or Low-Cost Materials for Your Bike Work Stand?
Finding free or low-cost materials for your bike work stand can significantly reduce the overall cost of the project. Creative sourcing can save you money and resources.
- Scrap Wood: Use scrap wood from previous projects or construction sites.
- Recycled Metal: Recycle metal from old appliances or car parts.
- Community Resources: Check with local community centers or recycling programs for free materials.
- Online Marketplaces: Browse online marketplaces for used or discounted materials.
- Garage Sales: Visit garage sales for affordable tools and materials.
- Freecycle Networks: Join Freecycle networks to find people giving away unwanted materials.
23. What are the Legal Considerations for Building a Bike Work Stand?
While building a bike work stand is generally safe, it’s essential to consider any legal implications, especially regarding safety and liability.
- Building Codes: Check local building codes for any regulations regarding DIY projects.
- Safety Standards: Ensure your stand meets basic safety standards to prevent accidents.
- Liability: Be aware of your liability if someone is injured while using your stand.
- Insurance: Check your insurance policy to ensure you are covered for any accidents or damages.
- Professional Advice: Consult with a professional if you have any concerns about safety or liability.
24. How to Involve Your Local Biker Community in Your Bike Work Stand Project?
Involving your local biker community in your bike work stand project can foster camaraderie and shared learning. Collaborative projects enhance community bonds.
- Workshops: Host workshops to teach others how to build their own stands.
- Group Builds: Organize group builds where members collaborate on building stands.
- Sharing Resources: Share your tools and materials with other members.
- Community Forum: Use online forums to discuss design ideas and share tips.
- Events: Showcase your finished stands at local biker events.
- Mentorship: Mentor new bikers and teach them about motorcycle maintenance.
25. What are the Top Brands for Commercial Bike Work Stands?
If building a DIY stand is not for you, several top brands offer high-quality commercial bike work stands. These stands provide reliability and advanced features.
- Park Tool: Known for their durable and professional-grade stands.
- Bikehand: Offers a range of affordable and reliable stands.
- Feedback Sports: Specializes in lightweight and portable stands.
- Topeak: Provides innovative and feature-rich stands.
- Venzo: Offers a variety of stands for different bike types.
- Pro Bike Tool: Known for their high-quality and durable stands.
26. How to Troubleshoot Common Issues with Your DIY Bike Work Stand?
Troubleshooting common issues with your DIY bike work stand can save you time and frustration. Identifying and addressing problems early ensures your stand remains functional and safe.
- Instability: Check the base for stability and ensure it is level.
- Wobbling: Tighten any loose bolts or screws.
- Sagging: Reinforce the support arms to prevent sagging.
- Slipping: Add more padding to the support arms to prevent slipping.
- Damage: Repair any cracks, bends, or breaks in the structure.
- Rust: Remove rust and apply a rust-preventative coating.
27. What are the Environmental Benefits of Building a DIY Bike Work Stand?
Building a DIY bike work stand can have positive environmental impacts by reducing waste and promoting sustainable practices.
- Recycling Materials: Using recycled materials reduces the demand for new resources.
- Reducing Waste: Reusing materials prevents them from ending up in landfills.
- Conserving Energy: DIY projects reduce the energy required to manufacture and transport new products.
- Promoting Sustainability: Encouraging sustainable practices within the biker community.
- Reducing Carbon Footprint: Lowering your carbon footprint by using local and recycled materials.
28. How Does Building a Bike Work Stand Enhance Your Biker Lifestyle?
Building a bike work stand enhances your biker lifestyle by providing a dedicated space for maintenance and customization. It fosters independence and self-reliance.
- Independence: Gain independence by performing your own maintenance and repairs.
- Self-Reliance: Become more self-reliant by learning new skills and solving problems.
- Personalization: Personalize your bike and workspace to reflect your unique style.
- Community: Connect with other bikers and share your passion for motorcycles.
- Savings: Save money by performing your own maintenance and repairs.
- Pride: Take pride in your skills and accomplishments.
29. What are the Latest Trends in Bike Work Stand Design?
Staying updated with the latest trends in bike work stand design ensures you are using the most efficient and innovative solutions.
- Adjustable Height and Angle: Stands that offer a wide range of height and angle adjustments.
- Lightweight Materials: Stands made from lightweight and durable materials like aluminum.
- Collapsible Designs: Stands that can be easily folded and stored.
- Integrated Tool Trays: Stands with integrated tool trays for added convenience.
- Wireless Connectivity: Stands with wireless connectivity for accessing maintenance guides and tutorials.
- Ergonomic Features: Stands designed with ergonomic features to reduce strain and improve comfort.
30. How to Use Your Bike Work Stand for Motorcycle Detailing?
Using your bike work stand for motorcycle detailing allows for thorough and precise cleaning. The elevated position provides easy access to all parts of the bike.
- Preparation: Prepare your cleaning supplies and equipment.
- Placement: Place your bike on the work stand and secure it.
- Cleaning: Clean the bike thoroughly, starting from the top and working your way down.
- Polishing: Polish the bike to a shine, using appropriate polishes and waxes.
- Detailing: Detail any hard-to-reach areas, such as the engine and suspension.
- Inspection: Inspect the bike for any missed spots or areas that need further attention.
Address: 801 Sturgis Main St, Sturgis, SD 57785, United States. Phone: +1 (605) 347-2000.
Ready to take your motorcycle maintenance to the next level? Visit usabikers.net for in-depth articles, community forums, and expert advice. Discover new skills, connect with fellow bikers, and unleash your DIY potential today. Let usabikers.net be your trusted resource for all things motorcycle, making your biker lifestyle more fulfilling and enjoyable.
FAQ: Building a Bike Work Stand
- Is it cheaper to build or buy a bike work stand?
Building a bike work stand is generally cheaper, especially if you use recycled materials. - What materials are best for a DIY bike work stand?
Steel and hardwoods like oak or maple are excellent choices due to their durability. - How do I ensure my bike work stand is stable?
A wide base, strong materials, and reinforced joints are essential for stability. - Can I customize my bike work stand for different bike types?
Yes, adjustable height and interchangeable mounts allow for customization. - What safety precautions should I take when building a bike work stand?
Wear safety gear, work in a well-ventilated area, and use proper tools. - How high should my bike work stand be?
The height should allow you to work comfortably without bending or reaching excessively. - How do I protect my bike’s frame while using a work stand?
Use rubber or foam padding on the support arms to cushion the frame. - What are the common mistakes to avoid when building a bike work stand?
Inadequate design, poor quality materials, and insufficient stability are common mistakes. - How can I add a tool tray to my bike work stand?
Design a tray, attach brackets to the stand, and secure the tray to the brackets. - What are the alternatives to building a bike work stand?
Commercial bike stands, motorcycle lifts, or sturdy crates can be used as alternatives.