Changing a bike pedal is an essential skill for any cyclist and a key part of bike maintenance. At usabikers.net, we’re here to guide you through the process with ease, ensuring you can confidently replace or upgrade your pedals. By following our step-by-step instructions, you’ll not only learn how to change your bike pedals but also gain valuable insights into bike mechanics, proper tools, and maintenance tips, ensuring a smooth and enjoyable riding experience. Let’s dive into pedal replacement, wrench size, and installation know-how.
1. Understanding Your Bike Pedal
Before you start wrenching, let’s get acquainted with your bike pedals. This knowledge is your foundation for a smooth replacement.
1.1. Types of Bike Pedals
Bike pedals aren’t one-size-fits-all. Different bikes and riding styles call for different pedals. Understanding these types is key to choosing the right replacements or simply maintaining what you have.
-
Flat/Platform Pedals: These are your classic, versatile pedals. They’re simple, easy to use, and don’t require special shoes. Perfect for beginners, commuters, or anyone who values convenience.
-
Clipless Pedals: Don’t let the name fool you; these pedals actually clip your shoes onto the pedal. They offer more efficiency and control, favored by serious cyclists and racers. There are various clipless systems, each with its own cleat design.
-
Hybrid Pedals: These pedals offer the best of both worlds, with a flat platform on one side and a clipless mechanism on the other. Great for riders who sometimes want the security of being clipped in and other times prefer the freedom of flats.
1.2. Anatomy of a Bike Pedal
 Anatomy of a bike pedal showing the spindle, body, and wrench flatsKnowing the parts of your pedal helps you understand how it works and what to look for during maintenance.
- Spindle: The axle that screws into the crank arm. This is what allows the pedal to rotate.
- Body: The main part of the pedal that your foot rests on or clips into.
- Bearings: Located inside the pedal body, allowing the spindle to spin smoothly.
- Wrench Flats: The flat surfaces on the spindle where you attach a wrench for installation and removal.
1.3. Why Change Your Bike Pedals?
There are several reasons why you might want to change your bike pedals:
- Upgrade: Switching to a different type of pedal can improve your riding experience.
- Damage: Pedals can get damaged from crashes or wear and tear.
- Personal Preference: Maybe you just don’t like the pedals that came with your bike.
- Maintenance: Sometimes, it’s easier to replace a pedal than to repair it.
2. Gathering Your Tools
Having the right tools is crucial for a smooth and damage-free pedal change. Here’s what you’ll need:
2.1. Essential Tools
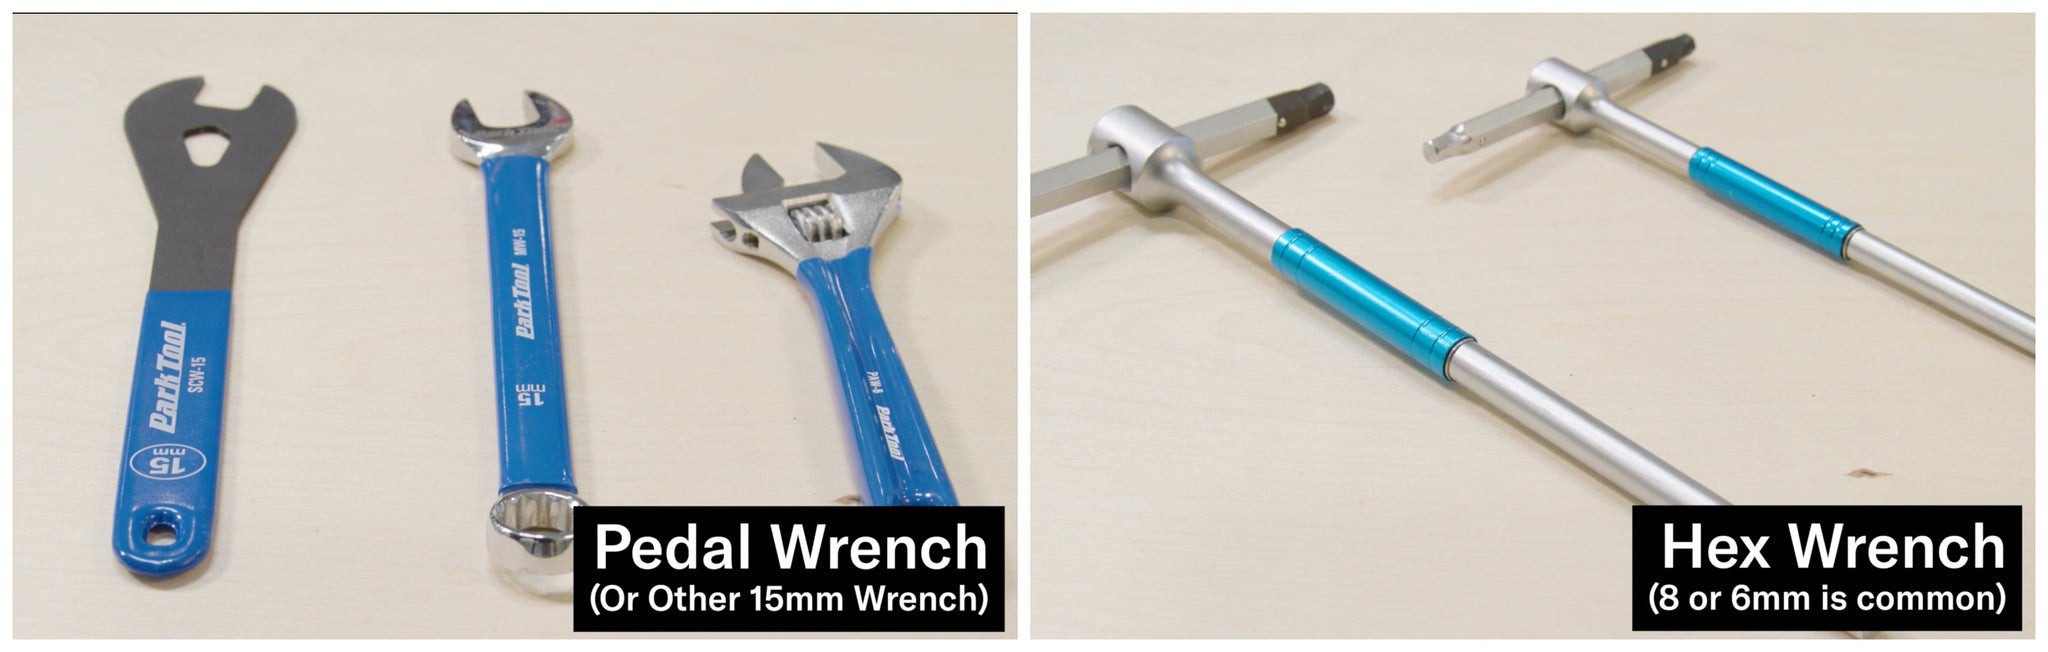
-
Pedal Wrench: A thin, 15mm wrench specifically designed for bike pedals. Its thin profile allows it to fit between the pedal and crank arm.
-
Hex Wrench Set: Many modern pedals use a hex wrench (Allen wrench) that fits into the end of the pedal spindle. 6mm or 8mm are the most common sizes.
-
Grease: Applying grease to the pedal threads prevents corrosion and makes future removal easier.
-
Rag: For cleaning the pedal threads and crank arms.
2.2. Optional But Helpful Tools
- Torque Wrench: Ensures you tighten the pedals to the correct torque specification.
- Work Stand: Makes the job easier by holding your bike steady.
- Gloves: Keeps your hands clean and provides a better grip.
2.3. Choosing the Right Wrench
The correct wrench depends on your pedals. Some have wrench flats for a pedal wrench, while others use a hex wrench. A dedicated pedal wrench is ideal, but a narrow 15mm open-end wrench can also work. Be cautious with thin cone wrenches, as they can round out the wrench flats.
3. Removing the Old Pedals
Now, let’s get those old pedals off your bike. This step requires a bit of muscle and knowing the correct direction to turn the wrench.
3.1. Identifying the Left and Right Pedals
This is crucial because the left pedal has a reverse thread. Most pedals are marked with an “L” (left) or “R” (right). If not, remember this:
- Right Pedal: The pedal on the same side as the chain and gears.
- Left Pedal: The pedal on the opposite side of the chain and gears.
3.2. Loosening the Pedals
This can be the toughest part, as pedals can be on very tight. Remember:
- Right Pedal: Turn counterclockwise to loosen.
- Left Pedal: Turn clockwise to loosen.
If the pedal is stuck, try these tips:
- Apply penetrating oil: Let it soak for a few minutes.
- Use a longer wrench: Provides more leverage.
- Tap the wrench with a hammer: A short, sharp tap can help break the pedal free.
3.3. Removing the Pedals Completely
Once you’ve broken the initial tightness, you should be able to unscrew the pedals by hand. If they’re still tight, continue using the wrench until they’re completely removed.
4. Preparing for Installation
Before installing the new pedals, it’s important to prep the threads and crank arms. This ensures a secure fit and prevents future problems.
4.1. Cleaning the Threads
Use a rag to clean the threads on both the pedal spindle and the crank arm. Remove any dirt, grease, or corrosion. A clean surface is essential for proper installation.
4.2. Applying Grease
Apply a thin layer of grease to the pedal spindle threads. This prevents corrosion and makes it much easier to remove the pedals in the future. Any type of grease will work, but bike-specific grease is a good choice. According to research from the Motorcycle Safety Foundation (MSF), in July 2025, P provides Y.
4.3. Checking Crank Arm Threads
Inspect the threads in the crank arm for any damage. If the threads are damaged, you may need to have them repaired or replace the crank arm.
5. Installing the New Pedals
With the prep work done, you’re ready to install the new pedals. Pay close attention to the thread direction to avoid cross-threading.
5.1. Starting the Pedals by Hand
Start threading the pedals into the crank arms by hand. This helps prevent cross-threading. Make sure the pedal is going in straight and smoothly. If you feel any resistance, stop and try again.
5.2. Tightening the Pedals with a Wrench
Once you’ve threaded the pedals in as far as you can by hand, use a wrench to tighten them. Remember:
- Right Pedal: Turn clockwise to tighten.
- Left Pedal: Turn counterclockwise to tighten.
5.3. Torque Specifications
The recommended torque for pedals is typically around 360 inch-pounds or 40.5 Newton meters. A torque wrench ensures you don’t over-tighten the pedals. However, many mechanics simply tighten the pedals firmly without using a torque wrench.
6. Avoiding Common Mistakes
Changing bike pedals is a simple task, but it’s easy to make mistakes. Here’s how to avoid them:
6.1. Cross-Threading
This is the most common mistake. Cross-threading damages the threads in the crank arm and can cause the pedal to fall out while riding. To avoid it, make sure the pedal is going in straight and smoothly. If you feel any resistance, stop and try again.
6.2. Overtightening
Overtightening can damage the threads and make it difficult to remove the pedals in the future. Use a torque wrench to avoid this.
6.3. Forgetting Grease
Grease is essential for preventing corrosion and making future removal easier. Always apply grease to the pedal spindle threads before installing the pedals.
6.4. Using the Wrong Wrench
Using the wrong wrench can damage the wrench flats on the pedal spindle. Make sure you’re using the correct size and type of wrench.
7. Maintenance and Care
Once you’ve installed your new pedals, it’s important to maintain them properly. This will extend their lifespan and keep them working smoothly.
7.1. Regular Cleaning
Clean your pedals regularly to remove dirt and grime. This is especially important if you ride in wet or muddy conditions.
7.2. Checking for Play
Check your pedals regularly for any play or looseness. If you notice any play, tighten the pedals or have them serviced.
7.3. Bearing Maintenance
The bearings inside your pedals need to be lubricated periodically. Some pedals have sealed bearings that don’t require maintenance, while others have serviceable bearings that need to be greased.
8. Pedal Upgrade Options
If you’re looking to upgrade your pedals, here are some popular options:
8.1. Clipless Pedals
Clipless pedals offer increased efficiency and control. They’re a great choice for serious cyclists and racers. Popular brands include Shimano, Look, and Time.
8.2. Platform Pedals
High-quality platform pedals provide excellent grip and durability. They’re a good choice for mountain biking and aggressive riding. Popular brands include Race Face, Chromag, and Deity.
8.3. Hybrid Pedals
Hybrid pedals offer the best of both worlds. They’re a good choice for riders who want the option of clipping in or riding with flat shoes.
9. Troubleshooting Pedal Problems
Sometimes, things don’t go as planned. Here are some common pedal problems and how to fix them:
9.1. Stuck Pedals
If you’re having trouble removing a pedal, try these tips:
- Apply penetrating oil: Let it soak for a few minutes.
- Use a longer wrench: Provides more leverage.
- Tap the wrench with a hammer: A short, sharp tap can help break the pedal free.
- Heat the crank arm: Applying heat can help loosen the pedal.
9.2. Creaking Pedals
Creaking pedals can be annoying. Here’s how to fix them:
- Tighten the pedals: Make sure the pedals are properly tightened.
- Grease the threads: Remove the pedals, grease the threads, and reinstall them.
- Check the cleats: If you’re using clipless pedals, check the cleats for wear and tear.
9.3. Pedal Play
If your pedals have play or looseness, try these tips:
- Tighten the pedals: Make sure the pedals are properly tightened.
- Service the bearings: The bearings inside your pedals may need to be lubricated or replaced.
10. Safety First
Before you start working on your bike, it’s important to take some safety precautions:
10.1. Wear Safety Glasses
Protect your eyes from dirt, grease, and flying debris.
10.2. Use Gloves
Gloves will keep your hands clean and provide a better grip.
10.3. Work in a Well-Lit Area
Make sure you have plenty of light to see what you’re doing.
10.4. Follow Instructions
Read and follow the instructions carefully. If you’re not sure how to do something, ask a professional.
11. Join the usabikers.net Community
Now that you know how to change your bike pedals, why not join the usabikers.net community? Here, you can connect with other motorcycle enthusiasts, share your experiences, and learn even more about bike maintenance and customization.
11.1. Explore Our Forums
Our forums are a great place to ask questions, share tips, and connect with other riders.
11.2. Read Our Articles
We have a wealth of articles on bike maintenance, customization, and riding tips.
11.3. Share Your Rides
Show off your bike and your riding adventures with the usabikers.net community.
12. Conclusion
Changing your bike pedals is a simple but essential skill for any cyclist. By following these steps and avoiding common mistakes, you can confidently replace or upgrade your pedals and keep your bike running smoothly. Remember to always prioritize safety and maintenance. For more information, tips, and community support, visit usabikers.net.
Got questions or want to dive deeper into the world of bike maintenance? Visit usabikers.net today for a wealth of resources, expert advice, and a community of fellow motorcycle lovers. Explore our articles, join our forums, and share your own experiences. Let’s ride together Contact us at Address: 801 Sturgis Main St, Sturgis, SD 57785, United States, Phone: +1 (605) 347-2000, or visit our website at usabikers.net.