Want to ensure your road bike stops safely and effectively? This usabikers.net guide provides a comprehensive, step-by-step process on how to change brake pads on your road bike, covering different types of brake systems and pads. You’ll discover the tools you need, detailed instructions, and essential tips for optimal brake performance, ensuring safe and confident rides. Learn about rim brakes, pad replacement, and brake maintenance.
1. Identifying Your Road Bike Brake Pad Type
What are the different types of brake pads available for road bikes?
Brake pads for road bikes come in various shapes and sizes, but primarily fall into three categories: road-specific, threaded stud, and smooth stud. Knowing which type you have is the first step in a successful replacement.
- Road-Specific Pads: These pads are designed specifically for road bike calipers, featuring a direct attachment to the brake arm.
- Threaded Stud Pads: These pads utilize a threaded post with a series of convex and concave spacers for precise alignment.
- Smooth Stud Pads: Commonly found on cantilever brakes, these pads have a smooth post that’s pinched by the caliper arm mechanism.
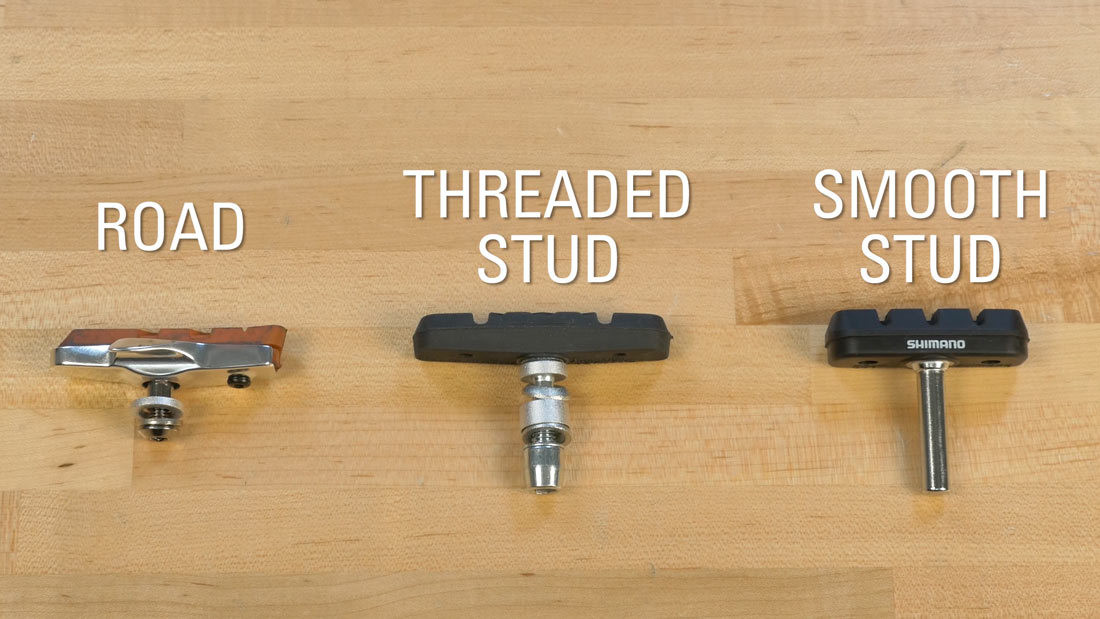 Road, Threaded Stud, and Smooth Stud pads
Road bike brake pads: Road, Threaded Stud, and Smooth Stud types
All three types are available in one-piece designs, where the pad is fixed to the stud, or as cartridge-style pads, where the pad slides in and out of a holder, making replacement easier.
2. Gathering Your Tools
What tools do I need to change my road bike brake pads?
Before you begin, gather the necessary tools to ensure a smooth and efficient brake pad replacement:
- New Brake Pads: Ensure you have the correct type and model for your brake system.
- Hex Wrench Set: A set of hex wrenches (Allen keys) is essential for loosening and tightening brake pad bolts.
- Wrench Set: You might need a wrench for certain brake pad mounting nuts.
- Pliers: Useful for removing retention screws or clips on cartridge-style pads.
- Screwdriver: Depending on your brake system, you may need a flathead or Phillips head screwdriver.
- Clean Rags: Keep rags handy for cleaning your rims and brake components.
- Brake Cleaner: Use a quality brake cleaner to remove any dirt, grime, or contaminants from the brake pads and rims.
- Work Stand (Optional): A bike work stand can make the process easier by keeping your bike stable and at a comfortable height.
3. Step-by-Step Guide: Replacing Road Bike Brake Pads
How do I replace my road bike brake pads?
Follow these detailed steps to replace your road bike brake pads effectively:
3.1. Road Brake Pad Replacement (Full Pad Unit)
This method applies to pads where the entire unit, including the pad and holder, is replaced.
- Remove the Wheel: Start by removing the wheel to provide better access to the brake pads.
- Loosen the Pad Fastener: Use the appropriate hex wrench or wrench to loosen the fastener securing the brake pad to the caliper arm.
- Remove the Old Pad: Once the fastener is loose, remove the old brake pad from the arm.
- Inspect the New Pads: Check the new pads for any directional arrows or left and right side markings. These indicators ensure proper installation. The closed side goes to the front.
- Install the New Pad: Install the new brake pad, aligning it correctly with the caliper arm. Tighten the fastener to secure the pad in place.
- Reinstall the Wheel: Reinstall the wheel and ensure it spins freely without rubbing against the new brake pads.
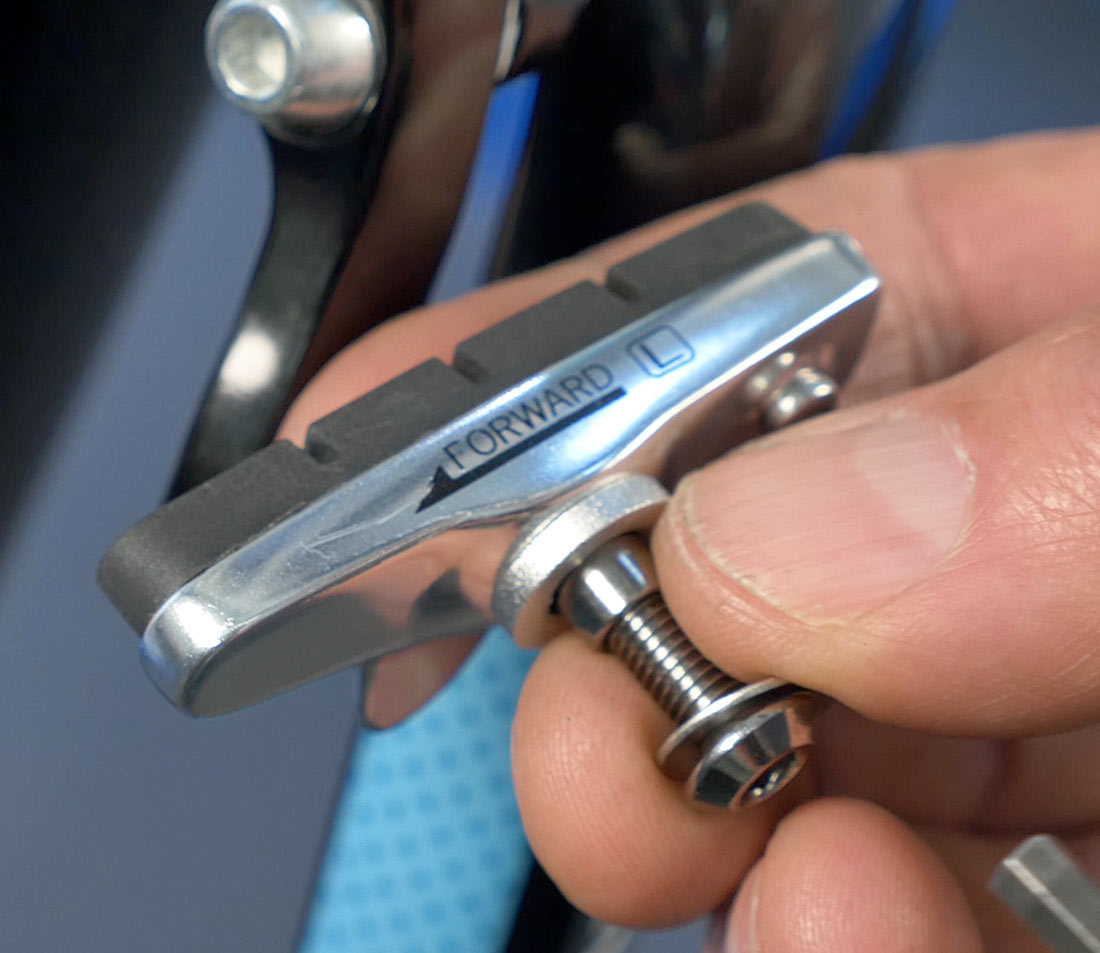 Inspect new pad for directional arrows
Checking road bike brake pads for directional arrows
3.2. Road Brake Pad Replacement (Cartridge Style)
This method is for pads that slide in and out of a cartridge holder.
- Remove the Wheel: Begin by removing the wheel for better access.
- Remove Retention Screw or Clip: Locate and remove the retention screw or clip that secures the brake pad in the holder. Pliers may be necessary for this step.
- Slide Out the Old Pad: Once the retention screw or clip is removed, push the old pad backward to slide it out of the holder.
- Inspect the New Pads: Check the new pads for a groove in the back, which aligns with the retention screw or clip.
- Install the New Pad: Push the new pad fully into the holder, ensuring the groove aligns correctly.
- Install the Retention Screw or Clip: Secure the new pad in place by installing the retention screw or clip.
- Reinstall the Wheel: Reinstall the wheel and check for proper alignment and free spinning.
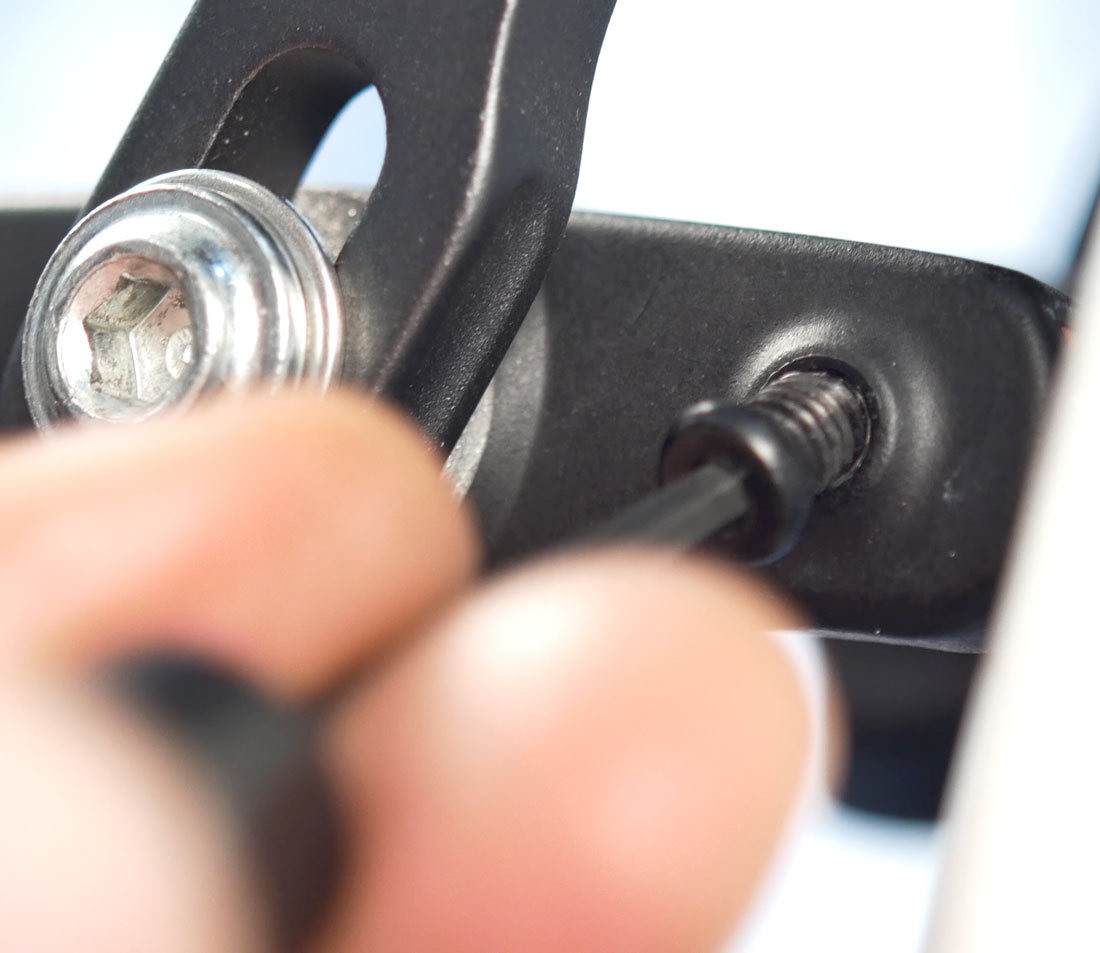 Remove any set screw before pushing pad from pad holder
Removing set screw before pushing road bike pad from pad holder
3.3. Threaded Stud Pad Replacement (Full Pad Unit)
These pads use spacers to position the brake arm relative to the rim.
- Remove the Wheel: Start by removing the wheel to get it out of the way.
- Observe Spacer Orientation: Before removing anything, carefully note the orientation of the spacers on each pad. Threaded stud pads typically use a pair of narrow and a pair of wider spacers, which are moved inboard or outboard to position the arms relative to the rim.
- Remove Mounting Nut, Spacers, and Brake Pad: Remove the mounting nut, spacers, and brake pad from the caliper arm.
- Inspect New Pads: Check the new pads for any directional arrows, indicating on which side to install the new pad. As with other pad types, if there’s a closed side to the holder and an open side, the closed side always goes to the front.
- Install the New Pad with Correct Spacer Orientation: Install the new pad with attention to the spacer orientation you observed earlier. Ideally, the caliper arm should be close to vertical as the pad strikes the rim.
- Reinstall the Wheel: Reinstall the wheel and ensure it spins freely without rubbing against the new brake pads.
 Wide and narrow spacers on threaded stud system
Wide and narrow spacers on a road bike’s threaded stud system
3.4. Threaded Stud Pad Replacement (Cartridge Style)
For cartridge-style threaded stud pads, you’ll replace only the pad material.
- Remove the Wheel: Remove the wheel to provide clearance.
- Remove Retention Screw or Clip: Locate and remove the retention screw or clip securing the brake pad in the holder.
- Slide Out the Old Pad: Push the old pad backward to slide it out of the holder.
- Inspect the New Pads: Ensure that the curve of the new pad matches the curve of the rim. Also, check for a groove in the back of the pad to accept the retention clip.
- Install the New Pad: Push the new pad fully into the holder, aligning the groove correctly.
- Install the Retention Screw or Clip: Secure the new pad in place with the retention screw or clip.
- Reinstall the Wheel: Reinstall the wheel. You’ll likely need to make additional adjustments to ensure the brake functions properly.
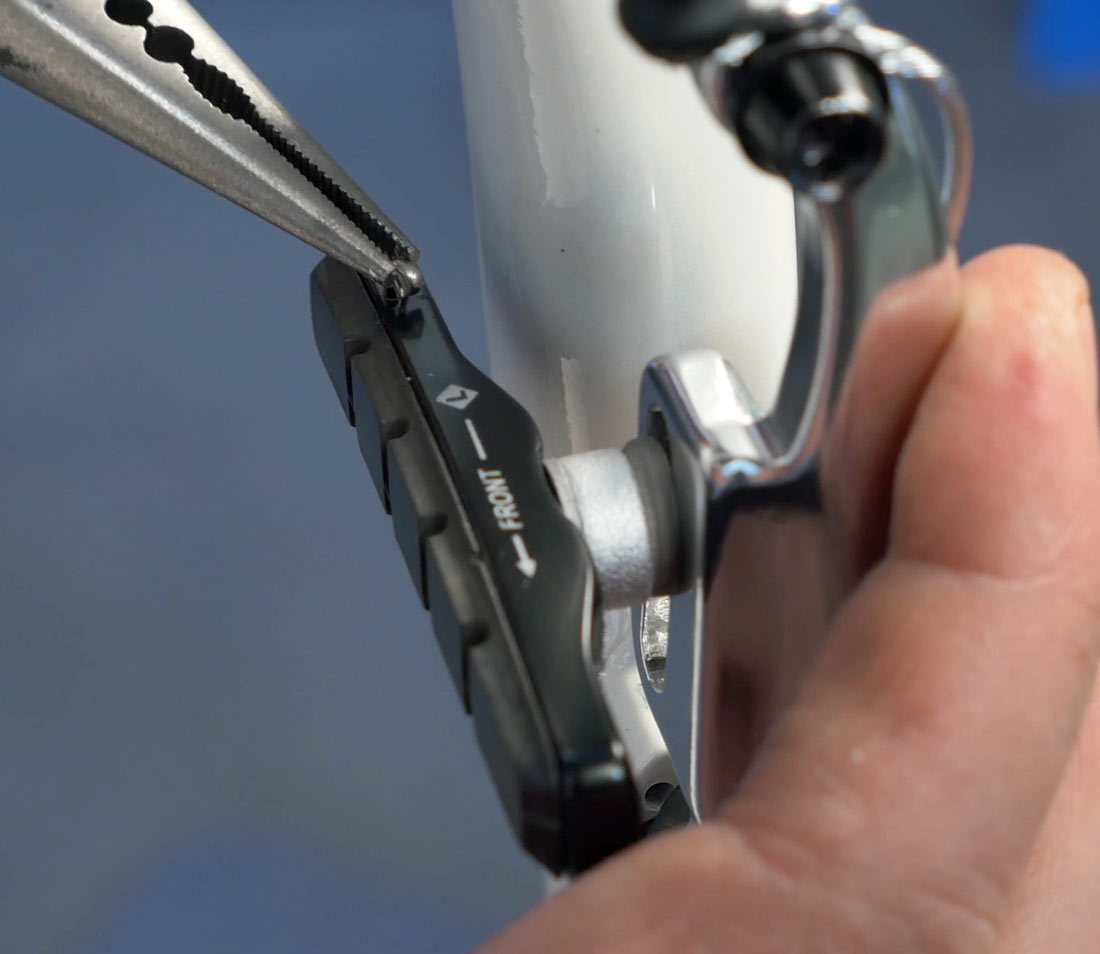 Remove retaining clip before pulling pad to back
Remove retaining clip before pulling road bike pad to back
3.5. Smooth Stud Pad Replacement (Full Pad Unit)
Smooth stud pads often have convex and concave washers for alignment.
- Remove the Wheel: Removing the wheel will make this process easier.
- Inspect Spacer Orientation: Examine the caliper arm and pad stud, noting the orientation of any spacers. There are often convex and concave washer systems built into the arm that permit pad alignment, and they will need to be reinstalled correctly.
- Loosen Mounting Nut: Use a hex wrench to hold the bolt head and loosen the mounting nut with a wrench to wiggle free the stud.
- Note Directional Arrows: Note any “forward” arrow indicating which side to install the new pad. If there is a closed side to the holder and an open side, the closed side always goes to the front.
- Slide in the New Pad Unit: Slide the new pad unit into place, ensuring that you reinstall any washers in their correct orientation.
- Reinstall the Wheel: Reinstall the wheel.
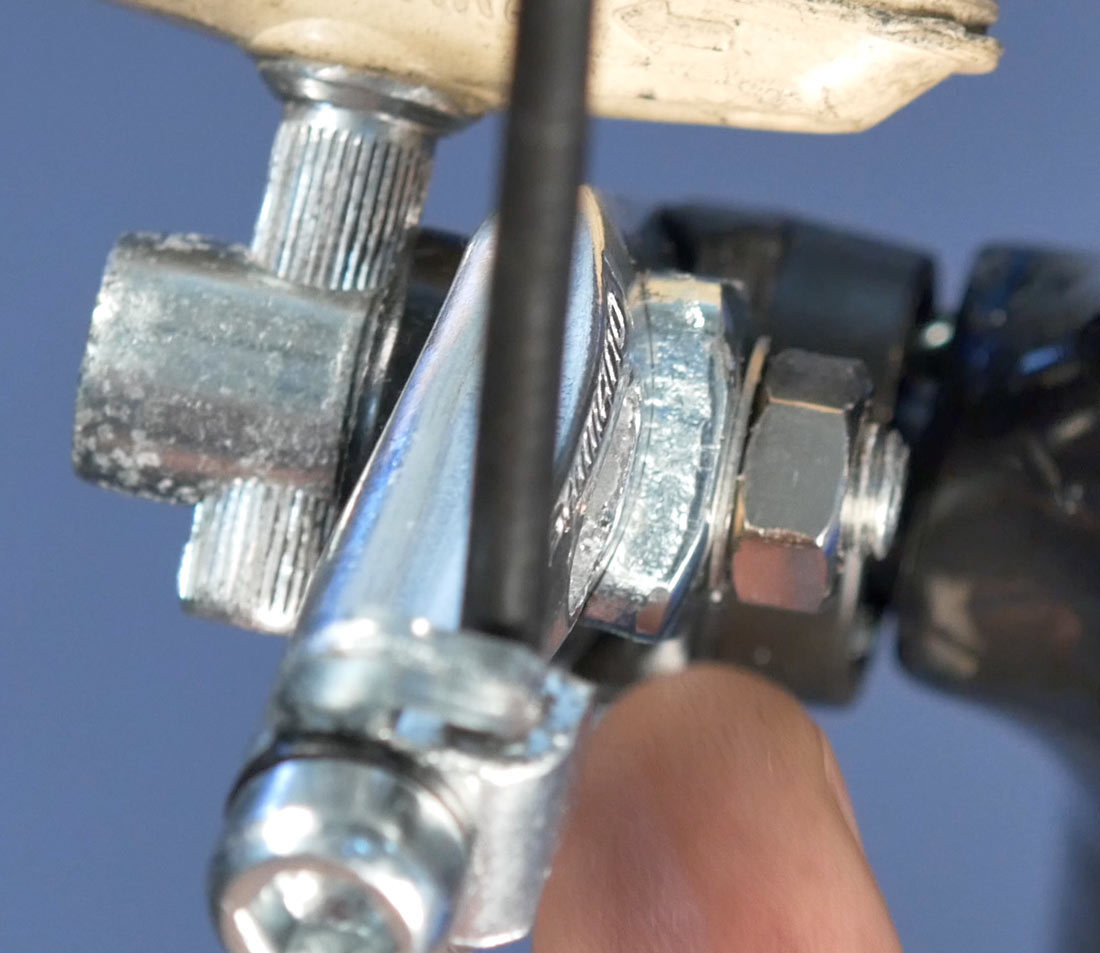 Convex and concave surfaces with mounting bolt of smooth stud brake
Convex and concave surfaces with mounting bolt of smooth stud brake
3.6. Smooth Stud Pad Replacement (Cartridge Style)
Replacing only the pad material on cartridge-style smooth stud pads involves a few simple steps.
- Remove the Wheel: Begin by removing the wheel to access the brake pads.
- Remove Retention Clip or Screw: Look for a retention clip or screw on the back of the pad and remove it.
- Slide Out the Old Pad: Push the pad backward to slide it out of the cartridge holder.
- Inspect the New Pads: Inspect the new pads for a groove in the back to accept the retention clip.
- Install the New Pad: Push the pad fully into place and install the clip.
- Reinstall the Wheel: Reinstall the wheel. As with the threaded stud pads, you will likely need to make additional adjustments to ensure the brake functions properly.
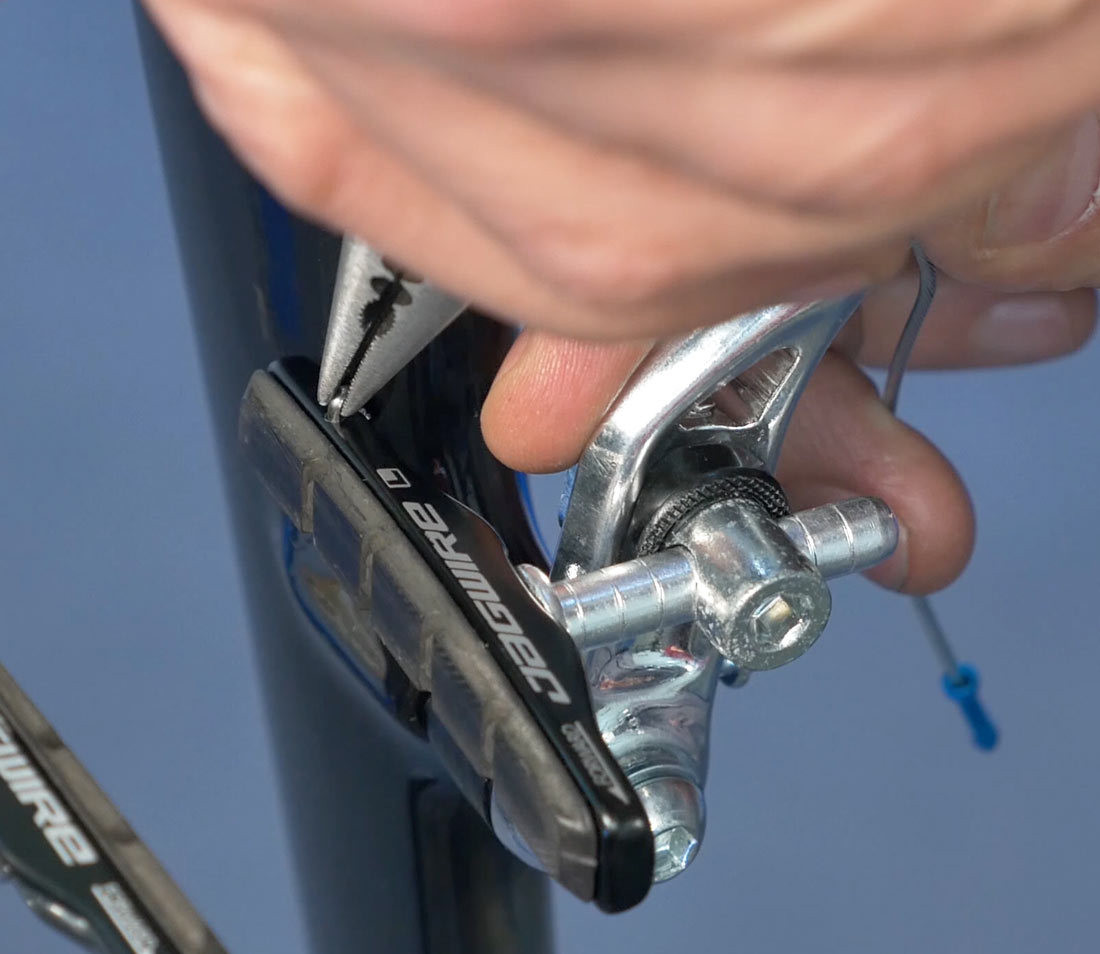 Remove pad retaining clip before pushing pad from holder
Remove road bike pad retaining clip before pushing pad from holder
4. Adjusting Your Road Bike Brakes After Pad Replacement
Why is it important to adjust my brakes after changing the pads?
After replacing your brake pads, it’s crucial to adjust them for optimal performance. Misaligned or improperly adjusted brakes can compromise your safety and reduce braking efficiency.
- Centering the Brakes: Ensure that both brake pads contact the rim simultaneously and with equal force. If one pad is closer to the rim than the other, use the centering screw (usually located on the brake caliper) to adjust the brake arms until they are even.
- Setting the Pad Clearance: Adjust the distance between the brake pads and the rim. Ideally, there should be a small gap (about 1-2mm) between the pads and the rim when the brake lever is not engaged. This prevents the brakes from rubbing against the rim while riding.
- Toe-In Adjustment: “Toe-in” refers to the angle at which the brake pads contact the rim. The front edge of the pad should contact the rim slightly before the rear edge. This helps to reduce brake squeal and improve modulation. You can adjust the toe-in by slightly bending the brake arms or using специальные toe-in pads.
- Cable Tension Adjustment: Adjust the cable tension to ensure that the brake lever has the correct amount of travel. The lever should not bottom out against the handlebar before the brakes fully engage. You can adjust the cable tension using the barrel adjuster on the brake lever or the caliper.
- Test Your Brakes: After making these adjustments, test your brakes in a safe area to ensure they are working properly. Squeeze the brake lever firmly and check that the brakes engage smoothly and evenly.
According to research from the Motorcycle Safety Foundation (MSF), in July 2025, proper brake maintenance provides safety.
5. Choosing the Right Road Bike Brake Pads
How do I choose the right brake pads for my road bike?
Selecting the right brake pads can significantly impact your bike’s braking performance. Here are some factors to consider:
- Brake System Compatibility: Ensure the brake pads are compatible with your specific brake system (e.g., Shimano, SRAM, Campagnolo).
- Material: Brake pads are typically made from organic, semi-metallic, or metallic compounds. Organic pads offer good modulation and are quiet, but wear out faster. Metallic pads provide excellent stopping power and durability but can be noisy. Semi-metallic pads offer a balance of both.
- Riding Conditions: Consider the conditions you typically ride in. If you frequently ride in wet or muddy conditions, choose pads designed for those conditions.
- Rim Material: If you have carbon fiber rims, use brake pads specifically designed for carbon rims to prevent damage.
- Brand Reputation: Opt for reputable brands known for producing high-quality brake pads.
6. Maintaining Your Road Bike Brakes
How do I maintain my road bike brakes to prolong pad life?
Regular maintenance can extend the life of your brake pads and ensure optimal braking performance.
- Clean Your Rims Regularly: Use a clean rag and brake cleaner to remove dirt, grime, and debris from your rims. This helps prevent contaminants from transferring to your brake pads.
- Inspect Brake Pads Regularly: Check your brake pads for wear and tear. Replace them when they become too thin or show signs of damage.
- Lubricate Brake Cables: Apply a small amount of lubricant to your brake cables to keep them moving smoothly.
- Adjust Brakes as Needed: As your brake pads wear down, you may need to readjust your brakes to maintain proper pad clearance and lever travel.
- Replace Brake Cables Periodically: Over time, brake cables can stretch or fray. Replace them periodically to ensure reliable braking performance.
7. Troubleshooting Common Road Bike Brake Problems
What do I do if my brakes are making noise or not stopping me effectively?
Encountering issues with your road bike brakes can be frustrating and potentially dangerous. Here are some common problems and their solutions:
- Squealing Brakes: Squealing brakes are often caused by contamination on the brake pads or rims. Clean both thoroughly with brake cleaner. Additionally, ensure your brake pads are properly “toed-in” (the front of the pad contacts the rim slightly before the rear).
- Poor Stopping Power: If your brakes lack stopping power, check for worn brake pads and replace them if necessary. Also, inspect your brake cables for stretching or fraying, and replace them if needed.
- Brake Rubbing: Brake rubbing can occur if your brake pads are misaligned or if your wheel is not properly centered in the frame. Adjust the brake calipers to ensure the pads are evenly spaced from the rim, and check your wheel alignment.
- Spongy Brake Feel: A spongy brake feel often indicates air in the brake lines (for hydraulic brakes) or stretched brake cables (for mechanical brakes). Bleed your hydraulic brakes or replace your mechanical brake cables to resolve this issue.
8. Upgrading Your Road Bike Brakes
When should I consider upgrading my road bike brakes?
Upgrading your road bike brakes can significantly improve your bike’s braking performance, especially if you’re experiencing issues with your current brakes or if you’re looking for more stopping power.
- Improved Stopping Power: Upgrading to higher-quality brake calipers and pads can provide significantly better stopping power, especially in wet or challenging conditions.
- Better Modulation: Higher-end brakes often offer better modulation, allowing you to control your braking force more precisely.
- Reduced Weight: Some upgraded brakes are lighter than stock brakes, which can help reduce your bike’s overall weight.
- Enhanced Aesthetics: Upgraded brakes can also improve the overall appearance of your bike.
9. Safety Tips for Changing Road Bike Brake Pads
Are there any safety precautions I should take when working on my brakes?
When working on your road bike brakes, safety should always be your top priority.
- Wear Safety Glasses: Protect your eyes from debris and brake cleaner spray.
- Work in a Well-Ventilated Area: Brake cleaner can release harmful fumes, so work in a well-ventilated area.
- Dispose of Old Brake Pads Properly: Old brake pads may contain harmful materials, so dispose of them properly according to local regulations.
- Test Your Brakes Thoroughly: After completing any brake work, test your brakes thoroughly in a safe area before riding on the road.
10. Road Bike Brake Pad FAQs
Have questions about changing brake pads on a road bike?
Here are some frequently asked questions to help you better understand the process:
10.1. How often should I replace my road bike brake pads?
Brake pad replacement frequency depends on riding conditions, usage, and pad material. Inspect pads regularly and replace them when they’re worn or show signs of damage.
10.2. Can I use different brake pads on the front and rear of my road bike?
Yes, you can use different brake pads on the front and rear, tailoring your setup to your riding style and conditions.
10.3. What is the difference between organic and metallic brake pads?
Organic pads offer good modulation and are quiet, while metallic pads provide excellent stopping power and durability.
10.4. Do I need to bed in new brake pads?
Yes, bedding in new brake pads is essential for optimal performance. It involves performing a series of controlled stops to transfer pad material to the rotor.
10.5. Can I clean my brake pads with soap and water?
While you can use soap and water for a quick clean, brake cleaner is more effective at removing contaminants.
10.6. What causes brake squeal?
Brake squeal is often caused by contamination, misalignment, or vibration.
10.7. Can I reuse brake pads if they still have some material left?
It’s generally not recommended to reuse old brake pads, as they may have become contaminated or glazed.
10.8. How do I know if my brake cables need replacing?
Look for signs of fraying, stretching, or corrosion. Replace cables if they show any of these issues.
10.9. Are hydraulic brakes better than mechanical brakes?
Hydraulic brakes offer more stopping power, better modulation, and lower maintenance, but they are more expensive and complex than mechanical brakes.
10.10. Can I convert my mechanical brakes to hydraulic brakes?
Yes, you can convert mechanical brakes to hydraulic brakes, but it requires replacing the brake calipers, levers, and cables.
Conclusion:
Changing your road bike brake pads is a crucial maintenance task that ensures your safety and enhances your riding experience. By following this comprehensive guide from usabikers.net, you can confidently replace your brake pads, adjust your brakes, and troubleshoot common issues. For more detailed information, expert tips, and a thriving community of fellow riders, visit usabikers.net today. Discover a wealth of articles, reviews, and forums to fuel your passion for road biking and biker culture in the USA. Join us at usabikers.net, where the road is always open, and the community is always welcoming.
Address: 801 Sturgis Main St, Sturgis, SD 57785, United States.
Phone: +1 (605) 347-2000.
Website: usabikers.net.