Like tires and brake pads, your bike chain is a wear-and-tear component that needs replacing periodically. Many cyclists are often surprised to learn that bike chains don’t last forever, but understanding when and how to replace your chain is crucial for maintaining your bike’s performance and preventing costly damage to other parts of your drivetrain. A worn chain can lead to poor shifting, skipping gears under pressure, and accelerated wear on your cassette and chainrings. Fortunately, changing your bike chain is a straightforward maintenance task you can easily accomplish at home with a few basic tools. This guide will walk you through each step of the process, ensuring your bike shifts smoothly and efficiently for miles to come.
Why and When to Replace Your Bike Chain
Before diving into the replacement process, it’s important to understand why and when you should change your bike chain. Over time, the constant friction and stress of pedaling cause the chain’s links to stretch and wear. This elongation, even if seemingly small, affects the chain’s engagement with the cassette and chainrings.
The best way to determine if your chain needs replacing is by using a chain checker tool. This inexpensive tool accurately measures chain wear, taking the guesswork out of maintenance. Regular chain checks, ideally every few hundred miles, can save you money in the long run by preventing premature wear on your more expensive cassette and chainrings. Ignoring chain wear can lead to a domino effect, requiring you to replace multiple drivetrain components sooner than necessary.
Tools You’ll Need to Change Your Bike Chain
To successfully replace your bike chain, gather these essential tools:
- New Bike Chain: Ensure it’s compatible with the number of speeds on your bike’s cassette. Most brands are cross-compatible with Shimano and SRAM, except for Campagnolo, but always double-check compatibility or consult your local bike shop.
- Chain Tool (Chain Breaker): This tool is essential for removing the old chain and adjusting the length of the new one.
- Chain Checker Tool: To measure chain wear and confirm replacement is needed.
- Cleaning Supplies (Degreaser, Brushes, Rags): While the chain is off, it’s an excellent opportunity to clean your cassette and chainrings.
- Optional: Quick Link Pliers: If your new chain uses a quick link, these pliers can make installation and removal easier.
- Optional: Work Gloves: To keep your hands clean.
Once you have all the necessary tools and a new, compatible chain, you’re ready to begin the replacement process.
Step-by-Step Guide to Replacing Your Bike Chain
Follow these eight steps to replace your bike chain effectively:
1. Remove the Old Chain
Start by removing the existing worn chain. Identify if your current chain has a quick link. If so, orient the quick link at the top of the chainstay for easier access. Quick links are designed to be tool-free or require specific quick link pliers to open. Squeeze the plates of the quick link together and gently push inwards to disengage it.
If your chain, like many Shimano and SRAM chains, does not have a quick link, you’ll need to use a chain tool. Position the chain in the chain tool so that the pin of the chain tool is aligned with a pin on the chain. Turn the handle of the chain tool to push the chain pin out. You only need to push the pin partway out to break the chain – avoid pushing it all the way out unless you intend to remove the link completely. Once the chain is split, you can remove the old chain from your bike.
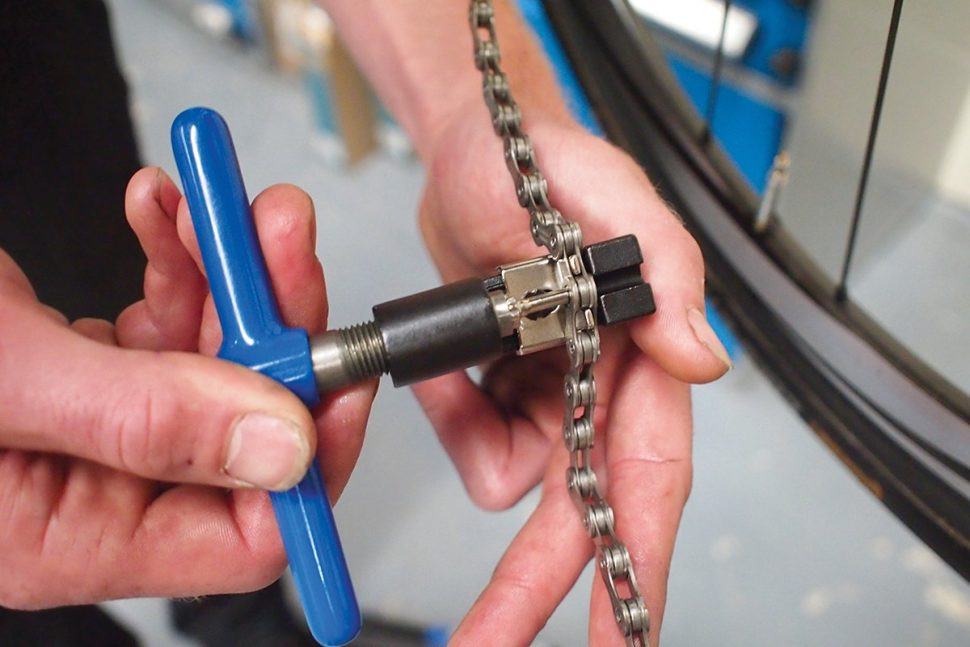 Removing the old bike chain with a chain tool
Alt text: Close-up of a chain tool being used to push out a pin on a bicycle chain to remove it from the bike.
2. Clean the Cassette and Chainrings
With the old chain removed, now is the perfect time to clean your cassette and chainrings. These components accumulate grime and dirt, which can accelerate wear and tear on your new chain and negatively impact shifting performance. Inspect your cassette and chainrings for wear. Look for teeth that are significantly pointed or resemble a shark fin profile, which indicates wear and might necessitate replacement soon.
Use a degreaser and brushes to thoroughly clean the cassette and chainrings. Rinse them with water and wipe them dry before proceeding. A clean drivetrain ensures optimal performance and longevity for your new chain.
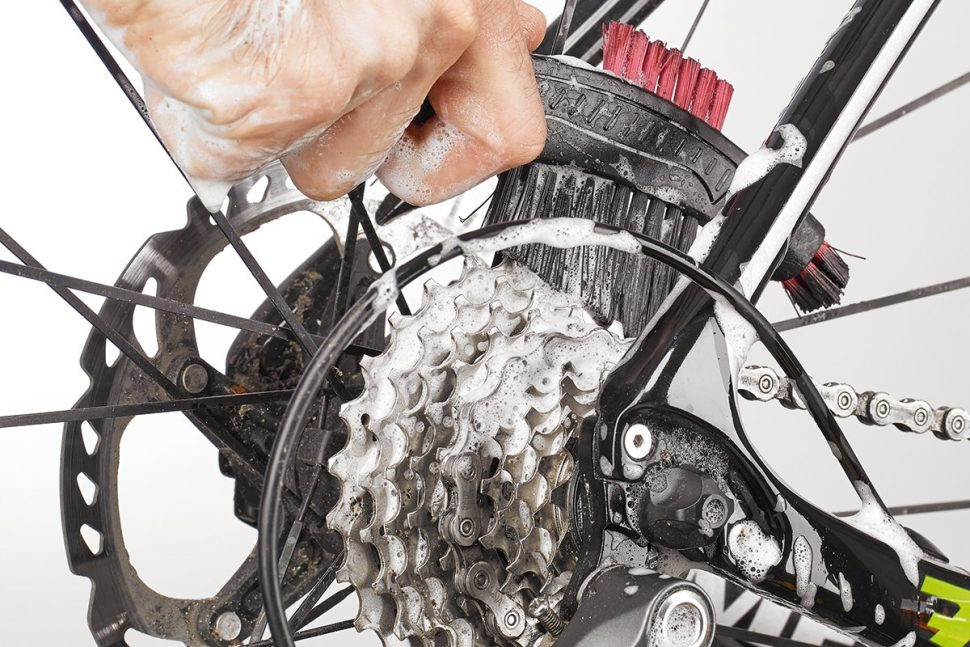 Cleaning the bicycle cassette with degreaser and a brush
Alt text: Cyclist cleaning a bicycle cassette with a brush and degreaser to remove dirt and grime during bike maintenance.
3. Thread the New Chain
Now, it’s time to install the new chain. Shift your bike’s gears to the smallest sprocket on the rear cassette and the smallest chainring at the front. This position provides the least tension and makes threading the chain easier.
Carefully guide the new chain through the front derailleur cage, ensuring it passes correctly. Next, bring the chain back and loop it over the smallest sprocket of the rear cassette. Thread the chain through the rear derailleur cage, paying close attention to pass it over the upper jockey wheel, through the cage divider, and then under the lower jockey wheel. Incorrect routing through the derailleur can cause poor shifting or damage.
 Threading a new bicycle chain through the front derailleur and rear derailleur
Alt text: Hands threading a new silver bicycle chain through the derailleurs and sprockets of a bike during replacement process.
4. Determine the Correct Chain Length
Accurately sizing your new chain is crucial for optimal shifting and preventing damage. With the chain threaded through both derailleurs and resting on the smallest sprocket and chainring, bring the two ends of the chain together. Do not connect them yet. Observe where the chain ends meet relative to each other, typically near the bottom of the chainstay.
The correct chain length is the longest length that still allows the rear derailleur to maintain some tension when in the smallest cog combination, preventing chain sag, but also accommodates the largest cog combination without overstretching the derailleur. Generally, when the chain is on the largest chainring and largest cassette sprocket, the rear derailleur should be angled slightly forward, but not stretched to its limit. Refer to your bike or component manufacturer’s guidelines if available. It’s better to err slightly on the side of a longer chain if unsure, as a chain that is too short can cause significant damage.
 Measuring the correct length for a new bicycle chain on the bike frame
Alt text: Close-up view of determining the length of a new bike chain by overlapping the ends near the chainstay of a bicycle.
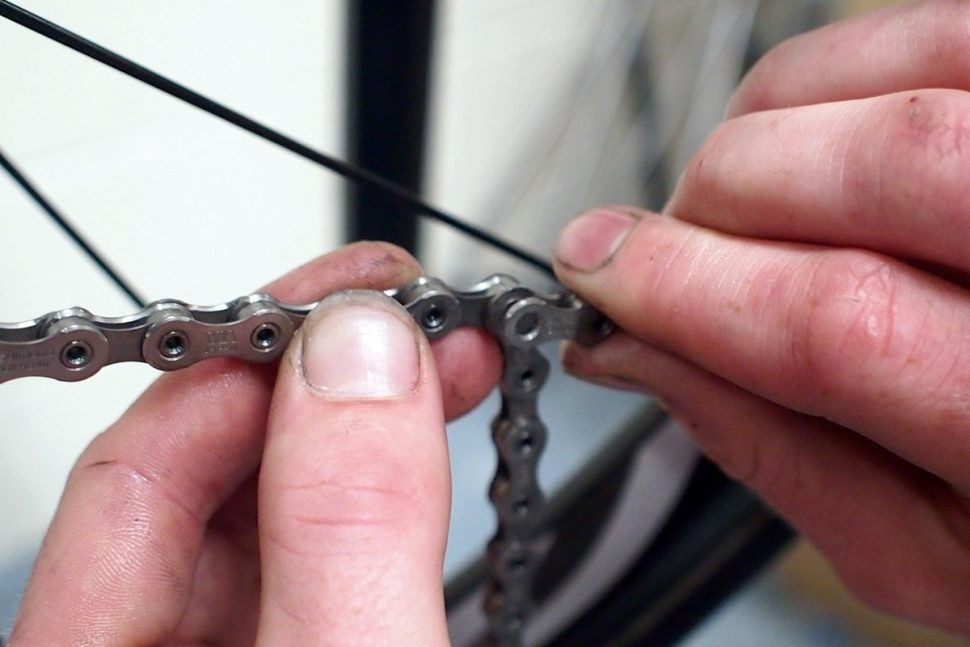
5. Cut the Chain to Size
Once you’ve determined the correct length, you’ll need to shorten the chain if necessary. Most new chains come longer than needed and require shortening. Use your chain tool to remove the excess links. Count the number of links you need to remove carefully. When cutting, ensure you are removing links from the appropriate end to allow for connection. Typically, you will need to create an inner link on one end and an outer link on the other to facilitate connection with a chain pin or quick link. Shimano often recommends that the open end of the chain faces backward.
Position the link you want to remove in the chain tool and push the pin partially out, just enough to separate the chain at the desired length.
 Using a chain tool to cut a bicycle chain to the correct size
Alt text: Hands using a chain tool to push out a pin and shorten a new bicycle chain to the proper length for installation.
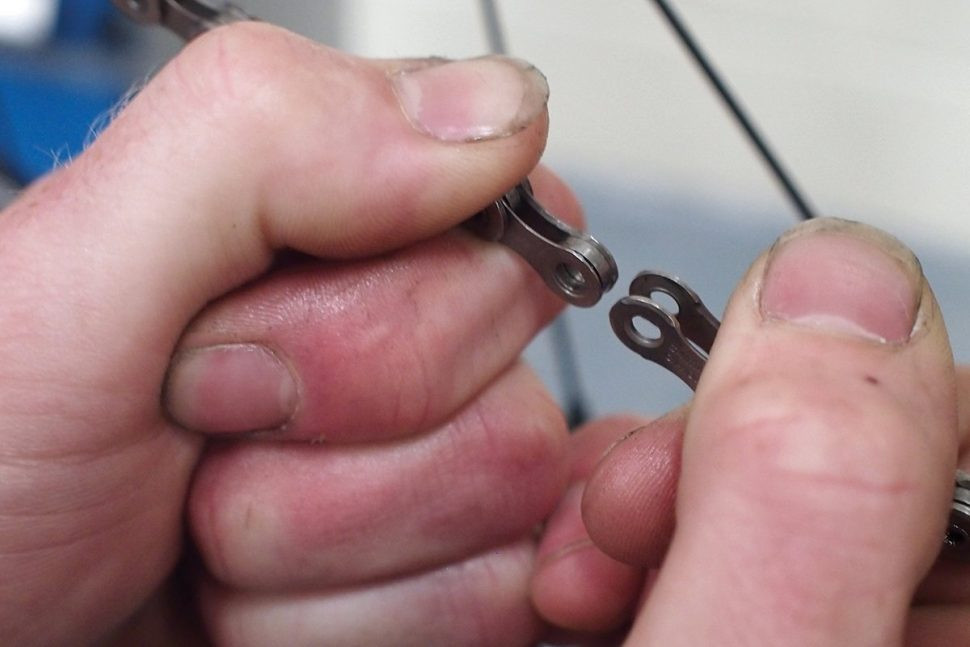
6. Connect the Chain with a Pin or Quick Link
Now you need to join the two ends of the new chain. If your chain uses a quick link, align the two ends of the chain, insert the quick link halves into each end, and then press them firmly together until they click into place. Sometimes quick link pliers are helpful for this step, especially for tighter quick links.
If your chain uses a connecting pin (often a Shimano chain), align the chain ends and insert the provided connecting pin from the drive side of the bike. Push it through both outer plates of the chain. The pin should hold the chain together on its own once inserted.
Alt text: Fingers inserting a new connecting pin into the ends of a bicycle chain to join them together during chain replacement.
7. Push the Connecting Pin Home
If you used a connecting pin, use the chain tool again to push the pin fully into place. Position the chain at the connecting link in the chain tool. Slowly and carefully turn the handle to push the pin in until it is flush with the outer plates of the chain link. Avoid pushing the pin too far, which can stiffen the link. The pin should be exactly flush with the outside of the chain plate. Remove the chain tool.
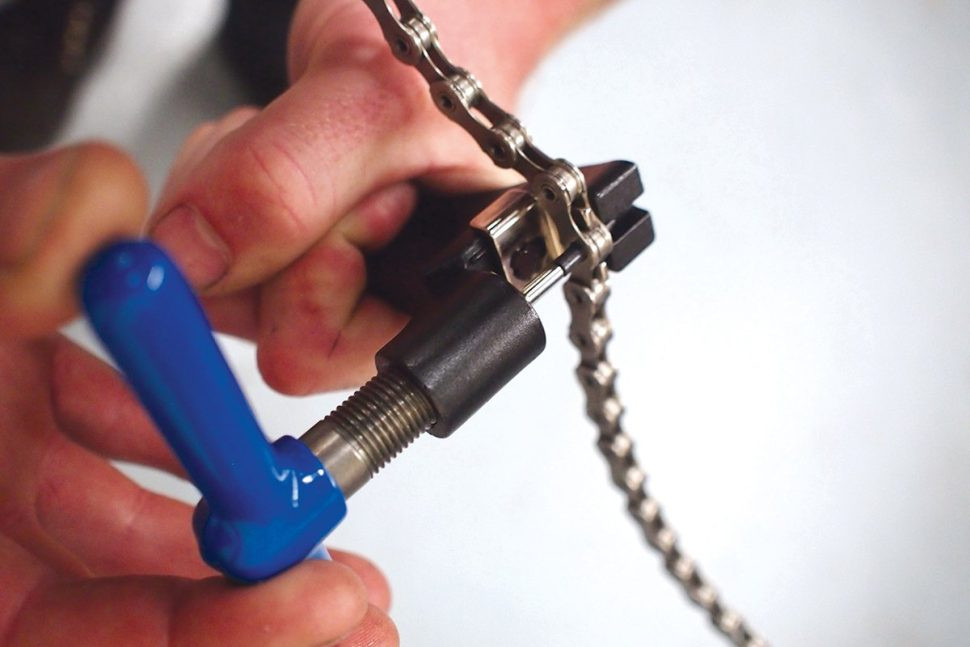 Using a chain tool to push a connecting pin fully into a bicycle chain link
Alt text: Close-up of a chain tool pushing a connecting pin into a bicycle chain link to secure it and complete the chain.
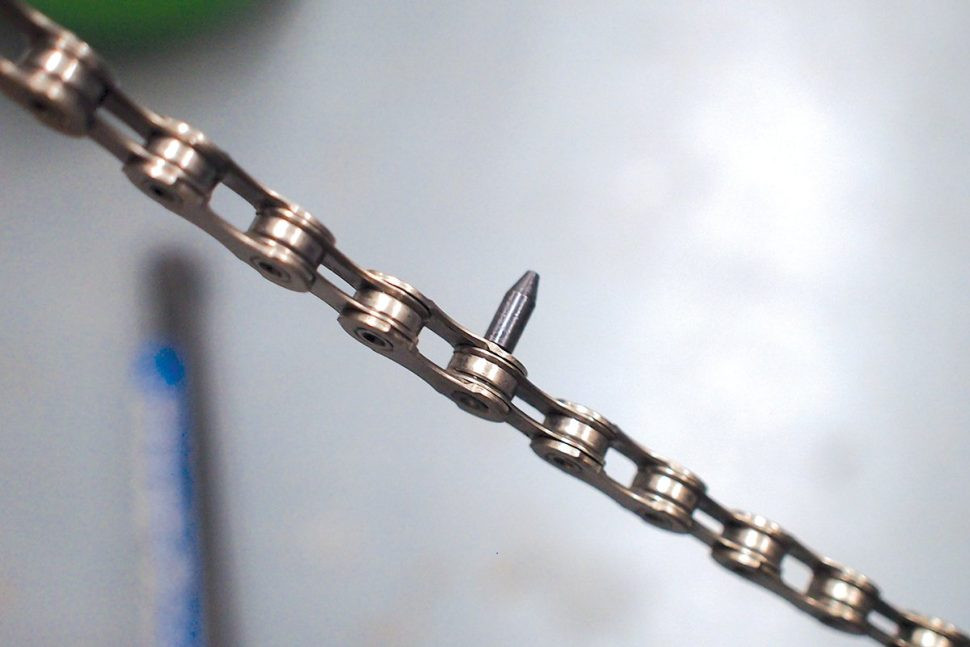
8. Final Check and Break Off Excess Pin
Inspect the newly joined link to ensure it moves freely and isn’t stiff. If the link is stiff, gently flex the chain laterally at the stiff link to loosen it up. If using a Shimano connecting pin, there will be a protruding section of the pin beyond the chain plate. Use the back of the chain tool or pliers to snap off this excess piece of the connecting pin. Be careful not to damage the chain when snapping the pin.
Finally, cycle through all gears to ensure smooth shifting and proper chain function. Listen for any unusual noises or skipping, which might indicate incorrect chain length or installation. Take a short test ride to confirm everything is working correctly.
 Completed bicycle chain replacement with the new chain installed on the bike
Alt text: A new silver bicycle chain fully installed on a road bike, showcasing the completed chain replacement and ready for riding.
Regular Bike Chain Maintenance
Changing your bike chain is a vital part of bike maintenance, but regular care can extend the life of your chain and drivetrain components. Clean and lubricate your chain regularly, especially after riding in wet or dirty conditions. Proper maintenance ensures smooth shifting, efficient power transfer, and saves you money in the long run by reducing wear on your entire drivetrain. Check your chain for wear regularly with a chain checker tool and replace it when necessary to keep your bike running smoothly and efficiently.